Azure架构
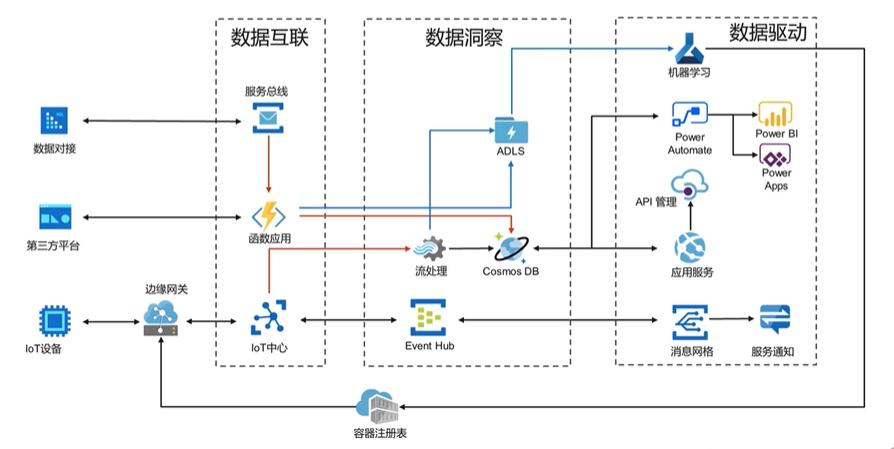
ADLS - 海量数据存储 为机器学习准备
拿到数据 - 数据的分析 - 数据的应用
RTOS,英文全称Real Time Operating System,即实时操作系统。TSOS,英文全称Time-sharing Operating System,即分时操作系统
区别
RTOS和TSOS各有各的特点,RTOS一般用于相对低速的MCU,比如运动控制类、按键输入等动作要求实时处理的系统,一般要求ms级,甚至us级响应。
分时:现在流行的PC,服务器都是采用这种运行模式,即把CPU的运行分成若干时间片分别处理不同的运算请求。
实时:一般用于单片机上,比如电梯的上下控制中,对于按键等动作要求进行实时处理。
最后
分通过以上分析,可以明确linux是分时系统,不过可以改成实时的如:UCOS就是linux修改而来的实时系统,至于他们的区别,可以引用百度中的类似回答:
分时系统是一个系统可以同时为两个或两个以上的账户服务!
实时系统是能立即对指令做出反应的操作系统!微软的常见系统不能吧!而且还死机!战斗机中的操作系统就是实时的系统,想想如果别人打仗时战斗机中的电脑反应的是飞行员上一条指令或死机了,谁还敢开这架飞机呢?
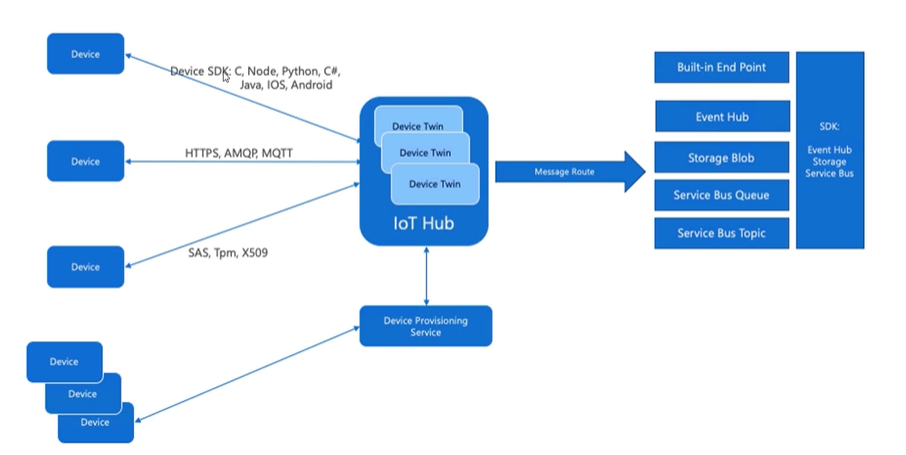
IOT hub
Azure IOT Hub是托管的pass服务, 充当网管, 实现设备和后端程序的双向通信, 安全可靠, 可缩放
IOT Hub就是IOT中心, 支持100W个设备的接入, 每天40W消息, 每月只需要200多元.
IOT带有JSON的数据文件库, 来存储设备信息, Device Twin
IOThub 内置的消息路由, 默认写入eventhub的服务, 用对应的SDK可以方便的读取到
DPS Device Provisioning Service : 海量设备连入云端, 配置的服务
配合限制
https://docs.microsoft.com/zh-cn/azure/iot-hub/iot-hub-devguide-quotas-throttling
使用流程
准备环境
创建IOT hub实例 —>在Iot hub注册设备信息 —- >调用对应sdk做通信
创建资源组 - 创建iot hub实例- 添加设备
发送消息到IOT hub()
例子来源都来自于官网: https://docs.microsoft.com/en-us/azure/iot-hub/
https://docs.microsoft.com/en-us/azure/iot-develop/quickstart-send-telemetry-iot-hub?toc=%2Fazure%2Fiot-hub%2Ftoc.json&bc=%2Fazure%2Fiot-hub%2Fbreadcrumb%2Ftoc.json&pivots=programming-language-java
E:\code\iot-lesson-code\azure-iot-samples-java-master\iot-hub\Quickstarts\simulated-device
// Copyright (c) Microsoft. All rights reserved.// Licensed under the MIT license. See LICENSE file in the project root for full license information.// This application uses the Azure IoT Hub device SDK for Java// For samples see: https://github.com/Azure/azure-iot-sdk-java/tree/master/device/iot-device-samplespackage com.microsoft.docs.iothub.samples;import com.microsoft.azure.sdk.iot.device.*;import com.google.gson.Gson;import java.io.*;import java.net.URISyntaxException;import java.util.Random;import java.util.concurrent.Executors;import java.util.concurrent.ExecutorService;public class SimulatedDevice {// The device connection string to authenticate the device with your IoT hub.// Using the Azure CLI:// az iot hub device-identity show-connection-string --hub-name {YourIoTHubName} --device-id MyJavaDevice --output tableprivate static String connString = "{Your device connection string here}";// Using the MQTT protocol to connect to IoT Hubprivate static IotHubClientProtocol protocol = IotHubClientProtocol.MQTT;private static DeviceClient client;// Specify the telemetry to send to your IoT hub.private static class TelemetryDataPoint {public double temperature;public double humidity;// Serialize object to JSON format.public String serialize() {Gson gson = new Gson();return gson.toJson(this);}}// Print the acknowledgement received from IoT Hub for the telemetry message sent.private static class EventCallback implements IotHubEventCallback {public void execute(IotHubStatusCode status, Object context) {System.out.println("IoT Hub responded to message with status: " + status.name());if (context != null) {synchronized (context) {context.notify();}}}}private static class MessageSender implements Runnable {public void run() {try {// Initialize the simulated telemetry.double minTemperature = 20;double minHumidity = 60;Random rand = new Random();while (true) {// Simulate telemetry.double currentTemperature = minTemperature + rand.nextDouble() * 15;double currentHumidity = minHumidity + rand.nextDouble() * 20;TelemetryDataPoint telemetryDataPoint = new TelemetryDataPoint();telemetryDataPoint.temperature = currentTemperature;telemetryDataPoint.humidity = currentHumidity;// Add the telemetry to the message body as JSON.String msgStr = telemetryDataPoint.serialize();Message msg = new Message(msgStr);// Add a custom application property to the message.// An IoT hub can filter on these properties without access to the message body.msg.setProperty("temperatureAlert", (currentTemperature > 30) ? "true" : "false");System.out.println("Sending message: " + msgStr);Object lockobj = new Object();// Send the message.EventCallback callback = new EventCallback();client.sendEventAsync(msg, callback, lockobj);synchronized (lockobj) {lockobj.wait();}Thread.sleep(1000);}} catch (InterruptedException e) {System.out.println("Finished.");}}}public static void main(String[] args) throws IOException, URISyntaxException {// Connect to the IoT hub.client = new DeviceClient(connString, protocol);client.open();// Create new thread and start sending messagesMessageSender sender = new MessageSender();ExecutorService executor = Executors.newFixedThreadPool(1);executor.execute(sender);// Stop the application.System.out.println("Press ENTER to exit.");System.in.read();executor.shutdownNow();client.closeNow();}}
需要修改连接信息:
private static String connString = “{Your device connection string here}”;
对应的在iot hub 中心:
查看发送的消息
使用工具连接到iot hub, 发送的消息可以用工具读取出来. azure storage explorer 或者 vscode的插件
https://github.com/Azure/azure-iot-explorer/releases?page=1
只需要填入连接iot中心的连接字符串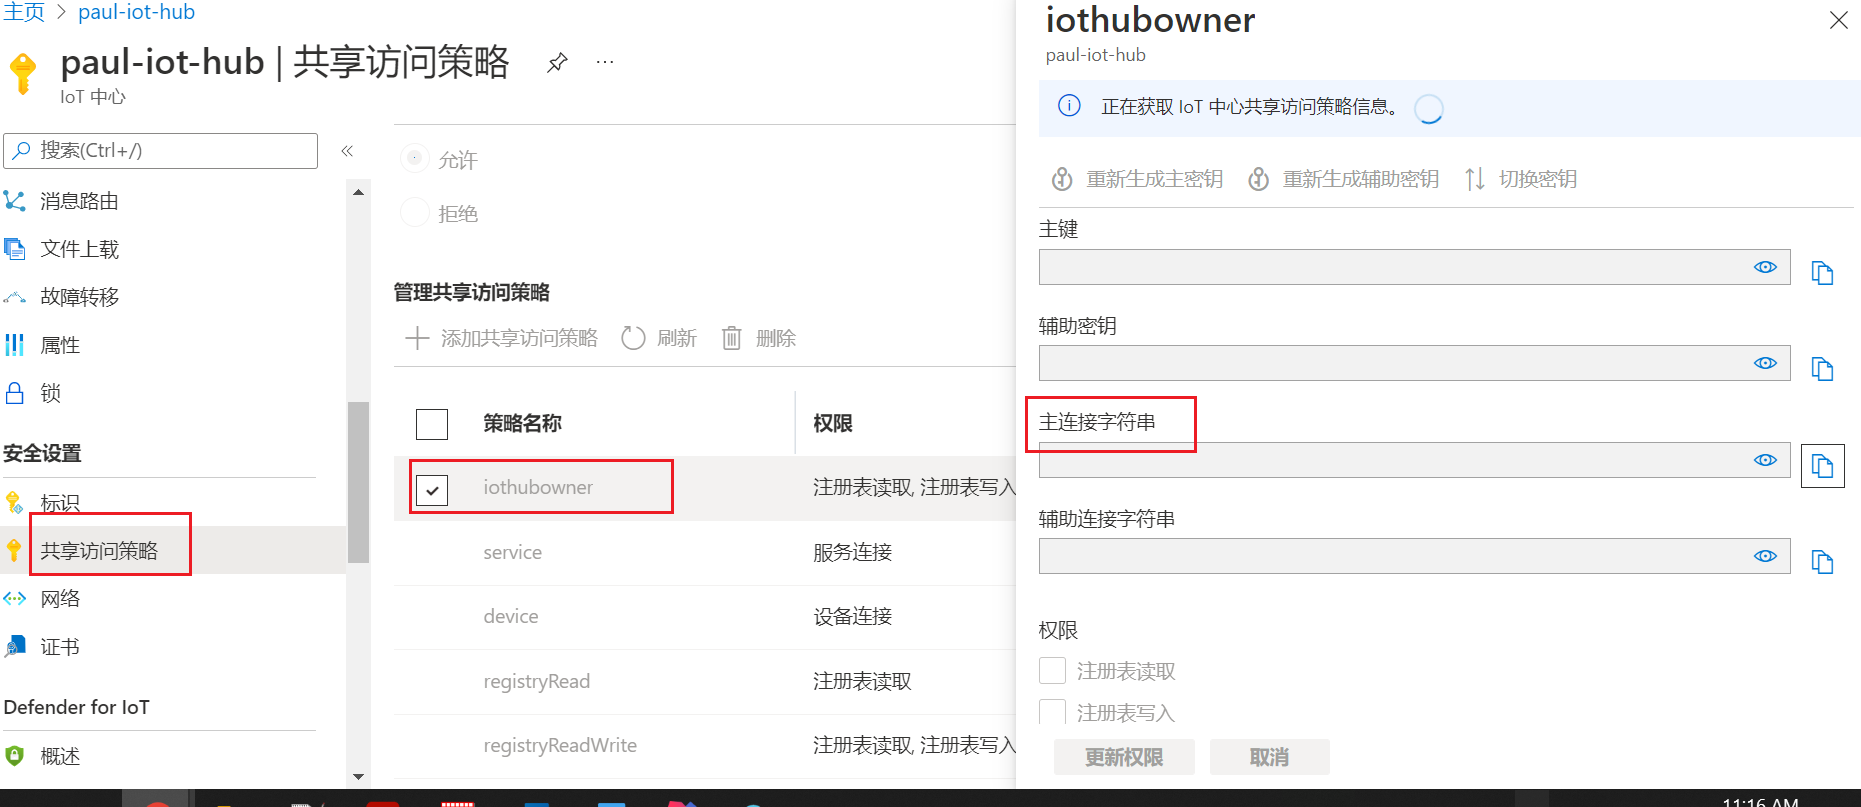
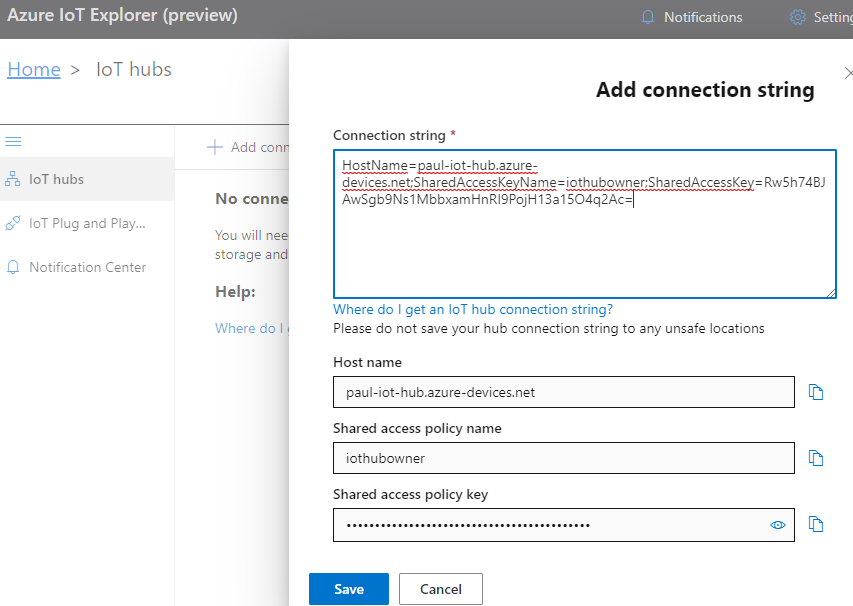
Tip: 要用外网, 公司内网不行.
使用MQTT连接到IOT hub
- Azure IOT SDK不够灵活, 我们可以自己在设备上做MQTT协议.
- 设备和云互双向通信
- 下载MQTTX: https://www.emqx.com/zh/downloads/MQTTX/v1.6.1
(官网 https://www.emqx.com/zh )
- 这个相当于是模拟一个设备使用mqtt协议连接到 iot中心, 没有用Azure的 sdk
- new connection的配置参官方文档: https://docs.microsoft.com/zh-cn/azure/iot-hub/iot-hub-mqtt-support
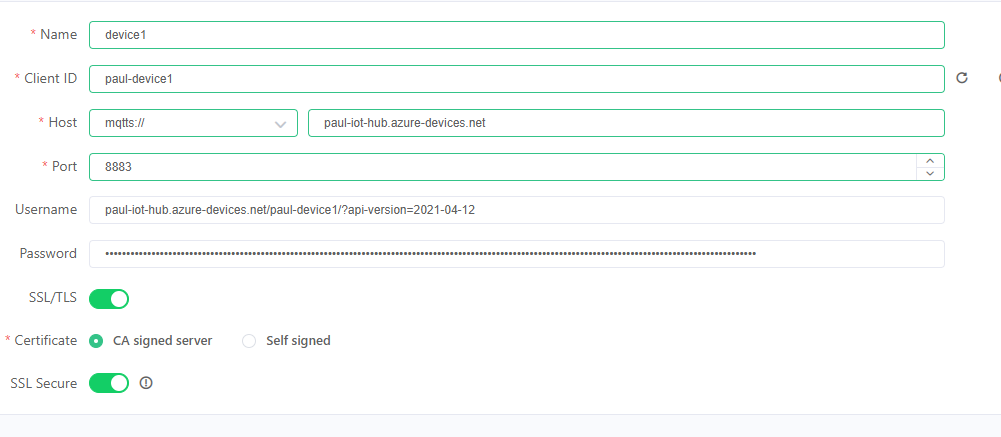
如果设备无法使用设备 SDK,仍可使用端口 8883 上的 MQTT 协议连接到公共设备终结点。 在 CONNECT 数据包中,设备应使用以下值:
- ClientId 字段使用 deviceId。
- name 字段 自己取
- 服务器地址: 是iot hub的主机名
- 端口8883
“用户名”字段使用 {iothubhostname}/{device_id}/?api-version=2021-04-12,其中 {iothubhostname} 是 IoT 中心的完整 CName。例如,如果 IoT 中心的名称为 contoso.azure-devices.net(也是截图中的主机名),设备的名称为 MyDevice01,则完整“用户名”字段应包含:contoso.azure-devices.net/MyDevice01/?api-version=2021-04-12
强烈建议在该字段中包含 api-version。 否则,可能会导致意外行为。
- “密码”字段使用 SAS 令牌。 对于 HTTPS 和 AMQP 协议,SAS 令牌的格式是相同的:
SharedAccessSignature sig={signature-string}&se={expiry}&sr={URL-encoded-resourceURI}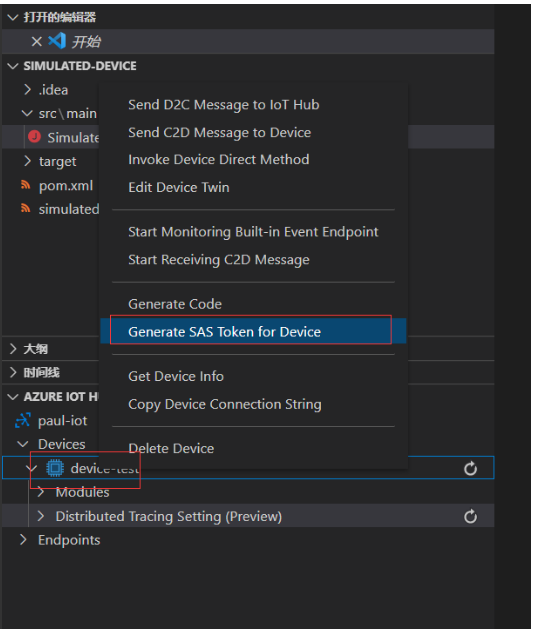
测试时,还可以使用跨平台的适用于 Visual Studio Code 的 Azure IoT Tools 或 CLI 扩展命令 az iot hub generate-sas-token 快速生成一个 SAS 令牌
发送“设备到云”消息
成功建立连接后,设备可以使用 devices/{device_id}/messages/events/ 或 devices/{device_id}/messages/events/{property_bag} 作为主题名称将消息发送到 IoT 中心。 {property_bag} 元素可让设备使用 URL 编码格式发送包含其他属性的消息。 例如:
接收“云到设备”消息
若要从 IoT 中心接收消息,设备应使用 devices/{device_id}/messages/devicebound/# 作为主题筛选器来进行订阅。 主题筛选器中的多级通配符 # 仅用于允许设备接收主题名称中的其他属性。 IoT 中心不允许使用 # 或 ? 通配符筛选子主题。 由于 IoT 中心不是常规用途的发布-订阅消息传送中转站,因此它仅支持存档的主题名称和主题筛选器。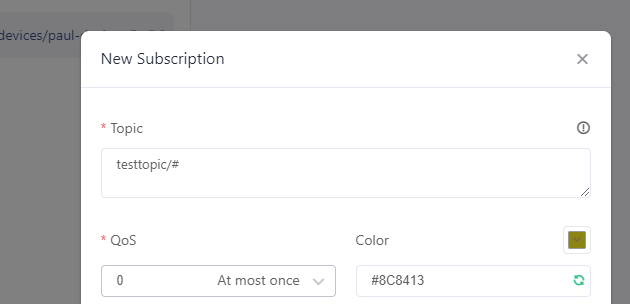
参考: https://docs.microsoft.com/zh-cn/azure/iot-hub/iot-hub-mqtt-support#using-the-mqtt-protocol-directly-as-a-device
使用java发送和接收消息
文档说明: https://docs.microsoft.com/zh-cn/azure/iot-hub/quickstart-control-device?pivots=programming-language-java
发送示例
Java示例代码: https://github.com/Azure-Samples/azure-iot-samples-java/tree/master/iot-hub/Quickstarts/simulated-device
接收示例
示例代码: https://github.com/Azure-Samples/azure-iot-samples-java/tree/master/iot-hub/Quickstarts/read-d2c-messages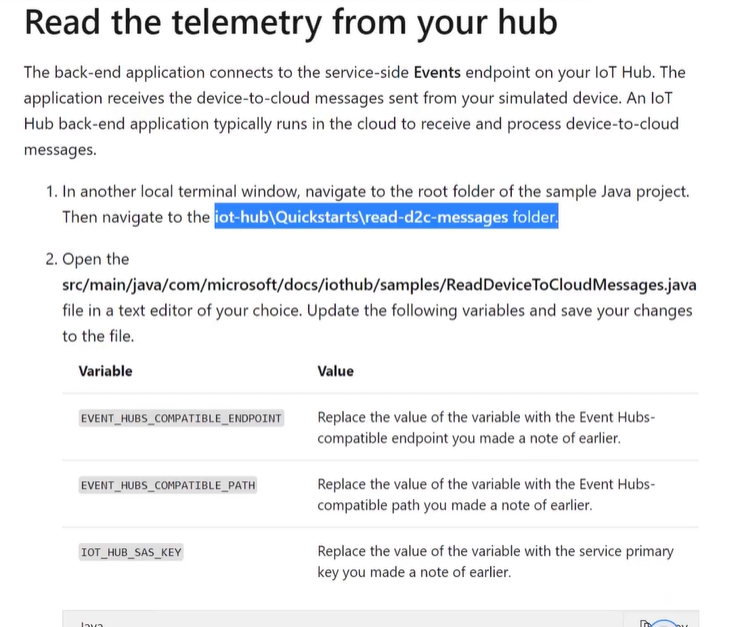
这个例子面的参数修改, 来源于hub - 内置终结点 - 共享访问策略(要修改为service) 复制下面信息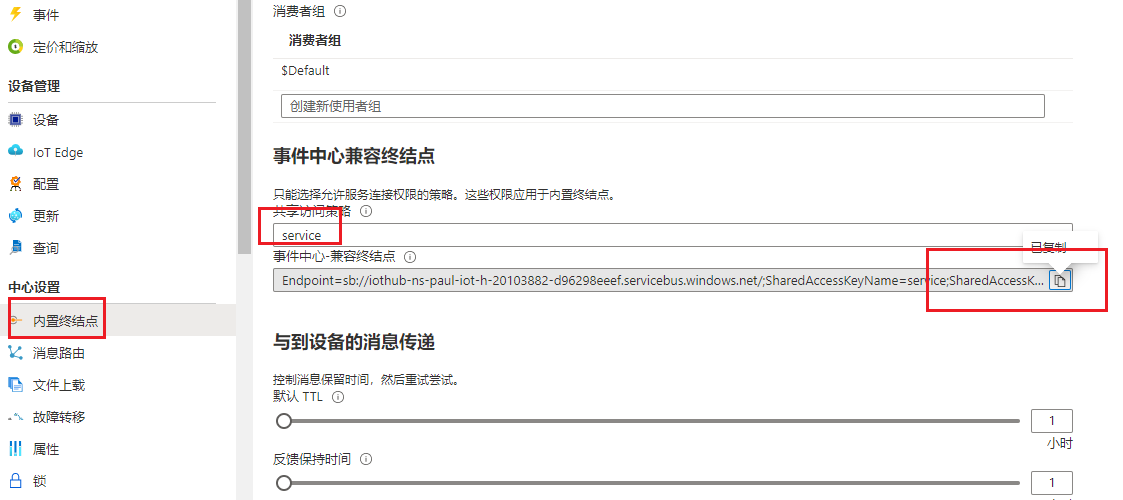
// Copyright (c) Microsoft. All rights reserved.// Licensed under the MIT license. See LICENSE file in the project root for full license information.// This application uses the Microsoft Azure Event Hubs Client for Java// For samples see: https://github.com/Azure/azure-sdk-for-java/tree/master/sdk/eventhubs/azure-messaging-eventhubs/src/samples// For documentation see: https://docs.microsoft.com/azure/event-hubs/package com.microsoft.docs.iothub.samples;import com.azure.core.amqp.AmqpTransportType;import com.azure.core.amqp.ProxyAuthenticationType;import com.azure.core.amqp.ProxyOptions;import com.azure.messaging.eventhubs.EventHubClientBuilder;import com.azure.messaging.eventhubs.EventHubConsumerAsyncClient;import com.azure.messaging.eventhubs.models.EventPosition;import java.net.InetSocketAddress;import java.net.Proxy;/*** A sample demonstrating how to receive events from Event Hubs sent from an IoT Hub device.* Endpoint=sb://iothub-ns-paul-iot-h-20103882-d96298eeef.servicebus.windows.net/;* SharedAccessKeyName=service;SharedAccessKey=MyYb30ISu7OsPHjPi8gE38qz8XBhXjPbVcPscn7JFzI=;* EntityPath=paul-iot-hub*/public class ReadDeviceToCloudMessages {private static final String EH_COMPATIBLE_CONNECTION_STRING_FORMAT = "Endpoint=%s/;EntityPath=%s;"+ "SharedAccessKeyName=%s;SharedAccessKey=%s";// az iot hub show --query properties.eventHubEndpoints.events.endpoint --name {your IoT Hub name}private static final String EVENT_HUBS_COMPATIBLE_ENDPOINT = "sb://iothub-ns-paul-iot-h-20103882-d96298eeef.servicebus.windows.net/";// az iot hub show --query properties.eventHubEndpoints.events.path --name {your IoT Hub name}private static final String EVENT_HUBS_COMPATIBLE_PATH = "paul-iot-hub";// az iot hub policy show --name service --query primaryKey --hub-name {your IoT Hub name}private static final String IOT_HUB_SAS_KEY = "service;SharedAccessKey=MyYb30ISu7OsPHjPi8gE38qz8XBhXjPbVcPscn7JFzI=";private static final String IOT_HUB_SAS_KEY_NAME = "service";/*** The main method to start the sample application that receives events from Event Hubs sent from an IoT Hub device.** @param args ignored args.* @throws Exception if there's an error running the application.*/public static void main(String[] args) throws Exception {// Build the Event Hubs compatible connection string.String eventHubCompatibleConnectionString = String.format(EH_COMPATIBLE_CONNECTION_STRING_FORMAT,EVENT_HUBS_COMPATIBLE_ENDPOINT, EVENT_HUBS_COMPATIBLE_PATH, IOT_HUB_SAS_KEY_NAME, IOT_HUB_SAS_KEY);// Setup the EventHubBuilder by configuring various options as needed.EventHubClientBuilder eventHubClientBuilder = new EventHubClientBuilder().consumerGroup(EventHubClientBuilder.DEFAULT_CONSUMER_GROUP_NAME).connectionString(eventHubCompatibleConnectionString);// uncomment to setup proxy// setupProxy(eventHubClientBuilder);// uncomment to use Web Sockets// eventHubClientBuilder.transportType(AmqpTransportType.AMQP_WEB_SOCKETS);// Create an async consumer client as configured in the builder.try (EventHubConsumerAsyncClient eventHubConsumerAsyncClient = eventHubClientBuilder.buildAsyncConsumerClient()) {receiveFromAllPartitions(eventHubConsumerAsyncClient);// uncomment to run these samples// receiveFromSinglePartition(eventHubConsumerAsyncClient);// receiveFromSinglePartitionInBatches(eventHubConsumerAsyncClient);// Shut down cleanly.System.out.println("Press ENTER to exit.");System.in.read();System.out.println("Shutting down...");}}/*** This method receives events from all partitions asynchronously starting from the newly available events in* each partition.** @param eventHubConsumerAsyncClient The {@link EventHubConsumerAsyncClient}.*/private static void receiveFromAllPartitions(EventHubConsumerAsyncClient eventHubConsumerAsyncClient) {eventHubConsumerAsyncClient.receive(false) // set this to false to read only the newly available events.subscribe(partitionEvent -> {System.out.println();System.out.printf("%nTelemetry received from partition %s:%n%s",partitionEvent.getPartitionContext().getPartitionId(), partitionEvent.getData().getBodyAsString());System.out.printf("%nApplication properties (set by device):%n%s", partitionEvent.getData().getProperties());System.out.printf("%nSystem properties (set by IoT Hub):%n%s",partitionEvent.getData().getSystemProperties());}, ex -> {System.out.println("Error receiving events " + ex);}, () -> {System.out.println("Completed receiving events");});}/*** This method queries all available partitions in the Event Hub and picks a single partition to receive* events asynchronously starting from the newly available event in that partition.** @param eventHubConsumerAsyncClient The {@link EventHubConsumerAsyncClient}.*/private static void receiveFromSinglePartition(EventHubConsumerAsyncClient eventHubConsumerAsyncClient) {eventHubConsumerAsyncClient.getPartitionIds() // get all available partitions.take(1) // pick a single partition.flatMap(partitionId -> {System.out.println("Receiving events from partition id " + partitionId);return eventHubConsumerAsyncClient.receiveFromPartition(partitionId, EventPosition.latest());}).subscribe(partitionEvent -> {System.out.println();System.out.printf("%nTelemetry received from partition %s:%n%s",partitionEvent.getPartitionContext().getPartitionId(), partitionEvent.getData().getBodyAsString());System.out.printf("%nApplication properties (set by device):%n%s", partitionEvent.getData().getProperties());System.out.printf("%nSystem properties (set by IoT Hub):%n%s",partitionEvent.getData().getSystemProperties());}, ex -> {System.out.println("Error receiving events " + ex);}, () -> {System.out.println("Completed receiving events");});}/*** This method queries all available partitions in the Event Hub and picks a single partition to receive* events asynchronously in batches of 100 events, starting from the newly available event in that partition.** @param eventHubConsumerAsyncClient The {@link EventHubConsumerAsyncClient}.*/private static void receiveFromSinglePartitionInBatches(EventHubConsumerAsyncClient eventHubConsumerAsyncClient) {int batchSize = 100;eventHubConsumerAsyncClient.getPartitionIds().take(1).flatMap(partitionId -> {System.out.println("Receiving events from partition id " + partitionId);return eventHubConsumerAsyncClient.receiveFromPartition(partitionId, EventPosition.latest());}).window(batchSize) // batch the events.subscribe(partitionEvents -> {partitionEvents.toIterable().forEach(partitionEvent -> {System.out.println();System.out.printf("%nTelemetry received from partition %s:%n%s",partitionEvent.getPartitionContext().getPartitionId(), partitionEvent.getData().getBodyAsString());System.out.printf("%nApplication properties (set by device):%n%s",partitionEvent.getData().getProperties());System.out.printf("%nSystem properties (set by IoT Hub):%n%s",partitionEvent.getData().getSystemProperties());});}, ex -> {System.out.println("Error receiving events " + ex);}, () -> {System.out.println("Completed receiving events");});}/*** This method sets up proxy options and updates the {@link EventHubClientBuilder}.** @param eventHubClientBuilder The {@link EventHubClientBuilder}.*/private static void setupProxy(EventHubClientBuilder eventHubClientBuilder) {int proxyPort = 8000; // replace with right proxy portString proxyHost = "{hostname}";Proxy proxyAddress = new Proxy(Proxy.Type.HTTP, new InetSocketAddress(proxyHost, proxyPort));String userName = "{username}";String password = "{password}";ProxyOptions proxyOptions = new ProxyOptions(ProxyAuthenticationType.BASIC, proxyAddress,userName, password);eventHubClientBuilder.proxyOptions(proxyOptions);// To use proxy, the transport type has to be Web Sockets.eventHubClientBuilder.transportType(AmqpTransportType.AMQP_WEB_SOCKETS);}}
使用severless
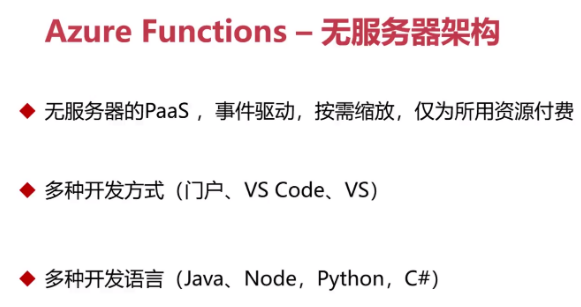
一些典型应用: 每隔15分钟清理数据库,; 上传发票, 自动触发函数调用OCR解析发票写入数据库;
参考: https://docs.microsoft.com/en-us/azure/azure-functions/functions-create-maven-intellij
要用最新版本的idea比较好. 使用用vscode开发Azure functions也可以
Prerequisites
- An Azure account with an active subscription. Create an account for free.
- An Azure supported Java Development Kit (JDK) for Java, version 8 or 11
- An IntelliJ IDEA Ultimate Edition or Community Edition installed
- Maven 3.5.0+
- Latest Function Core Tools (The Azure Functions Core Tools provide a local development experience for creating, developing, testing, running, and debugging Azure Functions.)

