二进制安装MySQL其实就是把已经编译好的mysql,做了个压缩包,下载下来,解压缩,简单配置之后,就能使用,‘安装’速度快,往往用于mysql的快速部署。
1、准备工作
- 检查系统中的Mysql或mariadb,如果存在将其卸载 ```bash [root@localhost ~]# rpm -qa | grep mysql [root@localhost ~]# rpm -qa | grep mariadb mariadb-libs-5.5.68-1.el7.x86_64 [root@localhost ~]# yum -y remove mariadb-libs.x86_64 Loaded plugins: fastestmirror Resolving Dependencies —> Running transaction check —-> Package mariadb-libs.x86_64 1:5.5.68-1.el7 will be erased —> Processing Dependency: libmysqlclient.so.18()(64bit) for package: 1:net-snmp-5.7.2-49.el7_9.1.x86_64 —> Processing Dependency: libmysqlclient.so.18()(64bit) for package: 1:net-snmp-agent-libs-5.7.2-49.el7_9.1.x86_64 —> Processing Dependency: libmysqlclient.so.18()(64bit) for package: 2:postfix-2.10.1-9.el7.x86_64 —> Processing Dependency: libmysqlclient.so.18(libmysqlclient_18)(64bit) for package: 2:postfix-2.10.1-9.el7.x86_64 —> Processing Dependency: libmysqlclient.so.18(libmysqlclient_18)(64bit) for package: 1:net-snmp-agent-libs-5.7.2-49.el7_9.1.x86_64 —> Processing Dependency: mysql-libs for package: 1:net-snmp-5.7.2-49.el7_9.1.x86_64 —> Running transaction check —-> Package net-snmp.x86_64 1:5.7.2-49.el7_9.1 will be erased —-> Package net-snmp-agent-libs.x86_64 1:5.7.2-49.el7_9.1 will be erased —-> Package postfix.x86_64 2:2.10.1-9.el7 will be erased —> Finished Dependency Resolution
Dependencies Resolved
===================================================================================================================================
Package Arch Version Repository Size
Removing: mariadb-libs x86_64 1:5.5.68-1.el7 @anaconda 4.4 M Removing for dependencies: net-snmp x86_64 1:5.7.2-49.el7_9.1 @updates 850 k net-snmp-agent-libs x86_64 1:5.7.2-49.el7_9.1 @updates 2.1 M postfix x86_64 2:2.10.1-9.el7 @anaconda 12 M
Transaction Summary
Remove 1 Package (+3 Dependent packages)
Installed size: 20 M Downloading packages: Running transaction check Running transaction test Transaction test succeeded Running transaction Erasing : 1:net-snmp-5.7.2-49.el7_9.1.x86_64 1/4 Erasing : 1:net-snmp-agent-libs-5.7.2-49.el7_9.1.x86_64 2/4 Erasing : 2:postfix-2.10.1-9.el7.x86_64 3/4 Erasing : 1:mariadb-libs-5.5.68-1.el7.x86_64 4/4 warning: /etc/my.cnf saved as /etc/my.cnf.rpmsave Verifying : 2:postfix-2.10.1-9.el7.x86_64 1/4 Verifying : 1:net-snmp-agent-libs-5.7.2-49.el7_9.1.x86_64 2/4 Verifying : 1:mariadb-libs-5.5.68-1.el7.x86_64 3/4 Verifying : 1:net-snmp-5.7.2-49.el7_9.1.x86_64 4/4
Removed: mariadb-libs.x86_64 1:5.5.68-1.el7
Dependency Removed: net-snmp.x86_64 1:5.7.2-49.el7_9.1 net-snmp-agent-libs.x86_64 1:5.7.2-49.el7_9.1 postfix.x86_64 2:2.10.1-9.el7
Complete! [root@localhost ~]#
- 下载MySQL 5.7安装包前往mysql官网下载二进制安装包,[https://dev.mysql.com/downloads/mysql/5.7.html#downloads](https://dev.mysql.com/downloads/mysql/5.7.html#downloads)(注意:选择操作系统时选Linux-Generic)。我这里下载的是mysql-5.7.26-linux-glibc2.12-x86_64。<br />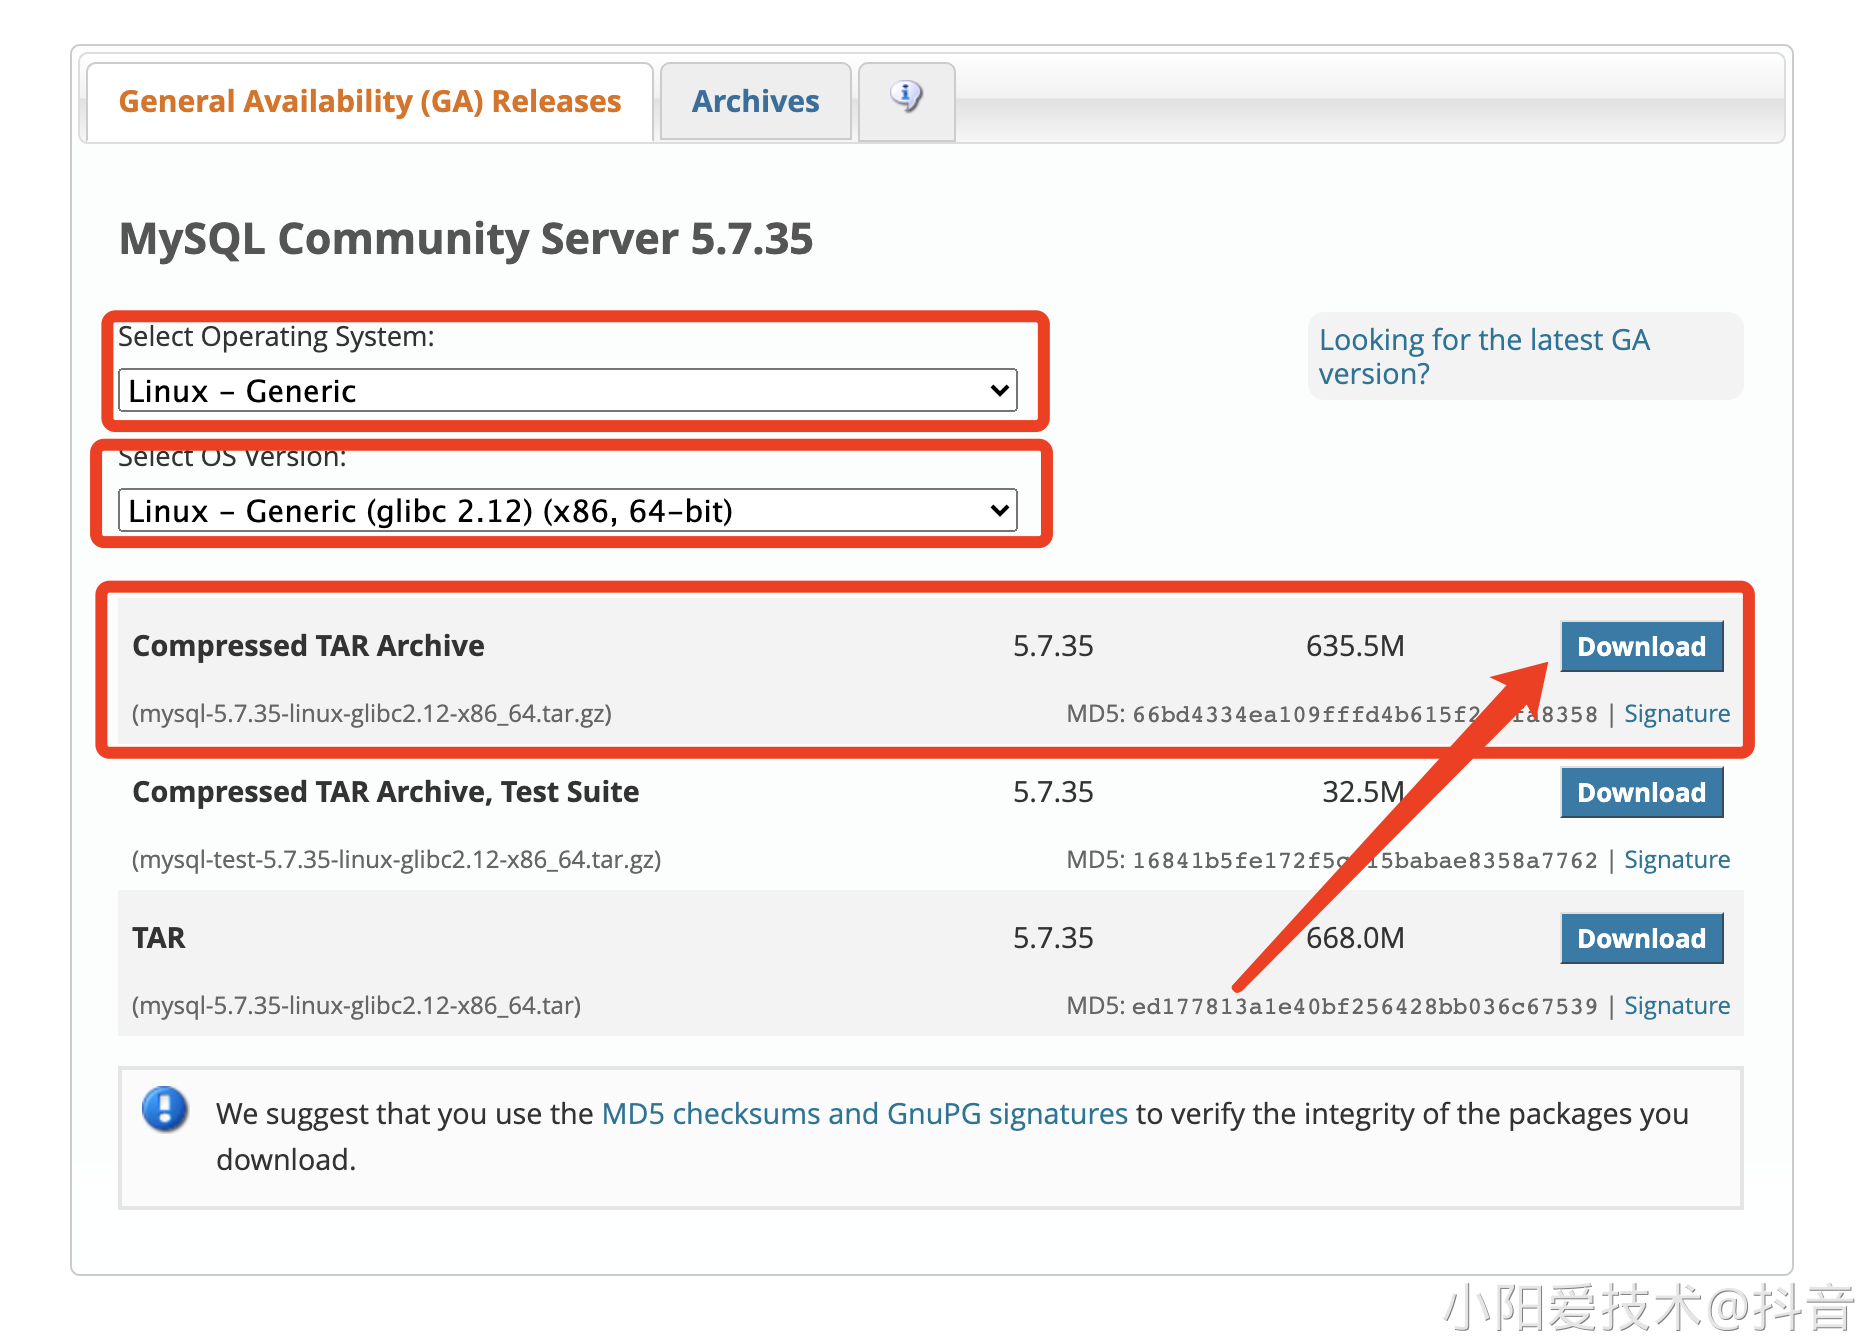<br />```bash[root@localhost ~]# wget https://dev.mysql.com/get/Downloads/MySQL-5.7/mysql-5.7.35-linux-glibc2.12-x86_64.tar.gz--2021-09-14 15:25:05-- https://dev.mysql.com/get/Downloads/MySQL-5.7/mysql-5.7.35-linux-glibc2.12-x86_64.tar.gzResolving dev.mysql.com (dev.mysql.com)... 137.254.60.11Connecting to dev.mysql.com (dev.mysql.com)|137.254.60.11|:443... connected.HTTP request sent, awaiting response... 302 FoundLocation: https://cdn.mysql.com//Downloads/MySQL-5.7/mysql-5.7.35-linux-glibc2.12-x86_64.tar.gz [following]--2021-09-14 15:25:06-- https://cdn.mysql.com//Downloads/MySQL-5.7/mysql-5.7.35-linux-glibc2.12-x86_64.tar.gzResolving cdn.mysql.com (cdn.mysql.com)... 23.44.151.164Connecting to cdn.mysql.com (cdn.mysql.com)|23.44.151.164|:443... connected.HTTP request sent, awaiting response... 200 OKLength: 666328842 (635M) [application/x-tar-gz]Saving to: ‘mysql-5.7.35-linux-glibc2.12-x86_64.tar.gz’100%[=========================================================================================>] 666,328,842 26.3MB/s in 23s2021-09-14 15:25:30 (27.6 MB/s) - ‘mysql-5.7.35-linux-glibc2.12-x86_64.tar.gz’ saved [666328842/666328842]
2、创建用户
之所以需要创建用户,主要的目的是为了统一MySQL的用户。
[root@localhost ~]# useradd -M -s /sbin/nologin -r mysql
3、安装依赖包
之所以要安装依赖包,主要的目的是提前安装好所有需要用到的插件包,防止MySQL在安装之后无法使用。
[root@localhost ~]# yum install -y ncurses-devel libaio-devel gcc gcc-c++ numactl libaio glibc cmake autoconf
4、解压MySQL压缩包
我们需要解压刚下载下来的MySQL压缩包,方便其进行安装。
[root@localhost ~]# tar -xf mysql-5.7.35-linux-glibc2.12-x86_64.tar.gz -C /usr/local/[root@localhost ~]# ln -s /usr/local/mysql-5.7.35-linux-glibc2.12-x86_64/ /usr/local/mysql[root@localhost ~]# ll /usr/local/mysql/total 272drwxr-xr-x. 2 root root 4096 Sep 14 15:42 bindrwxr-xr-x. 2 root root 55 Sep 14 15:43 docsdrwxr-xr-x. 3 root root 4096 Sep 14 15:42 includedrwxr-xr-x. 5 root root 230 Sep 14 15:43 lib-rw-r--r--. 1 7161 31415 259200 Jun 7 20:52 LICENSEdrwxr-xr-x. 4 root root 30 Sep 14 15:42 man-rw-r--r--. 1 7161 31415 566 Jun 7 20:52 READMEdrwxr-xr-x. 28 root root 4096 Sep 14 15:43 sharedrwxr-xr-x. 2 root root 90 Sep 14 15:43 support-files
5、将MySQL目录授权
之所以需要授权,主要的目的是为了让MySQL启动的时候不至于应为权限的问题导致启动报错。
[root@localhost local]# chown -R mysql.mysql /usr/local/mysql/[root@localhost local]# chown -R mysql.mysql /usr/local/mysql-5.7.36-linux-glibc2.12-x86_64
6、MySQL数据库初始化
在启动之前,我们需要将MySQL初始化一下,生成一些默认的配置和数据库以及数据库密码等。
- 创建保存数据的目录 ```bash [root@localhost mysql]# mkdir /mysql_data [root@localhost mysql]# chown -R mysql.mysql /mysql_data/
[root@localhost local]# touch /var/log/mysqld.log [root@localhost local]# chown -R mysql.mysql /var/log/mysqld.log
- 初始化```bash[root@localhost mysql]# bin/mysqld --initialize --user=mysql --basedir=/usr/local/mysql --datadir=/mysql_data2021-09-14T07:59:12.785658Z 0 [Warning] TIMESTAMP with implicit DEFAULT value is deprecated. Please use --explicit_defaults_for_timestamp server option (see documentation for more details).2021-09-14T07:59:14.770442Z 0 [Warning] InnoDB: New log files created, LSN=457902021-09-14T07:59:15.030108Z 0 [Warning] InnoDB: Creating foreign key constraint system tables.2021-09-14T07:59:15.113597Z 0 [Warning] No existing UUID has been found, so we assume that this is the first time that this server has been started. Generating a new UUID: a79a5fbd-1531-11ec-a40a-000c294d81ef.2021-09-14T07:59:15.117014Z 0 [Warning] Gtid table is not ready to be used. Table 'mysql.gtid_executed' cannot be opened.2021-09-14T07:59:16.480600Z 0 [Warning] A deprecated TLS version TLSv1 is enabled. Please use TLSv1.2 or higher.2021-09-14T07:59:16.480683Z 0 [Warning] A deprecated TLS version TLSv1.1 is enabled. Please use TLSv1.2 or higher.2021-09-14T07:59:16.481652Z 0 [Warning] CA certificate ca.pem is self signed.2021-09-14T07:59:17.481417Z 1 [Note] A temporary password is generated for root@localhost: nWHw,xjom9Nr // 默认的密码
7、编写配置文件
在启动MySQL之前,我们需要编写一个默认的配置文件/etc/my.cnf。
[root@localhost mysql]# vim /etc/my.cnf[root@localhost mysql]# cat /etc/my.cnf[mysqld]basedir=/usr/local/mysqldatadir=/mysql_dataport=3306socket=/usr/local/mysql/mysql.sockcharacter-set-server=utf8mb4log-error=/var/log/mysqld.logpid-file=/tmp/mysqld.pid[mysql]socket=/usr/local/mysql/mysql.sock[client]socket=/usr/local/mysql/mysql.sock
8、生成启动脚本,并启动mysql
将MySQL的启动脚本复制到对应的目录,为启动做准备。
[root@master ~]# cp /usr/local/mysql/support-files/mysql.server /etc/init.d/mysqld[root@localhost mysql]# chmod +x /etc/init.d/mysqld[root@localhost mysql]# vim /etc/init.d/mysqldbasedir=/usr/local/mysqldatadir=/mysql_data
9、启动,并测试
所有的准备工作做完之后,我们就可以启动了,然后登录到数据库,修改默认的密码。一切都做完之后就可以正常运行了。
[root@localhost mysql]# /etc/init.d/mysqld startStarting MySQL. SUCCESS![root@localhost mysql]# mysql -uroot -pnWHw,xjom9NrWarning: Using a password on the command line interface can be insecure.Welcome to the MySQL monitor. Commands end with ; or \g.Your MySQL connection id is 2Server version: 5.7.35Copyright (c) 2000, 2019, Oracle and/or its affiliates. All rights reserved.Oracle is a registered trademark of Oracle Corporation and/or itsaffiliates. Other names may be trademarks of their respectiveowners.Type 'help;' or '\h' for help. Type '\c' to clear the current input statement.mysql>
10、加入Systemd管理
为了更方便使用,我们将MySQL服务加入到Systemd之中,方便统一管理。
#1.配置system管理MySQL
[root@localhost mysql]# vim /usr/lib/systemd/system/mysql.service
[Unit]
Description=MySQL Server
Documentation=man:mysqld(8)
Documentation=https://dev.mysql.com/doc/refman/en/using-systemd.html
After=network.target
After=syslog.target
[Install]
WantedBy=multi-user.target
[Service]
User=mysql
Group=mysql
ExecStart=/usr/local/mysql/bin/mysqld --defaults-file=/etc/my.cnf
LimitNOFILE = 5000

#2.重新加载启动文件列表
[root@localhost mysql]# systemctl daemon-reload
[root@localhost mysql]# systemctl start mysql
[root@localhost mysql]# systemctl status mysql
● mysql.service - MySQL Server
   Loaded: loaded (/usr/lib/systemd/system/mysql.service; disabled; vendor preset: disabled)
   Active: active (running) since Tue 2021-09-14 16:19:09 CST; 4s ago
     Docs: man:mysqld(8)
           https://dev.mysql.com/doc/refman/en/using-systemd.html
 Main PID: 1797 (mysqld)
   CGroup: /system.slice/mysql.service
           └─1797 /usr/local/mysql/bin/mysqld --defaults-file=/etc/my.cnf

Sep 14 16:19:09 localhost.localdomain systemd[1]: Started MySQL Server.
至此,以二级制的方式部署MySQL结束。

若有收获,就点个赞吧
0 人点赞
