一、基本概念
(1)程序和进程的概念
- 程序 - 数据结构 + 算法,主要指存放在硬盘上的可执行文件。
- 进程 - 主要指运行在内存中的可执行文件。
- 目前主流的操作系统都支持多进程,为了让操作系统同时可以执行多个任务,但进程是重量级的,
也就是新建一个进程会消耗CPU和内存空间等系统资源,因此进程的数量比较局限。
(2)线程的概念
为了解决上述问题就提出线程的概念,线程就是进程内部的程序流,也就是说操作系统内部支持多
- 进程的,而每个进程的内部又是支持多线程的,线程是轻量的,新建线程会共享所在进程的系统资
- 源,因此目前主流的开发都是采用多线程。
- 多线程是采用时间片轮转法来保证多个线程的并发执行,所谓并发就是指宏观并行微观串行的机
- 制。
注:若是单核CPU,则将进程分成多个线程,每个线程分配一个时间片,快速执行完一个就到下一个,这让微观看起来是串行的操作,从宏观看起来是并行,而对于现在的硬件水平来说,4、8核的CPU能更好地去处理并发文问题。
二、线程的创建(重点)
来自CSDN,参考链接:https://blog.csdn.net/m0_37840000/article/details/79756932
(1) Thread类的概念
java.lang.Thread类代表线程,任何线程对象都是Thread类(子类)的实例。
Thread类是线程的模板,封装了复杂的线程开启等操作,封装了操作系统的差异性。
(2) 创建方式
1、自定义类继承Thread类并重写run方法,然后创建该类的对象调用start方法。
2、自定义类实现Runnable接口并重写run方法,创建该类的对象作为实参来构造Thread类型的对
象,然后使用Thread类型的对象调用start方法。
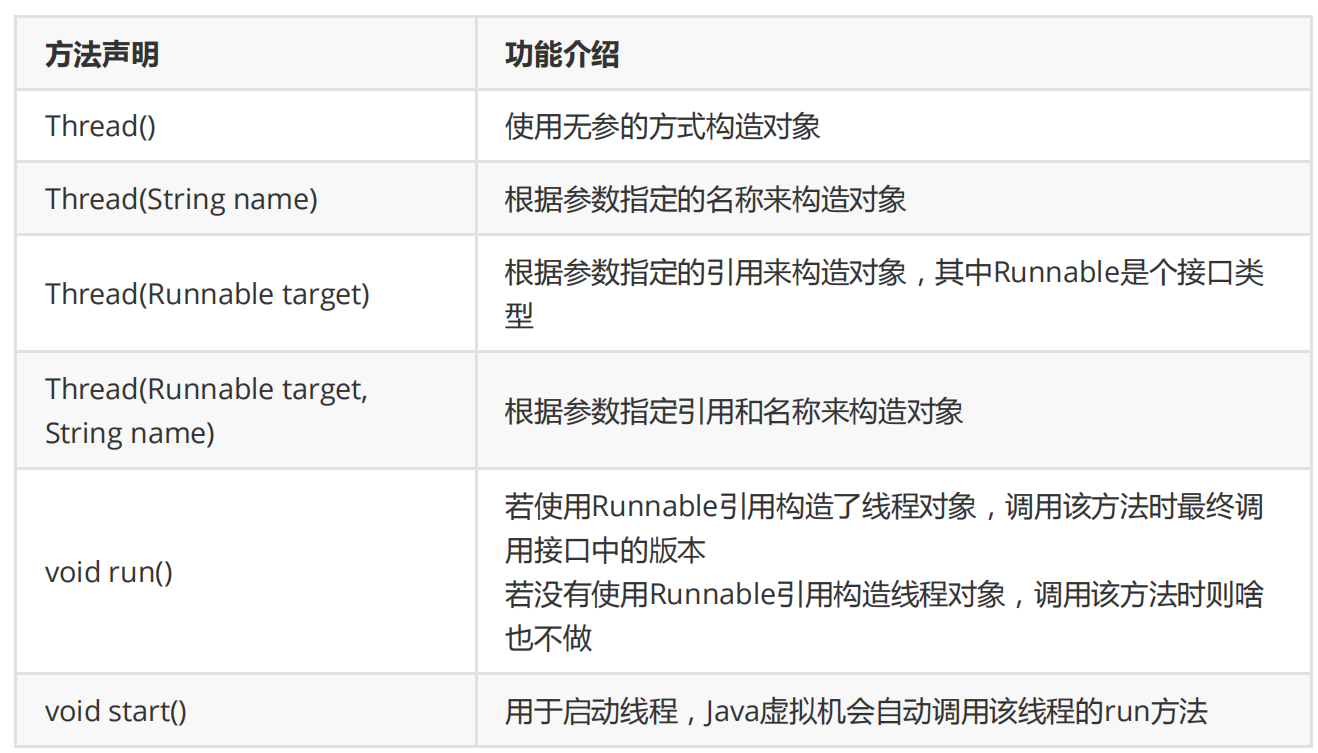
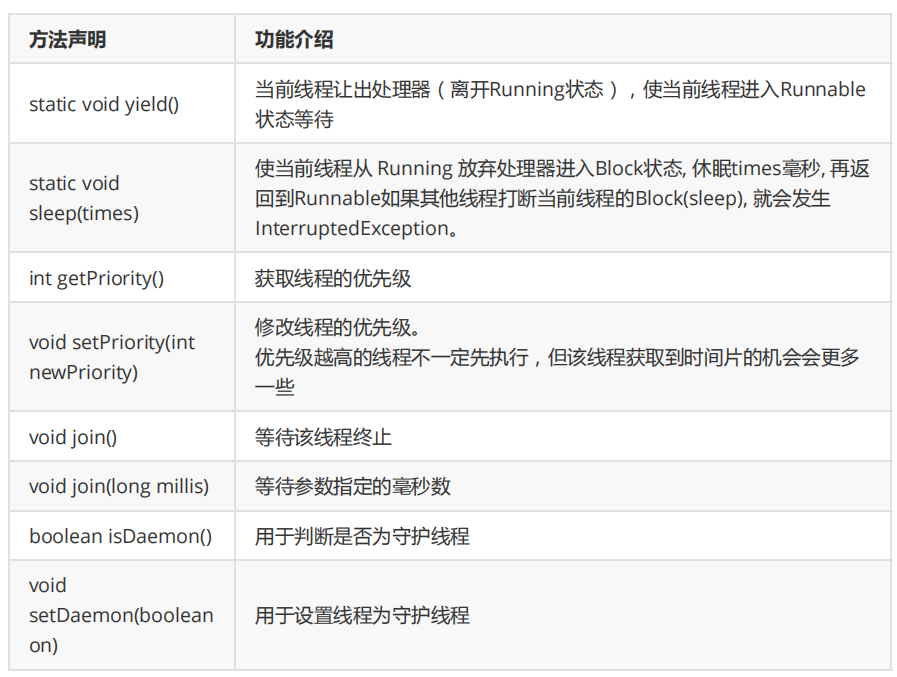
(3)常用方法
(4)run方法
注:调用前两个方法,run()方法实际上啥都不做
package task14;/** 通过代码看看run()是不是真的啥都不干* */public class ThreadTest {public static void main(String[] args) {//使用无参构造方法,创建Thread 对象//由源码可是,Thread类中的成员变量target为nullThread T=new Thread();//调用run()方法,方法中如果target为空,则啥都不干/** 源码:* @Overridepublic void run() {if (target != null) {target.run();}}*///所以由于成员变量中的target为null,并且if (target != null)后没有其他代码,跳出{},所以啥都不干T.run();//输出语句简单测试System.out.println("是否真的啥都不干!");}}
源码截图:
(1)Thread类
点击init进入
此时this.target是成员变量(this关键字的使用)
(2)run方法源码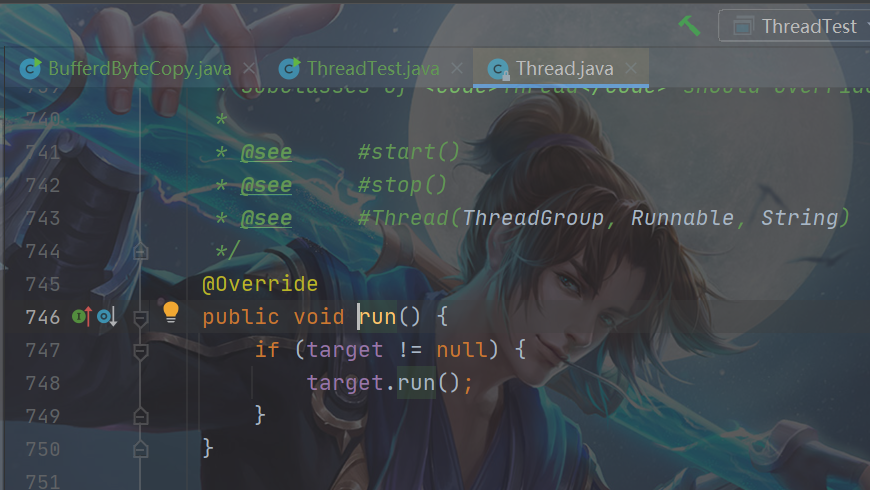
(5)执行流程(创建方式一)
执行main方法的线程叫做主线程,执行run方法的线程叫做新线程/子线程。
main方法是程序的入口,对于start方法之前的代码来说,由主线程执行一次,当start方法调用成
- 功后线程的个数由1个变成了2个,新启动的线程去执行run方法的代码,主线程继续向下执行,两
个线程各自独立运行互不影响。
当run方法执行完毕后子线程结束,当main方法执行完毕后主线程结束。
- 两个线程执行没有明确的先后执行次序,由操作系统调度算法来决定。
(1)创建方式一and直接使用run方法
继承Thread类
package task14;public class SubThread extends Thread {@Overridepublic void run() {for (int i = 0; i < 20; i++) {System.out.println("run方法中的i="+i);}}}
测试类调用,直接调用main方法
package task14;public class ThreadTest2 {public static void main(String[] args) {Thread t1=new SubThread();t1.run();for (int i = 0; i <20 ; i++) {System.out.println("-----------------------------这是main方法的i="+i);}}}
输出结果: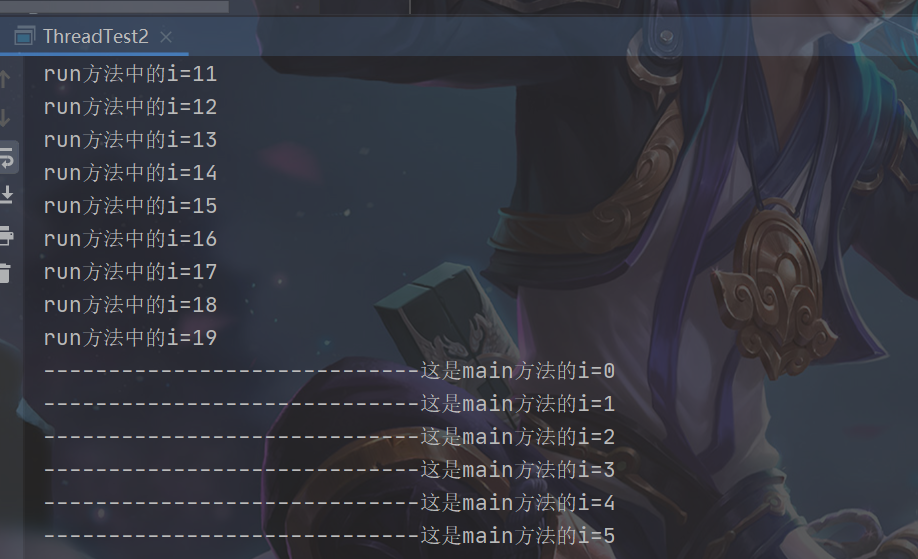
按顺序执行
(2)调用Start方法
package task14;public class ThreadTest2 {public static void main(String[] args) {Thread t1=new SubThread();t1.start();for (int i = 0; i <20 ; i++) {System.out.println("-----------------------------这是main方法的i="+i);}}}
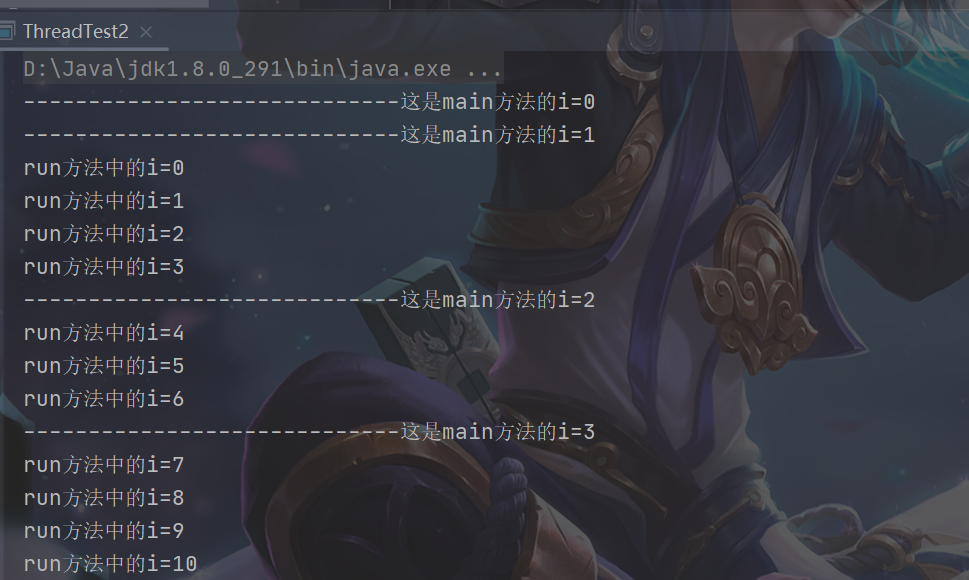
说明调用run()方法并没有启动线程,调用start()才启动线程。
宏观上实现并发操作,main为主线程。
- 当run方法执行完毕后子线程结束,当main方法执行完毕后主线程结束。
- 两个线程执行没有明确的先后执行次序,由操作系统调度算法来决定。
(6)实现Runnable接口创建线程
自定义类实现Runnable接口 ```java package task14;
public class SubRunnableTest implements Runnable{ @Override public void run() { for (int i = 0; i < 20; i++) { System.out.println(“run方法中的i=”+i); } } }
```javapackage task14;//测试类public class SubRunnableTest2 {public static void main(String[] args) {SubRunnableTest t=new SubRunnableTest();Thread t2=new Thread(t);t2.start();for (int i = 0; i <20 ; i++) {System.out.println("-----------------------------这是main方法的i="+i);}}}
传入t,相当于target=t,所以target.run(),实际上也是t.run();(具体参见源码)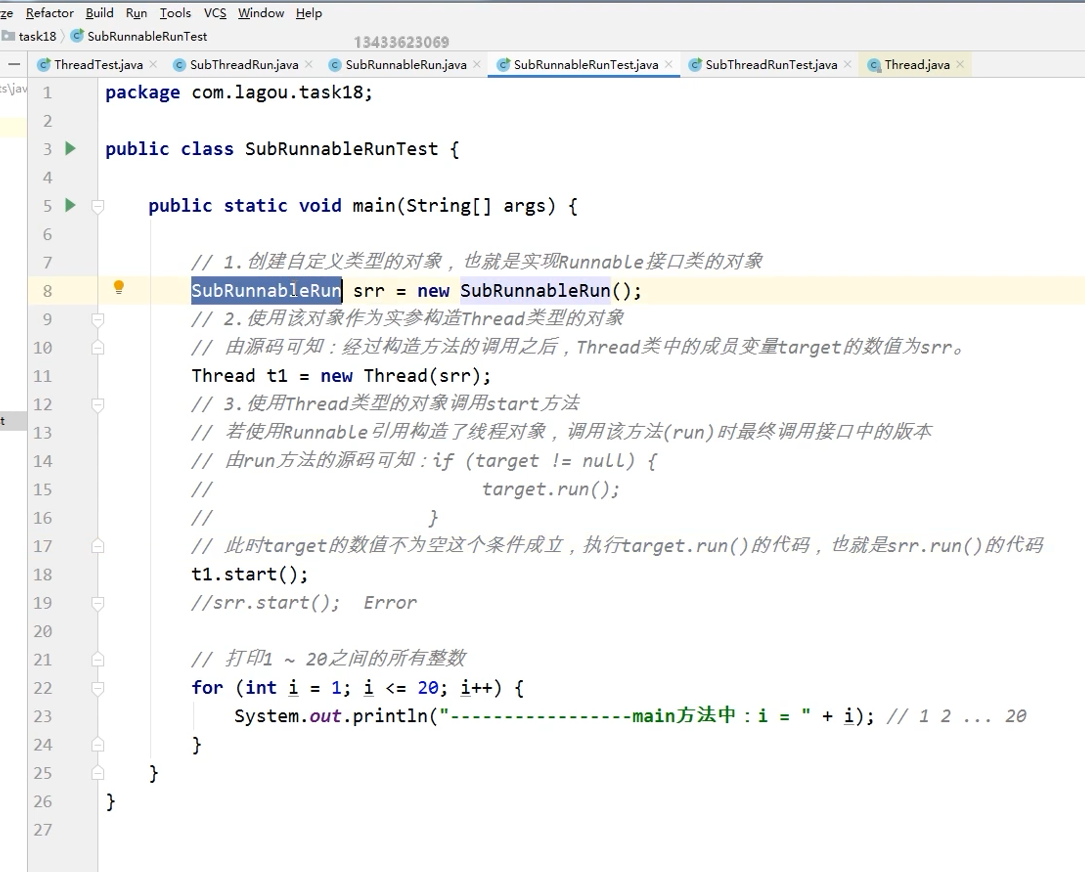
(7)匿名内部类
未优化
package task14;public class InnerRunnable {public static void main(String[] args) {//继承Thread父类创建线程并启动Thread t1=new Thread(){@Overridepublic void run(){System.out.println("在吗?");}};t1.start();//实现接口并重写方法创建线程并启动Runnable r=new Runnable() {@Overridepublic void run() {System.out.println("不在!");}};Thread t=new Thread(r);t.start();}}
优化后:
使用lambda更为简便
package task14;public class InnerRunnable {public static void main(String[] args) {//继承Thread父类创建线程并启动/*Thread t1=new Thread(){@Overridepublic void run(){System.out.println("在吗?");}};t1.start();*/new Thread(){@Overridepublic void run(){System.out.println("在吗?");}}.start();//实现接口并重写方法创建线程并启动/* Runnable r=new Runnable() {@Overridepublic void run() {System.out.println("不在!");}};Thread t=new Thread(r);t.start();*/new Thread(new Runnable() {@Overridepublic void run() {System.out.println("不在!");}}).start();//更为简便的方法还可以使用lambda表达式:(形参列表)->方法体Runnable ra=()-> System.out.println("不在!");new Thread(ra).start();}}
(7)方式的比较
1、继承Thread类的方式代码简单,但是若该类继承Thread类后则无法继承其它类,而实现
2、Runnable接口的方式代码复杂,但不影响该类继承其它类以及实现其它接口,因此以后的开发中
推荐使用第二种方式。
第2种方式可以多实现
三、线程的生命周期
(1)生命周期图示
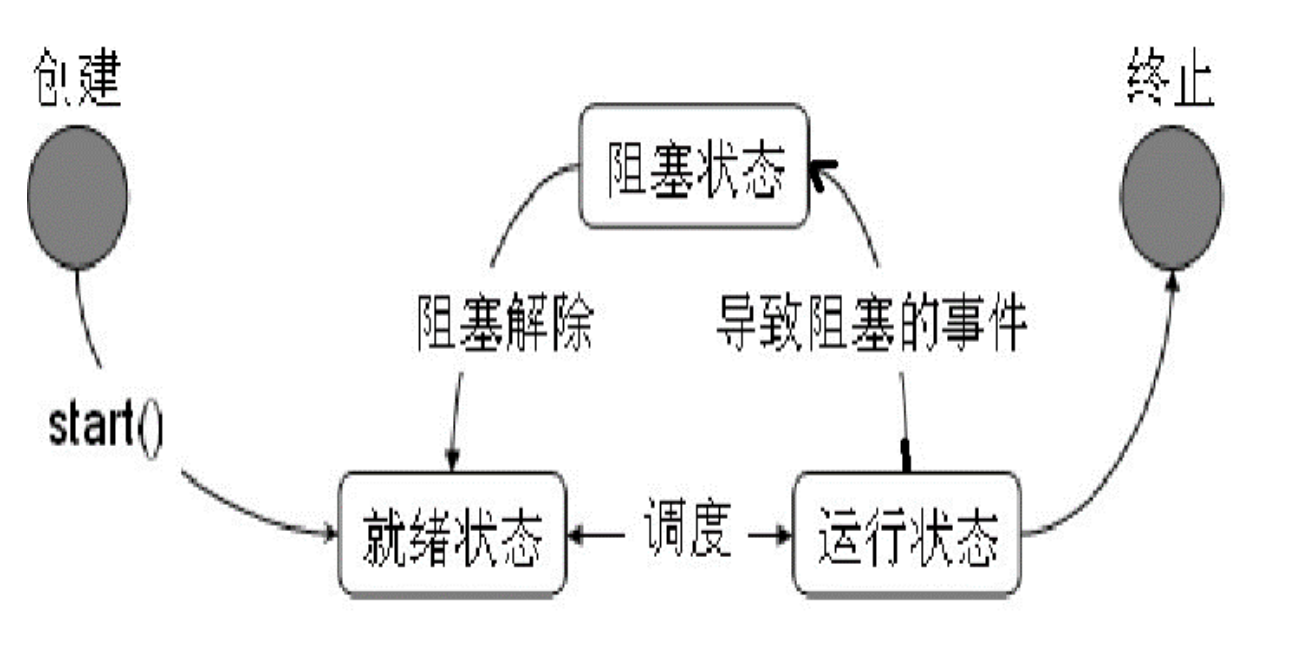
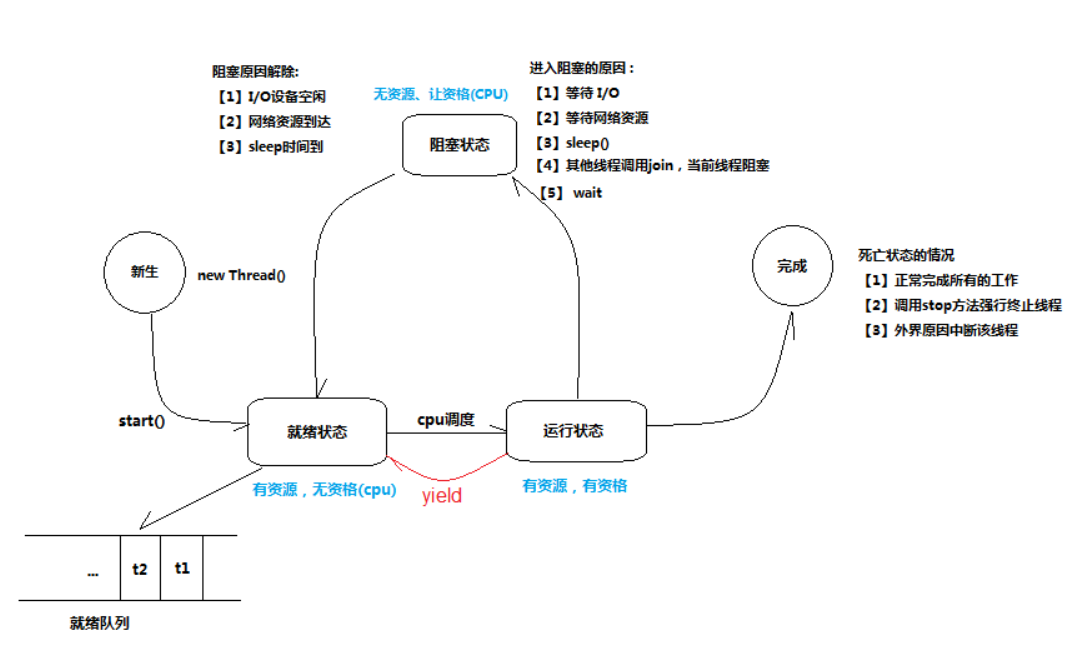
(来源:https://www.cnblogs.com/luojack/p/10840669.html)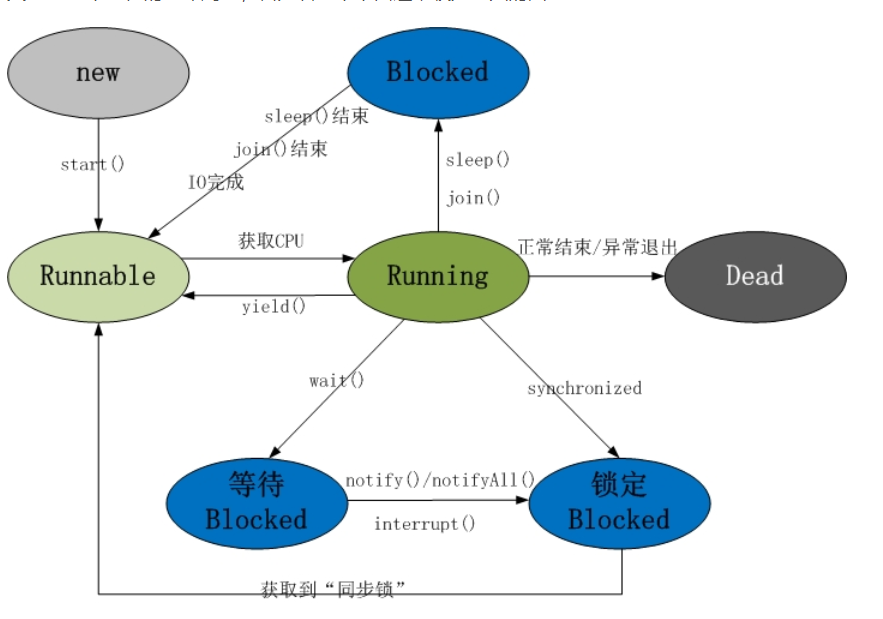
来源(https://blog.csdn.net/xiaosheng900523/article/details/82964768)
- 新建状态 - 使用new关键字创建之后进入的状态,此时线程并没有开始执行。
- 就绪状态 - 调用start方法后进入的状态,此时线程还是没有开始执行。
- 运行状态 - 使用线程调度器调用该线程后进入的状态,此时线程开始执行,当线程的时间片执行完
- 毕后任务没有完成时回到就绪状态。
- 消亡状态 - 当线程的任务执行完成后进入的状态,此时线程已经终止。
- 阻塞状态 - 当线程执行的过程中发生了阻塞事件进入的状态,如:sleep方法。 唤醒后,再回到就绪状态(相当于重新排队)
- 阻塞状态解除后进入就绪状态。
四、线程的编号和名称

案例题目
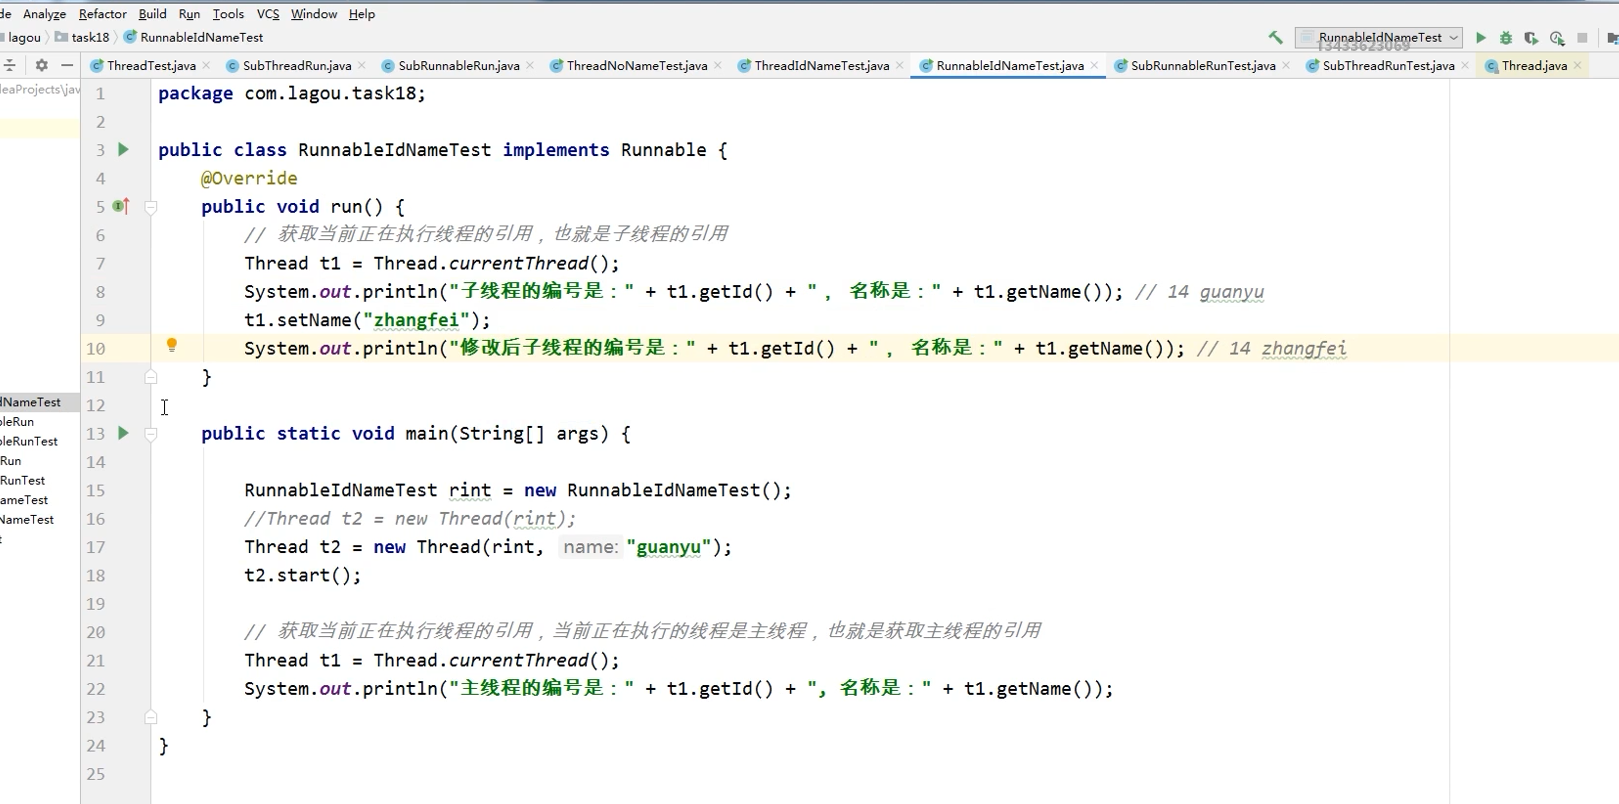
自定义类继承Thread类并重写run方法,在run方法中先打印当前线程的编号和名称,然后将线程
的名称修改为”zhangfei”后再次打印编号和名称。 要求在main方法中也要打印主线程的编号和名称。(1)继承方式管理线程编号和名字
```java package task14;
import java.util.Currency;
public class ThreadNameTest extends Thread{ @Override public void run() { System.out.println(“子线程的编号是:”+getId()+” 线程名称是:”+getName()); setName(“Zhangfei”); System.out.println(“子线程的编号是:”+getId()+” 线程名称是:”+getName());
}public static void main(String[] args) {ThreadNameTest t1=new ThreadNameTest();t1.start();//获取当前正在执行的线程,当前正在执行的线程为mainThread t2=Thread.currentThread();System.out.println("主线程的编号是:"+t2.getId()+"线程名字是:"+t2.getName());}
}
(2)实现方式管理线程编号和名字```javapackage task14;public class RunnableIdName implements Runnable{@Overridepublic void run() {Thread t1=Thread.currentThread();System.out.println("子线程的编号是:"+t1.getId()+"子线程的名字是"+t1.getName());}public static void main(String[] args) {RunnableIdName r1=new RunnableIdName();Thread t3=new Thread(r1);t3.start();Thread t2=Thread.currentThread();System.out.println("主线程的编号是"+t2.getId()+"主线程的名称是"+t2.getName());}}
五、常用方法
(1)sleep()方法的使用
package com.lagou.task18;import java.text.SimpleDateFormat;import java.time.LocalDateTime;import java.util.Date;public class ThreadSleepTest extends Thread {// 声明一个布尔类型的变量作为循环是否执行的条件private boolean flag = true;// 子类中重写的方法不能抛出更大的异常@Overridepublic void run() {// 每隔一秒获取一次系统时间并打印,模拟时钟的效果while (flag) {// 获取当前系统时间并调整格式打印// LocalDateTime.now();Date d1 = new Date();SimpleDateFormat sdf = new SimpleDateFormat("yyyy-MM-dd HH:mm:ss");System.out.println(sdf.format(d1));// 睡眠1秒钟try {Thread.sleep(1000);} catch (InterruptedException e) {e.printStackTrace();}}}public static void main(String[] args) {ThreadSleepTest tst = new ThreadSleepTest();tst.start();// 主线程等待5秒后结束子线程System.out.println("主线程开始等待...");try {Thread.sleep(5000);} catch (InterruptedException e) {e.printStackTrace();}// 停止子线程 过时 不建议使用//tst.stop();tst.flag = false;System.out.println("主线程等待结束!");}}
(2)线程的优先级
优先级高的线程不一定先执行,但该线程获取到时间片的机会会更多一些
package com.lagou.task18;public class ThreadPriorityTest extends Thread {@Overridepublic void run() {//System.out.println("子线程的优先级是:" + getPriority()); // 5 10 优先级越高的线程不一定先执行。for (int i = 0; i < 20; i++) {System.out.println("子线程中:i = " + i);}}public static void main(String[] args) {ThreadPriorityTest tpt = new ThreadPriorityTest();// 设置子线程的优先级tpt.setPriority(Thread.MAX_PRIORITY);tpt.start();Thread t1 = Thread.currentThread();//System.out.println("主线程的优先级是:" + t1.getPriority()); // 5 普通的优先级for (int i = 0; i < 20; i++) {System.out.println("--主线程中:i = " + i);}}}
(3)join()方法
package com.lagou.task18;public class ThreadJoinTest extends Thread {@Overridepublic void run() {// 模拟倒数10个数的效果System.out.println("倒计时开始...");for (int i = 10; i > 0; i--) {System.out.println(i);try {Thread.sleep(1000);} catch (InterruptedException e) {e.printStackTrace();}}System.out.println("新年快乐!");}public static void main(String[] args) {ThreadJoinTest tjt = new ThreadJoinTest();tjt.start();// 主线程开始等待System.out.println("主线程开始等待...");try {// 表示当前正在执行的线程对象等待调用线程对象,也就是主线程等待子线程终止//tjt.join();tjt.join(5000); // 最多等待5秒} catch (InterruptedException e) {e.printStackTrace();}//System.out.println("终于等到你,还好没放弃!");System.out.println("可惜不是你,陪我到最后!");}}
注意:join和sleep()的区别,sleep()是自己睡大觉,join()是等别人执行完再执行,加上参数表示等到多久就不再等待了。
(4)线程的守护
package com.lagou.task18;public class ThreadDaemonTest extends Thread {@Overridepublic void run() {//System.out.println(isDaemon()? "该线程是守护线程": "该线程不是守护线程"); // 默认不是守护线程// 当子线程不是守护线程时,虽然主线程先结束了,但是子线程依然会继续执行,直到打印完毕所有数据为止// 当子线程是守护线程时,当主线程结束后,则子线程随之结束for (int i = 0; i < 50; i++) {System.out.println("子线程中:i = " + i);}}public static void main(String[] args) {ThreadDaemonTest tdt = new ThreadDaemonTest();// 必须在线程启动之前设置子线程为守护线程tdt.setDaemon(true);tdt.start();for (int i = 0; i < 20; i++) {System.out.println("-------主线程中:i = " + i);}}}
当子线程不是守护线程时,虽然主线程先结束了,但是子线程依然会继续执行,直到打印完毕所有数据为止<br /> 当子线程是守护线程时,当主线程结束后,则子线程随之结束<br />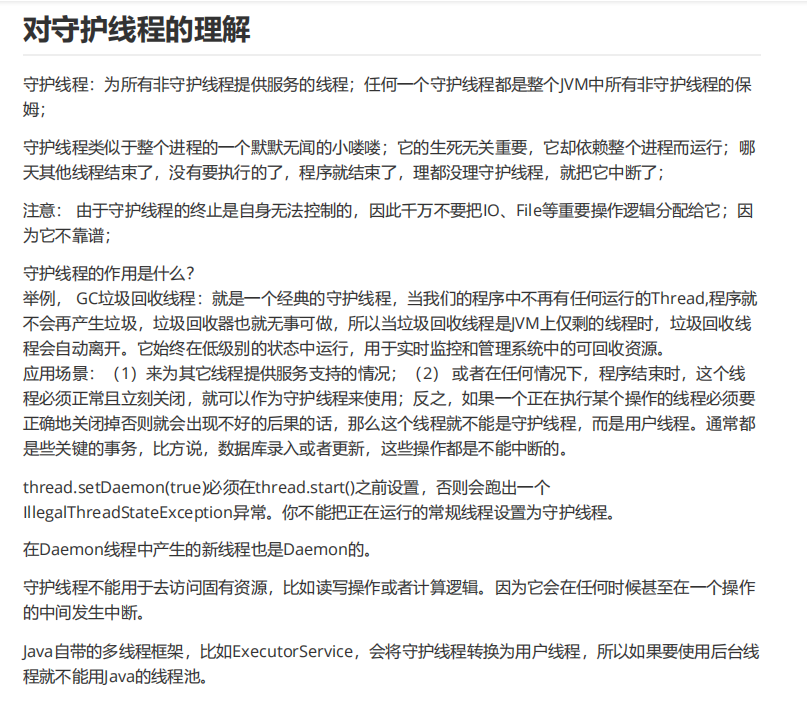
(5)案例
案例题目
编程创建两个线程,线程一负责打印1 ~ 100之间的所有奇数,其中线程二负责打印1 ~ 100之间的
所有偶数。
在main方法启动上述两个线程同时执行,主线程等待两个线程终止。
package task14;//输出1~100的偶数public class Thread1 extends Thread {@Overridepublic void run() {for (int i = 2; i <100 ; i+=2) {System.out.println("-线程1"+i);}}}
package task14;//打印奇数public class Thread2 extends Thread{@Overridepublic void run() {for (int i = 1; i <100 ; i+=2) {System.out.println("---------------------线程2"+i);}}}
package task14;public class SubTest {public static void main(String[] args) {Thread1 t1=new Thread1();t1.start();Thread2 t2=new Thread2();t2.start();System.out.println("结束");}}
六、线程同步机制(重点)
(1)基本概念
当多个线程同时访问同一种共享资源时,可能会造成数据的覆盖等不一致性问题,此时就需要对线程之间进行通信和协调,该机制就叫做线程的同步机制。 <br /> 多个线程并发读写同一个临界资源时会发生线程并发安全问题。 <br /> 异步操作:多线程并发的操作,各自独立运行。 <br /> 同步操作:多线程串行的操作,先后执行的顺序。
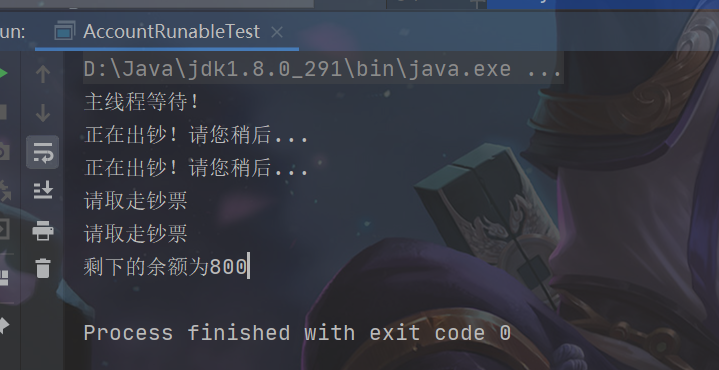
package task14;public class AccountRunableTest implements Runnable{private int balance;public AccountRunableTest() {}public AccountRunableTest(int balance) {this.balance = balance;}public int getBalance() {return balance;}public void setBalance(int balance) {this.balance = balance;}@Overridepublic void run() {int temp=getBalance();if (temp>=200){System.out.println("正在出钞!请您稍后...");temp-=200;try {Thread.sleep(5000); //模拟出钞的过程} catch (InterruptedException e) {e.printStackTrace();}System.out.println("请取走钞票");setBalance(temp);}else {System.out.println("余额不足!");}}public static void main(String[] args) {AccountRunableTest a=new AccountRunableTest(1000);Thread t1=new Thread(a);Thread t2=new Thread(a);t1.start();t2.start();System.out.println("主线程等待!");try {t1.join();t2.join();} catch (InterruptedException e) {e.printStackTrace();}System.out.println("剩下的余额为"+a.getBalance());}}
(2)解决方案
由程序结果可知:当两个线程同时对同一个账户进行取款时,导致最终的账户余额不合理。
引发原因:线程一执行取款时还没来得及将取款后的余额写入后台,线程二就已经开始取款。
解决方案:让线程一执行完毕取款操作后,再让线程二执行即可,将线程的并发操作改为串行操
作。
经验分享:在以后的开发尽量减少串行操作的范围,从而提高效率。
(3)实现方式
在Java语言中使用synchronized关键字来实现同步/对象锁机制从而保证线程执行的原子性,具体
方式如下:使用同步代码块的方式实现部分代码的锁定,格式如下:
synchronized(类类型的引用) {
编写所有需要锁定的代码;
}
使用同步方法的方式实现所有代码的锁定。
直接使用synchronized关键字来修饰整个方法即可
该方式等价于:
synchronized(this) { 整个方法体的代码 }
所有的对象都支持锁
(1)同步代码块实现线程同步方式一
使用锁锁住代码块
package task14;public class AccountRunableTest implements Runnable{private int balance;private Demo demo=new Demo();public AccountRunableTest() {}public AccountRunableTest(int balance) {this.balance = balance;}public int getBalance() {return balance;}public void setBalance(int balance) {this.balance = balance;}@Overridepublic void run() {System.out.println("线程启动"+Thread.currentThread());synchronized (demo) {int temp=getBalance();if (temp>=200){System.out.println("正在出钞!请您稍后...");temp-=200;try {Thread.sleep(5000); //模拟出钞的过程} catch (InterruptedException e) {e.printStackTrace();}System.out.println("请取走钞票");setBalance(temp);}else {System.out.println("余额不足!");}}}public static void main(String[] args) {AccountRunableTest a=new AccountRunableTest(1000);Thread t1=new Thread(a);Thread t2=new Thread(a);t1.start();t2.start();System.out.println("主线程等待!");try {t1.join();// t2.start(); //等待线程1结束后再启动线程2 但是这样失去了多线程的意义t2.join();} catch (InterruptedException e) {e.printStackTrace();}System.out.println("剩下的余额为"+a.getBalance());}}class Demo{}

启动锁机制,则两个线程同时启动,但是只有一个在“出钞”
......try {t1.join();t2.start(); //等待线程1结束后再启动线程2 但是这样失去了多线程的意义t2.join();} catch (InterruptedException e) {e.printStackTrace();}System.out.println("剩下的余额为"+a.getBalance());.......
若t2的启动在t1.join()后,只启动一个线程,等线程一结束后,线程二才会启动
注意:
这样子锁不住,因为每次调用就new一个对象,那就不是同一把锁。
(2)同步代码块实现线程同步方式二
由于new两个对象,那么操作时就new了两个锁,所以要让其使用的是同一个锁,将Demo类的引用为静态,static
package com.lagou.task18;public class AccountThreadTest extends Thread {private int balance; // 用于描述账户的余额private static Demo dm = new Demo(); // 隶属于类层级,所有对象共享同一个public AccountThreadTest() {}public AccountThreadTest(int balance) {this.balance = balance;}public int getBalance() {return balance;}public void setBalance(int balance) {this.balance = balance;}@Overridepublic /*static*/ /*synchronized*/ void run() {/*System.out.println("线程" + Thread.currentThread().getName() + "已启动...");//synchronized (dm) { // ok//synchronized (new Demo()) { // 锁不住 要求必须是同一个对象// 1.模拟从后台查询账户余额的过程int temp = getBalance(); // temp = 1000 temp = 1000// 2.模拟取款200元的过程if (temp >= 200) {System.out.println("正在出钞,请稍后...");temp -= 200; // temp = 800 temp = 800try {Thread.sleep(5000);} catch (InterruptedException e) {e.printStackTrace();}System.out.println("请取走您的钞票!");} else {System.out.println("余额不足,请核对您的账户余额!");}// 3.模拟将最新的账户余额写入到后台setBalance(temp); // balance = 800 balance = 800//}*/test();}public /*synchronized*/ static void test() {synchronized (AccountThreadTest.class) { // 该类型对应的Class对象,由于类型是固定的,因此Class对象也是唯一的,因此可以实现同步System.out.println("线程" + Thread.currentThread().getName() + "已启动...");//synchronized (dm) { // ok//synchronized (new Demo()) { // 锁不住 要求必须是同一个对象// 1.模拟从后台查询账户余额的过程int temp = 1000; //getBalance(); // temp = 1000 temp = 1000// 2.模拟取款200元的过程if (temp >= 200) {System.out.println("正在出钞,请稍后...");temp -= 200; // temp = 800 temp = 800try {Thread.sleep(5000);} catch (InterruptedException e) {e.printStackTrace();}System.out.println("请取走您的钞票!");} else {System.out.println("余额不足,请核对您的账户余额!");}// 3.模拟将最新的账户余额写入到后台//setBalance(temp); // balance = 800 balance = 800}}public static void main(String[] args) {AccountThreadTest att1 = new AccountThreadTest(1000);att1.start();AccountThreadTest att2 = new AccountThreadTest(1000);att2.start();System.out.println("主线程开始等待...");try {att1.join();//t2.start(); // 也就是等待线程一取款操作结束后再启动线程二att2.join();} catch (InterruptedException e) {e.printStackTrace();}System.out.println("最终的账户余额为:" + att1.getBalance()); // 800}}
(3)同步方法实现线程同步方式一
直接用synchronized修饰方法即可!
package com.lagou.task18;import java.util.concurrent.locks.ReentrantLock;public class AccountRunnableTest implements Runnable {private int balance; // 用于描述账户的余额private Demo dm = new Demo();private ReentrantLock lock = new ReentrantLock(); // 准备了一把锁public AccountRunnableTest() {}public AccountRunnableTest(int balance) {this.balance = balance;}public int getBalance() {return balance;}public void setBalance(int balance) {this.balance = balance;}@Overridepublic synchronized void run() {//开始加锁lock.lock();// 由源码可知:最终是account对象来调用run方法,因此当前正在调用的对象就是account,也就是说this就是account//synchronized (this) { // ok 和直接使用synchronized锁住方法一样的。***System.out.println("线程" + Thread.currentThread().getName() + "已启动...");//synchronized (dm) { // ok//synchronized (new Demo()) { // 锁不住 要求必须是同一个对象// 1.模拟从后台查询账户余额的过程int temp = getBalance(); // temp = 1000 temp = 1000// 2.模拟取款200元的过程if (temp >= 200) {System.out.println("正在出钞,请稍后...");temp -= 200; // temp = 800 temp = 800try {Thread.sleep(5000);} catch (InterruptedException e) {e.printStackTrace();}System.out.println("请取走您的钞票!");} else {System.out.println("余额不足,请核对您的账户余额!");}// 3.模拟将最新的账户余额写入到后台setBalance(temp); // balance = 800 balance = 800//}lock.unlock(); // 实现解锁}public static void main(String[] args) {AccountRunnableTest account = new AccountRunnableTest(1000);//AccountRunnableTest account2 = new AccountRunnableTest(1000);Thread t1 = new Thread(account);Thread t2 = new Thread(account);//Thread t2 = new Thread(account2);t1.start();t2.start();System.out.println("主线程开始等待...");try {t1.join();//t2.start(); // 也就是等待线程一取款操作结束后再启动线程二t2.join();} catch (InterruptedException e) {e.printStackTrace();}System.out.println("最终的账户余额为:" + account.getBalance()); // 600 800}}class Demo{}
(4)同步方法实现线程同步二
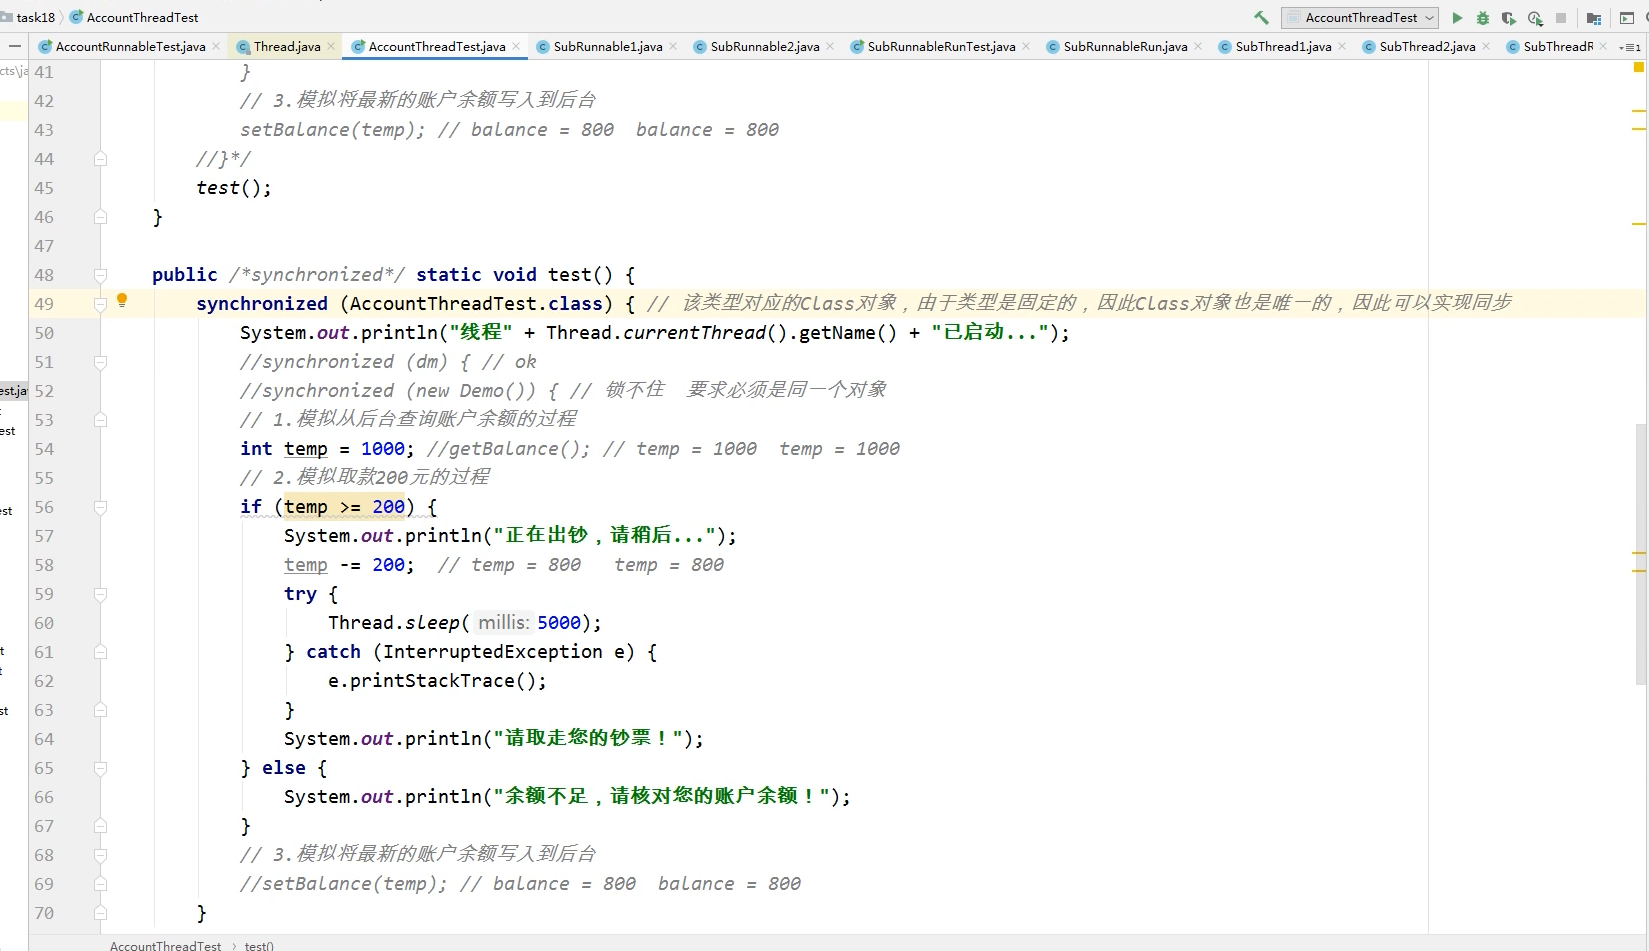
package com.lagou.task18;public class AccountThreadTest extends Thread {private int balance; // 用于描述账户的余额private static Demo dm = new Demo(); // 隶属于类层级,所有对象共享同一个public AccountThreadTest() {}public AccountThreadTest(int balance) {this.balance = balance;}public int getBalance() {return balance;}public void setBalance(int balance) {this.balance = balance;}@Overridepublic /*static*/ /*synchronized*/ void run() {/*System.out.println("线程" + Thread.currentThread().getName() + "已启动...");//synchronized (dm) { // ok//synchronized (new Demo()) { // 锁不住 要求必须是同一个对象// 1.模拟从后台查询账户余额的过程int temp = getBalance(); // temp = 1000 temp = 1000// 2.模拟取款200元的过程if (temp >= 200) {System.out.println("正在出钞,请稍后...");temp -= 200; // temp = 800 temp = 800try {Thread.sleep(5000);} catch (InterruptedException e) {e.printStackTrace();}System.out.println("请取走您的钞票!");} else {System.out.println("余额不足,请核对您的账户余额!");}// 3.模拟将最新的账户余额写入到后台setBalance(temp); // balance = 800 balance = 800//}*/test();}public /*synchronized*/ static void test() {synchronized (AccountThreadTest.class) { // 该类型对应的Class对象,由于类型是固定的,因此Class对象也是唯一的,因此可以实现同步System.out.println("线程" + Thread.currentThread().getName() + "已启动...");//synchronized (dm) { // ok//synchronized (new Demo()) { // 锁不住 要求必须是同一个对象// 1.模拟从后台查询账户余额的过程int temp = 1000; //getBalance(); // temp = 1000 temp = 1000// 2.模拟取款200元的过程if (temp >= 200) {System.out.println("正在出钞,请稍后...");temp -= 200; // temp = 800 temp = 800try {Thread.sleep(5000);} catch (InterruptedException e) {e.printStackTrace();}System.out.println("请取走您的钞票!");} else {System.out.println("余额不足,请核对您的账户余额!");}// 3.模拟将最新的账户余额写入到后台//setBalance(temp); // balance = 800 balance = 800}}public static void main(String[] args) {AccountThreadTest att1 = new AccountThreadTest(1000);att1.start();AccountThreadTest att2 = new AccountThreadTest(1000);att2.start();System.out.println("主线程开始等待...");try {att1.join();//t2.start(); // 也就是等待线程一取款操作结束后再启动线程二att2.join();} catch (InterruptedException e) {e.printStackTrace();}System.out.println("最终的账户余额为:" + att1.getBalance()); // 800}}
(5) 静态方法的锁定
当我们对一个静态方法加锁,如:
public synchronized static void xxx(){….}
那么该方法锁的对象是类对象。每个类都有唯一的一个类对象。获取类对象的方式:类名.class。
静态方法与非静态方法同时使用了synchronized后它们之间是非互斥关系的。
原因在于:静态方法锁的是类对象而非静态方法锁的是当前方法所属对象。
(6)注意事项
使用synchronized保证线程同步应当注意:
多个需要同步的线程在访问同步块时,看到的应该是同一个锁对象引用。
在使用同步块时应当尽量减少同步范围以提高并发的执行效率。
七、线程类和线程不安全类
StringBuffffer类是线程安全的类,但StringBuilder类不是线程安全的类。
参见源码:StrngBuffer的方法是用synchronized修饰的
Vector类和 Hashtable类是线程安全的类,但ArrayList类和HashMap类不是线程安全的类。
如果不考虑线程安全就使用ArraryList 和 HashMap,如果考虑线程安全使用以下 的方法
Collections.synchronizedList() 和 Collections.synchronizedMap()等方法实现安全。
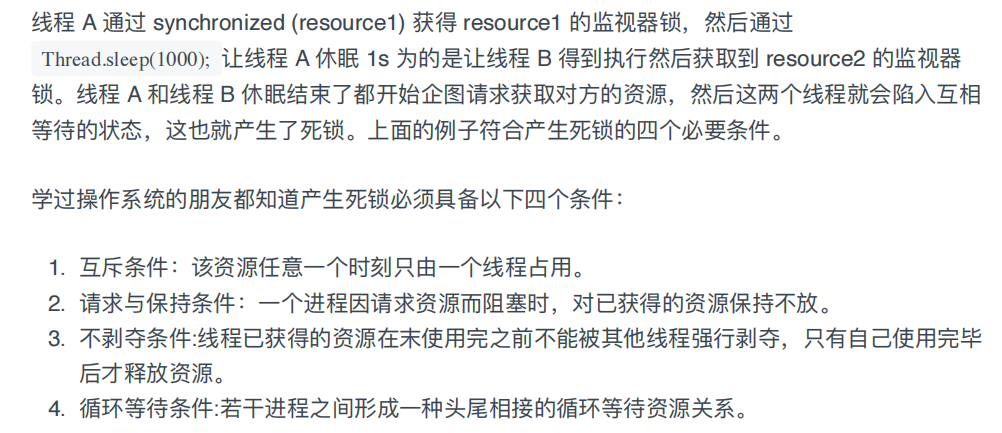
八、死锁的概念
(1)死锁的概念
线程一执行的代码:
public void run(){
synchronized(a){ //持有对象锁a,等待对象锁b
synchronized(b){
编写锁定的代码;
}
}
}
线程二执行的代码:
public void run(){
synchronized(b){ //持有对象锁b,等待对象锁a
synchronized(a){
编写锁定的代码;
}
}
}
注意:
在以后的开发中尽量减少同步的资源,减少同步代码块的嵌套结构的使用!
(2)再次认识死锁
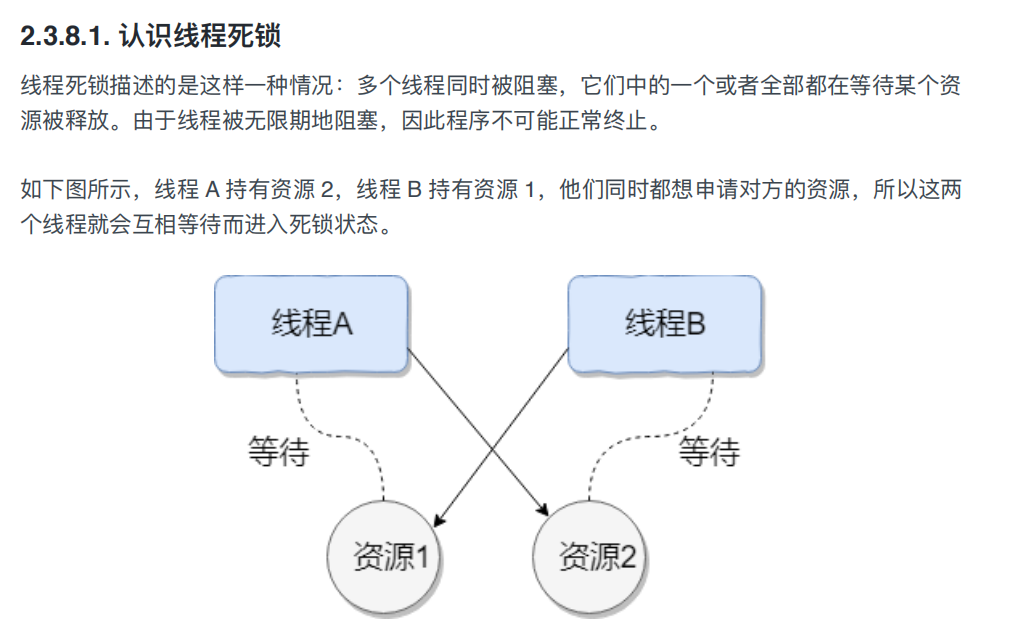

public class DeadLockDemo {private static Object resource1 = new Object();//资源 1private static Object resource2 = new Object();//资源 2public static void main(String[] args) {new Thread(() -> {synchronized (resource1) {System.out.println(Thread.currentThread() + "get resource1");try {Thread.sleep(1000);} catch (InterruptedException e) {e.printStackTrace();}System.out.println(Thread.currentThread() + "waiting getresource2");synchronized (resource2) {System.out.println(Thread.currentThread() + "getresource2");}}}, "线程 1").start();new Thread(() -> {synchronized (resource2) {System.out.println(Thread.currentThread() + "get resource2");try {Thread.sleep(1000);} catch (InterruptedException e) {e.printStackTrace();}System.out.println(Thread.currentThread() + "waiting getresource1");synchronized (resource1) {System.out.println(Thread.currentThread() + "getresource1");}}}, "线程 2").start();}}
output
Thread[线程 1,5,main]get resource1Thread[线程 2,5,main]get resource2Thread[线程 1,5,main]waiting get resource2Thread[线程 2,5,main]waiting get resource1
(3)死锁的避免
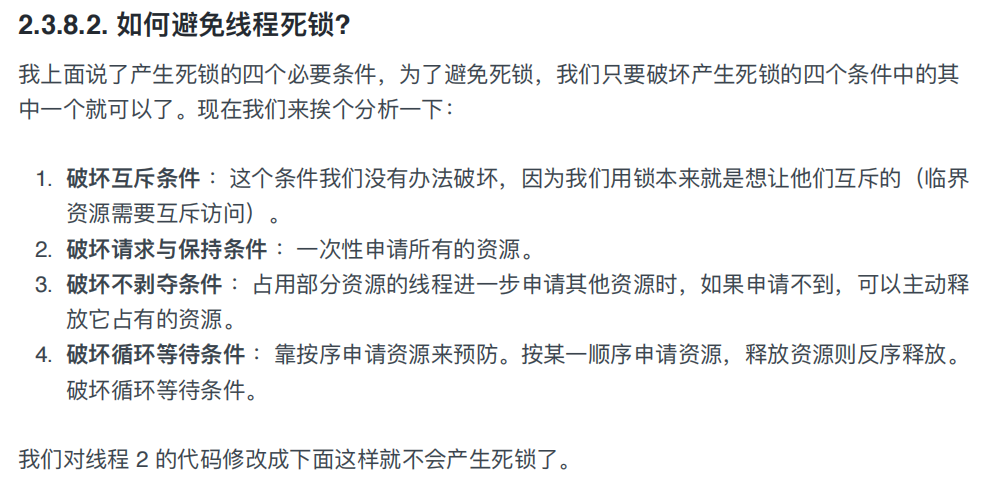
new Thread(() -> {synchronized (resource1) {System.out.println(Thread.currentThread() + "get resource1");try {Thread.sleep(1000);} catch (InterruptedException e) {e.printStackTrace();}System.out.println(Thread.currentThread() + "waiting getresource2");synchronized (resource2) {System.out.println(Thread.currentThread() + "getresource2");}}}, "线程 2").start();
output
Thread[线程 1,5,main]get resource1Thread[线程 1,5,main]waiting get resource2Thread[线程 1,5,main]get resource2Thread[线程 2,5,main]get resource1Thread[线程 2,5,main]waiting get resource2Thread[线程 2,5,main]get resource2Process finished with exit code 0
九、Lock锁实现线程同步
(1)基本概念
从Java5开始提供了更强大的线程同步机制—使用显式定义的同步锁对象来实现。 java.util.concurrent.locks.Lock接口是控制多个线程对共享资源进行访问的工具。 该接口的主要实现类是ReentrantLock类,该类拥有与synchronized相同的并发性,在以后的线程 安全控制中,经常使用ReentrantLock类显式加锁和释放锁。
package com.lagou.task18;import java.util.concurrent.locks.ReentrantLock;public class AccountRunnableTest implements Runnable {private int balance; // 用于描述账户的余额private Demo dm = new Demo();private ReentrantLock lock = new ReentrantLock(); // 准备了一把锁public AccountRunnableTest() {}public AccountRunnableTest(int balance) {this.balance = balance;}public int getBalance() {return balance;}public void setBalance(int balance) {this.balance = balance;}@Overridepublic synchronized void run() {//开始加锁lock.lock();// 由源码可知:最终是account对象来调用run方法,因此当前正在调用的对象就是account,也就是说this就是account//synchronized (this) { // ok 和直接使用synchronized锁住方法一样的。***System.out.println("线程" + Thread.currentThread().getName() + "已启动...");//synchronized (dm) { // ok//synchronized (new Demo()) { // 锁不住 要求必须是同一个对象// 1.模拟从后台查询账户余额的过程int temp = getBalance(); // temp = 1000 temp = 1000// 2.模拟取款200元的过程if (temp >= 200) {System.out.println("正在出钞,请稍后...");temp -= 200; // temp = 800 temp = 800try {Thread.sleep(5000);} catch (InterruptedException e) {e.printStackTrace();}System.out.println("请取走您的钞票!");} else {System.out.println("余额不足,请核对您的账户余额!");}// 3.模拟将最新的账户余额写入到后台setBalance(temp); // balance = 800 balance = 800//}lock.unlock(); // 实现解锁}public static void main(String[] args) {AccountRunnableTest account = new AccountRunnableTest(1000);//AccountRunnableTest account2 = new AccountRunnableTest(1000);Thread t1 = new Thread(account);Thread t2 = new Thread(account);//Thread t2 = new Thread(account2);t1.start();t2.start();System.out.println("主线程开始等待...");try {t1.join();//t2.start(); // 也就是等待线程一取款操作结束后再启动线程二t2.join();} catch (InterruptedException e) {e.printStackTrace();}System.out.println("最终的账户余额为:" + account.getBalance()); // 600 800}}class Demo{}
(2)常用的方法
(3)与synchronized方式的比较
- Lock是显式锁,需要手动实现开启和关闭操作,而synchronized是隐式锁,执行锁定代码后自动 释放。
- Lock只有同步代码块方式的锁,而synchronized有同步代码块方式和同步方法两种锁。
- 使用Lock锁方式时,Java虚拟机将花费较少的时间来调度线程,因此性能更好。
十、线程通信
(1)Object常用方法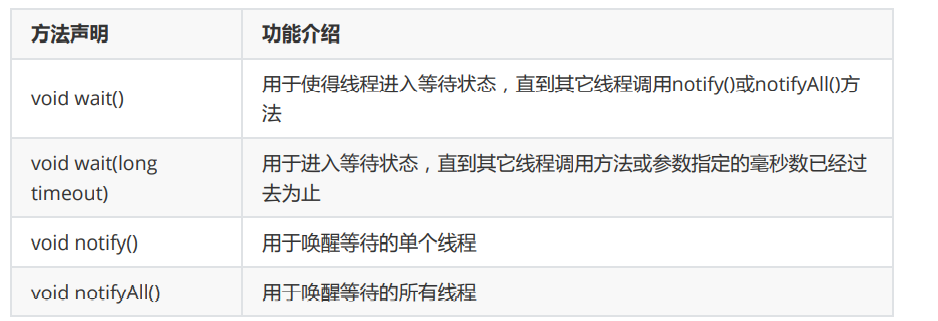
(1)方法的使用
```java package Ch12_Neuedu;
public class CommunicateTest implements Runnable{ int ctt=1; @Override public void run() { while (true){ synchronized (this) { //唤醒另一个线程等待,因为我现在有锁,现在先让它在门口等着,等我调用完wait方法它再执行 notify(); if (ctt <= 100) { System.out.println(“启动”+Thread.currentThread().getName()+”——-“+ctt); try { Thread.sleep(20); } catch (InterruptedException e) { e.printStackTrace(); } ctt++; try { //当线程打印完一个整数后,防止线程再次打印,让线程等待,调用wait方法 wait();//线程进入阻塞状态,自动释放对象锁,必须在锁定的代码中使用 } catch (InterruptedException e) { e.printStackTrace(); } } else { break; } } } }
public static void main(String[] args) {CommunicateTest c1=new CommunicateTest();Thread t1=new Thread(c1);Thread t2=new Thread(c1);t1.start();t2.start();}
}
<a name="il0Ml"></a>## (2)课堂案例: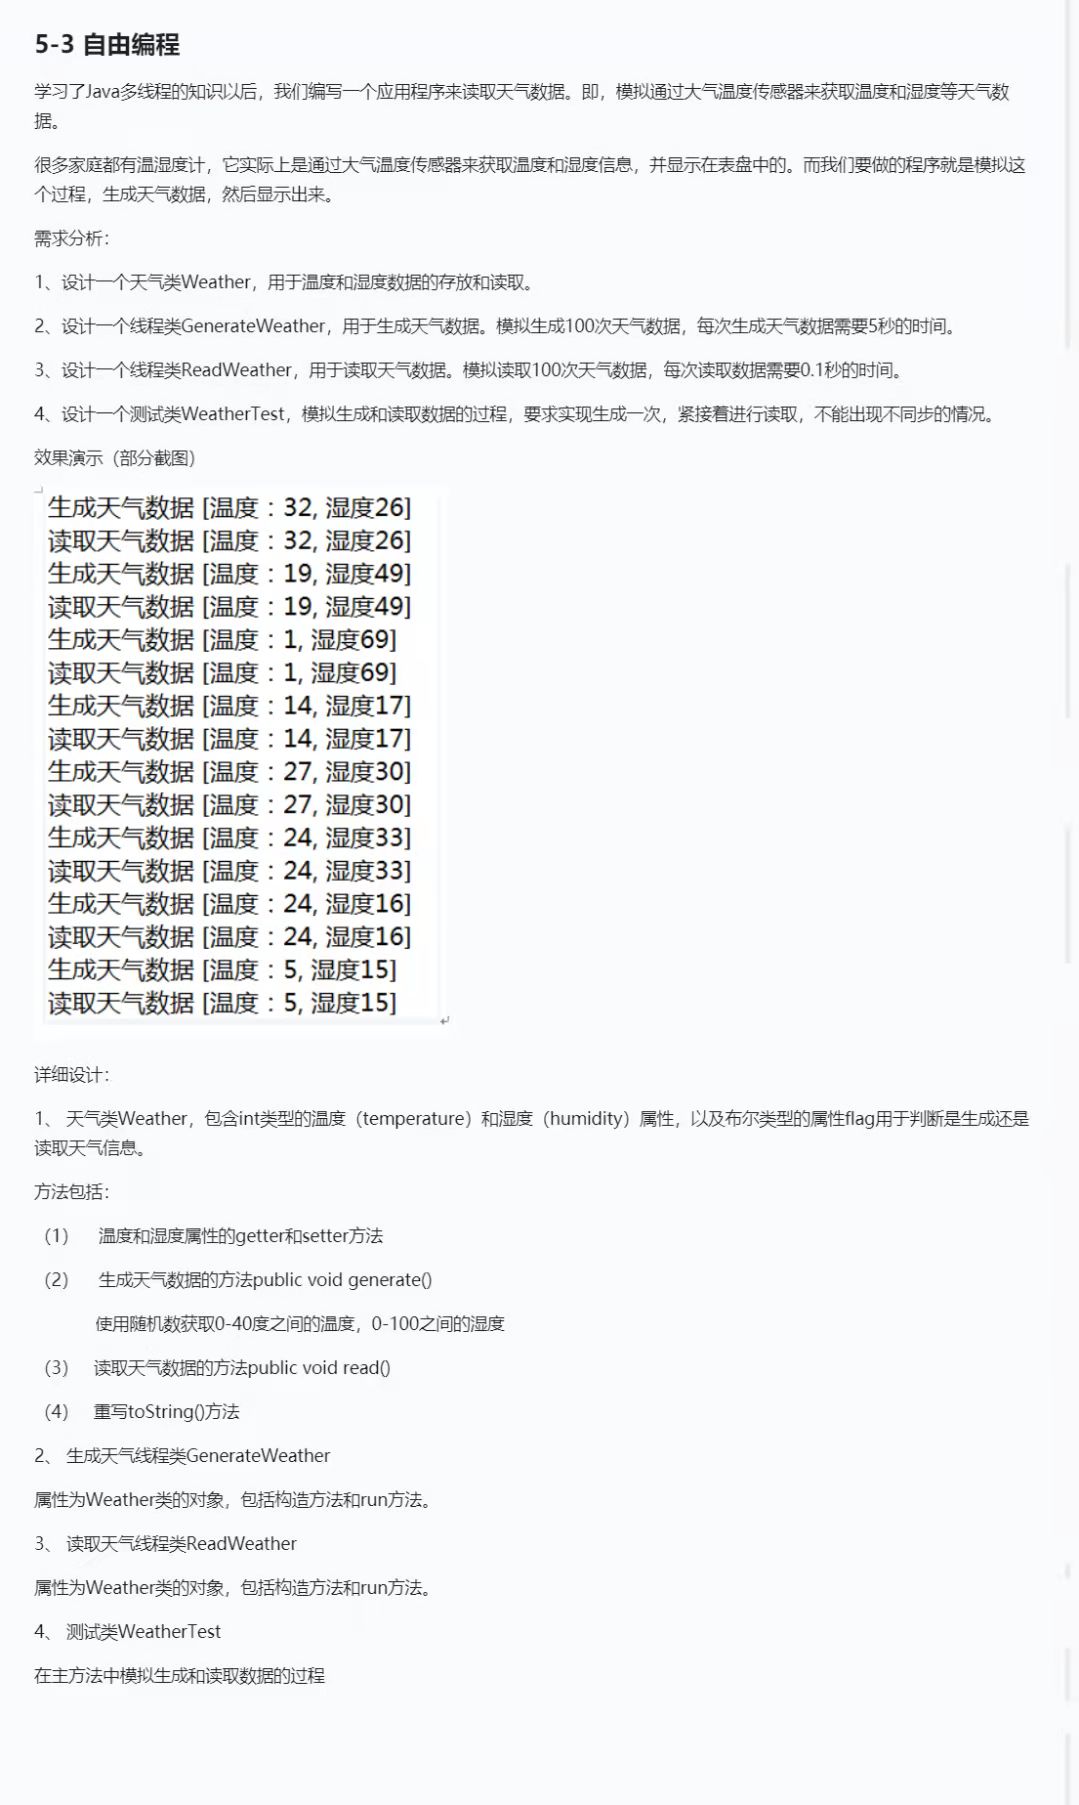```javapublic class Weather {private Integer temperature;private Integer humidity;Boolean flag = false;public Weather() {}public Weather(Integer temperature, Integer humidity) {this.temperature = temperature;this.humidity = humidity;}public Integer getTemperature() {return temperature;}public void setTemperature(Integer temperature) {this.temperature = temperature;}public Integer getHumidity() {return humidity;}public void setHumidity(Integer humidity) {this.humidity = humidity;}public String toString() {return "Weather{" +"temperature=" + temperature +", humidity=" + humidity +'}';}public synchronized void generate() throws InterruptedException {Random random = new Random();if(flag) {wait();}this.temperature = random.nextInt(40);this.humidity = random.nextInt(100);System.out.println("生成天气数据[温度:"+this.temperature+"湿度:"+this.humidity+"]");flag = true;notifyAll();}public synchronized void read() throws InterruptedException {if(!flag) {wait();}System.out.println("读取天气数据[温度:"+this.temperature+"湿度:"+this.humidity+"]");flag = false;notifyAll();}}
public class ReadWeather implements Runnable{Weather weather;public ReadWeather(Weather weather) {this.weather = weather;}@Overridepublic void run() {while (true) {try {weather.read();Thread.sleep(100);} catch (InterruptedException e) {e.printStackTrace();}}}}
public class GenerateWeather implements Runnable{Weather weather;public GenerateWeather(Weather weather) {this.weather = weather;}public void run() {while (true) {try {weather.generate();Thread.sleep(5000);} catch (InterruptedException e) {e.printStackTrace();}}}}
public class WeatherTest {public static void main(String[] args) {Weather weather = new Weather();GenerateWeather generateWeather = new GenerateWeather(weather);ReadWeather readWeather = new ReadWeather(weather);new Thread(generateWeather).start();new Thread(readWeather).start();}}
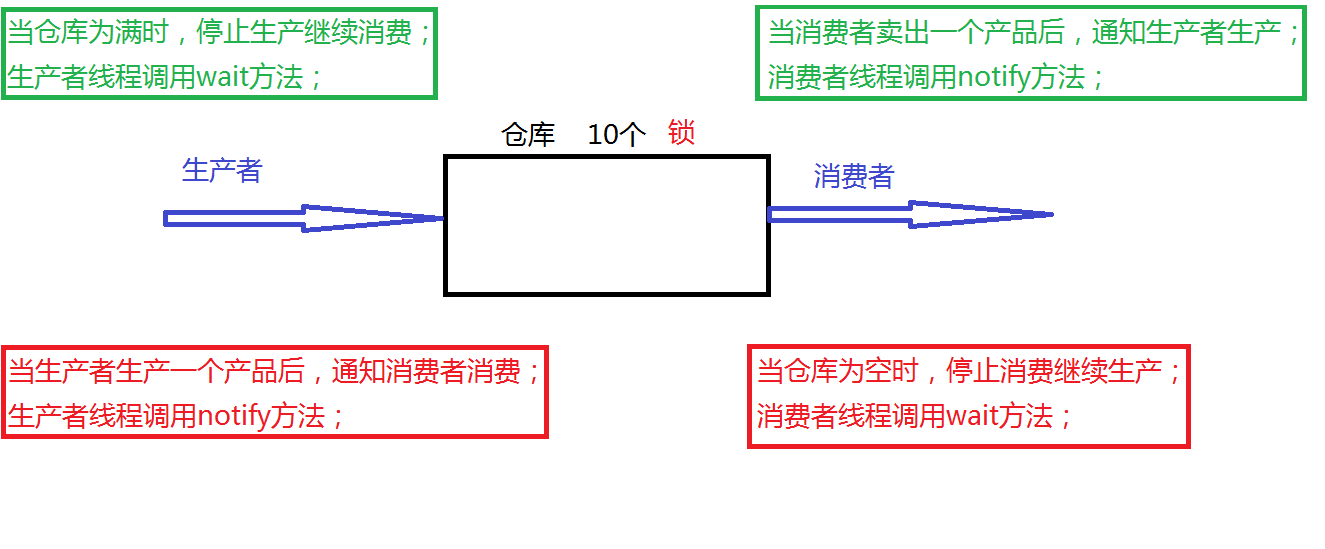
(3)生产者消费者的概念
(4)生产者-消费者:案例
package com.lagou.task18;/*** 编程实现仓库类*/public class StoreHouse {private int cnt = 0; // 用于记录产品的数量public synchronized void produceProduct() {notify();if (cnt < 10) {System.out.println("线程" + Thread.currentThread().getName() + "正在生产第" + (cnt+1) + "个产品...");cnt++;} else {try {wait();} catch (InterruptedException e) {e.printStackTrace();}}}public synchronized void consumerProduct() {notify();if (cnt > 0) {System.out.println("线程" + Thread.currentThread().getName() + "消费第" + cnt + "个产品");cnt--;} else {try {wait();} catch (InterruptedException e) {e.printStackTrace();}}}}
package com.lagou.task18;public class ConsumerThread extends Thread {// 声明一个仓库类型的引用作为成员变量,是为了能调用调用仓库类中的生产方法 合成复用原则private StoreHouse storeHouse;// 为了确保两个线程共用同一个仓库public ConsumerThread(StoreHouse storeHouse) {this.storeHouse = storeHouse;}@Overridepublic void run() {while (true) {storeHouse.consumerProduct();try {Thread.sleep(100);} catch (InterruptedException e) {e.printStackTrace();}}}}
package com.lagou.task18;/*** 编程实现生产者线程,不断地生产产品*/public class ProduceThread extends Thread {// 声明一个仓库类型的引用作为成员变量,是为了能调用调用仓库类中的生产方法 合成复用原则private StoreHouse storeHouse;// 为了确保两个线程共用同一个仓库public ProduceThread(StoreHouse storeHouse) {this.storeHouse = storeHouse;}@Overridepublic void run() {while (true) {storeHouse.produceProduct();try {Thread.sleep(1000);} catch (InterruptedException e) {e.printStackTrace();}}}}
package com.lagou.task18;public class StoreHouseTest {public static void main(String[] args) {// 创建仓库类的对象StoreHouse storeHouse = new StoreHouse();// 创建线程类对象并启动ProduceThread t1 = new ProduceThread(storeHouse);ConsumerThread t2 = new ConsumerThread(storeHouse);t1.start();t2.start();}}
十一、创建线程的第三种方式
(1)实现Callable接口
从Java5开始新增加创建线程的第三种方式为实现java.util.concurrent.Callable接口。
(2)FutureTask类
java.util.concurrent.FutureTask类用于描述可取消的异步计算,该类提供了Future接口的基本实
现,包括启动和取消计算、查询计算是否完成以及检索计算结果的方法,也可以用于获取方法调用
后的返回结果。
常用的方法如下:
package com.lagou.task18;import java.util.concurrent.Callable;import java.util.concurrent.ExecutionException;import java.util.concurrent.FutureTask;public class ThreadCallableTest implements Callable {@Overridepublic Object call() throws Exception {// 计算1 ~ 10000之间的累加和并打印返回int sum = 0;for (int i = 1; i <= 10000; i++) {sum +=i;}System.out.println("计算的累加和是:" + sum); // 50005000return sum;}public static void main(String[] args) {ThreadCallableTest tct = new ThreadCallableTest();FutureTask ft = new FutureTask(tct);Thread t1 = new Thread(ft);t1.start();Object obj = null;try {obj = ft.get();} catch (InterruptedException e) {e.printStackTrace();} catch (ExecutionException e) {e.printStackTrace();}System.out.println("线程处理方法的返回值是:" + obj); // 50005000}}
十二、线程池
(1)线程池的由来
在服务器编程模型的原理,每一个客户端连接用一个单独的线程为之服务,当与客户端的会话结束
时,线程也就结束了,即每来一个客户端连接,服务器端就要创建一个新线程。
如果访问服务器的客户端很多,那么服务器要不断地创建和销毁线程,这将严重影响服务器的性
能。
(2)概念和原理
线程池的概念:首先创建一些线程,它们的集合称为线程池,当服务器接受到一个客户请求后,就
从线程池中取出一个空闲的线程为之服务,服务完后不关闭该线程,而是将该线程还回到线程池
中。
在线程池的编程模式下,任务是提交给整个线程池,而不是直接交给某个线程,线程池在拿到任务
后,它就在内部找有无空闲的线程,再把任务交给内部某个空闲的线程,任务是提交给整个线程
池,一个线程同时只能执行一个任务,但可以同时向一个线程池提交多个任务。
(3)相关类和方法
从Java5开始提供了线程池的相关类和接口:java.util.concurrent.Executors类和
java.util.concurrent.ExecutorService接口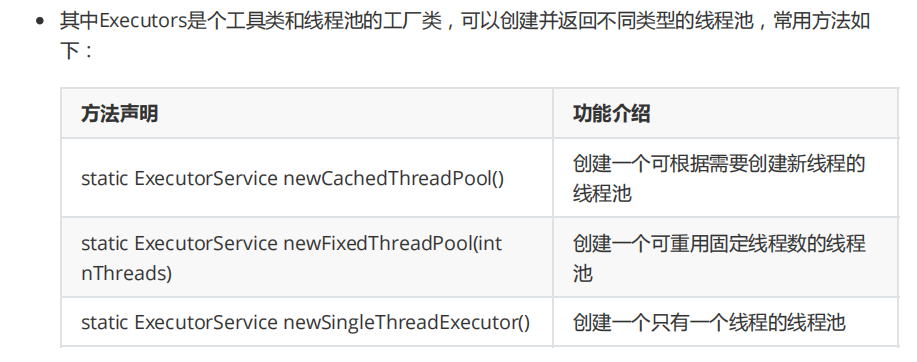

package com.lagou.task18;import java.util.concurrent.ExecutorService;import java.util.concurrent.Executors;public class ThreadPoolTest {public static void main(String[] args) {// 1.创建一个线程池ExecutorService executorService = Executors.newFixedThreadPool(10);// 2.向线程池中布置任务executorService.submit(new ThreadCallableTest());// 3.关闭线程池executorService.shutdown();}}
