- 前端二进制流处理(前端文件下载)
- 方法贰
- 查找两个数组中不同的元素
- CSS样式文字超出出现省略号
- Web3.0架构
- Formily(前端表单解决方案)
- 正则表达式
- Lesson 1: An Introduction, and the ABCs
- Lesson 2: The Dot
- Lesson 3: Matching specific characters
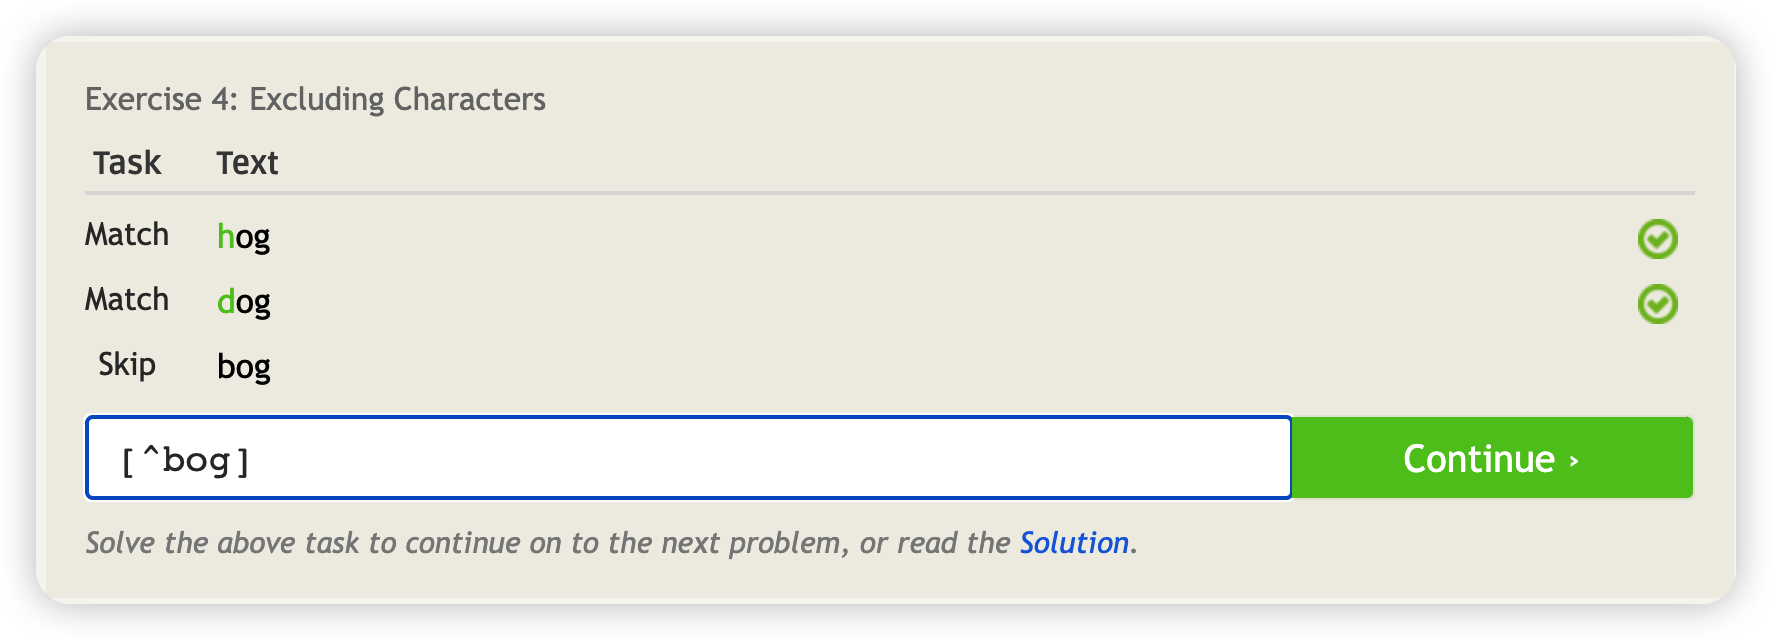
- Lesson 4: Excluding specific characters
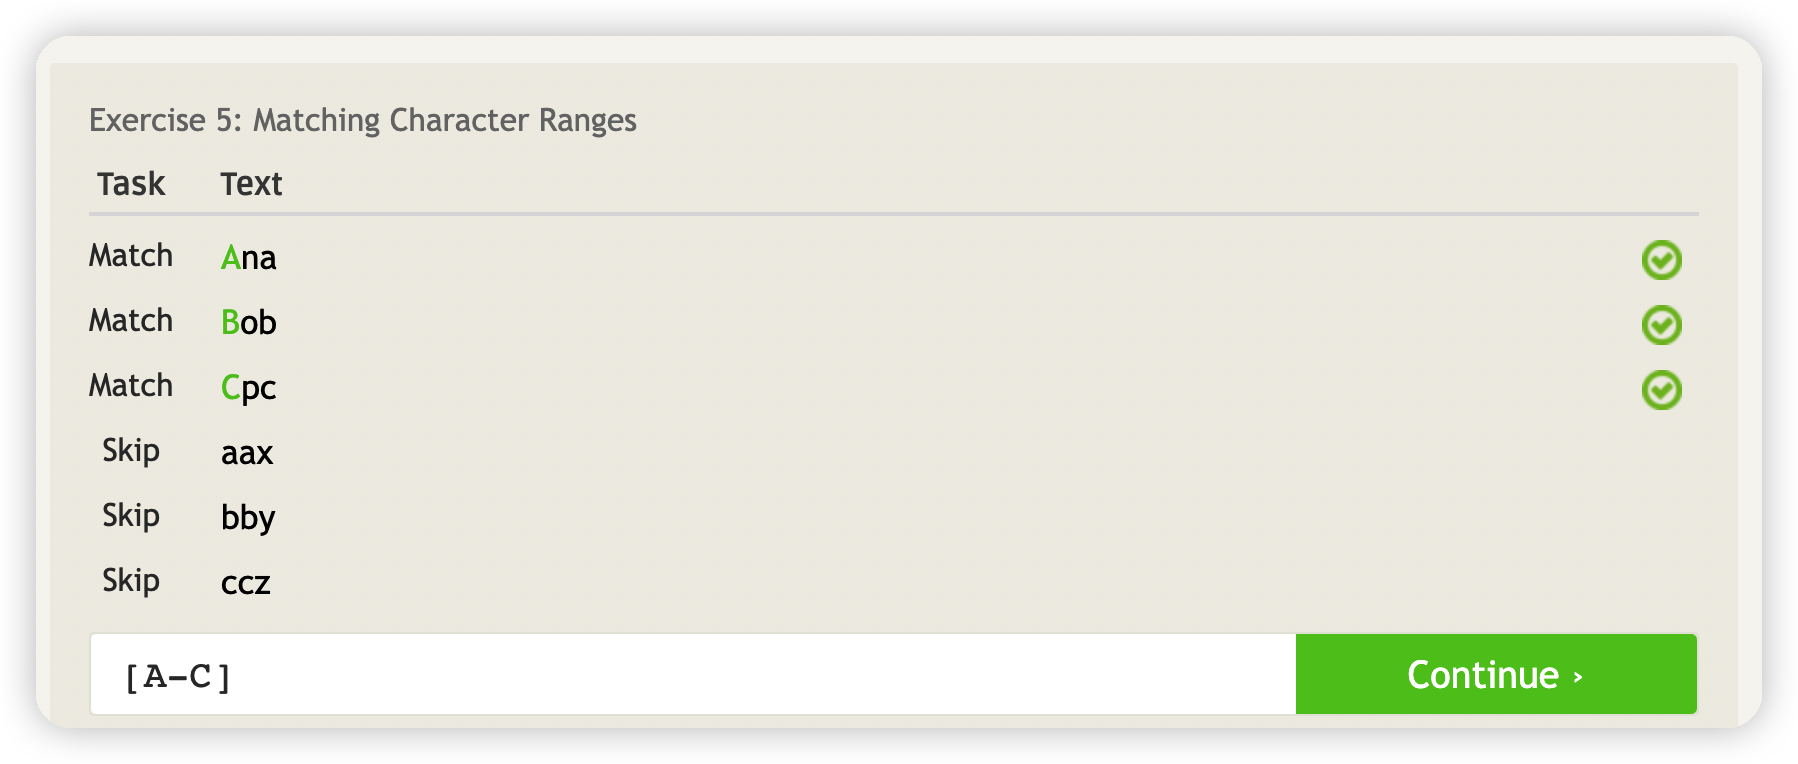
- Lesson 5: Character ranges
- Lesson 7: Mr. Kleene, Mr. Kleene
- Lesson 8: Characters optional
- Lesson 9: All this whitespace
- Lesson 10: Starting and ending
- Lesson 11: Match groups
- Lesson 12: Nested groups
- Lesson 14: It’s all conditional
- Lesson 15: Other special characters
- Lesson X: Infinity and beyond!
- Problem 1: Matching a decimal numbers
- Problem 2: Matching phone numbersProblem 2: Matching phone numbers
- 正则表达式挑战
- Emoji表情匹配正则
- 🥶Git操作篇
- webpack编程指南💡
前端二进制流处理(前端文件下载)
方法壹
二进制流程处理
axios.get({url: 'xxxxxx',method: 'get',data:{},responseType: 'blob', // 声明返回blob格式}).then(res => {downLoadBlobFile(res.data, fileName, mimeType);});
Blob
Blob 对象表示一个不可变、原始数据的类文件对象。它的数据可以按文本或二进制的格式进行读取,也可以转换成 ReadableStream 来用于数据操作。
二进制转换为实质URL
拿到文件流之后,需要生成一个 URL 来实现下载,我们可以通过 URL.createObjectURL() 方法生成一个链接。
const blob = new Blob([res.data]) // res.data 为接口返回的数据,依实例而行const URL = URL.createObjectURL(blob) // 生成一个 Blob URL
这时候后端返回的文件流就会被保存在内存里,而生成的URL 就是文件流在内存中的地址(这个地址为临时的,浏览器在 document 卸载时,会自动释放它们)。
a 标签添加文件名
正常情况下,通过 window.location = url 就可以下载文件。浏览器判断这个链接是资源而不是页面,就会自动下载文件。
但是通过文件流生成的url 对应的资源是没有文件名的,需要添加文件名。这时候我们需要创建一个 a 标签实现这个功能。
const fileName = 'xxxx.xls' // 文件名+后缀const listNode = document.createElement("a")listNode.download = fileNamelistNode.style.display = "none"listNode.href = URL // 文件流生成的urldocument.body.appendChild(listNode)listNode.click() // 模拟在按钮上实现一次鼠标点击URL.revokeObjectURL(listNode.href) // 释放 URL 对象document.body.removeChild(listNode) // 移除 a 标签
方法贰
原生xhr请求
/*** @function downloadUrlFile()* @method XMLHttpRequest.open(method,URL,async,username,password)* @param { string } method - 用于请求的 HTTP 方法。值包括 GET 、POST、HEAD、PUT、DELETE(不区分大小写)* @param { string } URL - 请求的主体* @param { boolean } async - 指示该请求是否应该异步执行 true-异步 false-同步* @param { string } username - 可选。为 url 所需的授权提供认证资格。如果指定了,它们会覆盖 url 自己指定的任何资格* @param { sting } password - 可选。为 url 所需的授权提供认证资格。如果指定了,它们会覆盖 url 自己指定的任何资格* @author: FORTUNATE* @date: 2021-12-17 09:55:29* @description:method - 创建http请求,说明XMLHttpRequest对象从哪里获取数据* @description:function - 将二进制数据流转为文件下载*/export function downloadUrlFile(url, fileName) {const url2 = url.replace(/\\/g, "/");// 创建XMLHttpRequest对象const xhr = new XMLHttpRequest();// 创建http请求,说明XMLHttpRequest对象从哪里获取数据 => XMLHttpRequest.open()xhr.open("GET", url2, true);// XMLHttpRequest.responseType 设置响应类型 => blob(一个包含二进制的Blob对象)xhr.responseType = "blob";// 为了避免大文件影响用户体验,建议加loadingxhr.onload = () => {// 判断XMLHttpRequest对象异步请求是否成功结束if (xhr.status === 200) {// 获取文件blob数据并保存saveAs(xhr.response, fileName);}};// HTTP 请求发到Web 服务器上去xhr.send();}function saveAs(data, name) {const urlObject = window.URL || window.webkitURL || window;// document.createElementNS() 创建一个带有命名空间的元素节点const save_link = document.createElementNS("http://www.w3.org/1999/xhtml","a");save_link.href = urlObject.createObjectURL(new Blob([data]));save_link.download = name;save_link.click();}
查找两个数组中不同的元素
应用场景:比较两个数组(新旧数组)获取当前新增的数据项
const mergeSelectedRowKeys = Array.from(new Set([...selectedRowKeys, ...newSelectedRowKeys]))/* 当前选中的元素 */const currentRowKeys = [...mergeSelectedRowKeys?.filter(item => !selectedRowKeys?.includes(item)), ...mergeSelectedRowKeys?.filter(item => !newSelectedRowKeys?.includes(item))]
CSS样式文字超出出现省略号
display: -webkit-box;-webkit-box-orient: vertical;-webkit-line-clamp: 2;text-overflow: ellipsis;word-break: break-all;overflow: hidden;
text-overflow: ellipsis;white-space: nowrap;overflow: hidden;
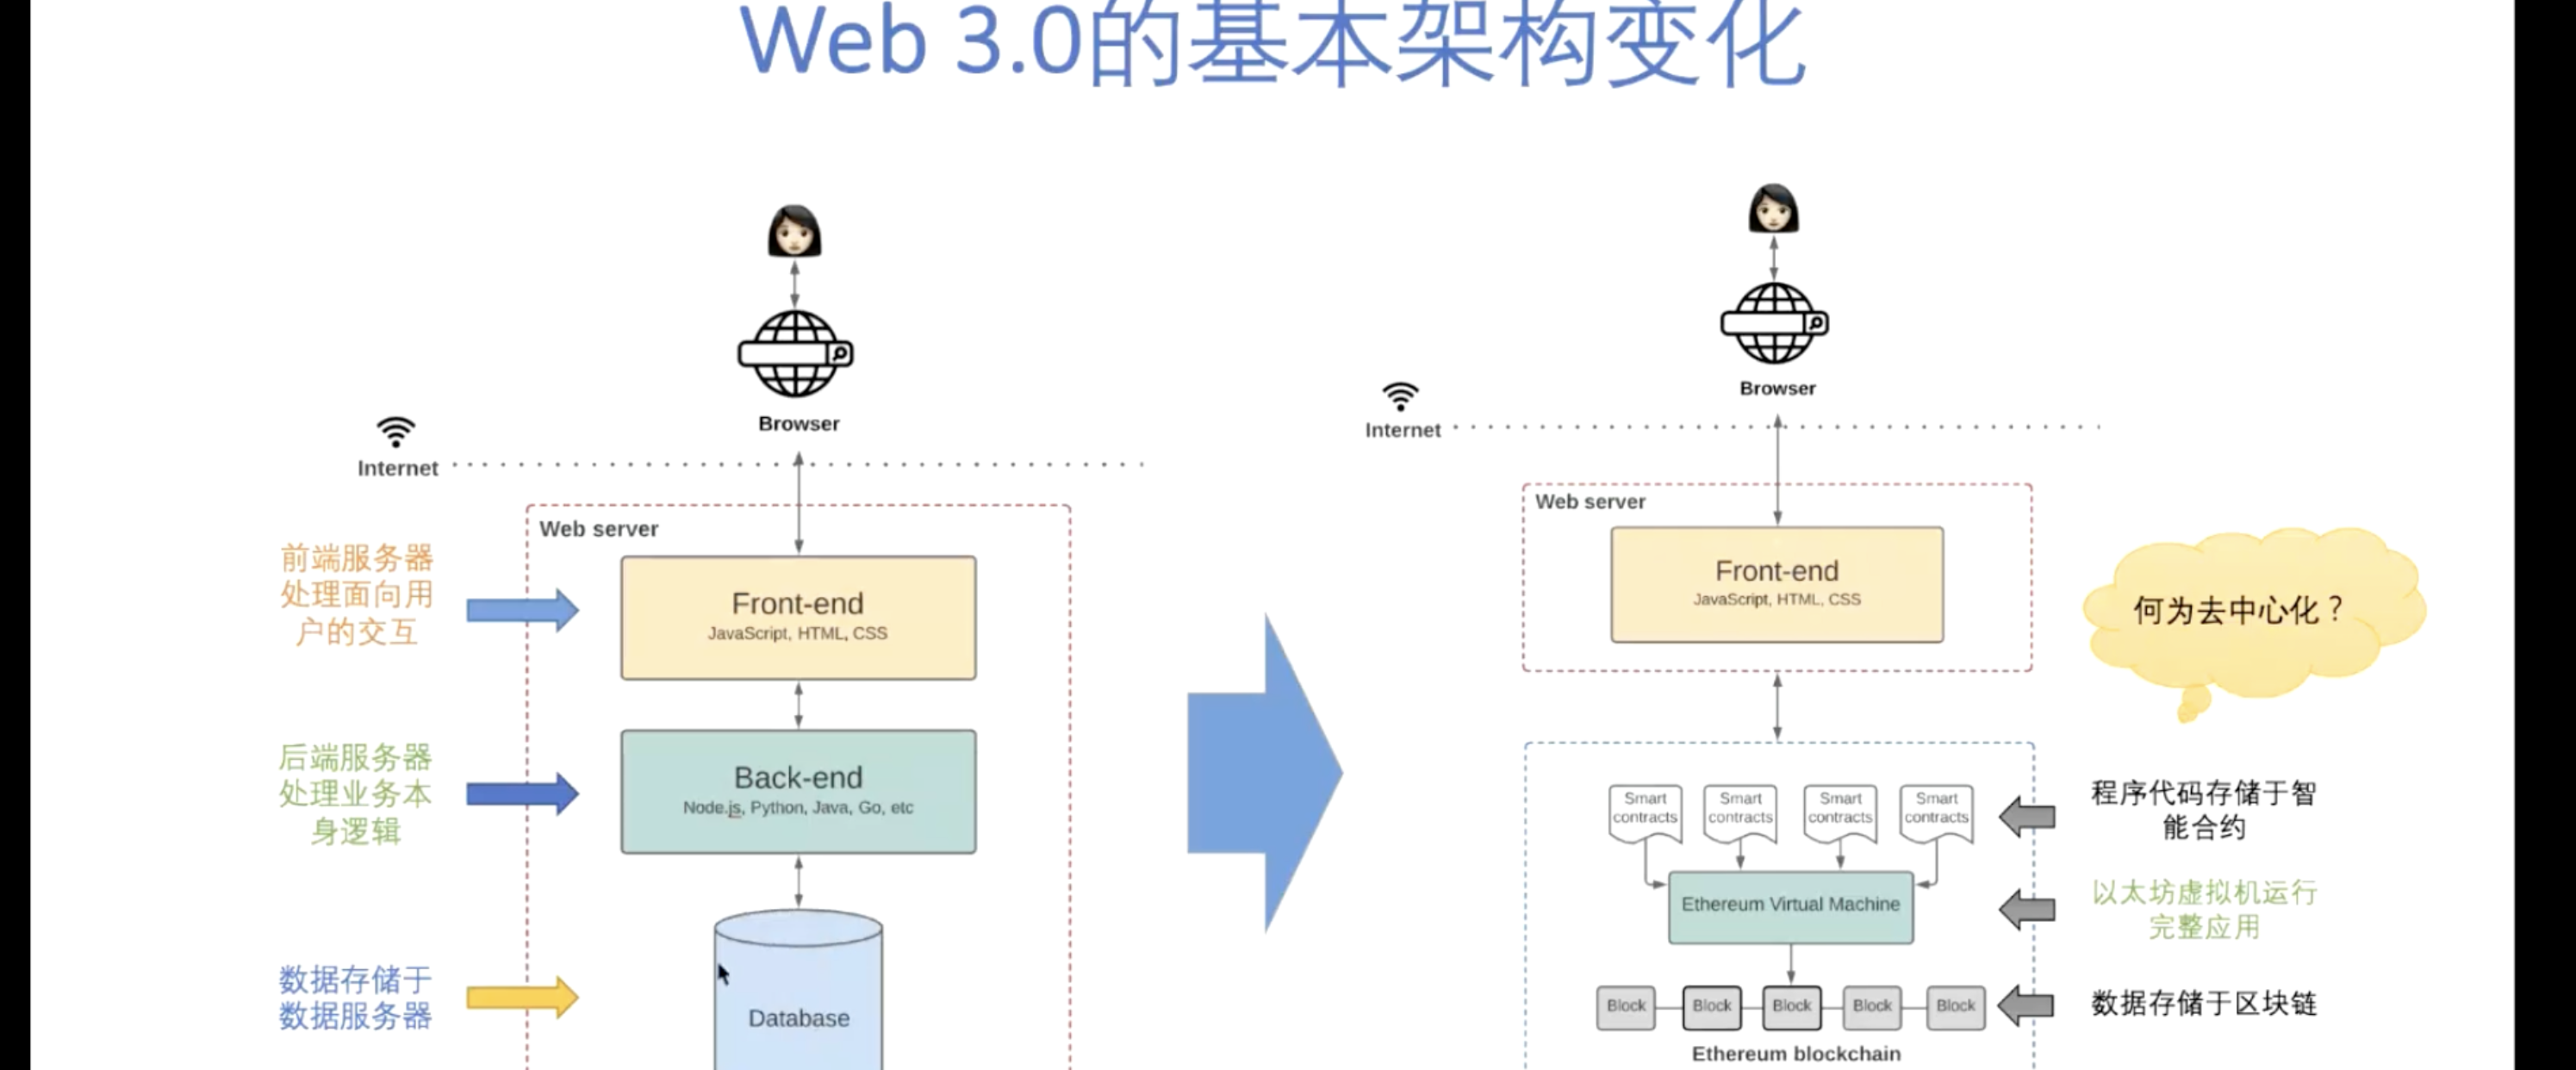
Web3.0架构
Formily(前端表单解决方案)
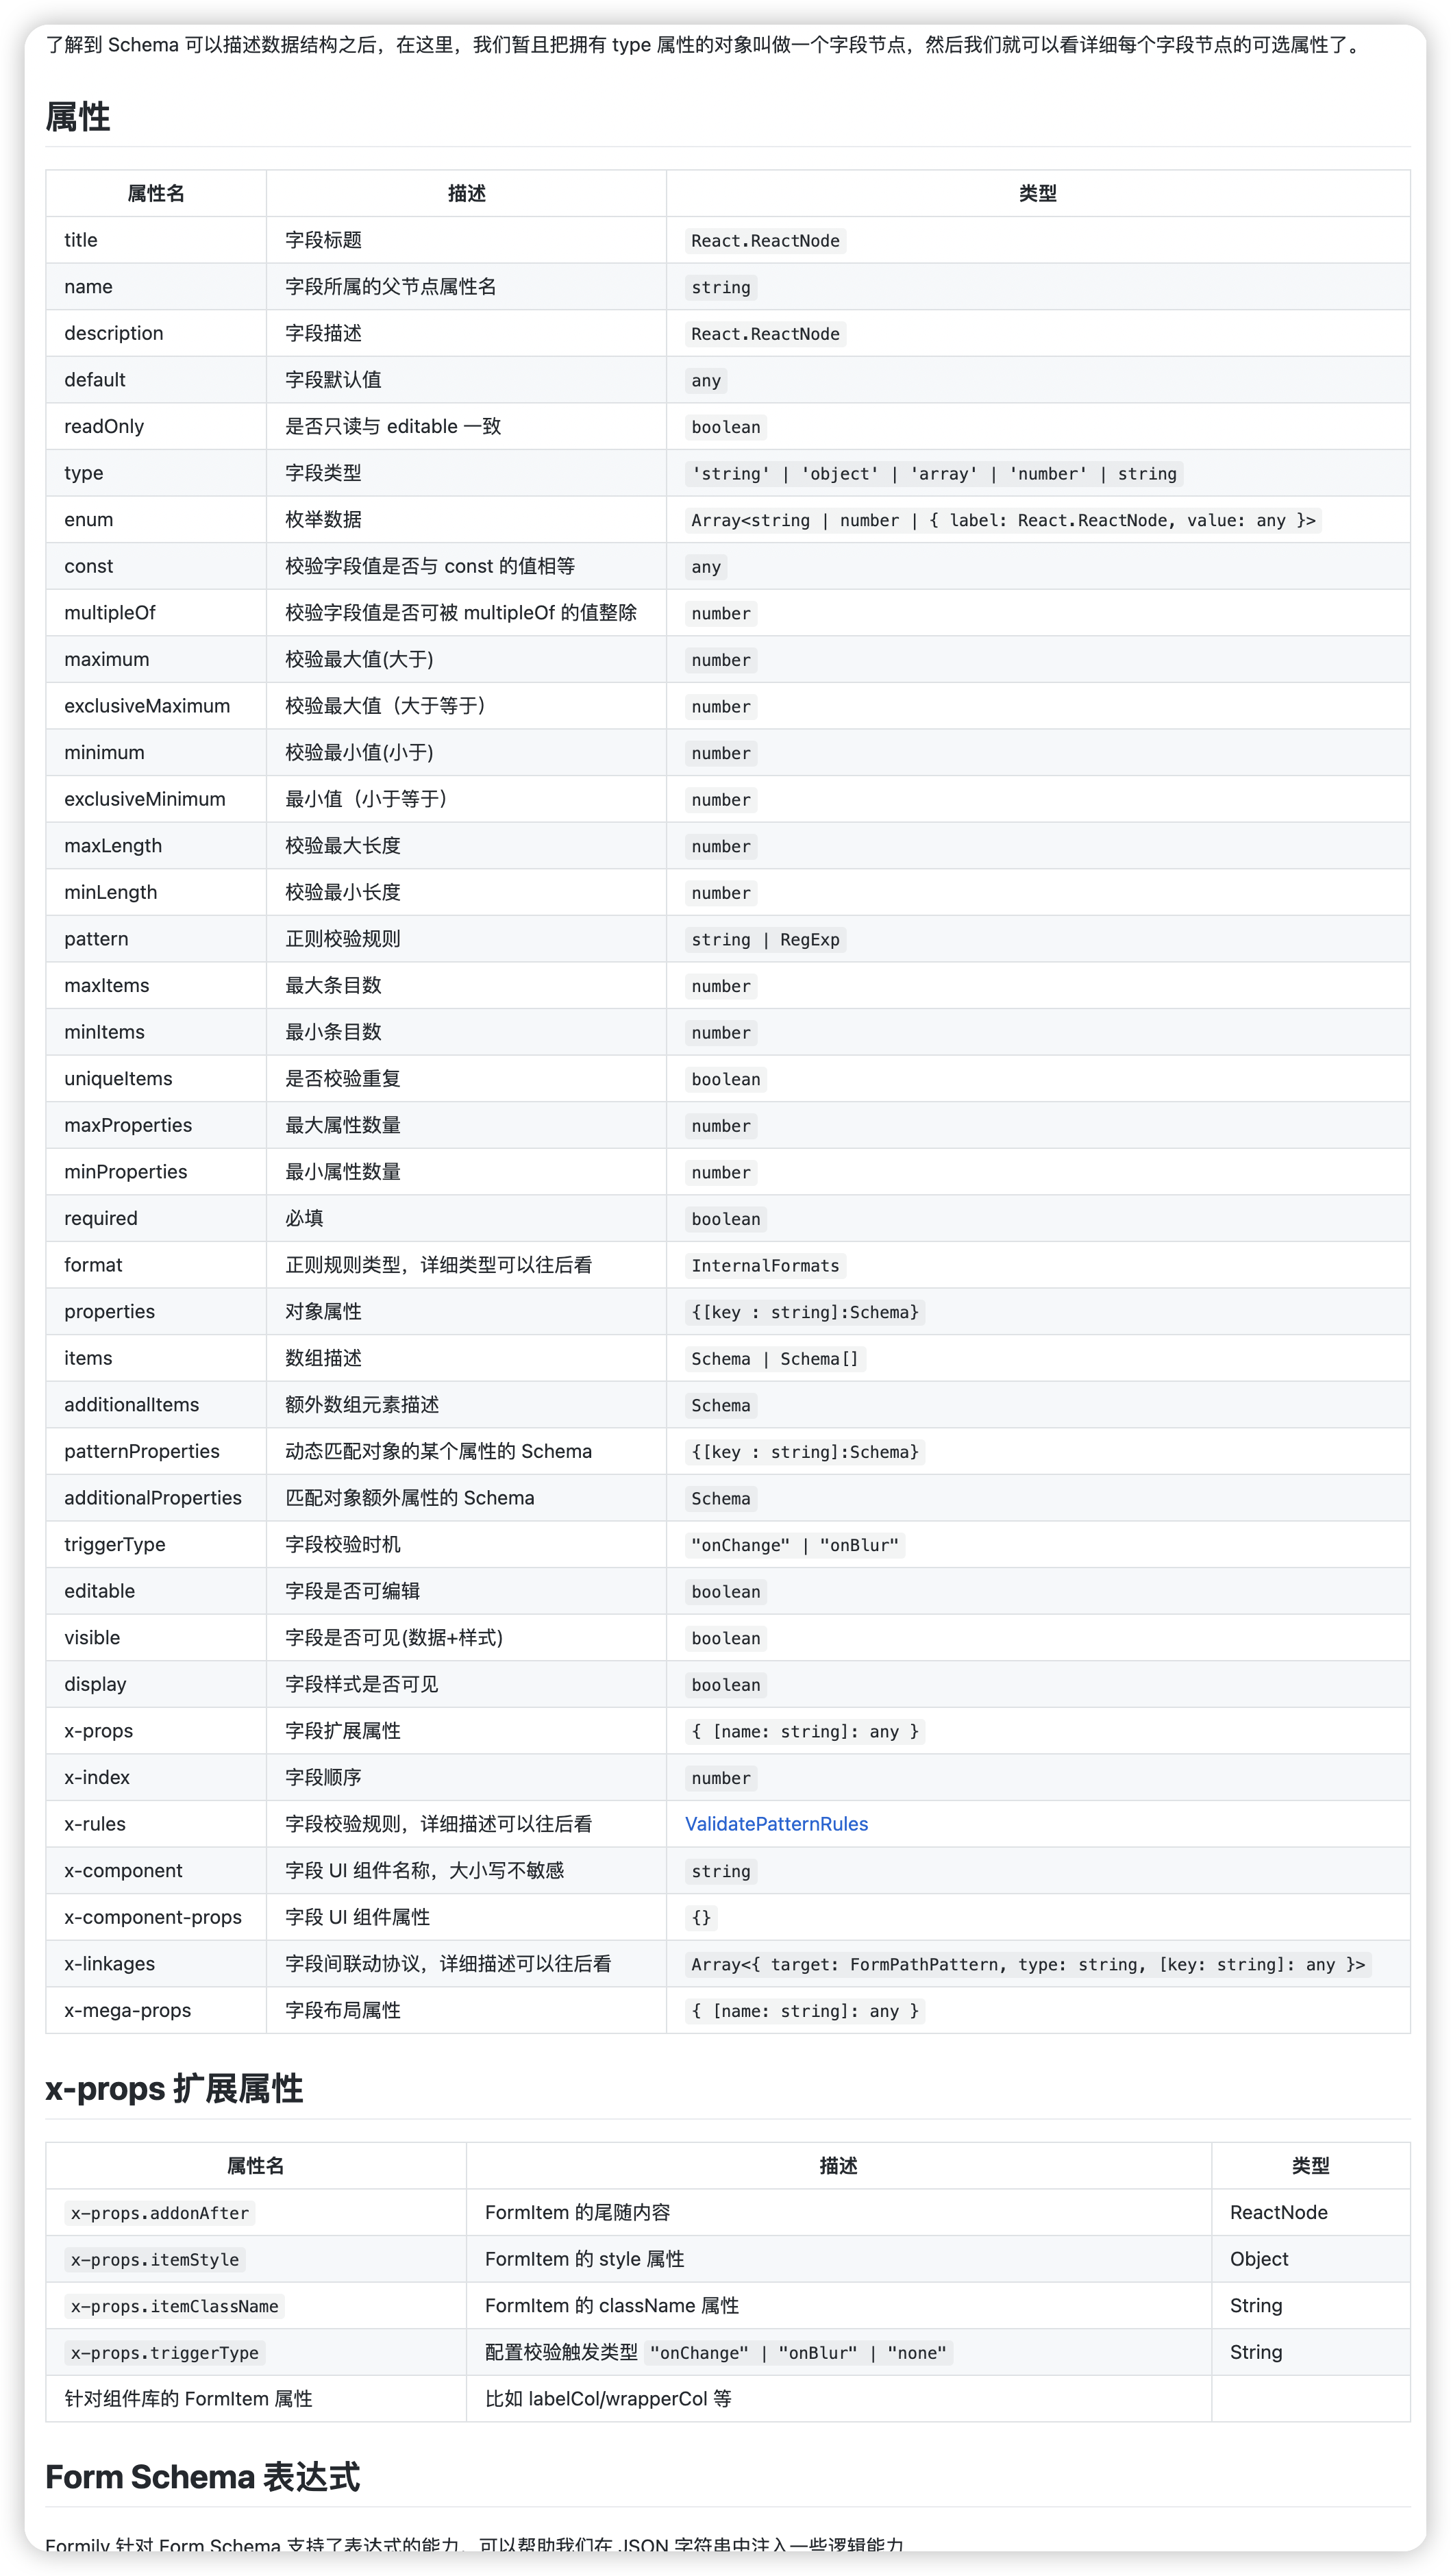
理解Schema部分

在 Formily 中,主要有三种开发模式,主要是:
- JSON Schema 开发表单
- 该方案主要用于后端动态渲染表单
- JSX Schema 开发表单
- 该方案主要用于后端动态渲染表单的过渡形态,Schema 在前端维护,方便未来迁移后端动态渲染模式
- 纯 JSX(源码) 开发表单
- 该方案主要用于纯前端开发方式,或者在前两个方案的自定义组件内部的开发以复合形态来开发。
<SchemaFormactions={actions}editable={!readOnlyflag}labelAlign={'left'}defaultValue={defaultValue}schema={schema}formItemComponent={(res) => TooltipFormItem({ isSingleOrderDetail, ...res })}virtualFields={{'ADD_GROUP': GroupItem,// 'TABLE_FORM': TooltipFormItem}}components={}effects={() => {}}/>
Schema对象
{{type: 'object','x-component-props': {labelCol: 7,wrapperCol: 12},properties: {string: {type: 'string',title: 'String','x-component': 'Input'}}}}
基本使用案例(Field组件与schema对象)
import React from 'react'import ReactDOM from 'react-dom'import {SchemaForm,SchemaMarkupField as Field,FormButtonGroup,Submit,Reset} from '@formily/antd' // 或者 @formily/nextimport { Input } from 'antd'import 'antd/dist/antd.css'const App = () => {return (<SchemaFormcomponents={{ Input }}onSubmit={values => {console.log(values)}}><Field type="string" name="name" title="Name" x-component="Input" /><FormButtonGroup><Submit>查询</Submit><Reset>重置</Reset></FormButtonGroup></SchemaForm>)}/*JSON Schema写法const App = () => {const { form, table } = useFormTableQuery(service)return (<SchemaFormcomponents={{ Input }}schema={{type:"object",properties:{name:{type:"string",title:"Name",x-component":"Input"}}}}onSubmit={(values)=>{console.log(values)}}><FormButtonGroup><Submit>查询</Submit><Reset>重置</Reset></FormButtonGroup></SchemaForm>)}*/ReactDOM.render(<App />, document.getElementById('root'))
案例解析
- SchemaForm 的 components 属性可以传入任意一个只要满足 value/onChange 属性的组件
- Field 组件代表每个 json schema 的一个原子描述节点,它的属性与 json schema 完全等价。
- Field 指定 x-component 的名称会和 SchemaForm 属性传入的 components 映射起来。
Formily实现只读样式效果
import React, { useEffect, useState } from 'react'import ReactDOM from 'react-dom'import {SchemaForm,SchemaMarkupField as Field,FormButtonGroup,Submit,Reset} from '@formily/antd' // 或者 @formily/nextimport Printer from '@formily/printer'import {Input,Radio,Checkbox,Select,DatePicker,NumberPicker,TimePicker,Upload,Switch,Range,Transfer,Rating} from '@formily/antd-components' // 或者@formily/next-componentsimport 'antd/dist/antd.css'const components = {Input,Radio: Radio.Group,Checkbox: Checkbox.Group,TextArea: Input.TextArea,NumberPicker,Select,Switch,DatePicker,DateRangePicker: DatePicker.RangePicker,YearPicker: DatePicker.YearPicker,MonthPicker: DatePicker.MonthPicker,WeekPicker: DatePicker.WeekPicker,TimePicker,TimeRangePicker: TimePicker.RangePicker,Upload,Range,Rating,Transfer}const getInitialValues = () => {return new Promise(reslove => {setTimeout(() => {reslove({daterange: ['2018-12-19', '2018-12-19'],string: 'this is string',radio: '2',checkbox: ['2', '3', '4'],textarea:'this is long text.this is long text.this is long text.this is long text.this is long text.',rating: 3,transfer: [1, 2],range: 384,date: '2020-02-20',month: '2020-08',year: '2023',time: '22:29:53',timerange: ['9:00:00', '18:00:00'],week: '2020-9th',number: 123,boolean: true,select: '2'})}, 1000)})}const App = () => {const [initialValues, setIntialValues] = useState({})useEffect(() => {getInitialValues().then(initialValues => {setIntialValues(initialValues)})}, [])return (<Printer><SchemaForminitialValues={initialValues}labelCol={5}wrapperCol={14}editable={false}components={components}><Field type="string" title="String" name="string" x-component="Input" /><Fieldtype="string"enum={['1', '2', '3', '4']}title="Radio"name="radio"x-component="Radio"/><Fieldtype="string"enum={['1', '2', '3', '4']}title="Select"name="select"x-component="Select"/><Fieldtype="string"enum={['1', '2', '3', '4']}title="Checkbox"name="checkbox"x-component="Checkbox"/><Fieldtype="string"title="TextArea"name="textarea"x-component="TextArea"/><Fieldtype="number"title="数字选择"name="number"x-component="NumberPicker"/><Fieldtype="boolean"title="开关选择"name="boolean"x-component="Switch"/><Fieldtype="string"title="日期选择"name="date"x-component="DatePicker"/><Fieldtype="array<date>"title="日期范围"default={['2018-12-19', '2018-12-19']}name="daterange"x-component="DateRangePicker"/><Fieldtype="string"title="年份"name="year"x-component="YearPicker"/><Fieldtype="string"title="月份"name="month"x-component="MonthPicker"/><Fieldtype="string"title="时间"name="time"x-component="TimePicker"/><Fieldtype="string"title="时间范围"name="timerange"x-component="TimeRangePicker"/><Field type="string" title="周" name="week" x-component="WeekPicker" /><Fieldtype="array"title="卡片上传文件"name="upload"x-component-props={{ listType: 'card' }}x-component="Upload"/><Fieldtype="array"title="拖拽上传文件"name="upload2"x-component-props={{ listType: 'dragger' }}x-component="Upload"/><Fieldtype="array"title="普通上传文件"name="upload3"x-component-props={{ listType: 'text' }}x-component="Upload"/><Fieldtype="number"title="范围选择"name="range"x-component-props={{ min: 0, max: 1024, marks: [0, 1024] }}x-component="Range"/><Fieldtype="number"enum={[{ key: 1, title: '选项1' },{ key: 2, title: '选项2' }]}x-component-props={{ render: item => item.title }}title="穿梭框"name="transfer"x-component="Transfer"/><Field type="number" title="等级" name="rating" x-component="Rating" /><FormButtonGroup offset={5}><Submit>查询</Submit><Reset>重置</Reset></FormButtonGroup></SchemaForm></Printer>)}ReactDOM.render(<App />, document.getElementById('root'))
案例解析
- 与编辑页相似,需要用 initialValues 来传递异步默认值
- 借助 editable 属性可以全局控制所有表单项变为阅读态,目前只针对简单数据类型的组件支持阅读,其他组件会以 disabled 状态显示
- 使用 Printer 组件,它内部会拦截 actions.getFormSchema,点击 Print JSON Schema 可以查看 JSX Schema 等价转换的 JSON Schema 形式
实现一些联动逻辑
- 模式分类
- 一对多联动(A—>B,A—>C,A—>D)
- 多对一联动(B—>A,C—>A,D—>A)
- 链式联动(A—>B,B—>C,C—>D)
- 循环联动(A—>B,B—>C,C—>A)
- 控制分类
- 控制显示隐藏
- 控制值
- 控制校验信息或校验规则
- 控制组件属性(只读/禁用/文案/加载态等等)
- 结构分类
- 对象结构的字段间联动
- 自增数组结构的字段间联动
- 其他联动
- 联动发生前存在异步取数
- 表单之外的组件与表单内字段的联动
🥘 联动的最终操作是操作具体字段的状态,可以是值,可以是它的显示隐藏,也可以是具体组件属性等等。
onFieldValueChange$('aa').subscribe(fieldState => {setFieldState('bb', state => {state.visible = fieldState.value === 123})})
- 这是一段伪代码,但是它也是实际 Formily 写联动逻辑的代码,
- 以上代码首先是监听了表单的生命周期,指定监听 aa 字段的变化,监听函数会返回一个 Rxjs 的 Observable 对象
- 然后根据变化的值去控制 bb 字段的状态,例子中是控制了 bb 的显示隐藏状态,
- 当 aa 的值为 123 时会控制 bb 字段的显示,否则隐藏
🛺词汇扫盲 subscribe:订阅
")
import React, { useEffect, useState } from 'react'import ReactDOM from 'react-dom'import {SchemaForm,SchemaMarkupField as Field,FormButtonGroup,FormEffectHooks,Submit,Reset} from '@formily/antd' // 或者 @formily/nextimport Printer from '@formily/printer'import { merge } from 'rxjs'import { Input, Select } from '@formily/antd-components' // 或者@formily/next-componentsimport 'antd/dist/antd.css'const components = {Input,Select}const { onFieldValueChange$, onFieldInit$ } = FormEffectHooksconst App = () => {return (<Printer><SchemaFormlabelCol={5}wrapperCol={14}components={components}effects={({ setFieldState }) => {merge(onFieldValueChange$('aa'), onFieldInit$('aa')).subscribe(fieldState => {setFieldState('bb', state => {state.visible = fieldState.value === 123})})}}><Fieldtype="string"title="AA"enum={[{ label: '123', value: 123 },{ label: '321', value: 321 }]}name="aa"x-component="Select"/><Field type="string" title="BB" name="bb" x-component="Input" /><FormButtonGroup offset={5}><Submit>查询</Submit><Reset>重置</Reset></FormButtonGroup></SchemaForm></Printer>)}ReactDOM.render(<App />, document.getElementById('root'))
案例解析
- 在 SchemaForm 组件属性上传入 effects 函数,所有联动操作统一在 effects 中实现
- FormEffectHooks 中包含表单所有生命周期钩子,调用生命周期钩子会返回 Rxjs 的 Observable 对象
- 借助 merge 操作符对字段初始化和字段值变化的时机进行合流,这样联动发生的时机会在初始化和值变化的时候发生
- 使用 Printer 组件,它内部会拦截 actions.getFormSchema,点击 Print JSON Schema 可以查看 JSX Schema 等价转换的 JSON Schema 形式
用户可以借助 createVirtaulBox 自己创建布局组件,每个布局组件都有一个 name 属性,可以用于联动控制显示隐藏

import React, { useState } from 'react'import ReactDOM from 'react-dom'import {SchemaForm,SchemaMarkupField as Field,FormButtonGroup,Submit,Reset,FormEffectHooks} from '@formily/antd'import { Button } from 'antd'import Printer from '@formily/printer'import {Input,Radio,Checkbox,Select,DatePicker,NumberPicker,TimePicker,Upload,Switch,Range,Transfer,Rating,FormItemGrid,FormTextBox,FormCard,FormBlock,FormLayout} from '@formily/antd-components' // 或者@formily/next-componentsimport 'antd/dist/antd.css'const components = {Input,Radio: Radio.Group,Checkbox: Checkbox.Group,TextArea: Input.TextArea,NumberPicker,Select,Switch,DatePicker,DateRangePicker: DatePicker.RangePicker,YearPicker: DatePicker.YearPicker,MonthPicker: DatePicker.MonthPicker,WeekPicker: DatePicker.WeekPicker,TimePicker,Upload,Range,Rating,Transfer}const App = () => {const [state, setState] = useState({ editable: true })return (<Printer><SchemaFormeditable={state.editable}labelCol={8}wrapperCol={6}components={components}effects={({ setFieldState }) => {FormEffectHooks.onFieldValueChange$('bbb').subscribe(({ value }) => {setFieldState('detailCard', state => {state.visible = value})})}}><FormCard title="基本信息"><Field name="aaa" type="string" title="字段1" x-component="Input" /><Fieldname="bbb"type="number"title="控制详细信息显示隐藏"enum={[{ value: true, label: '显示' },{ value: false, label: '隐藏' }]}default={true}x-component="Select"/><Fieldname="ccc"type="date"title="字段3"x-component="DatePicker"/></FormCard><FormCard title="详细信息" name="detailCard"><FormLayout labelCol={8} wrapperCol={12}><FormItemGrid title="字段3" gutter={10} cols={[6, 11]}><Field name="ddd" type="number" x-component="NumberPicker" /><Field name="eee" type="date" x-component="DatePicker" /></FormItemGrid><Field type="object" name="mmm" title="对象字段"><FormItemGrid gutter={10} cols={[6, 11]}><Fieldname="ddd1"default={123}type="number"x-component="NumberPicker"/><Fieldname="[startDate,endDate]"type="daterange"x-component="DateRangePicker"/></FormItemGrid></Field></FormLayout><FormLayout labelCol={8} wrapperCol={16}><FormTextBoxtitle="文本串联"text="订%s元/票 退%s元/票 改%s元/票"gutter={8}><Fieldtype="string"default={10}requiredname="aa1"x-props={{ style: { width: 80 } }}description="简单描述"x-component="Input"/><Fieldtype="number"default={20}requiredname="aa2"description="简单描述"x-component="NumberPicker"/><Fieldtype="number"default={30}requiredname="aa3"description="简单描述"x-component="NumberPicker"/></FormTextBox></FormLayout><Field name="aas" type="string" title="字段4" x-component="Input" /><FormBlock title="区块"><Fieldname="ddd2"type="string"title="字段5"x-component="Input"/><Fieldname="eee2"type="string"title="字段6"x-component="Input"/></FormBlock></FormCard><FormButtonGroup offset={8} sticky><Submit>提交</Submit><Buttontype="primary"onClick={() => setState({ editable: !state.editable })}>{state.editable ? '详情' : '编辑'}</Button><Reset>重置</Reset></FormButtonGroup></SchemaForm></Printer>)}ReactDOM.render(<App />, document.getElementById('root'))
案例解析
- FormCard/FormBlock/FormLayout/FormTextBox 都是属于布局扩展组件,这类布局组件只能在 Schema 场景中使用,如果是纯源码开发,则需要自行实现
- 每个布局组件都可以在 JSON Schema 中表示,具体可以点击 Print JSON Schema 按钮查看等价的布局组件使用方式。
- 用户可以借助 createVirtaulBox 自己创建布局组件,想看详细 API,可跳转至 API 手册中查看
- 每个布局组件都有一个 name 属性,可以用于联动控制显示隐藏
注意:Formily 布局组件不是普通的 UI 组件,它只能在 SchemaForm 中使用,放到其他地方是不能独立使用的。
实现一些校验规则
通常,我们的校验场景可以分为几类,我们可以是:
- 静态校验
- 必填校验
- 格式校验
- 提示型校验
- 其他规则性校验
- 动态校验
- 联动校验
- 异步校验
定制校验
- 定制文案
- 定制校验模板
通过 SchemaForm 的 expressionScope 属性,从顶层传递上下文,在 Schema 属性表达式中可以读取
Schema属性解读
Schema表达式
<SchemaFormschema={{type: 'object',aa: {title: '{{customTitle}}',description: '{{customDescription}}','x-component-props': {placeholder: '{{customPlaceholder}}'}}}}expressionScope={{customTitle: 'this is custom title',customDescription: 'this is custom description',customPlaceholder: 'this is custom placeholder'}}/>
例子说明:
- 通过 expressionScope 注入上下文
- 表达式要求字段值必须为字符串,同时首位字符必须是以{{开始,以}}结束,否则会被认为普通字符串,不会被编译
- 表达式编译执行只会在父组件渲染的时候执行
Form Schema 联动协议
考虑到协议层面希望做低纬度控制联动交互,所以我们抽象了一个叫做 x-linkages 的协议,帮助我们在协议层描述简单联动,注意,这个只是简单联动,它无法描述异步联动,也无法描述联动过程中的各种复杂数据处理。
抽象结构
首先,我们要理解 x-linkages 的核心抽象结构:
{"type": "string","x-linkages": [{"type": "value:visible","target": "aa","condition": "{{ $self.value === 123 }}"}]}
案例说明
- x-linkages 是一个数组结构,代表借助它可以实现 1 对多联动
- 每个数组项代表一个联动命令,需要指定联动类型 type 字段,也需要指定被联动的目标字段(target)
- target 是一个 FormPathPattern 匹配表达式,在这里我们可以使用 FormPath 的各种匹配语法
- 需要指定每个联动发生的条件(condition),由一个表达式来驱动
target 相邻路径查找
- prevPath.[].fieldName代表当前行字段
- prevPath.[+].fieldName代表下一行字段
- prevPath.[-].fieldName代表上一行字段
- prevPath.[+2].fieldName代表下下一行字段
- prevPath.[-2].fieldName代表上上一行字段
- 依次类推往下递增或者递减
target 向前路径查找
- .path.a.b代表基于当前字段路径往后计算
- ..path.a.b代表往前计算相对路径
- …path.a.b代表继续往前计算相对路径
- 以此类推向前查找
理解表单生命周期
在 Formily 表单系统中,主要由几部分构成:
- Form
- FormState
- FormLifeCycle
- Field
- FieldState
- VirtualFieldState
- FieldLifeCycle
可以看到,想要构成一个表单系统,必须要有一套完备的生命周期,才能驱动整个系统更好的运作,生命周期,就像心脏一样,它会不断的跳动,往外派发事件,借助生命周期,我们就能构建一个无限复杂的表单系统,毫不含糊的说,我们的业务逻辑,90%以上都是基于生命周期而来的。
所以,深度了解 Formily 生命周期体系之后,我们就可以更高效的开发表单了。
import React, { useEffect, useState } from 'react'import ReactDOM from 'react-dom'import {SchemaForm,SchemaMarkupField as Field,FormButtonGroup,LifeCycleTypes,Submit,Reset} from '@formily/antd' // 或者 @formily/nextimport Printer from '@formily/printer'import { merge } from 'rxjs'import { Input, Select } from '@formily/antd-components' // 或者@formily/next-componentsimport 'antd/dist/antd.css'const components = {Input,Select}const App = () => {return (<Printer><SchemaFormlabelCol={5}wrapperCol={14}components={components}effects={($, { setFieldState }) => {$(LifeCycleTypes.ON_FORM_INIT).subscribe(() => {setFieldState('aa', state => {state.value = 321})})$(LifeCycleTypes.ON_FIELD_VALUE_CHANGE, 'aa').subscribe(fieldState => {setFieldState('bb', state => {state.visible = fieldState.value === 123})})}}><Fieldtype="string"title="AA"enum={[{ label: '123', value: 123 },{ label: '321', value: 321 }]}name="aa"x-component="Select"/><Field type="string" title="BB" name="bb" x-component="Input" /><FormButtonGroup offset={5}><Submit>查询</Submit><Reset>重置</Reset></FormButtonGroup></SchemaForm></Printer>)}ReactDOM.render(<App />, document.getElementById('root'))
案例解析
- 在 effects 中使用\$订阅生命周期
- 通过订阅 ON_FORM_INIT 在表单初始化时设置字段状态
- 通过订阅 ON_FIELD_VALUE_CHANGE 在字段值变化时设置字段状态
理解action/effects
核心亮点🕑:
- 路径系统(字段查找,状态批处理,数据结构)
- 时间旅行,状态可回溯
- 可描述联动的JSON SChema协议
- 外部调用组件内部 API 的问题,这里主要是使用 actions
- 组件内部事件通知外部的问题,同时借助了 Rxjs 可以方便的处理异步事件流竞态组合问题,这里主要是使用 effects
import React, { useEffect } from 'react'import ReactDOM from 'react-dom'import {SchemaForm,SchemaMarkupField as Field,FormButtonGroup,createFormActions,Submit,Reset} from '@formily/antd' // 或者 @formily/nextimport { Input } from 'antd'import 'antd/dist/antd.css'const actions = createFormActions()const App = () => {useEffect(() => {actions.setFieldState('name', state => {state.value = 'First Name'})}, [])return (<SchemaFormactions={actions}components={{ Input }}onSubmit={values => {console.log(values)}}><Field type="string" name="name" title="Name" x-component="Input" /></SchemaForm>)}ReactDOM.render(<App />, document.getElementById('root'))
上面代码主要就是formily通过action方法去在组件加载的时候去外部调用组件内部的api,设置表单的值
案例解析
- 借助 actions,我们可以在外部自由调用 FormAPI
- 注意:调用 actions 中的 API,必须要 Form 初始化完成才能调用,其实我们真实业务逻辑通常也是会在某个异步事件完成后调用,所以对这个初始化时机问题感知不多,如果需要保证调用安全性,我们可以调用 createAsyncFormActions 来创建 actions,但是所创建出来的 actions 的内部所有 API,调用时都会返回 Promise 对象
理解表单路径系统
我们在生命周期章节中有讲到,Formily 主要由几部分构成:
- Form
- FormState
- FormLifeCycle
- Field
- FieldState
- VirtualFieldState
- FieldLifeCycle
两个实体 Form 与 Field 之间的关系是 1 对多的关系,那这些关系是怎么关联起来的呢?Formily 表单路径系统,我们可以说生命周期管理心脏,状态管理是肌肉,那么,路径系统就是血管,没有血管,整个体系就根本无法运作起来。
在 Formily 中,我们抽象了一个通用的类,叫做 FormPath ,其实它就是cool-path
这个类,提供了针对数据路径一系列的解析,匹配,取值,求值的能力。可以帮助我们在表单的很多地方高效实现业务逻辑。
下面我们具体看看怎么使用 FormPath。
FormPath 现在基本上都是内置在 Formily 中的,我们在 Formily 中主要有几个地方会用到 FormPath
- 监听字段变化
- 操作字段状态
- 解构字段
- 对路径做组合,转换操作
在这里我们主要讲前 3 个场景,最后一个,我们直接看 FormPath API 即可
匹配语法
全通配
"*"
扩展匹配
"aaa~" or "~" or "aaa~.bbb.cc"
部分通配
"a.b.*.c.*"
分组通配
"a.b.*(aa.bb.dd,cc,mm)"or"a.b.*(!aa.bb.dd,cc,mm)"
嵌套分组通配
"a.b.*(aa.bb.*(aa.b,c),cc,mm)"or"a.b.*(!aa.bb.*(aa.b,c),cc,mm)"
范围通配
"a.b.*[10:100]"or"a.b.*[10:]"or"a.b.*[:100]"
关键字通配
"a.b.[[cc.uu()sss*\\[1222\\]]]"
import React, { useEffect } from 'react'import ReactDOM from 'react-dom'import {SchemaForm,SchemaMarkupField as Field,FormButtonGroup,FormEffectHooks,createFormActions,FormPath,Submit,Reset} from '@formily/antd' // 或者 @formily/nextimport { ArrayTable, Input } from '@formily/antd-components'import { Button } from 'antd'import Printer from '@formily/printer'import 'antd/dist/antd.css'const { onFieldChange$ } = FormEffectHooksconst actions = createFormActions()const App = () => {return (<Printer><SchemaFormactions={actions}components={{ ArrayTable, Input }}onSubmit={values => {console.log(values)}}initialValues={{array: [{ aa: true, bb: '123' },{ aa: false, bb: '321' }]}}effects={({ setFieldState }) => {onFieldChange$('array.*.aa').subscribe(({ name, value }) => {setFieldState(FormPath.transform(name, /\d/, $1 => {return `array.${$1}.bb`}),state => {console.log(name, value, state.name)state.visible = !!value})})}}><Field type="array" name="array" title="Name" x-component="ArrayTable"><Field type="object"><Fieldtype="string"name="aa"title="控制相邻字段显示隐藏"enum={[{ label: '显示', value: true },{ label: '隐藏', value: false }]}x-component="Input"/><Field type="string" name="bb" title="BB" x-component="Input" /></Field></Field><FormButtonGroup><ButtononClick={() => {const mutators = actions.createMutators('array')mutators.push({})}}>Add</Button></FormButtonGroup></SchemaForm></Printer>)}ReactDOM.render(<App />, document.getElementById('root'))
案例解析
- 在 onFieldValueChange$入参中使用*批量匹配数组第 n 项的 aa 字段
- 使用 FormPath.transform 将一个路径转换成另外一个路径,目前该例子主要用于转换成相邻路径
import React from 'react'import ReactDOM from 'react-dom'import {SchemaForm,SchemaMarkupField as Field,FormButtonGroup,Submit,Reset,FormPath} from '@formily/antd'import { Select, FormLayout } from '@formily/antd-components'import { Button } from 'antd'import Printer from '@formily/printer'import 'antd/dist/antd.css'const MyComponent = ({ value, onChange }) => {return (<div><ButtononClick={() => {onChange({aa: {bb: {cc: 123,dd: [333, 444],ee: 'abcde'}}})}}>点击上传复杂数据</Button><code><pre>{JSON.stringify(value, null, 2)}</pre></code></div>)}const App = () => (<Printer><SchemaFormcomponents={{MyComponent,Select}}effects={($, { setFieldState }) => {$('onFieldChange', 'wrapper.relation').subscribe(({ value }) => {setFieldState('wrapper.{aa:{bb:{cc:destructor1,dd:[ destructor2, destructor3 ],ee}}}',state => {state.visible = value == 2})})}}><Field type="object" name="wrapper"><FormLayout labelCol={6} wrapperCol={6}><Fieldname="relation"type="number"title="隐藏复杂解构"default={1}enum={[{ label: '是', value: 1 },{ label: '否', value: 2 }]}x-component="Select"/><Fieldtype="object"name="{aa:{bb:{cc:destructor1,dd:[destructor2,destructor3],ee}}}"title="复杂解构"requiredx-component="MyComponent"/></FormLayout></Field><FormButtonGroup offset={6}><Submit>点击查看解构结果</Submit><Reset /></FormButtonGroup></SchemaForm></Printer>)ReactDOM.render(<App />, document.getElementById('root'))
name属性就相当于是字段在schema中的地址,追溯到这个节点字段就是通过这个字段去查找,也就死对象中的key值,它包裹的对象部分区域
理解传值属性
在 Formily 中,不管是 SchemaForm 组件还是 Form 组件,都支持 3 个传值属性
- value 受控值属性
- 主要用于外部多次渲染同步表单值的场景,但是注意,它不会控制默认值,点击重置按钮的时候值会被置空
- defaultValue 同步初始值属性
- 主要用于简单同步默认值场景,限制性较大,只保证第一次渲染生效,重置不会被置空
- initialValues 异步初始值属性
在前面的很多例子中,其实我们或多或少已经接触到了表单状态的概念,特别是实现联动逻辑的过程中,我们都是收敛到了设置字段状态,那么我们的表单到底有哪些状态呢?
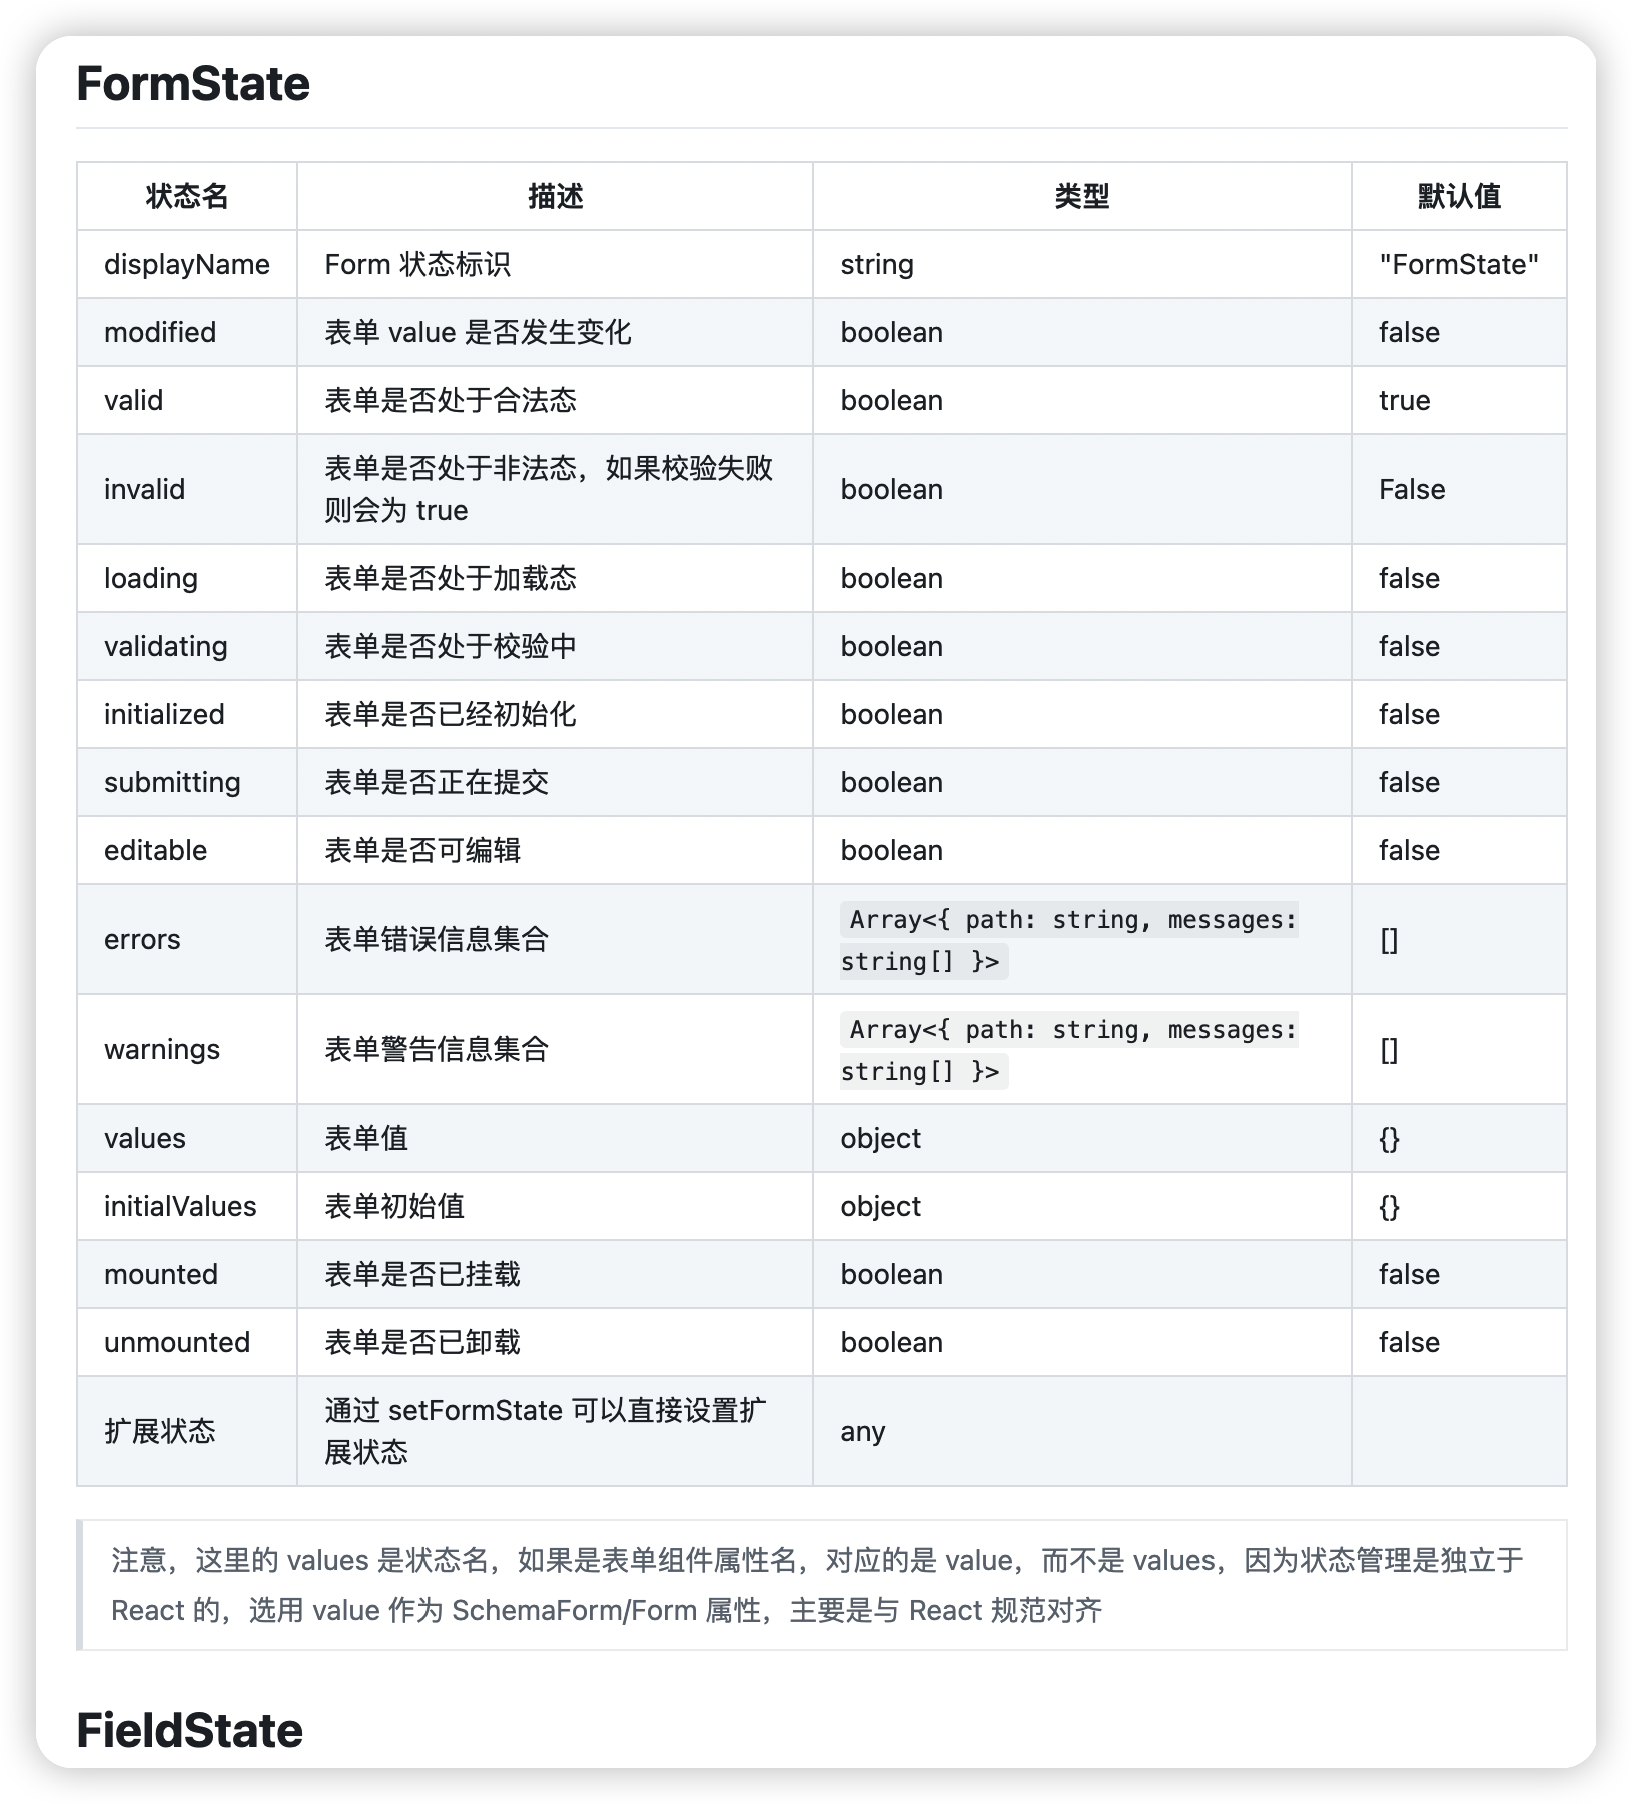
注意,这里的 values 是状态名,如果是表单组件属性名,对应的是 value,而不是 values,因为状态管理是独立于 React 的,选用 value 作为 SchemaForm/Form 属性,主要是与 React 规范对齐
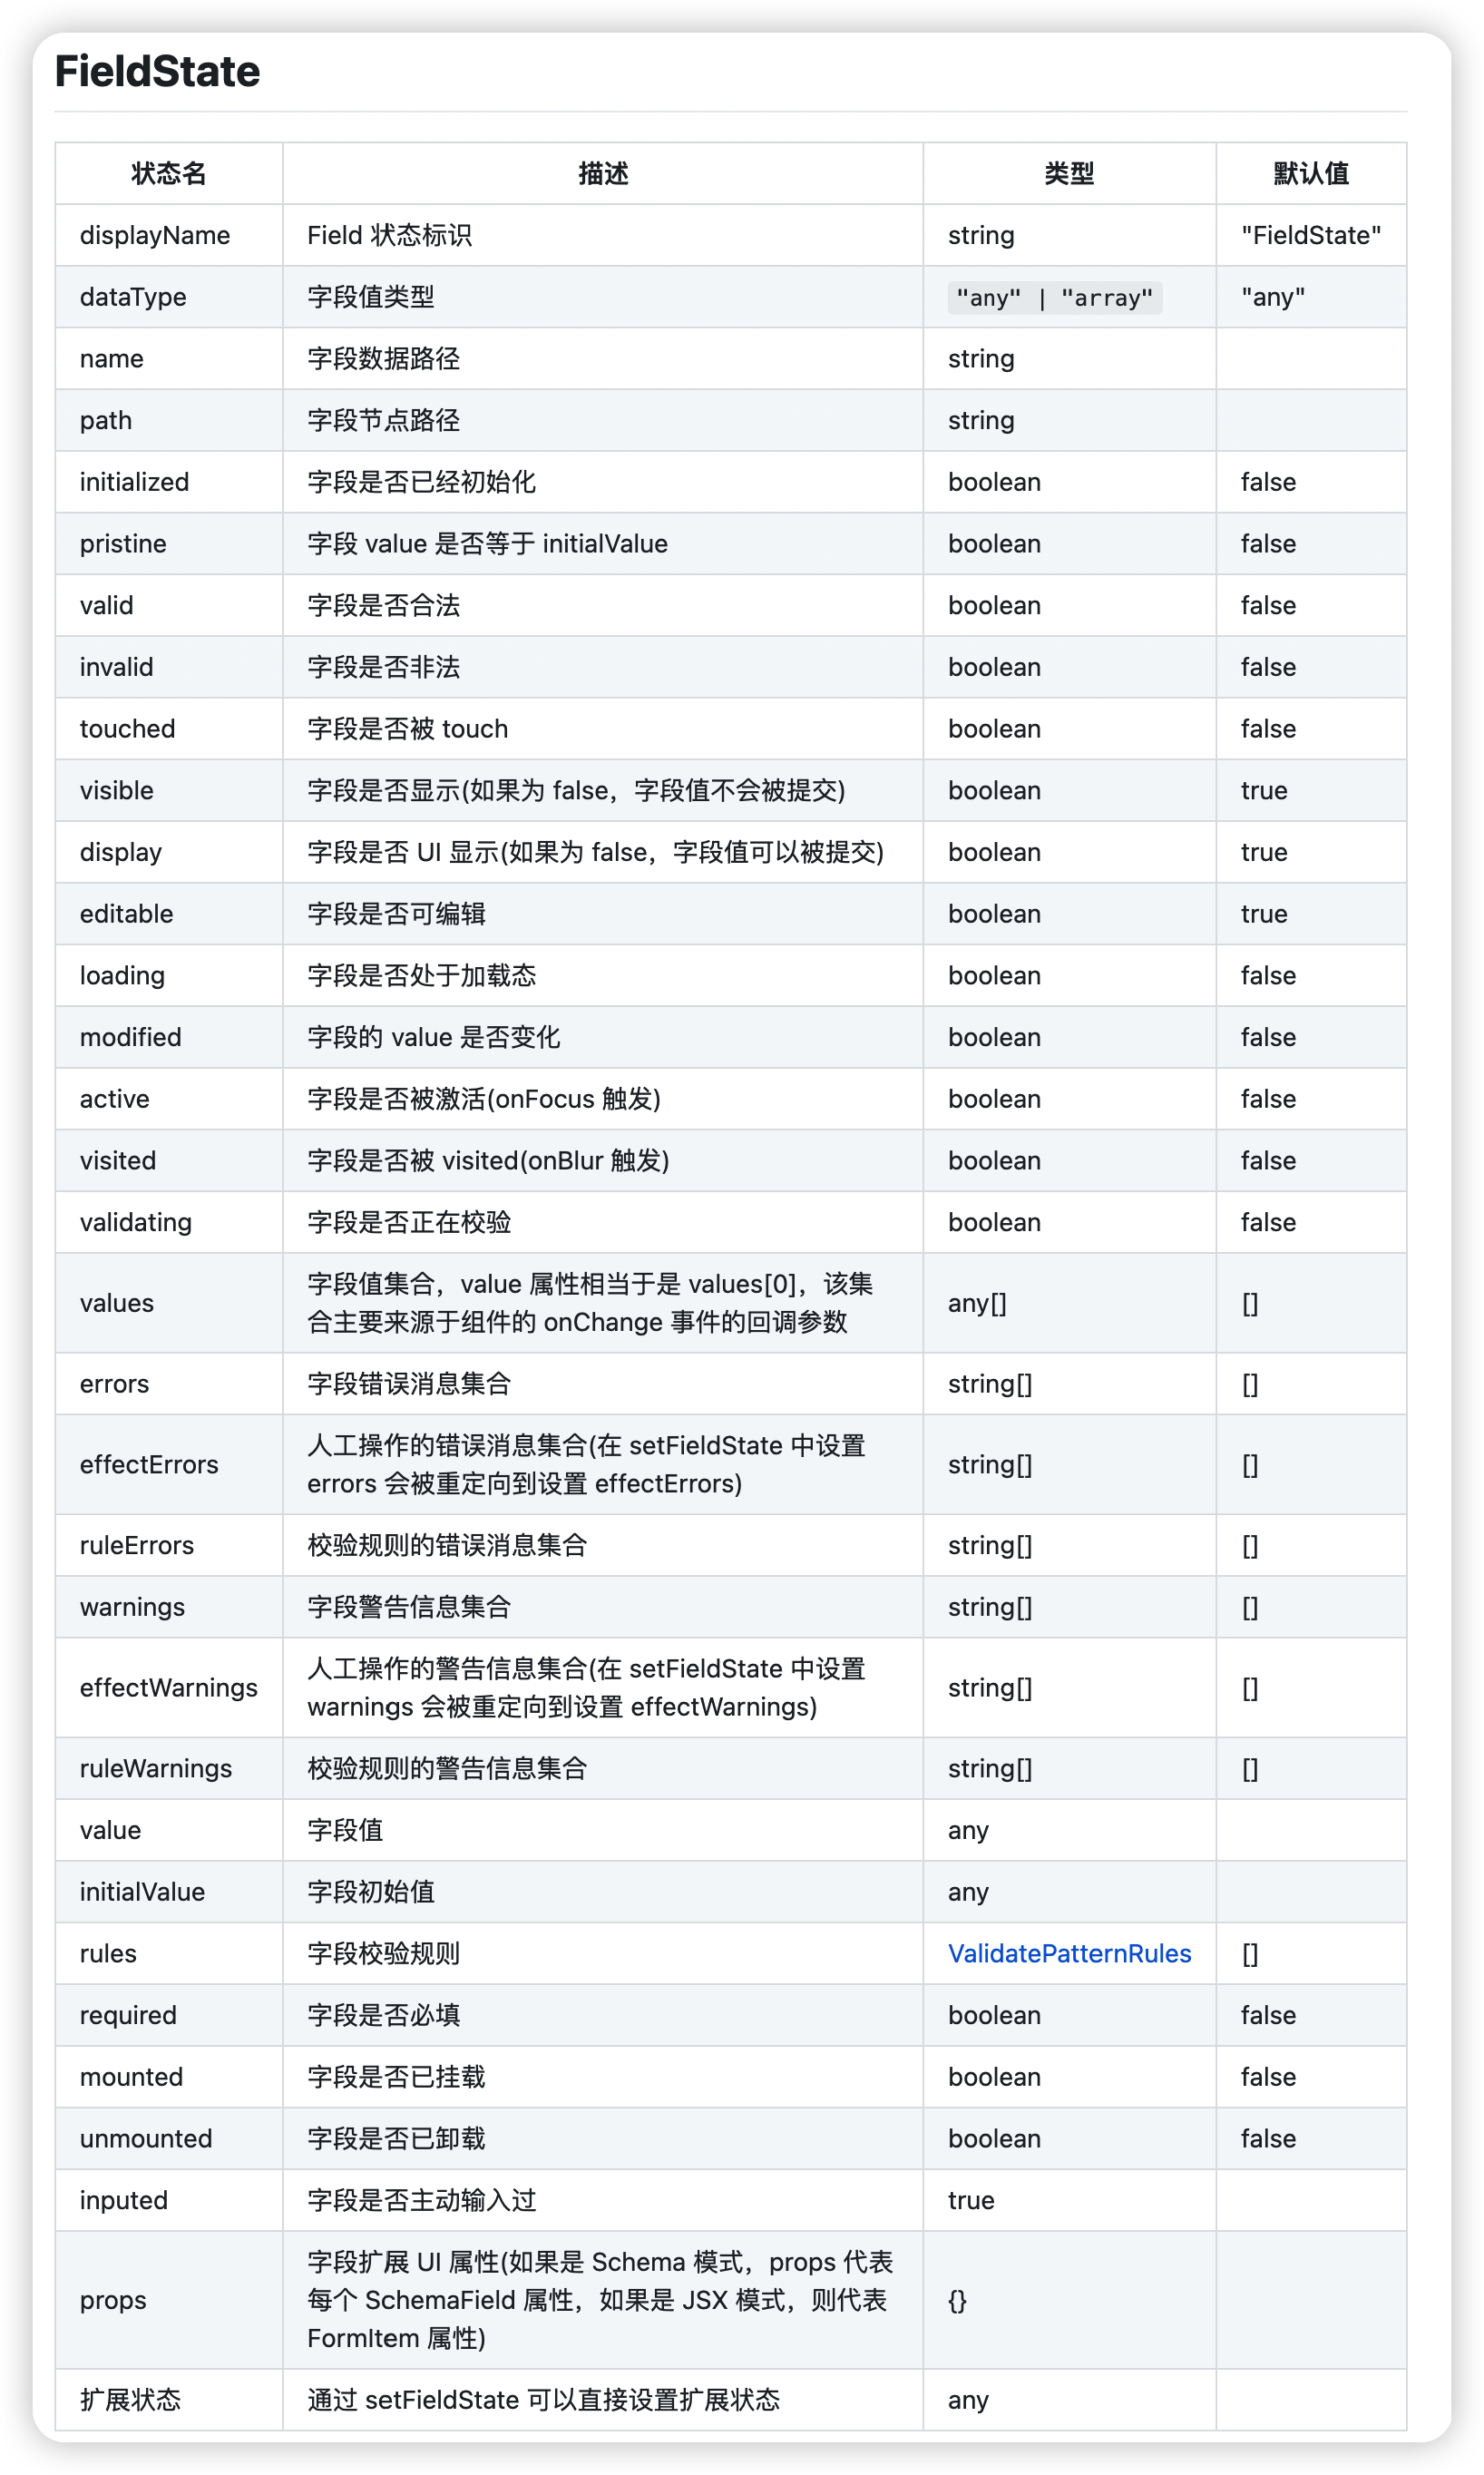
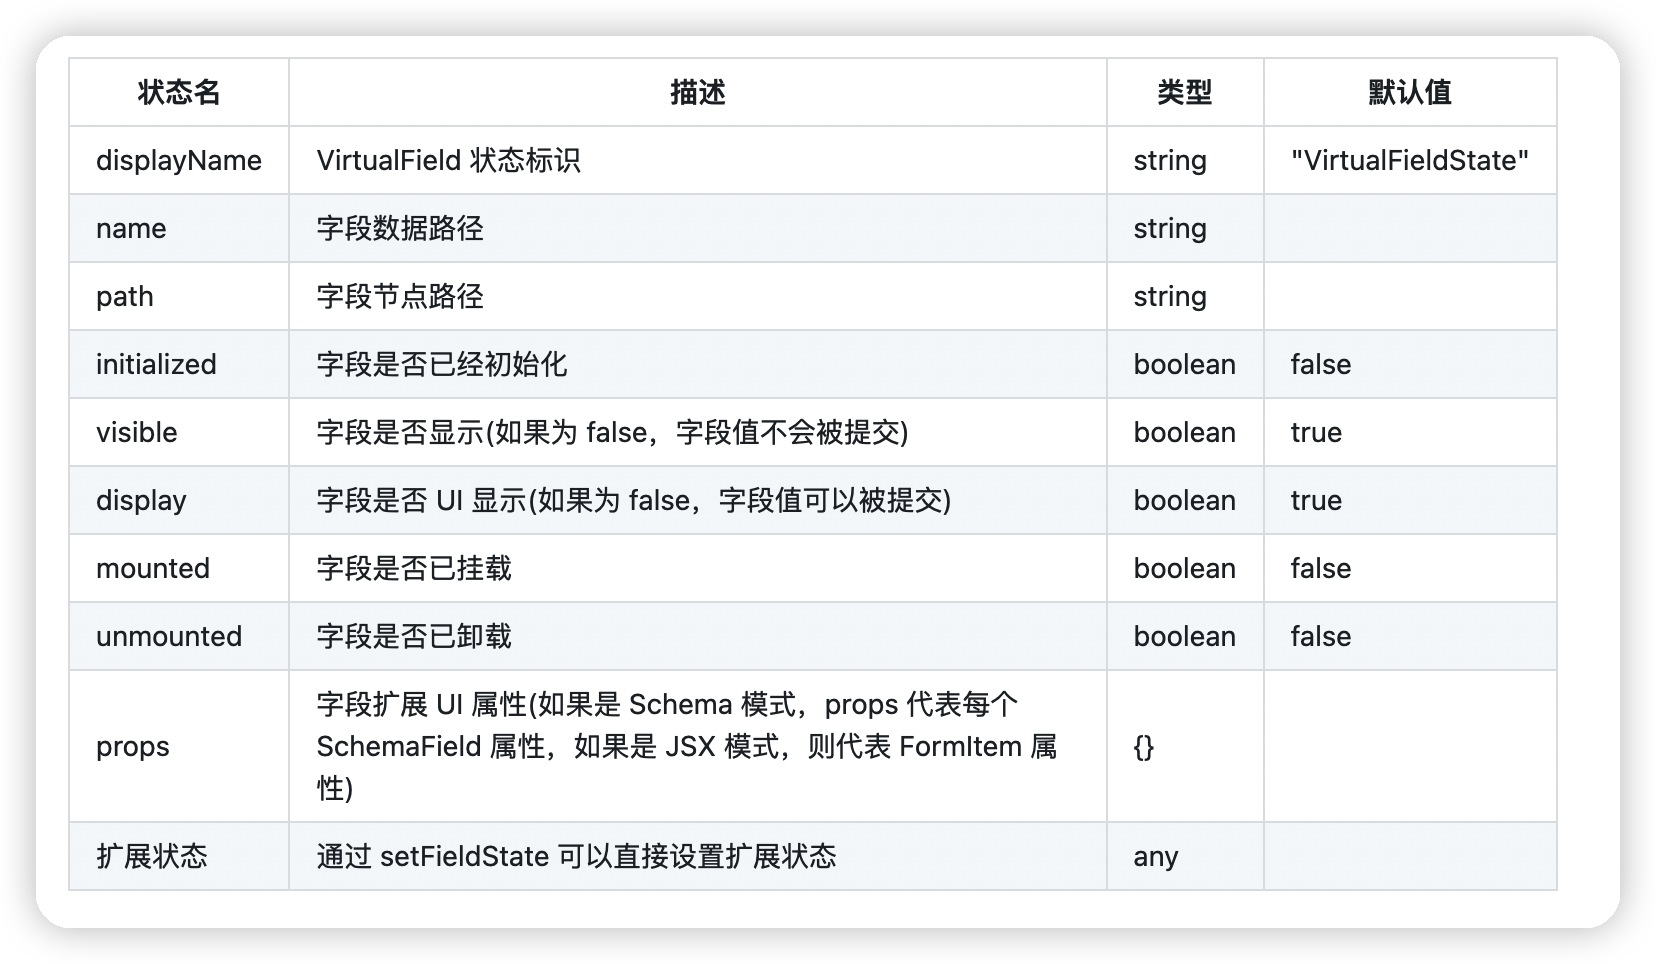
VirtualFieldState
VirtualFieldState 代表 VirtualField 的状态,VirtualField 是 Formily 节点树中的虚拟节点,它是无值节点,所以提交的时候,不会带值,但是我们又能控制它的具体 UI 属性,所以在 Formily 中,它更多的职责是作为布局组件而存在
理解表单布局
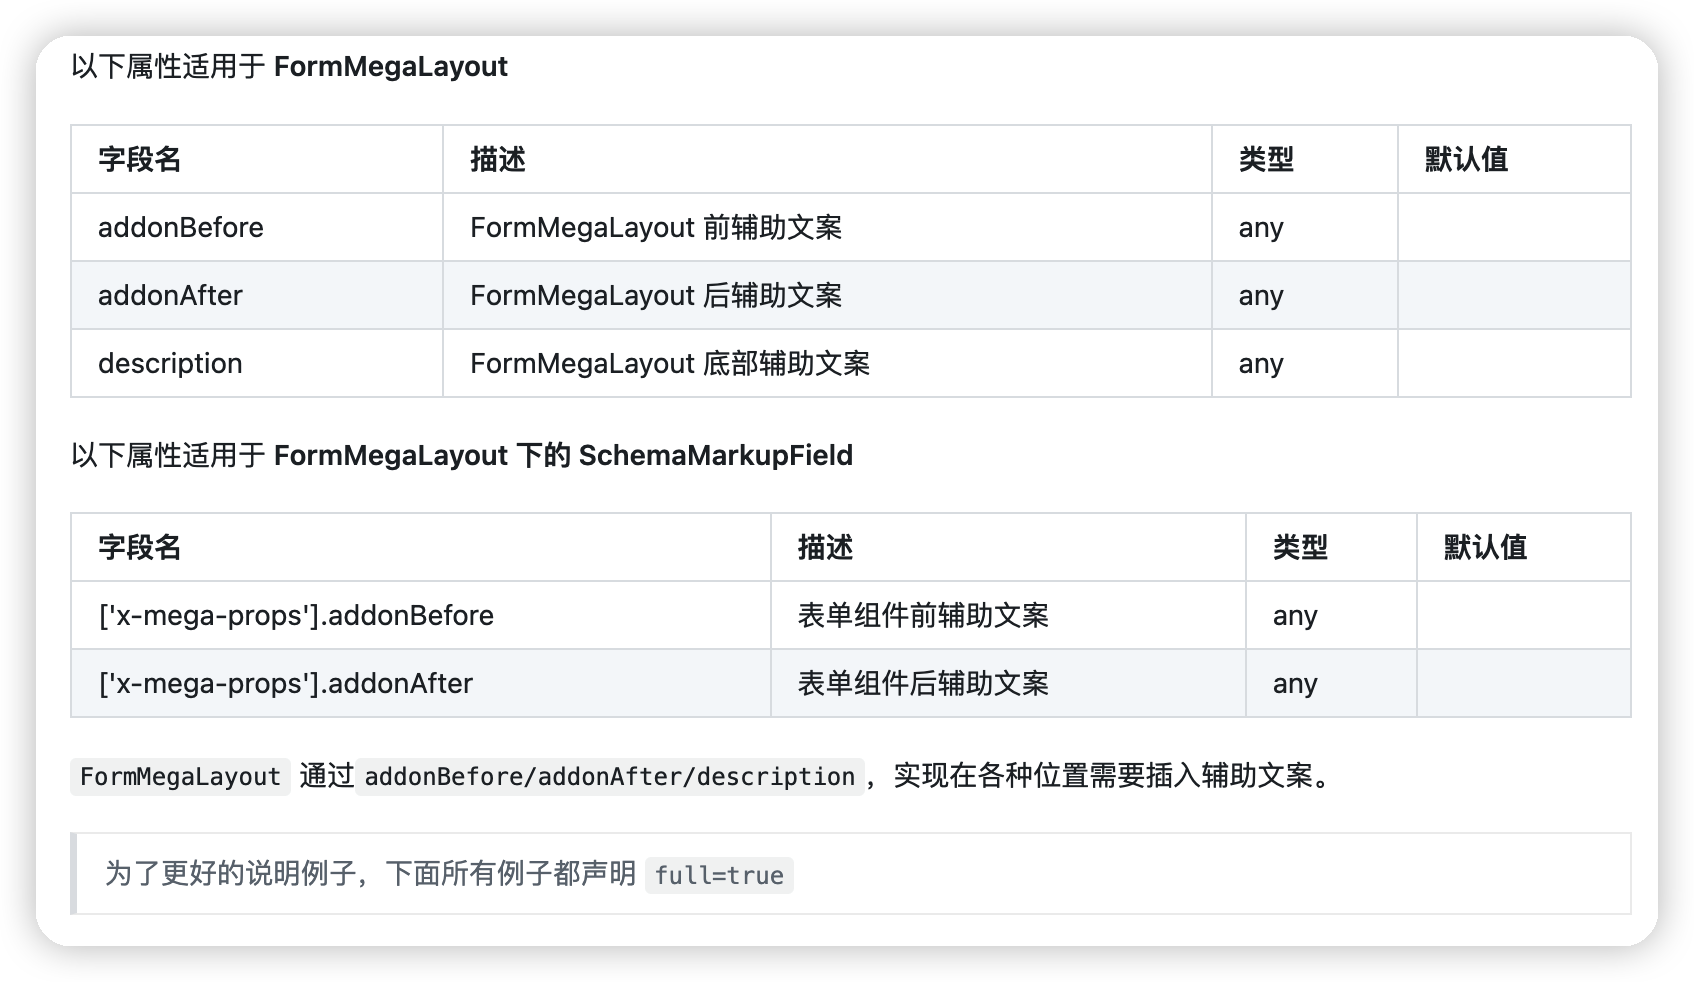
addonBefore/addonAfter/description 辅助文案

grid 栅格布局
FormMegaLayout 属性
| 字段名 | 描述 | 类型 | 默认值 |
|---|---|---|---|
| grid | 是否启用栅格布局 | boolean | false |
| columns | 栅格布局总共列数 | number | 3 |
| autoRow | 是否自动换行 | boolean | false |
FormMegaLayout 下 SchemaMarkupField 的属性
| 字段名 | 描述 | 类型 | 默认值 |
|---|---|---|---|
| [‘x-mega-props’].span | 所占列数 | number | 1 |
通过 CSS Grid Layout 实现栅格布局,功能更加强大。
理解表单节点树
我们在之前的教程中已经有讲到虚拟节点状态(VirtualFieldState),我们也有讲到整体 Formily 架构
- Form
- FormState
- FormLifeCycle
- Field
- FieldState
- VirtualFieldState
- FieldLifeCycle
现在我们整体来讲一下 Formily 节点树,先理解下面这张图: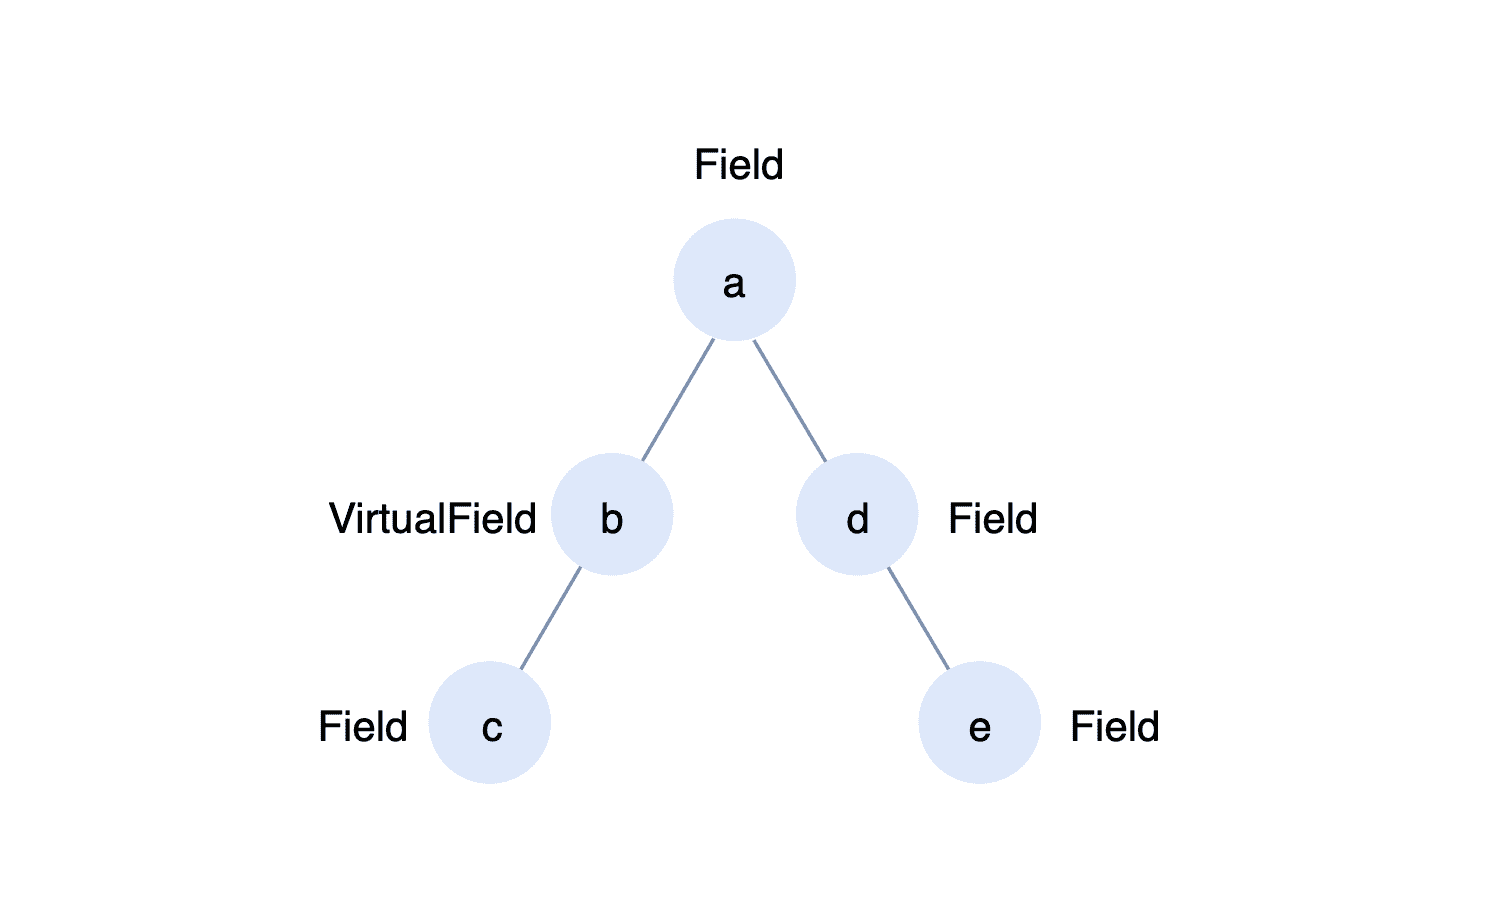
如果存在这样一棵树的话,那么:
- c 字段的 name 属性则是 a.c,path 属性是 a.b.c
- b 字段的 name 属性是 a.b,path 属性是 a.b
- d 字段的 name 属性是 a.d,path 属性是 a.d
- e 字段的 name 属性是 a.d.e,path 属性是 a.d.e
这一来解释之后,我们就大概明白了,只要在某个节点路径中,存在 VirtualField,那么 它的数据路径就会略过 VirtualField,但是,对于 VirtualField 自身这个节点,它的 name 属性,是包含它自身的节点标识的,这就是为什么 b 字段的 name 属性是 a.b 的原因
理解表单扩展机制
Schema 模式开发表单与纯源码开发表单不一样的地方主要就是 Schema 模式它是一个黑盒,想要定制,必须要通过扩展 API 去定制,所以这既是它的优点,也是它的缺点:
- 优点:内置了很多便捷化方案,研发效率较高
- 缺点,内部概念较多,学习成本较高
所以,我们选择哪种开发模式,还是得基于自己当前的业务述求出发。
下面主要讲讲 Formily SchemaForm 的扩展机制,目前我们提供的扩展口子主要有:
- 扩展 Form UI 组件
- 扩展 FormItem UI 组件
- 扩展 Field 组件
- 扩展 VirtualField 组件
- 扩展校验模型(规则、文案、模板引擎)
- 扩展联动协议
- 扩展生命周期
- 扩展 Effect Hook
- 扩展状态(FormState/FieldState/VirtualFieldState)
扩展Form UI组件
如果我们使用的是@formily/antd 或者 @firmily/next 这样的包,其实我们默认已经给您注册了 Form UI 组件,当然,您也可以自己覆盖。 我们的扩展方式主要有两种:
- 全局注册方式
- 实例注册方式
实例注册优先级要比全局注册高
全局注册
import React from 'react'import ReactDOM from 'react-dom'import {SchemaForm,SchemaMarkupField as Field,registerFormComponent} from '@formily/antd' // 或者 @formily/nextimport { Input } from 'antd'import 'antd/dist/antd.css'registerFormComponent(props => {return <div>全局扩展Form组件{props.children}</div>})const App = () => {return (<SchemaFormcomponents={{ Input }}onSubmit={values => {console.log(values)}}><Field type="string" name="name" title="Name" x-component="Input" /></SchemaForm>)}ReactDOM.render(<App />, document.getElementById('root'))
实例注册
import React from 'react'
import ReactDOM from 'react-dom'
import { SchemaForm, SchemaMarkupField as Field } from '@formily/antd' // 或者 @formily/next
import { Input } from 'antd'
import 'antd/dist/antd.css'

const formComponent = props => {
  return <div>实例级扩展Form组件{props.children}</div>
}

const App = () => {
  return (
    <SchemaForm
      formComponent={formComponent}
      components={{ Input }}
      onSubmit={values => {
        console.log(values)
      }}
    >
      <Field type="string" name="name" title="Name" x-component="Input" />
    </SchemaForm>
  )
}

ReactDOM.render(<App />, document.getElementById('root'))

扩展Field组件(正在使用)
扩展 Schema Field 组件可以说是我们平时用的最多的扩展方案,主要是用于扩展具体字段 UI 组件,目前我们提供的扩展方式主要有:
- SchemaForm 中传入 components 扩展(要求组件满足 value/onChange API)
SchemaForm 中传入 components 组件拥有 isFieldComponent 静态属性,可以拿到 FieldProps, 获取更多内容,则可以通过 useSchemaProps 方法
registerFormField 全局注册扩展组件,要求传入组件名和具体组件,同时,如果针对满足 value/onChange 的组件,需要用 connect 包装,不包装,需要手动同步状态(借助 mutators)
- registerFormFields 全局批量注册扩展组件,同时,如果针对满足 value/onChange 的组件,需要用 connect 包装,不包装,需要手动同步状态(借助 mutators)
components 实例扩展
import React, { useState } from 'react'
import ReactDOM from 'react-dom'
import { SchemaForm, SchemaMarkupField as Field, useSchemaProps } from '@formily/antd' // 或者 @formily/next
import 'antd/dist/antd.css'

const CustomComponent = props => {
  return (
    <input
      value={props.value || ''}
      onChange={e => props.onChange(e.target.value)}
    />
  )
}

const CustomFieldComponent = props => {
  const schemaProps = useSchemaProps()
  return (
    <input
      value={props.value || ''}
      onChange={e => props.mutators.change(e.target.value)}
    />
  )
}

CustomFieldComponent.isFieldComponent = true

const App = () => {
  const [value, setValue] = useState({})
  return (
    <SchemaForm
      components={{ CustomComponent, CustomFieldComponent }}
      onChange={values => {
        setValue(values)
      }}
    >
      <Field
        type="string"
        name="name"
        title="Name"
        x-component="CustomComponent"
      />
      <Field
        type="string"
        name="lastName"
        title="Last Name"
        x-component="CustomFieldComponent"
      />
      {JSON.stringify(value, null, 2)}
    </SchemaForm>
  )
}

ReactDOM.render(<App />, document.getElementById('root'))
registerFormField 全局扩展
import React, { useState } from 'react'
import ReactDOM from 'react-dom'
import {
  SchemaForm,
  SchemaMarkupField as Field,
  registerFormField,
  connect
} from '@formily/antd' // 或者 @formily/next
import 'antd/dist/antd.css'

const CustomComponent = props => {
  return (
    <input
      value={props.value || ''}
      onChange={e => props.onChange(e.target.value)}
    />
  )
}

registerFormField('CustomComponent2', connect()(CustomComponent))

const App = () => {
  const [value, setValue] = useState({})
  return (
    <SchemaForm
      onChange={values => {
        setValue(values)
      }}
    >
      <Field
        type="string"
        name="name"
        title="Name"
        x-component="CustomComponent2"
      />
      {JSON.stringify(value, null, 2)}
    </SchemaForm>
  )
}

ReactDOM.render(<App />, document.getElementById('root'))
扩展 VirtualField 组件(扩展布局组件)
扩展 Schema VirtualField 组件,其实就是扩展布局组件,我们的扩展方式主要有:
- SchemaForm 中传入 components 只要组件拥有 isVirtualFieldComponent 静态属性,那么会被当做虚拟组件,同时组件属性可以拿到 VirtualFieldProps
- 通过 isVirtualFieldComponent (推荐)
- registerVirtualBox 全局扩展
- createVirtualBox 全局扩展
- createControllerBox 全局扩展
通过 isVirtualFieldComponent (推荐)
通过 isVirtualFieldComponent 声明为 VirtualBox,可以通过 useSchemaProps 拿到完整上下文内容。
import React, { useState } from 'react'
import ReactDOM from 'react-dom'
import {
  SchemaForm,
  SchemaMarkupField as Field,
  useSchemaProps,
} from '@formily/antd' // 或者 @formily/next
import { Input } from '@formily/antd-components'
import 'antd/dist/antd.css'

const CustomLayout = (props) => {
  const { children } = props
  const schemaProps = useSchemaProps()
  return <div style={{ border: '1px solid red', padding: 10 }}>
    {children}
  </div>
}

CustomLayout.isVirtualFieldComponent = true

const App = () => {
  return (
    <SchemaForm
      components={{
        Input,
        CustomLayout,
      }}
    >
      <Field
        x-component="CustomLayout"
        type="object"
      >
        <Field name="name" title="Name" x-component="Input" />
      </Field>
    </SchemaForm>
  )
}

ReactDOM.render(<App />, document.getElementById('root'))
扩展联动协议
联动协议,我们之前在理解 Form Schema 中有提到,目前 Formily 内置了
- value:visible
- value:schema
- value:state 3 种类型的联动协议,我们现在可以试着扩展一个 value:disabled,用于联动控制其他字段是否被禁用 ```go import React, { useState } from ‘react’ import ReactDOM from ‘react-dom’ import { SchemaForm, useValueLinkageEffect } from ‘@formily/antd’ // 或者 @formily/next import { Input, Select } from ‘@formily/antd-components’ import ‘antd/dist/antd.css’
const useValueDisabledLinkageEffect = () => { useValueLinkageEffect({ type: ‘value:disabled’, resolve: ({ target }, { setFieldState }) => { setFieldState(target, innerState => { innerState.props[‘x-component-props’] = { disabled: true } }) }, reject: ({ target }, { setFieldState }) => { setFieldState(target, innerState => { innerState.props[‘x-component-props’] = { disabled: false } }) } }) }
const App = () => {
const [value, setValue] = useState({})
return (
ReactDOM.render(
**案例解析**
- 使用 useValueLinkageEffect 创建了一个 Effect Hook,在 effects 中注入即可注册联动协议
- useValueLinkageEffect 需要传入一个协议类型,同时需要传入**条件满足**的 resolve 回调和**条件不满足**的 reject 回调
<a name="xkJix"></a>
### 扩展 Effect Hook
我们在扩展联动协议的时候,其实已经涉及到了扩展 Effect Hook,Effect Hook 其实就像 **React Hook** 一样,它是一个**逻辑复用方案** 想要实现一个 Effect Hook,我们可能会使用到以下 API:
- FormEffectHooks 使用现成生命周期 Hook
- createEffectHook 创建扩展生命周期 Hook
- createFormActions,获取上下文中的 actions
<a name="B0OnP"></a>
### 案例
<a name="cVqJv"></a>
#### 扩展虚拟节点折叠面板包裹formily组件

```go
import React, { useState } from "react";
import ReactDOM from "react-dom";
import {
SchemaForm,
SchemaMarkupField as Field,
useSchemaProps
} from "@formily/antd"; // 或者 @formily/next
import { Input } from "@formily/antd-components";
import "antd/dist/antd.css";
import { Collapse } from 'antd';
const { Panel } = Collapse;
const CustomLayout = (props) => {
const { children } = props;
const schemaProps = useSchemaProps();
return (
<Collapse defaultActiveKey={["1"]}>
<Panel header="This is panel header 1" key="1">
<p>{children}</p>
</Panel>
</Collapse>
);
};
CustomLayout.isVirtualFieldComponent = true;
const App = () => {
return (
<SchemaForm
components={{
Input,
CustomLayout
}}
>
<Field x-component="CustomLayout" type="object">
<Field name="name" title="Name" x-component="Input" />
</Field>
</SchemaForm>
);
};
ReactDOM.render(<App />, document.getElementById("root"));
实现DOSM2.0-UIUE改造项目中面板样式,可以参考这个Field组件扩展,自定义扩展对应类型组件的样式,比如基本信息中分组组件面板头部是没有颜色的,那么可以自定义分组组件头部,最外层通过虚拟组件布局样式
正则表达式
Lesson 1: An Introduction, and the ABCs
第1课:介绍和ABCS
Regular expressions are extremely useful in extracting information from text such as code, log files, spreadsheets, or even documents. And while there is a lot of theory behind formal languages, the following lessons and examples will explore the more practical uses of regular expressions so that you can use them as quickly as possible.
正则表达式在从文本中提取信息(例如代码,日志文件,电子表格甚至文档)中非常有用。尽管形式语言背后有很多理论,但以下课程和示例将探讨正则表达式的更实际用途,以便您可以尽快使用它们。
The first thing to recognize when using regular expressions is that everything is essentially a character, and we are writing patterns to match a specific sequence of characters (also known as a string). Most patterns use normal ASCII, which includes letters, digits, punctuation and other symbols on your keyboard like %#$@!, but unicode characters can also be used to match any type of international text.
使用正则表达式时要识别的第一件事是所有内容本质上都是字符,我们正在编写模式以匹配特定字符序列(也称为字符串)。大多数模式使用普通的ASCII,其中包括键盘上的字母,数字,标点符号和其他符号,例如%#$@!,但也可以使用Unicode字符来匹配任何类型的国际文本。
Characters include normal letters, but digits as well. In fact, numbers 0-9 are also just characters and if you look at an ASCII table, they are listed sequentially.
字符包括普通字母,但数字也包括数字。实际上,数字0-9也只是字符,如果您查看ASCII表,则将它们顺序列出。
Over the various lessons, you will be introduced to a number of special metacharacters used in regular expressions that can be used to match a specific type of character. In this case, the character \d can be used in place of any digit from 0 to 9. The preceding slash (前面的斜线)distinguishes it from the simple d character and indicates that it is a metacharacter.
在各种课程中,您将被介绍给正则表达式中使用的许多特殊的metacharacters,可用于匹配特定类型的字符。在这种情况下,字符\ d可以代替从0到9的任何数字来使用。前面的斜杠将其与简单的D字符区分开来,并指示它是一个Metacharacter。
Below are a few more lines of text containing digits. Try writing a pattern that matches all the digits in the strings below, and notice how your pattern matches anywhere within the string, not just starting at the first character. We will learn how to control this in a later lesson.
以下是更多包含数字的文本行。尝试编写与下面字符串中所有数字匹配的模式,并注意您的图案在字符串中的任何位置匹配,而不仅仅是从第一个字符开始。我们将在以后的课程中学习如何控制这一点。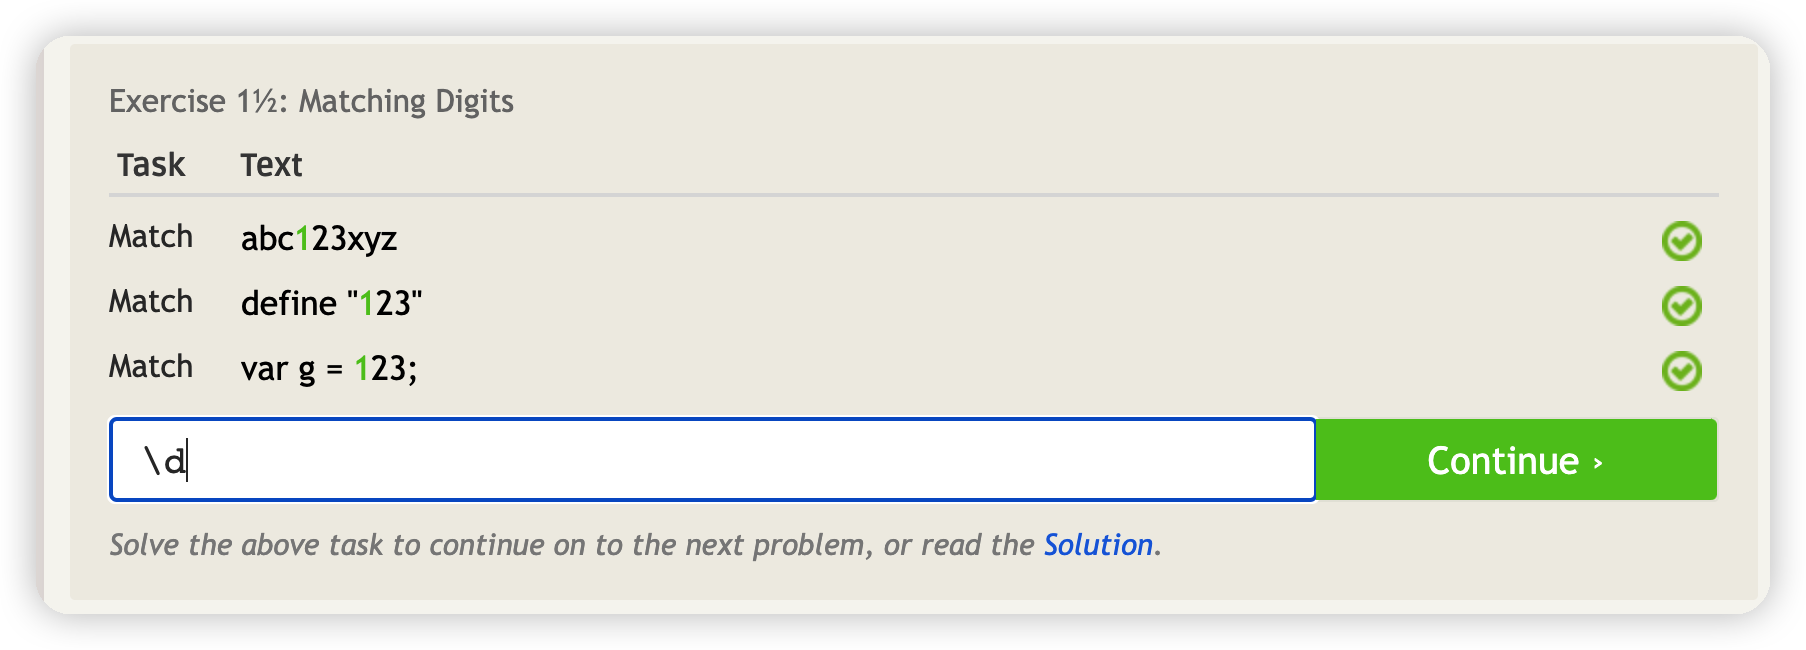
Lesson 2: The Dot
In some card games, the Joker is a wildcard and can represent any card in the deck. With regular expressions, you are often matching pieces of text that you don’t know the exact contents of, other than the fact that they share a common pattern or structure (eg. phone numbers or zip codes).
在某些纸牌游戏中,小丑是通配符,可以代表甲板上的任何卡片。使用正则表达式,除了它们共享共同的模式或结构(例如,电话号码或邮政编码)之外,您通常会匹配您不知道确切内容的文本。
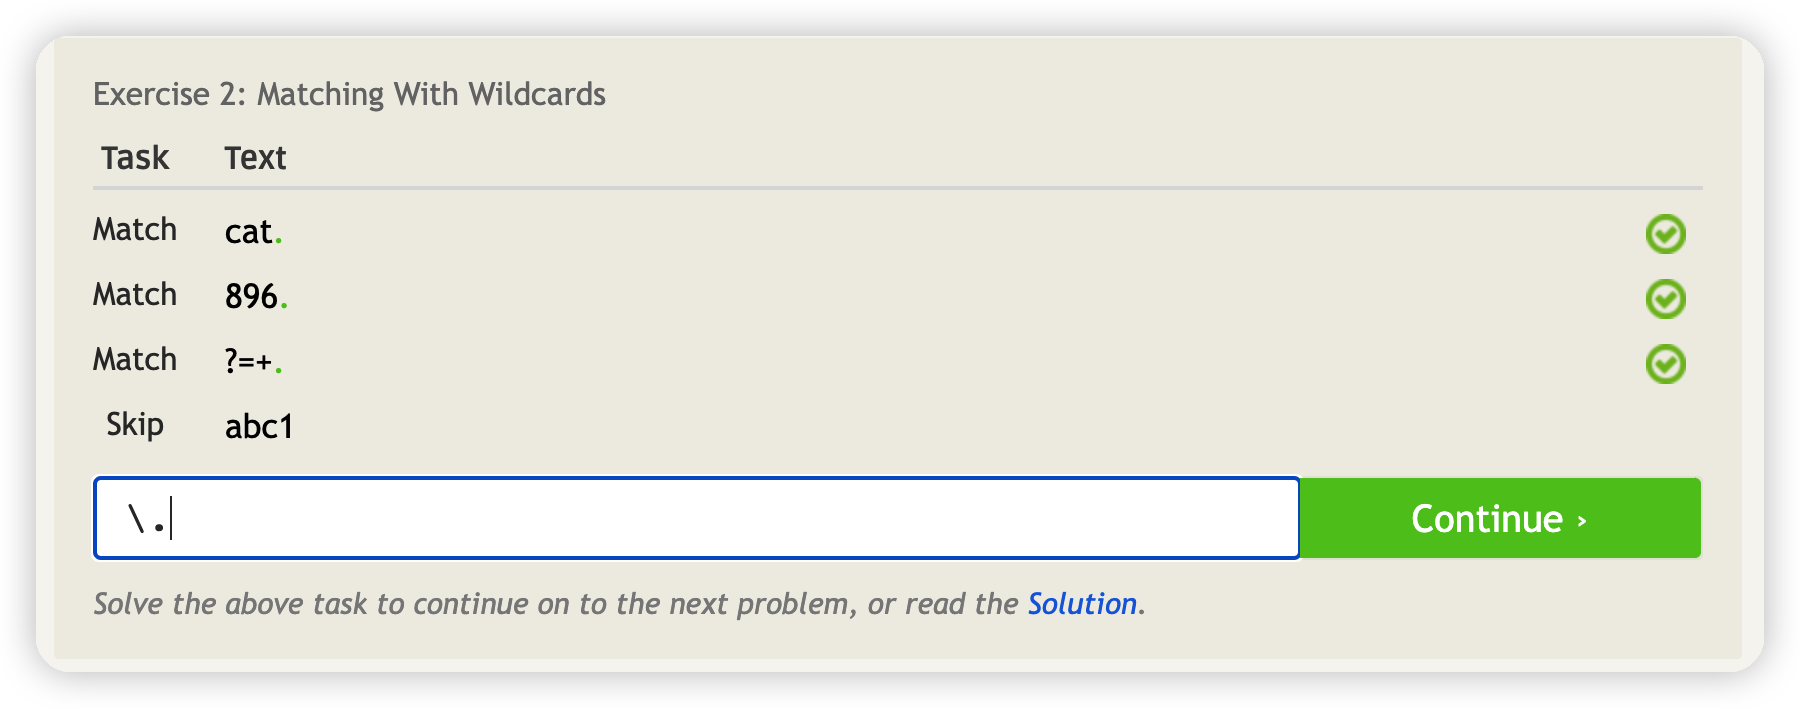
Similarly, there is the concept of a wildcard, which is represented by the . (dot) metacharacter, and can match any single character (letter, digit, whitespace, everything). You may notice that this actually overrides the matching of the period character, so in order to specifically match a period, you need to escape the dot by using a slash . accordingly.
同样,也有一个通配符的概念,它由。(点)Metacharacter,并且可以匹配任何单个字符(字母,数字,空格等)。您可能会注意到,这实际上覆盖了周期字符的匹配,因此,为了专门匹配一个周期,您需要使用slash \逃脱点。因此。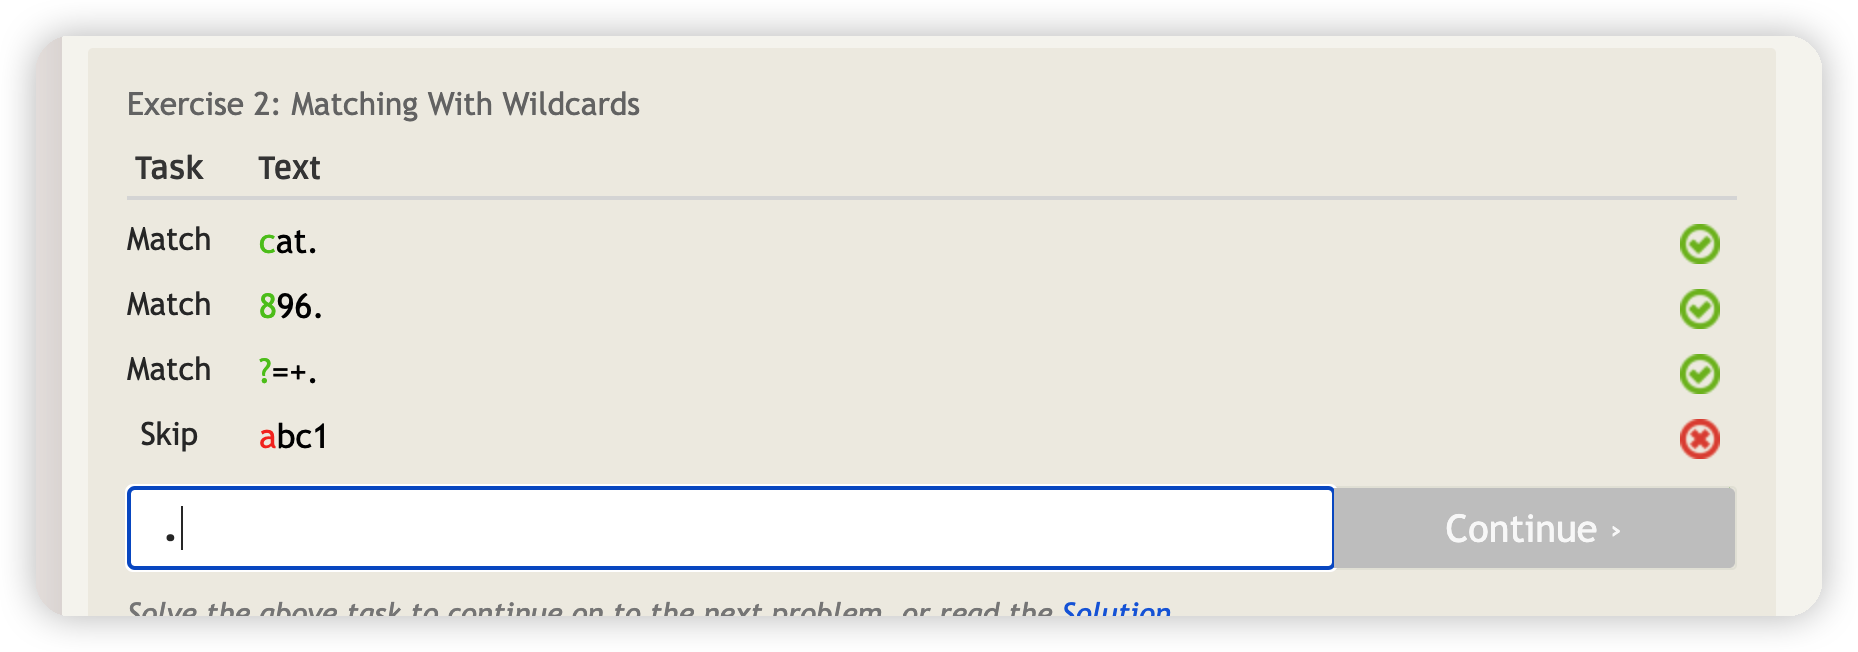
Lesson 3: Matching specific characters
The dot metacharacter from the last lesson is pretty powerful, but sometimes too powerful. If we are matching phone numbers for example, we don’t want to validate the letters “(abc) def-ghij” as being a valid number!
上一课的点元学者非常有力,但有时太强大了。例如,如果我们要匹配电话号码,我们不想验证字母“(ABC)def-ghij”为有效号码!
There is a method for matching specific characters using regular expressions, by defining them inside square brackets(方括号). For example, the pattern [abc] will only match a single a, b, or c letter and nothing else.
有一种使用正则表达式匹配特定字符的方法,通过在方括号内定义它们。例如,模式[ABC]只能匹配单个A,B或C字母,而无需其他。
Below are a couple lines, where we only want to match the first three strings, but not the last three strings. Notice how we can’t avoid matching the last three strings if we use the dot, but have to specifically define what letters to match using the notation above.
以下是几行,我们只想匹配前三个字符串,但不能匹配最后三个字符串。请注意,如果我们使用DOT,我们无法避免匹配最后三个字符串,但必须专门定义使用上面的符号匹配的字母。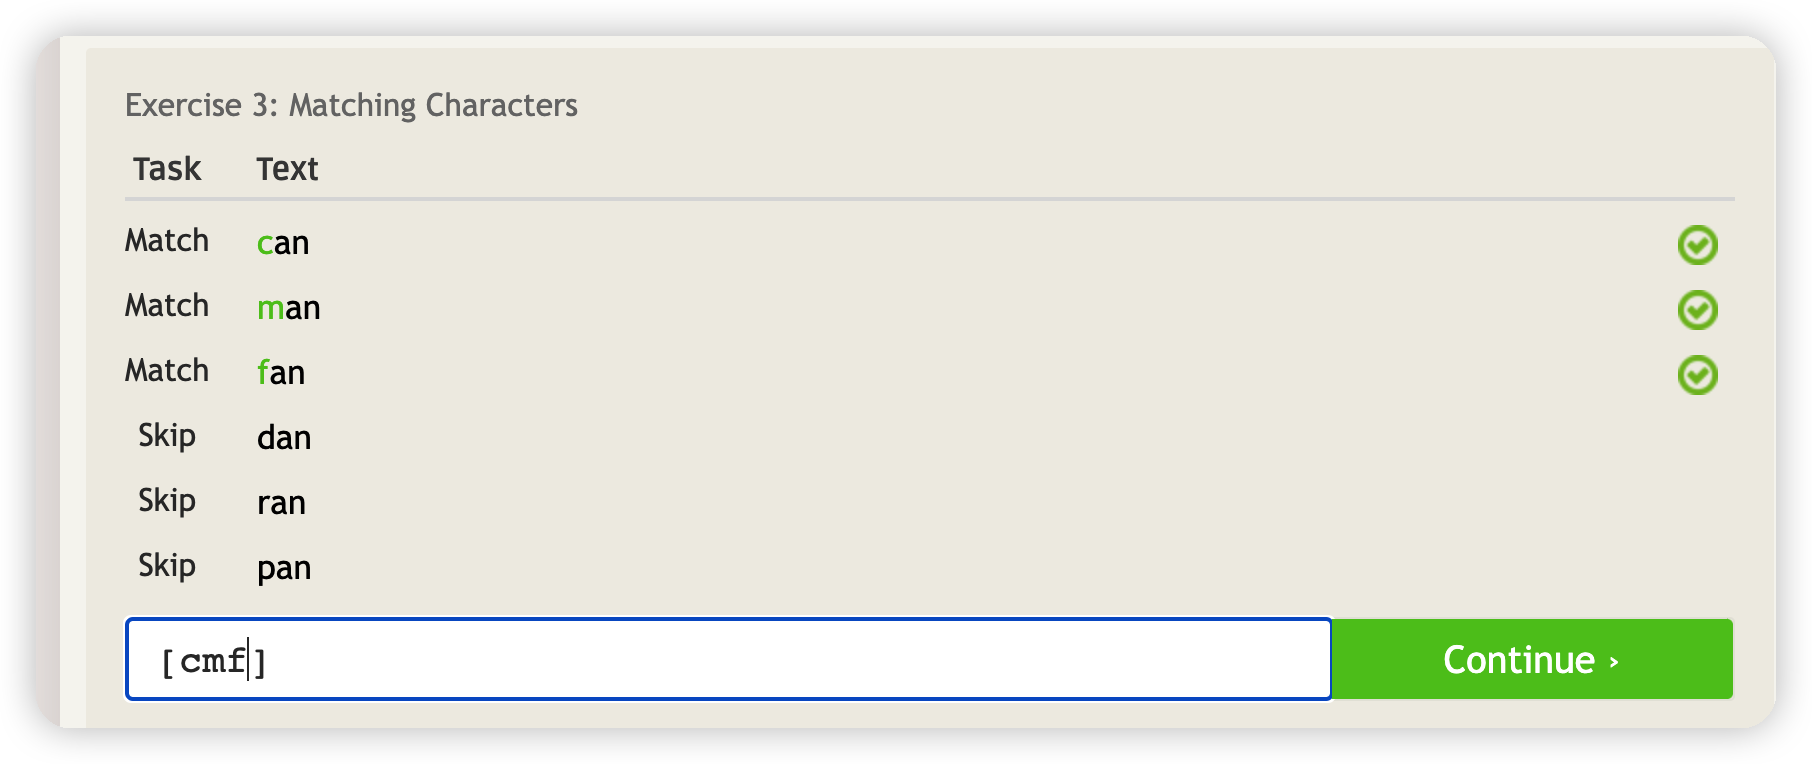
Lesson 4: Excluding specific characters
In some cases, we might know that there are specific characters that we don’t want to match too, for example, we might only want to match phone numbers that are not from the area code 650.
在某些情况下,我们可能知道我们也不想匹配的特定字符,例如,我们可能只想匹配不是区域代码650的电话号码。
To represent this, we use a similar expression that excludes specific characters using the square brackets and the ^ (hat). For example, the pattern [^abc] will match any single character except for the letters a, b, or c.
为了代表这一点,我们使用类似的表达式,该表达式使用方括号和 ^(HAT)排除特定字符。例如,模式[^abc]将匹配除字母A,B或c以外的任何单个字符。
With the strings below, try writing a pattern that matches only the live animals (hog, dog, but not bog). Notice how most patterns of this type can also be written using the technique from the last lesson as they are really two sides of the same coin. By having both choices, you can decide which one is easier to write and understand when composing your own patterns.
在下面的字符串的情况下,尝试编写仅与活动物(猪,狗,但不适合沼泽)相匹配的图案。请注意,这种类型的大多数模式也可以使用上一课的技术编写,因为它们实际上是同一硬币的两个方面。通过有两种选择,您可以决定在撰写自己的模式时更容易编写和理解。
Lesson 5: Character ranges
匹配前面的子表达式零次或一次,或指明一个非贪婪限定符
We just learned how to create a pattern that matches or excludes specific characters — but what if we want to match a character that can be in a sequential range characters? Do we have no choice but to list them all out?
我们刚刚学会了如何创建与特定字符匹配或排除特定字符的模式 - 但是,如果我们想匹配可以在顺序范围字符中的字符呢?我们别无选择,只能将它们全部列出?
Luckily, when using the square bracket notation, there is a shorthand for matching a character in list of sequential characters by using the dash to indicate a character range. For example, the pattern [0-6] will only match any single digit character from zero to six, and nothing else. And likewise, [^n-p] will only match any single character except for letters n to p.
幸运的是,当使用方括号符号时,有一个速记可以通过使用仪表板指示字符范围来匹配顺序字符列表中的字符。例如,模式[0-6]只能匹配从零到六的任何单个数字字符,而无需其他。同样,[^n-p]只能匹配除字母n与p以外的任何单个字符。
Multiple character ranges can also be used in the same set of brackets, along with individual characters. An example of this is the alphanumeric \w metacharacter which is equivalent to the character range **[A-Za-z0-9]** and often used to match characters in English text.
多个字符范围也可以与单个字符一起使用。一个例子是字母数字\ w metacharacter,等同于字符范围[A-ZA-Z0-9],通常用于匹配英语文本中的字符。
| \w | Any Alphanumeric character(任何文字数字式字符) |
|---|---|
| \W | Any Non-alphanumeric character(任何非文字数字式字符) |
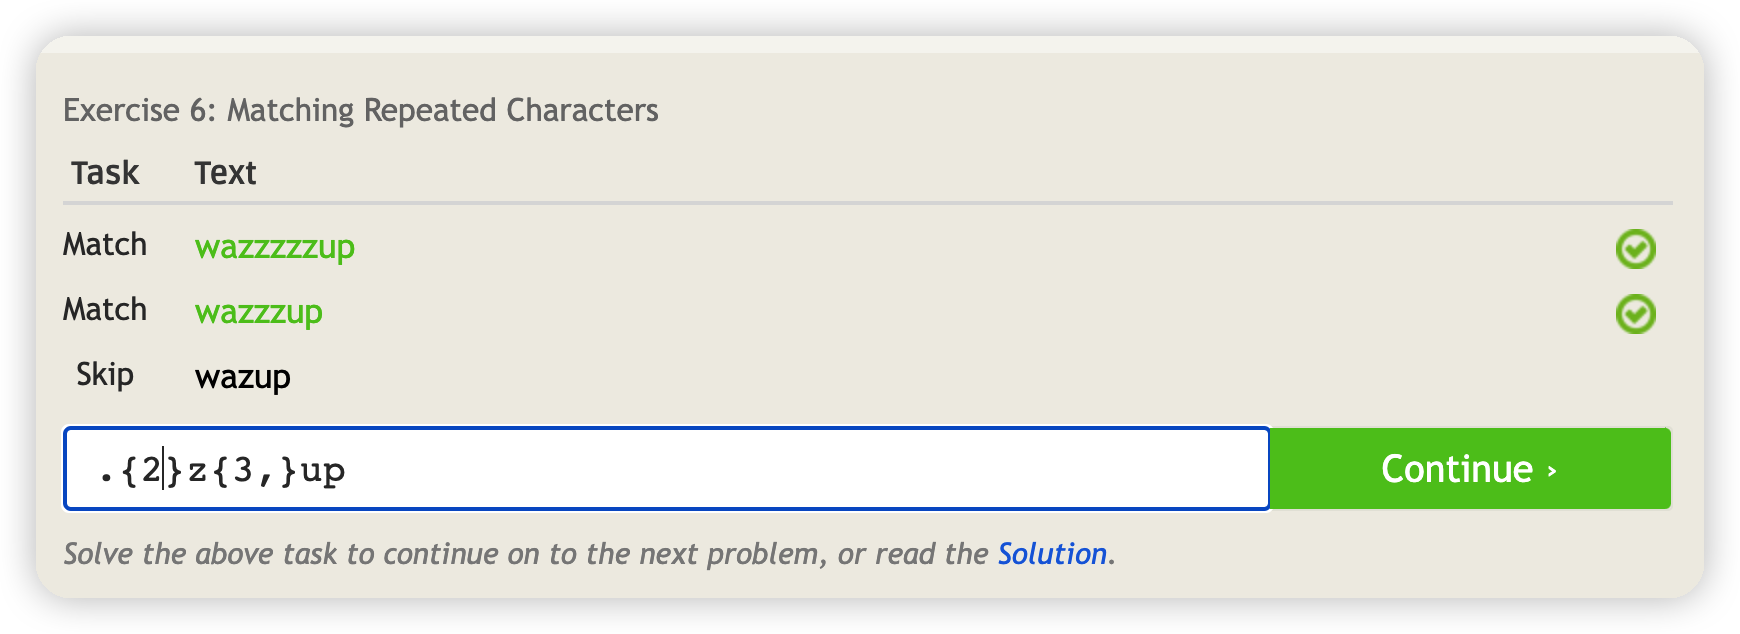
Lesson 6: Catching some zzz’s
Note: Some parts of the repetition syntax below isn’t supported in all regular expression implementations.
注意:以下重复语法的某些部分在所有正则表达实现中不支持
We’ve so far learned how to specify the range of characters we want to match, but how about the number of repetitions of characters that we want to match? One way that we can do this is to explicitly spell out exactly how many characters we want, eg. \d\d\d which would match exactly three digits.
到目前为止,我们已经学会了如何指定要匹配的字符范围,但是我们要匹配的字符重复数量如何?我们可以做到这一点的一种方法是明确阐明我们想要多少个字符,例如。\ d \ d \ d将完全匹配三位数。
A more convenient way is to specify how many repetitions of each character we want using the curly braces(花括号) notation(记号,符号). For example, a{3} will match the a character exactly three times. Certain regular expression engines will even allow you to specify a range for this repetition such that a{1,3} will match the a character no more than 3 times, but no less than once for example.
一种更方便的方法是指定使用Curly Bracs符号的每个字符的重复数量。例如,{3}将完全匹配A角色三次。某些正则表达式引擎甚至可以允许您指定此重复的范围,以使{1,3}的A角色不超过3次,但不少于一次。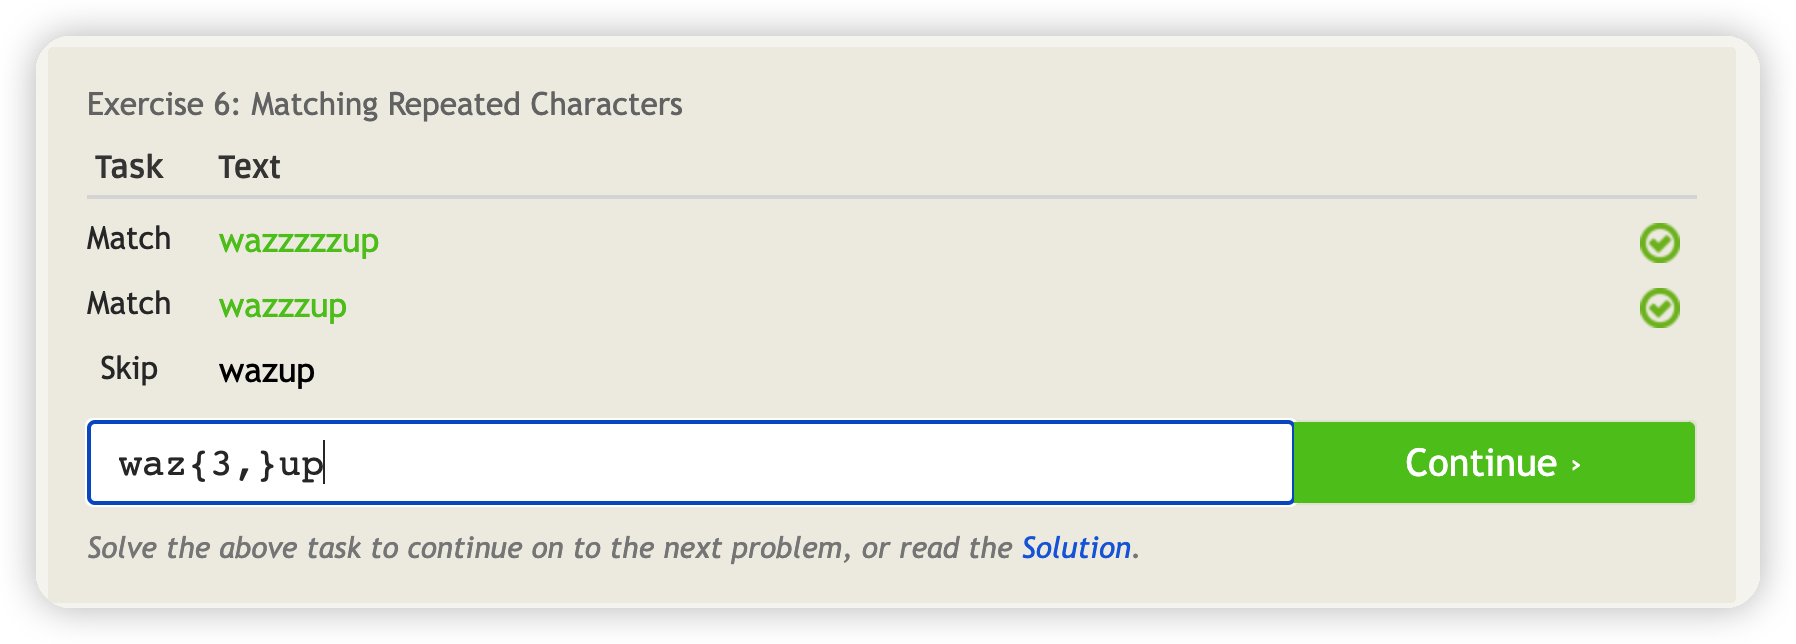
Lesson 7: Mr. Kleene, Mr. Kleene
A powerful concept(强大的概念) in regular expressions is the ability to match an arbitrary(任意) number of characters. For example, imagine that you wrote a form that has a donation field that takes a numerical value in dollars.(以美元为价值) A wealthy user may drop by and want to donate $25,000, while a normal user may want to donate $25.
正则表达式中的一个强大概念是能够匹配任意数量的字符的能力。例如,想象一下您编写了一个具有捐赠字段的表格,该表格以美元为美元。富裕的用户可能会跌入并希望捐赠25,000美元,而普通用户可能希望捐赠25美元。
One way to express such a pattern would be to use what is known as the Kleene Star and the Kleene Plus, which essentially represents either 0 or more or 1 or more of the character that it follows (it always follows a character or group). For example, to match the donations above, we can use the pattern \d* to match any number of digits, but a tighter regular expression would be \d+ which ensures that the input string has at least one digit.
表达这种模式的一种方法是使用所谓的Kleene Star(星号)和Kleene Plus(加号),它本质上代表其遵循的0或更多或1个或1个或更多的字符(它总是遵循角色或组)。例如,要匹配上面的捐赠,我们可以使用模式\ d匹配任何数量的数字,但是更紧密的正则表达式为\ d+,可确保输入字符串至少具有一个数字。
These quantifiers can be used with any character or special metacharacters, for example a+ (one or more a’s), [abc]+ (one or more of any a, b, or c character) and _. (zero or more of any_ character).
这些量词可以与任何字符或特殊的metacharacter一起使用,例如A+(一个或多个A),[ABC]+(一个或多个A,B或C字符的一个或多个)和。*(任何字符的零或更多字符)。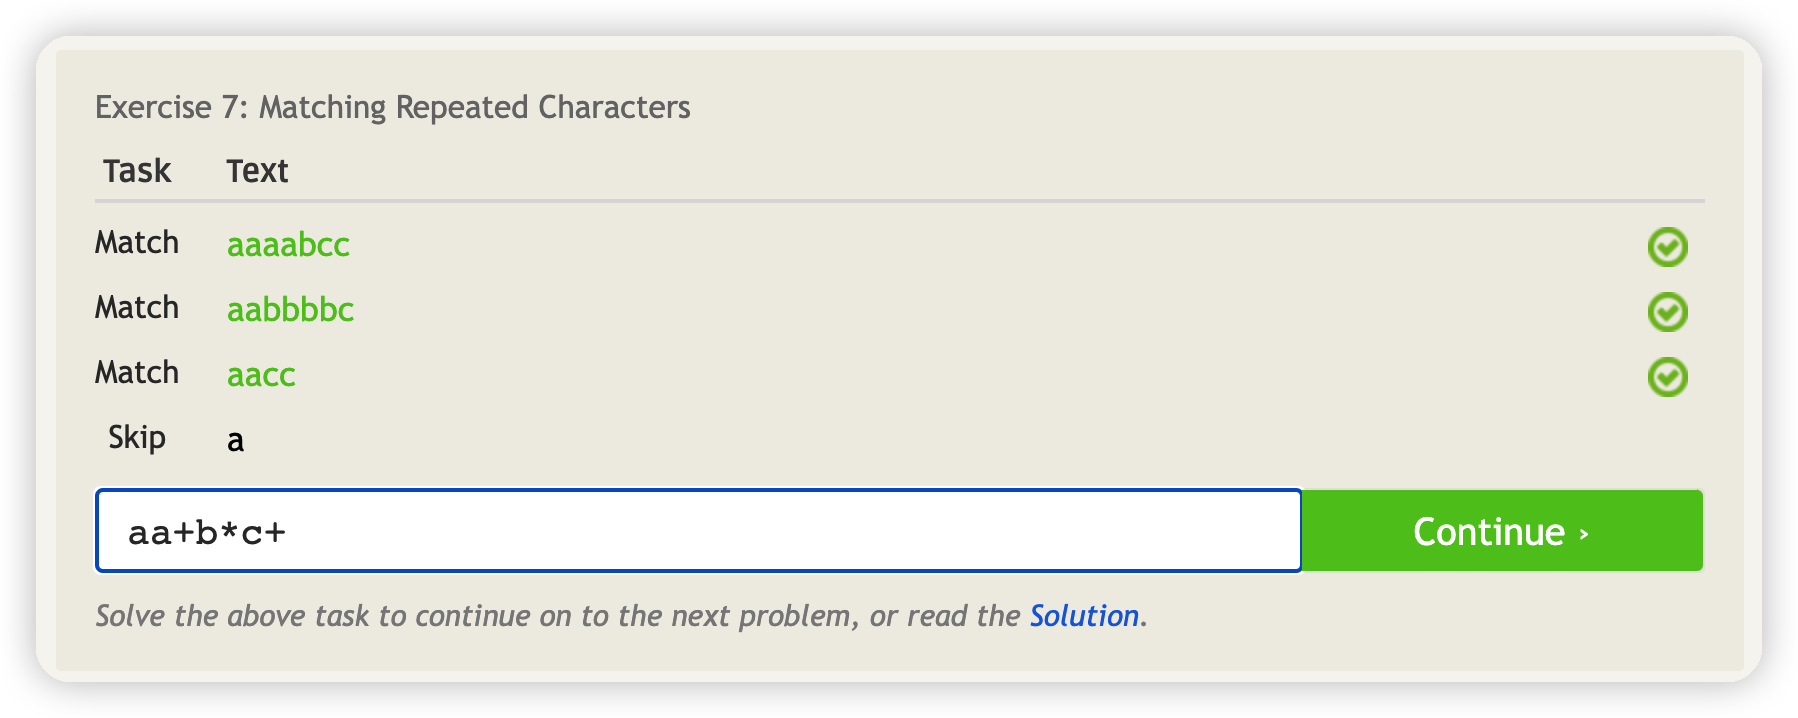
Lesson 8: Characters optional
第8课:可选的字符
Another quantifier that is really common when matching and extracting text is the ? (question mark) metacharacter which denotes optionality. This metacharacter allows you to match either zero or one of the preceding character or group. For example, the pattern ab?c will match either the strings “abc” or “ac” because the b is considered optional.
匹配和提取文本时确实很常见的另一个量词是?(问号)Metacharacter表示选择性。该元时间允许您匹配零或前一个字符或组之一。例如,模型AB?C将匹配字符串“ ABC”或“ AC”,因为B被认为是可选的。
Similar to the dot metacharacter, the question mark is a special character and you will have to escape it using a slash \? to match a plain question mark character in a string.
与点Metacharacter类似,问号是一个特殊的角色,您必须使用斜杠\转义它?,转义后就可以匹配字符串中的普通问号字符。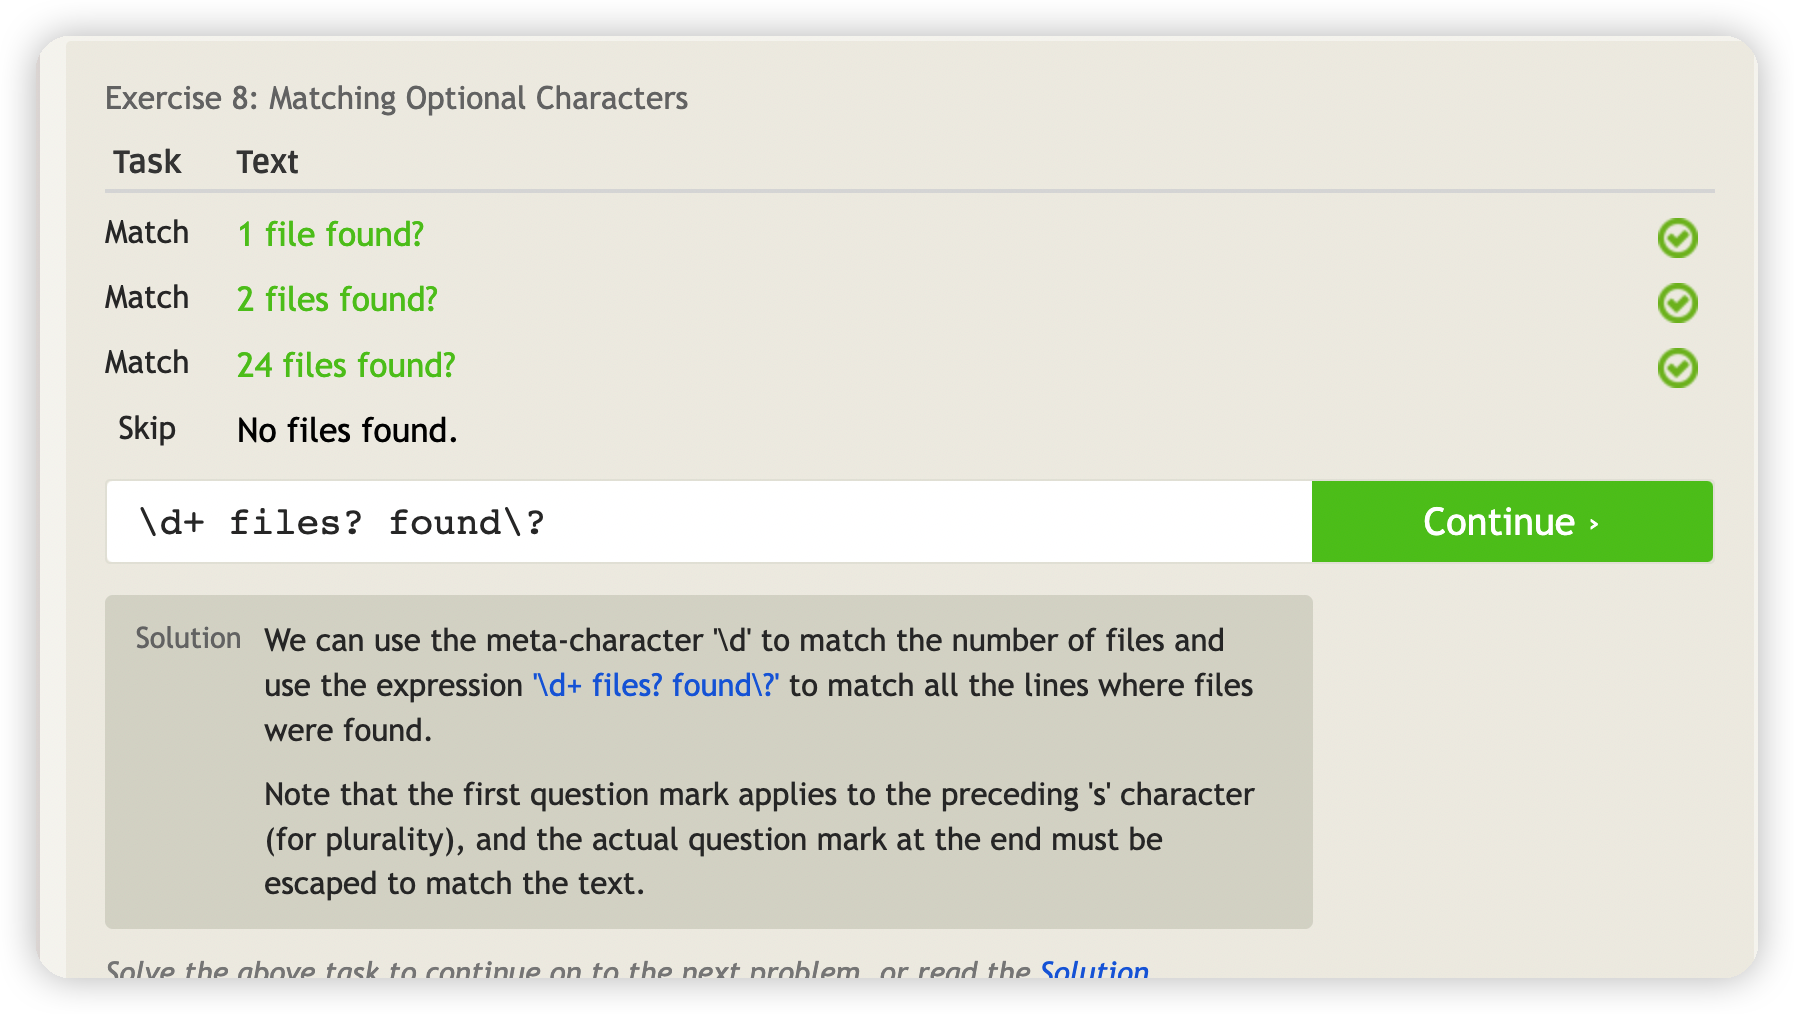
Lesson 9: All this whitespace
第9课:所有这些空白
When dealing with real-world input, such as log files and even user input, it’s difficult not to encounter whitespace. We use it to format pieces of information to make it easier to read and scan visually, and a single space can put a wrench into the simplest regular expression.
在处理现实世界输入(例如日志文件甚至用户输入)时,很难不遇到空格。我们使用它来格式化信息,以使其更易于视觉阅读和扫描,并且单个空间可以将扳手放入最简单的正则表达式中。
| \s | Any Whitespace(任意空白字段) |
|---|---|
| \S | Any Non-whitespace character |
The most common forms of whitespace you will use with regular expressions are the space (␣), the tab (\t), the new line (\n) and the carriage return (\r) (useful in Windows environments), and these special characters match each of their respective whitespaces. In addition, a whitespace special character \s will match any of the specific whitespaces above and is extremely useful when dealing with raw input text.
您将在正则表达式中使用的最常见的空格形式是空间(␣),选项卡(\ t),新行(\ n)和托架返回(\ r)(在Windows环境中有用),这些特殊字符匹配他们各自的空格。此外,Whitespace特殊字符\ s将与上面的任何特定空格匹配,并且在处理原始输入文本时非常有用。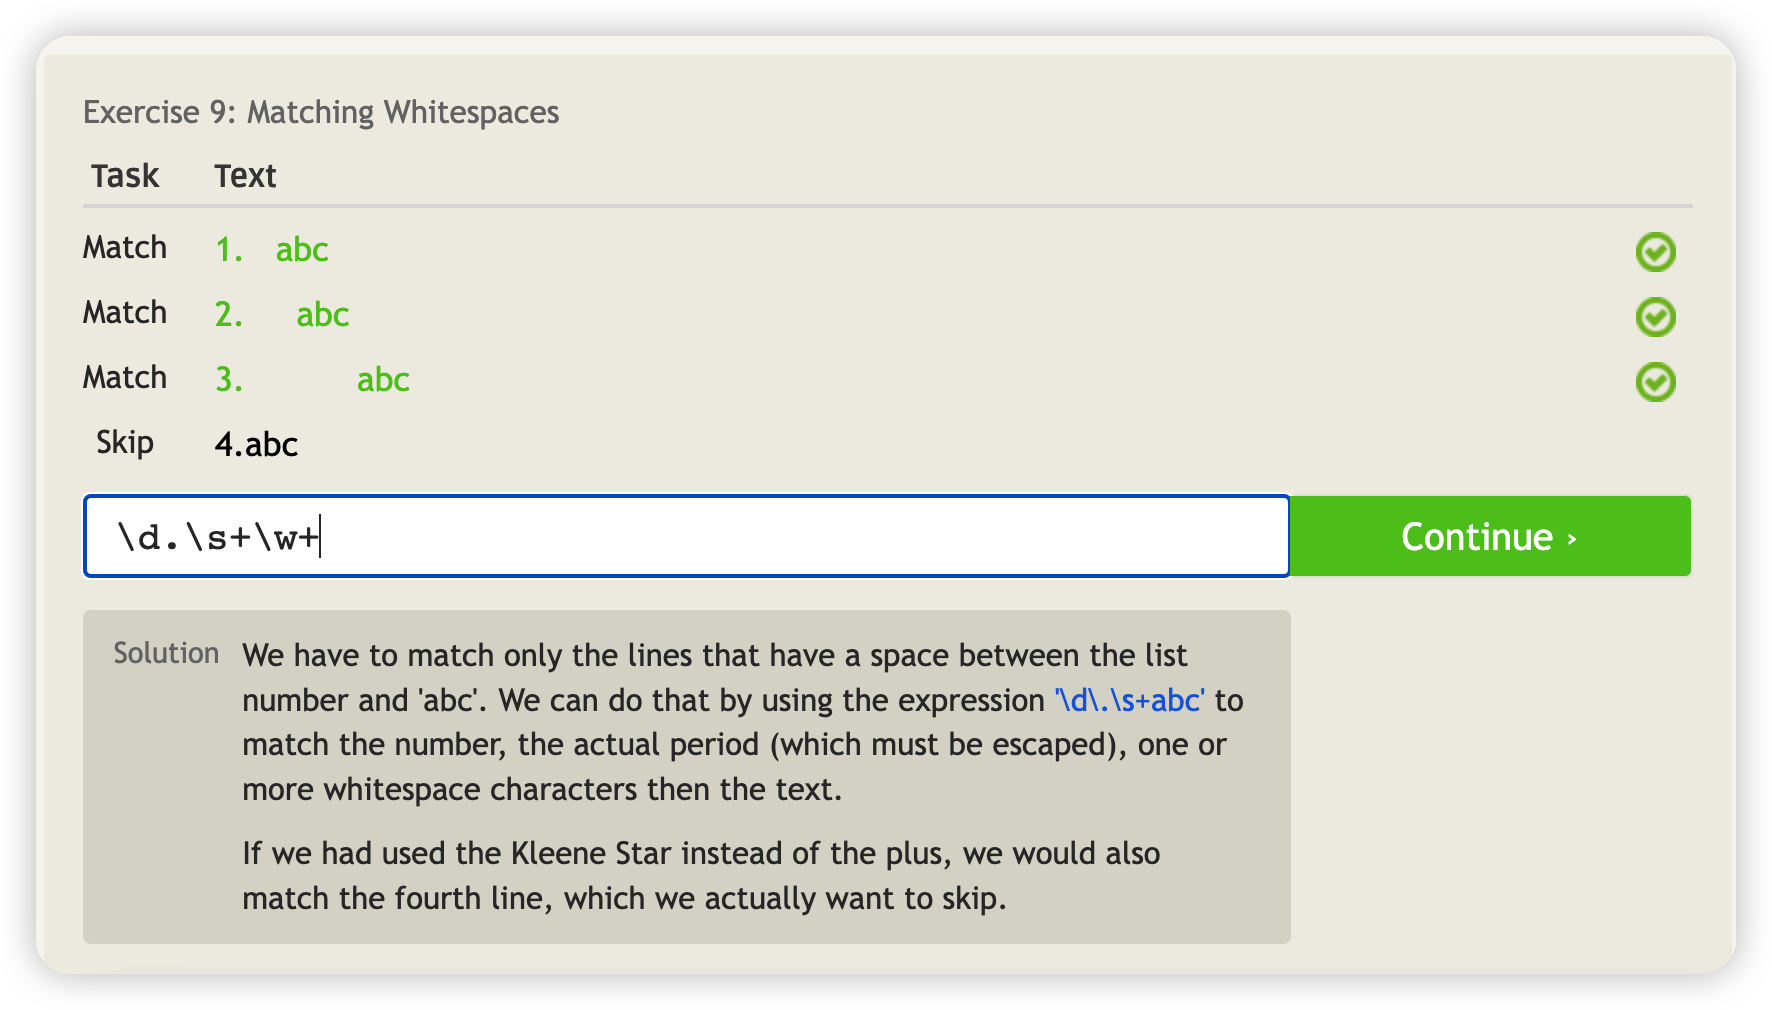
Lesson 10: Starting and ending
第10课:开始和结束
So far, we’ve been writing regular expressions that partially match pieces across all the text. Sometimes this isn’t desirable, imagine for example(想象一个示例) we wanted to match the word “success” in a log file. We certainly don’t want that pattern to match a line that says “Error: unsuccessful operation”! That is why it is often best practice to write as specific regular expressions as possible to ensure that we don’t get false positives when matching against real world text.
到目前为止,我们一直在编写正则表达式,使所有文本中的部分匹配。有时这不是可取的,例如,我们想在日志文件中匹配“成功”一词。我们当然不希望这种模式与“错误:失败操作”的行匹配!这就是为什么最好的做法通常是尽可能多的特定正则表达式来确保我们在与现实世界文本匹配时不会获得误报的原因。
One way to tighten our patterns is to define a pattern that describes both the start and the end of the line using the special ^ (hat) and $ (dollar sign) metacharacters. In the example above, we can use the pattern ^success to match only a line that begins with the word “success”, but not the line “Error: unsuccessful operation”. And if you combine both the hat and the dollar sign, you create a pattern that matches the whole line completely at the beginning and end.
收紧我们的模式的一种方法是定义一种使用特殊 ^(HAT)和$(美元符号)Metacharacters来描述线路和末端的模式。在上面的示例中,我们可以使用模式^success仅匹配以“成功”一词开头的行,而不是线“Error: unsuccessful operation”。而且,如果将帽子和美元标志都结合在一起,则创建一个模式,该模式在开始和结束时完全匹配整个线路。
Note that this is different than the hat used inside a set of bracket [^…] for excluding characters, which can be confusing when reading regular expressions.
请注意,这与一组用于排除字符的括号内使用的^不同,在阅读正则表达式时可能会令人困惑。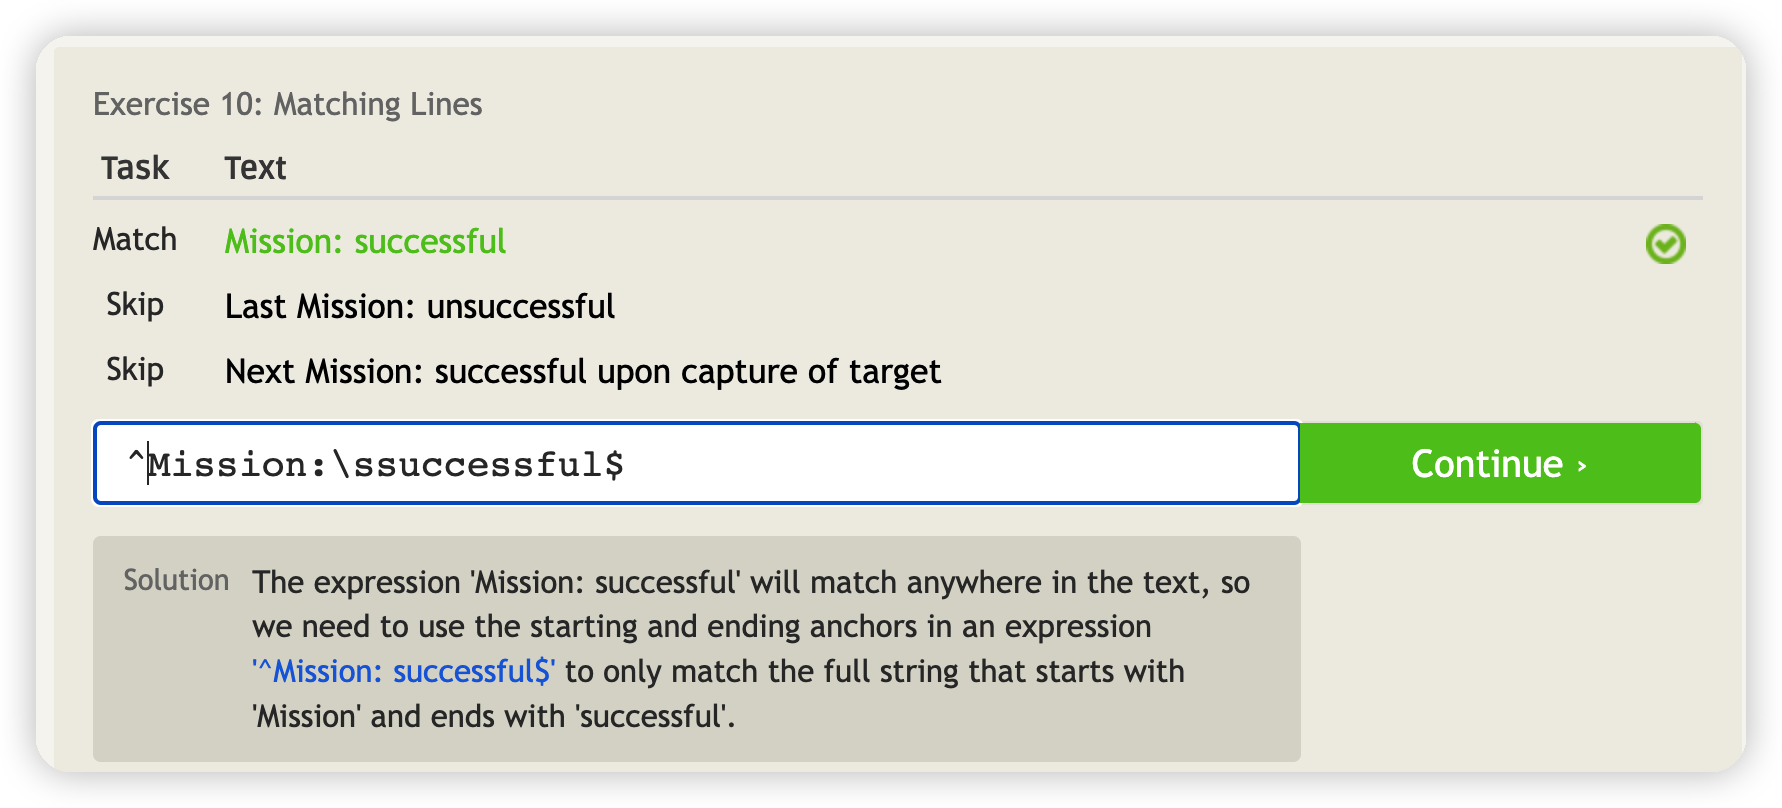
Lesson 11: Match groups
Regular expressions allow us to not just match text but also to extract information for further processing. This is done by defining(定义) groups of characters and capturing them using the special parentheses ( and ) metacharacters. Any subpattern inside a pair of parentheses will be captured as a group. In practice, this can be used to extract information like phone numbers or emails from all sorts of data.
正则表达式使我们不仅可以匹配文本,还可以提取信息以进行进一步处理。这是通过定义角色组并使用特殊括号(和)Metacharacters捕获它们来完成的。一对括号内的任何子模型都将作为一个组捕获。实际上,这可用于提取来自各种数据的电话号码或电子邮件之类的信息。
Imagine for example that you had a command line tool to list all the image files you have in the cloud. You could then use a pattern such as ^(IMG\d+.png)$ to capture and extract the full filename, but if you only wanted to capture the filename without the extension, you could use the pattern ^(IMG\d+).png$ which only captures the part before the period.
想象一下,例如,您有一个命令行工具来列出云中所有图像文件。然后,您可以使用 ^(img \ d+\。png)$之类的模式来捕获和提取完整的文件名,但是如果您只想在没有扩展名的情况下捕获文件名,则可以使用模式 ^(img \ d+)\ .png $,仅在此期间之前捕获零件。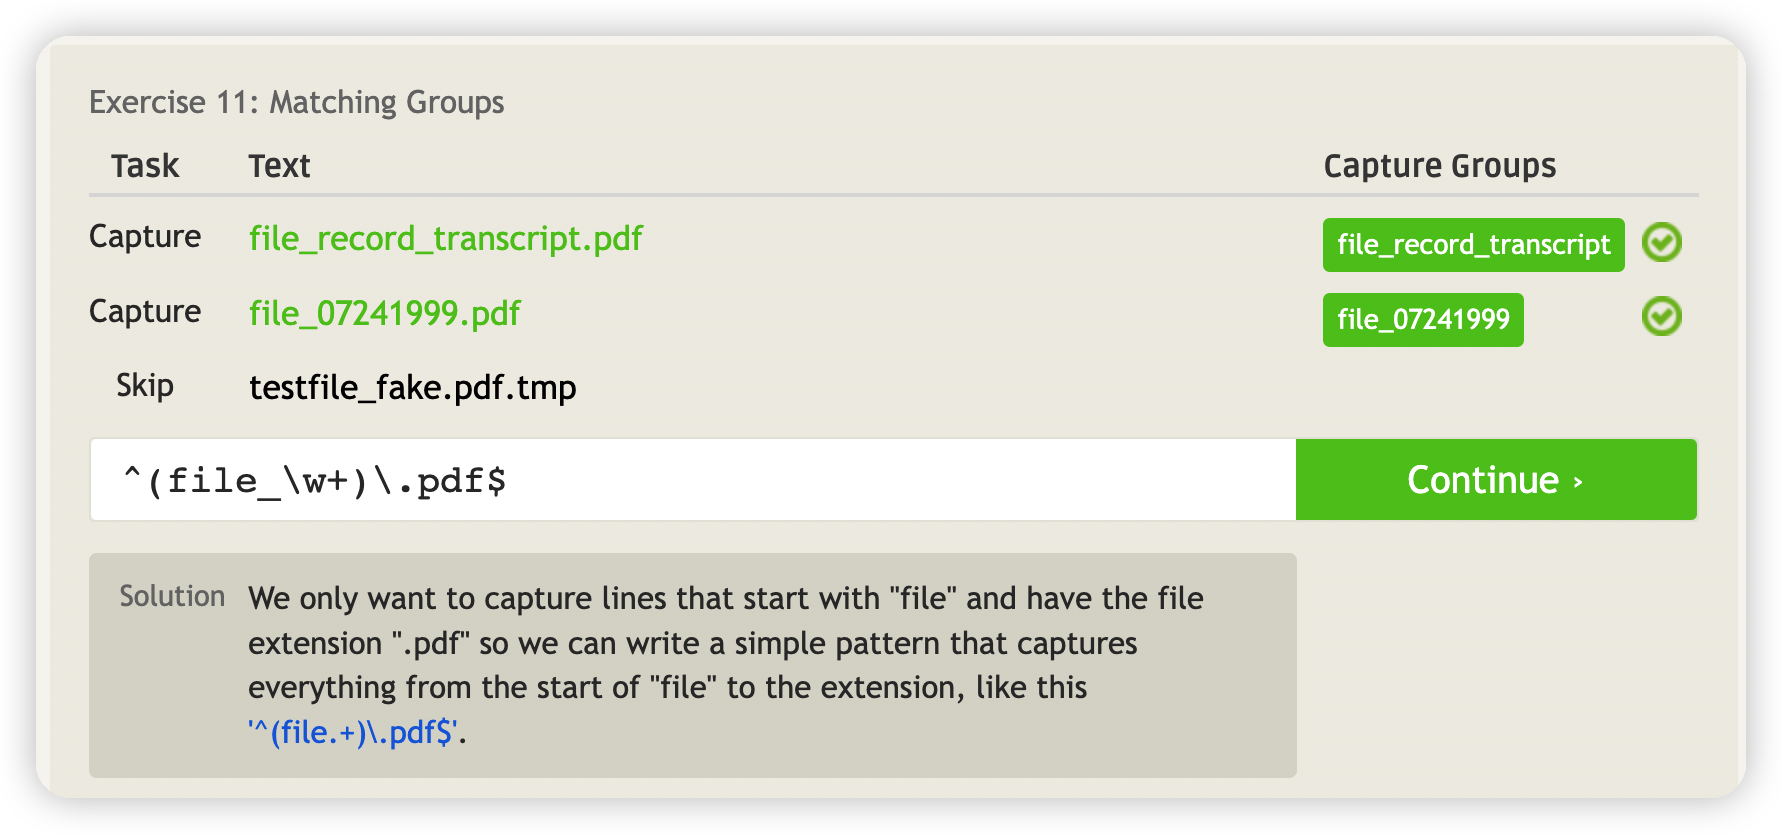
Lesson 12: Nested groups
第12课:嵌套组
As you saw in the previous lessons, all the quantifiers including the star *, plus +, repetition {m,n} and the question mark ? can all be used within the capture group patterns. This is the only way to apply quantifiers on sequences of characters(字符序列) instead of the individual characters themselves.
正如您在以前的课程中看到的那样,所有量词包括星 ,plus +,重复{m,n}和问号?可以在捕获组模式中使用。这是应用字符序列而不是单个字符本身的量化符的唯一方法。
For example, if I knew that a phone number may or may not contain an area code, the right pattern would test for the existence of the whole group of digits _*(\d{3})?_ and not the individual characters themselves (which would be wrong).
例如,如果我知道电话号码可能包含或可能不包含区域代码,那么正确的模式将测试整个数字的存在(\ d {3})?而不是单个角色本身(这是错误的)。
Depending on the regular expression engine you are using, you can also use non-capturing groups which will allow you to match the group but not have it show up in the results.
Below are a couple different common display resolutions, try to capture the width and height of each display.
根据所使用的正则表达引擎,您还可以使用非捕捉组,这些组将允许您匹配该组,但在结果中不显示它们。
以下是几个不同的公共显示分辨率,请尝试捕获每个显示的宽度和高度。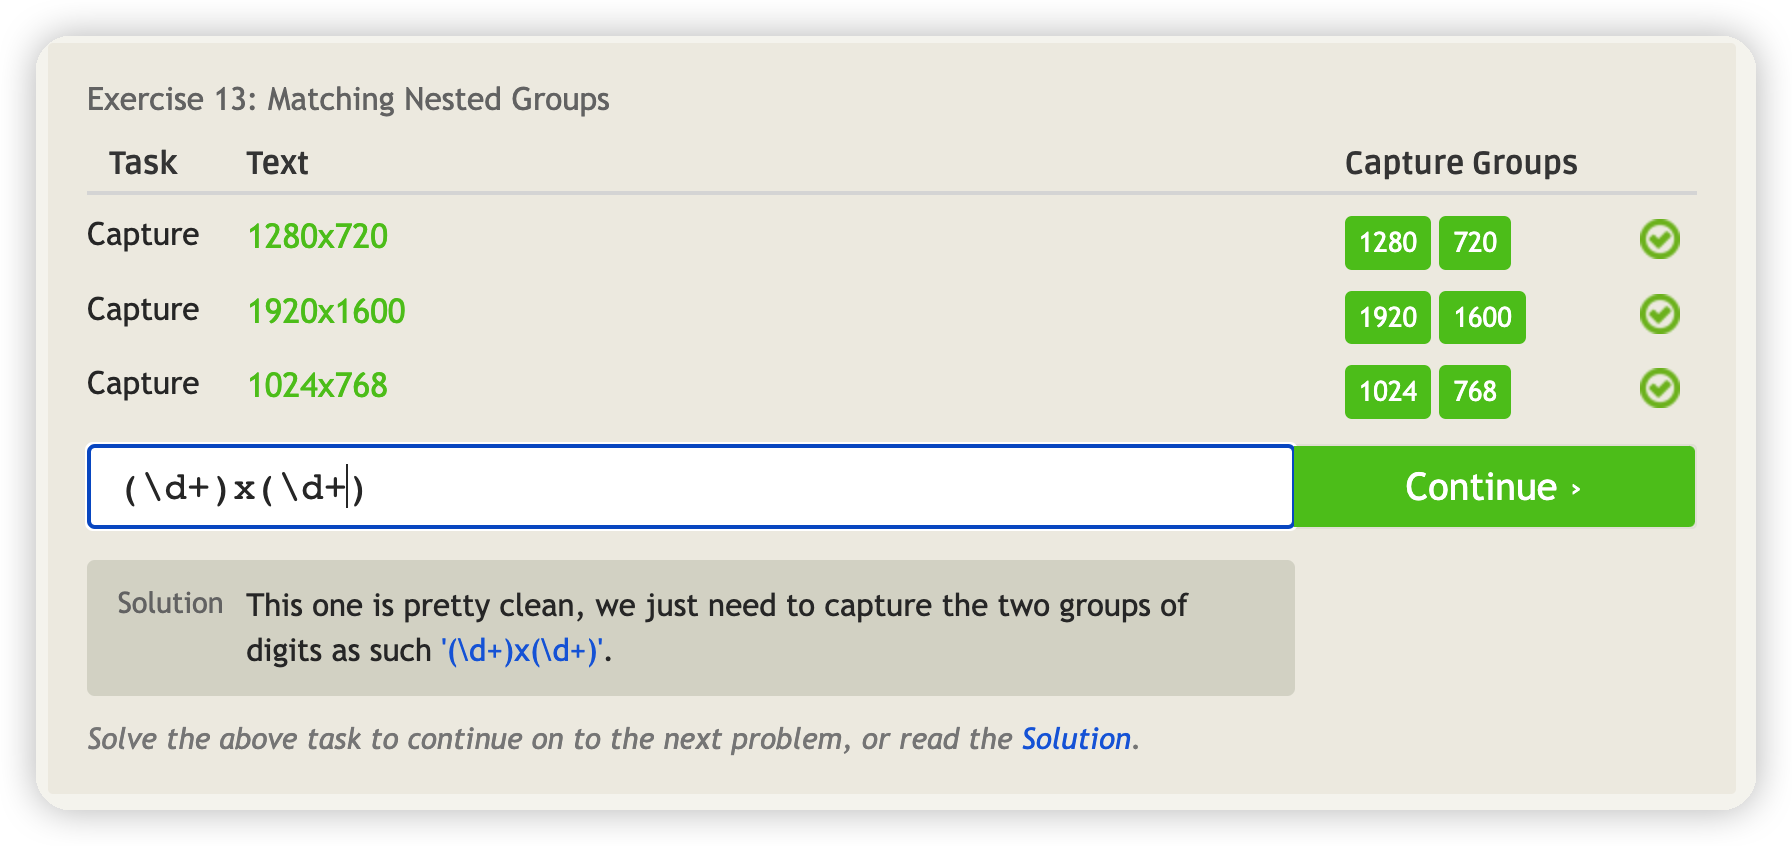
Lesson 14: It’s all conditional
第14课:都是有条件的
As we mentioned before, it’s always good to be precise, and that applies to coding, talking, and even regular expressions. For example, you wouldn’t write a grocery list for someone to Buy more .* because you would have no idea what you could get back. Instead you would write Buy more milk or Buy more bread, and in regular expressions, we can actually define these conditionals explicitly.
正如我们之前提到的,准确地说,这总是很好,这适用于编码,说话甚至正则表达式。例如,您不会写杂货清单以供某人购买更多。因为您不知道自己可以回来什么。取而代之的是,您会写更多的牛奶或购买更多面包,并且在正则表达式中,我们实际上可以明确定义这些条件。
Specifically when using groups, you can use the | (logical OR, aka. the pipe) to denote different possible sets of characters. In the above example, I can write the pattern “Buy more (milk|bread|juice)” to match only the strings Buy more milk, Buy more bread, or Buy more juice.
特别是在使用组时,您可以使用|(逻辑或,又称管道)表示不同可能的字符集。在上面的示例中,我可以写出“购买更多(牛奶|面包|果汁)”的模式,以匹配弦乐,购买更多牛奶,购买更多面包或购买更多果汁。
Like normal groups, you can use any sequence of characters or metacharacters in a condition, for example, ([cb]ats|[dh]ogs?) would match either cats or bats, or, dogs or hogs. Writing patterns with many conditions can be hard to read, so you should consider making them separate patterns if they get too complex.
像普通组一样,您可以使用任何条件下的字符或metacharacter序列,例如([cb] ats*| [dh] ogs?)匹配猫或蝙蝠,或狗或猪。具有许多条件的写作模式可能很难阅读,因此,如果它们变得太复杂,则应考虑将它们分开。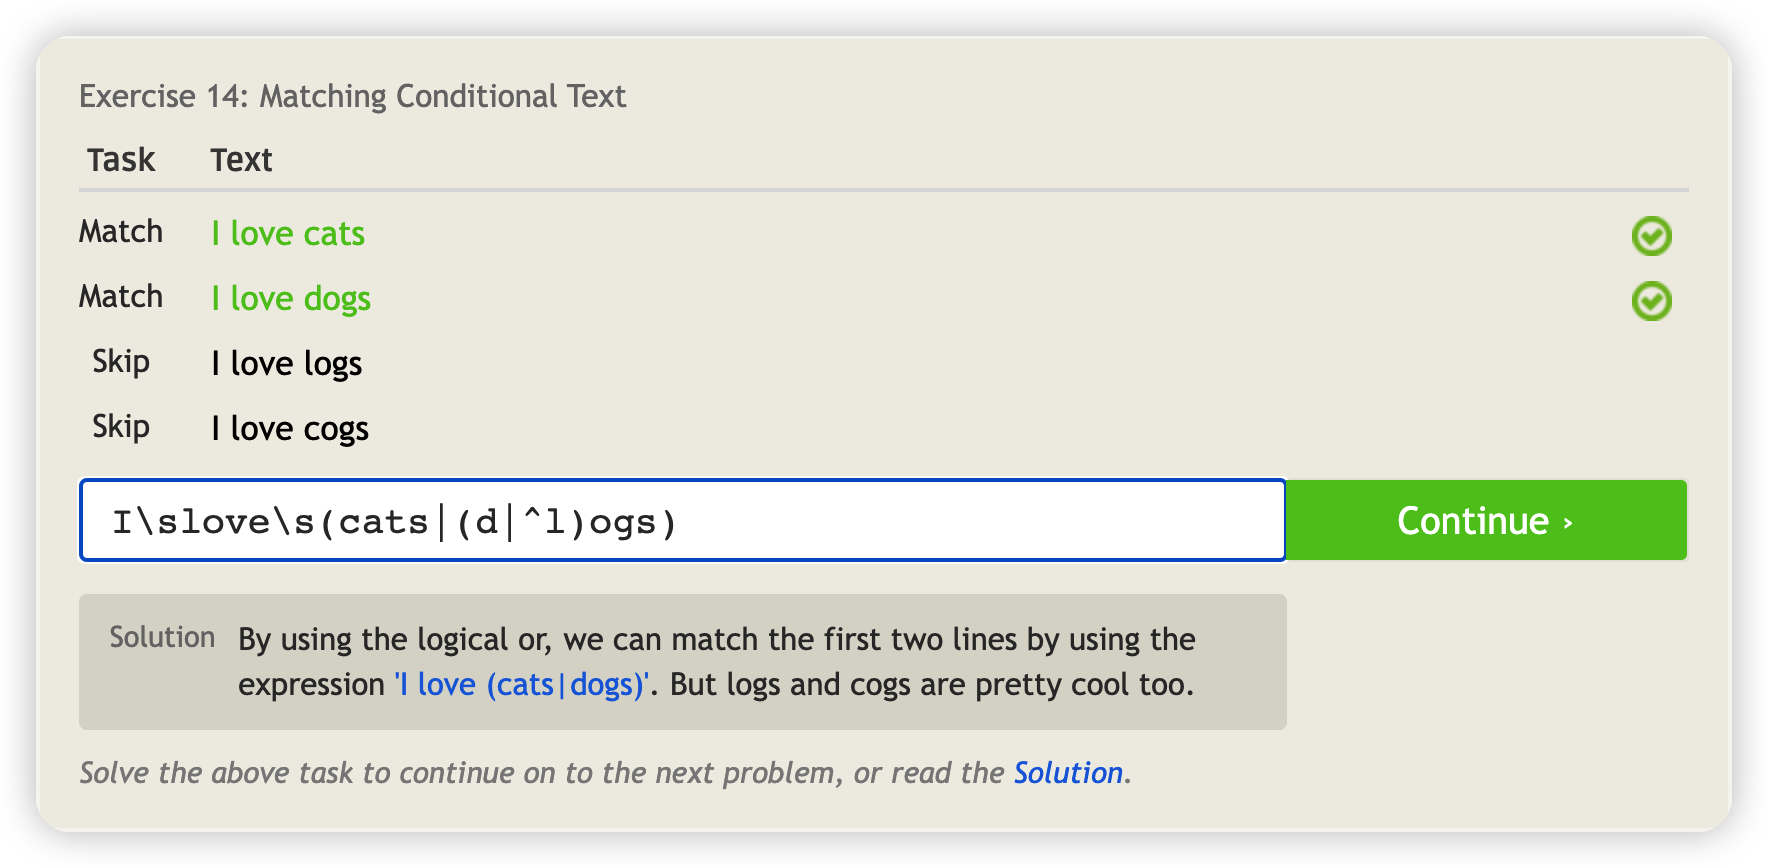
Lesson 15: Other special characters
第15课:其他特殊角色
This lesson will cover some extra metacharacters, as well as the results of captured groups.
本课程将涵盖一些额外的元字段以及被捕获组的结果
We have already learned the most common metacharacters to capture digits using \d, whitespace using \s, and alphanumeric letters and digits using \w, but regular expressions also provides a way of specifying the opposite sets of each of these metacharacters by using their upper case letters. For example, \D represents any non-digit character, \S any non-whitespace character, and \W any non-alphanumeric character (such as punctuation). Depending on how you compose your regular expression, it may be easier to use one or the other.
我们已经学习了使用\ d,使用\ s和字母数字的字母和数字使用\ w捕获数字的最常见的metacharacters,但正则表达式也提供了一种通过使用其上部的每个Metacharacters的相反集的方法案例字母。例如,\ d代表任何非数字字符,\ s任何非whitespace字符,以及\ w任何非alphanumeric字符(例如标点符号)。根据您如何构成正则表达式的方式,使用一个或另一种可能会更容易。
One concept that we will not explore in great detail in these lessons is back referencing, mostly because it varies depending on the implementation. However, many systems allow you to reference your captured groups by using \0 (usually the full matched text), \1 (group 1), \2 (group 2), etc. This is useful for example when you are in a text editor and doing a search and replace using regular expressions to swap two numbers, you can search for “(\d+)-(\d+)” and replace it with “\2-\1” to put the second captured number first, and the first captured number second for example.
我们不会在这些课程中详细探讨的一个概念是回到引用,主要是因为它取决于实现。但是,许多系统允许您使用\ 0(通常是完整匹配的文本),\ 1(第1组),\ 2(第2组)等引用捕获的组。编辑器并使用正则表达式进行搜索和替换以交换两个数字,您可以搜索“(\ d+) - (\ d+)”,然后用“ \ 2- \ 1”替换为“ \ 2- \ 1”,以将第二个捕获的编号放在首位,并且例如,第一个捕获的数字第二。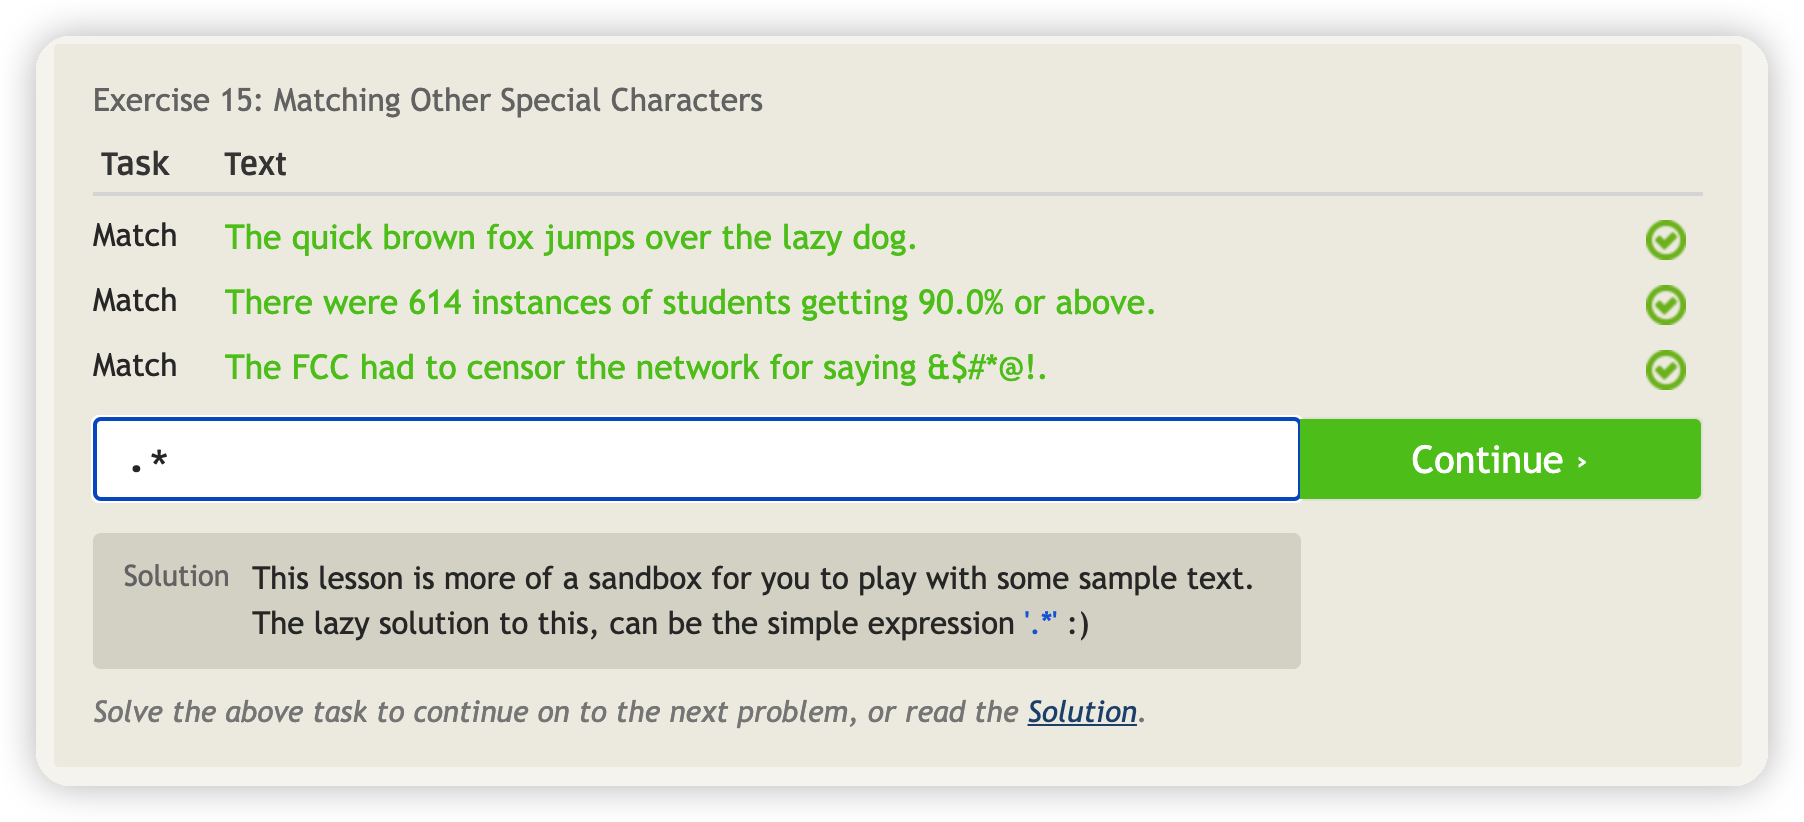
Lesson X: Infinity and beyond!
课X:无限和超越!

You’ve finished the tutorial!
Congrats on finishing the lessons! We hope that they’ve given you a bit more experience with regular expressions and how to apply them in everyday use.
恭喜完成课程!我们希望他们能为您提供更多的正则表达方式以及如何在日常使用中应用它们的经验。
There are still topics within regular expressions that we have not yet explored, – things like greedy vs. non-greedy expressions, posix notation and more. We will try to elaborate more on these in future lessons.
我们尚未探索的正则表达式中仍然存在一些主题,例如贪婪和非怪兽表达,posix符号等。我们将尝试在以后的课程中详细说明这些内容。
Problem 1: Matching a decimal numbers
At first glance, writing a regular expression to match a number should be easy right?
乍一看,编写正则表达式以匹配一个数字应该很容易吗?
We have the \d special character to match any digit, and all we need to do is match the decimal point right? For simple numbers, that may be right, but when working with scientific or financial numbers, you often have to deal with positive and negative numbers, significant digits, exponents, and even different representations (like the comma used to separate thousands and millions).
我们有\ d特殊字符可以匹配任何数字,而我们所要做的就是匹配小数点正确吗?对于简单的数字,这可能是正确的,但是在使用科学或财务数字时,您通常必须处理正数,负数,大量数字,指数,甚至不同的表示(例如用于分离数千和数百万的逗号)。
Below are a few different formats of numbers that you might encounter. Notice how you will have to match the decimal point itself and not an arbitrary character using the dot metacharacter. If you are having trouble skipping the last number, notice how that number ends the line compared to the rest.
以下是您可能遇到的几种数字格式。请注意,您将如何使用点Metacharacter匹配小数点本身,而不是任意角色。如果您没有跳过最后一个数字,请注意该数字与其他数字相比如何结束。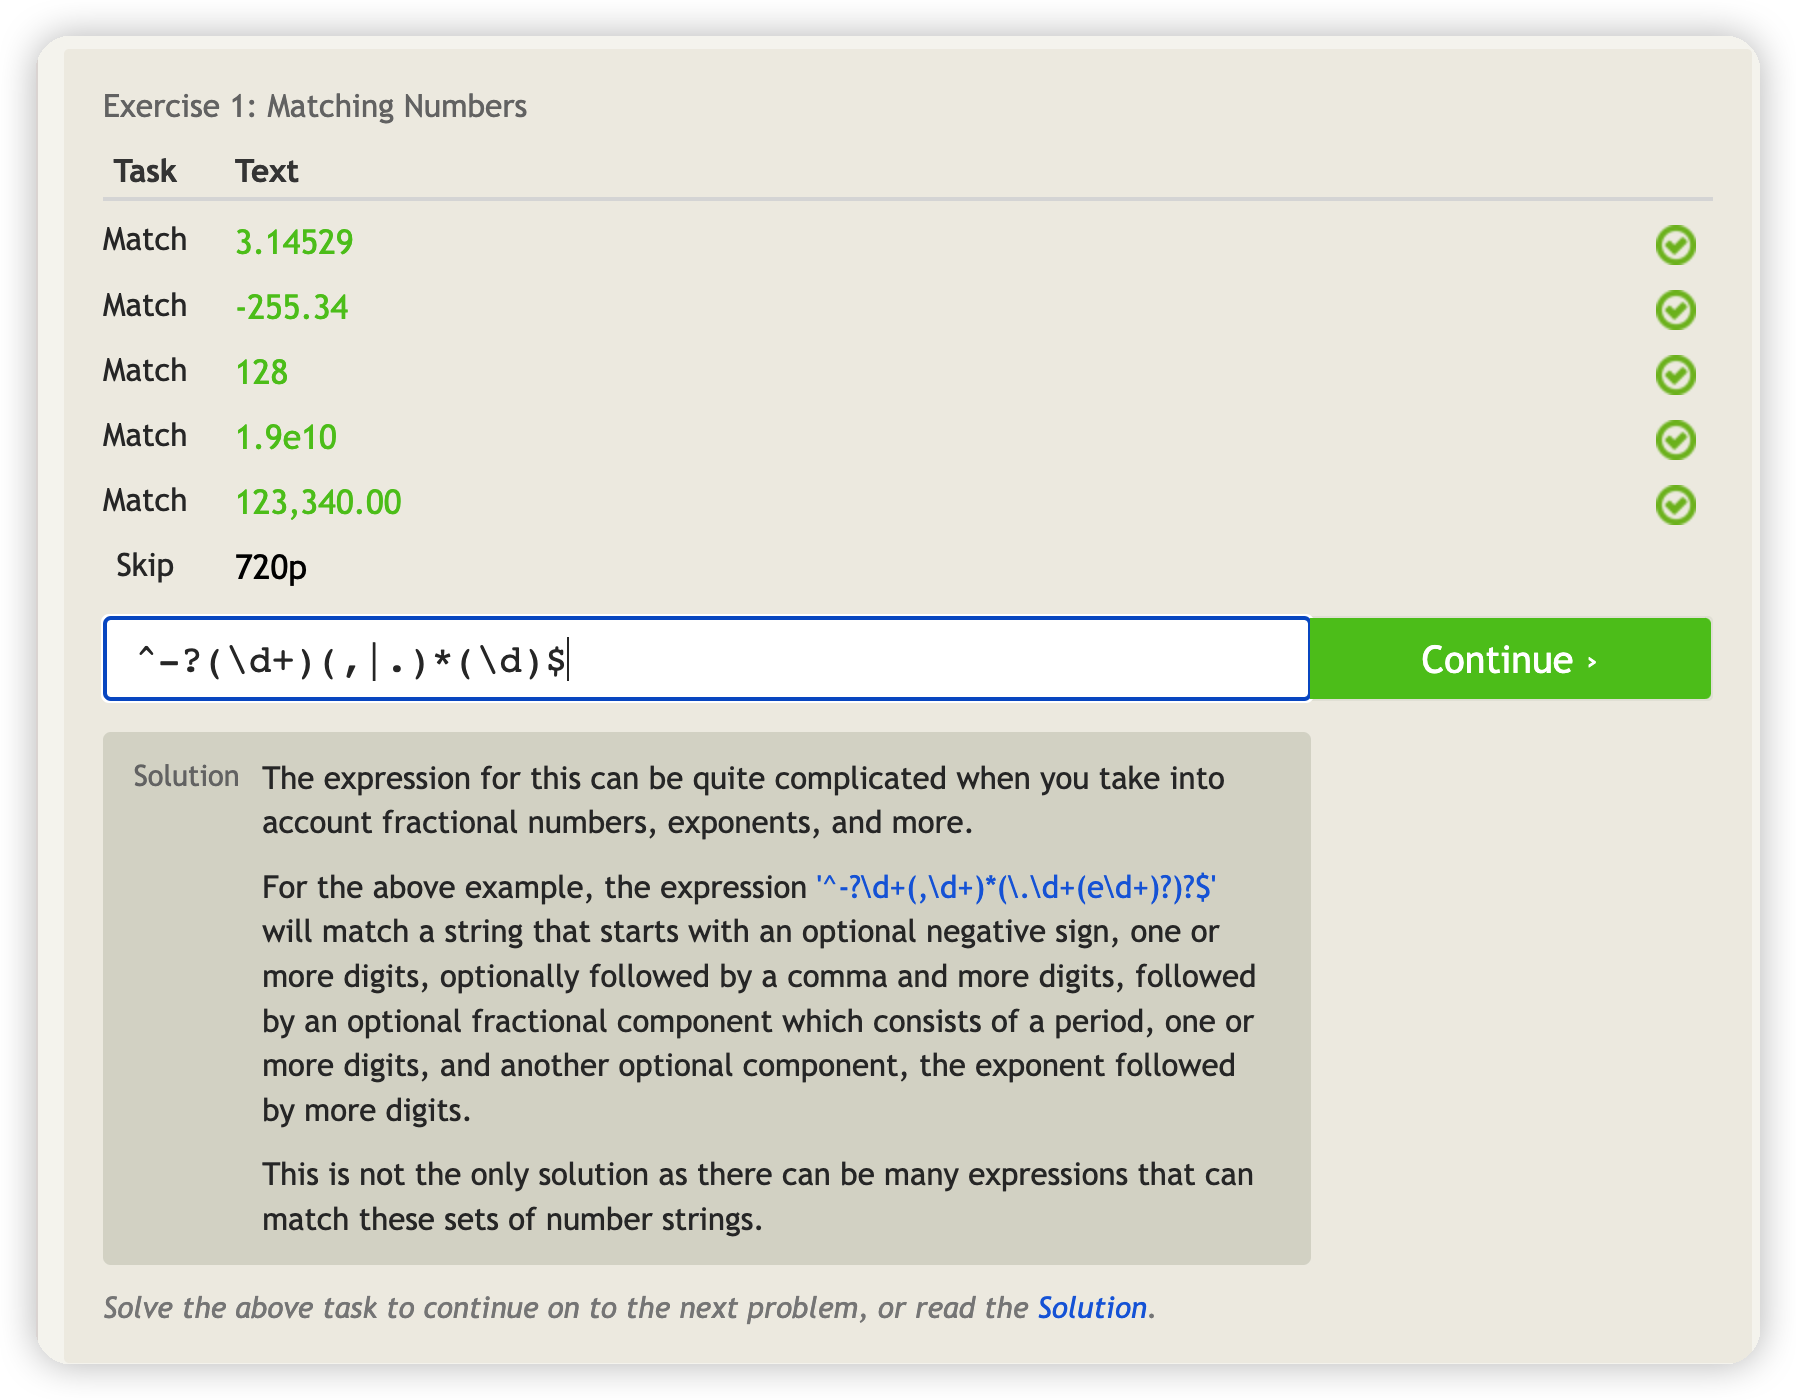
Problem 2: Matching phone numbersProblem 2: Matching phone numbers
Validating phone numbers is another tricky task depending on the type of input that you get. Having phone numbers from out of the state which require an area code, or international numbers which require a prefix will add complexity to the regular expression, as does the individual preferences that people have for entering phone numbers (some put dashes or whitespace while others do not for example).
根据您获得的输入类型,验证电话号码是另一个棘手的任务。从州外的电话号码需要区域代码或需要前缀的国际电话号码会增加正则表达式的复杂性,人们对输入电话号码的偏好也是如此(有些人放置破折号或空间,而其他人则确实如此例如)
正则表达式挑战
// 挑战一:数字
var pattern1 = null;  // 补全该正则表达式
console.log(pattern1.test('123')); // true
console.log(pattern1.test('abc')); // false
// 挑战二:3位的数字
var pattern2 = null;  // 补全该正则表达式
console.log(pattern2.test('123'));  // true
console.log(pattern2.test('1234')); // false
// 挑战三:至少3位的数字
var pattern3 = null;  // 补全该正则表达式
console.log(pattern3.test('1234')); // true
console.log(pattern3.test('12'));   // false
// 挑战四:3-5位的数字
var pattern4 = null;  // 补全该正则表达式
console.log(pattern4.test('1234')); // true
console.log(pattern4.test('1'));    // false
// 挑战五:由26个英文字母组成的字符串
var pattern5 = null;  // 补全该正则表达式
console.log(pattern5.test('abc'));  // true
console.log(pattern5.test('1abc')); // false
// 挑战六:由数字和26个英文字母组成的字符串
var pattern6 = null;  // 补全该正则表达式
console.log(pattern6.test('1abc'));  // true
console.log(pattern6.test('_abc'));  // false
// 挑战七:日期格式:年-月-日
var pattern7 = null;  // 补全该正则表达式
console.log(pattern7.test('2016-08-20'));  // true
console.log(pattern7.test('2016/08/20'));  // false
// 挑战八:时间格式:小时:分钟, 24小时制
var pattern8 = null;  // 补全该正则表达式
console.log(pattern8.test('13:45'));  // true
console.log(pattern8.test('13点45')); // false
// 挑战九:中国大陆身份证号,15位或18位
var pattern9 = null;  // 补全该正则表达式
console.log(pattern9.test('4223222199901090033'));  // true
console.log(pattern9.test('asdfasdfasfasdf1234'));  // false
Emoji表情匹配正则
/([0-9|*|#]\uFE0F\u20E3)|([0-9|#]\u20E3)|([\u203C-\u3299]\uFE0F\u200D)|([\u203C-\u3299]\uFE0F)|([\u2122-\u2B55])|(\u303D)|([\A9|\AE]\u3030)|(\uA9)|(\uAE)|(\u3030/)|([\uD83C|\uD83D|\uD83E][\uDC00-\uDFFF])|([\uD83C|\uD83D|\uD83E][\uDC00-\uDFFF][\u200D|\uFE0F])/g
🥶Git操作篇
git添加记录(git add *)
/* 添加修改的指定文件到本地仓库 */
git add *.text
/* 添加修改的全部文件到本地仓库 */
git add .
git提交记录(git commit -m ‘*’)
git commit -m '这里书写本次提交的信息'
git status查看当前仓库状态
git status
git diff *查看指定文件具体修改内容
git diff *.text
git reflog查看操作的每条记录
git reflog
🥘远程仓库
由于你的本地Git仓库和GitHub仓库之间的传输是通过SSH加密的,所以,需要一点设置
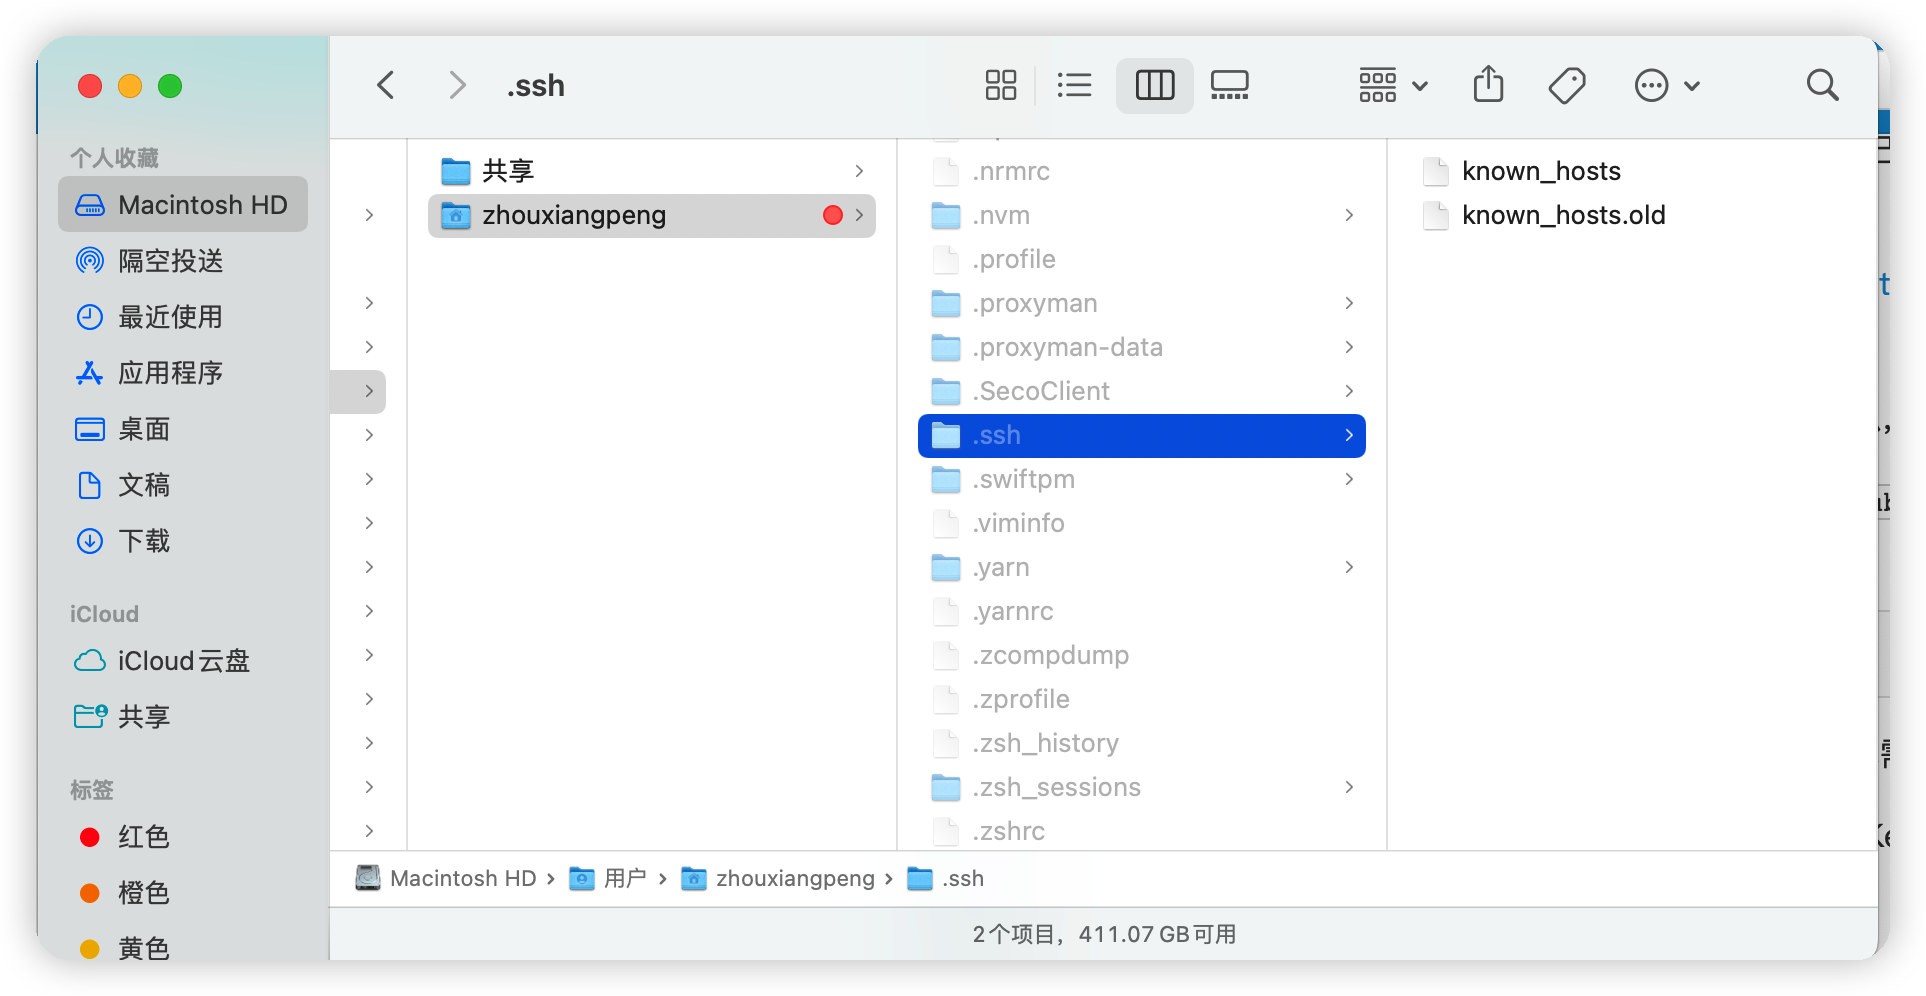
第1步:创建SSH Key。在用户主目录下,看看有没有.ssh目录,如果有,再看看这个目录下有没有id_rsa和id_rsa.pub这两个文件,如果已经有了,可直接跳到下一步。如果没有,打开Shell(Windows下打开Git Bash),创建SSH Key:
ssh-keygen -t rsa -C "youremail@example.com"你需要把邮件地址换成你自己的邮件地址,然后一路回车,使用默认值即可,由于这个Key也不是用于军事目的,所以也无需设置密码。
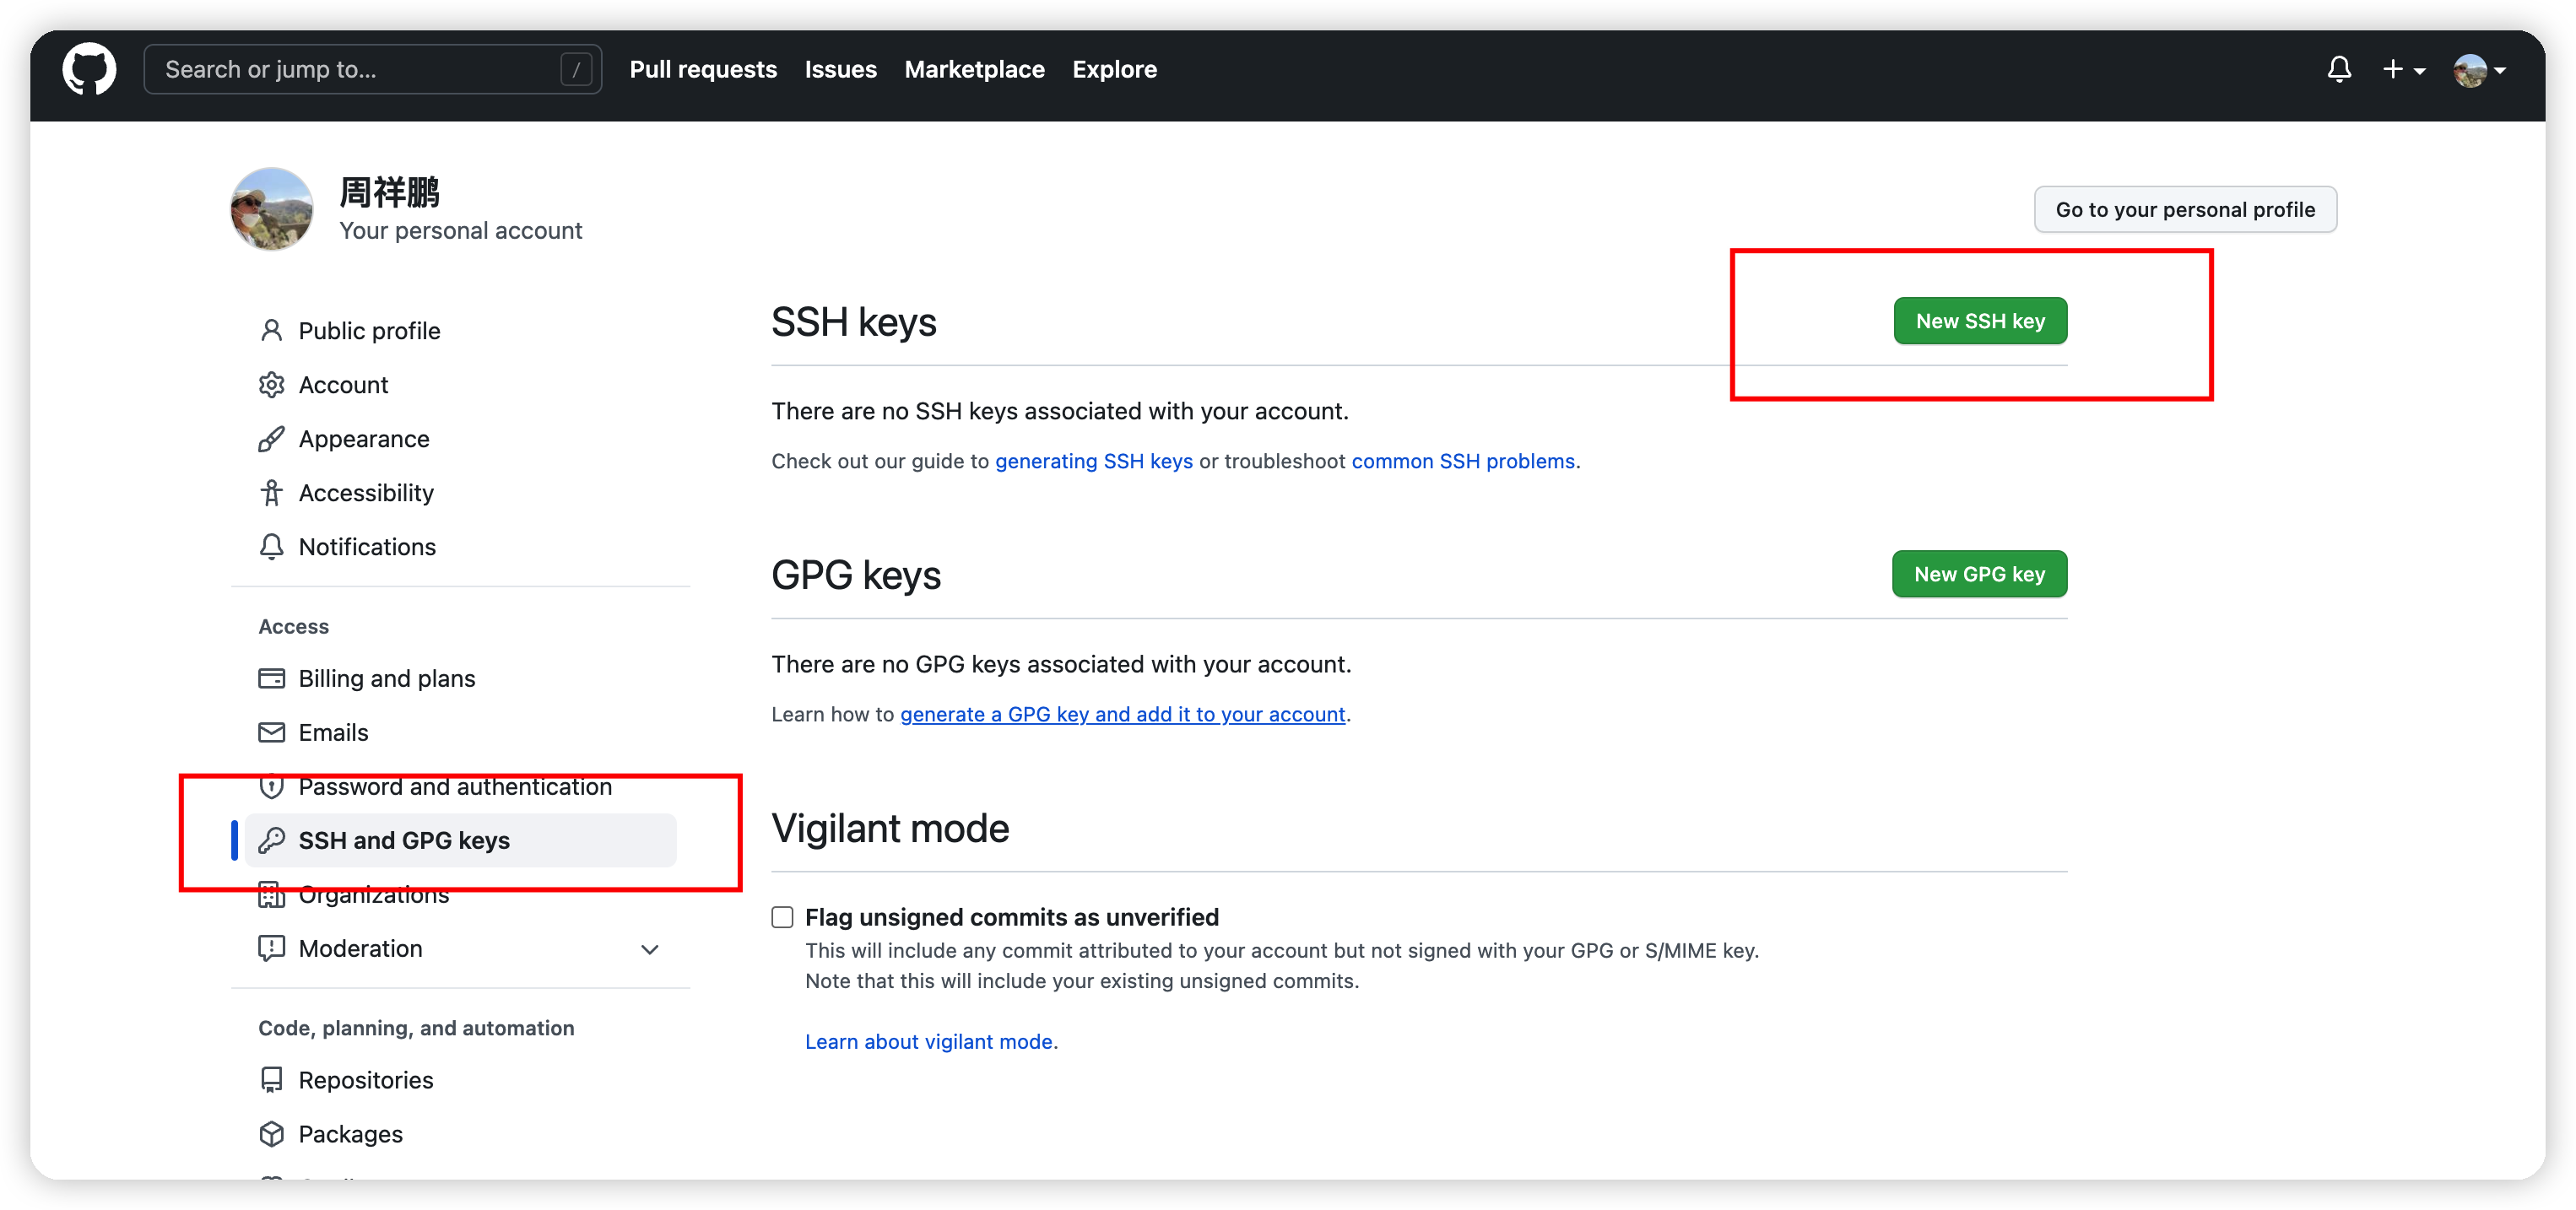
如果一切顺利的话,可以在用户主目录里找到.ssh目录,里面有id_rsa和id_rsa.pub两个文件,这两个就是SSH Key的秘钥对,id_rsa是私钥,不能泄露出去,id_rsa.pub是公钥,可以放心地告诉任何人。第2步:登陆GitHub,打开“Account settings”,“SSH Keys”页面:
- 然后,点“Add SSH Key”,填上任意Title,在Key文本框里粘贴id_rsa.pub文件的内容:
要关联一个远程库,使用命令
git remote add origin git@server-name:path/repo-name.git;关联一个远程库时必须给远程库指定一个名字,origin是默认习惯命名;
- 关联后,使用命令
**git push -u origin master**第一次推送master分支的所有内容; - 此后,每次本地提交后,只要有必要,就可以使用命令
**git push origin master**推送最新修改; - 删除远程库
如果添加的时候地址写错了,或者就是想删除远程库,可以用git remote rm **git remote -v**查看远程库信息:
$ git remote -v
origin  git@github.com:michaelliao/learn-git.git (fetch)
origin  git@github.com:michaelliao/learn-git.git (push)
然后,根据名字删除,比如删除origin:
$ git remote rm origin
git remote rename old_name new_name
提交忽略文件设置(.gitignore)
# Numerous always-ignore extensions
*.bak
*.patch
*.diff
*.err

# temp file for git conflict merging
*.orig
*.log
*.rej
*.swo
*.swp
*.zip
*.vi
*~
*.sass-cache
*.tmp.html
*.dump

# OS or Editor folders
.DS_Store
._*
.cache
.project
.settings
.tmproj
*.esproj
*.sublime-project
*.sublime-workspace
nbproject
thumbs.db
*.iml

# Folders to ignore
.hg
.svn
.CVS
.idea
node_modules/
jscoverage_lib/
bower_components/
dist/
————————————————
版权声明:本文为CSDN博主「不懂小小彬」的原创文章,遵循CC 4.0 BY-SA版权协议,转载请附上原文出处链接及本声明。
原文链接:https://blog.csdn.net/hf123lsk/article/details/79001411
git 分支切换
/* 切换并且创建改分支,如果分支名不存在的话 */
git checkout -b dev
/* 切换分支 */
git checkout dev
/* 删除分支 */
git branch -D dev
webpack编程指南💡
2022.05.20
指南
指南章节,用于理解和掌握 webpack 提供的各种工具和特性。首先是一个 快速开始 指引。
指南会逐步带你由浅入深。本章节更多是作为一个切入点,一旦阅读完成后,你就会更加容易深入到实际的 配置 文档中。
起步
webpack 用于编译 JavaScript 模块。一旦完成 安装,你就可以通过 webpack CLI 或 API 与其配合交互。如果你还不熟悉 webpack,请阅读 核心概念 和 对比,了解为什么要使用 webpack,而不是社区中的其他工具。
Warning
运行 webpack 5 的 Node.js 最低版本是 10.13.0 (LTS)。
基本安装
首先我们创建一个目录,初始化 npm,然后 在本地安装 webpack,接着安装 webpack-cli(此工具用于在命令行中运行 webpack):
mkdir webpack-demo
cd webpack-demo
npm init -y
npm install webpack webpack-cli --save-dev
概念篇总结
- 对于loader的理解
webpack内置是对于js语言进行编译打包,将高级别的语言或者高版本的js编译为低版本,浏览器支持的版本语法!由于前端发展迅速,导致不同js库的出现,层出不穷,但是webpack内部并没有支持这些库语法!
那么loader就是webpack内部抛出的API接口,支持接收一些其他的类型转换的方法转译为js的片段的入口!我们可以通过指定的loader转译器去转译一些指定的语法库,然后将转换后的js片段让weback去打包,创建graph(代码依赖图)。
总的就是一句话总结loader: 它是帮助不同js库或者语法库编译转换类型的加载器,转译为符合webpack能编译操作处理的js代码片段!
loader 可以将文件从不同的语言(如 TypeScript)转换为 JavaScript 或将内联图像转换为 data URL。loader 甚至允许你直接在 JavaScript 模块中 import CSS 文件!
- 对于plugin(插件)的理解
plugin(插件),无疑就是处理loader没法去处理的东西,例如:打包优化📦,静态资源管理,传递全局环境变量!
例如html-plugin-template插件,该插件可以进行扩展,让你的打包后的chunk(js文件)文件自动引入到模版HTML文件中!
入口出口篇总结
- 入口配置
入口配置有两种配置
1️⃣ 单页面配置
module.export = {
    entry: './index.js'
}
2️⃣ 多页面入口
module.export = {
    entry: {
        "page_1": "./page_1.js",
        "page_2": "./page_2.js",
    }
}
博客:多页面应用的好处
个人了解知道的是:单页面应用,打包的时候是打包所有的依赖进入一个依赖关系图(graph),这样应用的大小就很大,就比如,如果是一个网站,有后台以及前端网页,如果他是坐在一个文件项目中,那么打包部署的文件就很大!但是如果前台后台是分开不同的文件进行开发,那就当我没说!
多页面应用配置打包就相当于拆开引用,也就相当于是两个文件夹单独配置webpack打包,每个入口进去有自己的依赖关系图谱!
- 出口配置

若有收获,就点个赞吧
0 人点赞
