知识点
vue-router
Vue Router是vue官方的路有管理器,它和Vue.js的核心深度集成,让构建单页面应用变的易如反掌
安装: vue add router
核心步骤:
步骤一:使用vue-router插件,router.js
import Router from 'vue-router'Vue.use(Router)
步骤二:创建router实例,router.js
export default new Router({...})
步骤三:在根组件添加该实例 main.js
import router from './router';new Vue({router,}).$mount(#app);
步骤四:添加路由视图,app.vue
<router-view></router-view>
导航
<router-link to="/">home</router-link><router-link to="/about">about</router-link>
this.$router.push('/');this.$router.push('/about')
vue-router源码实现
单页面应用程序,url发生变化,不能刷新,显示对应视图内容。
需求分析
- spa页面不能刷新
- hash #about
- histort api /about
- 根据uri显示对应内容
- router-view
- 数据响应式
- current变量持有uri地址,一旦变化,动态重新执行render
任务
- 实现一个插件
//保存选项 class VueRouter{ constructor(options){ this.$options = options;
//监控url变化 定义响应式属性current const initial = window.location.hash.slice(‘1’) || ‘’ //从#后开始截取 Vue.util.defineReactive(this,’current’,initial); //将current值响应式 window.addEventListener(‘haschange’,this.onHasChange.bind(this))
}
onHasChange(){ this.current = window.location.hash.slice(1); } }
//插件需要实现install方法 VueRouter.install = function(_vue){ //引用构造函数,VueRouter中要使用 Vue =_vue;
//任务一,挂载$router Vue.mixin({ beforeCreate(){ //只有根组件拥有router选项 if(this.$options.router){ Vue.prototype.$router = this.$options.router } } }) }
//任务二,实现两个全局组件router-link和router-view Vue.component(‘router-link’,Link); Vue.component(‘router-view’,View);
export default VueRouter
问题:为什么要用混入的形式 因为Vue.use在前,Router实例创建在后,而install逻辑需要使用该实例
<a name="Zs8ew"></a>### 创建router-view router-link创建Krouter-link.js```vueexport default {props:{to:string,requried:true}render(h){// return '<a herf={'#'+this.to}{this.$slots.default}</a>'return h('a',{attrs:{href="#" +this.to}},[this.$slots.default;])}}}
创建krouter-view.js
动态获取对应组件,krouter-view.js
export default{render(h){//动态获取对应组件let comonent = null;//通过在vue实例的router options选项中,寻找当前path对应的组件const route = this.$router.options.route.find(route=>{route.path === this.$router.current;if(route){component = route.component;return h(component);}})}}
Vuex
vuex集中式存储管理应用的所有组件的状态,并以响应的规则保证状态以可预测的方式发生改变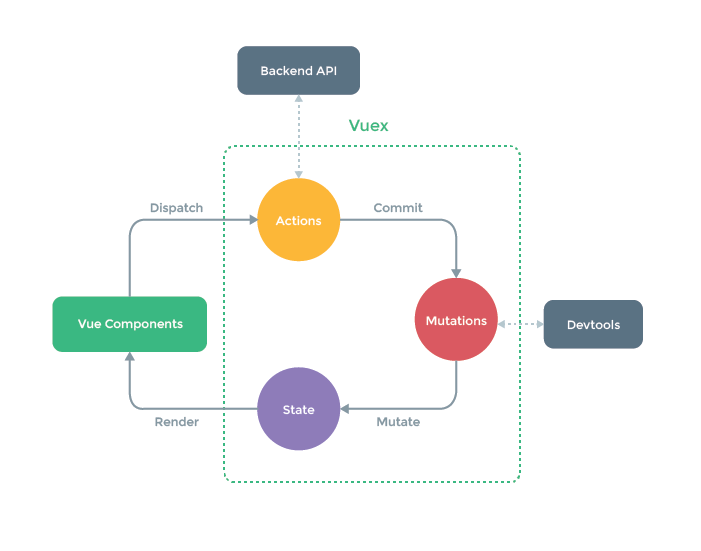
使用vuex
vue add vuex
核心概念
- state状态,数据
- mutations更新状态数据
- actions异步操作数据
- store包含以上数据的容器
状态-state
state保存应用状态
export default Vuex.store({state:{counter:0}})
状态变更-mutations
mutations用于修改状态
export default Vuex.store({mutations:{add(state){state.counter++;}}})
派生状态-getters
从state派生出新状态,类似计算属性
export default new Vuex.store({getters:{doubuleCouter(state){//计算属性return state.counter * 2;}}})
动态-actions
添加业务逻辑,类似于controller
export default new Vuex.store({actions:{add({commit}){setTimeOut(()=>{commit('add');},500)}}})
测试代码
<p @click="$store.commit('add')">counter:{{$store.state.couter}}</p><p @click="$store.dispatch('add')">async counter:{{$store.state.couter}}</p><p>double counter:{{$store.getters.doubleCounter}}</p>
Vuex解析原理
任务分析
- 实现插件
class Store{ // 设置默认值 construtor(options={}){ this._vm = new Vue({data:{ $$state:options.state; }})
保存用户的mutaions选项 this._mutations = options.mutations || {}; this._actions = options.actions || {};
//实现action,根据用户传入type获取并执行对应action //同时把action也绑了,因为action可以互调 绑定commit上下文否则action中调用commit可能会出问题 const store = this; const {commit ,action} = store;
this.commit = function boundCommit(type,payload){ commit.call(store,type,payload); }
this.action = function boundAction(type,payload){ action.call(store,type,payload); } }
commit(type,payload){ 获取type对应的mutaion this.entry = this._mutations[type]; if(!entry){ console.log(‘unknow mutation type’) return; } 指定上下文为store实例 传递state给mutation entry(this.state,payload); }
dispatch(type,payload){ 获取用户编写的type对应的action const entry = this._actions[type]; if(!entry){ console.error(unknow action type) return; } //异步结果处理常常需要返回promise return entry(this,payload); }
//设置一个存取器 get(){ returen this._vm.data.$$state; }
set(v){ console.log(‘warnning to set state’); } }
function install(_vue){ Vue = _vue; 挂载store,与挂在router一样,use在前,Store创建在后,而在install Vue.mixin({ beforeCreate(){ if(this.$options.store){ Vue.prototype.$store = this.$options.store; } } }) }
export default {Store,install}; ```

若有收获,就点个赞吧
0 人点赞
