- Dom 对象
- (一) Dom 树, Dom 节点和 Dom 对象
- (二) Dom 节点操作(增删改查)
- (四) 事件常见类型
- (五) 事件对象
- Bom 对象
- 1. location.href 获取浏览器地址 (window.location)
- http://www.baidu.com‘ // 跳转到百度">2. location.href = ‘http://www.baidu.com‘ // 跳转到百度
- http://www.baidu.com?username=huruqing‘
// 跳转到百度的时候,加上参数 username=huruqing">3. location.href = ‘http://www.baidu.com?username=huruqing‘
// 跳转到百度的时候,加上参数 username=huruqing - 4. setTimeout 延迟
- 5. setInterval 定时器和清除定时器
- 6. navigator: userAgent 用来判断用户在使用什么设备
- 7. history对象 浏览器历史对象
Dom 对象
目录
- DOM 树, DOM 节点, DOM 对象是什么
- 利用 DOM 对象对 DOM 节点进行增删改查操作
- 事件绑定
- 事件常见类型
- 事件对象
- 事件冒泡和事件捕获
(一) Dom 树, Dom 节点和 Dom 对象
DOM 树 (见图)
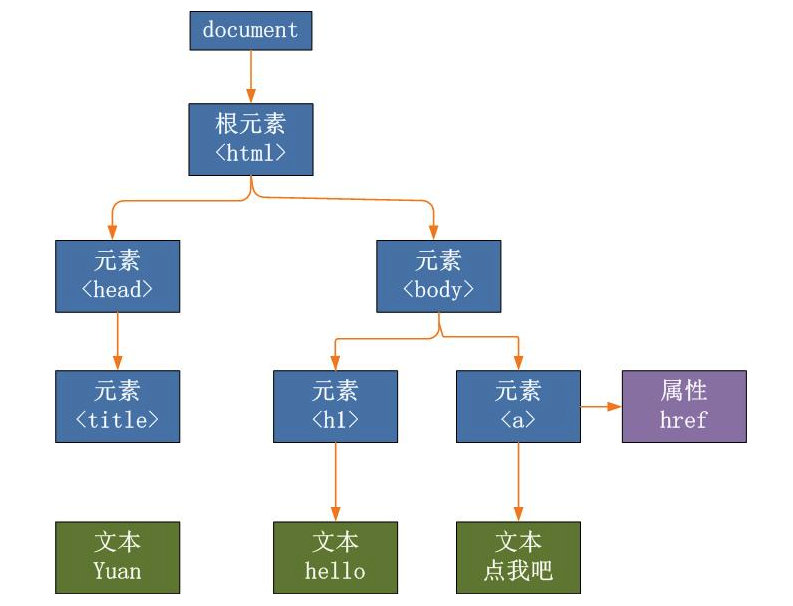
2. DOM 节点
3. DOM 对象
4. 全称 Document object Model, 中文名称文档对象模型
作用: 用来的元素节点进行操作, 比如修改元素节点的内容, 修改元素节点的样式
(二) Dom 节点操作(增删改查)
2.1 获取 DOM 节点,获取 DOM 节点的属性,样式和内容
1. 获取 DOM 节点
<body><div id="app">app</div><ul><li class="item">1</li><li class="item">2</li><li class="item">3</li><li class="item">4</li><li class="item">5</li></ul><script>var $app = document.querySelector('#app');console.log('app', $app);var $item = document.querySelector('.item');console.log('item', $item);var $items = document.querySelectorAll('.item');console.log('$items', $items);</script></body>
document.getElementById('xxx'); //根据id来获取dom节点,xxx是id名,id是唯一的document.querySelector('xxx'); // 根据选择器来获取dom节点(只能获取一个),xxx可以是任意选择器document.querySelectorAll(); // 根据选择器来获取dom节点(获取全部),xxx可以是任意选择器dir(xxx) 可以在控制台查看对象的属性
2. 获取 DOM 节点的属性和样式
<style>a {color: red;}</style></head><body><a href="http://www.baidu.com" style="font-size: 20px;background-color: gray;">百度</a><script>// 获取a标签的href属性var $a = document.querySelector('a');console.log('href属性:', $a.href); //// 获取a标签的样式console.log('a标签的样式', $a.style.fontSize, $a.style.backgroundColor);// 获取a标签的字体颜色console.log('a标签的字体样式', $a.style.color); // 获取不到console.log('a标签的字体样式', window.getComputedStyle($a, null).color); // 了解</script></body>
(1)获取属性 - 见demo(2)获取样式 - 见demo
3. 获取 dom 节点的内容
<body><div id="app"><div>aaaaaa<p>bbbbbb</p></div></div><script>var $app = document.querySelector('#app');// 获取标签和文本console.log('innerHTML=', $app.innerHTML);// 只获取文本console.log('innerText=', $app.innerText);</script></body>
innerHTML 获取内容连同元素节点innerText 只获取文本内容
2.2 添加节点
1. 创建节点和插入节点
<body><ul id="list"><li>1</li><li>2</li><li>3</li></ul><script>// 创建li节点var $li = document.createElement('li');$li.innerText = 4;// 把li节点插入到ul里面var $list = document.querySelector('#list');$list.appendChild($li);</script></body>
2. 通过点击事件插入节点
<body><button onclick="add();">添加节点</button><ul id="list"><li>1</li><li>2</li><li>3</li></ul><script>var num = 4;function add() {// 创建li节点var $li = document.createElement('li');$li.innerText = num++;console.log(num);// 把li节点插入到ul里面var $list = document.querySelector('#list');$list.appendChild($li);}</script></body>
2.3 删除节点
remove()
<body><ul id="list"><li>1</li><li>2</li><li>3</li></ul><button onclick="remove();">删除</button><script>function remove() {var $list = document.querySelector('#list');$list.remove();}</script></body>
2.4 修改节点(内容,样式,属性)
- 修改内容 节点.innerHTML=xxx; innerText=xxx;- 修改样式 节点.style.xxx=xxx; // style是行内样式- 修改属性 节点.属性名=xxx;
- 修改内容 节点.innerHTML=xxx; innerText=xxx; ```javascript
<script>function showDiv() {var $box = document.querySelector('.box');var $button = document.querySelector('button');var flag = $box.style.display;if (flag === 'none') {$box.style.display = 'block';$button.innerText = '隐藏';} else {$box.style.display = 'none';$button.innerText = '显示';}}</script>
- 修改样式 节点.style.xxx=xxx; // style是行内样式```javascript<style>div {border: 1px solid;margin-top: 20px;}.dsn {display: none;}</style></head><body><button onclick="showDiv();">显示</button><div class="box"><p>xxxxxx</p><p>xxxxxx</p><p>xxxxxx</p></div><script>function showDiv() {var $box = document.querySelector('.box');var $button = document.querySelector('button');var className = $box.className;if (className === 'box') {$box.className = 'box dsn';$button.innerText = '隐藏';} else {$box.className = 'box';$button.innerText = '显示';}}</script>
- 修改属性 节点.属性名=xxx; ```javascript
<button onclick="changeImg(1)">换图1</button><button onclick="changeImg(2)">换图2</button><div class="box"><img src="./img/fj1.jpg" alt=""></div><script>function changeImg(num) {// 修改img的src属性document.querySelector('img').src = `./img/fj${num}.jpg`;}</script>
<a name="MsSUb"></a>## (三)事件绑定<a name="Ah1gk"></a>### 3.1 普通事件绑定(DOM 一级)- onxxx- xxx.click```javascript<body><button onclick="alert('哈哈哈哈');">点我</button><button id="btn">点我2</button><script>var $btn = document.querySelector('#btn');$btn.onclick = function() {alert('嘿嘿嘿');}</script></body>
3.2 高级事件绑定(DOM 二级) addEventListener
dom一级事件绑定和dom二级事件绑定区别: 同类型事件, 前者绑定多次, 只会执行一次, 后者可以执行多次
<body><button id="btn1" onclick="alert('哈哈哈哈');">点我</button><button id="btn2">点我2</button><script>var $btn = document.querySelector('#btn1');$btn.onclick = function() {alert('再绑定一次');}var $btn2 = document.querySelector('#btn2');// 参数1:事件名称 参数2:监听器(监听函数) 参数3:事件模式$btn2.addEventListener('click', function() {alert('dom二级事件绑定')}, false);// 函数也可以在外边声明$btn2.addEventListener('click', test, false);function test() {alert('再绑定一次')}</script></body>
3.3 使用 js 触发事件
<body><button id="btn1" onclick="console.log('哈哈哈哈');">点我</button><button id="btn2">点我2</button><script>var $btn = document.querySelector('#btn1');$btn.onclick = function() {console.log('再绑定一次');}var $btn2 = document.querySelector('#btn2');// 参数1:事件名称 参数2:监听器(监听函数) 参数3:事件模式$btn2.addEventListener('click', function() {console.log('dom二级事件绑定')}, false);// 函数也可以在外边声明$btn2.addEventListener('click', test, false);function test() {console.log('再绑定一次')}// 通过js触发事件$btn.click();setTimeout(function() {$btn2.click();}, 3000)</script></body>
(四) 事件常见类型
1.如图
| onchange | HTML 元素改变 |
|---|---|
| onclick | 用户点击 HTML 元素 |
| onmouseover | 用户在一个 HTML 元素上移动鼠标 |
| onmouseout | 用户从一个 HTML 元素上移开鼠标 |
| onkeydown | 用户按下键盘按键 |
| onkeyup | 用户松开键盘按键 |
| onload | 浏览器已完成页面的加载 |
| oninput | 键盘输入事件 |
| touchStart | 触摸开始 |
| touchMove | 滑动 |
<script>window.onload = function() {console.log('页面加载完成');var $button = document.querySelector('button');$button.onclick = function() {alert('哈哈哈哈');}}</script></head><body><button>点我</button></body>
<body><input type="text" name="" id="" oninput="test();" onkeydown="test2();"><script>function test() {var $input = document.querySelector('input');console.log($input.value);}var count = 0;function test2() {console.log(`键盘被按下了${++count}次`);}</script></body>
<body><p>xxxx</p><p>xxxx</p><script>// 滚动事件var count = 0;window.onscroll = function() {console.log(`滚动了${++count}次`);}</script></body>
| touchEnd | 触摸结束 |
更多事件类型
https://www.runoob.com/jsref/dom-obj-event.html
(五) 事件对象
1. event 对象: 每个事件被触发时,都会产生一个event对象
<body><button onclick="clickMe();">点击我</button><input type="text" oninput="inputData()"><script>function clickMe() {console.log(event);}function inputData() {console.log(event);}</script></body>
2. target 和 currentTarget
- target表示被触发的元素(比如: 点击事件就是被点击的元素)
- currentTarget是事件绑定的元素 ```javascript
<script>function clickMe() {var target = event.target; // 点击谁就是谁var currentTarget = event.currentTarget; // divconsole.log('被点击的元素是:', target);console.log('事件绑定的元素:', currentTarget);}</script>
<a name="KZoqo"></a>## (六) 事件冒泡和事件捕获<a name="WUUVt"></a>### 1. 事件流(事件的传播)1. 事件捕获阶段1. 目标阶段1. 事件冒泡阶段```javascript<style>#box {width: 500px;height: 500px;background-color: gray;}#pp {width: 300px;height: 300px;background-color: green;padding: 50px;}#btn {position: fixed;bottom: 20px;left: 20px;}</style></head><body><div id="box"><p id="pp"><button id="btn">事件源</button></p></div><script>var $box = document.querySelector('#box');var $pp = document.querySelector('#pp');var $btn = document.querySelector('#btn');// false表示在冒泡阶段触发, true表示在捕获阶段触发$box.addEventListener('click', function() {console.log('div监听到了事件');}, false);$pp.addEventListener('click', function() {console.log('p标签监听到了事件');}, false);$btn.addEventListener('click', function() {console.log('button标签监听到了事件');}, false);</script>
2. 事件冒泡应用: 事件委托(托管)
<style>li {border: 1px solid;margin-top: 10px;cursor: pointer;width: 100px;}.on {color: red;}</style></head><body><ul id="app" onclick="clickLi();"><li>1</li><li>2</li><li>3</li><li>4</li><li>5</li></ul><script>function clickLi() {// console.log(event.target);var target = event.target;console.log(target);if (target.nodeName !== 'LI') return false;// 其他的li清除颜色var $li = document.querySelector('.on');if ($li) {$li.className = ''}// 被点击的li改变颜色target.className = 'on';}</script>
- 改造计算器
Bom 对象
1. location.href 获取浏览器地址 (window.location)
2. location.href = ‘http://www.baidu.com‘ // 跳转到百度
3. location.href = ‘http://www.baidu.com?username=huruqing‘
// 跳转到百度的时候,加上参数 username=huruqing
// 1.location对象// (1) 获取url地址var urlStr = location.href;console.log('urlStr:', urlStr);// (2) 用location.href进行页面跳转location.href = 'http://www.baidu.com';// (2) 页面参数传递,比如a页面要传数据给b页面location.href = 'http://www.baidu.com?a=222&b=333';// (3) location.search 获取浏览器地址?开始的参数// 作业: 把字符 ?a=123&b=456,使用对象存起来,比如: {a:123,b:456}// var str = '?a=123&b=456';// var obj = {};var params = location.search;
4. setTimeout 延迟
// (4) 延迟执行setTimeout(function() {console.log('一秒后执行')}, 1000);
5. setInterval 定时器和清除定时器
// (5) setInterval 定时器var count = 0;var timer = setInterval(function() {console.log(count++);// 当count等于10的时候,清除定时器if (count === 10) {// 清除定时器clearInterval(timer);}}, 1000);
6. navigator: userAgent 用来判断用户在使用什么设备
<!DOCTYPE html><html lang="en"><head><meta charset="UTF-8"><meta http-equiv="X-UA-Compatible" content="IE=edge"><meta name="viewport" content="width=device-width, initial-scale=1.0"><title>Document</title></head><body><h3>正在判断用户设备......</h3><script>// 判断用户使用设备//js判断是否移动端function fIsMobile() {return /Android|iPhone|iPad|iPod|BlackBerry|webOS|Windows Phone|SymbianOS|IEMobile|Opera Mini/i.test(navigator.userAgent);}setTimeout(function() {var res = fIsMobile();if (res) {location.href = './mobile.html';} else {location.href = './pc.html';}}, 3000);</script></body></html>
7. history对象 浏览器历史对象
history.back();history.forward();history.go();

若有收获,就点个赞吧
0 人点赞
