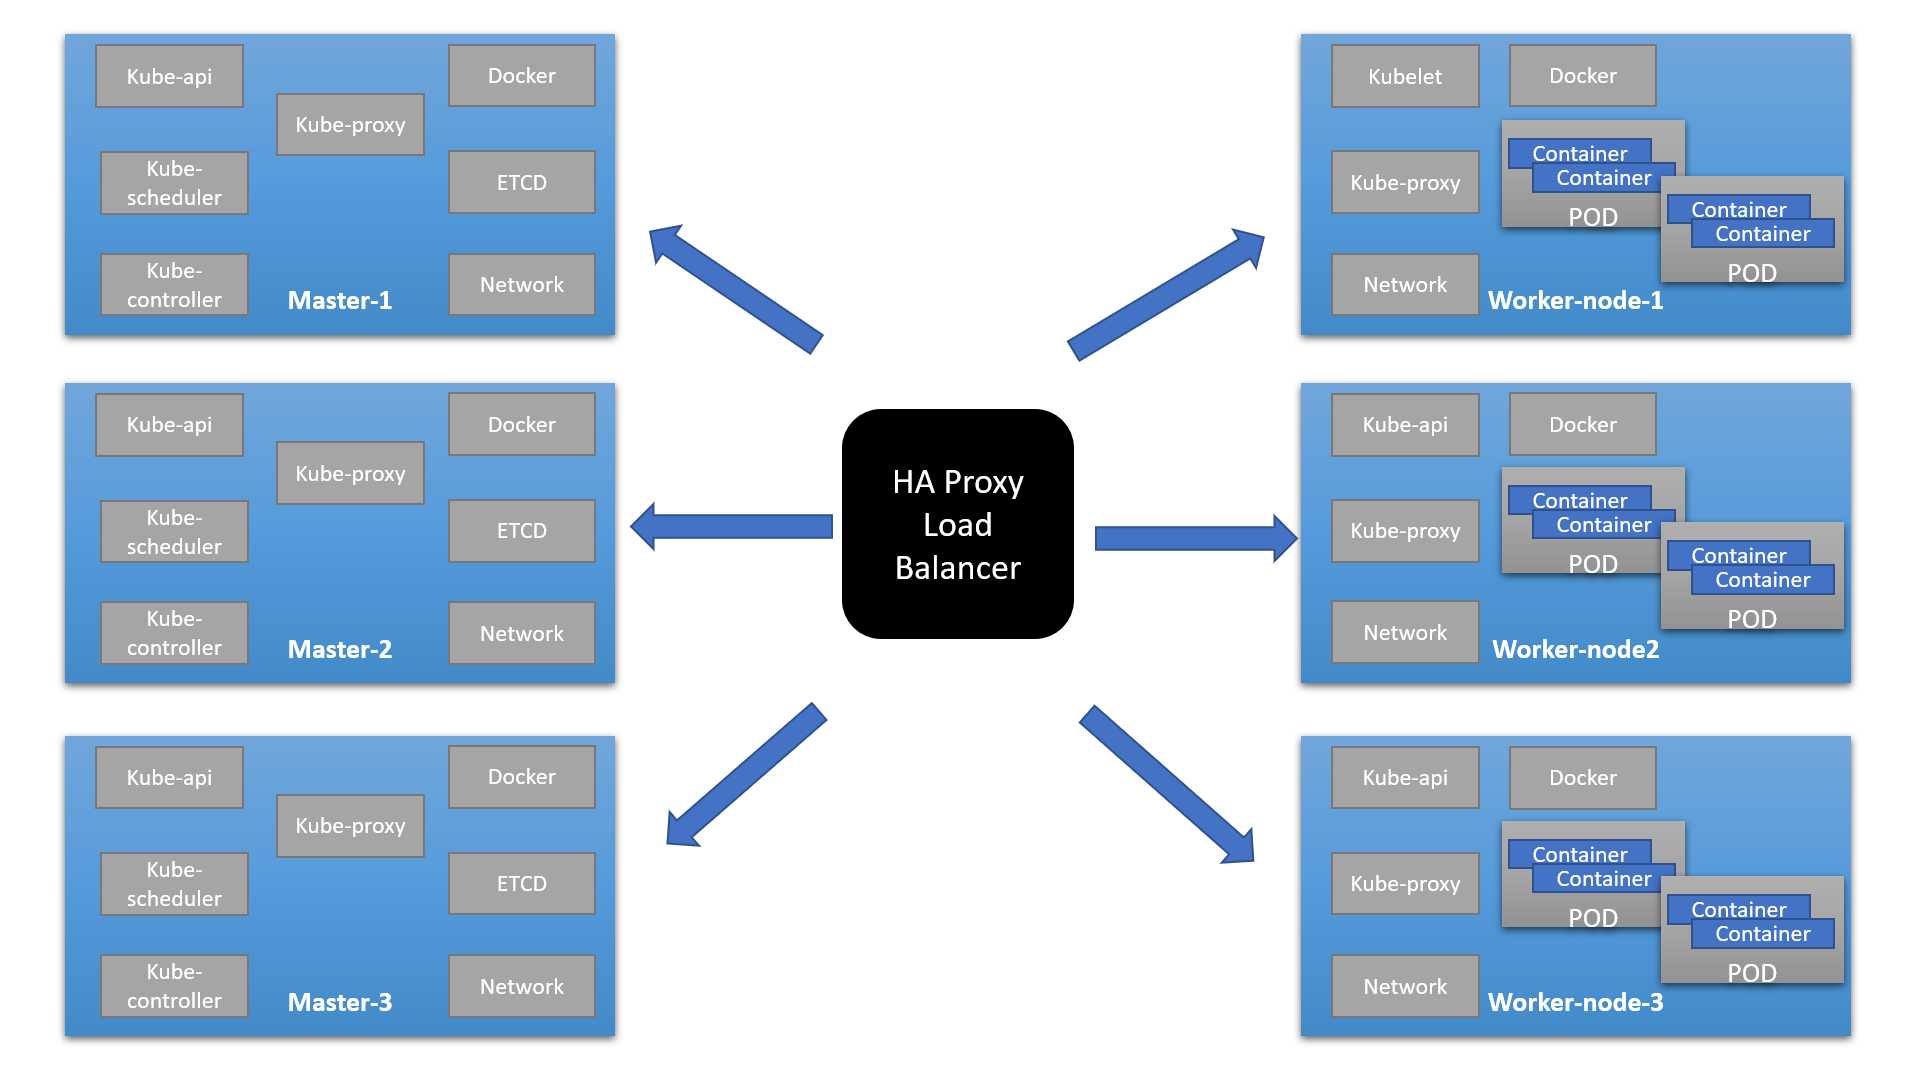
准备机器列表如下
机器列表如下:
| IP地址 | hostname |
|---|---|
| 10.158.1.9 | k8s-master-03 |
| 10.158.1.8 | k8s-master-02 |
| 10.158.1.7 | k8s-master-01 |
| 10.158.1.5 | k8s-worker-05 |
| 10.158.1.4 | k8s-worker-04 |
| 10.158.1.3 | k8s-worker-03 |
| 10.158.1.2 | k8s-worker-02 |
| 10.158.1.1 | k8s-worker-01 |
准备Etcd环境
节点准备kubeadm基本环境
每个节点需要安装的软件
| 软件包 | 版本 |
|---|---|
| kubeadm | 1.16.1 |
| docker | 19.03.5 |
| kubelet | 1.16.1 |
| kubectl | 1.16.1 |
kubeadm: 部署集群用的命令kubelet: 在集群中每台机器上都要运行的组件,负责管理pod、容器的生命周期kubectl: 集群管理工具(可选,只要在控制集群的节点上安装即可)
添加yum源
cat <<EOF | sudo tee /etc/yum.repos.d/kubernetes.repo[kubernetes]name=Kubernetesbaseurl=http://mirrors.aliyun.com/kubernetes/yum/repos/kubernetes-el7-x86_64enabled=1gpgcheck=0repo_gpgcheck=0gpgkey=http://mirrors.aliyun.com/kubernetes/yum/doc/yum-key.gpghttp://mirrors.aliyun.com/kubernetes/yum/doc/rpm-package-key.gpgEOF# 找到要安装的版本号,目前最新为1.16.1yum list kubeadm --showduplicates | sort -r# 安装指定版本1.16.1yum install -y kubeadm-1.16.1-0 kubelet-1.16.1-0 kubectl-1.16.1-0 --disableexcludes=kubernetes# 设置kubelet的cgroupdriver(kubelet的cgroupdriver默认为systemd,如果上面没有设置docker的exec-opts为systemd,这里就需要将kubelet的设置为cgroupfs)# 这里我上面设置了docker的exec-opts为systemd,所以跳过这一步sed -i "s/cgroup-driver=systemd/cgroup-driver=cgroupfs/g" /etc/systemd/system/kubelet.service.d/10-kubeadm.conf# 启动kubeletsystemctl enable kubelet && systemctl start kubelet
安装HAProxy
haproxy为kube-apiserver提供反向代理,haproxy将所有请求轮询转发到每个master节点上。相对于仅仅使用keepalived主备模式仅单个master节点承载流量,这种方式更加合理、健壮。
yum方式安装haproxy
yum install -y haproxy
编辑haproxy配置
cat <<EOF | sudo tee /etc/haproxy/haproxy.cfg
#---------------------------------------------------------------------
# Global settings
#---------------------------------------------------------------------
global
    # to have these messages end up in /var/log/haproxy.log you will
    # need to:
    #
    # 1) configure syslog to accept network log events.  This is done
    #    by adding the '-r' option to the SYSLOGD_OPTIONS in
    #    /etc/sysconfig/syslog
    #
    # 2) configure local2 events to go to the /var/log/haproxy.log
    #   file. A line like the following can be added to
    #   /etc/sysconfig/syslog
    #
    #    local2.*                       /var/log/haproxy.log
    #
    log         127.0.0.1 local2

    chroot      /var/lib/haproxy
    pidfile     /var/run/haproxy.pid
    maxconn     4000
    user        haproxy
    group       haproxy
    daemon

    # turn on stats unix socket
    stats socket /var/lib/haproxy/stats

#---------------------------------------------------------------------
# common defaults that all the 'listen' and 'backend' sections will
# use if not designated in their block
#---------------------------------------------------------------------
defaults
    mode                    http
    log                     global
    option                  httplog
    option                  dontlognull
    option http-server-close
    option forwardfor       except 127.0.0.0/8
    option                  redispatch
    retries                 3
    timeout http-request    10s
    timeout queue           1m
    timeout connect         10s
    timeout client          5m
    timeout server          1m
    timeout http-keep-alive 10s
    timeout check           10s
    maxconn                 3000

#---------------------------------------------------------------------
# kubernetes apiserver frontend which proxys to the backends
#---------------------------------------------------------------------
frontend kubernetes-apiserver
    mode                 tcp
    bind                 *:16443
    option               tcplog
    default_backend      kubernetes-apiserver

#---------------------------------------------------------------------
# round robin balancing between the various backends
#---------------------------------------------------------------------
backend kubernetes-apiserver
    mode        tcp
    balance     roundrobin
    server  k8s-master-01 10.158.1.7:6443 check
    server  k8s-master-02 10.158.1.8:6443 check
    server  k8s-master-03 10.158.1.9:6443 check

#---------------------------------------------------------------------
# collection haproxy statistics message
#---------------------------------------------------------------------
listen stats
    bind                 *:1080
    stats auth           admin:awesomePassword
    stats refresh        5s
    stats realm          HAProxy\ Statistics
    stats uri            /admin?stats
EOF
启动并检测
systemctl enable haproxy.service
systemctl start haproxy.service
systemctl status haproxy.service
ss -lnt | grep -E "16443|1080"
LISTEN     0      128          *:1080                     *:*
LISTEN     0      128          *:16443                    *:*
kubeadm init指令初始化
config.yaml文件如下:
apiVersion: kubeadm.k8s.io/v1beta2
kind: ClusterConfiguration
kubernetesVersion: v1.16.1
apiServer:
  certSANs:
  - 10.158.1.9
  - 127.0.0.1
controlPlaneEndpoint: "10.158.1.9:16443"
etcd:
  external:
    endpoints:
    - https://10.158.1.9:2379
    - https://10.158.1.8:2379
    - https://10.158.1.7:2379
    caFile: /etc/etcd/ca.pem
    certFile: /etc/etcd/kubernetes.pem
    keyFile: /etc/etcd/kubernetes-key.pem
networking:
  podSubnet: 10.244.0.0/16
imageRepository: registry.aliyuncs.com/google_containers
apiServerExtraArgs:
  apiserver-count: "3"
初始化第一个master节点
sudo kubeadm init --config config.yaml --v=5 --ignore-preflight-errors=all
安装成功输出大概如下所示:
Your Kubernetes control-plane has initialized successfully!

To start using your cluster, you need to run the following as a regular user:

  mkdir -p $HOME/.kube
  sudo cp -i /etc/kubernetes/admin.conf $HOME/.kube/config
  sudo chown $(id -u):$(id -g) $HOME/.kube/config

You should now deploy a pod network to the cluster.
Run "kubectl apply -f [podnetwork].yaml" with one of the options listed at:
  https://kubernetes.io/docs/concepts/cluster-administration/addons/

You can now join any number of control-plane nodes by copying certificate authorities
and service account keys on each node and then running the following as root:

  kubeadm join 10.158.1.9:16443 --token xxxx \
    --discovery-token-ca-cert-hash xxx \
    --control-plane

Then you can join any number of worker nodes by running the following on each as root:

kubeadm join 10.158.1.9:16443 --token xxx \
    --discovery-token-ca-cert-hash xxxx
安装网络插件flannel
配置文件如下所示:
cat <<EOF | sudo tee kube-flannel.yaml
---
kind: ClusterRole
apiVersion: rbac.authorization.k8s.io/v1beta1
metadata:
  name: flannel
rules:
  - apiGroups:
      - ""
    resources:
      - pods
    verbs:
      - get
  - apiGroups:
      - ""
    resources:
      - nodes
    verbs:
      - list
      - watch
  - apiGroups:
      - ""
    resources:
      - nodes/status
    verbs:
      - patch
---
kind: ClusterRoleBinding
apiVersion: rbac.authorization.k8s.io/v1beta1
metadata:
  name: flannel
roleRef:
  apiGroup: rbac.authorization.k8s.io
  kind: ClusterRole
  name: flannel
subjects:
- kind: ServiceAccount
  name: flannel
  namespace: kube-system
---
apiVersion: v1
kind: ServiceAccount
metadata:
  name: flannel
  namespace: kube-system
---
kind: ConfigMap
apiVersion: v1
metadata:
  name: kube-flannel-cfg
  namespace: kube-system
  labels:
    tier: node
    app: flannel
data:
  cni-conf.json: |
    {
      "name": "cbr0",
      "plugins": [
        {
          "type": "flannel",
          "delegate": {
            "hairpinMode": true,
            "isDefaultGateway": true
          }
        },
        {
          "type": "portmap",
          "capabilities": {
            "portMappings": true
          }
        }
      ]
    }
  net-conf.json: |
    {
      "Network": "10.244.0.0/16",
      "Backend": {
        "Type": "vxlan"
      }
    }
---
apiVersion: extensions/v1beta1
kind: DaemonSet
metadata:
  name: kube-flannel-ds-amd64
  namespace: kube-system
  labels:
    tier: node
    app: flannel
spec:
  template:
    metadata:
      labels:
        tier: node
        app: flannel
    spec:
      hostNetwork: true
      nodeSelector:
        beta.kubernetes.io/arch: amd64
      tolerations:
      - operator: Exists
        effect: NoSchedule
      serviceAccountName: flannel
      initContainers:
      - name: install-cni
        image: registry.cn-shenzhen.aliyuncs.com/cp_m/flannel:v0.10.0-amd64
        command:
        - cp
        args:
        - -f
        - /etc/kube-flannel/cni-conf.json
        - /etc/cni/net.d/10-flannel.conflist
        volumeMounts:
        - name: cni
          mountPath: /etc/cni/net.d
        - name: flannel-cfg
          mountPath: /etc/kube-flannel/
      containers:
      - name: kube-flannel
        image: registry.cn-shenzhen.aliyuncs.com/cp_m/flannel:v0.10.0-amd64
        command:
        - /opt/bin/flanneld
        args:
        - --ip-masq
        - --kube-subnet-mgr
        resources:
          requests:
            cpu: "100m"
            memory: "50Mi"
          limits:
            cpu: "100m"
            memory: "50Mi"
        securityContext:
          privileged: true
        env:
        - name: POD_NAME
          valueFrom:
            fieldRef:
              fieldPath: metadata.name
        - name: POD_NAMESPACE
          valueFrom:
            fieldRef:
              fieldPath: metadata.namespace
        volumeMounts:
        - name: run
          mountPath: /run
        - name: flannel-cfg
          mountPath: /etc/kube-flannel/
      volumes:
        - name: run
          hostPath:
            path: /run
        - name: cni
          hostPath:
            path: /etc/cni/net.d
        - name: flannel-cfg
          configMap:
            name: kube-flannel-cfg
EOF
安装指令如下:
kubectl apply -f kube-flannel.yaml
“Network”: “10.244.0.0/16”要和kubeadm-config.yaml配置文件中podSubnet: 10.244.0.0/16相同
k8s-master-01和k8s-master-02节点准备证书
在两个节点分别创建/etc/kubernetes/pki/etcd目录
mkdir -p /etc/kubernetes/pki/etcd
scp /etc/kubernetes/admin.conf it@k8s-master-02:/etc/kubernetes

scp /etc/kubernetes/pki/{ca.*,sa.*,front-proxy-ca.*} it@k8s-master-02:/etc/kubernetes/pki

scp /etc/kubernetes/pki/etcd/ca.* it@k8s-master-02:/etc/kubernetes/pki/etcd
启动k8s-master-01和k8s-master-02
sudo kubeadm join 10.158.1.9:16443 --token xxxx \
    --discovery-token-ca-cert-hash xxxx \
    --control-plane --v=5 --ignore-preflight-errors=all
启动k8s-worker节点
在五个Worker节点分别运行
sudo kubeadm join 10.158.1.9:16443 --token xxx \
    --discovery-token-ca-cert-hash xxxxx --v=5 --ignore-preflight-errors=all


