一、MVC
1. spring-web-mvc.xml 代码
加入依赖
<!-- 引入 Servlet 容器中相关依赖 --><dependency><groupId>javax.servlet</groupId><artifactId>servlet-api</artifactId><scope>provided</scope></dependency><!-- JSP 页面使用的依赖 --><dependency><groupId>javax.servlet.jsp</groupId><artifactId>jsp-api</artifactId><scope>provided</scope></dependency>
编写spring-web-mvc.xml
<?xml version="1.0" encoding="UTF-8"?>
<beans xmlns="http://www.springframework.org/schema/beans"
       xmlns:xsi="http://www.w3.org/2001/XMLSchema-instance"
       xmlns:context="http://www.springframework.org/schema/context"
       xmlns:mvc="http://www.springframework.org/schema/mvc"
       xsi:schemaLocation="http://www.springframework.org/schema/beans http://www.springframework.org/schema/beans/spring-beans.xsd http://www.springframework.org/schema/context http://www.springframework.org/schema/context/spring-context.xsd http://www.springframework.org/schema/mvc http://www.springframework.org/schema/mvc/spring-mvc.xsd">
    <!--配置自动扫描包,不仅仅有controller-->
    <context:component-scan base-package="com.yixuexi.crowd.mvc"/>
    <!--配置springMvc的注解驱动-->
    <mvc:annotation-driven/>

    <!--配置视图解析器-->
    <bean id="viewResolver" class="org.springframework.web.servlet.view.InternalResourceViewResolver">
        <!--为了保护jsp文件,将jsp都放在/WEB-INF/ 目录下 所以前缀是 /WEB-INF/-->
        <property name="prefix" value="/WEB-INF/"/>
        <!--后置-->
        <property name="suffix" value=".jsp"/>
    </bean>
</beans>
2. 做AJAX有两个注解
@RequestBody 请求体,将json数据转换成java实体类
@ResponseBody 响应体,将实体类转换成json数据返回给页面
@RequestBody和@ResponseBody要想要工作必须有json的支持,
- 需要下面的依赖
- 同时配置了
<!-- Spring 进行 JSON 数据转换依赖 -->
<dependency>
<groupId>com.fasterxml.jackson.core</groupId>
<artifactId>jackson-core</artifactId>
</dependency>
<dependency>
<groupId>com.fasterxml.jackson.core</groupId>
<artifactId>jackson-databind</artifactId>
</dependency>
1. @RequestBody的使用
1) 前端发送数组到服务器端,方案一:
- 在后端接收的时候,使用@RequestParam注解时,需要 添加上[] 可查看抓包工具
- 缺点:在后端接收时,需要添加[] 来接受
前端ajax发送代码
<script>
    $(function(){
        // 编写jQuery相关代码
        $("#btn1").click(function () {
            $.ajax({
                url: "send/array.html",
                data: {
                    "array": [1, 22, 33]
                },
                dataType:"text",
                success: function (response) {
                    alert(response)
                }
            })
        })
    });
</script>
通过开发者工具 发现前端发送的是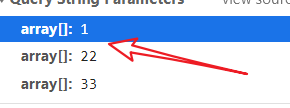
后端controller接收
需要在接收的时候 添加@RequestParam(“array[]”)
@RequestMapping("/send/array.html")
public void array(@RequestParam("array[]") int[] array){
    for (int i : array) {
        System.out.println(i);
    }
}
2) 前端发送数组到服务器端,方案二:
缺点: 需要再次创建一个ParamData类,里面封装数组
创建一个实体类,用来接收数组,实体类中属性的名字要和前端发过来的一致
实体类
public class ParamData {
    private List<Integer> array;
    public List<Integer> getArray() {
        return array;
    }

    public void setArray(List<Integer> array) {
        this.array = array;
    }
}
前端发送时这样发送
$("#btn2").click(function () {
    $.ajax({
        url: "send/array/two.json",
        data: {
            "array[0]": 1,
            "array[1]": 22,
            "array[2]": 33
        },
        dataType:"text",
        success: function (response) {
            alert(response)
        }
    })
})
后端这样接收
@ResponseBody
@RequestMapping("/send/array/two.json")
public String arrayTwo(ParamData paramData){
    List<Integer> list = paramData.getArray();
    for (int i : list) {
        System.out.println(i);
    }
    return "Success";
}
3) 前端发送数组到服务器端,方案三:
javascript代码
将JSON数组转换成JSON字符串 JSON.stringify(array)
$("#btn3").click(function () {
    // 准备好要发送到服务器端的数据
    var array = [1, 22, 33];
    //将JSON数组转换成JSON字符串
    var requestBody = JSON.stringify(array);
    $.ajax({
        url: "send/array/three.json",
        type:"post",
        data: requestBody,
        contentType:"application/json;charset=utf-8", //请求体的内容类型
        dataType:"text",   //如何对待服务端返回的数据
        success: function (response) {
            alert(response)
        },
    })
})
controller代码
@ResponseBody
@RequestMapping("/send/array/three.json")
public String arrayThree(@RequestBody List<Integer> array){
    for (Integer integer : array) {
        System.out.println(integer);
    }
    return "success";
}
二、
不使用base标签,使用jsp
<a href="${pageContext.request.contextPath}/test.html">测试2</a>
- 页面上要使用绝对路径,使用相对路径的话,碰到套娃的就坏事了。
- 使用绝对路径的话,基准度比较高
1. 使用base标签方式一
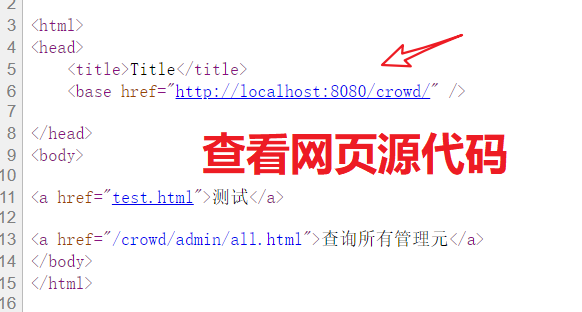
<%
 //获取项目路径,到myWeb项目那里
 String basePath = request.getScheme() + "://" +
 request.getServerName() + ":" + request.getServerPort() +
 request.getContextPath() + "/";
%>
<title>Title</title>
<base href="<%=basePath%>">
<a href="user/doSome">aaaaaaaaaaa</a>
  //在使用了base之后,就不需要添加/开头了,因为base会将没有以斜杠开头的地址,把参考地址改为base地址
2. 使用bse标签方式二
在head中 ```html
<a name="jXsBR"></a>
## 
<a name="P5cPN"></a>
## 3.注意点
- 注意的点:
- 端口号前面的冒号不能省略
- contextPath 前面不能写 /
- contextPath 后面必须写 /
- 页面上所有参照base标签的 都必须在base后面
- 页面上所有参照base标签的 路径 都不能 以/ 开头
<a name="a8GQM"></a>
# 三、AJAX发送复杂对象
如果发送一个 复杂的对象的话,需要使用JSON.stringify(obejct)来转换成JSON字符串在发送<br />后端使用@RequestBody 来接收
```javascript
var student={
name: "zhangsan",
age: 18,
address:{
city:"北京",
district: "海淀区",
street:"幸福街道"
},
subject: {
{
….
}
}
}
//转换
var requestBody = JSON.stringify(student);
$.ajax({
url: "send/array/three.json",
type:"post",
data: requestBody,
contentType:"application/json;charset=utf-8", //请求体的内容类型
dataType:"text", //如何对待服务端返回的数据
success: function (response) {
alert(response)
},
})
后端接受
@ResponseBody
@RequestMapping("/send/array/three.json")
public String arrayThree(@RequestBody Student student){
    System.out.println(student);
    return "success";
}

若有收获,就点个赞吧
0 人点赞
