1. 创建 springboot 工程
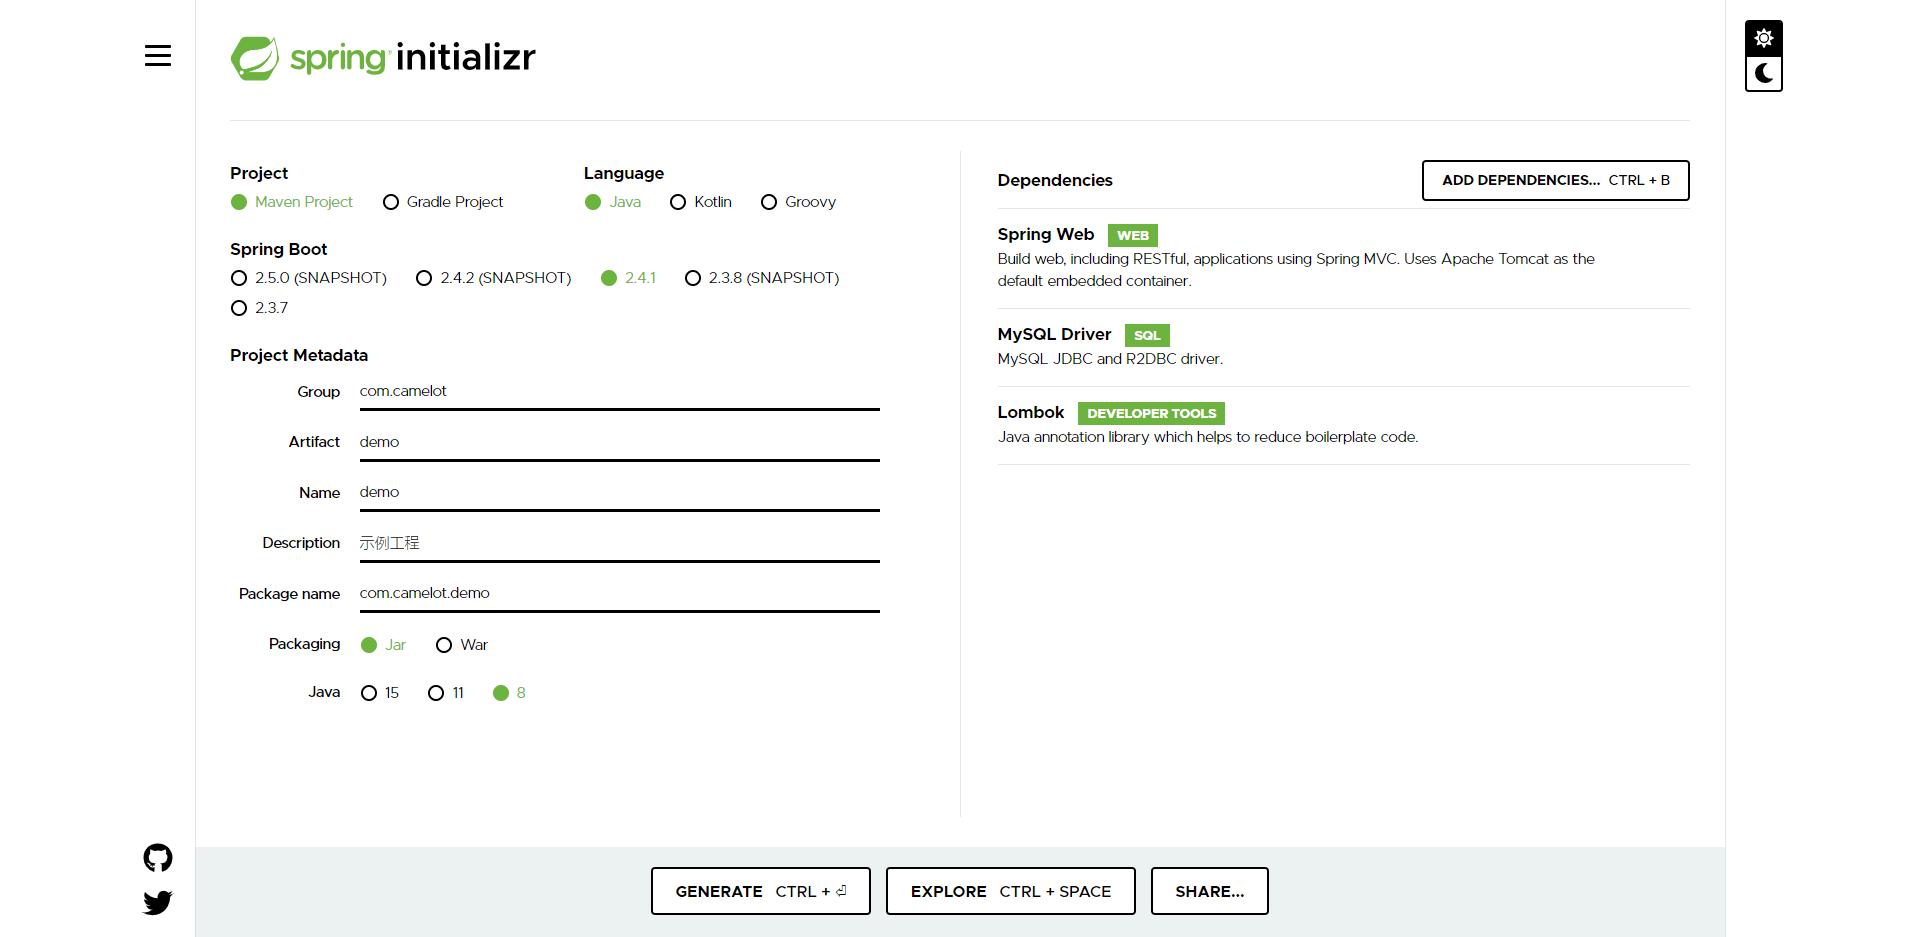
一.官网创建 https://start.spring.io/
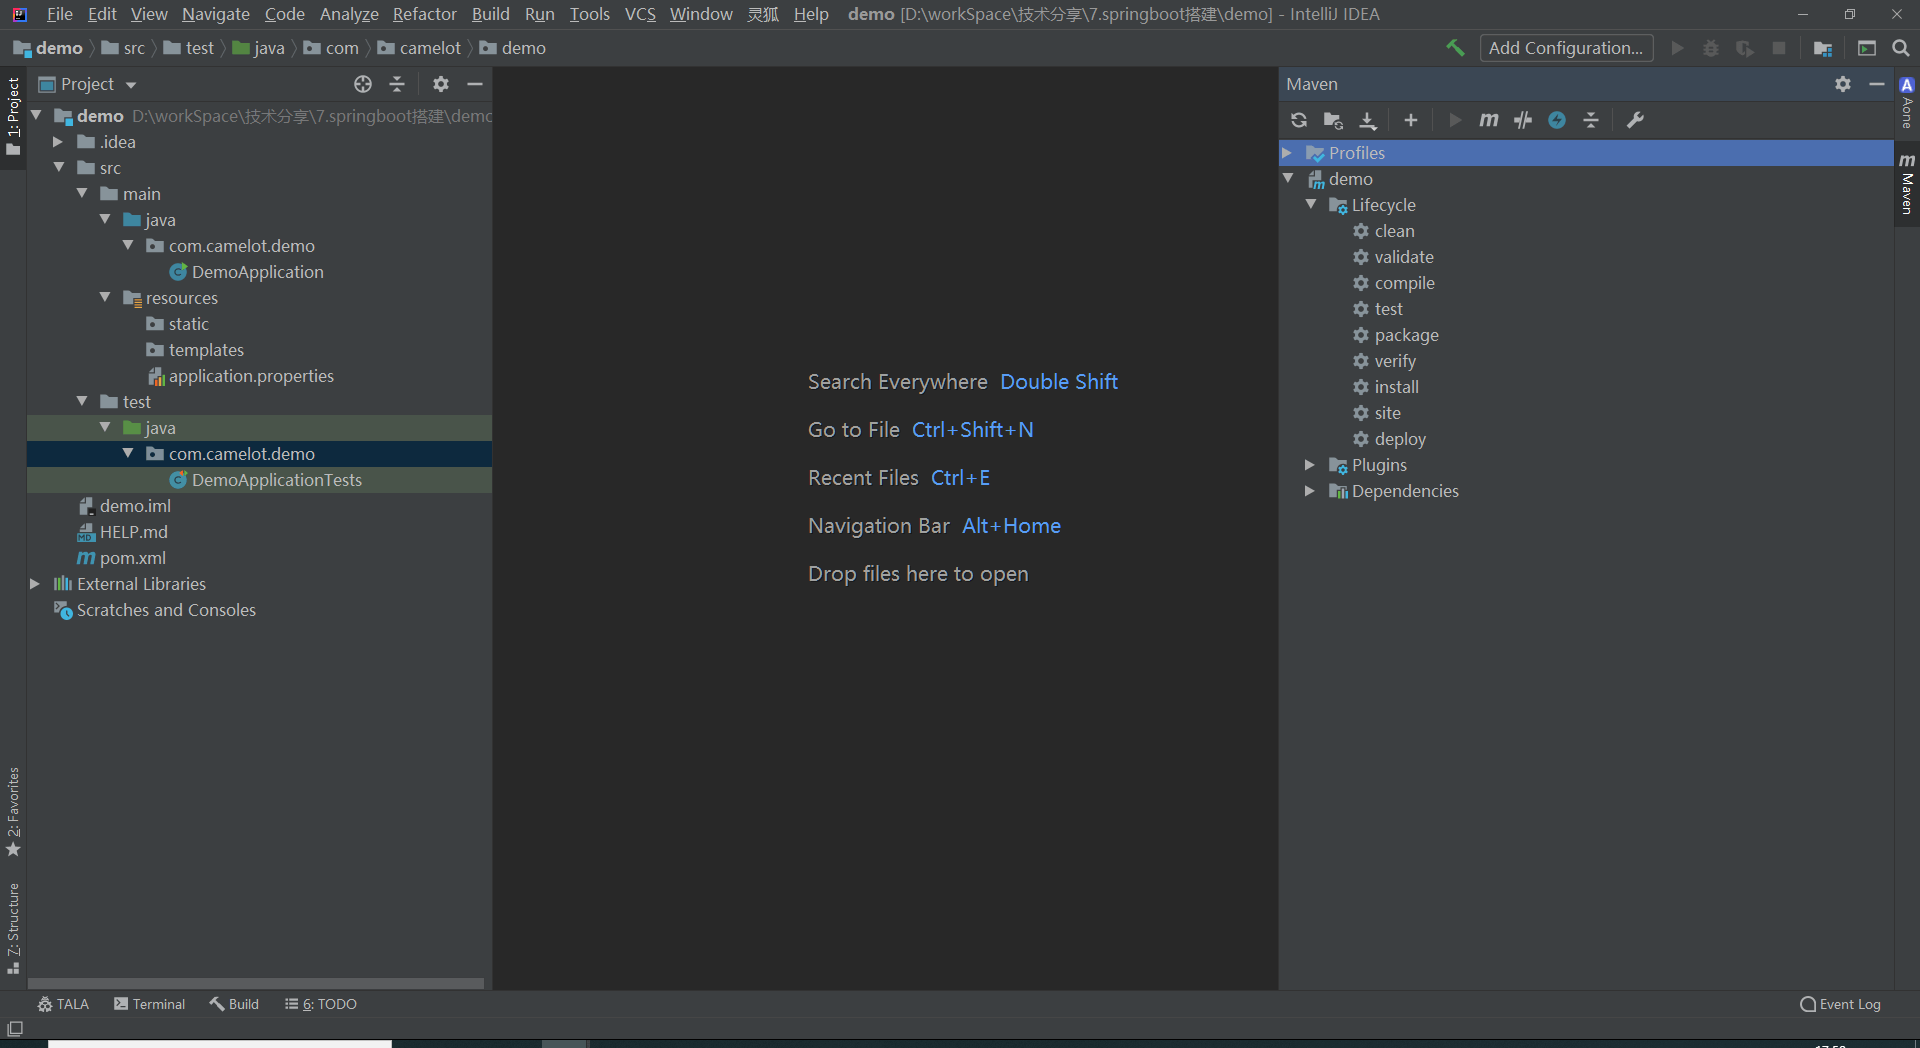
二. 工程导入 idea 并初始化
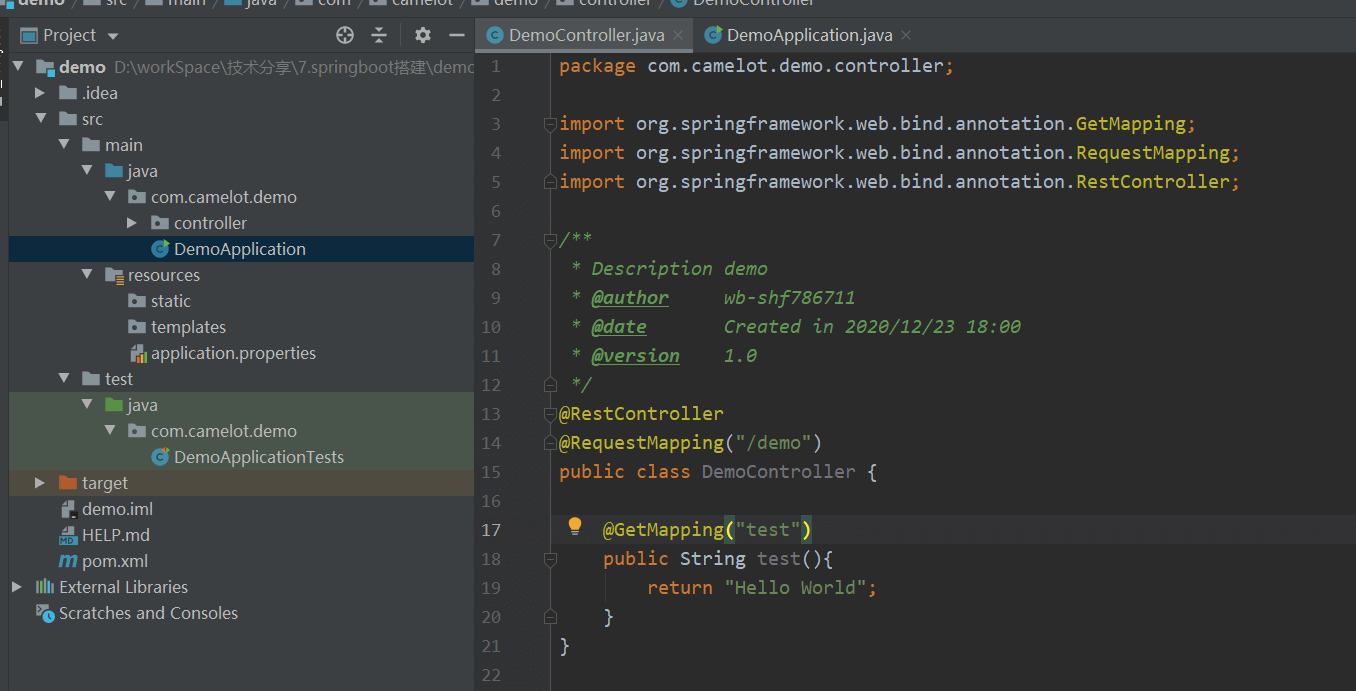
三. 编写一个接口
三. 启动服务,请求接口。
2.基础的配置项
1.我们可以在application.yml下自定义一些属性:
# 自定义配置test: Hello
2.定义配置类获取配置文件属性值:
@Data@Componentpublic class DemoConfig {/** @Value 注解:获取配置文件属性值 */@Value("${test}")private String test;}
参考链接:application.properties中可配置所有官方属性
3. 整合 mybatisplus
官方文档: mybatis-plus 官方文档
一、添加依赖pom.xml
<!-- mysql驱动 --><dependency><groupId>mysql</groupId><artifactId>mysql-connector-java</artifactId></dependency><!-- druid 连接池 --><dependency><groupId>com.alibaba</groupId><artifactId>druid-spring-boot-starter</artifactId><version>1.1.10</version></dependency><!-- mybatis-plus --><dependency><groupId>com.baomidou</groupId><artifactId>mybatis-plus-boot-starter</artifactId><version>3.1.0</version></dependency><!-- mybatis plus 代码生成器依赖 --><dependency><groupId>com.baomidou</groupId><artifactId>mybatis-plus-generator</artifactId><version>3.1.0</version></dependency><!-- 代码生成器模板 --><dependency><groupId>org.freemarker</groupId><artifactId>freemarker</artifactId></dependency>
二、application.yml添加配置
# 数据库相关spring:#数据库配置datasource:url: jdbc:mysql://IP:3306/demo?useUnicode=true&useSSL=false&characterEncoding=utf-8username: namepassword: password# 使用druid数据源type: com.alibaba.druid.pool.DruidDataSourcedriver-class-name: com.mysql.jdbc.Driver# 数据源配置druid:# druid连接池监控stat-view-servlet:enabled: trueurl-pattern: /druid/*login-username: adminlogin-password: admin# 初始化时建立物理连接的个数initial-size: 5# 最大连接池数量max-active: 30# 最小连接池数量min-idle: 5# 获取连接时最大等待时间,单位毫秒max-wait: 60000# 配置间隔多久才进行一次检测,检测需要关闭的空闲连接,单位是毫秒time-between-eviction-runs-millis: 60000# 连接保持空闲而不被驱逐的最小时间min-evictable-idle-time-millis: 300000# 用来检测连接是否有效的sql,要求是一个查询语句validation-query: select count(*) from dual# 建议配置为true,不影响性能,并且保证安全性。申请连接的时候检测,如果空闲时间大于timeBetweenEvictionRunsMillis,执行validationQuery检测连接是否有效。test-while-idle: true# 申请连接时执行validationQuery检测连接是否有效,做了这个配置会降低性能。test-on-borrow: false# 归还连接时执行validationQuery检测连接是否有效,做了这个配置会降低性能。test-on-return: false# 是否缓存preparedStatement,也就是PSCache。PSCache对支持游标的数据库性能提升巨大,比如说oracle。在mysql下建议关闭。pool-prepared-statements: false# 要启用PSCache,必须配置大于0,当大于0时,poolPreparedStatements自动触发修改为true。max-pool-prepared-statement-per-connection-size: 50# 配置监控统计拦截的filters,去掉后监控界面sql无法统计filters: stat,wall# 通过connectProperties属性来打开mergeSql功能;慢SQL记录connection-properties:druid.stat.mergeSql: truedruid.stat.slowSqlMillis: 500# 合并多个DruidDataSource的监控数据use-global-data-source-stat: truefilter:stat:log-slow-sql: trueslow-sql-millis: 1000merge-sql: truewall:config:multi-statement-allow: true# mybatis-plus 配置mybatis-plus:configuration:map-underscore-to-camel-case: trueauto-mapping-behavior: full# 日志打印log-impl: org.apache.ibatis.logging.stdout.StdOutImpl# 配置 Mapper 对应的 XML 文件路径mapper-locations: classpath*:mapper/**/*Mapper.xml# 参考配置mybatis-plus:mapper-locations: classpath:/mapping/**/*.xmlglobal-config:db-config:#刷新mapper 调试神器#主键类型 0:"数据库ID自增", 1:"用户输入ID",2:"全局唯一ID (数字类型唯一ID)", 3:"全局唯一ID UUID";id-type: auto#驼峰下划线转换capital-mode: true#逻辑删除配置sql-injector: com.baomidou.mybatisplus.mapper.LogicSqlInjectorlogic-delete-value: 1logic-not-delete-value: 0# 配置数据源db-type: mysql# 操作是否判断nullfield-strategy: not-nullconfiguration:map-underscore-to-camel-case: truecache-enabled: false
三、application配置@MapperScan
@MapperScan("com.alibaba.demo.mapper")@EnableConfigurationProperties({DemoBeanConfig.class})@SpringBootApplicationpublic class DemoApplication {public static void main(String[] args) {SpringApplication.run(DemoApplication.class, args);}}
四、代码生成器
自动生成entity,mapper等文件,使用代码生成器来自动生成对应的文件了。需要修改几个地方:
1、数据库连接
2、文件需要放置的文件夹地址。
具体代码:
package com.alibaba.demo;import com.baomidou.mybatisplus.core.exceptions.MybatisPlusException;import com.baomidou.mybatisplus.core.toolkit.StringPool;import com.baomidou.mybatisplus.core.toolkit.StringUtils;import com.baomidou.mybatisplus.generator.AutoGenerator;import com.baomidou.mybatisplus.generator.InjectionConfig;import com.baomidou.mybatisplus.generator.config.*;import com.baomidou.mybatisplus.generator.config.po.TableInfo;import com.baomidou.mybatisplus.generator.config.rules.NamingStrategy;import com.baomidou.mybatisplus.generator.engine.FreemarkerTemplateEngine;import java.util.ArrayList;import java.util.List;import java.util.Scanner;/*** 代码自动生成工具* 执行 main 方法控制台输入模块表名回车自动生成对应项目目录中* @author shf*/public class CodeGenerator {/*** <p>* 读取控制台内容* </p>*/public static String scanner(String tip) {Scanner scanner = new Scanner(System.in);StringBuilder help = new StringBuilder();help.append("请输入" + tip + ":");System.out.println(help.toString());if (scanner.hasNext()) {String ipt = scanner.next();if (StringUtils.isNotEmpty(ipt)) {return ipt;}}throw new MybatisPlusException("请输入正确的" + tip + "!");}public static void main(String[] args) {// 代码生成器AutoGenerator mpg = new AutoGenerator();// 全局配置GlobalConfig gc = new GlobalConfig();// TODO 工程目录,需要手动填写String projectPath = "D:/workSpace/技术分享/7.springboot搭建工程/demo";gc.setOutputDir(projectPath + "/src/main/java");gc.setAuthor("shf");gc.setOpen(false);// service 命名方式gc.setServiceName("%sService");// service impl 命名方式gc.setServiceImplName("%sServiceImpl");// mapper文件命名,注意 %s 会自动填充表实体属性!gc.setMapperName("%sMapper");// xml文件结尾gc.setXmlName("%sMapper");gc.setFileOverride(true);gc.setActiveRecord(true);// XML 二级缓存gc.setEnableCache(false);// XML ResultMapgc.setBaseResultMap(true);// XML columListgc.setBaseColumnList(false);// gc.setSwagger2(true); 实体属性 Swagger2 注解mpg.setGlobalConfig(gc);// TODO 数据源配置DataSourceConfig dsc = new DataSourceConfig();dsc.setUrl("jdbc:mysql://IP:3306/demo?useUnicode=true&useSSL=false&characterEncoding=utf-8");// dsc.setSchemaName("public");dsc.setDriverName("com.mysql.jdbc.Driver");dsc.setUsername("root");dsc.setPassword("123456");mpg.setDataSource(dsc);// TODO 包配置,按模板分PackageConfig pc = new PackageConfig();//pc.setModuleName(scanner("模块名"));pc.setParent("com.alibaba.demo");pc.setEntity("model");pc.setService("service");pc.setServiceImpl("service.impl");pc.setMapper("mapper");mpg.setPackageInfo(pc);// 自定义配置InjectionConfig cfg = new InjectionConfig() {@Overridepublic void initMap() {// to do nothing}};// 如果模板引擎是 freemarkerString templatePath = "/templates/mapper.xml.ftl";// 自定义输出配置List<FileOutConfig> focList = new ArrayList<>();// 自定义配置会被优先输出focList.add(new FileOutConfig(templatePath) {@Overridepublic String outputFile(TableInfo tableInfo) {// 自定义输出文件名 , 如果你 Entity 设置了前后缀、此处注意 xml 的名称会跟着发生变化!!return projectPath + "/src/main/resources/mapper/" +tableInfo.getEntityName() + "Mapper" + StringPool.DOT_XML;}});cfg.setFileOutConfigList(focList);mpg.setCfg(cfg);// 配置模板TemplateConfig templateConfig = new TemplateConfig();// 配置自定义输出模板// 指定自定义模板路径,注意不要带上.ftl/.vm, 会根据使用的模板引擎自动识别// templateConfig.setEntity("templates/entity2.java");// templateConfig.setService();// templateConfig.setController();templateConfig.setXml(null);mpg.setTemplate(templateConfig);// 策略配置,驼峰式StrategyConfig strategy = new StrategyConfig();strategy.setNaming(NamingStrategy.underline_to_camel);strategy.setColumnNaming(NamingStrategy.underline_to_camel);strategy.setEntityLombokModel(true);strategy.setRestControllerStyle(true);// 公共父类,实体继承自通用父类,例如时间等字段可以提取// strategy.setSuperControllerClass("com.alibaba.demo.model");// 写于父类中的公共字段// strategy.setSuperEntityColumns("id");strategy.setInclude(scanner("表名,多个英文逗号分割").split(","));strategy.setControllerMappingHyphenStyle(true);strategy.setTablePrefix(pc.getModuleName() + "_");mpg.setStrategy(strategy);mpg.setTemplateEngine(new FreemarkerTemplateEngine());mpg.execute();}}
五、添加测试
测试Mybatis-Plus的CURD等方法。
@RunWith(SpringRunner.class)@SpringBootTestpublic class SampleTest {private static Logger log = LoggerFactory.getLogger(SampleTest.class);@Autowiredprivate MpUserService mpUserService;@Testpublic void test1() {// 插入新记录MpUser mpUser = new MpUser();//mpUser.setId(1L);mpUser.setEmail("test66@baomidou.com");mpUser.setAge(22);mpUser.setName("David Hong");mpUserService.save(mpUser);// 或者mpUser.insertOrUpdate();// 更新完成后,mpUser对象的id会被补全log.info("mpUser={}", mpUser.toString());}@Testpublic void test2() {// 通过主键id查询MpUser mpUser = mpUserService.getById(1);log.info("mpUser={}", mpUser.toString());}@Testpublic void test3() {// 条件查询,下面相当于xml中的 select * from mp_user where name = 'Tom' and age = '28' limit 1MpUser mpUser = mpUserService.getOne(new QueryWrapper<MpUser>().eq("name", "Tom").eq("age", "28").last("limit 1"));log.info("mpUser={}", mpUser.toString());// 批量查询List<MpUser> mpUserList = mpUserService.list();System.out.println("------------------------------all");mpUserList.forEach(System.out::println);// 分页查询int pageNum = 1;int pageSize = 10;IPage<MpUser> mpUserIPage = mpUserService.page(new Page<>(pageNum, pageSize), new QueryWrapper<MpUser>().gt("age", "20"));// IPage to ListList<MpUser> mpUserList1 = mpUserIPage.getRecords();System.out.println("------------------------------page");mpUserList1.forEach(System.out::println);// 总页数long allPageNum = mpUserIPage.getPages();System.out.println("------------------------------allPageNum");System.out.println(allPageNum);}@Testpublic void test4() {MpUser mpUser = mpUserService.getById(2);// 修改更新mpUser.setName("广东广州");//mpUserService.updateById(mpUser);// 或者mpUser.insertOrUpdate();// 通过主键id删除mpUserService.removeById(1);// 或者//mpUser.deleteById();}}
六、数据分页
1、简单分页方法
int pageNum = 1;int pageSize = 10;IPage<MpUser> mpUserIPage = mpUserService.page(new Page<>(pageNum, pageSize), new QueryWrapper<MpUser>().gt("age", "20"));
上面的分页其实是调用BaseMapper的selectPage方法,这样的分页返回的数据确实是分页后的数据,但在控制台打印的SQL语句上看到其实并没有真正的物理分页,而是通过缓存来获得全部数据中再进行的分页,这样对于大数据量操作时是不可取的,那么接下来就叙述一下,真正实现物理分页的方法。
2、 物理分页方法
新建一个MybatisPlusConfig配置类文件
//Spring boot方式@EnableTransactionManagement@Configuration@MapperScan("com.baomidou.cloud.service.*.mapper*")public class MybatisPlusConfig {@Beanpublic PaginationInterceptor paginationInterceptor() {PaginationInterceptor paginationInterceptor = new PaginationInterceptor();// 设置请求的页面大于最大页后操作, true调回到首页,false 继续请求 默认false// paginationInterceptor.setOverflow(false);// 设置最大单页限制数量,默认 500 条,-1 不受限制// paginationInterceptor.setLimit(500);// 设置数据源为mysql,数据源配置使用阿里TDDL或其他数据源时,需要自行设置paginationInterceptor.setDbType(DbType.MYSQL);return paginationInterceptor;}}
重新调用mpUserService.page可以看到数据有物理分页
3、XML自定义分页
- UserMapper.java 方法内容
public interface UserMapper{//可以继承或者不继承BaseMapper/*** <p>* 查询 : 根据state状态查询用户列表,分页显示* 注意!!: 如果入参是有多个,需要加注解指定参数名才能在xml中取值* </p>** @param page 分页对象,xml中可以从里面进行取值,传递参数 Page 即自动分页,必须放在第一位(你可以继承Page实现自己的分页对象)* @param state 状态* @return 分页对象*/IPage<User> selectPageVo(Page page, @Param("age") Integer age);}
- UserMapper.xml 等同于编写一个普通 list 查询,mybatis-plus 自动替你分页
<?xml version="1.0" encoding="UTF-8"?><!DOCTYPE mapper PUBLIC "-//mybatis.org//DTD Mapper 3.0//EN" "http://mybatis.org/dtd/mybatis-3-mapper.dtd"><mapper namespace="cn.com.bluemoon.demo.mapper.MpUserMapper"><select id="selectPageVo" resultType="cn.com.bluemoon.demo.entity.MpUser">SELECT * FROM mp_user WHERE age=#{age}</select></mapper>
- UserServiceImpl.java 调用分页方法
public IPage<User> selectUserPage(Page<User> page, Integer state) {// 不进行 count sql 优化,解决 MP 无法自动优化 SQL 问题,这时候你需要自己查询 count 部分// page.setOptimizeCountSql(false);// 当 total 为小于 0 或者设置 setSearchCount(false) 分页插件不会进行 count 查询// 要点!! 分页返回的对象与传入的对象是同一个return baseMapper.selectPageVo(page, state);}
4、测试自定义方法
@Testpublic void test5() {Page<MpUser> mpUserPage = new Page<>(1,2);IPage<MpUser> iPage = mpUserService.selectUserPage(mpUserPage,22);System.out.println("总页数:"+iPage.getPages());System.out.println("总记录数:"+iPage.getTotal());List<MpUser> mpUserList1 = iPage.getRecords();mpUserList1.forEach(System.out::println);}
七、打印sql日志
为了方便排查错误,很多时候需要打印mybatis生成的sql语句,这时候就需要打印日志了。
在application.yml中添加:
# Logger Configlogging:level:cn.com.vicente.demo: debug
或者
mybatis-plus:configuration:log-impl: org.apache.ibatis.logging.stdout.StdOutImpl
八、逻辑删除
很多时候需要表的数据虽然删除了,但是还是希望不是真正删除数据,数据还是留在数据库中,只需要使用一个字段来做标志为即可,这时候就需要逻辑删除功能。
SpringBoot 配置方式:
application.yml 加入配置(如果你的默认值和mp默认的一样,该配置可无):
mybatis-plus:global-config:db-config:logic-delete-value: 1 # 逻辑已删除值(默认为 1)logic-not-delete-value: 0 # 逻辑未删除值(默认为 0)
注册 Bean(3.1.1开始不再需要这一步):
import com.baomidou.mybatisplus.core.injector.ISqlInjector;import com.baomidou.mybatisplus.extension.injector.LogicSqlInjector;import org.springframework.context.annotation.Bean;import org.springframework.context.annotation.Configuration;@Configurationpublic class MyBatisPlusConfiguration {@Beanpublic ISqlInjector sqlInjector() {return new LogicSqlInjector();}}
实体类字段上加上
@TableLogic注解@TableField(select = false)注解,可以不查询出deleted字段
@TableLogic//@TableField(select = false)private Integer deleted;
效果: 使用mp自带方法删除和查找都会附带逻辑删除功能 (自己写的xml不会)
example删除时 update user set deleted=1 where id =1 and deleted=0查找时 select * from user where deleted=0
附件说明
逻辑删除是为了方便数据恢复和保护数据本身价值等等的一种方案,但实际就是删除。
- 如果你需要再查出来就不应使用逻辑删除,而是以一个状态去表示。
九、主键策略
mybatis-plus 的主键生成的类型 默认类型 是 IdType.ID_WORKER全局唯一ID,内容为空自动填充(默认配置),雪花算法
1,局部主键策略实现
在实体类中 ID属性加注解
@TableId(type = IdType.AUTO) 主键自增 数据库中需要设置主键自增private Long id;@TableId(type = IdType.NONE) 默认跟随全局策略走private Long id;@TableId(type = IdType.UUID) UUID类型主键private Long id;@TableId(type = IdType.ID_WORKER) 数值类型数据库中也必须是数值类型 否则会报错private Long id;@TableId(type = IdType.ID_WORKER_STR) 字符串类型 数据库也要保证一样字符类型private Long id;@TableId(type = IdType.INPUT) 用户自定义了 数据类型和数据库保持一致就行private Long id;
2,全局主键策略实现
需要在application.yml文件中添加
mybatis-plus:global-config:db-config:id-type: uuid/none/input/id_worker/id_worker_str/auto 表示全局主键都采用该策略(如果全局策略和局部策略都有设置,局部策略优先级高)
十、自动填充
很多时候表中都需要添加创建时间,创建人,修改时间,修改人来跟踪数据的来源和变动,但每次插入数据和修改数据的时候都要set这几个字段又感觉很麻烦,这个时候就系统系统能自动填充这几个字段了。
- 注意:自动填充字段类型在拦截器中类型需要一致
字段必须声明
TableField注解,属性fill选择对应策略,该申明告知Mybatis-Plus需要预留注入SQL字段@TableField(fill = FieldFill.INSERT)private LocalDateTime createTime;@TableField(fill = FieldFill.INSERT_UPDATE)private LocalDateTime updateTime;
属性
fill有四种对应策略,分别为:public enum FieldFill {/*** 默认不处理*/DEFAULT,/*** 插入填充字段*/INSERT,/*** 更新填充字段*/UPDATE,/*** 插入和更新填充字段*/INSERT_UPDATE}
自定义实现类 MyMetaObjectHandler:
@Componentpublic class MyMetaObjectHandler implements MetaObjectHandler {private static final Logger LOGGER = LoggerFactory.getLogger(MyMetaObjectHandler.class);@Overridepublic void insertFill(MetaObject metaObject) {LOGGER.info("start insert fill ....");//this.setFieldValByName("createTime", LocalDateTime.now(), metaObject);this.setInsertFieldValByName("createTime", LocalDate.now(), metaObject);this.setInsertFieldValByName("updateTime", LocalDate.now(), metaObject);}@Overridepublic void updateFill(MetaObject metaObject) {LOGGER.info("start update fill ....");this.setUpdateFieldValByName("updateTime", LocalDate.now(), metaObject);}}
测试使用
@Testpublic void testInsert() {// 插入新记录MpUser mpUser = new MpUser();mpUser.setEmail("wm@baomidou.com");mpUser.setAge(28);mpUser.setName("王蒙");mpUserService.save(mpUser);log.info("mpUser={}", mpUser.toString());}@Testpublic void testUpdate() {// 更新记录MpUser mpUser = new MpUser();mpUser.setId(1182478087497998337L);MpUser newUser = mpUser.selectById();System.out.println(mpUser == newUser);mpUser.setName("王天");mpUser.updateById();log.info("mpUser={}", mpUser.toString());log.info("newUser={}", newUser.toString());}
自动填充优化
insertFill方法每次插入的时候都会调用,如果不存在createTime属性的话,每次插入都会白白调用了,浪费资源,所以可以判断是否存在该属性boolean hasCreateTime = metaObject.hasSetter("createTime");if (hasCreateTime){this.setInsertFieldValByName("createTime", LocalDateTime.now(), metaObject);}
希望,当更新时有设定时间,就用更新时设定的时间,当没有设定时就自动填充更新时间,可以这样设置
Object fieldValue = getFieldValByName("updateTime", metaObject);if (fieldValue == null){this.setUpdateFieldValByName("updateTime", LocalDateTime.now(), metaObject);/}


