

一、常用的一些命令
# 查看日志$ git log --oneline、######Git confifurations#######在本地存储库中注册您的用户名和电子邮件git config --global user.name "firstName LastName"git config --global user.email "you-email@email-provider.com"git config --global color.ui.truegit config --list#git starting a repository 初始化本地存储库git init#查看状态git status######git staging files#######在暂存区添加和删除文件git add <file-name>#提交多个文件git add <file-name> <another-flle-name>#只会添加 根目录的文件,注意后面的 .!!!git add .# --all or -A 在整个项目的任何地方找到所有新的和更新文件,并将他添加到暂存区git add --allgit add -A#rm 表删除, --cached 选项便是暂存区的文件git rm --cached <file-name>#也是取消跟踪文件 ,作为rm --cached 的替代方法 --soft --hardgit reset <file-name>######git committing to a repository #######提交对存储库的更改和撤销命令git commit -m 'Add three files'# reset和add命令相反,reset 告诉git撤销提交 ,reset 之后的--soft意味着提交被取消,并且移到了HEAD之前,'^' 表示最后一次提交git reset --soft HEAD^#提交到存储库时使用“--amend”选项来纠正提交,而不是重置 HEAD 和撤消最后一次提交。只需将剩余文件添加到暂存区,然后提交:git commit --amend -m <enter your message>######git pulling and pushing from and to a reposiroty#######you need to bind this remote repository to your local repositorygit remote add orgin <link>#pushing to remote master branchgit push -u origin mastergit clone <url>git pull######git branch#######显示我们所有的本地分支git branch#创建新的分支git branch <branch-name>#切换到指定的分支git checkout <branch-name>#合并指定分支到当前分支git merge <branch-name>git checkout -b <branch-name>######git tag#######列出所有本地标签git tag#创建新的标签git tag <tag-name>#删除标签git tag -d <tag-name>
二、Git常用命令速查表
扩展:
- 对于HEAD的理解
请回想一下我们在分支机构工作。目前我们在 master 分支,HEAD指向这个 master 分支。当我们稍后切换到不同的分支时,HEAD 将指向那个不同的分支。
HEAD 只是一个指向分支的指针:
你在图中看到的是每个点代表一个单独的提交,最新的提交位于分支的顶部(HEAD)。
在命令“git reset —soft HEAD^”中,最后一个字符“^”代表最后一次提交。我们可以将“git reset —soft HEAD^”读作“撤消当前分支中的最后一次提交并将 HEAD 移回一次提交”。
我们可以在提交到存储库时使用“—amend”选项来纠正提交,而不是重置 HEAD 和撤消最后一次提交。只需将剩余文件添加到暂存区,然后提交:
“—amend”选项允许您通过添加一个新文件(或多个文件)来修改最后一次提交。使用“—amend”选项,您还可以覆盖上次提交的消息。
note:
reset相关链接:
https://git-scm.com/docs/git-reset
reset字面意思是重置或者回退,就是后悔药,参数说明
—soft: local repository—->index
—hard: local repository—->workspace
当然还有其他选项—mixed等,可以看一下
git reset [<mode>] [<commit>]This form resets the current branch head to <commit> and possibly updates the index (resetting it to the tree of <commit>) and the working tree depending on <mode>. If <mode> is omitted, defaults to --mixed. The <mode> must be one of the following:--softDoes not touch the index file or the working tree at all (but resets the head to <commit>, just like all modes do). This leaves all your changed files "Changes to be committed", as git status would put it.--mixedResets the index but not the working tree (i.e., the changed files are preserved but not marked for commit) and reports what has not been updated. This is the default action.If -N is specified, removed paths are marked as intent-to-add (see git-add[1]).--hardResets the index and working tree. Any changes to tracked files in the working tree since <commit> are discarded. Any untracked files or directories in the way of writing any tracked files are simply deleted.--mergeResets the index and updates the files in the working tree that are different between <commit> and HEAD, but keeps those which are different between the index and working tree (i.e. which have changes which have not been added). If a file that is different between <commit> and the index has unstaged changes, reset is aborted.In other words, --merge does something like a git read-tree -u -m <commit>, but carries forward unmerged index entries.--keepResets index entries and updates files in the working tree that are different between <commit> and HEAD. If a file that is different between <commit> and HEAD has local changes, reset is aborted.--[no-]recurse-submodulesWhen the working tree is updated, using --recurse-submodules will also recursively reset the working tree of all active submodules according to the commit recorded in the superproject, also setting the submodules' HEAD to be detached at that commit.See "Reset, restore and revert" in git[1] for the differences between the three commands.
- 对Amend的理解
“—amend”选项允许您通过添加一个新文件(或多个文件)来修改最后一次提交。使用“—amend”选项,您还可以覆盖上次提交的消息。
以这种方式思考这个命令:您从抽屉中取出最上面的一叠文件,并通过简单地拆开这叠文件,在顶部添加另一张文件 file-i-forgot-to-add.html 来“修改”它们并在“提交”纸上重写消息。
小结
从开发人员的角度来看,Git 是一大堆命令。我们应该知道几十个 Git 命令。但首先,熟悉我们在教程中提供的最基本的 Git 命令就足够了:
- 在本地存储库中注册您的用户名和电子邮件
- 初始化本地存储库
- 在暂存区添加和删除文件
- 提交对存储库的更改
- 撤消提交
- 将您的本地仓库推送到远程服务器,例如 GitHub 或 BitBucket
- 通过管理分支来控制开发流程
三、git的分支&tag标签
git branch are named pointer to commit
每个分支指向具体的commit
知道自己的当期在那个分支
常见的命令
#查看分支命令 head 和 master的区别git branch#新建分支git branch <new-branch>#删除分支 -D 表示强制删除git branch -D <branch>#分支的删除 or --delete 推荐使用(有提示)git branch -d#切换到 HAED branchgit checkout <branch-name>#mark the current commit with a taggit tag <tag-name>
四、git undo 回退
# 丢弃Local changes in your working directory ???git reset -hard HEAD#Discard local changes in a specific file ???git checkout HEAD <file>#Revert a commit (by producing a new commit with contrary changes)git revert <commit>#Reset your HEAD pointer to previous commit and discard all changes since than ???git reset -hard <commit>
五、git的官网介绍&分支管理
https://git-scm.com/book/en/v2/Getting-Started-About-Version-Control
连续三周都是关于git的文章,这周也不例外,今天读了一篇关于A successful Git branching model的文章,主要讲的是git 的分支模型,以及讲了一些关于分支策略方面的文章
分为大的二类
the main branches 主分支 有两种无限生命时间的an infinite lifetime 的分支
master分支 代码库有且只有一个主分支,所有提供给用户使用的正式版本,都是在主分支上开发,他是自动创建的
develop分支 开发分支,叫develop分支
git创建develop分支命令
git checkout -b develop master
将develop分支发布到master分支
#切换到master分支git checkout master# 将develop合并到主分支,git merger --no-ff develop
—no-ff参数的意思是:进行fast-farward merge ,直接将master分支指向develop分支
supporting branches 临时性分支
不同类型有不同的分支
feature branches #功能分支release branches #预发布分支hotfix branches # 修补分支
上面三种分支的具体细节
feature branches 功能分支:
为了开发某种特定的功能,开发完后要在进行合并
功能分支的名字一般采用 feature-*的形式来命名
#创建feature-x分支git checkout -b feature-x develop#切换分支git checkout develop#合并分支git merge --no-ff feature-x#删除分支git branch -d feature-x
release branch 预发布分支:指的是在发布版本之前,我们可能需要一个预发布的版本进行测试,预发布分支是从develop分支上分出来的,,预发布结束后,必须合并进develop和master分支
git checkout -b release-1.2 developgit checkout mastergit merge --no-ff release-1.2# 对合并生成的新节点,做一个标签git tag -a 1.2git checkout develop#再合并到develop分支git merge --no-ff release-1.2#删除预发布分支git branch -d release-1.2
修补bug分支
#创建一个修补bug分支git checkout -b fixbug-0.1 master#修补结束后,合并到master分支git checkout mastergit merge --no-ff fixbug-0.1git tag -a 0.1.1git checkout develop#合并到develop分支git merge --no-ff fixbug-0.1#删除"修补bug分支"git branch -d fixbug-0.1
六、submodule
对于行云平台下面的6系列的代码
依次执行一下命令就可以把子模块来使用git submodule initgit config submodule.recurse truegit pull --recurse-submodules
无法使用包管理工具时,才使用submodule来管理这些包,一般很少使用
关于git submodule的原理感兴趣的可以看,如下视频:
https://www.bilibili.com/video/BV1zK4y1N75x?from=search&seid=18436761002311587871&spm_id_from=333.337.0.0
相关submodule文章man page中的描述如下:
Submodules can be used for at least two different use cases:
- Using another project while maintaining independent history. Submodules allow you to contain the working tree of another project within your own working tree while keeping the history of both projects separate. Also, since submodules are fixed to an arbitrary version, the other project can be independently developed without affecting the superproject, allowing the superproject project to fix itself to new versions only when desired.
- Splitting a (logically single) project into multiple repositories and tying them back together. This can be used to overcome current limitations of Git’s implementation to have finer grained access:
- Size of the Git repository: In its current form Git scales up poorly for large repositories containing content that is not compressed by delta computation between trees. For example, you can use submodules to hold large binary assets and these repositories can be shallowly cloned such that you do not have a large history locally.
- Transfer size: In its current form Git requires the whole working tree present. It does not allow partial trees to be transferred in fetch or clone. If the project you work on consists of multiple repositories tied together as submodules in a superproject, you can avoid fetching the working trees of the repositories you are not interested in.
- Access control: By restricting user access to submodules, this can be used to implement read/write policies for different users.
由上文可知:
一般两种情况下使用子模块
1)可以独立开发其他项目而不影响superproject (父类项目),允许superproject (父类项目)仅在需要时将自身修复为新版本
2)更细力度的访问,通过限制用户对子模块的访问,可用于实现不同用户的读/写策略
七、merge&rebase 合并和衍合
介绍:
Merge和Rebase 是合并两个分支的操作,都是checkout到某个分支上,然后把别的分支合并到该分支
其中,
一、对于merge操作:
1)merge在没有分叉的情况下,会自动fast-forward的方式,快速移动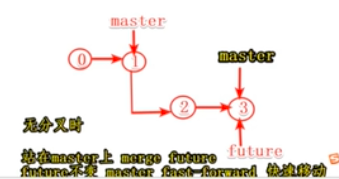
2)merge在有分叉的情况下,会产生一个新的提交点,他就是别的分支多次commit的合并
二、对于rebase操作
rebase 叫做变基, 也是把别的分支合到自己的身上,但是效果就像在基的基础上重新提交自己的多次commit,看起来就好像从基抽出来一次
异同点分析
作用大体相同:
都是把别的分支合到自己的身上,别的分支不会改变,变的只是自己
效果有些不同
1)对于merge branch,它是把branch的多次提交合成一个commit,然后加在自己分支的后面,
(2-3-6),6就是4和5合成的一个新的提交点,自己的提交(4、5)在前面,别人的提交在后面

2)对于rebase branch ,它就好像branch(基)的基础上,重新提交自己的多次commit,(4-5-2-3),看起来像重新从基抽取出来一次
自己的提交总是在最后面,而且不会多出一个提交点
总结:
- 在公共的分支上选择merger(将新功能整合到master上)
- 功能分支上选择rebase主分支(和公共分支同步,把自己提交顶到最后)
- 功能分支上选择merge(把别的分支功能加到自己的身上,假如不介意顺序的话)
- 切记不要在公共分支(master)上 rebase
会出现变基,master 上的多次提交 相当于篡改了历史
git pull = git fetch + merge
相关视频:
Git Merge和Rebase的区别。包括作用,效果和使用场景
[
](https://www.bilibili.com/video/BV1cv411u7wd/?spm_id_from=333.788.recommend_more_video.1)
八、cherry-pick
使用场景:将代码从一个分支转移到另一个分支,我们只需要部分代码变动的时候(某几个提交),这时我们可以采用cherry pick
#作用将指定提交应用于其他的分支 这里不一定要分支的hash值,也可以是分支名git cherry-pick <commitHash>
举例说明:代码仓库有master和feature两个分支
a - b - c - d Master\e - f - g Feature
需求:现在将提交f应用到master分支
# 切换到 master 分支$ git checkout master# Cherry pick 操作$ git cherry-pick f
操作完后:代码仓库变为
a - b - c - d - f Master\e - f - g Feature
出现冲突时cherry pick 会停下来
如果操作过程中发生代码冲突,Cherry pick 会停下来,让用户决定如何继续操作。
(1)—continue
用户解决代码冲突后,第一步将修改的文件重新加入暂存区(git add .),第二步使用下面的命令,让 Cherry pick 过程继续执行。
$ git cherry-pick —continue
(2)—abort
发生代码冲突后,放弃合并,回到操作前的样子。
(3)—quit
发生代码冲突后,退出 Cherry pick,但是不回到操作前的样子。
相关文章:
git cherry-pick 教程
九、冲突的解决
1)对人编辑相同文件的相同的地方
git pull时出现冲突
解决方案:必须手工处理冲突
2)多人编辑相同文件的不同地方
git 可以帮助我们自动处理冲突
十、什么时候使用fetch 和什么时候使用 pull
git fetch & get pull

1.someone push a new commit to github
2.git fetch to sync remote master
3.git fetch
不确定有冲突:git fetch 要两步先fetch 后merge,git diff
一定不会冲突,就去git pull 还需要自己去手动merge解决冲突

若有收获,就点个赞吧
0 人点赞
