第三章:数据解析
爬取页面的内容
编码流程:
- 指定url
- 发起请求
- 获取响应数据
- 数据解析
- 持久化存储
数据解析的分类:
- 正则(了解)
- bs4(了解)
- xpath(重点)
数据解析的原理:
解析的局部的文本内容都会在标签之间或者标签对应的属性中进行存储
- 进行指定标签的定位
- 标签或者标签对应的属性中存储的数据值进行提取(解析)
0.图片的爬取:
import requestsif __name__ == '__main__':# content 返回一个二进制形式的数据# text (文本) content (二进制) json() (对象)url = 'https://pic1.zhimg.com/v2-a95e9350681a5bc4f1d79988deff2a5c_b.jpg'img_data = requests.get(url=url).contentwith open('test.gif', 'wb') as fp:fp.write(img_data)
1.正则解析
html
<div class="thumb"><a href="/article/123657832" target="_blank"><img src="//pic.qiushibaike.com/system/pictures/12365/123657832/medium/BYTTLNQ3HW0ST63W.jpg" alt="糗事#123657832" class="illustration" width="100%" height="auto"></a></div>
正则
ex = '<div class="thumb">.*?<img src="(.*?)" alt=.*?</div>'
代码
import requestsimport reimport osfrom tqdm import tqdmif __name__ == '__main__':if not os.path.exists('./img'):os.mkdir('./img')# UA伪装headers = {'User-Agent': 'Mozilla/5.0 (Windows NT 10.0; Win64; x64) AppleWebKit/537.36 (KHTML, like Gecko) Chrome/87.0.4280.67 Safari/537.36 Edg/87.0.664.52'}url = 'https://www.qiushibaike.com/imgrank/'html = requests.get(url=url, headers=headers).text# 使用聚焦爬虫将页面中所有的糗图进行解析/提取ex = '<div class="thumb">.*?<img src="(.*?)" alt.*?</div>'img_src_list = re.findall(ex, html, re.S)for src in tqdm(img_src_list):src = 'https:'+srcimage_data = requests.get(url=src).contentimage_name = src.split('/')[-1]with open('./img/' + image_name, 'wb') as fp:fp.write(image_data)
注意:
1.获取图片的名称
image_name = src.split('/')[-1]
2.正则解析-分页下载
import requestsimport reimport osfrom tqdm import tqdmif __name__ == '__main__':if not os.path.exists('./img'):os.mkdir('./img')# UA伪装headers = {'User-Agent': 'Mozilla/5.0 (Windows NT 10.0; Win64; x64) AppleWebKit/537.36 (KHTML, like Gecko) Chrome/87.0.4280.67 Safari/537.36 Edg/87.0.664.52'}for page in range(1, 13):print("下载第%d页的图片" % page)url = 'https://www.qiushibaike.com/imgrank/page/' + str(page)html = requests.get(url=url, headers=headers).text# 使用聚焦爬虫将页面中所有的糗图进行解析/提取ex = '<div class="thumb">.*?<img src="(.*?)" alt.*?</div>'img_src_list = re.findall(ex, html, re.S)for src in tqdm(img_src_list):src = 'https:' + srcimage_data = requests.get(url=src).contentimage_name = src.split('/')[-1]with open('./img/' + image_name, 'wb') as fp:fp.write(image_data)
3.xpath 解析方式(首选)
xpath的解析原理
- 实例化一个etree的对象,且需要将需解析的数据源码加载到改对象中
- 调用etree对象中的xpath方法结合着xpath表达式实现标签的定位和内容的捕获
环境安装
- pip install lxml
如何实例化etree对象 from lxml import etree
- 将本地的html文档中的源码数据加载到etree对象中
- etree.parse(filePath)
- 将互联网上获取的源码数据加载到该对象中
- etree.HTML(‘page_text’)
- xpath(‘xpath表达式’)
3.xpath表达式:
- /:表示的是从根节点开始定位。表示的是一个层级。
- //:表示的是多个层级。可以表示从任意位置开始定位。
- 属性定位://[@class=’song’] tag[@attrName=”attrValue”]
- 索引定位://div[@class=”song”]/p[3] 索引是从1开始的。
- 取文本:
- /text() 获取的是标签中直系的文本内容
- //text() 标签中非直系的文本内容(所有的文本内容)
- 取属性:
/@attrName ==>img/src
6.xpath解析案例-58二手房
import requestsfrom lxml import etreeif __name__ == '__main__':headers = {'user-agent': 'Mozilla/5.0 (Windows NT 10.0; Win64; x64) AppleWebKit/537.36 (KHTML, like Gecko) Chrome/87.0.4280.67 Safari/537.36 Edg/87.0.664.52'}url = 'https://yz.58.com/ershoufang/'html = requests.get(url=url, headers=headers).texttree = etree.HTML(html)li_list = tree.xpath('//ul[@class="house-list-wrap"]/li')with open('./58.txt', 'w', encoding='utf-8') as pf:for li in li_list:title = li.xpath('./div[2]/h2/a/text()')[0]print(title)pf.write(title + '\n')
7.xpath解析案例-4k图片解析爬取
import requestsimport osfrom lxml import etreefrom tqdm import tqdmif __name__ == '__main__':headers = {'user-agent': 'Mozilla/5.0 (Windows NT 10.0; Win64; x64) AppleWebKit/537.36 (KHTML, like Gecko) Chrome/87.0.4280.67 Safari/537.36 Edg/87.0.664.52'}url = 'http://pic.netbian.com/4kmeinv/index_7.html'html = requests.get(url=url, headers=headers).texttree = etree.HTML(html)li_list = tree.xpath('//div[@class="slist"]/ul/li')if not os.path.exists('./美女图片'):os.mkdir('./美女图片')for li in tqdm(li_list):# 拼接图片地址img_src = "http://pic.netbian.com" + li.xpath('./a/img/@src')[0]# 得到图片后缀img_suffix = '.'+str(img_src.split('.')[-1])# 拼接图片名称img_name = li.xpath('./a/img/@alt')[0] + img_suffix# 通用处理中文乱码的解决方案img_name = img_name.encode('iso-8859-1').decode('gbk')# 下载图片img_data = requests.get(url=img_src, headers=headers).content# 持久化with open('./美女图片/'+img_name, 'wb') as fp:fp.write(img_data)
解决数据编码格式
# 手动设定响应数据的编码格式response.encoding = 'utf-8'# 通用处理中文乱码的解决方案img_name = img_name.encode('iso-8859-1').decode('gbk')
7.xpath解析案例-4k图片解析爬取-升级
import requestsimport osfrom lxml import etreefrom tqdm import tqdmif __name__ == '__main__':headers = {'user-agent': 'Mozilla/5.0 (Windows NT 10.0; Win64; x64) AppleWebKit/537.36 (KHTML, like Gecko) Chrome/87.0.4280.67 Safari/537.36 Edg/87.0.664.52'}for page in range(2, 8):url = 'http://pic.netbian.com/4kmeinv/index_%s.html' % pagehtml = requests.get(url=url, headers=headers).texttree = etree.HTML(html)li_list = tree.xpath('//div[@class="slist"]/ul/li')if not os.path.exists('./美女图片'):os.mkdir('./美女图片')for li in tqdm(li_list):# 去详情页爬取href = li.xpath('./a/@href')[0]detail_url = 'http://pic.netbian.com' + hrefdetail_html = requests.get(url=detail_url, headers=headers).textdetail_tree = etree.HTML(detail_html)detail_img_url = 'http://pic.netbian.com' + detail_tree.xpath('//*[@id="img"]/img/@src')[0]# 得到图片后缀img_suffix = '.' + detail_img_url.split('.')[-1]# 拼接图片名称img_name = detail_tree.xpath('//h1/text()')[0] + img_suffix# 通用处理中文乱码的解决方案img_name = img_name.encode('iso-8859-1').decode('gbk')# 下载图片img_data = requests.get(url=detail_img_url, headers=headers).content# 持久化with open('./美女图片/' + img_name, 'wb') as fp:fp.write(img_data)
7.xpath解析案例-4k图片解析爬取-终极版
其实上面的图片都不够清晰,根本不是什么4K
通过我的研究,找到下载4k图片的方法: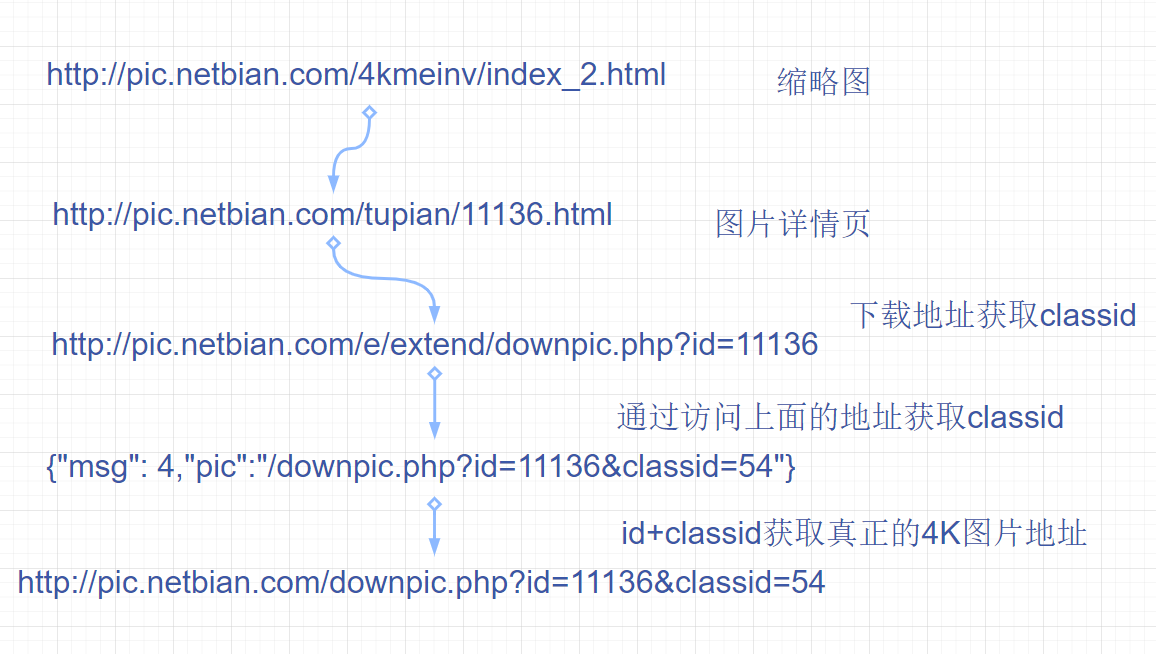
但是我get最后一个链接,图片直接从浏览器上面下载下来了,但我不知道如何在python中处理????
http://pic.netbian.com/4kmeinv/index_2.htmlhttp://pic.netbian.com/tupian/11136.htmlhttp://pic.netbian.com/e/extend/downpic.php?id=11136{"msg": 4,"pic":"/downpic.php?id=11136&classid=54"}http://pic.netbian.com/downpic.php?id=11136&classid=54http://pic.netbian.com/e/extend/downpic.php?id=26596
8.xpath解析案例-全国城市名称爬取
#!/usr/bin/env python# -*- coding:utf-8 -*-import requestsfrom lxml import etree#项目需求:解析出所有城市名称https://www.aqistudy.cn/historydata/if __name__ == "__main__":# headers = {# 'User-Agent':'Mozilla/5.0 (Macintosh; Intel Mac OS X 10_12_0) AppleWebKit/537.36 (KHTML, like Gecko) Chrome/73.0.3683.103 Safari/537.36'# }# url = 'https://www.aqistudy.cn/historydata/'# page_text = requests.get(url=url,headers=headers).text## tree = etree.HTML(page_text)# host_li_list = tree.xpath('//div[@class="bottom"]/ul/li')# all_city_names = []# #解析到了热门城市的城市名称# for li in host_li_list:# hot_city_name = li.xpath('./a/text()')[0]# all_city_names.append(hot_city_name)## #解析的是全部城市的名称# city_names_list = tree.xpath('//div[@class="bottom"]/ul/div[2]/li')# for li in city_names_list:# city_name = li.xpath('./a/text()')[0]# all_city_names.append(city_name)## print(all_city_names,len(all_city_names))headers = {'User-Agent': 'Mozilla/5.0 (Macintosh; Intel Mac OS X 10_12_0) AppleWebKit/537.36 (KHTML, like Gecko) Chrome/73.0.3683.103 Safari/537.36'}url = 'https://www.aqistudy.cn/historydata/'page_text = requests.get(url=url, headers=headers).texttree = etree.HTML(page_text)#解析到热门城市和所有城市对应的a标签# //div[@class="bottom"]/ul/li/ 热门城市a标签的层级关系# //div[@class="bottom"]/ul/div[2]/li/a 全部城市a标签的层级关系a_list = tree.xpath('//div[@class="bottom"]/ul/li/a | //div[@class="bottom"]/ul/div[2]/li/a')all_city_names = []for a in a_list:city_name = a.xpath('./text()')[0]all_city_names.append(city_name)print(all_city_names,len(all_city_names))
4.bs4
使用流程:
- 实例化一个beautifulSoup对象,并将页面加载到其中
- 通过beautifulSoup对象中的属性和方法进行标签定位和数据提取
环境安装
- pip install bs4
- pip install lxml
如何使用
- 导包
from bs4 import BeautifulSoup 实例化
BeautifulSoup引入本地的文件
fp = open('./test.html', 'w', encoding='utf-8')soup = BeautifulSoup(fp, 'lxml')
引入网络资源
page_text = response.textsoup = BeautifulSoup(page_text, 'lxml')
BeautifulSoup相关方法
获取相关标签:
soup.tagName返回HTML中第一出现的tagName的标签soup.find('tagName')返回HTML中第一出现的tagName的标签soup.find('tagName',class_/id/attr='song')soup.find_all()参数通find() 返回HTML中全部出现的tagName的标签soup.select('')可以使用选择器 类选择器,标签选择器,块选择器 返回列表soup.select('.tang>ul>li>a')> 表示一个层级soup.select('.tang>ul>li>a')空格表示多个层级
获取标签之间的文本值:
souop.a.text/string/get_text()text/get_text()可以获取标签中所有的文本内容string只可以获取直系的文本内容
获取标签中属性值:
soup.a['herf']
作业:
爬取站长素材中免费简历模板

若有收获,就点个赞吧
0 人点赞


