命令模式
什么是命令模式
命令模式是将一个请求封装成一个对象,从而使您可以用不同的请求对客户进行参数化。请求以命令的形式包裹在对象中,并传给调用对象。调用对象寻找可以处理该命令的合适的对象,并把该命令传给相应的对象,该对象执行命令。
命令模式可以用来解决什么问题
在软件系统中,行为请求者与行为实现者通常是一种紧耦合的关系,但某些场合,比如需要对行为进行记录、撤销或重做、事务等处理时,这种无法抵御变化的紧耦合的设计就不太合适。
命令模式的结构
基础结构
- 发布者 invoker(发出命令,调用命令对象,不知道如何执行与谁执行);
- 接收者 receiver (提供对应接口处理请求,不知道谁发起请求);
- 命令对象 command(接收命令,调用接收者对应接口处理发布者的请求)。
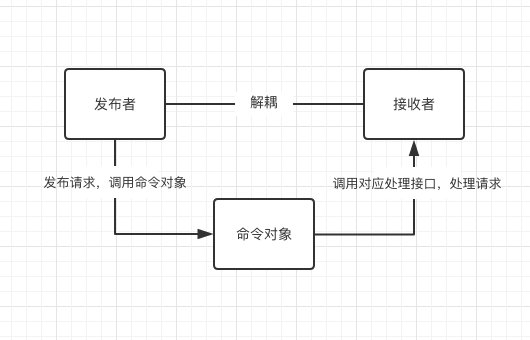
发布者 invoker 和接收者 receiver 各自独立,将请求封装成命令对象 command ,请求的具体执行由命令对象 command 调用接收者 receiver 对应接口执行。
代码实现
// 接收者类class Receiver {execute(action) {console.log(`接收者执行命令:${action}`)}}// 命令对象class Command {constructor(receiver) {this.receiver = receiver}execute (action) {console.log(`命令对象接收到命令:${action}`);this.receiver.execute(action)}}// 发布者class Invoker {constructor(command) {this.command = command}invoke(action) {console.log(`发布者发布命令:${action}`)this.command.execute(action)}}// 仓库const warehouse = new Receiver();// 订单const order = new Command(warehouse);// 客户const client = new Invoker(order);client.invoke('生产一张书桌')

命令对象 command 充当发布者 invoker 与接收者 receiver 之间的连接桥梁(中间对象介入)。实现发布者与接收之间的解耦,对比过程化请求调用,命令对象 command 拥有更长的生命周期,接收者 receiver 属性方法被封装在命令对象 command 属性中,使得程序执行时可任意时刻调用接收者对象 receiver 。因此 command 可对请求进行进一步管控处理,如实现延时、预定、排队、撤销等功能。
// 接收者类class Receiver {execute(action) {console.log(`接收者执行命令: 生产${action}`);switch (action) {case "书桌":this.outputDesk();break;case "椅子":this.outputChair();break;default:console.log(`工厂没有生产${action}的能力,请确认订单`);break;}}// 生产书桌的方法outputDesk() {setTimeout(() => {console.log('生产了一张书桌');console.log('书桌已经生产好了,可以交给客户了');}, 1000);}// 生产椅子的方法outputChair() {setTimeout(() => {console.log('生产了一把椅子');console.log('椅子已经生产好了,可以交给客户了');}, 1000);}}// 命令对象class Command {constructor(receiver) {this.receiver = receiver;}execute(action) {console.log(`命令对象接收到命令:${action}`);this.receiver.execute(action)}}class DeskCommand extends Command {constructor(receiver) {super(receiver);}execute() {console.log(`接到一张书桌的订单,给工厂下命令生产一张书桌`);this.receiver.execute('书桌');}}class ChairCommand extends Command {constructor(receiver) {super(receiver);}execute() {console.log(`接到一把椅子的订单,给工厂下命令生产一把椅子`);this.receiver.execute('椅子');}}// 发布者class Invoker {constructor() {this.orderList = [];}// 下订单setOrder(orderType, order) {console.log(`接到一个订单:${orderType}`)this.orderList.push(order);}// 取消订单cancelOrder(orderType, order) {let index = this.orderList.indexOf(order);this.orderList.splice(index, 1);console.log(`取消一个订单:${orderType}`);}// 发布命令invoke() {console.log(`发布者发布命令,给工厂下订单`)this.orderList.forEach((item) => { item.execute(); });}}// 仓库const warehouse = new Receiver();// 订单const desk = new DeskCommand(warehouse);const chair = new ChairCommand(warehouse);// 客户const client = new Invoker();client.setOrder("书桌", desk);client.setOrder("书桌", desk);client.setOrder("书桌", desk);client.setOrder("书桌", desk);client.setOrder("椅子", chair);client.setOrder("椅子", chair);client.setOrder("椅子", chair);client.setOrder("椅子", chair);client.setOrder("椅子", chair);client.setOrder("椅子", chair);client.cancelOrder("书桌", desk);setTimeout(() => {client.invoke();}, 1000);
完整结构
Command:定义命令的接口,声明执行的方法。
ConcreteCommand:命令接口实现对象,是”虚”的实现。
通常会持有接收者,并调用接收者的功能来完成命令要执行的操作。
Receiver:接收者,真正执行命令的对象。
任何类都可能成为一个接收者,只要它能够实现命令要求实现的相应功能。
Invoker:要求命令对象执行请求,通常会持有命令对象,可以持有很多的命令对象。
这个是客户端真正触发命令并要求命令执行相应操作的地方,也就是说相当于使用命令对象的入口。
Client:创建具体的命令对象,并且设置命令对象的接收者。
注意这个不是我们常规意义上的客户端,而是在组装命令对象和接收者,或许,把这个 Client 称为装配者会更好理解,因为真正使用命令的客户端是从 Invoker 来触发执行。
代码实现
// 烧烤店的实现// Receiver 接收者类 厨师,拥有烤羊肉串,烤鸡翅等能力class Cooker {execute(action) {console.log(`厨房收到订单: 开始${action}`)switch (action) {case "烤羊肉串":this.bakeMutton();break;case "烤鸡翅":this.bakeChickenWing();break;default:console.log(`厨房没有${action}了,请点其他的菜`);break;}}// 烤羊肉串bakeMutton() {setTimeout(() => {console.log('羊肉串烤好了,可以给客人上菜了');}, 500);}// 烤鸡翅bakeChickenWing() {setTimeout(() => {console.log('鸡翅烤好了,可以给客人上菜了');}, 1000);}}// command 命令对象类class Command {constructor(receiver) {this.receiver = receiver;}execute(action) {this.receiver.execute(action);}}// ConcreteCommand// 烤羊肉串的命令class BakeMuttonCommand extends Command {constructor(receiver) {super(receiver);}execute() {this.receiver.execute('烤羊肉串');}}// 烤牛肉串的命令class BakeBeefCommand extends Command {constructor(receiver) {super(receiver);}execute() {this.receiver.execute('烤牛肉串');}}// 烤鸡翅的命令class BakeChickenWingCommand extends Command {constructor(receiver) {super(receiver);}execute() {this.receiver.execute('烤鸡翅');}}// Invoker 发布者 服务员class Invoker {constructor() {this.orders = [];}// 添加菜品setOrder(type, command) {this.orders.push(command);console.log(`${Date.now()} 下单 ${type}`);}// 取消菜品cancelOrder(type, command) {let index = this.orders.indexOf(command);this.orders.splice(index, 1);console.log(`${Date.now()} 取消下单 ${type}`)}// 向后厨下单notify() {console.log('向后厨下单');this.orders.forEach(element => {element.execute();});}}let cooker = new Cooker();let bakeMuttonCommand = new BakeMuttonCommand(cooker);let bakeBeefCommand = new BakeBeefCommand(cooker);let bakeChickenWingCommand = new BakeChickenWingCommand(cooker);let waiter = new Invoker();waiter.setOrder('烤羊肉串', bakeMuttonCommand);waiter.setOrder('烤羊肉串', bakeMuttonCommand);waiter.setOrder('烤牛肉串', bakeBeefCommand);waiter.setOrder('烤鸡翅', bakeChickenWingCommand);waiter.cancelOrder('烤羊肉串', bakeMuttonCommand);setTimeout(() => {waiter.notify();}, 1000);
命令模式例子——菜单命令
现在页面中有三个button元素和一个菜单程序界面,这三个button元素的作用是:当用户点击时,他们分别会执行“刷新菜单”、“添加子菜单”和“删除子菜单”这三个功能。如果由一个程序员来完成这个功能就非常的简单了,因为他非常清楚那个按钮对应那个功能。但是如果实在一个分工很细致的团队里就不是这样了,例如一个人负责写html和css样式布局,另一个人负责写js,他们两个人同时进行各自的工作。在这种情况下,负责写js的那个人就很难确定哪个按钮对应哪个功能了。我们回想一下命令模式的使用场景:
有时候需要向某些对象发送请求,但是并不知道请求的接收者是谁,也不知道被请求的操作是什么,此时希望用一种松耦合的方式来设计软件,使得请求发送者和请求接收者能够消除彼此之间的耦合关系。
我们发现这种情况非常符合使用命令模式。
HTML按钮结构:
<button class="ref">刷新菜单</button><button class="add">添加子菜单</button><button class="del">删除子菜单</button>
首先我们对功能进行封装,将三个功能分别封装到Menu和SubMenu两个对象中:
//菜单对象var Menu = {refresh: function(){console.log("刷新菜单");}};//子菜单var SubMenu = {add: function(){console.log('增加子菜单');},del: function(){console.log('删除子菜单');}};
然后封装三个功能调用的命令:
//封装刷新菜单命令var refreshMenuCommand = function(receiver){this.receiver = receiver;}refreshMenuCommand.prototype.execute = function(){this.receiver.refresh();}//封装添加子菜单命令var addSubMenuCommand = function(receiver){this.receiver = receiver;}addSubMenuCommand.prototype.execute = function(){this.receiver.add();}//封装删除子菜单命令var delSubMenuCommand = function(receiver){this.receiver = receiver;}delSubMenuCommand.prototype.execute = function(){this.receiver.del();}
在然后是封装设置命令函数:
//设置命令函数function setCommand(btn, command){btn.addEventListener("click", function(){command.execute();})};
最后是客户端(client)的调用:
//client客户调用var refreshCommand = new refreshMenuCommand(Menu);var addCommand = new addSubMenuCommand(SubMenu);var delCommand = new delSubMenuCommand(SubMenu);var btn = document.querySelectorAll("button");setCommand(btn[0], refreshCommand);setCommand(btn[1], addCommand);setCommand(btn[2], delCommand);
JavaScript中的命令模式:
大家细看上面菜单的例子,会发现实现一个这么简单的功能,竟然弄得代码这么复杂难懂。即使不用什么模式,用下面几行代码就可以实现相同的功能:
//菜单对象var Menu = {refresh: function(){console.log("刷新菜单");}};//子菜单var SubMenu = {add: function(){console.log('增加子菜单');},del: function(){console.log('删除子菜单');}};//事件绑定函数function addEvent(dom, fn, Capture){dom.addEventListener("click", fn, !!Capture);};var btn = document.querySelectorAll("button");addEvent(btn[0], Menu.refresh);addEvent(btn[1], SubMenu.add);addEvent(btn[2], SubMenu.del);
这就是JavaScript语言中的命令模式,在JavaScript语言中函数是一等对象,它可以作为一个参数传递到函数内部去执行。所以在JavaScript这门语言中,命令模式和策略模式一样是JavaScript这门语言的天赋(生来即具有的属性)或者是隐性模式。命令模式其实就是回调函数一个面向对象的替代品,在JavaScript中命令模式和策略模式一样依赖回调函数实现,使用起来也更简单、更便捷。但有些时候这会成为一种缺点,因为他无法执行撤销操作,所以在实现撤销操作时,我们最好还是使用命令对象的execute方法为好。
撤销操作的实例
现在页面中有一个元素,有两个按钮,其中一个按钮点击时元素会往右移动一段距离,另一个按钮是撤销上一个移动操作。用命令模式实现这个功能,代码如下:
HTML结构:
<div class="demo"><button class="move">移动</button><button class="undo">撤销</button><div class="target" style="left:0"></div></div>
CSS样式:
.demo{width:100%;height:100px;position:relative;}.target{width:50px;height:50px;position:absolute;bottom:0;background-color:red;}
js代码:
//移动对象var Animate = function(dom){this.dom = dom;var self = this;//移动函数this.move = function(){var left = parseInt(self.dom.style.left);self.dom.style.left = left + 10 + 'px';};//取消移动函数this.undo = function(){var left = parseInt(self.dom.style.left);self.dom.style.left = left - 10 + 'px';};};//命令对象var Command = function(receiver){var self = this;this.receiver = receiver;this.count = 0; //记录执行命令的次数//执行命令this.execute = function(){self.receiver.move();self.count+= 1;};//撤销命令this.unexecute = function(){if(self.count === 0) return;self.receiver.undo();self.count-= 1;}};//设置命令函数function addEvent(dom, fn, Capture){dom.addEventListener("click", fn, !!Capture);};//client调用var dom = document.querySelector(".target");var moveBtn = document.querySelector(".move");var unmoveBtn = document.querySelector(".undo");var m = new Animate(dom);var c = new Command(m);addEvent(moveBtn, c.execute);addEvent(unmoveBtn, c.unexecute);
命令模式的优缺点:
优点: 1、降低了系统耦合度。 2、新的命令可以很容易添加到系统中去。
缺点:使用命令模式可能会导致某些系统有过多的具体命令类。
宏命令
宏命令:一组命令集合(命令模式与组合模式的产物)
发布者发布一个请求,命令对象会遍历命令集合下的一系列子命令并执行,完成多任务。
// 宏命令对象class MacroCommand {constructor() {this.commandList = []; // 缓存子命令对象}add(command) { // 向缓存中添加子命令this.commandList.push(command);}execute() { // 对外命令执行接口// 遍历自命令对象并执行其 execute 方法for (const command of this.commandList) {command.execute();}}}const openWechat = { // 命令对象execute: () => {console.log('打开微信');}};const openChrome = { // 命令对象execute: () => {console.log('打开Chrome');}};const openEmail = { // 命令对象execute: () => {console.log('打开Email');}}const macroCommand = new MacroCommand();macroCommand.add(openWechat); // 宏命令中添加子命令macroCommand.add(openChrome); // 宏命令中添加子命令macroCommand.add(openEmail); // 宏命令中添加子命令macroCommand.execute(); // 执行宏命令/* 输出:打开微信打开Chrome打开Email*/
傻瓜命令与智能命令
傻瓜命令:命令对象需要接收者来执行客户的请求。 智能命令:命令对象直接实现请求,不需要接收者,“聪明”的命令对象。
“傻瓜命令” 与 “智能命令” 的区别在于是否有 “接收者” 对象。
// openWechat 是智能命令对象,并没有传入 receiver 接收对象const openWechat = {execute: () => { // 命令对象直接处理请求console.log('打开微信');}};
没有 “接收者” 的智能命令与策略模式很类似。代码实现类似,区别在于实现目标不同。
- 策略模式中实现的目标是一致的,只是实现算法不同(如目标:根据KPI计算奖金);
- 智能命令的解决问题更广,目标更具散发性。(如目标:计算奖金/计算出勤率等)。
PPT
https://www.yuque.com/stay_hungry_stay_foolish/language/xmgf0b#page=1
参考文档

若有收获,就点个赞吧
0 人点赞
