Data Class
在Kotlin中数据类能够帮助生成equals() hashCode() toString() copy()方法,不需要手动重写这些方法
by lazy
使用了一个代理对象 Lazy 来获取值。只会获取一次,获取的时候使用 synchronized 加锁。获取的时候就是通过调用 by lazy 后面的 lambda 表达式的来获取。
data class Test3(var name: String? = null) {val age by lazy { 1+2 }}
反编译后
public final class Test3 {
   @NotNull
   private final Lazy age$delegate;
   @Nullable
   private String name;

   public final int getAge() {
      Lazy var1 = this.age$delegate;
      Object var3 = null;
      boolean var4 = false;
       //通过代理对象来获取值
      return ((Number)var1.getValue()).intValue();
   }

   @Nullable
   public final String getName() {
      return this.name;
   }

   public final void setName(@Nullable String var1) {
      this.name = var1;
   }

   public Test3(@Nullable String name) {
      this.name = name;
       //代理对象
      this.age$delegate = LazyKt.lazy((Function0)null.INSTANCE);
   }
   // $FF: synthetic method
   public Test3(String var1, int var2, DefaultConstructorMarker var3) {
      if ((var2 & 1) != 0) {
         var1 = (String)null;
      }

      this(var1);
   }

   public Test3() {
      this((String)null, 1, (DefaultConstructorMarker)null);
   }

   @Nullable
   public final String component1() {
      return this.name;
   }

   @NotNull
   public final Test3 copy(@Nullable String name) {
      return new Test3(name);
   }

   // $FF: synthetic method
   public static Test3 copy$default(Test3 var0, String var1, int var2, Object var3) {
      if ((var2 & 1) != 0) {
         var1 = var0.name;
      }

      return var0.copy(var1);
   }

   @NotNull
   public String toString() {
      return "Test3(name=" + this.name + ")";
   }

   public int hashCode() {
      String var10000 = this.name;
      return var10000 != null ? var10000.hashCode() : 0;
   }

   public boolean equals(@Nullable Object var1) {
      if (this != var1) {
         if (var1 instanceof Test3) {
            Test3 var2 = (Test3)var1;
            if (Intrinsics.areEqual(this.name, var2.name)) {
               return true;
            }
         }

         return false;
      } else {
         return true;
      }
   }
}
代理对象是通过 顶层函数 LazyKt.lazy((Function0)null.INSTANCE); 来获取
public actual fun <T> lazy(initializer: () -> T): Lazy<T> = SynchronizedLazyImpl(initializer)

private class SynchronizedLazyImpl<out T>(initializer: () -> T, lock: Any? = null) : Lazy<T>, Serializable {
    private var initializer: (() -> T)? = initializer
    @Volatile private var _value: Any? = UNINITIALIZED_VALUE
    // final field is required to enable safe publication of constructed instance
    private val lock = lock ?: this

    override val value: T
        get() {
            val _v1 = _value
            if (_v1 !== UNINITIALIZED_VALUE) {
                //如果已经初始化过,直接返回结果
                @Suppress("UNCHECKED_CAST")
                return _v1 as T
            }
            //加锁
            return synchronized(lock) {
                val _v2 = _value
                if (_v2 !== UNINITIALIZED_VALUE) {
                    @Suppress("UNCHECKED_CAST") (_v2 as T)
                } else {
                    //通过调用 by lazy 后面的函数进行获取值
                    val typedValue = initializer!!()
                    //赋值
                    _value = typedValue
                    initializer = null
                    typedValue
                }
            }
        }

    override fun isInitialized(): Boolean = _value !== UNINITIALIZED_VALUE

    override fun toString(): String = if (isInitialized()) value.toString() else "Lazy value not initialized yet."

    private fun writeReplace(): Any = InitializedLazyImpl(value)
}
lateinit var
在使用的时候,会进行是否初始化检查,如果没有,则报错。
class Test4{
    lateinit var name:Test4
    fun test(){
        name = Test4()
    }
}
反编译
public final class Test4 {
   public Test4 name;

   @NotNull
   public final Test4 getName() {
      Test4 var10000 = this.name;
      if (var10000 == null) {
         Intrinsics.throwUninitializedPropertyAccessException("name");
      }

      return var10000;
   }

   public final void setName(@NotNull Test4 var1) {
      Intrinsics.checkNotNullParameter(var1, "<set-?>");
      this.name = var1;
   }

   public final void test() {
      this.name = new Test4();
   }
}
扩展函数
相当于创建了一个当前文件名为类名的类,然后把这个对象传过去。例如Test4.kt 文件中,写一个扩展函数
//Test4.kt
class Test4{
    var name  = ""
}
fun String.test(str:String){
    val text = this+str
    println(text)
}
反编译后:
public final class Test4Kt {
   public static final void test(@NotNull String $this$test, @NotNull String str) {
      Intrinsics.checkNotNullParameter($this$test, "$this$test");
      Intrinsics.checkNotNullParameter(str, "str");
      String text = $this$test + str;
      boolean var3 = false;
      System.out.println(text);
   }
}
Lambda
kotlin 定义了大量的 Function 接口,分别接受不同数量的参数。
每一个 Lambda 都是实现了这些接口的一个匿名内部类。
var action :(a:String)->Unit = {}
反编译
public final class Test4 {
   @NotNull
   private Function1 action;

   @NotNull
   public final Function1 getAction() {
      return this.action;
   }

   public final void setAction(@NotNull Function1 var1) {
      Intrinsics.checkNotNullParameter(var1, "<set-?>");
      this.action = var1;
   }

   public Test4() {
      this.action = (Function1)null.INSTANCE;
   }
}
空安全
空安全其实就是使用了 if(x!=null){} 的形式实现的。只不过相对于 if 判断是否为 null,这样的写法更方便。
class Test4{
    var txt:String? = ""
    fun test(){
        txt?.toString()
    }
}
反编译
public final class Test4 {
   @Nullable
   private String txt = "";

   @Nullable
   public final String getTxt() {
      return this.txt;
   }

   public final void setTxt(@Nullable String var1) {
      this.txt = var1;
   }

   public final void test() {
      String var10000 = this.txt;
      if (var10000 != null) {
         var10000.toString();
      }

   }
}
密封类
不能使用密封类实例化对象,只能用它的子类实例化对象。
密封类功能更多在于限制继承,起到划分子类的作用。将抽象类定义为密封类,可以禁止外部继承,对于一些只划分为固定类型的数据,可以保证安全。
/**
 * 密封类
 * 1.密封类用sealed关键词表示
 * 2.密封类的子类只能定义在密封类的内部或同一个文件中,因为其构造方法为私有的
 * 3.密封类相比于普通的open类,可以不被此文件外被继承,有效保护代码
 * 4.与枚举的区别:密封类适用于子类可数的情况,枚举适用于实例可数的情况
 */
sealed class PlayerCmd { //演奏控制类(密封类)
    val playerName: String = "Player"

    //演奏类
    class Player(val url: String, val position: Long = 0): PlayerCmd() {
        fun showUrl() {
            println("$url, $position")
        }
    }

    class Seek(val position: Long): PlayerCmd() //快进

    object Pause: PlayerCmd() //暂停(无需进行重载的类适合用单例object)
}

(密封类的子类也可以定义在密封类的外部,但要在同一个文件中)
object Resume: PlayerCmd() //继续

object Stop: PlayerCmd() //停止

enum class PlayerState { //枚举适合表现简单的状态
    IDLE, PAUSE, PLAYING, STOP
}

fun main(args: Array<String>) {
    PlayerCmd.Player("苍茫的天涯").showUrl()
    println(Resume.playerName)
}

//--------------输出--------------
苍茫的天涯, 0
Player
inline、noinline、crossinline
- inline 可以让你用内联——也就是函数内容直插到调用处——的方式来优化代码结构,从而减少函数类型的对象的创建;
- noinline 是局部关掉这个优化,来摆脱 inline 带来的「不能把函数类型的参数当对象使用」的限制;
- crossinline 是局部加强这个优化,让内联函数里的函数类型的参数可以被当做对象使用。
要点:
当一个函数被内联之后,它内部的那些函数类型的参数就不再是对象了,因为它们的壳被脱掉了。换句话说,对于编译之后的字节码来说,这个对象根本就不存在。一个不存在的对象,你怎么使用?
如果你写的是高阶函数,会有函数类型的参数,加上 inline 就对了。但是使用 inline 后,这些函数类型参数就不能作为对象使用了,这时可以函数类型参数可以使用 return,return 的是外层的外层。如果不加 inline,不能使用 return。
Lambda 表达式里不允许使用 return,除非——这个 Lambda 是内联函数的参数。 那这样的话规则就简单了:
- Lambda 里的 return,结束的不是直接的外层函数,而是外层再外层的函数;
- 但只有内联函数的 Lambda 参数可以使用 return。
crossinline: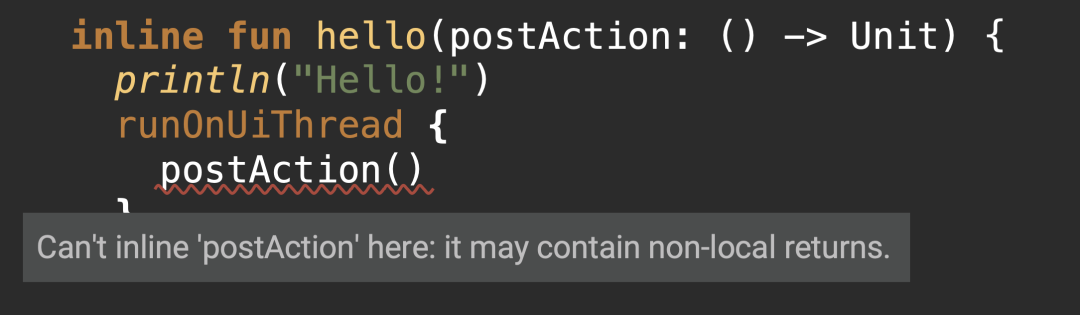

这次,我用 runOnUiThread() 把这个参数放在了主线程执行,这是一种很常见的操作。
但,这就带来了一个麻烦:本来在调用处最后那行的 return 是要结束它外层再外层的 main() 函数的,但现在因为它被放在了 runOnUiThread() 里,hello() 对它的调用就变成了间接调用。所谓间接调用,直白点说就是它和外层的 hello() 函数之间的关系被切断了。和 hello() 的关系被切断,那就更够不着更外层的 main() 了,也就是说这个间接调用,导致 Lambda 里的 return 无法结束最外面的 main() 函数了。
Kotlin 决定:内联函数里的函数类型的参数,不允许这种间接调用
如果我真的需要间接调用,怎么办?使用 crossinline。 内联函数里被 crossinline 修饰的函数类型的参数,将不再享有「Lambda 表达式可以使用 return」的福利。所以这个 return 并不会面临「要结束谁」的问题,而是直接就不许这么写。
扔物线-朱凯讲解 inline、noinline、crossinline
reified
fun <T>Int.toCase():T?{
        return (this as T)
    }
上述代码在转换类型时,没有进行检查,所以有可能会导致运行时崩溃,编译器会提示unchecked cast警告,如果获得的数据不是它期望的类型,这个函数会出现崩溃
 fun testCase() {
        1.toCase<String>()?.substring(0)
    }
这就会出现TypeCastException错误,所以为了安全获取数据一般都是需要显式传递class信息:
 fun <T> Int.toCase(clz:Class<T>):T?{
        return if (clz.isInstance(this)){
            this as? T
        }else{
            null
        }
    }
  fun testCase() {
     1.toCase(String::class.java)?.substring(0)
    }
但这需要通过显示传递class的方式过于麻烦繁琐尤其是传递多类型参数,基于类型擦除机制无法在运行时得到T的类型信息,所以用到安全转换操作符as或者as?
    fun <T> Bundle.putCase(key: String, value: T, clz:Class<T>){
        when(clz){
            Long::class.java -> putLong(key,value as Long)
            String::class.java -> putString(key, value as String)
            Char::class.java -> putChar(key, value as Char)
            Int::class.java -> putInt(key, value as Int)
            else -> throw IllegalStateException("Type not supported")
        }
    }
reified 关键字
reified关键字的使用很简单:
- 在泛型类型前面增加
reified修饰 - 在方法前面增加
inline
改进上述代码:
inline fun <reified T> Int.toCase():T?{
    return if (this is T) {
        this
    } else {
        null
    }
}

fun testCase() {
    1.toCase(String::class.java)?.substring(0)
}
testCase()方法调用转成Java 代码看下 :
public final void testCase() {
    int $this$toCase$iv = 1;
    int $i$f$toCase = false;
    String var10000 = (String)(Integer.valueOf($this$toCase$iv) instanceof String ? Integer.valueOf($this$toCase$iv) : null);
    // inline部分
    String var1;
    if (var10000 != null) {
        // 替换开始
        var1 = var10000;
        $this$toCase$iv = 0;
        if (var1 == null) {
            throw new TypeCastException("null cannot be cast to non-null type java.lang.String");
        }
        var10000 = var1.substring($this$toCase$iv);
        Intrinsics.checkExpressionValueIsNotNull(var10000, "(this as java.lang.String).substring(startIndex)");
    } else {
        var10000 = null;
    }
    // reified替换结束
    var1 = var10000;
    System.out.println(var1);
}
泛型在运行时会被类型擦除,但是在inline函数中我们可以指定类型不被擦除, 因为inline函数在编译期会将字节码copy到调用它的方法里,所以编译器会知道当前的方法中泛型对应的具体类型是什么,然后把泛型替换为具体类型,从而达到不被擦除的目的,在inline函数中我们可以通过reified关键字来标记这个泛型在编译时替换成具体类型。
internal
internal 修饰类的方法,表示这个类方法只适合当前module使用,如果其他module使用的话,会找不到这个internal方法或者报错。
inner
kotlin中支持类的嵌套(内部类),不过和java中不一样(java中包含一个指向外部类的对象的引用),kotlin中所有的内部类默认为静态的,这样很好的减少了内存泄漏问题。如果需要在内部类引用外部类的对象,可以使用inner声明内部类,使内部类变为非静态的,通过this@外部类名,指向外部类。
第八章 Kotlin之This,inner关键字
kotlin 泛型
let、also、with、run、apply
1. let函数
1.1 简介

1.2 使用方法
// 作用1:使用it替代object对象去访问其公有的属性 & 方法
object.let{
   it.todo()
}
// 作用2:判断object为null的操作
object?.let{//表示object不为null的条件下,才会去执行let函数体
   it.todo()
}
// 注:返回值 = 最后一行 / return的表达式
1.3 使用示例
// 使用Java
if( mVar != null ){
    mVar.function1();
    mVar.function2();
    mVar.function3();
}

// 使用kotlin(无使用let函数)
mVar?.function1()
mVar?.function2()
mVar?.function3()

// 使用kotlin(使用let函数)
// 方便了统一判空的处理 & 确定了mVar变量的作用域
mVar?.let {
       it.function1()
       it.function2()
       it.function3()
}
2. also函数
2.1 作用 & 应用场景
类似let函数,但区别在于返回值:
- let函数:返回值 = 最后一行 / return的表达式
- also函数:返回值 = 传入的对象的本身
2.2 使用示例
```kotlin // let函数 var result = mVar.let {
} // 最终结果 = 返回999给变量resultit.function1() it.function2() it.function3() 999
// also函数 var result = mVar.also { it.function1() it.function2() it.function3() 999 } // 最终结果 = 返回一个mVar对象给变量result
<a name="s316v"></a>
## 3. with函数
<a name="94891793"></a>
### 3.1 作用
调用同一个对象的多个方法 / 属性时,可以省去对象名重复,直接调用方法名 / 属性即可
<a name="eff30928"></a>
### 3.2 应用场景
需要调用同一个对象的多个方法 / 属性
<a name="7af7471d"></a>
### 3.3 使用方法
```kotlin
 with(object){
   // ...
 }

// 返回值 = 函数块的最后一行 / return表达式
3.4 使用示例
// 此处要调用people的name 和 age属性
// kotlin
val people = People("carson", 25)
with(people) {
println("my name is $name, I am $age years old")
}

// Java
User peole = new People("carson", 25);
String var1 = "my name is " + peole.name + ", I am " + peole.age + " years old";
System.out.println(var1);
4. run函数
4.1 作用 & 应用场景
with 和 T.run,这两个函数非常的相似,他们的区别在于 with 是个普通函数,T.run 是个扩展函数。run结合了let、with两个函数的作用,即:
- 调用同一个对象的多个方法 / 属性时,可以省去对象名重复,直接调用方法名 / 属性即可
- 定义一个变量在特定作用域内
- 统一做判空处理
4.2 使用方法
object.run{
// ...
}
// 返回值 = 函数块的最后一行 / return表达式
4.3 使用示例
// 此处要调用people的name 和 age属性,且要判空
// kotlin
val people = People("carson", 25)
people?.run{
    println("my name is $name, I am $age years old")
}

// Java
User peole = new People("carson", 25);
String var1 = "my name is " + peole.name + ", I am " + peole.age + " years old";
System.out.println(var1);
5. apply函数
5.1 作用 & 应用场景
与run函数类似,但区别在于返回值:
- run函数返回最后一行的值 / 表达式
- apply函数返回传入的对象的本身
5.2 应用场景
对象实例初始化时需要对对象中的属性进行赋值 & 返回该对象5.3 使用示例
```kotlin // run函数 val people = People(“carson”, 25) val result = people?.run{ println(“my name is $name, I am $age years old”) 999 } // 最终结果 = 返回999给变量result
// apply val people = People(“carson”, 25) val result = people?.apply{ println(“my name is $name, I am $age years old”) 999 } // 最终结果 = 返回一个people对象给变量result ```
总结

| 函数名 | 应用 | 返回值 |
|---|---|---|
| let | it | 函数块最后一行/return 的表达式 |
| also | it | 传入的对象本身 |
| with | this,with是一个函数,不好判空处理 | 函数块最后一行/return 的表达式 |
| run | this | 函数块最后一行/return 的表达式 |
| apply | this | 传入的对象本身 |

若有收获,就点个赞吧
0 人点赞
