- tabbar案例
- 父传子- props
- 子传父- 自定义事件 $emit props传函数的形式 $parent
- 插槽-想自定义组件的结构- 因为插槽可以传标签
- 作用域插槽- 父组件想要传传插槽内容的时候,在里面使用子组件的数据
<slot></slot><slot name="abc" a="1" b ="2" ></slot>
v-on:事件名=”方法”<child> 123 <template slot="abc" slot-scope="obj">123</template> <template v-slot:abc="obj">123</template> <template #abc="obj">123</template> </child>
路由-映射关系-前端路由-地址和组件的映射关系
一个地址对应一个组件
vue项目的路由需要使用 vue-router
安装
$ npm i vue-router@3.5.4创建router/index.js ```javascript import Vue from ‘vue’ import VueRouter from ‘vue-router’
Vue.use(VueRouter) // 调用了 对象里面的一个install方法 并且传入了Vue作为第一个参数 // 实际上注册了两个组件。router-link. router-view
export default new VueRouter({ // 映射关系 routes: [{ name: ‘’ // 名字 path: ‘/‘, // 地址 component: a // 组件
}] })
3. 在main.js中挂载router
```javascript
import router from '@/router' // @表示src的根目录 是通过webpack配置来的
new Vue({
  router
})
- 放置router-view
<div>
<router-view />
</div>
自动创建带路由的项目
导航 router-link 类似于a链接
<router-link to="/login">登录</router-link>
<router-link to="/">首页</router-link>
1. 编程导航传值
- query传值
- 动态参数传值
都属于地址栏传值
- query传值的语法
<router-link to="/about?money=100&price=50">关于</router-link>
- 接收传值 ```javascript this.$route // 当前路由信息对象 this.$router // 导入的router实例
this.$route.query // 是所有query参数的集合
2. 动态路由传参
> 路由地址上加 :参数名

```javascript
export default new VueRouter({
  routes: [{
    name: '',
    path: '/about/:name/:age',
    component
  }]

})
router-link传值
<router-link to="/about/张三/18">动态路由传参</router-link>
接收-$route.params
this.$route.params // 所有动态路由参数的集合
3.路由重定向
- 默认的地址打开之后,访问path路径是 /
- 假设路由表中没有/ ,显示空白
{
  path: "/",
  redirect: '/home' // 自动跳转到 /home页
},
一般只会配制一次
4. 404页面的设置
使用了通配符 * , 404应该放到所有路由规则最后
export default new VueRouter({
  routes: [
    ...

    { path: "*", component }
  ]

})
按需引入
{
    path: "*",
    component: () => import("@/views/NotFound.vue")
  }
假定你有100个路由组件,假设正常引入,把所有的组件都打包成一个js文件
- 假如用按需加载的方式- 切换路由的时候,才会加载这个js文件-只会加载一次。
- 大幅度的节省性能。
正常的优化性能的方法。
5.路由模式的切换
- hash模式- #地址代表路由地址 #后面地址变化不引起服务器的响应
- history模式- 会造成服务器刷新-webpack有对单页面的配置-部署上线的话-需要服务器的配置 ```javascript export default new VueRouter({ mode: ‘history’ // hash
})
<a name="gvVFG"></a>
## 6. 编程式导航

- 所有的组件都有this.$router
```javascript
this.$route // 表示当前的路由信息对象
this.$router // 等价于 router/index.js里面导出的实例对象
跳转路由使用
this.$router.push()
this.$router.replace()
push 可以是对象也可以是是地址 ```javascript this.$router.push(地址) this.$router.push({ path: ‘地址’ })
this.$router.replace(地址) this.$router.replace({ path: ‘地址’ })
replace 和push的区别- push会增加一条历史记录<br />replace 不会增加历史记录,只会替换当前的地址


<a name="G8itB"></a>
## 6. 编程式导航的传参
```javascript
this.$router.push({
  path: '',
  name '',
  query: {

  },
  params: {} // params不能和path公用
})
注意事项: 传params的时候不能和path一起用,只能和name一起用
7. 路由嵌套
- 在一级路由的基础上,嵌套一个二级路由
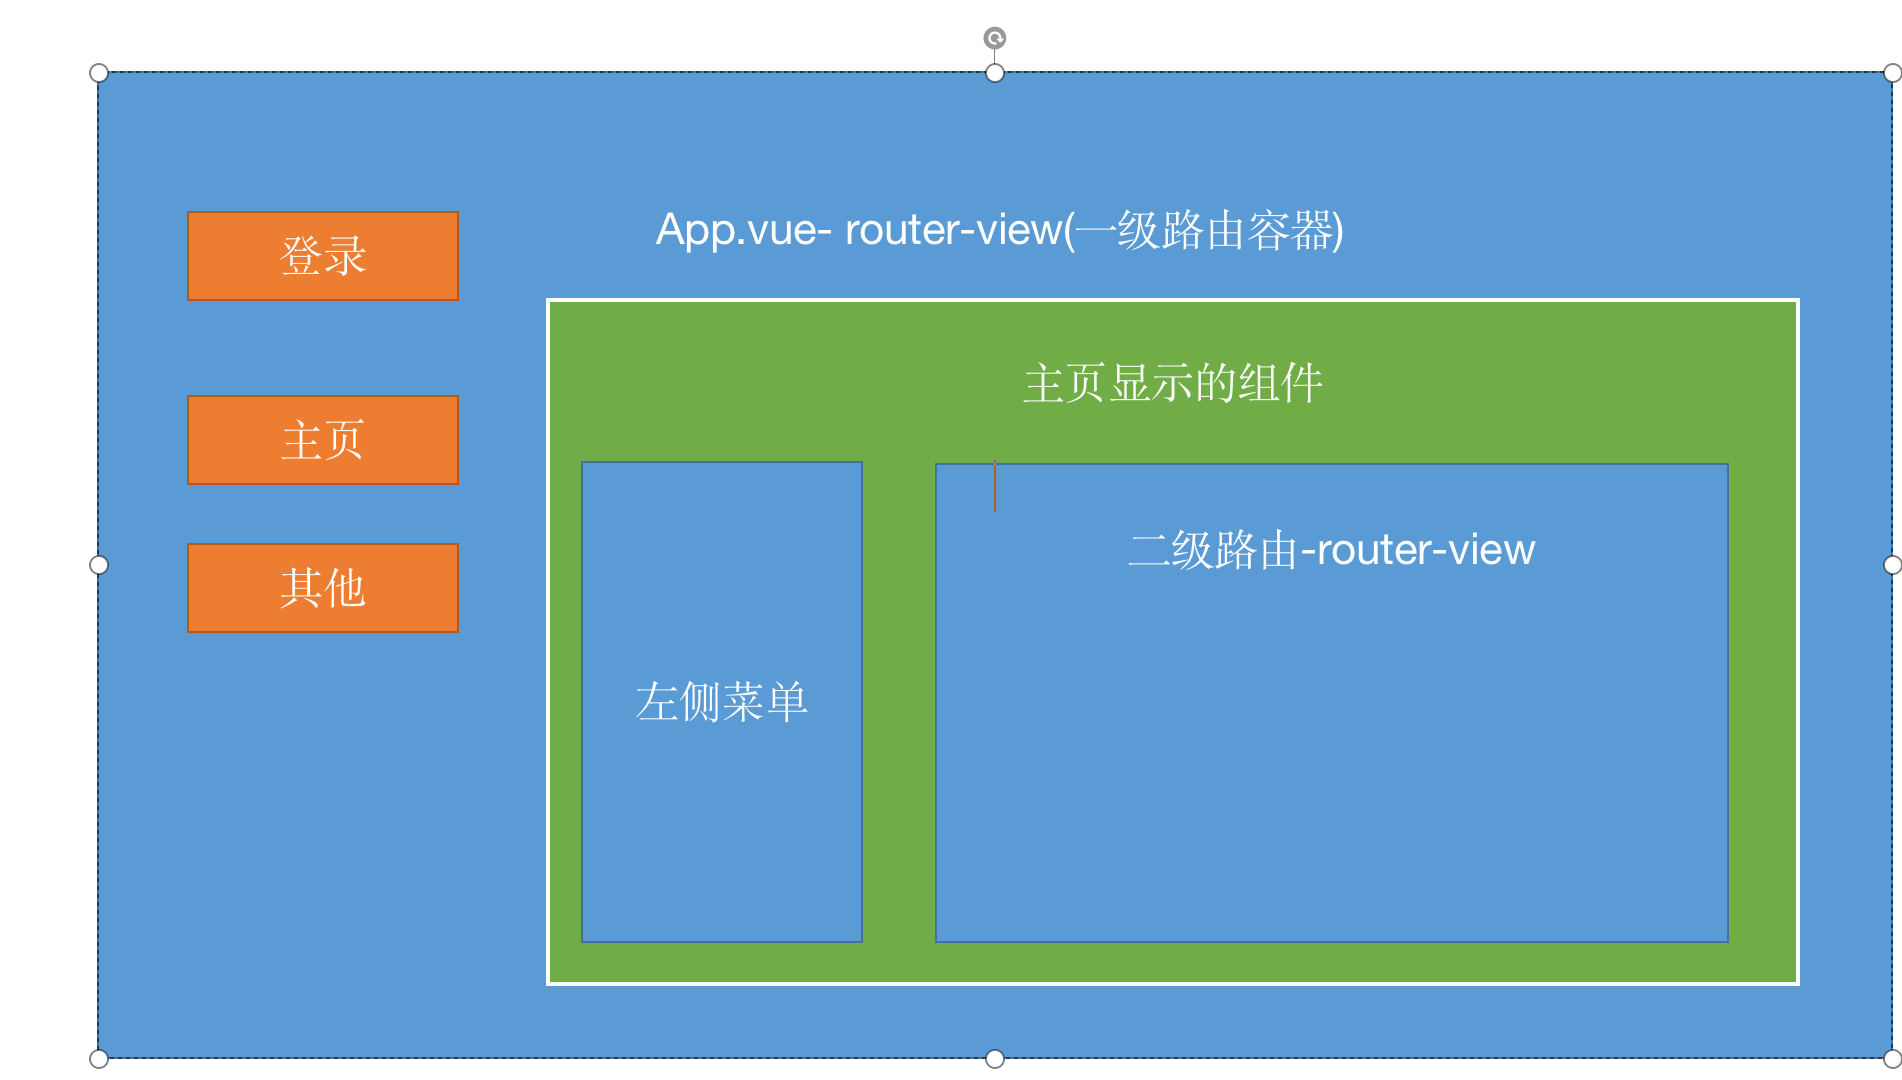
哪个组件显示二级路由,就需要在它的组件上放置一个router-view
<div style="width: 800px; height: 400px; border: 1px solid red; margin: 40px auto">
  <router-link to="/home/a">主页-子页面1</router-link>
  <router-link to="/home/b">主页-子页面2</router-link>
  <router-link to="/home/c">主页-子页面3</router-link>

  <router-view></router-view>

</div>
还需要路由规则,应该在一级路由的规则下定义二级路由 ```javascript import Vue from ‘vue’ import VueRouter from ‘vue-router’ import HomeView from ‘../views/HomeView.vue’
Vue.use(VueRouter)
const routes = [ { path: “/“, redirect: ‘/home’ // 自动跳转到 /home页 }, { path: ‘/home’, name: ‘home’, component: HomeView, children: [{ path: “”, // 什么都不写意味着默认二级路由 redirect: “/home/a” },{ path: ‘/home/a’, // 写相对地址或者完整地址 component: () => import(“@/views/HomeA”) // path: ‘/home/a’ }, { path: ‘/home/b’, // 写相对地址或者完整地址 component: () => import(“@/views/HomeB”) }, { path: ‘/home/c’, // 写相对地址或者完整地址 component: () => import(“@/views/HomeC”) }] }, { path: ‘/about/:name?’, name: ‘about’, // route level code-splitting // this generates a separate chunk (about.[hash].js) for this route // which is lazy-loaded when the route is visited. component: () => import(/ webpackChunkName: “about” / ‘../views/AboutView.vue’) }, { path: “*”, component: () => import(“@/views/NotFound.vue”) } ]
const router = new VueRouter({ mode:”history”, routes })
export default router
<a name="dXEZg"></a>
## 8. v-model绑定自定义组件

- v-model的指令原理   监听了input事件  绑定了value属性
> 只需要封装一个组件- 接收value的值, value值变化的时候- 触发一个input事件

自定义的组件
```vue
<template>
  <div>
    <input type="text" @input="$emit('input', $event.target.value)" :value="value">
  </div>
</template>

<script>
export default {
    props: {
        value: {
            type: String
        }
    }

}
</script>

<style>

</style>
使用
<template>
  <h1>
    HomeA
    <h1>{{ name }}</h1>
    <van-input v-model="name"></van-input>
  </h1>
</template>

<script>
import VanInput from '@/components/VanInput.vue'
export default {
  components: {
    VanInput
  },
  data() {
    return {
      name: '张三'
    }
  }
}
</script>

<style>

</style>
9. 激活类型的模糊匹配和精确匹配
链接地址 /home 真实的地址 /home/a- 模糊匹配
模糊匹配-a标签有一个 router-link-active
链接地址 /home/a 真实的地址 /home/a- 精确匹配
router-link-active router-link-exact-active
10.导航守卫
全局前置守卫
router的方法 beforeEach
全局后置守卫
router的方法 afterEach
router.beforeEach((to, from , next) => {
  // to到哪里去
  // from从哪里来
  // next执行函数
  //
})
不论成功与否,都必须执行next()
- next() - 放行
- next(false) - 不放行-停留在当前页面
- next(地址) next({ path: 地址 }) - 强制它跳转到别的页面
项目中权限,一般建立单独的文件 src/permission.js
import router from '@/router'

// 这个函数会在任何的路由跳转的时候执行
let isLogin = false
router.beforeEach((to, from , next) => {
    if(to.path.startsWith("/about") && !isLogin) {
    //   next(false)
      next("/")
    }else {
      next()
    }

})
场景: 导航守卫的场景- 需要控制一些页面不能白白访问的时候,就需要在导航守卫处做一些判断
比如 没有登录-不能进入主页
11. .sync修饰符
语法糖
- enter
- esc
- stop
- prevent
- once
- lazy
- trim
- number
.sync修饰符是修饰自定义事件的属性的
子传父
this.$emit("自定义事件", 参数)
父组件监听
<child @自定义事件="方法"></child>
.sync修饰符可以简化父组件的操作
- 要求自定义事件的名字 this.$emit(“update:props属性名”, 值)
.sync修饰符是一个语法糖-简写
父组件不需要再监听自定义事件,这是一个简写的方式。
12. vant组件库
移动组件库-基于vue
- mui
- miui
- vant-主流的移动组件库
安装
$ npm i vant全局导入-将所有的组件的打包 ```javascript import Vue from ‘vue’
import Vant from ‘vant’
import ‘vant/lib/index.css’;
Vue.use(Vant)
<a name="zvbEN"></a>
## 13. Vant组件库的按需导入

- 手动-太笨-不用
- 自动- 按需引入的方式注册全局注册
> 配置一个插件 babel-plugin-import

1. 下载babel插件
```bash
$ npm i babel-plugin-import -D
- 添加一个babel的配置到 babel.config.js文件 ```javascript module.exports = { presets: [ ‘@vue/cli-plugin-babel/preset’ ], plugins: [ [‘import’, { libraryName: ‘vant’, libraryDirectory: ‘es’, style: true }, ‘vant’] ] }
3. 需要在main.js完成按需组件的全局注册
```javascript
import { Button, Image, ActionSheet } from 'vant'

Vue.use(Button)
Vue.use(Image)
Vue.use(ActionSheet)
真正项目中推荐自动按需导入的方式,因为按需导入可以节省空间
- 路由- 按需加载
- 组件-按需导入
优化性能。
14. 登录模块的vant组件库应用-登录退出的闭环
- 登录模块是一个单独的页面,配置相关的路由 ```javascript import Vue from ‘vue’ import VueRouter from ‘vue-router’ import HomeView from ‘../views/HomeView.vue’
Vue.use(VueRouter)
const routes = [ { path: ‘/‘, redirect: ‘/home’ }, { path: ‘/home’, name: ‘home’, component: HomeView }, { path: ‘/about’, name: ‘about’, // route level code-splitting // this generates a separate chunk (about.[hash].js) for this route // which is lazy-loaded when the route is visited. component: () => import(/ webpackChunkName: “about” / ‘../views/AboutView.vue’) }, { path: ‘/login’, component: () => import(‘@/views/login’) } ]
const router = new VueRouter({ routes })
export default router
2. 新建 views/login/index.vue
```vue
<template>
  <van-form @submit="onSubmit">
  <van-field
    v-model="username"
    name="mobile"
    label="手机号"
    placeholder="手机号"
    :rules="[{ required: true, message: '请填写手机号' },
    {
      message: '手机号的格式不正确',
      pattern: /^1[3-9]\d{9}$/ // 正则表达式
    }]"
  />
  <van-field
    v-model="password"
    type="password"
    name="code"
    label="验证码"
    placeholder="验证码"
    :rules="[{ required: true, message: '请填写密码' },
    { pattern: /^\d{6}$/, message: '验证码格式不正确' }]"
  />
  <div style="margin: 16px;">
    <van-button round block type="info" native-type="submit">提交</van-button>
  </div>
</van-form>

</template>

<script>
import axios from 'axios'
import { Notify } from 'vant';

axios.defaults.baseURL = "http://toutiao.itheima.net"
export default {
  name: 'login-form',
  data() {
    return {
      username: '',
      password: '',
    };
  },
  methods: {
    onSubmit(values) {
      axios.post("/v1_0/authorizations", values).then(result => {
        const {data: {data: {token}} } = result
        // 拿到token  放入前端缓存
        localStorage.setItem("token",token)
        this.$router.push("/") // 实际跳的是 /home页
        Notify({
            type: 'success',
            message: '登录成功'
        })

      }).catch(()=> {
        Notify("登录失败")
      })
    },
  },
};

</script>

<style>

</style>
- 添加全局前置守卫 src/permisson.js ```javascript import router from ‘@/router’
router.beforeEach((to, from, next) => { // 去的如果是home if(to.path.startsWith(“/home”)) { // 检查token是否在 if(localStorage.getItem(“token”)) { // 可以进 next() }else { next(“/login”) // 中转到登录页 }
}else { next() // 正常放行 }
})
4. 主页退出登录
```vue
<template>
  <div class="home">
    <van-image :src="defaultImg"></van-image>
    <van-button @click="logout" type="warning">退出登录</van-button>

  </div>
</template>

<script>
// @ is an alias to /src
import defaultImg from '@/assets/a.png'
import { Dialog } from 'vant'
export default {
  name: 'HomeView',
  components: {

  },
  data() {
    return {
      defaultImg,
      show: false,
       actions: [{ name: '选项一' }, { name: '选项二' }, { name: '选项三' }],
    }
  },
  methods: {
    logout() {
      Dialog.confirm({
        title: '提示',
        message: '您确认要离开我了吗'
      }).then(() => {
        localStorage.removeItem("token")
        this.$router.push("/login")
      })
    }
  }
}
</script>

若有收获,就点个赞吧
0 人点赞
