原理
Mybatis插件的实现是基于四大核心对象来实现的,本质都是拦截器,基于动态代理实现。
- Executor对象:基于执行器对象
- StatementHandler对象:预处理Sql对象
- ParamterHandler对象:参数处理器对象
- ResultSetHandler对象:结果处理器对象
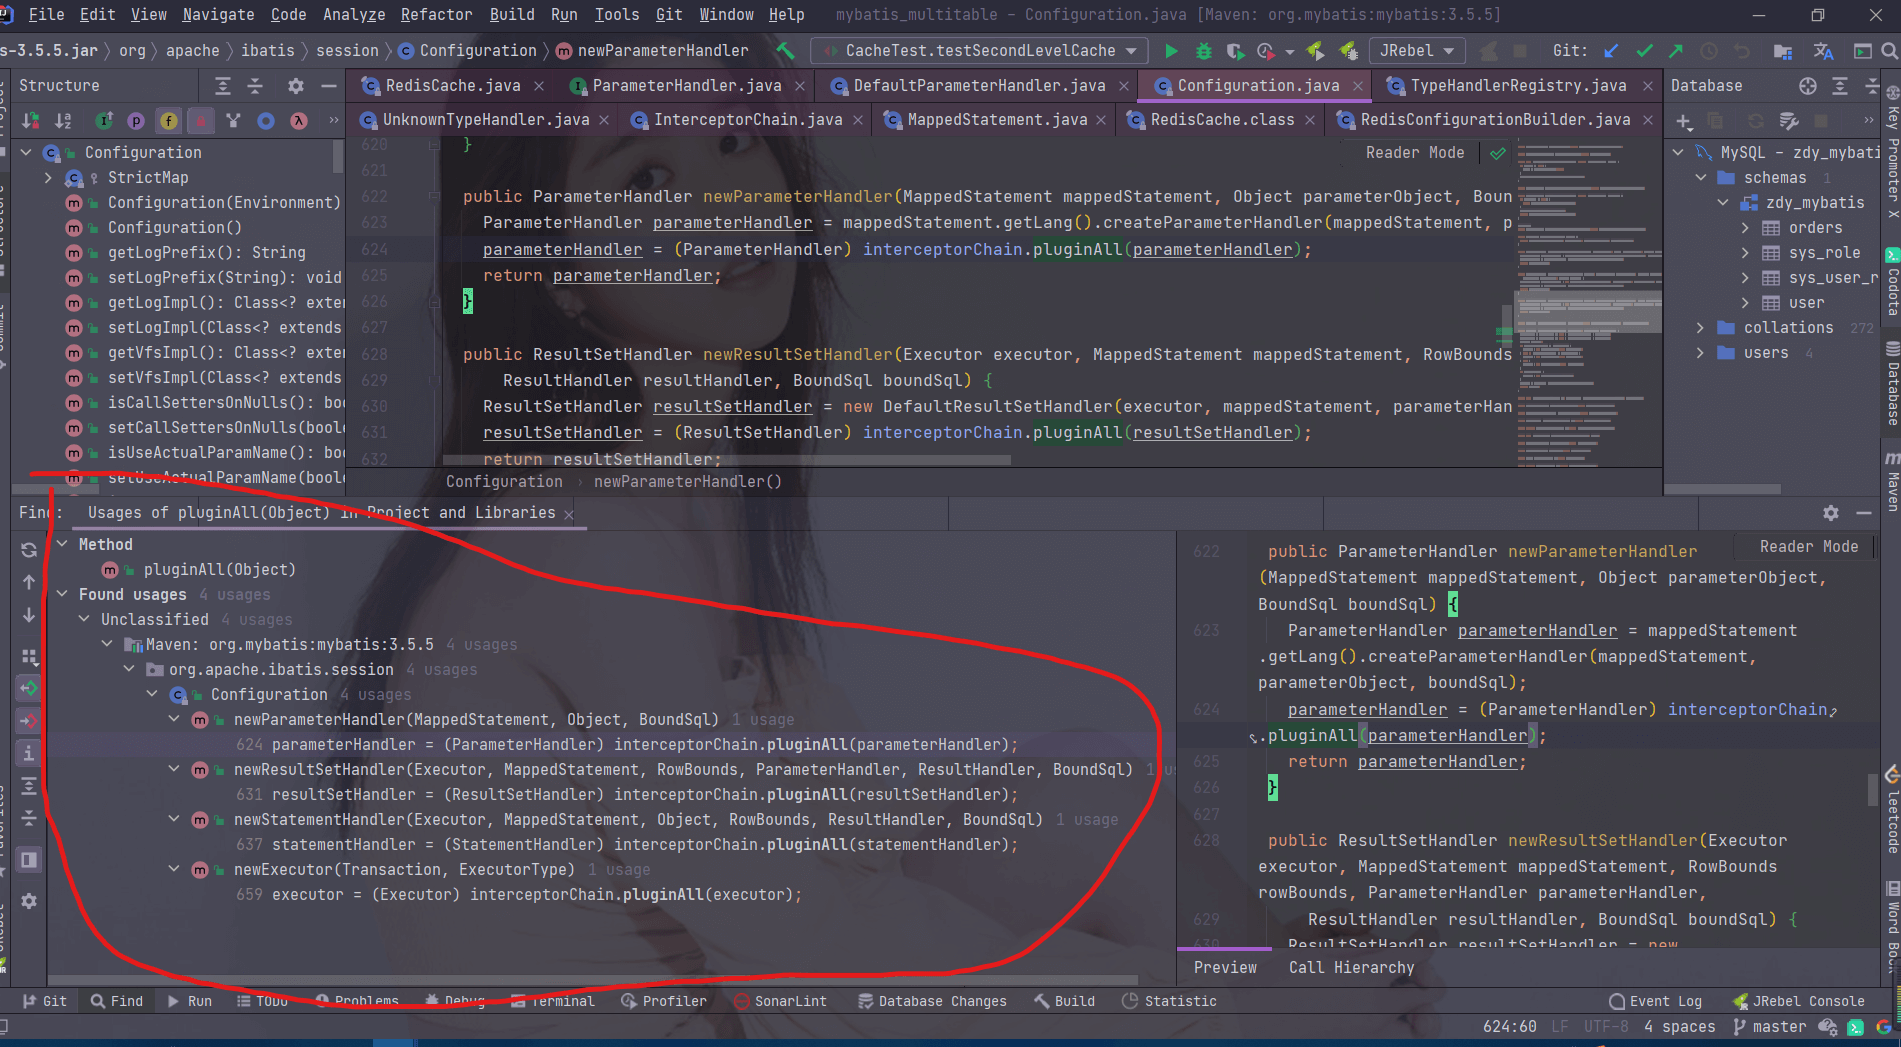
具体的代码是怎么的呢?其实是借助了 InterceptorChain 的pluginAll方法,在创建上面的四大对象的时候都会调用这个方法,如图:
这个时候,其实创建出来的四大对象已经是代理对象了,这样在执行四大对象的方法的时候就会被代理到invoke方法。
具体的插件如何定义呢?首先需要实现 Interceptor接口,然后在类上使用注解声明被代理的类、方法以及方法的参数,至于加参数的目的是防止方法的重构。
类定义完成之后最后将类配置在configuration配置文件中,使用plugin标签进行配置就ok了。这样启动的时候就会加载插件,具体的操作我们放在下面。
自定义插件
手首先自定义类,实现Interceptor接口:
@Intercepts({@Signature(type = StatementHandler.class, method = "prepare", args = {Connection.class, Integer.class})})public class MyPlugins implements Interceptor {/*** 代理方法执行时要执行的方法,在代理方法执行前执行* @param invocation* @return* @throws Throwable*/@Overridepublic Object intercept(Invocation invocation) throws Throwable {System.out.println("进行方法增强:" + invocation);// 执行业务逻辑return invocation.proceed();}/*** 将当前插件保存到mybatis的插件链中* @param target* @return*/@Overridepublic Object plugin(Object target) {System.out.println("保存插件链路中:" + target);Object wrap = Plugin.wrap(target, this);return wrap;}/*** 设置插件的属性* @param properties*/@Overridepublic void setProperties(Properties properties) {System.out.println("读取插件的属性为:" + properties);}}
之后在configuration配置文件中配置:
<plugins><plugin interceptor="com.wangzhi.plugin.MyPlugins"><property name="name" value="芊儿"/></plugin></plugins>// 注意配置标签的一个顺序问题
最后可以查看执行结果,设置插件属性的方法最先执行,之后会执行四次plugin方法,为什么?因为我们插件可以代理的对象就是四大对象,所以这里会将插件分别保存到四大对象的链路中,最后才会执行intercept方法。
至于具体是如何实现的呢? 我们都知道使用的四大对象其实都是代理对象,所以执行任何方法都会执行invoke方法,invoke方法就在于Plugin类中,如下:
@Overridepublic Object invoke(Object proxy, Method method, Object[] args) throws Throwable {try {// 获取类的所有方法列表,至于 signatureMap 是所有插件设置代理的类,也就是上面注解中的type属性Set<Method> methods = signatureMap.get(method.getDeclaringClass());// 判读被增强方法是否包含了当前执行的方法if (methods != null && methods.contains(method)) {return interceptor.intercept(new Invocation(target, method, args));}return method.invoke(target, args);} catch (Exception e) {throw ExceptionUtil.unwrapThrowable(e);}}
PageHelper插件
原理一样,实现也是先实现接口Interceptor,重写方法,配置文件配置,使用就好。
<!-- https://mvnrepository.com/artifact/com.github.pagehelper/pagehelper --><dependency><groupId>com.github.pagehelper</groupId><artifactId>pagehelper</artifactId><version>5.2.0</version></dependency>// 配置文件进行配置<plugin interceptor="com.github.pagehelper.PageInterceptor"><!--<property name="dialect" value="mysql"/>--></plugin>// 注意版本差别,当前笔者用着5.2,如果是5.0之下,可以看源码,看到是 PageHelper 类实现的接口,从5.0开始,是PageInterceptor实现的接口,所以5.0一下的配置:<plugin interceptor="com.github.pagehelper.PageHelper"><!—指定方言 —><property name="dialect" value="mysql"/></plugin>
测试类:
@Testpublic void testPageHelper() {PageHelper.startPage(1, 1);List<User> allByAnno = mapper.findAllByAnno();PageInfo<User> userPageInfo = new PageInfo<>(allByAnno);System.out.println("总条数:" + userPageInfo.getTotal());System.out.println("总页数:" + userPageInfo.getPages());System.out.println("当前页:" + userPageInfo.getPageNum());System.out.println("每页条数:" + userPageInfo.getPageSize());userPageInfo.getList().forEach(System.out::println);}

