- 一:官方源码安装
- 使用python3版本创建superset虚拟环境
python3 -m venv superset-env
#进入superset-env虚拟环境
source superset-env/bin/activate
# 进入到superset目录,安装依赖
pip3 install -r requirements/testing.txt
#安装superset开发环境
pip3 install -e . - 初始化数据库(默认为sqllite,可更改为mysql)
superset db upgrade - Create an admin user in your metadata database (use
adminas username to be able to load the examples)
superset fab create-admin - Create default roles and permissions
superset init - Load some data to play with.
# Note: you MUST have previously created an admin user with the usernameadminfor this command to work.
superset load-examples - Start the Flask dev web server from inside your virtualenv.
# Note that your page may not have CSS at this point.
# See instructions below how to build the front-end assets.
FLASK_ENV=development superset run -p 8088 —with-threads —reload —debugger
``` - install pip packages + pre-commit
$ make install - Install superset pip packages and setup env only
$ make superset - Setup pre-commit only
$ make pre-commit
一:官方源码安装
- python环境(大于3.6) 会有各种依赖问题。
下载superset源码包
git clone https://github.com/apache/superset.git
创建python虚拟环境
使用python3版本创建superset虚拟环境
python3 -m venv superset-env
#进入superset-env虚拟环境
source superset-env/bin/activate
# 进入到superset目录,安装依赖
pip3 install -r requirements/testing.txt
#安装superset开发环境
pip3 install -e .
初始化数据库(默认为sqllite,可更改为mysql)
superset db upgrade
Create an admin user in your metadata database (use admin as username to be able to load the examples)
superset fab create-admin
Create default roles and permissions
superset init
Load some data to play with.
# Note: you MUST have previously created an admin user with the username admin for this command to work.
superset load-examples
Start the Flask dev web server from inside your virtualenv.
# Note that your page may not have CSS at this point.
# See instructions below how to build the front-end assets.
FLASK_ENV=development superset run -p 8088 —with-threads —reload —debugger
```
Or you can install via our Makefile
```bash
# Create a virtual environment and activate it (recommended)
$ python3 -m venv venv # setup a python3 virtualenv
$ source venv/bin/activate
install pip packages + pre-commit
$ make install
Install superset pip packages and setup env only
$ make superset
Setup pre-commit only
$ make pre-commit
启动后端工程:
FLASK_ENV=development superset run -p 8088 —with-threads —reload —debugger
编译前端工程:
需安装node-js,因为需要用到npm
- wget https://nodejs.org/dist/v16.8.0/node-v16.8.0-linux-x64.tar.gz
- tar -zxvf /opt/node-v12.8.0-linux-x64.tar.gz
- mv /opt/node-v12.8.0-linux-x64 /opt/node
- ln -s /opt/node/bin/node /usr/local/bin/node
- ln -s /opt/node/lib/node_modules/npm/bin/npm-cli.js /usr/local/bin/npm
- npm -v 验证命令
编译superset-frontend:
- 进入虚拟环境
- cd superset-frontend目录
- 执行npm install下载依赖
执行npm ci下载依赖
如果npm ci报错版本问题,按提示升降版本。
npm install npm@7.5.4 -g
5. 修改文件\superset-frontend\webpack.config.js
加上一行代码path.resolve(dirname, ‘./src’)
{
test: /.jsx?$/,
// include source code for plugins, but exclude node_modules and test files within them
exclude: [/superset-ui.\/node_modules\//, /.test.jsx?$/],
include: [
new RegExp(${APP_DIR}/src),
/superset-ui.\/src/,
new RegExp(${APP_DIR}/.storybook),
/@encodable/,
path.resolve(dirname, ‘./src’),
],
use: [babelLoader],
},执行num run dev-server
“dev-server”: “cross-env NODE_ENV=development BABEL_ENV=development node —max_old_space_size=4096 ./node_modules/webpack-dev-server/bin/webpack-dev-server.js —mode=development”
执行命令cross-env会报错,修改命令位置package.json
set NODE_ENV=development; set BABEL_ENV=development; node —max_old_space_size=4096 ./node_modules/webpack-dev-server/bin/webpack-dev-server.js —mode=development
- 启动前端工程
num run dev-server
- 可能遇到的问题
- npm及node版本报错
需使用nvm管理node版本,安装nvm
yum update -y nss curl libcurl
curl -o- https://raw.githubusercontent.com/nvm-sh/nvm/v0.37.0/install.sh | bash
nvm命令会自动加到bashrc中,你需要执行source ~/.bashrc
执行nvm:
nvm install —lts
nvm use —lts
重新执行npm ci
- 前端工程及后端工程关联(后端工程启动于9002端口)
npm run dev-server — —host=dwdev3.ishumei.com —port=9001 —superset=http://dwdev3.ishumei.com:9002
二:docker安装
- 安装docker
a. 卸载老版本依赖
sudo yum remove docker \
docker-client \
docker-client-latest \
docker-common \
docker-latest \
docker-latest-logrotate \
docker-logrotate \
docker-engine
b. 添加yum源
sudo yum install -y yum-utils
sudo yum-config-manager —add-repo https://download.docker.com/linux/centos/docker-ce.repo
c.配置下载
sudo yum-config-manager —enable docker-ce-nightly
sudo yum install docker-ce docker-ce-cli containerd.io
d.查看版本并选择版本安装
yum list docker-ce —showduplicates | sort -r
sudo yum install docker-ce-
exp:sudo yum install docker-ce-18.06.3.ce docker-ce-cli-18.06.3.ce containerd.io
e. 启动docker
sudo systemctl start docker
f. 测试docker
sudo docker run hello-world
hello-docker! 安装成功
安装docker-compose
sudo curl -L “https://github.com/docker/compose/releases/download/1.29.2/docker-compose-$(uname -s)-$(uname -m)” -o /usr/local/bin/docker-compose由于docker是管理自己环境与本机环境分离,所有当连接本机数据库时不能识别localhost等标识,需使用docker-ip:172.18.0.1或者ifconfig中docker0网卡分配ip。
- 当docker-compse up启动测试环境时,报错cannot import name ‘STRNAVALUES’ from ‘pandas.io.parsers’ (/usr/local/lib/python3.8/site-packages/pandas/io/parsers/__init.py)
问题可见:https://github.com/apache/superset/pull/16400
猜测pandas版本问题:
pip3 install pandas
启动python3
from pandas.io.parsers import STR_NA_VALUES失败
from pandas._libs.parsers import STR_NA_VALUES成功
修改配置源码:
/opt/apache-superset-1.3.2/superset/config.py
from pandas.io.parsers import STR_NA_VALUES 修改为 from pandas._libs.parsers import STR_NA_VALUES
/opt/apache-superset-1.3.2/tox.ini
[testenv:pylint]
commands =
pylint superset 改为 pylint superset —extension-pkg-allow-list=pandas._libs.parsers
- getaddrinfo EAI_AGAIN registry.npmjs.org registry.npmjs.org问题
在dockerFile中添加:
RUN npm install -g cnpm —registry=http://r.cnpmjs.org
重启docker:
sudo service docker restart
- 导出csv用excel打开乱码问题
修改superset-config.py
增加配置:csv_export={“encoding”:”utf-8-sig”}
- 解决日志时间落后8小时问题
修改/opt/git_repo/superset/superset/models/core.py
# dttm = Column(DateTime, default=datetime.utcnow)
dttm = Column(DateTime, default=datetime.now)
8. 启动jinja模板,并自定义jinja表达式获取登录用户中文名字
启用jinja模板:
在FEATURE_FLAGS配置项中添加配置,
“ENABLE_TEMPLATE_PROCESSING”: True
自定义jinja表达式current_chinese_username:
/opt/git_repo/superset/superset/jinja_context.py
第一步:添加表达式匹配
regex = re.compile(
r”{{.(“
r”current_user_id(.)|”
r”current_username(.)|”
r”current_chinese_username(.)|”
r”cache_key_wrapper(.)|”
r”url_param(.)“
r”).*}}“ )
第二步:添加表达式编码逻辑
#自定义jinja模板,获取登录用户中文名字
def current_chinese_username(self, add_to_cache_keys: bool = True) -> Optional[str]:
“””
Return the chinese username of the user who is currently logged in.
:param add_to_cache_keys: Whether the value should be included in the cache key
:returns: The username
“””
if g.user and hasattr(g.user, “first_name”):
if add_to_cache_keys:
self.cache_key_wrapper(g.user.first_name)
return g.user.first_name
return None
第三步:添加update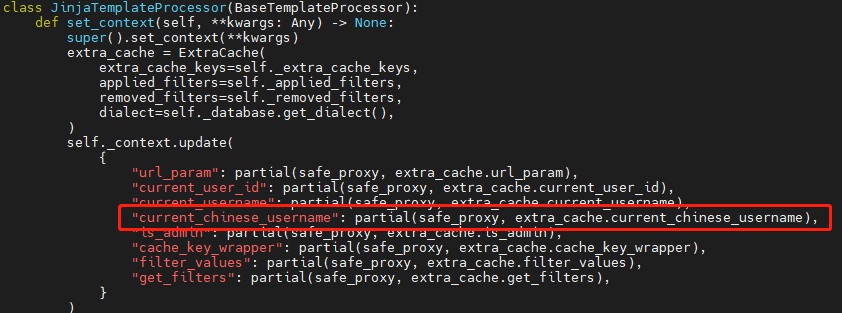
superset二次汉化:
来源交流群

若有收获,就点个赞吧
0 人点赞
