本篇笔记内容全部摘自慕课网Jack老师课程笔记,不是原创
Pipenv管理Python虚拟环境
2020年5月更新:有不少同学反映
pipenv问题太多,我后来也发现的确是,建议大家直接弃坑。管理Python项目环境的方式有多种,用virtualenv最好,简单稳定。本课程后面章节学习,同学们直接用virtualenv就好了。坚持用pipenv的同学建议先多搜几篇文章学习下,理解它的命令。
一、pipenv介绍
简单说,pipenv就是把pip和virtualenv包装起来的一个便携工具,它会自动为您的项目创建和管理virtualenv,以及在安装/卸载软件包时添加/删除Pipfile中的软件包。
使用pipenv管理python环境虚拟环境的优势:
- 不再需要分开使用
pip和virtualenv,合并到了一起 - 不再需要管理
requirements.txt,pipenv install xxx安装包时自动生成版本号、Hash值、包依赖关系到Pipfile和Pipfile.lock,并且可以手工编辑以区分开发环境和生产环境 - 使用Hash校验安装的包,有利于主动暴露安全问题
- 使用最新版本的依赖项,以最大限度地降低过时组件带来的安全风险
- 可以图形化显示包之间的依赖关系(
pipenv graph) -
二、安装pipenv
首先,确保你已经正确安装python3和pip3
[root@shiyanlou ~]# python3 -VPython 3.7.2[root@shiyanlou ~]# pip3 -Vpip 19.0.1 from /usr/local/python3/lib/python3.7/site-packages/pip (python 3.7)[root@shiyanlou ~]#
然后,Linux下
pip3 install pipenv,Mac下brew install pipenv[root@shiyanlou ~]# pip3 install pipenvLooking in indexes: http://mirrors.aliyun.com/pypi/simple/Collecting pipenvDownloading http://mirrors.aliyun.com/pypi/packages/13/b4/3ffa55f77161cff9a5220f162670f7c5eb00df52e00939e203f601b0f579/pipenv-2018.11.26-py3-none-any.whl (5.2MB)100% |████████████████████████████████| 5.2MB 4.0MB/sRequirement already satisfied: certifi in /usr/local/python3/lib/python3.7/site-packages (from pipenv) (2018.11.29)Requirement already satisfied: setuptools>=36.2.1 in /usr/local/python3/lib/python3.7/site-packages (from pipenv) (40.6.2)Requirement already satisfied: pip>=9.0.1 in /usr/local/python3/lib/python3.7/site-packages (from pipenv) (18.1)Requirement already satisfied: virtualenv in /usr/local/python3/lib/python3.7/site-packages (from pipenv) (16.2.0)Requirement already satisfied: virtualenv-clone>=0.2.5 in /usr/local/python3/lib/python3.7/site-packages (from pipenv) (0.4.0)Installing collected packages: pipenvSuccessfully installed pipenv-2018.11.26[root@shiyanlou ~]#
pipenv依赖psutil, virtualenv-clone, pew, certifi, urllib3, chardet, requests, mccabe, pyflakes, pycodestyle, flake8等第三方模块,pipenv有很漂亮的彩色终端界面。三、Pipfile和Pipfile.lock
Pipfile, 简明地显示项目环境和依赖包[[source]]name = "pypi"url = "https://mirrors.aliyun.com/pypi/simple/" # 指定国内pip源,不然会慢死人的verify_ssl = true[dev-packages] # 开发环境[packages] # 生产环境requests = "*" # *表示最新版本django = "*"[requires]python_version = "3.7" # python版本
Pipfile.lock, 详细记录环境依赖,并且利用了Hash算法保证了它完整对应关系{"_meta": {"hash": {"sha256": "d737a1ef2f8b591f86cd0fa6a8cb48918f742d60df2a394ebc3d23aff4748999"},"pipfile-spec": 6,"requires": {"python_version": "3.7"},"sources": [{"name": "pypi","url": "https://pypi.org/simple","verify_ssl": true}]},"default": {"certifi": {"hashes": ["sha256:47f9c83ef4c0c621eaef743f133f09fa8a74a9b75f037e8624f83bd1b6626cb7","sha256:993f830721089fef441cdfeb4b2c8c9df86f0c63239f06bd025a76a7daddb033"],"version": "==2018.11.29"},"chardet": {"hashes": ["sha256:84ab92ed1c4d4f16916e05906b6b75a6c0fb5db821cc65e70cbd64a3e2a5eaae","sha256:fc323ffcaeaed0e0a02bf4d117757b98aed530d9ed4531e3e15460124c106691"],"version": "==3.0.4"},"django": {"hashes": ["sha256:a32c22af23634e1d11425574dce756098e015a165be02e4690179889b207c7a8","sha256:d6393918da830530a9516bbbcbf7f1214c3d733738779f06b0f649f49cc698c3"],"index": "pypi","version": "==2.1.5"},"idna": {"hashes": ["sha256:c357b3f628cf53ae2c4c05627ecc484553142ca23264e593d327bcde5e9c3407","sha256:ea8b7f6188e6fa117537c3df7da9fc686d485087abf6ac197f9c46432f7e4a3c"],"version": "==2.8"},"pytz": {"hashes": ["sha256:32b0891edff07e28efe91284ed9c31e123d84bea3fd98e1f72be2508f43ef8d9","sha256:d5f05e487007e29e03409f9398d074e158d920d36eb82eaf66fb1136b0c5374c"],"version": "==2018.9"},"requests": {"hashes": ["sha256:502a824f31acdacb3a35b6690b5fbf0bc41d63a24a45c4004352b0242707598e","sha256:7bf2a778576d825600030a110f3c0e3e8edc51dfaafe1c146e39a2027784957b"],"index": "pypi","version": "==2.21.0"},"urllib3": {"hashes": ["sha256:61bf29cada3fc2fbefad4fdf059ea4bd1b4a86d2b6d15e1c7c0b582b9752fe39","sha256:de9529817c93f27c8ccbfead6985011db27bd0ddfcdb2d86f3f663385c6a9c22"],"version": "==1.24.1"}},"develop": {}}
四、虚拟环境管理
4.1 创建虚拟环境
进入项目的文件夹,直接
pipenv install xxx安装你需要的包,就会在当前文件夹下创建虚拟环境,生成Pipfile和Pipfile.lock[root@shiyanlou ~]# cd myproject/[root@shiyanlou myproject]# pipenv install requestsCreating a virtualenv for this project…Pipfile: /root/myproject/PipfileUsing /usr/local/python3/bin/python3.7 (3.7.2) to create virtualenv…⠸ Creating virtual environment...Already using interpreter /usr/local/python3/bin/python3.7Using base prefix '/usr/local/python3'New python executable in /root/.local/share/virtualenvs/myproject-zKJX12a5/bin/python3.7Also creating executable in /root/.local/share/virtualenvs/myproject-zKJX12a5/bin/pythonInstalling setuptools, pip, wheel...done.✔ Successfully created virtual environment!Virtualenv location: /root/.local/share/virtualenvs/myproject-zKJX12a5Creating a Pipfile for this project…Installing requests…✔ Installation SucceededPipfile.lock not found, creating…Locking [dev-packages] dependencies…Locking [packages] dependencies…✔ Success!Updated Pipfile.lock (444a6d)!Installing dependencies from Pipfile.lock (444a6d)…▉▉▉▉▉▉▉▉▉▉▉▉▉▉▉▉▉▉▉▉▉▉▉▉▉▉▉▉▉▉▉▉ 5/5 — 00:00:04To activate this project's virtualenv, run pipenv shell.Alternatively, run a command inside the virtualenv with pipenv run.[root@shiyanlou myproject]# ll -altotal 12drwxr-xr-x. 2 root root 39 Jan 31 14:09 .dr-xr-x---. 17 root root 4096 Jan 31 14:08 ..-rw-r--r--. 1 root root 153 Jan 31 14:09 Pipfile-rw-r--r--. 1 root root 1914 Jan 31 14:09 Pipfile.lock[root@shiyanlou myproject]#
如果需要指定python版本的话
$ pipenv --three # 泛指python的版本$ pipenv --python 3.7 # 或者,特指某个python版本$ pipenv --python <path/to/python> # 或者,特指某个位置的python
4.2 进入/退出/删除虚拟环境
[root@shiyanlou myproject]# pipenv shell # 进入虚拟环境Launching subshell in virtual environment…. /root/.local/share/virtualenvs/myproject-zKJX12a5/bin/activate[root@shiyanlou myproject]# . /root/.local/share/virtualenvs/myproject-zKJX12a5/bin/activate(myproject) [root@shiyanlou myproject]# exit # 退出虚拟环境exit[root@shiyanlou myproject]# pipenv --rm # 删除整个环境Removing virtualenv (/root/.local/share/virtualenvs/myproject-zKJX12a5)…[root@shiyanlou myproject]#
有几点需要注意:
平时安装和卸载包的时候不需要先进入或退出虚拟环境,直接在项目文件下
pipenv install/uninstall xxx就行了退出虚拟环境不要
deactivate,请使用exit,否则下次pipenv进入的时候就会报如下错[root@shiyanlou myproject]# pipenv shellShell for UNKNOWN_VIRTUAL_ENVIRONMENT already activated.No action taken to avoid nested environments.[root@shiyanlou myproject]#
pipenv --rm并不会删除生成的Pipfile和Pipfile.lock4.3 管理开发环境
通常有一些Python包只在你的开发环境中需要,而不是在生产环境中,例如单元测试包。 Pipenv使用–dev标志区分两个环境。也就是说一个–dev参数,帮你在同一个虚拟环境中又区分出了开发和非开发环境。
$ pipenv install --dev pytest
在虚拟环境中运行命令,使用run参数,提供要运行的命令:
$ pipenv run python manage.py runserver
这将使用当前虚拟环境关联的Python解释器,执行命令。或者简单的执行脚本:
$ pipenv run python your_script.py
如果你不想每次运行Python时都输入这么多字符,可以在shell中设置一个别名,例如:
$ alias prp="pipenv run python"
冻结Pipfile,相当于将项目所使用的第三方库列表进行打包输出,类似于virtualenv中生成requirements.txt文件。通过更新Pipfile.lock来冻结库名称及其版本,以及其依赖关系的列表。需要使用
lock参数:[root@shiyanlou myproject]# pipenv lockLocking [dev-packages] dependencies…Locking [packages] dependencies…✔ Success!Updated Pipfile.lock (748999)![root@shiyanlou myproject]#
定位项目路径、虚拟环境、Python解释器,显示依赖关系,卸载包
[root@shiyanlou myproject]# pipenv --where # 定位项目路径/root/myproject[root@shiyanlou myproject]# pipenv --venv # 定位虚拟环境/root/.local/share/virtualenvs/myproject-zKJX12a5[root@shiyanlou myproject]# pipenv --py # 定位Python解释器/root/.local/share/virtualenvs/myproject-zKJX12a5/bin/python[root@shiyanlou myproject]# pipenv graph # 显示依赖关系atomicwrites==1.2.1attrs==18.2.0Django==2.1.5- pytz [required: Any, installed: 2018.9]more-itertools==5.0.0- six [required: >=1.0.0,<2.0.0, installed: 1.12.0]py==1.7.0requests==2.21.0- certifi [required: >=2017.4.17, installed: 2018.11.29]- chardet [required: >=3.0.2,<3.1.0, installed: 3.0.4]- idna [required: >=2.5,<2.9, installed: 2.8]- urllib3 [required: >=1.21.1,<1.25, installed: 1.24.1][root@shiyanlou myproject]# pipenv uninstall --all # 卸载所有包Un-installing all [dev-packages] and [packages]…Found 12 installed package(s), purging…Uninstalling Django-2.1.5:Successfully uninstalled Django-2.1.5...略...Environment now purged and fresh![root@shiyanlou myproject]#
4.4 有个大坑等你跳
pipenv有个缺点,lock不稳定而且时间非常长,所以安装包的时候记得加上--skip-lock,在最后开发完成要提交到仓库的时候再pipenv lock。希望将来的版本能够优化。[root@shiyanlou myproject]# pipenv install django --skip-lockInstalling django…✔ Installation SucceededInstalling dependencies from Pipfile…▉▉▉▉▉▉▉▉▉▉▉▉▉▉▉▉▉▉▉▉▉▉▉▉▉▉▉▉▉▉▉▉ 2/2 — 00:00:02[root@shiyanlou myproject]#
五、常用命令汇总
pipenv具有下列的选项:$ pipenvUsage: pipenv [OPTIONS] COMMAND [ARGS]...Options:--where 显示项目文件所在路径--venv 显示虚拟环境实际文件所在路径--py 显示虚拟环境Python解释器所在路径--envs 显示虚拟环境的选项变量--rm 删除虚拟环境--bare 最小化输出--completion 完整输出--man 显示帮助页面--three / --two 使用Python 3/2创建虚拟环境(注意本机已安装的Python版本)--python TEXT 指定某个Python版本作为虚拟环境的安装源--site-packages 附带安装原Python解释器中的第三方库--jumbotron An easter egg, effectively.--version 版本信息-h, --help 帮助信息
pipenv可使用的命令参数:Commands:check 检查安全漏洞graph 显示当前依赖关系图信息install 安装虚拟环境或者第三方库lock 锁定并生成Pipfile.lock文件open 在编辑器中查看一个库run 在虚拟环境中运行命令shell 进入虚拟环境uninstall 卸载一个库update 卸载当前所有的包,并安装它们的最新版本
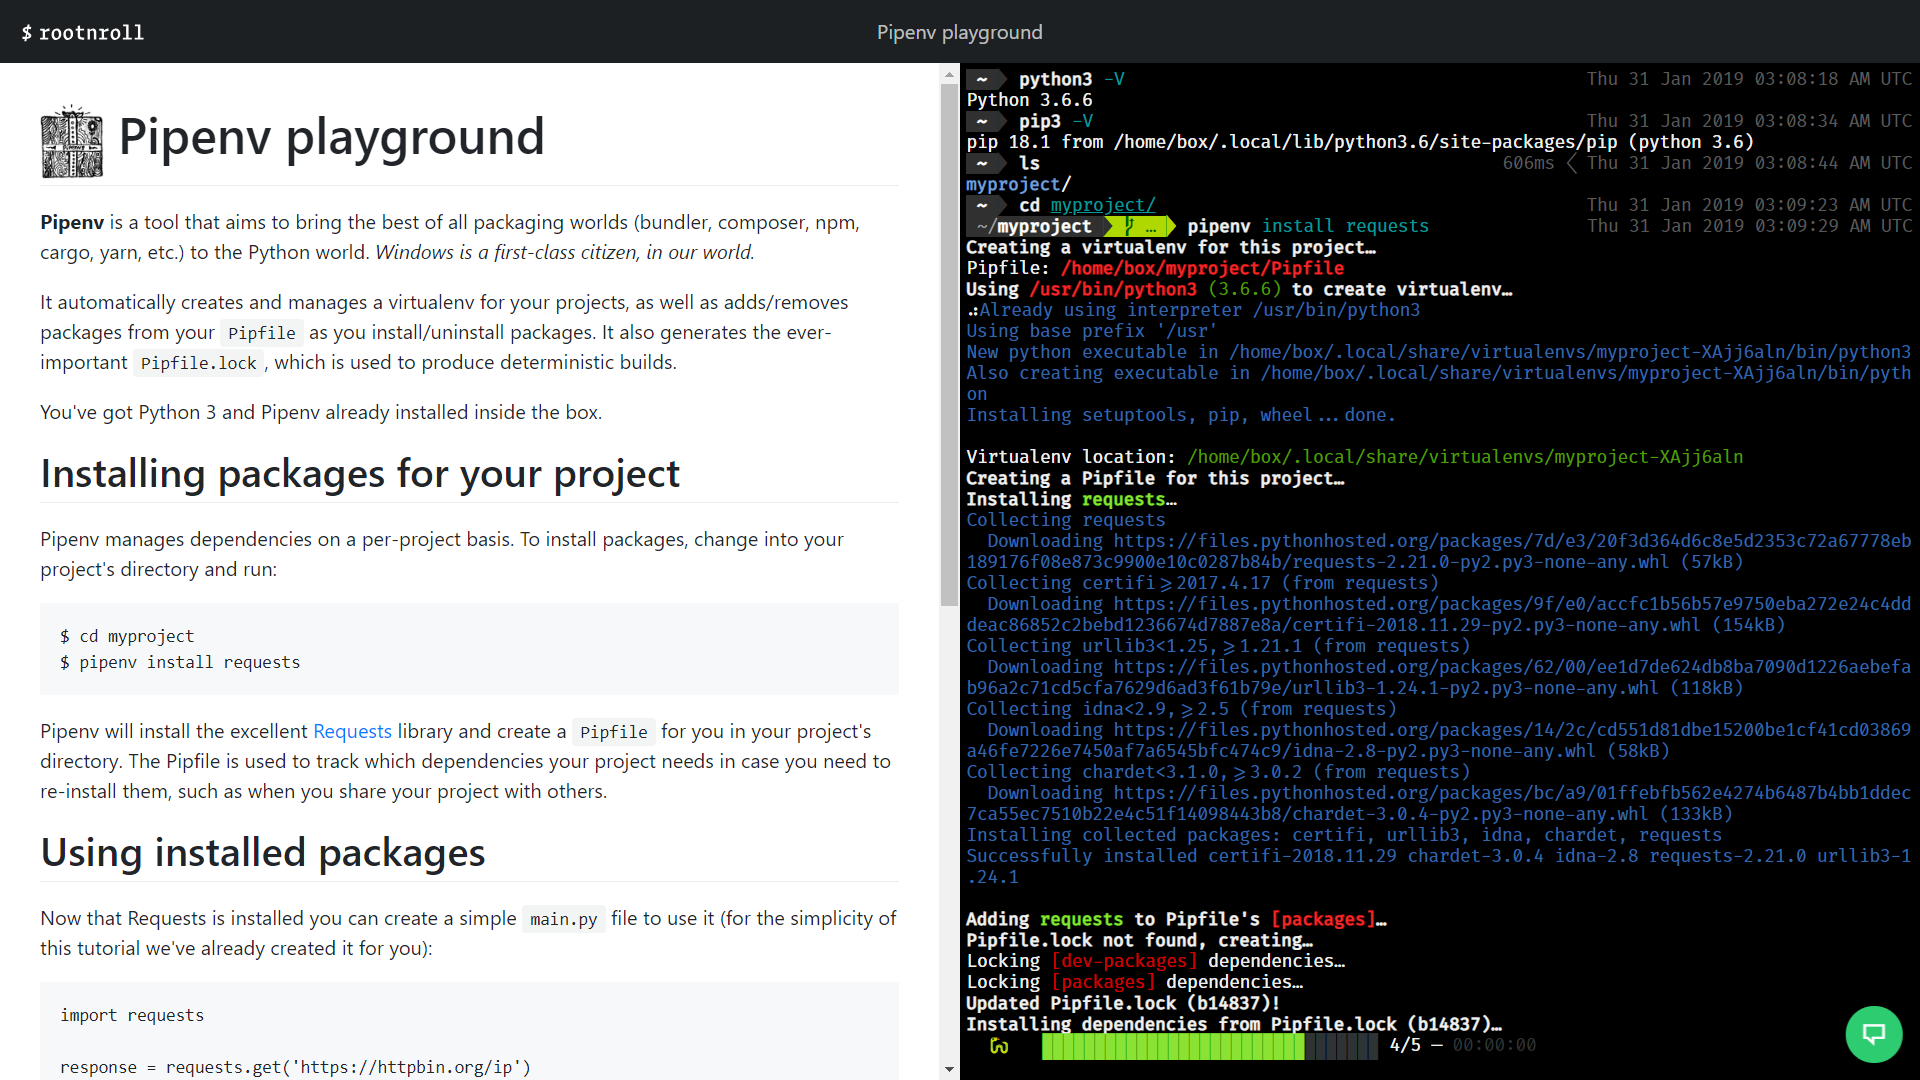
六、在线练习
Pipenv playground是官方的在线练习网站:https://rootnroll.com/d/pipenv/,非常棒!
[文章参考]
快速入门Python 最新最流行的pipenv虚拟环境
Pipenv: Python Dev Workflow for Humans

若有收获,就点个赞吧
0 人点赞
