笔者拟做背景虚化的光斑效果,但是RGB(NV21转YUV420)通道做出的效果容易产生色差,而且在过曝光的条件下出现光斑过多等问题;故在YUV444做虚化;需要将NV21(YUV420)转成YUV444。
2、YUV420转YUV444的主要思路:
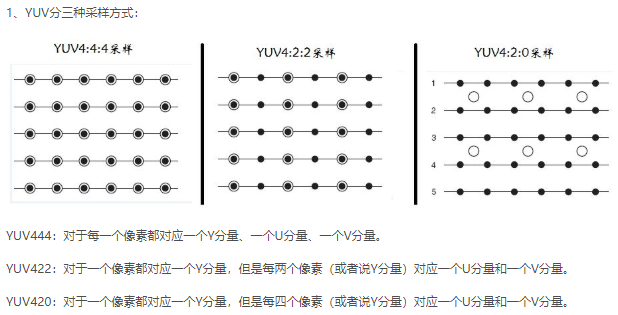
nv21格式yuv420文件,其排列方式为:YYYYYYYYVUVU; 即为:Y在前面,VU交错排列;
nv12格式yuv420文件,其排列方式为: YYYYYYYYUVUV; 即为:Y在前面,UV交错排列;
YUV420转YUV444,实际就是对色度(V和U)进行上采样,最为简单的实现思路是直接填充。
代码如下:
1、将nv21文件读取为yuv420格式Mat类型
Mat nv21_to_yuv420(string nv21_file_name,int height, int width){assert(rgb_img.channels() == 3);FILE *fp;fopen_s(&fp, nv21_file_name.c_str(), "r");void *img_block = malloc(height * width * 1.5 * sizeof(uchar));fread(img_block, sizeof(uchar), height * width * 1.5, fp);cv::Mat img_yuv(height*1.5, width, CV_8UC1, img_block);return img_yuv;// convert yuv420 to rgb// cv::Mat img_rgb(height, width, CV_8UC3);// cv::cvtColor(img_yuv, img_rgb, COLOR_YUV2BGR_NV21);}
static void UpSample(Mat &srcImg, Mat &dstImg)
{
    int rows = dstImg.rows;
    int cols = dstImg.cols;
    for (int row = 0; row < rows; ++row)
    {
        uchar * srcImg_ptr = srcImg.ptr<uchar>(row / 2);
        uchar * dstImg_ptr = dstImg.ptr<uchar>(row);
        for (int col = 0; col < cols; ++col)
        {
            dstImg_ptr[col] = srcImg_ptr[col / 2];
        }
    }
}

void yuv420_to_yuv444(const Mat & img_yuv420, Mat & img_yuv444)
{
    assert(img_yuv444.channels() == 3);
    assert(img_yuv420.channels() == 1);

    int height = img_yuv420.rows * 2 / 3;
    int width = img_yuv420.cols;

    Mat U(height / 2, width / 2, CV_8UC1);
    Mat V(height / 2, width / 2, CV_8UC1);
    uchar * img_vu_ptr = img_yuv420.data + height * width;
    uchar * img_v_ptr = V.data;
    uchar * img_u_ptr = U.data;
    int size = width * height / 2;
    int i = 0;
    while (i < size)
    {
        *img_v_ptr++ = *img_vu_ptr++;
        img_vu_ptr++;
        ++i;
        ++i;
    }

    i = 1;
    img_vu_ptr = img_yuv420.data + height * width;
    while (i < size)
    {
        img_vu_ptr++;
        *img_u_ptr++ = *img_vu_ptr++;
        ++i;
        ++i;
    }

    Mat upSampled_U(height, width, CV_8UC1);
    Mat upSampled_V(height, width, CV_8UC1);
    UpSample(U, upSampled_U);
    UpSample(V, upSampled_V);

    vector<Mat> yuv(3);
    yuv[0] = img_yuv420(Rect(0, 0, width, height));
    yuv[1] = upSampled_U;
    yuv[2] = upSampled_V;
    merge(yuv, img_yuv444);
}
2、YUV444转YUV420,实际就是对色度(V和U)进行降采样,最为简单的实现思路是直接取值(4个中取一个)。
static void DownSample(Mat & srcImg, Mat & dstImg)
{
    int rows = dstImg.rows;
    int cols = dstImg.cols;
    for (int row = 0; row < rows; ++row)
    {
        uchar * srcImg_ptr = srcImg.ptr<uchar>(row << 1);
        uchar * dstImg_ptr = dstImg.ptr<uchar>(row);
        for (int col = 0; col < cols; ++col)
        {
            dstImg_ptr[col] = srcImg_ptr[col << 1];
        }
    }
}

void yuv444_to_yuv420(const Mat & img_yuv444, Mat & img_yuv420)
{
    assert(img_yuv444.channels() == 3);
    assert(img_yuv420.channels() == 1);
    vector<Mat> yuv(3);
    split(img_yuv444, yuv);
    int height = yuv[0].rows;
    int width = yuv[0].cols;
    img_yuv420.create(Size(width, height * 1.5), CV_8UC1);
    Mat downSampled_U(height / 2, width / 2, CV_8UC1);
    Mat downSampled_V(height / 2, width / 2, CV_8UC1);
    DownSample(yuv[1], downSampled_U);
    DownSample(yuv[2], downSampled_V);
    yuv[0].copyTo(img_yuv420(Rect(0, 0, width, height)));

    Mat vu420(height / 2, width, CV_8UC1);
    uchar * img_vu_ptr = vu420.data;
    uchar * img_v_ptr = downSampled_V.data;
    uchar * img_u_ptr = downSampled_U.data;
    int size = width * height / 2;
    int i = 0;
    while (i < size)
    {
        if (i & 0x1)
            *img_vu_ptr++ = *img_u_ptr++;
        else
            *img_vu_ptr++ = *img_v_ptr++;
        ++i;
    }
    vu420.copyTo(img_yuv444(Rect(0, height, width, height / 2)));
}
3、保存yuv420为nv21文件
void saveYUV420_to_nv21(const Mat & yuv420_Img, string nv21_file_name)
{
    FILE  *fp = fopen(nv21_file_name.c_str(), "wb");   // string.c_str() transform string to char *

    if (yuv420_Img.empty())
    {
        std::cout << "Empty! check your image! " << endl;
        return;
    }
    int cols = yuv420_Img.cols;
    int rows = yuv420_Img.rows;
    int size = rows * cols;
    // unsigned char * nv21_buff = new unsigned char[size];
    uchar * yuv420_img_ptr = yuv420_Img.data;
    // size_t fwrite(const void *ptr, size_t size, size_t nmemb, FILE *stream))  把ptr所指向的数组中的数据写入到给定流 stream 中
    // ptr --- 指向要被写入的元素数组的指针;
    // size --- 被写入的每个元素大小,字节为单位
    // nmemb --- 元素个数,每个远大的大小为size字节
    // stream --- FILE对象的指针,FILE对象指定了一个输出流
    // 如果成功,返回一个size_t对象,表示元素的总数;如果该数与nmemb不同,则会输出一个错误
    fwrite(yuv420_img_ptr, sizeof(uchar), size, fp);
    // for (int i = 0; i < size; ++i){
    //      fwrite(yuv420_img_ptr++, 1, 1, fp);
    // }
    fclose(fp);
}

若有收获,就点个赞吧
0 人点赞
