2021-10-18
5-1 MySql 介绍
- mysql 介绍、安装和使用
- nodejs连接 mysql
- API 连接 mysql
先用 mysql 再用 Mongodb
- 做 server 端,mysql 和 MongoDB 都要学习
- 先用 mysql 再用 MongoDB,虽然后者学习成本低
5-2 数据库操作(创建和增、删、查)
- 建库
- 建表
- 表操作
建库
- 创建 myblog 数据库
- 执行 show databases; 查询
CREATE SCHEMA `myblog` ;
建表

id 是标识,不能重复
createtime 是 13位的整数
比如 users 表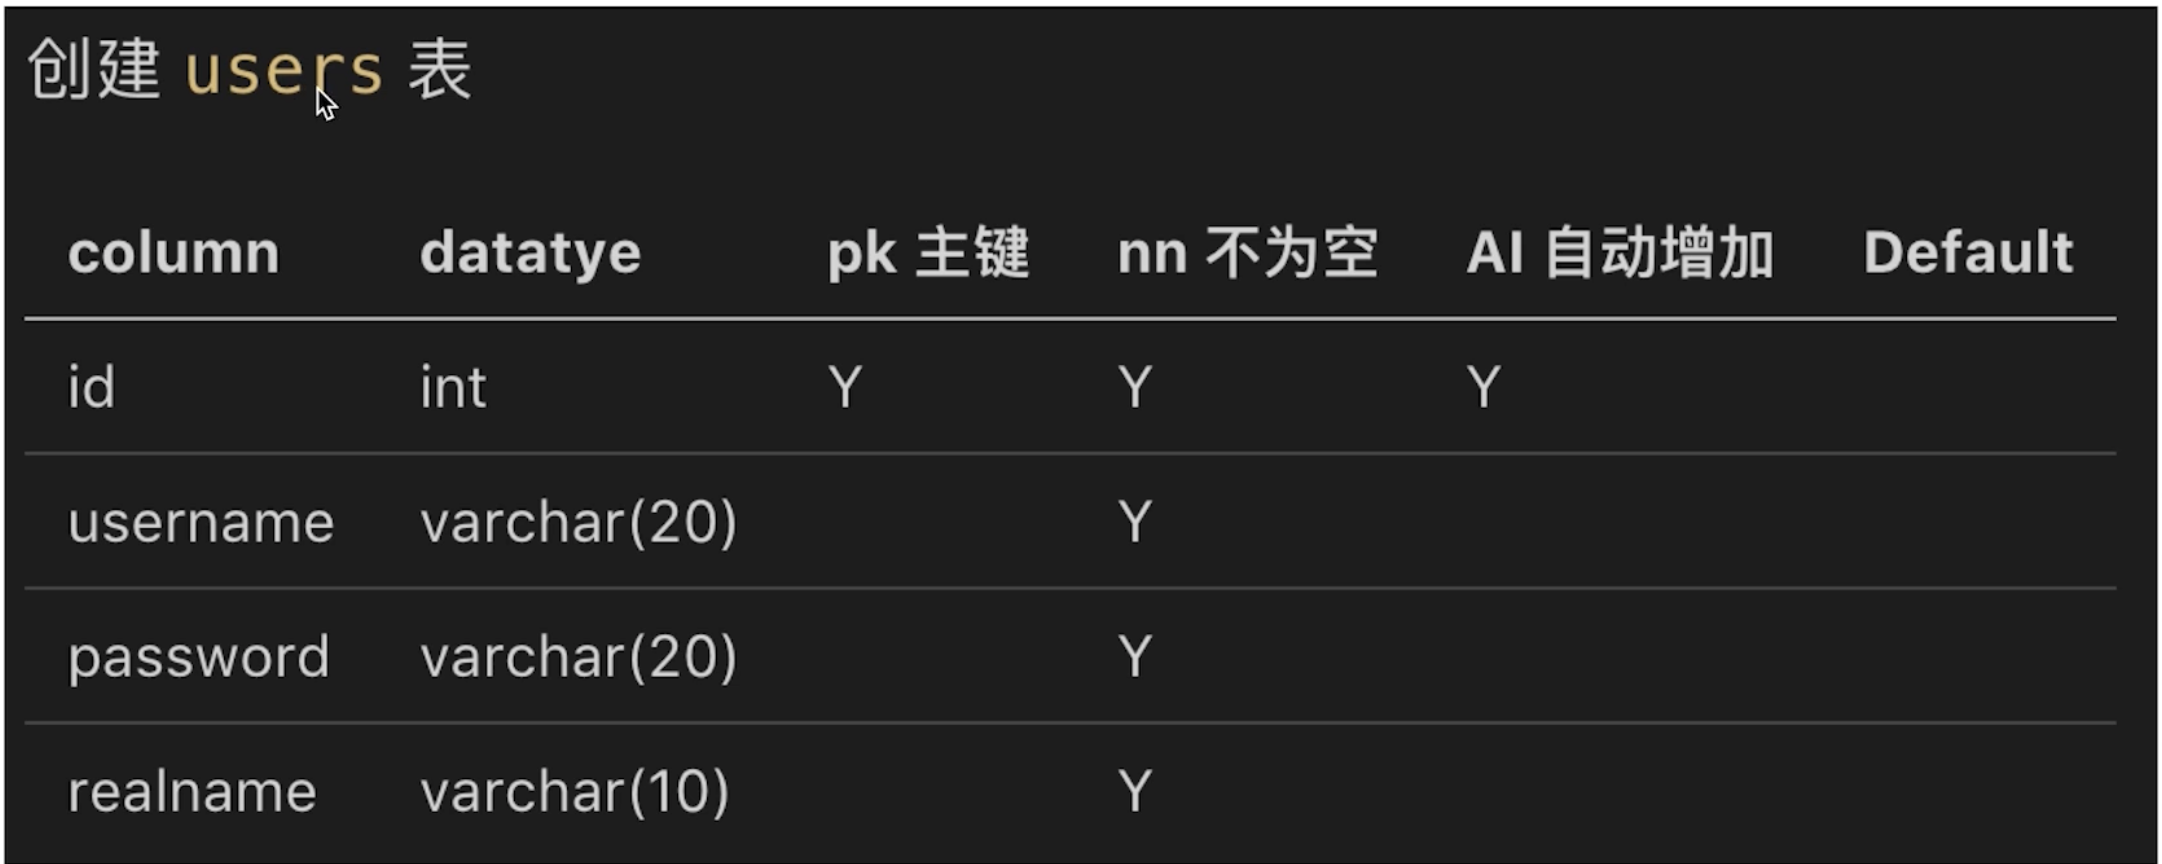
varchar 表示字符串类型,20 是长度,主键就是保证不能重复,自动增加可以用来确保不能重复
在 workbench 中这样创建
CREATE TABLE `myblog`.`users` (`id` INT NOT NULL AUTO_INCREMENT,`username` VARCHAR(20) NOT NULL,`password` VARCHAR(20) NOT NULL,`realname` VARCHAR(10) NOT NULL,PRIMARY KEY (`id`));
同样的创建blogs table
CREATE TABLE `myblog`.`blogs` (`id` INT NOT NULL AUTO_INCREMENT,`title` VARCHAR(50) NOT NULL,`content` LONGTEXT NOT NULL,`createtime` BIGINT(20) NOT NULL DEFAULT 0,`author` VARCHAR(20) NOT NULL,PRIMARY KEY (`id`));
表操作
- 增 删 改 查
- 使用 sql 语句(入门简单,一学就会)
增加数据
因为 password 是关键字,所以使用反引号把它包裹
insert into users(username,`password`,realname) values ('zhangsan','123','张三');insert into users(username,`password`,realname) values ('lisi','123','李四');
查询一下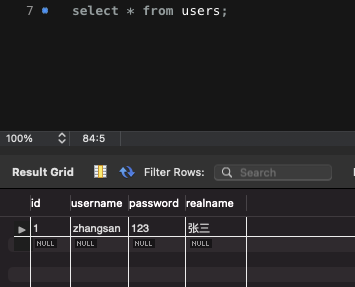
其他一些查询语句
select id username from users;select * from users where username like '%zhang%';select * form users where password like '%1%' order by id desc;
5-3 数据库操作(更新)
更新操作
更新之前会出现一个问题:权限不够
这个 Error Code:1175
解决:
使用一次这个,就可以成功 update 了
SET SQL_SAFE_UPDATES = 0;
更新操作:
update users set realname='李四2' where username='lisi';
修改成功
删除操作
delete from users where username='wangwu';
软删除
其实在真正的操作中,想要删除一条数据不是真正的删除它,而是做标记
修改表的结构,给他加一行 state,默认值为 1
代码:
ALTER TABLE `myblog`.`users`ADD COLUMN `state` INT NOT NULL DEFAULT 1 AFTER `realname`;
然后操作
select * from users where state=1;update users set state=0 where username='lisi';
因此,只要 state 为0则证明已经被删除了
添加 blogs 的数据
insert into blogs(title,content,createtime,author) values ('标题B','内容B',1634557734333,'lisi');
总结
- 如何建库 如何建表
- 建表时常用的数据类型(int bigint varchar longtext)
- sql 语句实现增、删、改、查
5-4 nodejs 操作 mysql
- 示例:用 demo 演示,不考虑使用
- 封装:将其封装为系统可用的工具
- 使用:让 API 直接操作数据库,不再使用假数据
操作:
新建一个 mysql-test 这样一个空白目录
然后 npm init -y 空白目录
然后新建对应的 index.js
然后 npm i mysql
然后在 index.js 中写一整套查询逻辑
const mysql = require('mysql')// 创建连接对象const connnectionObject = mysql.createConnection({host: 'localhost',user: 'root',password: 'admin123',port: '3306',database: 'myblog'})// 开始连接connnectionObject.connect()// 执行 SQL 语句const sqlStatement = 'select * from users;'// 查询connnectionObject.query(sqlStatement, (err, result) => {if (err) {console.error(err)return}console.log(result)})// 关闭连接connnectionObject.end()
然后尝试连接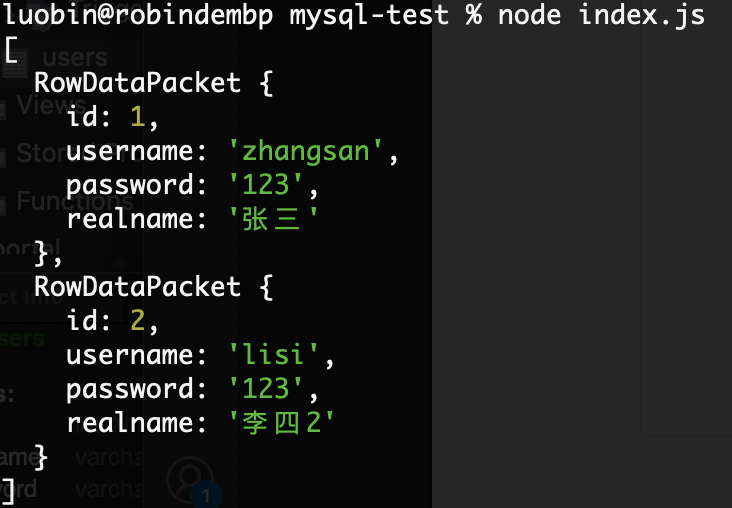
试试更新语句
因此在假数据的那个地方,就可以根据 changedRows 和 affectedRows 来判断是否更新或者删除成功
试试 插入
返回 id 为 3
const sqlStatement = `insert into blogs(title,content,createtime,author) values ('标题C','内容C',1634607744531,'wangwu');`
2021-10-19
5-5 nodejs 链接 mysql 做成工具
回到 blog-1 安装 mysql 然后启动
创建conf文件夹,创建db.js(/src/conf/db.js )
db.js 用来配置环境参数
const env = process.env.NODE_ENV // 环境参数// 配置 mysql 的值let MYSQL_CONFif (env === 'dev') {MYSQL_CONF = {host: 'localhost',user: 'root',password: 'admin123',port: '3306',database: 'myblog'}}if (env === 'production') {// 因为 production 是用本地环境做模拟的,所以和 dev 环境设置的一样MYSQL_CONF = {host: 'localhost',user: 'root',password: 'admin123',port: '3306',database: 'myblog'}}module.exports = {MYSQL_CONF}
然后创建 db 文件夹和 mysql.js 文件(/src/db/mysql.js )
借用之前创建的 demo 代码来完成
其中回调函数使用 promise 来处理
const mysql = require('mysql')const { MYSQL_CONF } = require('../conf/db')// 创建连接对象const connectionObject = mysql.createConnection(MYSQL_CONF)// 开始连接connectionObject.connect()// 统一执行 sql 的函数function exec(sqlStatement) {const promise = new Promise((resolve, reject) => {connectionObject.query(sqlStatement, (err, result) => {if (err) {reject(err)return}resolve(result)})})return promise}// 要保持连接,不能断开连接,即单例函数// connectionObject.end()module.exports = {exec}
5-6 API对接 mysql(博客列表)
将假数据全部改为真数据
将 controller/blog.js 下的数据分别修改
这里的 1 =1 的作用为:
当没有 author 和 keyword 时,sql语句就会变成 select * from blogs where order by createtime desc
就会直接报错
如果没有 where 当有 author 或者有 keyword 时 就会报错
const getList = (author, keyword) => {let sql = `select * from blogs where 1=1 `if (author) {sql += `and author='${author}'`}if (keyword) {sql += `and title like '%${author}%' `}sql += `order by createtime desc;`// 返回 promisereturn exec(sql)}
同样的,如果拼接数据 xxx.html?k1=v1&k2=v2&k3=v3 时也可以使用这样的操作手段
获取数据:
router/blog.js
// 获取博客列表if (method === 'GET' && req.path === '/api/blog/list') {// 获取地址栏中 query 中的数据const author = req.query.author || ''const keyword = req.query.keyword || ''// 然后根据 query 的值查询 mock 数据// const listData = getList(author, keyword)// return new SuccessModel(listData)const result = getList(author, keyword)return result.then(listData => {return new SuccessModel(listData)})}
试一下 http://localhost:8000/api/blog/list
成功!
2021-10-20
5-7 API对接mysql(博客详情和新建)
忘记测试模糊查询,一样也可以,比如输入keyword=A
只展示标题里含A的
同样的 查询 author为lisi 的
继续获取博客详情
博客详情
首先修改获取数据的逻辑 即 controller/blog.js
修改 getDetail 方法
const getDetail = (id) => {// 根据 id 来获取某条博客的具体内容const sql = `select * from blogs where id='${id}'`// 因为返回的数组,所以讲数组的括号去掉,变成对象的形式return exec(sql).then(rows => {return rows[0]})}
然后修改路由信息 即 router/blog.js
修改
// 获取博客详情if (method === 'GET' && req.path === '/api/blog/detail'){// const listData = getDetail(id)// return new SuccessModel(listData)// 拿到 id 即为 req.query.idconst result = getDetail(id)return result.then(listData => {return new SuccessModel(listData)})}
新建博客
新建博客的逻辑在之前的假数据中返回的是 插入的 id
修改获取数据的逻辑 即 controller/blog.js
修改 getDetail 方法
const newBlog = (blogData = {}) => {// blogData 是一个博客对象,包含 title content author属性const title = blogData.titleconst content = blogData.contentconst author = blogData.authorconst createtime = Date.now()const sql = `insert into blogs (title, content, author, createtime)values ('${title}', '${content}', '${author}', ${createtime});`return exec(sql).then(insertData => {console.log('insertData', insertData)return {id: insertData.insertId}})// return {// id: 3 // 表示新建博客,插入到数据表里面的 id// }}
然后修改路由信息 即 router/blog.js
修改
这里注意修改 author 数据为假数据,后期添加了 users 的逻辑再改
// 新建一篇博客if (method === 'POST' && req.path === '/api/blog/new') {// const blogData = req.body// const data = newBlog(blogData)// return new SuccessModel(data)// 因为逻辑是登录之后(即获取 author 值之后)才能新建博客// 而此时我们没写author的逻辑,所以先用假数据const author = 'zhangsan'req.body.author = author // 假数据,待开发登录时再改为真数据const result = newBlog(req.body)// 这里的 data 就是返回新建成功的博客的 idreturn result.then(data => {return new SuccessModel(data)})}
然后去 postman 试下 post 请求
这里返回成功,再去 workbench 试下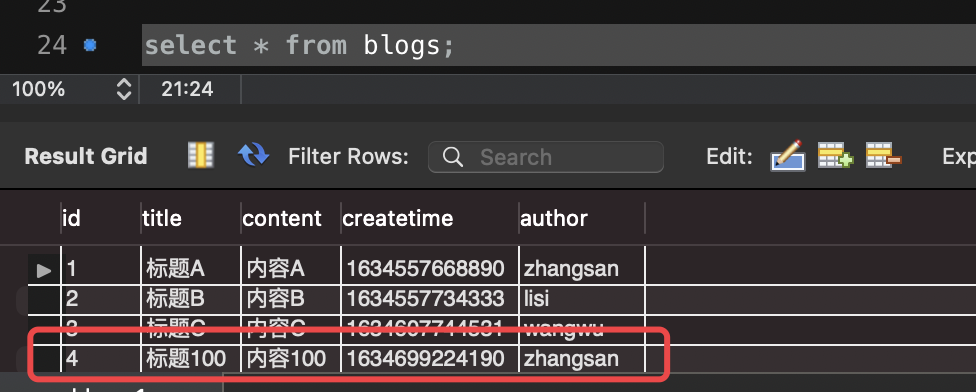
成功!
5-8 API对接mysql(博客更新和删除)
博客更新
在假数据中,我们设置的返回逻辑是 true 或者 false,传入更新的数据和id
const updateBlog = (id, blogData = {}) => {// blogData 是一个博客对象,包含 title content 属性// 更新时只需要更新blogData的 title content 属性const title = blogData.titleconst content = blogData.contentconst sql = `update blogs set title='${title}',content='${content}' where id=${id}`return exec(sql).then(updateData => {console.log('updateData', updateData);if (updateData.affectedRows > 0) {return true}return false})// console.log('blogData,id', blogData, id);// return true}
更新 router
// 更新一篇博客if (method === 'POST' && req.path === '/api/blog/update') {const result = updateBlog(id, req.body)return result.then(data => {if (data) {return new SuccessModel()} else{return new ErrorModel('update failed')}})// if (result) {// return new SuccessModel()// } else{// return new ErrorModel('update failed')// }}
在 postman 中试一下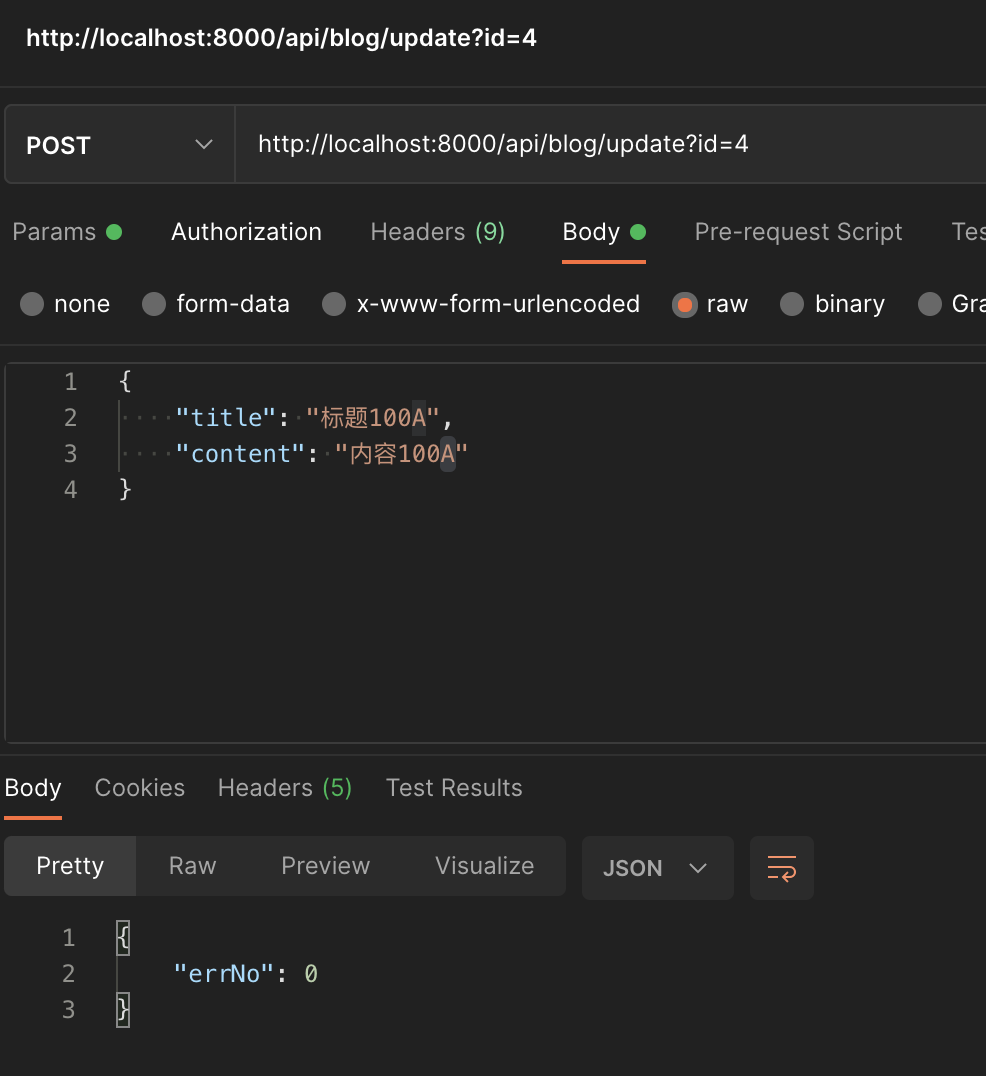
成功
数据库中内容也一致
博客删除
删除逻辑和更新完全一样
更新一下 SQL 语句
const sql = `delete from blogs where id=${id}`
删除的时候要加 author 增强博客删除的安全性
5-9 API对接mysql(登录)
登录博客
修改三个文件
app.js 用 promise 的形式来处理路由
controller user.js
const { exec } = require('../db/mysql')const loginCheck = (username, password) =>{const sql = `select username,realname from users where username='${username}' and password='${password}'`return exec(sql).then(rows => {return rows[0] || {}})}module.exports = {loginCheck}
router user.js
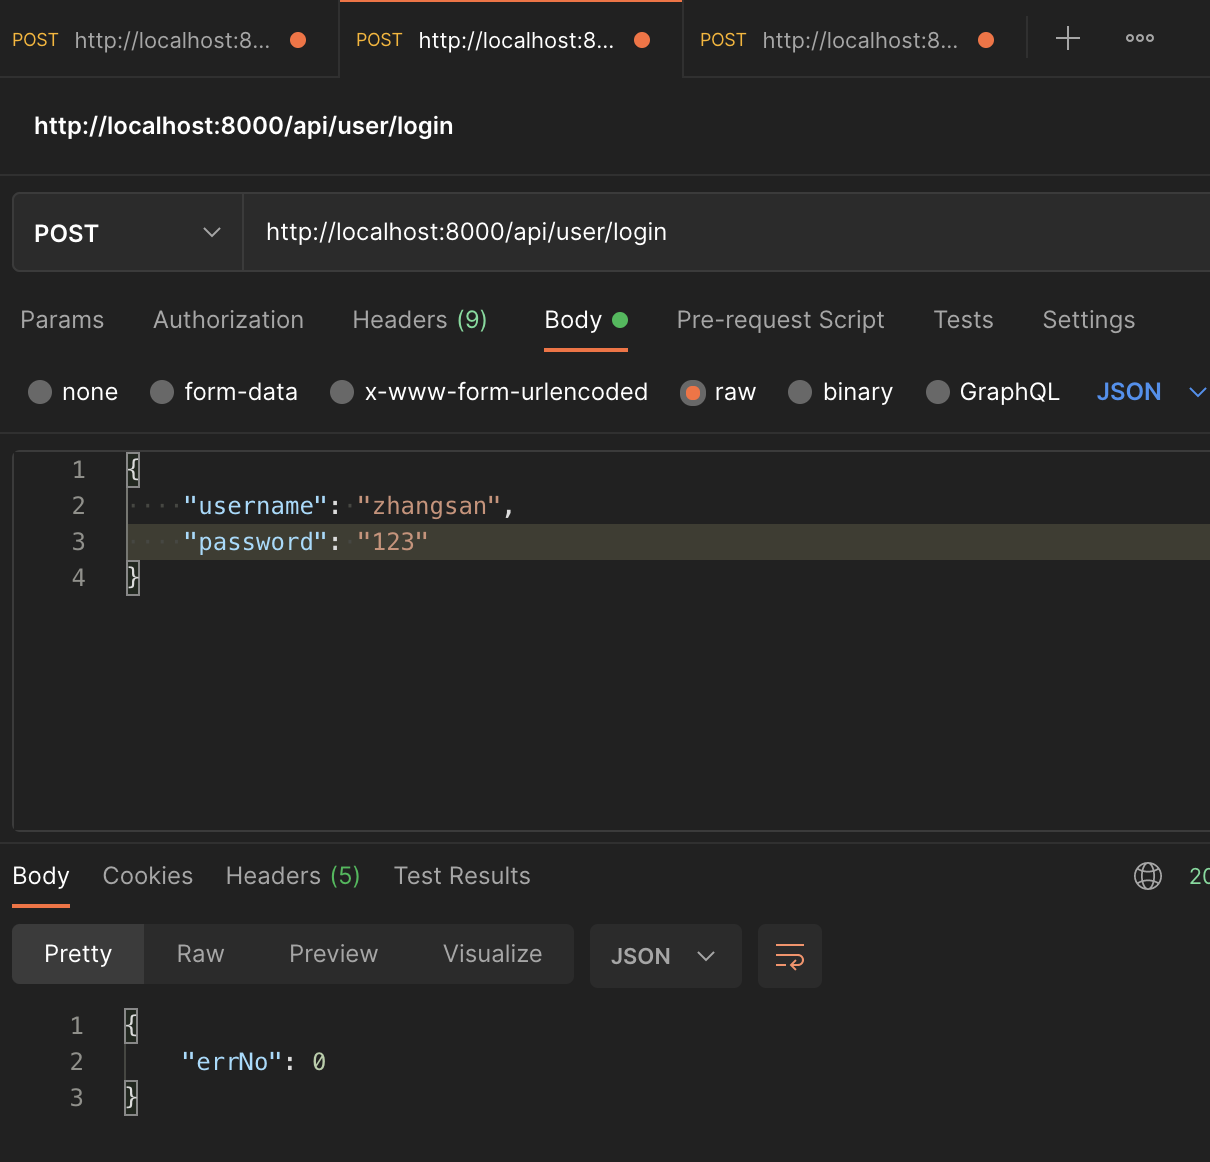
if (method === 'POST' && req.path === '/api/user/login') {const { username, password } = req.bodyconst result = loginCheck(username, password)return result.then(data => {if (data.username) {return new SuccessModel()}return new ErrorModel('login failed')})}
总结
- nodejs 连接 mysql ,如何执行 SQL 语句
- 根据 NODE_ENV 来区分配置
- 封装 exec 函数,API 使用 exec 操作数据库
5-10 总结


