快速上手
Welcome
from flask import Flaskfrom flask_restaction import Apiapp = Flask(__name__)# 创建一个 Api 对象,把 app 作为参数api = Api(app)# 创建 Welcome 类,描述欢迎信息(框架可以序列化任意类型的对象)class Welcome:def __init__(self, name):self.name = nameself.message = "Hello %s, Welcome to flask-restaction!" % name# 创建一个 Hello 类,定义 get 方法class Hello:"""Hello world"""# 在 get 方法文档字符串中描述输入参数和输出的格式def get(self, name):"""Get welcome message$input:name?str&default="world": Your name$output:message?str: Welcome message"""return Welcome(name)# 添加资源api.add_resource(Hello)# 配置API文档的访问路径app.route('/')(api.meta_view)if __name__ == '__main__':app.run(debug=True)
保存为 hello.py, 然后运行:
$ python hello.py* Running on http://127.0.0.1:5000/* Restarting with reloader
打开浏览器,访问 http://127.0.0.1:5000/hello:
{"message": "Hello world, Welcome to flask-restaction!"}
再访问 http://127.0.0.1:5000/hello?name=kk
你将会看到:
{"message": "Hello kk, Welcome to flask-restaction!"}
访问 http://127.0.0.1:5000 可以查看自动生成的文档。
两个概念
Resource : 资源,比如这里的 Hello 类,表示一类资源。
Action : 操作,例如 get, post, delete, getlist, post_login。 只要是 HTTP 方法或 HTTP 方法加下划线 开头就行。
校验输入输出
在Api的参数 Api(docs=__doc__) 中用 $shared 描述全局共享的Schema。
在Resource的文档字符串中用 $shared 描述Resource内共享的Schema。
在Action的文档字符串中用 $input, $output 描述输入输出Schema, 用 $error 描述可能返回的错误。
$input
: 输入格式,如果没有$input,则不校验输入,以无参数的形式调用Action。
实际数据来源取决于HTTP方法,GET和DELETE请求,取自url参数,
POST,PUT和PATCH请求,取自请求体,Content-Type为application/json。
$output : 输出格式,如果没有$output,则不校验输出。
$error : 描述可能返回的错误,仅作为API文档,例如:
$error:400.InvalidData: 输入参数错误403.PermissionDeny: 权限不足格式为: `status.Error: message`
请求参数校验失败会返回:
{"status": 400,"error": "InvalidData","message": "xxx xxxx"}
响应内容校验失败会返回:
{"status": 500,"error": "ServerError","message": "xxx xxxx"}
Schema为YAML格式的字符串,语法见Schema语法。
自定义校验器
在Validr的文档中讲述了自定义校验器的用法。
所有自定义的校验器通过Api(validators=validators)进行注册。
更多内容请移步Validr。
添加资源
使用 Api.add_resource 方法添加资源,传给 add_resource 的参数都会原封不动的传给Resource的 __init__ 方法。
路由路径是和Resource名称相同的,如果需要指定不同的路径,可以通过创建一个新Resource实现:
api.add_resource(type('NewName', (MyResource,), {}))
一个Resource可能要依赖其他对象,或者是依赖于网络上的另一个API。 使用依赖注入的方式为Resource提供依赖,而不是使用全局变量。
例如,User依赖于其他对象:
class User:def __init__(self, dependecy):self.dependecy = dependecydependecy = Xxx()api.add_resource(User, dependecy=dependecy)
构建 URL
可以使用 flask 中的 url_for() 函数构建指定 action 的 URL。
endpoint (url_for 的参数) 是 resource@action_name
resource : Resource类名称的小写
action_name : Action的后半部分(下划线分隔)
格式:
url_for("resource@action_name") -> /resource/action_name
示例:
url_for("hello") -> /hellourl_for("hello@login") -> /hello/login
返回错误信息
from flask_restaction import abort# 函数原型abort(code, error=None, message=None)
如果没有error参数,效果和 flask.abort(code) 一样。
如果有error是 flask.Response 类型,效果和 flask.abort(code, error) 一样。
其他情况返回内容为:
{"status": code,"error": error,"message": message}
返回内容会序列化为适当的格式。
权限管理
这里的实现适用于许多不需要非常灵活的权限系统的应用,方便实用为主,角色和权限通过一份JSON文件 配置即可使用。你也可以使用 flask-login 等Flask插件,总之Flask里能用的这里一样都可以使用。
举个栗子
meta.json 设定角色和权限
{"$roles": {"admin": {"hello": ["get", "post"],"user": ["post"]},"guest": {"user": ["post"]}}}
init.py 根据token确定角色
from flask_restaction import Api, TokenAuthapi = Api(metafile='meta.json')auth = TokenAuth(api)@auth.get_roledef get_role(token):if token:return token["role"]else:return "guest"
hello.py 业务代码
class Hello:def get(self):passdef post(self):pass
user.py 登录接口
from flask import gclass User:def __init__(self, api):self.api = apidef post(self, username, password):# query user from databaseg.token = {"id": user.id, "role": user.role}return user
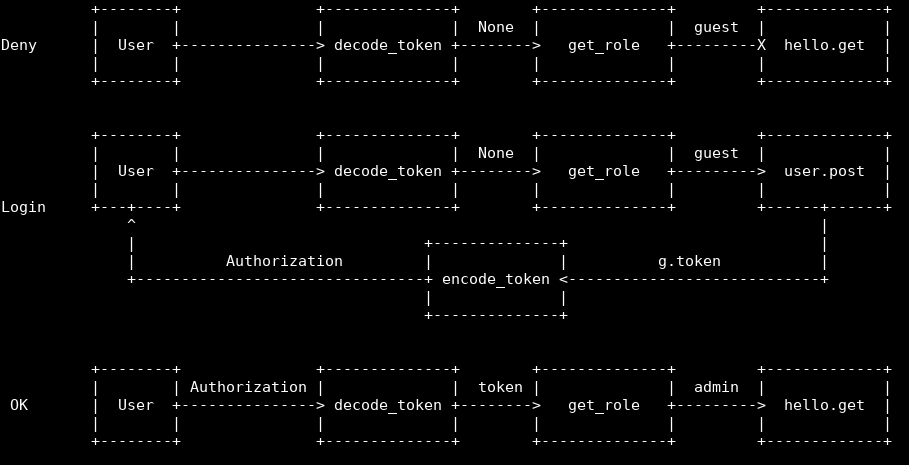
使用情景
用户直接请求 hello.get 接口,框架收到请求后,从请求头的 Authorization 中取 token ,
此时 token 为 None,然后框架调用 get_role(None) ,得到角色 guest ,再判断
meta["$roles"]["guest"]["hello"] 中有没有 get,发现没有,框架直接拒绝此次请求。
用户请求 user.post 接口,处理流程同上,请求到达 user.post 方法,验证用户名和密码,如果验证成功,就设置
g.token,token 里面保存了用户ID,角色和过期时间。TokenAuth会将 g.token 用JWT进行签名,
然后通过响应头的 Authorization 返回给用户。
用户再次请求 hello.get 接口,在请求头的 Authorization 中带上了刚才得到的 token,
处理流程同上,框架允许此次请求,请求到达 hello.get 方法。
示意图
分步说明
1. 在 metafile 中设定角色和权限
metafile是一个描述API信息的文件,通常放在应用的根目录下,文件名 meta.json。
在Api初始化的时候通过 Api(metafile="meta.json") 加载。
{"$roles": {"Role": {"Resource": ["Action", ...]}}}
请求到来时,根据 Role, Resource, Action 可以快速确定是否许可此次请求。
!!! note “提示”
Flask的Development Server不能检测到python代码文件之外变动,所以修改metafile的内容之后需要手动重启才能生效。
注册 get_role 函数
框架通过URL能解析出Resource, Action,但是无法知道用户是什么角色, 所以需要你提供一个能返回用户角色的函数。
生成 token
为了能够确认用户的身份,需要在用户登录成功后生成一个 token,将 token 通过响应头(Authorization)返回给用户。
token 一般会储存用户ID和过期时间,用户在发送请求时需要将 token 通过请求头发送给服务器。
TokenAuth使用 json web token 作为身份验证工具。
!!! note “提示”
token 会用密钥(app.secret_key)对 token 进行签名,无法篡改。生成 token 前需要先设置 app.secret_key,或通过 flask 配置。token 是未加密的,不要把敏感信息保存在里面。
身份/权限验证失败会返回:
{"status": 403,"error": "PermissionDeny","message": "xxx can't access xxxx"}
安全性和设置
对安全性要求不同,权限管理的实现也会不同,TokenAuth的实现适用于对安全性要求不高的应用。
当收到请求时,检测到token即将过期,会主动颁发一个新的token给客户端,这样能避免token过期 导致中断用户正常使用的问题。但这样也导致token能够被无限被刷新,有一定的安全隐患。
以下是默认设置:
{"$auth": {"algorithm": "HS256", # token签名算法"expiration": 3600, # token存活时间,单位为秒"header": "Authorization" # 用于传递token的请求/响应头"cookie": null # 用于传递token的cookie名称, 默认不用cookie"refresh": true # 是否主动延长token过期时间}}
自定义权限管理
Api.authorize(role) 方法能根据 $roles 和请求URL判断该角色是否有权限调用API,
利用它可以简化自定义权限管理实现。
以下是基本结构,具体实现可以参考 flask_restaction/auth.py:
class MyAuth:def __init__(self, api):self.api = apiself.config = api.meta["$auth"]api.before_request(self.before_request)api.after_request(self.after_request)def before_request(self):"""Parse request, check permission"""# parse role from requestself.api.authorize(role)def after_request(self, rv, status, headers):"""Modify response"""return rv, status, headers
API文档
有两种方式配置API文档的访问路径。
Flask.route
app.route('/')(api.meta_view)
Api.add_resource
这种方式把文档作为一种资源添加到API中,可以方便的控制文档的访问权限。
# 允许用cookie传递token{"$auth": {"cookie": "Authorization"}}# add_resourceapi.add_resource(type('Docs', (), {'get': api.meta_view}))
Api.meta_view也能返回JSON格式的API元数据,只需要设置请求头 Accept 为 application/json 即可。
使用蓝图
Api可以放在蓝图中,这样所有的 Resource 都会路由到蓝图中。
from flask import Flask, Blueprintfrom flask_restaction import Apiapp = Flask(__name__)bp = Blueprint('api', __name__)api = Api(bp)api.add_resource(XXX)app.register_blueprint(bp)
注意: add_resource 需要在 register_blueprint 之前执行,否则 add_resource 无效。
事件处理
Api提供before_request, after_request, error_handler这3个装饰器用来注册事件处理函数。
@api.before_requestdef before_request():# 此函数会在在请求到来的第一时间执行# 若response不为None,则不再继续处理请求return response@api.after_requestdef after_request(rv, status, headers):# 此处可以对Action中的返回值进行处理return rv, status, headers@api.error_handlerdef error_handler(ex):# 处理从before_request到Action过程中抛出的异常# 若response不为None,则返回此response给客户端return response
自定义响应格式
默认响应格式为JSON,你也可以很方便的添加自定义的响应格式。
from flask import make_responsefrom flask_restaction import exporter@exporter('text/html')def export_text(data, status, headers):return make_response(str(data), status, headers)
框架会根据请求头中Accept的值选择合适的响应格式。
使用 res.js
在API文档页面打开控制台即可使用 res.js。
如果API路径不是网站根路径,则需要配置 API_URL_PREFIX,用于生成API文档中显示的URL 和res.js调用API的URL,这项配置不会影响API的真实路径。
例如: http://127.0.0.1:5000/api
app.config["API_URL_PREFIX"] = "/api"
详细用法见resjs。
使用 res.py
res.py 的用法类似于 res.js,网络请求用的是Requests库。
>>> from flask_restaction import Res>>> help(Res)

若有收获,就点个赞吧
0 人点赞
