- 1 环境准备
- ">
- AuthUserFile - location of the file used in authentication for balancer-manager
- Linux: “/opt/polarion/data/svn/passwd”
- Windows: “C:\Polarion\data\svn\passwd”
- Set the timeout (in seconds) to match the Tomcat/Apache Timeout values
- Adjust the BalancerMembers to point to the address of each node
- Adjust the ProxyPassReverse to point to the address of each node
- To monitor the routes in the load balancer, use the following extra LogFormat:
- LogFormat “%h %l %u %t %{BALANCER_WORKER_NAME}e %{JSESSIONID}C %{BALANCER_SESSION_STICKY}e %{BALANCER_SESSION_ROUTE}e \”%{BALANCER_WORKER_ROUTE}e\” \”%{BALANCER_ROUTE_CHANGED}e\” \”%r\” %>s %b” extra
- Example:
- LogFormat “%h %l %u %t %{BALANCER_WORKER_NAME}e %{JSESSIONID}C %{BALANCER_SESSION_STICKY}e %{BALANCER_SESSION_ROUTE}e \”%{BALANCER_WORKER_ROUTE}e\” \”%{BALANCER_ROUTE_CHANGED}e\” \”%r\” %>s %b” extra
- CustomLog “logs/access_extra_log” extra
- repoSystem=file://$[com.polarion.root]/data/svn/repo
- com.polarion.platform.internalPG=polarion:admin@localhost:5433
- 4.4 集群节点服务器Cluster’s nodes配置
- 5 检查安装结果
1 环境准备
1.1 背景描述
1.2 实验环境机器清单
实验环境基于VMware ESXi 6.7;
宿主机环境配置 CPU : 40 Cores @ 2.0GHz / RAM : 256GB / Storage : 800GB SSD
实验涉及到的虚拟机清单如下:
| 序号 | 机器名 | IP地址 | 机器描述 | 硬件配置 | 软件配置 |
|---|---|---|---|---|---|
| 1 | coordinator | 10.1.2.73 | 协调服务 | CPU: 4 Cores @ 2.0GHz RAM:8GB Storage:64GB SSD |
CentOS 7.7 |
| 2 | instance1 | 10.1.2.74 | 节点1 | CPU: 4 Cores @ 2.0GHz RAM:8GB Storage:64GB SSD |
CentOS 7.7 |
| 3 | instance2 | 10.1.2.75 | 节点2 | CPU: 4 Cores @ 2.0GHz RAM:8GB Storage:64GB SSD |
CentOS 7.7 |
| 4 | shared-services | 10.1.2.76 | 共享服务 | CPU: 4 Cores @ 2.0GHz RAM:8GB Storage:64GB SSD |
CentOS 7.7 |
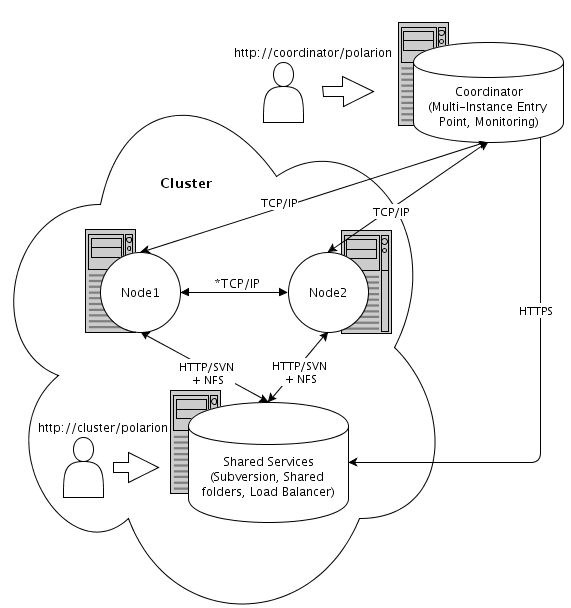
1.3 系统架构图
2 系统环境配置
该操作需要在4台机器上分别执行
2.1 配置防火墙
- 确认已开放的端口
firewall-cmd --zone=public --list-ports
- 永久打开端口 80 [HTTP] /2181 [ZOOKEEPER] / 8887 [POLARION CONTROL] / 8889 [TOMCAT AJP13]
firewall-cmd --zone=public --add-port=80/tcp --permanentfirewall-cmd --zone=public --add-port=2181/tcp --permanentfirewall-cmd --zone=public --add-port=8887/tcp --permanentfirewall-cmd --zone=public --add-port=8889/tcp --permanent
- 重新载入防火墙
firewall-cmd --reload
2.2 配置SELINUX
- 关闭SELINUX
sed -i 's#SELINUX=enforcing#SELINUX=disabled#g' /etc/selinux/configsetenforce 0
2.3 配置工具软件
yum install -y unzip
3 软件配置
该操作需要在4台机器上分别执行
3.1 OpenJDK安装
安装JDK
yum install -y java-11-openjdk.x86_64
配置环境变量
vi /etc/profile
在文件末尾加上
export JAVA_HOME=/usr/lib/jvm/java-11-openjdk-11.0.6.10-1.el7_7.x86_64export JDK_HOME=/usr/lib/jvm/java-11-openjdk-11.0.6.10-1.el7_7.x86_64
运行脚本
source /etc/profile
确认环境变量配置
echo $JAVA_HOMEecho $JDK_HOME
3.2 Polarion安装
解压缩安装介质
unzip PolarionALM_19.3_linux.zip
进入安装介质目录
cd Polarion
运行安装脚本
./install.sh
安装过程一路yes确认,无需任何配置;
- 等待安装过程出现如下信息 ```
- 6/9) CONFIGURATION CHECK
Please check settings in files
“/opt/polarion/etc/polarion.properties”
and
“/opt/polarion/etc/config.sh”
before continuing.
When you are done press Enter to continue.
Or press “Ctrl+C” to halt the script. You can re-run it later.
6. 重新新建一个SSH连接,修改配置文件
vi /opt/polarion/etc/polarion.properties
7. 修改其中的3条配置项
base.url=http://[IP地址] repo=http://[IP地址]/repo controlHostname=[IP地址]
8. 返回步骤5,按回车继续完成全部安装,等待Polarion完成启动8. 在浏览器中访问 `http://[IP地址]/polarion` 来验证是否安装完成,此时不要激活系统8. 停止Polarion服务,准备进行下一步配置```bashsystemctl stop polarion
4 节点配置
4.1 协调服务器Coordinator配置
复制
[安装介质]/polarion/install folder: polarion.properties.template.coordinator到/opt/polarion/etc/polarion.properties;编辑
polarion.properties<br />vi /opt/polarion/etc/polarion.properties
``` com.polarion.application=polarion.coordinator base.url=http://10.1.2.73 TomcatService.ajp13-port=8889
controlPort=8887 controlHostname=10.1.2.73
com.polarion.zookeeper.port=2181
3. 删除协调服务器上的SVN服务```bashrm /etc/httpd/conf.d/polarionSVN.conf
重启
apache服务systemctl restart httpd
启动
polarion服务systemctl start polarion
4.2 共享服务器Cluster’s Shared Services配置
卸载Polarion服务,运行卸载脚本
/opt/polarion/bin/uninstall_polarion_service.sh
复制
[安装介质]/polarion/install/loadbalancer.conf.apache24.template到/etc/httpd/conf.d/loadbalancer.conf编辑
loadbalancer.confvi /etc/httpd/conf.d/loadbalancer.conf
```
LoadModule proxy_module modules/mod_proxy.so
AuthUserFile - location of the file used in authentication for balancer-manager
Linux: “/opt/polarion/data/svn/passwd”
Windows: “C:\Polarion\data\svn\passwd”
Header add Set-Cookie “ROUTEID=.%{BALANCER_WORKER_ROUTE}e; path=/“ env=BALANCER_ROUTE_CHANGED
Set the timeout (in seconds) to match the Tomcat/Apache Timeout values
Adjust the BalancerMembers to point to the address of each node
ProxyPass /polarion balancer://10.1.2.76/polarion
Adjust the ProxyPassReverse to point to the address of each node
ProxyPassReverse /polarion http://10.1.2.74/polarion ProxyPassReverse /polarion http://10.1.2.75/polarion LogLevel debug
To monitor the routes in the load balancer, use the following extra LogFormat:
LogFormat “%h %l %u %t %{BALANCER_WORKER_NAME}e %{JSESSIONID}C %{BALANCER_SESSION_STICKY}e %{BALANCER_SESSION_ROUTE}e \”%{BALANCER_WORKER_ROUTE}e\” \”%{BALANCER_ROUTE_CHANGED}e\” \”%r\” %>s %b” extra
Example:
LogFormat “%h %l %u %t %{BALANCER_WORKER_NAME}e %{JSESSIONID}C %{BALANCER_SESSION_STICKY}e %{BALANCER_SESSION_ROUTE}e \”%{BALANCER_WORKER_ROUTE}e\” \”%{BALANCER_ROUTE_CHANGED}e\” \”%r\” %>s %b” extra
CustomLog “logs/access_extra_log” extra
4. 重启 `apache` 服务```bashsystemctl restart httpd
修改
polarion.propertiesvi /opt/polarion/etc/polarion.properties
修改文档 ``` 在文档最后加上 com.polarion.zookeeper=10.1.2.73:2181 com.polarion.clusterId=cluster1 com.polarion.clusterLabel=Main Cluster com.polarion.clusterDescription=Description of Main Cluster com.polarion.loadBalancer=http://10.1.2.76/balancer-manager
修改如下项为 svn.access.file=$[com.polarion.shared]/data/svn/access svn.passwd.file=$[com.polarion.shared]/data/svn/passwd polarion.build.default.deploy.repository.url=file://$[com.polarion.shared]/data/shared-maven-repo
将如下项注释掉
repoSystem=file://$[com.polarion.root]/data/svn/repo
com.polarion.platform.internalPG=polarion:admin@localhost:5433
<a name="v2Jz0"></a>### 4.3 共享服务器、集群节点服务器NFS共享文件挂载<a name="lxTm0"></a>#### 4.3.1 共享服务器Cluster's Shared Services的配置1. 编辑 `/etc/exports````bashvi /etc/exports
在文件末尾加上
/opt/polarion 10.1.2.74(rw,sync,no_root_squash,no_subtree_check)/opt/polarion 10.1.2.75(rw,sync,no_root_squash,no_subtree_check)
安装依赖
yum -y install nfs-utils
启动服务
systemctl start nfs-config.servicesystemctl start nfs-server.serviceexportfs -a
4.3.2 节点服务器Cluster’s nodes 的配置
需要在所有的节点服务器上执行
安装依赖
yum -y install nfs-utils
启动服务
systemctl start nfs-config.servicesystemctl start nfs-server.service
编辑
/etc/fstabvi /etc/fstab
在文档最后增加
10.1.2.76:/opt/polarion /opt/polarion/shared nfs defaults 0 0
新建共享文件夹挂载点
mkdir /opt/polarion/shared
挂载文件夹
mount -v 10.1.2.76:/opt/polarion /opt/polarion/shared/
检查文件夹是否挂载正常
cd /opt/polarion/sharedls
4.4 集群节点服务器Cluster’s nodes配置
复制
[安装介质]/polarion/install/polarion.properties.template.node到/opt/polarion/etc/polarion.properties;修改
polarion.propertiesvi /opt/polarion/etc/polarion.properties
修改文档/节点1 ``` com.polarion.shared=/opt/polarion/shared com.polarion.nodeId=node1 TomcatService.ajp13-port=8889
com.polarion.loadBalancer.workerUrl=http://10.1.2.74
controlPort=8887 controlHostname=10.1.2.74
calc.base.url=http://10.1.2.74 com.polarion.platform.internalPG=polarion:admin@localhost:5433
4. 修改文档/节点2
com.polarion.shared=/opt/polarion/shared com.polarion.nodeId=node2 TomcatService.ajp13-port=8889
com.polarion.loadBalancer.workerUrl=http://10.1.2.75
controlPort=8887 controlHostname=10.1.2.75
calc.base.url=http://10.1.2.75 com.polarion.platform.internalPG=polarion:admin@localhost:5433
5. 删除协调服务器上的SVN服务```bashrm /etc/httpd/conf.d/polarionSVN.conf
重启
apache服务systemctl restart httpd
启动
polarion服务systemctl start polarion
5 检查安装结果
访问协调服务器 http://10.1.2.73/polarion/,会看到选择集群服务器的页面

- 点击集群服务器,会跳转到共享服务器http://10.1.2.76/polarion/,此处为正常的登录页面

- 正常登陆ALM系统


若有收获,就点个赞吧
0 人点赞
