
SpringBoot一站式开发
官网:https://spring.io/projects/spring-boot
Spring Boot可以轻松创建独立的、基于Spring的生产级应用程序,它可以让你“运行即可”。大多数Spring Boot应用程序只需要少量的Spring配置。
SpringBoot功能:
- 创建独立的Spring应用程序
- 直接嵌入Tomcat、Jetty或Undertow(无需部署WAR包,打包成Jar本身就是一个可以运行的应用程序)
- 提供一站式的“starter”依赖项,以简化Maven配置(需要整合什么框架,直接导对应框架的starter依赖)
- 尽可能自动配置Spring和第三方库(除非特殊情况,否则几乎不需要你进行什么配置)
- 提供生产就绪功能,如指标、运行状况检查和外部化配置
- 没有代码生成,也没有XML配置的要求(XML是什么,好吃吗)
SpringBoot是现在最主流的开发框架,它提供了一站式的开发体验,大幅度提高了我们的开发效率。
走进SpringBoot
在SSM阶段,当我们需要搭建一个基于Spring全家桶的Web应用程序时,我们不得不做大量的依赖导入和框架整合相关的Bean定义,光是整合框架就花费了我们大量的时间,但是实际上我们发现,整合框架其实基本都是一些固定流程,我们每创建一个新的Web应用程序,基本都会使用同样的方式去整合框架,我们完全可以将一些重复的配置作为约定,只要框架遵守这个约定,为我们提供默认的配置就好,这样就不用我们再去配置了,约定优于配置!
而SpringBoot正是将这些过程大幅度进行了简化,它可以自动进行配置,我们只需要导入对应的启动器(starter)依赖即可。
完成本阶段的学习,基本能够胜任部分网站系统的后端开发工作,也建议同学们学习完SpringBoot之后寻找合适的队友去参加计算机项目相关的高校竞赛。
我们可以通过IDEA来演示如何快速创建一个SpringBoot项目,并且无需任何配置,就可以实现Bean注册。
SpringBoot项目文件结构
我们在创建SpringBoot项目之后,首先会自动生成一个主类,而主类中的main方法中调用了SpringApplication类的静态方法来启动整个SpringBoot项目,并且我们可以看到主类的上方有一个@SpringBootApplication注解:
@SpringBootApplicationpublic class SpringBootTestApplication {public static void main(String[] args) {SpringApplication.run(SpringBootTestApplication.class, args);}}
同时还自带了一个测试类,测试类的上方仅添加了一个@SpringBootTest注解:
@SpringBootTestclass SpringBootTestApplicationTests {@Testvoid contextLoads() {}}
我们接着来看Maven中写了哪些内容:
<?xml version="1.0" encoding="UTF-8"?><project xmlns="http://maven.apache.org/POM/4.0.0" xmlns:xsi="http://www.w3.org/2001/XMLSchema-instance"xsi:schemaLocation="http://maven.apache.org/POM/4.0.0 https://maven.apache.org/xsd/maven-4.0.0.xsd"><modelVersion>4.0.0</modelVersion><!-- 父工程 --><parent><groupId>org.springframework.boot</groupId><artifactId>spring-boot-starter-parent</artifactId><version>2.6.2</version><relativePath/> <!-- lookup parent from repository --></parent><groupId>com.example</groupId><artifactId>springboot-study</artifactId><version>0.0.1-SNAPSHOT</version><name>SpringBootTest</name><description>SpringBootTest</description><properties><java.version>1.8</java.version></properties><dependencies><!-- spring-boot-starter SpringBoot核心启动器 --><dependency><groupId>org.springframework.boot</groupId><artifactId>spring-boot-starter</artifactId></dependency><!-- spring-boot-starter-test SpringBoot测试模块启动器 --><dependency><groupId>org.springframework.boot</groupId><artifactId>spring-boot-starter-test</artifactId><scope>test</scope></dependency></dependencies><build><plugins><!-- SpringBoot Maven插件,打包Jar都不用你操心了 --><plugin><groupId>org.springframework.boot</groupId><artifactId>spring-boot-maven-plugin</artifactId></plugin></plugins></build></project>
除了以上这些文件以外,我们的项目目录下还有:
- .gitignore - Git忽略名单,下一章我们会专门讲解Git版本控制。
- application.properties - SpringBoot的配置文件,所有依赖的配置都在这里编写,但是一般情况下只需要配置必要项即可。
整合Web相关框架
我们来看一下,既然我们前面提到SpringBoot会内嵌一个Tomcat服务器,也就是说我们的Jar打包后,相当于就是一个可以直接运行的应用程序,我们来看一下如何创建一个SpringBootWeb项目。
这里我们演示使用IDEA来创建一个基于SpringBoot的Web应用程序。
它是真的快
创建完成后,直接开启项目,我们就可以直接访问:http://localhost:8080/,我们可以看到,但是由于我们没有编写任何的请求映射,所以没有数据。我们可以来看看日志:
2022-01-06 22:17:46.308 INFO 853 --- [ main] c.example.SpringBootWebTestApplication : Starting SpringBootWebTestApplication using Java 1.8.0_312 on NagodeMacBook-Pro.local with PID 853 (/Users/nagocoler/Downloads/SpringBootWebTest/target/classes started by nagocoler in /Users/nagocoler/Downloads/SpringBootWebTest)2022-01-06 22:17:46.309 INFO 853 --- [ main] c.example.SpringBootWebTestApplication : No active profile set, falling back to default profiles: default2022-01-06 22:17:46.629 INFO 853 --- [ main] o.s.b.w.embedded.tomcat.TomcatWebServer : Tomcat initialized with port(s): 8080 (http)2022-01-06 22:17:46.632 INFO 853 --- [ main] o.apache.catalina.core.StandardService : Starting service [Tomcat]2022-01-06 22:17:46.632 INFO 853 --- [ main] org.apache.catalina.core.StandardEngine : Starting Servlet engine: [Apache Tomcat/9.0.56]2022-01-06 22:17:46.654 INFO 853 --- [ main] o.a.c.c.C.[Tomcat].[localhost].[/] : Initializing Spring embedded WebApplicationContext2022-01-06 22:17:46.654 INFO 853 --- [ main] w.s.c.ServletWebServerApplicationContext : Root WebApplicationContext: initialization completed in 325 ms2022-01-06 22:17:46.780 INFO 853 --- [ main] o.s.b.w.embedded.tomcat.TomcatWebServer : Tomcat started on port(s): 8080 (http) with context path ''2022-01-06 22:17:46.785 INFO 853 --- [ main] c.example.SpringBootWebTestApplication : Started SpringBootWebTestApplication in 0.62 seconds (JVM running for 0.999)2022-01-06 22:18:02.979 INFO 853 --- [nio-8080-exec-1] o.a.c.c.C.[Tomcat].[localhost].[/] : Initializing Spring DispatcherServlet 'dispatcherServlet'2022-01-06 22:18:02.979 INFO 853 --- [nio-8080-exec-1] o.s.web.servlet.DispatcherServlet : Initializing Servlet 'dispatcherServlet'2022-01-06 22:18:02.980 INFO 853 --- [nio-8080-exec-1] o.s.web.servlet.DispatcherServlet : Completed initialization in 1 ms
我们可以看到,日志中除了最基本的SpringBoot启动日志以外,还新增了内嵌Web服务器(Tomcat)的启动日志,并且显示了当前Web服务器所开放的端口,并且自动帮助我们初始化了DispatcherServlet,但是我们只是创建了项目,导入了web相关的starter依赖,没有进行任何的配置,实际上它使用的是starter提供的默认配置进行初始化的。
由于SpringBoot是自动扫描的,因此我们直接创建一个Controller即可被加载:
@Controllerpublic class MainController {//直接访问http://localhost:8080/index即可,不用加web应用程序名称了@RequestMapping("/index")@ResponseBodypublic String index(){return "你好,欢迎访问主页!";}}
我们几乎没有做任何配置,但是可以直接开始配置Controller,SpringBoot创建一个Web项目的速度就是这么快!
它还可以自动识别类型,如果我们返回的是一个对象类型的数据,那么它会自动转换为JSON数据格式,无需配置:
@Datapublic class Student {int sid;String name;String sex;}
@RequestMapping("/student")@ResponseBodypublic Student student(){Student student = new Student();student.setName("小明");student.setSex("男");student.setSid(10);return student;}
最后浏览器能够直接得到application/json的响应数据,就是这么方便。
修改Web相关配置
如果我们需要修改Web服务器的端口或是一些其他的内容,我们可以直接在application.properties中进行修改,它是整个SpringBoot的配置文件:
# 修改端口为80server.port=80
我们还可以编写自定义的配置项,并在我们的项目中通过@Value直接注入:
test.data=100
@Controllerpublic class MainController {@Value("${test.data}")int data;
通过这种方式,我们就可以更好地将一些需要频繁修改的配置项写在配置文件中,并通过注解方式去获取值。
配置文件除了使用properties格式以外,还有一种叫做yaml格式,它的语法如下:
一级目录:二级目录:三级目录1: 值三级目录2: 值三级目录List:- 元素1- 元素2- 元素3
我们可以看到,每一级目录都是通过缩进(不能使用Tab,只能使用空格)区分,并且键和值之间需要添加冒号+空格来表示。
SpringBoot也支持这种格式的配置文件,我们可以将application.properties修改为application.yml或是application.yaml来使用YAML语法编写配置:
server:port: 80
整合SpringSecurity依赖
我们接着来整合一下SpringSecurity依赖,继续感受SpringBoot带来的光速开发体验,只需要导入SpringSecurity的Starter依赖即可:
<dependency><groupId>org.springframework.boot</groupId><artifactId>spring-boot-starter-security</artifactId></dependency>
导入依赖后,我们直接启动SpringBoot应用程序,可以发现SpringSecurity已经生效了。
并且SpringSecurity会自动为我们生成一个默认用户user,它的密码会出现在日志中:
2022-01-06 23:10:51.329 INFO 2901 --- [ main] o.apache.catalina.core.StandardService : Starting service [Tomcat]2022-01-06 23:10:51.329 INFO 2901 --- [ main] org.apache.catalina.core.StandardEngine : Starting Servlet engine: [Apache Tomcat/9.0.56]2022-01-06 23:10:51.350 INFO 2901 --- [ main] o.a.c.c.C.[Tomcat].[localhost].[/] : Initializing Spring embedded WebApplicationContext2022-01-06 23:10:51.351 INFO 2901 --- [ main] w.s.c.ServletWebServerApplicationContext : Root WebApplicationContext: initialization completed in 341 ms2022-01-06 23:10:51.469 INFO 2901 --- [ main] .s.s.UserDetailsServiceAutoConfiguration :Using generated security password: ff24bee3-e1b7-4309-9609-d32618baf5cb
其中ff24bee3-e1b7-4309-9609-d32618baf5cb就是随机生成的一个密码,我们可以使用此用户登录。
我们也可以在配置文件中直接配置:
spring:security:user:name: test # 用户名password: 123456 # 密码roles: # 角色- user- admin
实际上这样的配置方式就是一个inMemoryAuthentication,只是我们可以直接配置而已。
当然,页面的控制和数据库验证我们还是需要提供WebSecurityConfigurerAdapter的实现类去完成:
@Configurationpublic class SecurityConfiguration extends WebSecurityConfigurerAdapter {@Overrideprotected void configure(HttpSecurity http) throws Exception {http.authorizeRequests().antMatchers("/login").permitAll().anyRequest().hasRole("user").and().formLogin();}}
注意这里不需要再添加@EnableWebSecurity了,因为starter依赖已经帮我们添加了。
使用了SpringBoot之后,我们发现,需要什么功能,只需要导入对应的starter依赖即可,甚至都不需要你去进行额外的配置,你只需要关注依赖本身的必要设置即可,大大提高了我们的开发效率。
整合Mybatis框架
我们接着来看如何整合Mybatis框架,同样的,我们只需要导入对应的starter依赖即可:
<dependency><groupId>org.mybatis.spring.boot</groupId><artifactId>mybatis-spring-boot-starter</artifactId><version>2.2.0</version></dependency><dependency><groupId>mysql</groupId><artifactId>mysql-connector-java</artifactId></dependency>
导入依赖后,直接启动会报错,是因为有必要的配置我们没有去编写,我们需要指定数据源的相关信息:
spring:datasource:url: jdbc:mysql://localhost:3306username: rootpassword: 123456driver-class-name: com.mysql.cj.jdbc.Driver
再次启动,成功。
我们发现日志中会出现这样一句话:
2022-01-07 12:32:09.106 WARN 6917 --- [ main] o.m.s.mapper.ClassPathMapperScanner : No MyBatis mapper was found in '[com.example]' package. Please check your configuration.
这是Mybatis自动扫描输出的语句,导入依赖后,我们不需要再去设置Mybatis的相关Bean了,也不需要添加任何@MapperSacn注解,因为starter已经帮助我们做了,它会自动扫描项目中添加了@Mapper注解的接口,直接将其注册为Bean,不需要进行任何配置。
@Mapperpublic interface MainMapper {@Select("select * from users where username = #{username}")UserData findUserByName(String username);}
当然,如果你觉得每个接口都去加一个@Mapper比较麻烦的话也可以用回之前的方式,直接@MapperScan使用包扫描。
添加Mapper之后,使用方法和SSM阶段是一样的,我们可以将其与SpringSecurity结合使用:
@Servicepublic class UserAuthService implements UserDetailsService {@ResourceMainMapper mapper;@Overridepublic UserDetails loadUserByUsername(String username) throws UsernameNotFoundException {UserData data = mapper.findUserByName(username);if(data == null) throw new UsernameNotFoundException("用户 "+username+" 登录失败,用户名不存在!");return User.withUsername(data.getUsername()).password(data.getPassword()).roles(data.getRole()).build();}}
最后配置一下自定义验证即可,注意这样之前配置文件里面配置的用户就失效了:
@Overrideprotected void configure(AuthenticationManagerBuilder auth) throws Exception {auth.userDetailsService(service).passwordEncoder(new BCryptPasswordEncoder());}
在首次使用时,我们发现日志中输出以以下语句:
2022-01-07 12:39:40.559 INFO 6930 --- [nio-8080-exec-3] com.zaxxer.hikari.HikariDataSource : HikariPool-1 - Starting...2022-01-07 12:39:41.033 INFO 6930 --- [nio-8080-exec-3] com.zaxxer.hikari.HikariDataSource : HikariPool-1 - Start completed.
实际上,SpringBoot会自动为Mybatis配置数据源,默认使用的就是HikariCP数据源。
整合Thymeleaf框架
整合Thymeleaf也只需导入对应的starter即可:
<dependency><groupId>org.springframework.boot</groupId><artifactId>spring-boot-starter-thymeleaf</artifactId></dependency>
接着我们只需要直接使用即可:
@RequestMapping("/index")public String index(){return "index";}
但是注意,这样只能正常解析HTML页面,但是js、css等静态资源我们需要进行路径指定,不然无法访问,我们在配文件中配置一下静态资源的访问前缀:
spring:mvc:static-path-pattern: /static/**
接着我们像之前一样,把登陆页面实现一下吧。
<html lang="en" xmlns:th=http://www.thymeleaf.orgxmlns:sec=http://www.thymeleaf.org/extras/spring-security>
日志系统
SpringBoot为我们提供了丰富的日志系统,它几乎是开箱即用的。
日志门面和日志实现
我们首先要区分一下,什么是日志门面(Facade)什么是日志实现,我们之前学习的JUL实际上就是一种日志实现,我们可以直接使用JUL为我们提供的日志框架来规范化打印日志,而日志门面,如Slf4j,是把不同的日志系统的实现进行了具体的抽象化,只提供了统一的日志使用接口,使用时只需要按照其提供的接口方法进行调用即可,由于它只是一个接口,并不是一个具体的可以直接单独使用的日志框架,所以最终日志的格式、记录级别、输出方式等都要通过接口绑定的具体的日志系统来实现,这些具体的日志系统就有log4j、logback、java.util.logging等,它们才实现了具体的日志系统的功能。
日志门面和日志实现就像JDBC和数据库驱动一样,一个是画大饼的,一个是真的去做饼的。
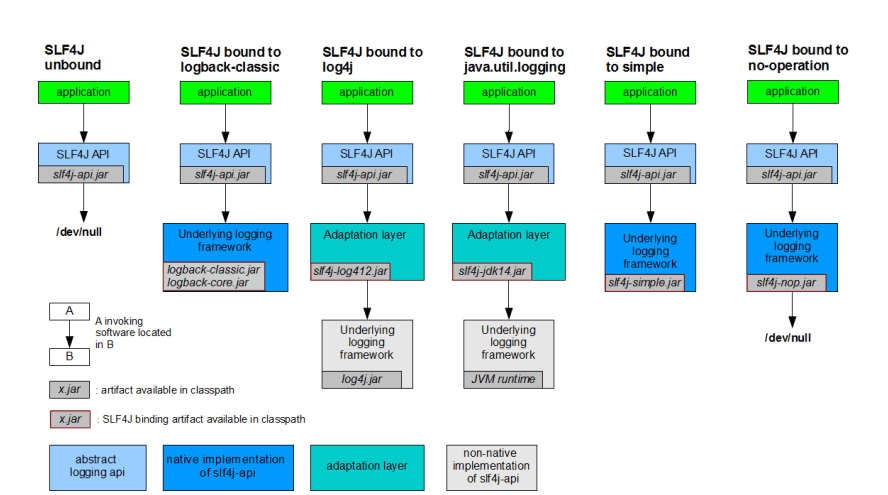
但是现在有一个问题就是,不同的框架可能使用了不同的日志框架,如果这个时候出现众多日志框架并存的情况,我们现在希望的是所有的框架一律使用日志门面(Slf4j)进行日志打印,这时该怎么去解决?我们不可能将其他框架依赖的日志框架替换掉,直接更换为Slf4j吧,这样显然不现实。
这时,可以采取类似于偷梁换柱的做法,只保留不同日志框架的接口和类定义等关键信息,而将实现全部定向为Slf4j调用。相当于有着和原有日志框架一样的外壳,对于其他框架来说依然可以使用对应的类进行操作,而具体如何执行,真正的内心已经是Slf4j的了。
所以,SpringBoot为了统一日志框架的使用,做了这些事情:
- 直接将其他依赖以前的日志框架剔除
- 导入对应日志框架的Slf4j中间包
- 导入自己官方指定的日志实现,并作为Slf4j的日志实现层
在SpringBoot中打印日志信息
SpringBoot使用的是Slf4j作为日志门面,Logback(Logback 是log4j 框架的作者开发的新一代日志框架,它效率更高、能够适应诸多的运行环境,同时天然支持SLF4J)作为日志实现,对应的依赖为:
<dependency><groupId>org.springframework.boot</groupId><artifactId>spring-boot-starter-logging</artifactId></dependency>
此依赖已经被包含了,所以我们如果需要打印日志,可以像这样:
@RequestMapping("/login")public String login(){Logger logger = LoggerFactory.getLogger(MainController.class);logger.info("用户访问了一次登陆界面");return "login";}
因为我们使用了Lombok,所以直接一个注解也可以搞定哦:
@Slf4j@Controllerpublic class MainController {@RequestMapping("/login")public String login(){log.info("用户访问了一次登陆界面");return "login";}
日志级别从低到高分为TRACE < DEBUG < INFO < WARN < ERROR < FATAL,SpringBoot默认只会打印INFO以上级别的信息。
配置Logback日志
Logback官网:https://logback.qos.ch
和JUL一样,Logback也能实现定制化,我们可以编写对应的配置文件,SpringBoot推荐将配置文件名称命名为logback-spring.xml表示这是SpringBoot下Logback专用的配置,可以使用SpringBoot 的高级Profile功能,它的内容类似于这样:
<?xml version="1.0" encoding="UTF-8"?><configuration><!-- 配置 --></configuration>
最外层由configuration包裹,一旦编写,那么就会替换默认的配置,所以如果内部什么都不写的话,那么会导致我们的SpringBoot项目没有配置任何日志输出方式,控制台也不会打印日志。
我们接着来看如何配置一个控制台日志打印,我们可以直接导入并使用SpringBoot为我们预设好的日志格式,在org/springframework/boot/logging/logback/defaults.xml中已经帮我们把日志的输出格式定义好了,我们只需要设置对应的appender即可:
<included><conversionRule conversionWord="clr" converterClass="org.springframework.boot.logging.logback.ColorConverter" /><conversionRule conversionWord="wex" converterClass="org.springframework.boot.logging.logback.WhitespaceThrowableProxyConverter" /><conversionRule conversionWord="wEx" converterClass="org.springframework.boot.logging.logback.ExtendedWhitespaceThrowableProxyConverter" /><property name="CONSOLE_LOG_PATTERN" value="${CONSOLE_LOG_PATTERN:-%clr(%d{${LOG_DATEFORMAT_PATTERN:-yyyy-MM-dd HH:mm:ss.SSS}}){faint} %clr(${LOG_LEVEL_PATTERN:-%5p}) %clr(${PID:- }){magenta} %clr(---){faint} %clr([%15.15t]){faint} %clr(%-40.40logger{39}){cyan} %clr(:){faint} %m%n${LOG_EXCEPTION_CONVERSION_WORD:-%wEx}}"/><property name="CONSOLE_LOG_CHARSET" value="${CONSOLE_LOG_CHARSET:-${file.encoding:-UTF-8}}"/><property name="FILE_LOG_PATTERN" value="${FILE_LOG_PATTERN:-%d{${LOG_DATEFORMAT_PATTERN:-yyyy-MM-dd HH:mm:ss.SSS}} ${LOG_LEVEL_PATTERN:-%5p} ${PID:- } --- [%t] %-40.40logger{39} : %m%n${LOG_EXCEPTION_CONVERSION_WORD:-%wEx}}"/><property name="FILE_LOG_CHARSET" value="${FILE_LOG_CHARSET:-${file.encoding:-UTF-8}}"/><logger name="org.apache.catalina.startup.DigesterFactory" level="ERROR"/><logger name="org.apache.catalina.util.LifecycleBase" level="ERROR"/><logger name="org.apache.coyote.http11.Http11NioProtocol" level="WARN"/><logger name="org.apache.sshd.common.util.SecurityUtils" level="WARN"/><logger name="org.apache.tomcat.util.net.NioSelectorPool" level="WARN"/><logger name="org.eclipse.jetty.util.component.AbstractLifeCycle" level="ERROR"/><logger name="org.hibernate.validator.internal.util.Version" level="WARN"/><logger name="org.springframework.boot.actuate.endpoint.jmx" level="WARN"/></included>
导入后,我们利用预设的日志格式创建一个控制台日志打印:
<?xml version="1.0" encoding="UTF-8"?><configuration><!-- 导入其他配置文件,作为预设 --><include resource="org/springframework/boot/logging/logback/defaults.xml" /><!-- Appender作为日志打印器配置,这里命名随意 --><!-- ch.qos.logback.core.ConsoleAppender是专用于控制台的Appender --><appender name="CONSOLE" class="ch.qos.logback.core.ConsoleAppender"><encoder><pattern>${CONSOLE_LOG_PATTERN}</pattern><charset>${CONSOLE_LOG_CHARSET}</charset></encoder></appender><!-- 指定日志输出级别,以及启用的Appender,这里就使用了我们上面的ConsoleAppender --><root level="INFO"><appender-ref ref="CONSOLE"/></root></configuration>
配置完成后,我们发现控制台已经可以正常打印日志信息了。
接着我们来看看如何开启文件打印,我们只需要配置一个对应的Appender即可:
<!-- ch.qos.logback.core.rolling.RollingFileAppender用于文件日志记录,它支持滚动 --><appender name="FILE" class="ch.qos.logback.core.rolling.RollingFileAppender"><encoder><pattern>${FILE_LOG_PATTERN}</pattern><charset>${FILE_LOG_CHARSET}</charset></encoder><!-- 自定义滚动策略,防止日志文件无限变大,也就是日志文件写到什么时候为止,重新创建一个新的日志文件开始写 --><rollingPolicy class="ch.qos.logback.core.rolling.SizeAndTimeBasedRollingPolicy"><!-- 文件保存位置以及文件命名规则,这里用到了%d{yyyy-MM-dd}表示当前日期,%i表示这一天的第N个日志 --><FileNamePattern>log/%d{yyyy-MM-dd}-spring-%i.log</FileNamePattern><!-- 到期自动清理日志文件 --><cleanHistoryOnStart>true</cleanHistoryOnStart><!-- 最大日志保留时间 --><maxHistory>7</maxHistory><!-- 最大单个日志文件大小 --><maxFileSize>10MB</maxFileSize></rollingPolicy></appender><!-- 指定日志输出级别,以及启用的Appender,这里就使用了我们上面的ConsoleAppender --><root level="INFO"><appender-ref ref="CONSOLE"/><appender-ref ref="FILE"/></root>
配置完成后,我们可以看到日志文件也能自动生成了。
我们也可以魔改官方提供的日志格式,官方文档:https://logback.qos.ch/manual/layouts.html
这里需要提及的是MDC机制,Logback内置的日志字段还是比较少,如果我们需要打印有关业务的更多的内容,包括自定义的一些数据,需要借助logback MDC机制,MDC为“Mapped Diagnostic Context”(映射诊断上下文),即将一些运行时的上下文数据通过logback打印出来;此时我们需要借助org.sl4j.MDC类。
比如我们现在需要记录是哪个用户访问我们网站的日志,只要是此用户访问我们网站,都会在日志中携带该用户的ID,我们希望每条日志中都携带这样一段信息文本,而官方提供的字段无法实现此功能,这时就需要使用MDC机制:
@Slf4j@Controllerpublic class MainController {@RequestMapping("/login")public String login(){//这里就用Session代替ID吧MDC.put("reqId", request.getSession().getId());log.info("用户访问了一次登陆界面");return "login";}
通过这种方式,我们就可以向日志中传入自定义参数了,我们日志中添加这样一个占位符%X{键值},名字保持一致:
%clr([%X{reqId}]){faint}
这样当我们向MDC中添加信息后,只要是当前线程(本质是ThreadLocal实现)下输出的日志,都会自动替换占位符。
自定义Banner
我们在之前发现,实际上Banner部分和日志部分是独立的,SpringBoot启动后,会先打印Banner部分,那么这个Banner部分是否可以自定义呢?答案是可以的。
我们可以直接来配置文件所在目录下创建一个名为banner.txt的文本文档,内容随便你:
// _ooOoo_ //// o8888888o //// 88" . "88 //// (| ^_^ |) //// O\ = /O //// ____/`---'\____ //// .' \\| |// `. //// / \\||| : |||// \ //// / _||||| -:- |||||- \ //// | | \\\ - /// | | //// | \_| ''\---/'' | | //// \ .-\__ `-` ___/-. / //// ___`. .' /--.--\ `. . ___ //// ."" '< `.___\_<|>_/___.' >'"". //// | | : `- \`.;`\ _ /`;.`/ - ` : | | //// \ \ `-. \_ __\ /__ _/ .-` / / //// ========`-.____`-.___\_____/___.-`____.-'======== //// `=---=' //// ^^^^^^^^^^^^^^^^^^^^^^^^^^^^^^^^^^^^^^^^^^^^^^^^^^ //// 佛祖保佑 永无BUG 永不修改 //
可以使用在线生成网站进行生成自己的个性Banner:https://www.bootschool.net/ascii
我们甚至还可以使用颜色代码来为文本切换颜色:
${AnsiColor.BRIGHT_GREEN} //绿色
也可以获取一些常用的变量信息:
${AnsiColor.YELLOW} 当前 Spring Boot 版本:${spring-boot.version}
玩的开心!
多环境配置
在日常开发中,我们项目会有多个环境。例如开发环境(develop)也就是我们研发过程中疯狂敲代码修BUG阶段,生产环境(production )项目开发得差不多了,可以放在服务器上跑了。不同的环境下,可能我们的配置文件也存在不同,但是我们不可能切换环境的时候又去重新写一次配置文件,所以我们可以将多个环境的配置文件提前写好,进行自由切换。
由于SpringBoot只会读取application.properties或是application.yml文件,那么怎么才能实现自由切换呢?SpringBoot给我们提供了一种方式,我们可以通过配置文件指定:
spring:profiles:active: dev
接着我们分别创建两个环境的配置文件,application-dev.yml和application-prod.yml分别表示开发环境和生产环境的配置文件,比如开发环境我们使用的服务器端口为8080,而生产环境下可能就需要设置为80或是443端口,那么这个时候就需要不同环境下的配置文件进行区分:
server:port: 8080
server:port: 80
这样我们就可以灵活切换生产环境和开发环境下的配置文件了。
SpringBoot自带的Logback日志系统也是支持多环境配置的,比如我们想在开发环境下输出日志到控制台,而生产环境下只需要输出到文件即可,这时就需要进行环境配置:
<springProfile name="dev"><root level="INFO"><appender-ref ref="CONSOLE"/><appender-ref ref="FILE"/></root></springProfile><springProfile name="prod"><root level="INFO"><appender-ref ref="FILE"/></root></springProfile>
注意springProfile是区分大小写的!
那如果我们希望生产环境中不要打包开发环境下的配置文件呢,我们目前虽然可以切换开发环境,但是打包的时候依然是所有配置文件全部打包,这样总感觉还欠缺一点完美,因此,打包的问题就只能找Maven解决了,Maven也可以设置多环境:
<!--分别设置开发,生产环境--><profiles><!-- 开发环境 --><profile><id>dev</id><activation><activeByDefault>true</activeByDefault></activation><properties><environment>dev</environment></properties></profile><!-- 生产环境 --><profile><id>prod</id><activation><activeByDefault>false</activeByDefault></activation><properties><environment>prod</environment></properties></profile></profiles>
接着,我们需要根据环境的不同,排除其他环境的配置文件:
<resources><!--排除配置文件--><resource><directory>src/main/resources</directory><!--先排除所有的配置文件--><excludes><!--使用通配符,当然可以定义多个exclude标签进行排除--><exclude>application*.yml</exclude></excludes></resource><!--根据激活条件引入打包所需的配置和文件--><resource><directory>src/main/resources</directory><!--引入所需环境的配置文件--><filtering>true</filtering><includes><include>application.yml</include><!--根据maven选择环境导入配置文件--><include>application-${environment}.yml</include></includes></resource></resources>
接着,我们可以直接将Maven中的environment属性,传递给SpringBoot的配置文件,在构建时替换为对应的值:
spring:profiles:active: '@environment@' #注意YAML配置文件需要加单引号,否则会报错
这样,根据我们Maven环境的切换,SpringBoot的配置文件也会进行对应的切换。
最后我们打开Maven栏目,就可以自由切换了,直接勾选即可,注意切换环境之后要重新加载一下Maven项目,不然不会生效!
打包运行
现在我们的SpringBoot项目编写完成了,那么如何打包运行呢?非常简单,只需要点击Maven生命周期中的package即可,它会自动将其打包为可直接运行的Jar包,第一次打包可能会花费一些时间下载部分依赖的源码一起打包进Jar文件。
我们发现在打包的过程中还会完整的将项目跑一遍进行测试,如果我们不想测试直接打包,可以手动使用以下命令:
mvn package -DskipTests
打包后,我们会直接得到一个名为springboot-study-0.0.1-SNAPSHOT.jar的文件,这时在CMD窗口中输入命令:
java -jar springboot-study-0.0.1-SNAPSHOT.jar
输入后,可以看到我们的Java项目成功运行起来了,如果手动关闭窗口会导致整个项目终止运行。
再谈Spring框架
注意:开始本部分前,建议先完成SSM阶段的Spring源码讲解部分。
我们在SpringBoot阶段,需要继续扩充Spring框架的相关知识,来巩固和强化对于Spring框架的认识。
任务调度
为了执行某些任务,我们可能需要一些非常规的操作,比如我们希望使用多线程来处理我们的结果或是执行一些定时任务,到达指定时间再去执行。
这时我们首先想到的就是创建一个新的线程来处理,或是使用TimerTask来完成定时任务,但是我们有了Spring框架之后,就不用这样了,因为Spring框架为我们提供了更加便捷的方式进行任务调度。
异步任务
需要使用Spring异步任务支持,我们需要在配置类上添加@EnableAsync或是在SpringBoot的启动类上添加也可以。
@EnableAsync@SpringBootApplicationpublic class SpringBootWebTestApplication {public static void main(String[] args) {SpringApplication.run(SpringBootWebTestApplication.class, args);}}
接着我们只需要在需要异步执行的方法上,添加@Async注解即可将此方法标记为异步,当此方法被调用时,会异步执行,也就是新开一个线程执行,不是在当前线程执行。
@Servicepublic class TestService {@Asyncpublic void test(){try {Thread.sleep(3000);System.out.println("我是异步任务!");} catch (InterruptedException e) {e.printStackTrace();}}}
@RequestMapping("/login")public String login(HttpServletRequest request){service.test();System.out.println("我是同步任务!");return "login";}
实际上这也是得益于AOP机制,通过线程池实现,但是也要注意,正是因为它是AOP机制的产物,所以它只能是在Bean中才会生效!
使用 @Async 注释的方法可以返回 ‘void’ 或 “Future” 类型,Future是一种用于接收任务执行结果的一种类型,我们会在Java并发编程中进行讲解,这里暂时不做介绍。
定时任务
看完了异步任务,我们接着来看定时任务,定时任务其实就是指定在哪个时候再去执行,在JavaSE阶段我们使用过TimerTask来执行定时任务。
Spring中的定时任务是全局性质的,当我们的Spring程序启动后,那么定时任务也就跟着启动了,我们可以在配置类上添加@EnableScheduling或是在SpringBoot的启动类上添加也可:
@EnableAsync@EnableScheduling@SpringBootApplicationpublic class SpringBootWebTestApplication {public static void main(String[] args) {SpringApplication.run(SpringBootWebTestApplication.class, args);}}
接着我们可以创建一个定时任务配置类,在配置类里面编写定时任务:
@Configurationpublic class ScheduleConfiguration {@Scheduled(fixedRate = 2000)public void task(){System.out.println("我是定时任务!"+new Date());}}
我们注意到@Scheduled中有很多参数,我们需要指定’cron’, ‘fixedDelay(String)’, or ‘fixedRate(String)’的其中一个,否则无法创建定时任务,他们的区别如下:
- fixedDelay:在上一次定时任务执行完之后,间隔多久继续执行。
- fixedRate:无论上一次定时任务有没有执行完成,两次任务之间的时间间隔。
- cron:使用cron表达式来指定任务计划。
这里重点讲解一下cron表达式:https://blog.csdn.net/sunnyzyq/article/details/98597252
监听器
监听器对我们来说也是一个比较陌生的概念,那么何谓监听呢?
监听实际上就是等待某个事件的触发,当事件触发时,对应事件的监听器就会被通知。
@Componentpublic class TestListener implements ApplicationListener<ContextRefreshedEvent> {@Overridepublic void onApplicationEvent(ContextRefreshedEvent event) {System.out.println(event.getApplicationContext());}}
通过监听事件,我们就可以在对应的时机进行一些额外的处理,我们可以通过断点调试来查看一个事件是如何发生,以及如何通知监听器的。
通过阅读源码,我们得知,一个事件实际上就是通过publishEvent方法来进行发布的,我们也可以自定义我们自己项目中的事件,并注册对应的监听器进行处理。
public class TestEvent extends ApplicationEvent { //需要继承ApplicationEventpublic TestEvent(Object source) {super(source);}}
@Componentpublic class TestListener implements ApplicationListener<TestEvent> {@Overridepublic void onApplicationEvent(TestEvent event) {System.out.println("自定义事件发生了:"+event.getSource());}}
@ResourceApplicationContext context;@RequestMapping("/login")public String login(HttpServletRequest request){context.publishEvent(new TestEvent("有人访问了登录界面!"));return "login";}
这样,我们就实现了自定义事件发布和监听。
Aware系列接口
我们在之前讲解Spring源码时,经常会发现某些类的定义上,除了我们当时讲解的继承关系以外,还实现了一些接口,他们的名称基本都是xxxxAware,比如我们在讲解SpringSecurity的源码中,AbstractAuthenticationProcessingFilter类就是这样:
public abstract class AbstractAuthenticationProcessingFilter extends GenericFilterBean implements ApplicationEventPublisherAware, MessageSourceAware {protected ApplicationEventPublisher eventPublisher;protected AuthenticationDetailsSource<HttpServletRequest, ?> authenticationDetailsSource = new WebAuthenticationDetailsSource();private AuthenticationManager authenticationManager;...
我们发现它除了继承自GenericFilterBean之外,还实现了ApplicationEventPublisherAware和MessageSourceAware接口,那么这些Aware接口到底是干嘛的呢?
Aware的中文意思为感知。简单来说,他就是一个标识,实现此接口的类会获得某些感知能力,Spring容器会在Bean被加载时,根据类实现的感知接口,会调用类中实现的对应感知方法。
比如AbstractAuthenticationProcessingFilter就实现了ApplicationEventPublisherAware接口,此接口的感知功能为事件发布器,在Bean加载时,会调用实现类中的setApplicationEventPublisher方法,而AbstractAuthenticationProcessingFilter类则利用此方法,在Bean加载阶段获得了容器的事件发布器,以便之后发布事件使用。
public void setApplicationEventPublisher(ApplicationEventPublisher eventPublisher) {this.eventPublisher = eventPublisher; //直接存到成员变量}
protected void successfulAuthentication(HttpServletRequest request, HttpServletResponse response, FilterChain chain, Authentication authResult) throws IOException, ServletException {SecurityContext context = SecurityContextHolder.createEmptyContext();context.setAuthentication(authResult);SecurityContextHolder.setContext(context);if (this.logger.isDebugEnabled()) {this.logger.debug(LogMessage.format("Set SecurityContextHolder to %s", authResult));}this.rememberMeServices.loginSuccess(request, response, authResult);//在这里使用if (this.eventPublisher != null) {this.eventPublisher.publishEvent(new InteractiveAuthenticationSuccessEvent(authResult, this.getClass()));}this.successHandler.onAuthenticationSuccess(request, response, authResult);}
同样的,除了ApplicationEventPublisherAware接口外,我们再来演示一个接口,比如:
@Servicepublic class TestService implements BeanNameAware {@Overridepublic void setBeanName(String s) {System.out.println(s);}}
BeanNameAware就是感知Bean名称的一个接口,当Bean被加载时,会调用setBeanName方法并将Bean名称作为参数传递。
有关所有的Aware这里就不一一列举了。
探究SpringBoot实现原理
注意:难度较大,本版块作为选学内容,在开始前,必须完成SSM阶段源码解析部分的学习。
我们在前面的学习中切实感受到了SpringBoot为我们带来的便捷,那么它为何能够实现如此快捷的开发模式,starter又是一个怎样的存在,它是如何进行自动配置的,我们现在就开始研究。
启动原理
首先我们来看看,SpringBoot项目启动之后,做了什么事情,SpringApplication中的静态run方法:
public static ConfigurableApplicationContext run(Class<?> primarySource, String... args) {return run(new Class[]{primarySource}, args);}
套娃如下:
public static ConfigurableApplicationContext run(Class<?>[] primarySources, String[] args) {return (new SpringApplication(primarySources)).run(args);}
我们发现,这里直接new了一个新的SpringApplication对象,传入我们的主类作为构造方法参数,并调用了非static的run方法,我们先来看看构造方法里面做了什么事情:
public SpringApplication(ResourceLoader resourceLoader, Class<?>... primarySources) {...this.resourceLoader = resourceLoader;Assert.notNull(primarySources, "PrimarySources must not be null");this.primarySources = new LinkedHashSet(Arrays.asList(primarySources));//这里是关键,这里会判断当前SpringBoot应用程序是否为Web项目,并返回当前的项目类型//deduceFromClasspath是根据类路径下判断是否包含SpringBootWeb依赖,如果不包含就是NONE类型,包含就是SERVLET类型this.webApplicationType = WebApplicationType.deduceFromClasspath();this.bootstrapRegistryInitializers = new ArrayList(this.getSpringFactoriesInstances(BootstrapRegistryInitializer.class));//创建所有ApplicationContextInitializer实现类的对象this.setInitializers(this.getSpringFactoriesInstances(ApplicationContextInitializer.class));this.setListeners(this.getSpringFactoriesInstances(ApplicationListener.class));this.mainApplicationClass = this.deduceMainApplicationClass();}
关键就在这里了,它是如何知道哪些类是ApplicationContextInitializer的实现类的呢?
这里就要提到spring.factories了,它是 Spring 仿造Java SPI实现的一种类加载机制。它在 META-INF/spring.factories 文件中配置接口的实现类名称,然后在程序中读取这些配置文件并实例化。这种自定义的SPI机制是 Spring Boot Starter 实现的基础。
SPI的常见例子:
- 数据库驱动加载接口实现类的加载:JDBC加载不同类型数据库的驱动
- 日志门面接口实现类加载:SLF4J加载不同提供商的日志实现类
说白了就是人家定义接口,但是实现可能有很多种,但是核心只提供接口,需要我们按需选择对应的实现,这种方式是高度解耦的。
我们来看看getSpringFactoriesInstances方法做了什么:
private <T> Collection<T> getSpringFactoriesInstances(Class<T> type, Class<?>[] parameterTypes, Object... args) {//获取当前的类加载器ClassLoader classLoader = this.getClassLoader();//获取所有依赖中 META-INF/spring.factories 中配置的对应接口类的实现类列表Set<String> names = new LinkedHashSet(SpringFactoriesLoader.loadFactoryNames(type, classLoader));//根据上方列表,依次创建实例对象List<T> instances = this.createSpringFactoriesInstances(type, parameterTypes, classLoader, args, names);//根据对应类上的Order接口或是注解进行排序AnnotationAwareOrderComparator.sort(instances);//返回实例return instances;}
其中SpringFactoriesLoader.loadFactoryNames正是读取配置的核心部分,我们后面还会遇到。
接着我们来看run方法里面做了什么事情。
public ConfigurableApplicationContext run(String... args) {long startTime = System.nanoTime();DefaultBootstrapContext bootstrapContext = this.createBootstrapContext();ConfigurableApplicationContext context = null;this.configureHeadlessProperty();//获取所有的SpringApplicationRunListener,并通知启动事件,默认只有一个实现类EventPublishingRunListener//EventPublishingRunListener会将初始化各个阶段的事件转发给所有监听器SpringApplicationRunListeners listeners = this.getRunListeners(args);listeners.starting(bootstrapContext, this.mainApplicationClass);try {//环境配置ApplicationArguments applicationArguments = new DefaultApplicationArguments(args);ConfigurableEnvironment environment = this.prepareEnvironment(listeners, bootstrapContext, applicationArguments);this.configureIgnoreBeanInfo(environment);//打印BannerBanner printedBanner = this.printBanner(environment);//创建ApplicationContext,注意这里会根据是否为Web容器使用不同的ApplicationContext实现类context = this.createApplicationContext();context.setApplicationStartup(this.applicationStartup);//初始化ApplicationContextthis.prepareContext(bootstrapContext, context, environment, listeners, applicationArguments, printedBanner);//执行ApplicationContext的refresh方法this.refreshContext(context);this.afterRefresh(context, applicationArguments);Duration timeTakenToStartup = Duration.ofNanos(System.nanoTime() - startTime);if (this.logStartupInfo) {(new StartupInfoLogger(this.mainApplicationClass)).logStarted(this.getApplicationLog(), timeTakenToStartup);}....}
我们发现,实际上SpringBoot就是Spring的一层壳罢了,离不开最关键的ApplicationContext,也就是说,在启动后会自动配置一个ApplicationContext,只不过是进行了大量的扩展。
我们来看ApplicationContext是怎么来的,打开createApplicationContext方法:
protected ConfigurableApplicationContext createApplicationContext() {return this.applicationContextFactory.create(this.webApplicationType);}
我们发现在构造方法中applicationContextFactory直接使用的是DEFAULT:
this.applicationContextFactory = ApplicationContextFactory.DEFAULT;
ApplicationContextFactory DEFAULT = (webApplicationType) -> {try {switch(webApplicationType) {case SERVLET:return new AnnotationConfigServletWebServerApplicationContext();case REACTIVE:return new AnnotationConfigReactiveWebServerApplicationContext();default:return new AnnotationConfigApplicationContext();}} catch (Exception var2) {throw new IllegalStateException("Unable create a default ApplicationContext instance, you may need a custom ApplicationContextFactory", var2);}};ConfigurableApplicationContext create(WebApplicationType webApplicationType);
DEFAULT是直接编写的一个匿名内部类,其实已经很明确了,正是根据webApplicationType类型进行判断,如果是SERVLET,那么久返回专用于Web环境的AnnotationConfigServletWebServerApplicationContext对象(SpringBoot中新增的),否则返回普通的AnnotationConfigApplicationContext对象,也就是到这里为止,Spring的容器就基本已经确定了。
注意AnnotationConfigApplicationContext是Spring框架提供的类,从这里开始相当于我们在讲Spring的底层源码了,我们继续深入,AnnotationConfigApplicationContext对象在创建过程中会创建AnnotatedBeanDefinitionReader,它是用于通过注解解析Bean定义的工具类:
public AnnotationConfigApplicationContext() {StartupStep createAnnotatedBeanDefReader = this.getApplicationStartup().start("spring.context.annotated-bean-reader.create");this.reader = new AnnotatedBeanDefinitionReader(this);createAnnotatedBeanDefReader.end();this.scanner = new ClassPathBeanDefinitionScanner(this);}
其构造方法:
public AnnotatedBeanDefinitionReader(BeanDefinitionRegistry registry, Environment environment) {...//这里会注册很多的后置处理器AnnotationConfigUtils.registerAnnotationConfigProcessors(this.registry);}
public static Set<BeanDefinitionHolder> registerAnnotationConfigProcessors(BeanDefinitionRegistry registry, @Nullable Object source) {DefaultListableBeanFactory beanFactory = unwrapDefaultListableBeanFactory(registry);....Set<BeanDefinitionHolder> beanDefs = new LinkedHashSet(8);RootBeanDefinition def;if (!registry.containsBeanDefinition("org.springframework.context.annotation.internalConfigurationAnnotationProcessor")) {//注册了ConfigurationClassPostProcessor用于处理@Configuration、@Import等注解//注意这里是关键,之后Selector还要讲到它//它是继承自BeanDefinitionRegistryPostProcessor,所以它的执行时间在Bean定义加载完成后,Bean初始化之前def = new RootBeanDefinition(ConfigurationClassPostProcessor.class);def.setSource(source);beanDefs.add(registerPostProcessor(registry, def, "org.springframework.context.annotation.internalConfigurationAnnotationProcessor"));}if (!registry.containsBeanDefinition("org.springframework.context.annotation.internalAutowiredAnnotationProcessor")) {//AutowiredAnnotationBeanPostProcessor用于处理@Value等注解自动注入def = new RootBeanDefinition(AutowiredAnnotationBeanPostProcessor.class);def.setSource(source);beanDefs.add(registerPostProcessor(registry, def, "org.springframework.context.annotation.internalAutowiredAnnotationProcessor"));}...
回到SpringBoot,我们最后来看,prepareContext方法中又做了什么事情:
private void prepareContext(DefaultBootstrapContext bootstrapContext, ConfigurableApplicationContext context, ConfigurableEnvironment environment, SpringApplicationRunListeners listeners, ApplicationArguments applicationArguments, Banner printedBanner) {//环境配置context.setEnvironment(environment);this.postProcessApplicationContext(context);this.applyInitializers(context);listeners.contextPrepared(context);bootstrapContext.close(context);if (this.logStartupInfo) {this.logStartupInfo(context.getParent() == null);this.logStartupProfileInfo(context);}//将Banner注册为BeanConfigurableListableBeanFactory beanFactory = context.getBeanFactory();beanFactory.registerSingleton("springApplicationArguments", applicationArguments);if (printedBanner != null) {beanFactory.registerSingleton("springBootBanner", printedBanner);}if (beanFactory instanceof AbstractAutowireCapableBeanFactory) {((AbstractAutowireCapableBeanFactory)beanFactory).setAllowCircularReferences(this.allowCircularReferences);if (beanFactory instanceof DefaultListableBeanFactory) {((DefaultListableBeanFactory)beanFactory).setAllowBeanDefinitionOverriding(this.allowBeanDefinitionOverriding);}}if (this.lazyInitialization) {context.addBeanFactoryPostProcessor(new LazyInitializationBeanFactoryPostProcessor());}//这里会获取我们一开始传入的项目主类Set<Object> sources = this.getAllSources();Assert.notEmpty(sources, "Sources must not be empty");//这里会将我们的主类直接注册为Bean,这样就可以通过注解加载了this.load(context, sources.toArray(new Object[0]));listeners.contextLoaded(context);}
因此,在prepareContext执行完成之后,我们的主类成功完成Bean注册,接下来,就该类上注解大显身手了。
自动配置原理
既然主类已经在初始阶段注册为Bean,那么在加载时,就会根据注解定义,进行更多的额外操作。所以我们来看看主类上的@SpringBootApplication注解做了什么事情。
@Target({ElementType.TYPE})@Retention(RetentionPolicy.RUNTIME)@Documented@Inherited@SpringBootConfiguration@EnableAutoConfiguration@ComponentScan(excludeFilters = {@Filter(type = FilterType.CUSTOM,classes = {TypeExcludeFilter.class}), @Filter(type = FilterType.CUSTOM,classes = {AutoConfigurationExcludeFilter.class})})public @interface SpringBootApplication {
我们发现,@SpringBootApplication上添加了@ComponentScan注解,此注解我们此前已经认识过了,但是这里并没有配置具体扫描的包,因此它会自动将声明此接口的类所在的包作为basePackage,因此当添加@SpringBootApplication之后也就等于直接开启了自动扫描,但是一定注意不能在主类之外的包进行Bean定义,否则无法扫描到,需要手动配置。
接着我们来看第二个注解@EnableAutoConfiguration,它就是自动配置的核心了,我们来看看它是如何定义的:
@Target({ElementType.TYPE})@Retention(RetentionPolicy.RUNTIME)@Documented@Inherited@AutoConfigurationPackage@Import({AutoConfigurationImportSelector.class})public @interface EnableAutoConfiguration {
老套路了,直接一手@Import,通过这种方式来将一些外部的Bean加载到容器中。我们来看看AutoConfigurationImportSelector做了什么事情:
public class AutoConfigurationImportSelector implements DeferredImportSelector, BeanClassLoaderAware, ResourceLoaderAware, BeanFactoryAware, EnvironmentAware, Ordered {...}
我们看到它实现了很多接口,包括大量的Aware接口,实际上就是为了感知某些必要的对象,并将其存到当前类中。
其中最核心的是DeferredImportSelector接口,它是ImportSelector的子类,它定义了selectImports方法,用于返回需要加载的类名称,在Spring加载ImportSelector类型的Bean时,会调用此方法来获取更多需要加载的类,并将这些类一并注册为Bean:
public interface ImportSelector {String[] selectImports(AnnotationMetadata importingClassMetadata);@Nullabledefault Predicate<String> getExclusionFilter() {return null;}}
到目前为止,我们了解了两种使用@Import有特殊机制的接口:ImportSelector(这里用到的)和ImportBeanDefinitionRegistrar(之前Mybatis-spring源码有讲)当然还有普通的@Configuration配置类。
我们可以来阅读一下ConfigurationClassPostProcessor的源码,看看它到底是如何处理@Import的:
public void processConfigBeanDefinitions(BeanDefinitionRegistry registry) {List<BeanDefinitionHolder> configCandidates = new ArrayList();//注意这个阶段仅仅是已经完成扫描了所有的Bean,得到了所有的BeanDefinition,但是还没有进行任何区分//candidate是候选者的意思,一会会将标记了@Configuration的类作为ConfigurationClass加入到configCandidates中String[] candidateNames = registry.getBeanDefinitionNames();String[] var4 = candidateNames;int var5 = candidateNames.length;for(int var6 = 0; var6 < var5; ++var6) {String beanName = var4[var6];BeanDefinition beanDef = registry.getBeanDefinition(beanName);if (beanDef.getAttribute(ConfigurationClassUtils.CONFIGURATION_CLASS_ATTRIBUTE) != null) {if (this.logger.isDebugEnabled()) {this.logger.debug("Bean definition has already been processed as a configuration class: " + beanDef);}} else if (ConfigurationClassUtils.checkConfigurationClassCandidate(beanDef, this.metadataReaderFactory)) { //判断是否添加了@Configuration注解configCandidates.add(new BeanDefinitionHolder(beanDef, beanName));}}if (!configCandidates.isEmpty()) {//...省略//这里创建了一个ConfigurationClassParser用于解析配置类ConfigurationClassParser parser = new ConfigurationClassParser(this.metadataReaderFactory, this.problemReporter, this.environment, this.resourceLoader, this.componentScanBeanNameGenerator, registry);//所有配置类的BeanDefinitionHolder列表Set<BeanDefinitionHolder> candidates = new LinkedHashSet(configCandidates);//已经解析完成的类HashSet alreadyParsed = new HashSet(configCandidates.size());do {//这里省略,直到所有的配置类全部解析完成//注意在循环过程中可能会由于@Import新增更多的待解析配置类,一律丢进candidates集合中} while(!candidates.isEmpty());...}}
我们接着来看,ConfigurationClassParser是如何进行解析的:
protected void processConfigurationClass(ConfigurationClass configClass, Predicate<String> filter) throws IOException {//@Conditional相关注解处理//后面会讲if (!this.conditionEvaluator.shouldSkip(configClass.getMetadata(), ConfigurationPhase.PARSE_CONFIGURATION)) {...}ConfigurationClassParser.SourceClass sourceClass = this.asSourceClass(configClass, filter);do {//核心sourceClass = this.doProcessConfigurationClass(configClass, sourceClass, filter);} while(sourceClass != null);this.configurationClasses.put(configClass, configClass);}}
最后我们再来看最核心的doProcessConfigurationClass方法:
protected final SourceClass doProcessConfigurationClass(ConfigurationClass configClass, SourceClass sourceClass)...processImports(configClass, sourceClass, getImports(sourceClass), true); // 处理Import注解...return null;}
private void processImports(ConfigurationClass configClass, ConfigurationClassParser.SourceClass currentSourceClass, Collection<ConfigurationClassParser.SourceClass> importCandidates, Predicate<String> exclusionFilter, boolean checkForCircularImports) {if (!importCandidates.isEmpty()) {if (checkForCircularImports && this.isChainedImportOnStack(configClass)) {this.problemReporter.error(new ConfigurationClassParser.CircularImportProblem(configClass, this.importStack));} else {this.importStack.push(configClass);try {Iterator var6 = importCandidates.iterator();while(var6.hasNext()) {ConfigurationClassParser.SourceClass candidate = (ConfigurationClassParser.SourceClass)var6.next();Class candidateClass;//如果是ImportSelector类型,继续进行运行if (candidate.isAssignable(ImportSelector.class)) {candidateClass = candidate.loadClass();ImportSelector selector = (ImportSelector)ParserStrategyUtils.instantiateClass(candidateClass, ImportSelector.class, this.environment, this.resourceLoader, this.registry);Predicate<String> selectorFilter = selector.getExclusionFilter();if (selectorFilter != null) {exclusionFilter = exclusionFilter.or(selectorFilter);}//如果是DeferredImportSelector的实现类,那么会走deferredImportSelectorHandler的handle方法if (selector instanceof DeferredImportSelector) {this.deferredImportSelectorHandler.handle(configClass, (DeferredImportSelector)selector);//否则就按照正常的ImportSelector类型进行加载} else {//调用selectImports方法获取所有需要加载的类String[] importClassNames = selector.selectImports(currentSourceClass.getMetadata());Collection<ConfigurationClassParser.SourceClass> importSourceClasses = this.asSourceClasses(importClassNames, exclusionFilter);//递归处理,直到没有this.processImports(configClass, currentSourceClass, importSourceClasses, exclusionFilter, false);}//判断是否为ImportBeanDefinitionRegistrar类型} else if (candidate.isAssignable(ImportBeanDefinitionRegistrar.class)) {candidateClass = candidate.loadClass();ImportBeanDefinitionRegistrar registrar = (ImportBeanDefinitionRegistrar)ParserStrategyUtils.instantiateClass(candidateClass, ImportBeanDefinitionRegistrar.class, this.environment, this.resourceLoader, this.registry);//往configClass丢ImportBeanDefinitionRegistrar信息进去,之后再处理configClass.addImportBeanDefinitionRegistrar(registrar, currentSourceClass.getMetadata());//否则按普通的配置类进行处理} else {this.importStack.registerImport(currentSourceClass.getMetadata(), candidate.getMetadata().getClassName());this.processConfigurationClass(candidate.asConfigClass(configClass), exclusionFilter);}}} catch (BeanDefinitionStoreException var17) {throw var17;} catch (Throwable var18) {throw new BeanDefinitionStoreException("Failed to process import candidates for configuration class [" + configClass.getMetadata().getClassName() + "]", var18);} finally {this.importStack.pop();}}}}
不难注意到,虽然这里额外处理了ImportSelector对象,但是还针对ImportSelector的子接口DeferredImportSelector进行了额外处理,Deferred是延迟的意思,它是一个延迟执行的ImportSelector,并不会立即进处理,而是丢进DeferredImportSelectorHandler,并且在parse方法的最后进行处理:
public void parse(Set<BeanDefinitionHolder> configCandidates) {...this.deferredImportSelectorHandler.process();}
我们接着来看DeferredImportSelector正好就有一个process方法:
public interface DeferredImportSelector extends ImportSelector {@Nullabledefault Class<? extends DeferredImportSelector.Group> getImportGroup() {return null;}public interface Group {void process(AnnotationMetadata metadata, DeferredImportSelector selector);Iterable<DeferredImportSelector.Group.Entry> selectImports();public static class Entry {...
最后经过ConfigurationClassParser处理完成后,通过parser.getConfigurationClasses()就能得到通过配置类导入了哪些额外的配置类。最后将这些配置类全部注册BeanDefinition,然后就可以交给接下来的Bean初始化过程去处理了。
this.reader.loadBeanDefinitions(configClasses);
最后我们再去看loadBeanDefinitions是如何运行的:
public void loadBeanDefinitions(Set<ConfigurationClass> configurationModel) {ConfigurationClassBeanDefinitionReader.TrackedConditionEvaluator trackedConditionEvaluator = new ConfigurationClassBeanDefinitionReader.TrackedConditionEvaluator();Iterator var3 = configurationModel.iterator();while(var3.hasNext()) {ConfigurationClass configClass = (ConfigurationClass)var3.next();this.loadBeanDefinitionsForConfigurationClass(configClass, trackedConditionEvaluator);}}private void loadBeanDefinitionsForConfigurationClass(ConfigurationClass configClass, ConfigurationClassBeanDefinitionReader.TrackedConditionEvaluator trackedConditionEvaluator) {if (trackedConditionEvaluator.shouldSkip(configClass)) {String beanName = configClass.getBeanName();if (StringUtils.hasLength(beanName) && this.registry.containsBeanDefinition(beanName)) {this.registry.removeBeanDefinition(beanName);}this.importRegistry.removeImportingClass(configClass.getMetadata().getClassName());} else {if (configClass.isImported()) {this.registerBeanDefinitionForImportedConfigurationClass(configClass); //注册配置类自己}Iterator var3 = configClass.getBeanMethods().iterator();while(var3.hasNext()) {BeanMethod beanMethod = (BeanMethod)var3.next();this.loadBeanDefinitionsForBeanMethod(beanMethod); //注册@Bean注解标识的方法}//注册`@ImportResource`引入的XML配置文件中读取的bean定义this.loadBeanDefinitionsFromImportedResources(configClass.getImportedResources());//注册configClass中经过解析后保存的所有ImportBeanDefinitionRegistrar,注册对应的BeanDefinitionthis.loadBeanDefinitionsFromRegistrars(configClass.getImportBeanDefinitionRegistrars());}}
这样,整个@Configuration配置类的底层配置流程我们就大致了解了。接着我们来看AutoConfigurationImportSelector是如何实现自动配置的,可以看到内部类AutoConfigurationGroup的process方法,它是父接口的实现,因为父接口是DeferredImportSelector,那么很容易得知,实际上最后会调用process方法获取所有的自动配置类:
public void process(AnnotationMetadata annotationMetadata, DeferredImportSelector deferredImportSelector) {Assert.state(deferredImportSelector instanceof AutoConfigurationImportSelector, () -> {return String.format("Only %s implementations are supported, got %s", AutoConfigurationImportSelector.class.getSimpleName(), deferredImportSelector.getClass().getName());});//获取所有的Entry,其实就是,读取spring.factories来查看有哪些自动配置类AutoConfigurationImportSelector.AutoConfigurationEntry autoConfigurationEntry = ((AutoConfigurationImportSelector)deferredImportSelector).getAutoConfigurationEntry(annotationMetadata);this.autoConfigurationEntries.add(autoConfigurationEntry);Iterator var4 = autoConfigurationEntry.getConfigurations().iterator();while(var4.hasNext()) {String importClassName = (String)var4.next();this.entries.putIfAbsent(importClassName, annotationMetadata);}}
我们接着来看getAutoConfigurationEntry方法:
protected AutoConfigurationImportSelector.AutoConfigurationEntry getAutoConfigurationEntry(AnnotationMetadata annotationMetadata) {//判断是否开启了自动配置,是的,自动配置可以关if (!this.isEnabled(annotationMetadata)) {return EMPTY_ENTRY;} else {//根据注解定义获取一些属性AnnotationAttributes attributes = this.getAttributes(annotationMetadata);//得到spring.factories文件中所有需要自动配置的类List<String> configurations = this.getCandidateConfigurations(annotationMetadata, attributes);... 这里先看前半部分}}
注意这里并不是spring.factories文件中所有的自动配置类都会被加载,它会根据@Condition注解的条件进行加载。这样就能实现我们需要什么模块添加对应依赖就可以实现自动配置了。
所有的源码看不懂,都源自于你的心中没有形成一个完整的闭环!一旦一条线推到头,闭环形成,所有疑惑迎刃而解。
自定义Starter
我们仿照Mybatis来编写一个自己的starter,Mybatis的starter包含两个部分:
<project xmlns="http://maven.apache.org/POM/4.0.0" xmlns:xsi="http://www.w3.org/2001/XMLSchema-instance" xsi:schemaLocation="http://maven.apache.org/POM/4.0.0 http://maven.apache.org/xsd/maven-4.0.0.xsd"><modelVersion>4.0.0</modelVersion><parent><groupId>org.mybatis.spring.boot</groupId><artifactId>mybatis-spring-boot</artifactId><version>2.2.0</version></parent><!-- starter本身只做依赖集中管理,不编写任何代码 --><artifactId>mybatis-spring-boot-starter</artifactId><name>mybatis-spring-boot-starter</name><properties><module.name>org.mybatis.spring.boot.starter</module.name></properties><dependencies><dependency><groupId>org.springframework.boot</groupId><artifactId>spring-boot-starter</artifactId></dependency><dependency><groupId>org.springframework.boot</groupId><artifactId>spring-boot-starter-jdbc</artifactId></dependency><!-- 编写的专用配置模块 --><dependency><groupId>org.mybatis.spring.boot</groupId><artifactId>mybatis-spring-boot-autoconfigure</artifactId></dependency><dependency><groupId>org.mybatis</groupId><artifactId>mybatis</artifactId></dependency><dependency><groupId>org.mybatis</groupId><artifactId>mybatis-spring</artifactId></dependency></dependencies></project>
因此我们也将我们自己的starter这样设计:
我们设计三个模块:
- spring-boot-hello:基础业务功能模块
- spring-boot-starter-hello:启动器
- spring-boot-autoconifgurer-hello:自动配置依赖
首先是基础业务功能模块,这里我们随便创建一个类就可以了:
public class HelloWorldService {}
启动器主要做依赖管理,这里就不写任何代码,只写pom文件:
<dependencies><dependency><groupId>org.example</groupId><artifactId>spring-boot-autoconfigurer-hello</artifactId><version>1.0-SNAPSHOT</version></dependency></dependencies>
导入autoconfigurer模块作为依赖即可,接着我们去编写autoconfigurer模块,首先导入依赖:
<dependencies><dependency><groupId>org.springframework.boot</groupId><artifactId>spring-boot-autoconfigure</artifactId><version>2.6.2</version></dependency><dependency><groupId>org.springframework.boot</groupId><artifactId>spring-boot-configuration-processor</artifactId><version>2.6.2</version><optional>true</optional></dependency><dependency><groupId>org.example</groupId><artifactId>spring-boot-hello</artifactId><version>1.0-SNAPSHOT</version></dependency></dependencies>
接着创建一个HelloWorldAutoConfiguration作为自动配置类:
@Configuration(proxyBeanMethods = false)@ConditionalOnWebApplication@ConditionalOnClass(HelloWorldService.class)@EnableConfigurationProperties(HelloWorldProperties.class)public class HelloWorldAutoConfiguration {Logger logger = Logger.getLogger(this.getClass().getName());@ResourceHelloWorldProperties properties;@Beanpublic HelloWorldService helloWorldService(){logger.info("自定义starter项目已启动!");logger.info("读取到自定义配置:"+properties.getValue());return new HelloWorldService();}}
对应的配置读取类:
@ConfigurationProperties("hello.world")public class HelloWorldProperties {private String value;public void setValue(String value) {this.value = value;}public String getValue() {return value;}}
最后再编写spring.factories文件,并将我们的自动配置类添加即可:
org.springframework.boot.autoconfigure.EnableAutoConfiguration=\com.hello.autoconfigurer.HelloWorldAutoConfiguration
最后再Maven根项目执行install安装到本地仓库,完成。接着就可以在其他项目中使用我们编写的自定义starter了。
Runner接口
在项目中,可能会遇到这样一个问题:我们需要在项目启动完成之后,紧接着执行一段代码。
我们可以编写自定义的ApplicationRunner来解决,它会在项目启动完成后执行:
@Componentpublic class TestRunner implements ApplicationRunner {@Overridepublic void run(ApplicationArguments args) throws Exception {System.out.println("我是自定义执行!");}}
当然也可以使用CommandLineRunner,它也支持使用@Order或是实现Ordered接口来支持优先级执行。
实际上它就是run方法的最后:
public ConfigurableApplicationContext run(String... args) {....listeners.started(context, timeTakenToStartup);//这里已经完成整个SpringBoot项目启动,所以执行所有的Runnerthis.callRunners(context, applicationArguments);} catch (Throwable var12) {this.handleRunFailure(context, var12, listeners);throw new IllegalStateException(var12);}try {Duration timeTakenToReady = Duration.ofNanos(System.nanoTime() - startTime);listeners.ready(context, timeTakenToReady);return context;} catch (Throwable var11) {this.handleRunFailure(context, var11, (SpringApplicationRunListeners)null);throw new IllegalStateException(var11);}}
下一章,我们将继续讲解几乎程序员必会的Git版本控制。

若有收获,就点个赞吧
0 人点赞
