- Introduction
- Chapter 1: Basics
- Chapter 2: Structure, Trait
- Chapter 3: HashMap, Array
- Special Chapter: 🔥 Ownership, Borrowing and Life Cycle
- Chapter 4: Code Organization
- Chapter 5: Rust Highlights
- Special chapter: ❌ error handling
- Chapter 6: Concurrency
- Chapter 7: Macro
- Chapter 8: Testing
- ——Practice small project: Json processing
- in conclusion
Introduction
Welcome to Rust Ocean.
Reader positioning
Position the reader to understand the basic programming concepts. In order to briefly ignore the basic concepts, if you feel that understanding is difficult, consider looking for a more basic book.
What is Rust?
Rust is a modern system programming language that focuses on safety, speed, and concurrency. Rust achieves these goals through memory security, but does not use the Garbage Collection (GC).
Rust solves the null pointer problem, and the error handling is more reliable, greatly increasing reliability and confidence in the code.
If you have read the brief introduction above me and still don’t know the truth, if you are still hesitating to learn Rust, you can browse “Love Rust”. You can check out the short video introduction of intorust before reading.
Minimalist style
This book adopts a minimalist style and does not seek encyclopedia. The goal is to have a basic understanding after the completion of the course. Hope is an easy way to finish in two or three days.
Refer to Study Rust by Examples and RustPrimer two books, please go to more content.
To English Readers
I wrote this in Chinese, so if some links are in Chinese, you can use Google Translate to help it.
English version is done by Google, so thanks Google but sorry for not being perfect.
Chapter 1: Basics
When you start reading, you have some interest.
Getting started with Rust is very simple and doesn’t require any configuration.
You can go to playground to run the code online. The local installation is omitted, please refer to the reference book in the introduction.
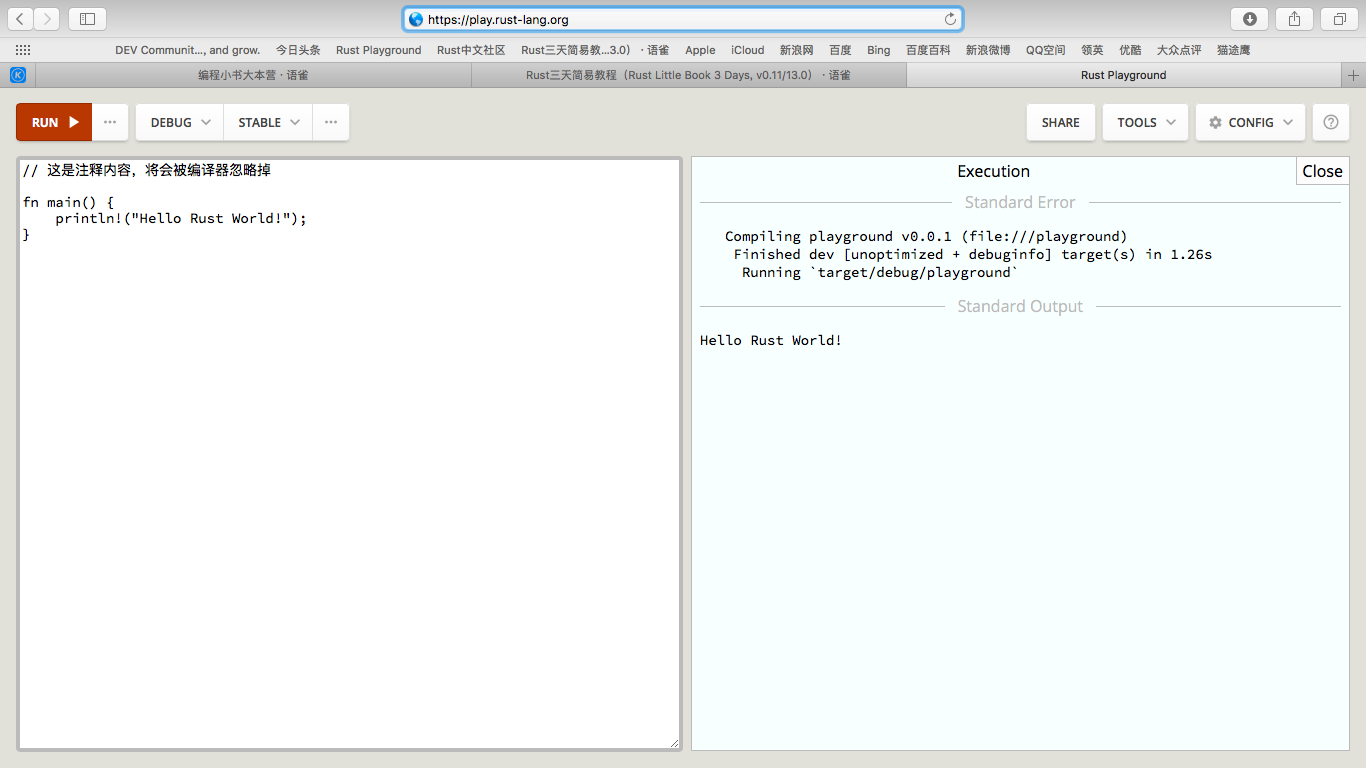
Here is hello world:
// This is the comment content and will be ignored by the compiler.fn main() {println!("Hello Rust World!");}
println! is a macro (macros) that can output text to the console.
The source program can be used to generate executable files using Rust’s compiler rustc:
$ rustc hello.rs
rustc will get the executable hello after compilation.
$ ./helloHello Rust World!
There is a runner that can be run in one step.
In addition, the built-in cargo can provide project management and is introduced in small projects.
Chapter 2: Structure, Trait
First look at the structure:
// unit structurestruct Nil;// tuple structurestruct Pair(i32, f32);// structure with two fieldsstruct Point {x: f32,y: f32,}// The structure can be used as a field for another structure#[allow(dead_code)]struct Rectangle {p1: Point,p2: Point,}fn main() {// Instantiate the structure `Point`let point: Point = Point { x: 0.3, y: 0.4 };// access the field of pointprintln!("point coordinates: ({}, {})", point.x, point.y);// instantiate a unit structurelet _nil = Nil;// instantiate a tuple structurelet pair = Pair(1, 0.1);// access the fields of the tuple structureprintln!("pair contains {:?} and {:?}", pair.0, pair.1);// Deconstruct a tuple structurelet Pair(integer, decimal) = pair;println!("pair contains {:?} and {:?}", integer, decimal);}
Trait
trait HasArea {fn area(&self) -> f64;}struct Circle {radius: f64,}impl HasArea for Circle {fn area(&self) -> f64 {std::f64::consts::PI * (self.radius * self.radius)}}fn main() {let c = Circle {radius: 1.0f64,};println!("circle c has an area of {}", c.area());}
This program will output:
circle c has an area of 3.141592653589793
{}, {:?} correspond to two Trait:Display and Debug respectively.
Chapter 3: HashMap, Array
Let’s take a look at the simple usage of HashMap.
use std::collections::HashMap;fn main(){let mut come_from = HashMap::new();// insertcome_from.insert("WaySLOG", "HeBei");come_from.insert("Marisa", "U.S.");come_from.insert("Mike", "HuoGuo");// find the keyif !come_from.contains_key("elton") {println!("Oh, we found {} personal, but poor Elton cat is still homeless", come_from.len());}/ / Delete elements according to the keycome_from.remove("Mike");println!("\nMike猫!\n");/ / use the return of get to determine whether the element existslet who = ["MoGu", "Marisa"];for person in &who {match come_from.get(person) {Some(location) => println!("{} from: {}", person, location),None => println!("{} is also homeless.", person),}}// traversal outputprintln!("\nSo, everyone?");for (name, location) in &come_from {println!("{}From: {}", name, location);}}
Look at the array again:
fn main() {let mut array: [i32; 3] = [0; 3];array[1] = 1;array[2] = 2;assert_eq!([1, 2], &array[1..]);// This loop prints: 0 1 2for x in &array {println!("{} ", x);}}
Dynamic array Vec
fn main() {/ / Create an empty Veclet v: Vec<i32> = Vec::new();println!("{:?}", v);/ / use the macro to create an empty Veclet v = vec![1, 2, 3, 4, 5];println!("{:?}", v);//Create ten zeroslet v = vec![0; 10];/ / Create a variable Vec, and press element 3println!("{:?}", v);let mut v = vec![1, 2];v.push(3);println!("{:?}", v);/ / Create a Vec with two elements, and pop up an elementlet mut v = vec![1, 2];let two = v.pop();println!("{:?}", two);/ / Create a variable Vec containing three elements, and index a value and modify a valuelet mut v = vec![1, 2, 3];v[1] = v[1] + 5;println!("{:?}", v);}
Special Chapter: 🔥 Ownership, Borrowing and Life Cycle
These concepts of ownership systems are where Rust is different. It is the basis of security, and it is said that compilation will not crash.
The ownership system can be analogized by borrowing books, first look at ownership:
fn main() {let a: String = String::from("xyz");let _b = a;println!("{}", a);}
This code is ok in traditional languages, and the compilation will report an error because of a transfer of ownership.
Look at borrowing again:
fn main() {let a: String = String::from("xyz");let _b = &a;println!("{}", a);}
Changed a word is borrowed, you can compile it.
Look at the life cycle:
fn _foo<'a>(x: &'a str) -> &'a str {x}
This is a strange life cycle. Some simple cases can omit the life cycle and be more concise. Simply put, the life cycle is the time to specify the variable, when the compiler can not be sure, the programmer will be required to write the life cycle.
Summary
Through three simple examples, three concepts are introduced. Of course, the actual situation is more complicated, but the basic idea is similar.
Rust is through ownership, borrowing, and life.
Chapter 4: Code Organization
Basic usage of the module
mod ccc {pub fn print_ccc() {println!("{}", 25);}}fn main() {use ccc::print_ccc;print_ccc();// orccc::print_ccc();}
The package crate is a larger unit.
Really we use a lot of external libraries when we are developing. External library is passed
extern crate xxx;
This was introduced.
Note: For the above references to take effect, you must also add xxx="version num" to the dependecies section of Cargo.toml.
After the introduction, it is equivalent to the introduction of a symbol xxx, which can be directly referenced to the item in the crate with this xxx as the root:
extern crate xxx;use xxx::yyy::zzz;
When introduced, it can be renamed with the as keyword.
uxtern crate xxx as foo;use foo::yyy::zzz;
Chapter 5: Rust Highlights
I didn’t want to write anything, it was temporarily blank.
Special chapter: ❌ error handling
Rust solves the problem of null pointers and does not use exceptions.
Rust’s error handling is very special, let’s take a look at the example:
1 simple options
fn get(x: i32) -> Option<i32> {match x>0 {true => Some(1),false => None}}fn main() {let x : i32;x = get(1).unwrap();println!("x has the value {}", x);}
Option is an Enum type with two values Some and None. In the example, match is handled separately. Unwrap is suitable for demo code and triggers panic directly on None.
2 More complex error handling with Result, see example:
use std::io;use std::io::Read;use std::fs::File;fn read_username_from_file() -> Result<String, io::Error> {let f = File::open("hello.txt");let mut f = match f {Ok(file) => file,Err(e) => return Err(e),};let mut s = String::new();match f.read_to_string(&mut s) {Ok(_) => Ok(s),Err(e) => Err(e),}}fn main() {let result : Result<String, io::Error>;result = read_username_from_file();println!("{:?}", result);}
Result is also an Enum type, and the two values are Ok and Err, respectively, which can easily convey error information.
3 Simplify the question mark operation of error delivery
use std::io;use std::io::Read;use std::fs::File;fn read_username_from_file() -> Result<String, io::Error> {let mut f = File::open("hello.txt")?;let mut s = String::new();f.read_to_string(&mut s)?;Ok(s)}
? The operation is used to simplify the delivery of errors.
You can try to get rid of the tricks at the end, you will find that the compiler accurately found the error, which greatly enhances your confidence in the code, without the extra effort to write unit tests.
Summary:
Through a few simple examples, I learned the error handling roughly.
In summary, there are roughly two ways:
Option
Result
Option, including Some and None. Suitable for simple situations.
enum Option<T> {Some(T),None,}
Result, including Ok and Err. Used to pass error messages.
enum Result<T, E> {Ok(T),Err(E),}
Simplify the error delivery? Operation, optional. Unwrap is common in the demo code and will be panic. There is also an expect("info"), which is also a panic, but will bring info.
The good news is that the null pointer problem is eliminated. The downside is that it seems complicated and takes time to digest.
In this way, the next topic.
Chapter 6: Concurrency
fn main() {let mut colors = [-20.0f32, 0.0, 20.0, 40.0,80.0, 100.0, 150.0, 180.0, 200.0, 250.0, 300.0];println!("original: {:?}", &colors);colors.par_iter_mut().for_each(|color| {let c : f32 = if *color < 0.0 {0.0} else if *color > 255.0 {255.0} else {*color};*color = c / 255.0;});println!("transformed: {:?}", &colors);}
This example is concurrency through the library and looks simpler.
I still lack experience with concurrency, so I will click on it. Leave it for later discussion.
Chapter 7: Macro
Here is a brief introduction.
macro_rules! create_function {($func_name:ident) => (fn $func_name() {println!("function {:?} is called", stringify!($func_name))})}fn main() {create_function!(foo);foo();}
Chapter 8: Testing
Rust’s test features are divided into three levels according to their granularity:
Function level
Module level
Engineering level
In addition, Rust also supports testing of documents.
Here is a simple function level test.
#[test]fn it_works() {assert!(2>1); // do test work}
Very simple, in Rust, you only need to put a #[test] on top of a function to indicate that this is a function for testing.
With this property, these functions are ignored when compiling with cargo build. These functions can be run using cargo test.
Rust provides two macros to perform test assertions:
assert!(expr) Tests if the expression is true or falseassert_eq!(expr, expr) tests whether the results of two expressions are equal
——Practice small project: Json processing
This project refers to the RustPrimer book, Json Processing. Introduced the use of caogo.
A small project can verify that our understanding of Rust is correct.
in conclusion
I finally finished learning, see how much time you spent, getting started?
I hope to learn happily, wait for the next language, see you next time!

若有收获,就点个赞吧
0 人点赞
