DHCP
- DynamicHostConfigurationProtocol
- 动态主机配置协议
基于广播通信
IP
- NETMASK
- GATEWAY
- DNS
-
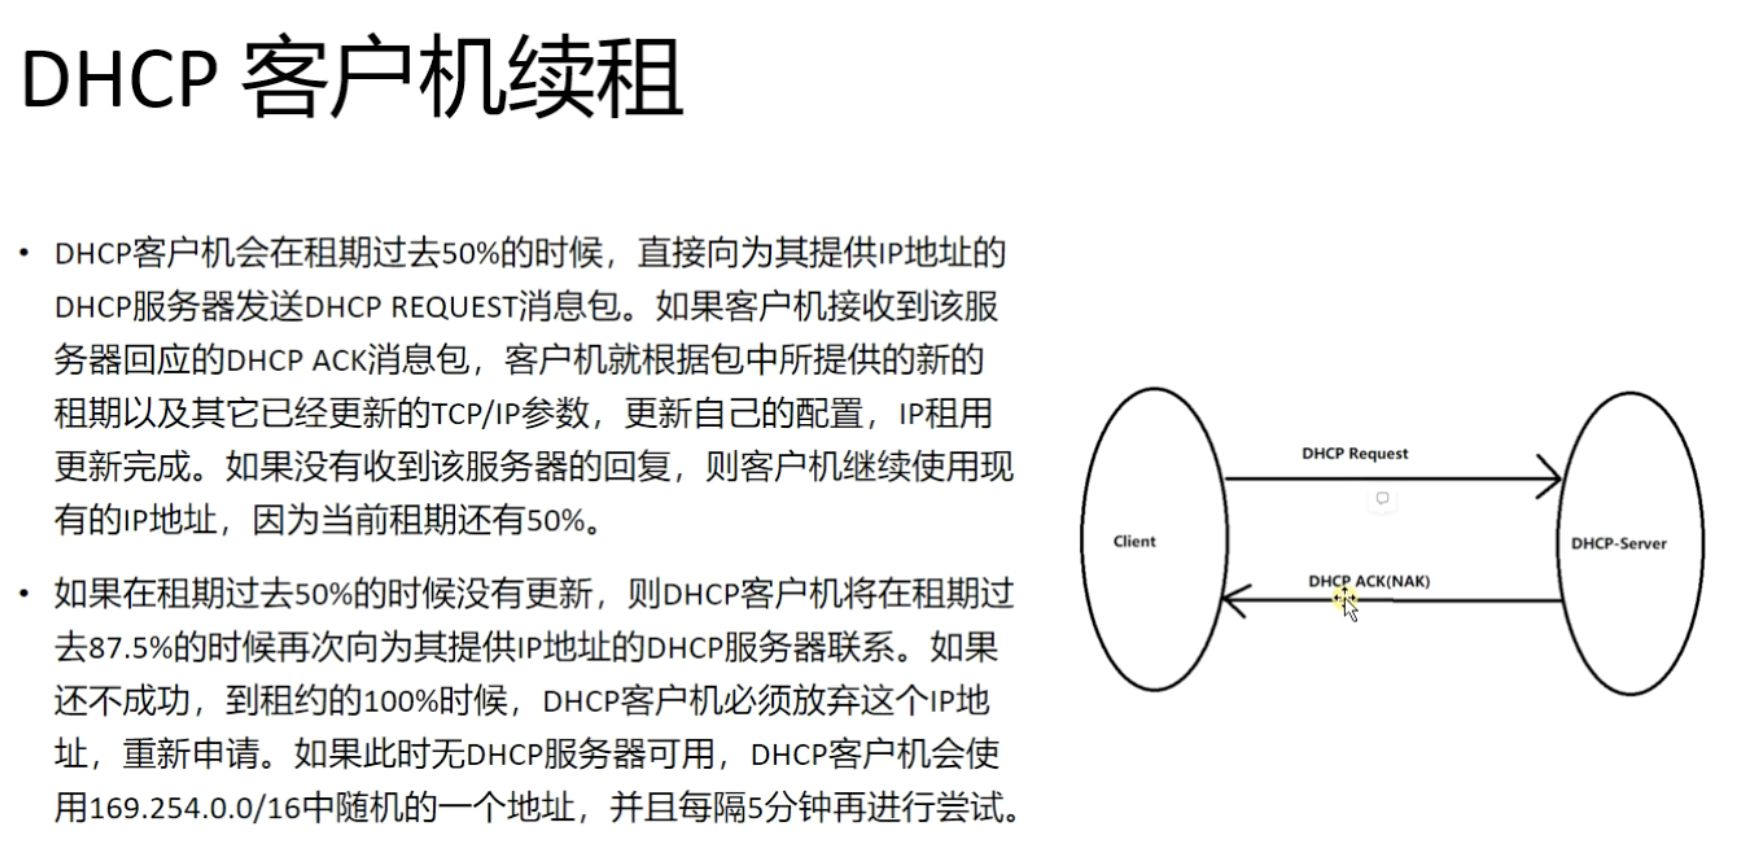
工作原理
PPT
DNS
域名解析过程
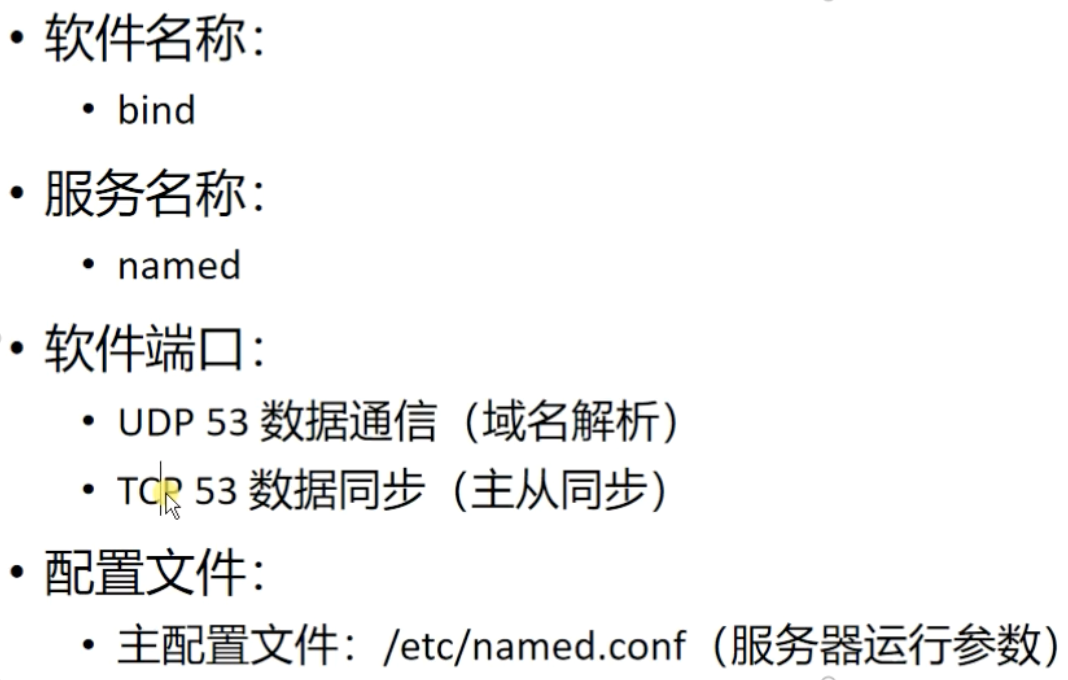
服务
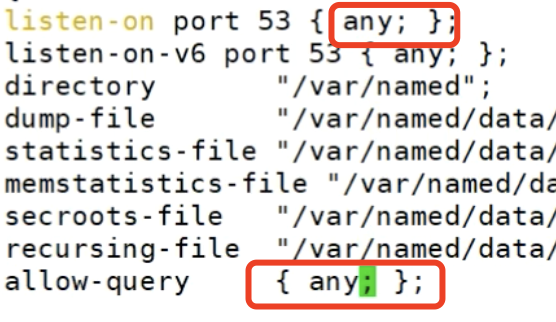
三大配置文件
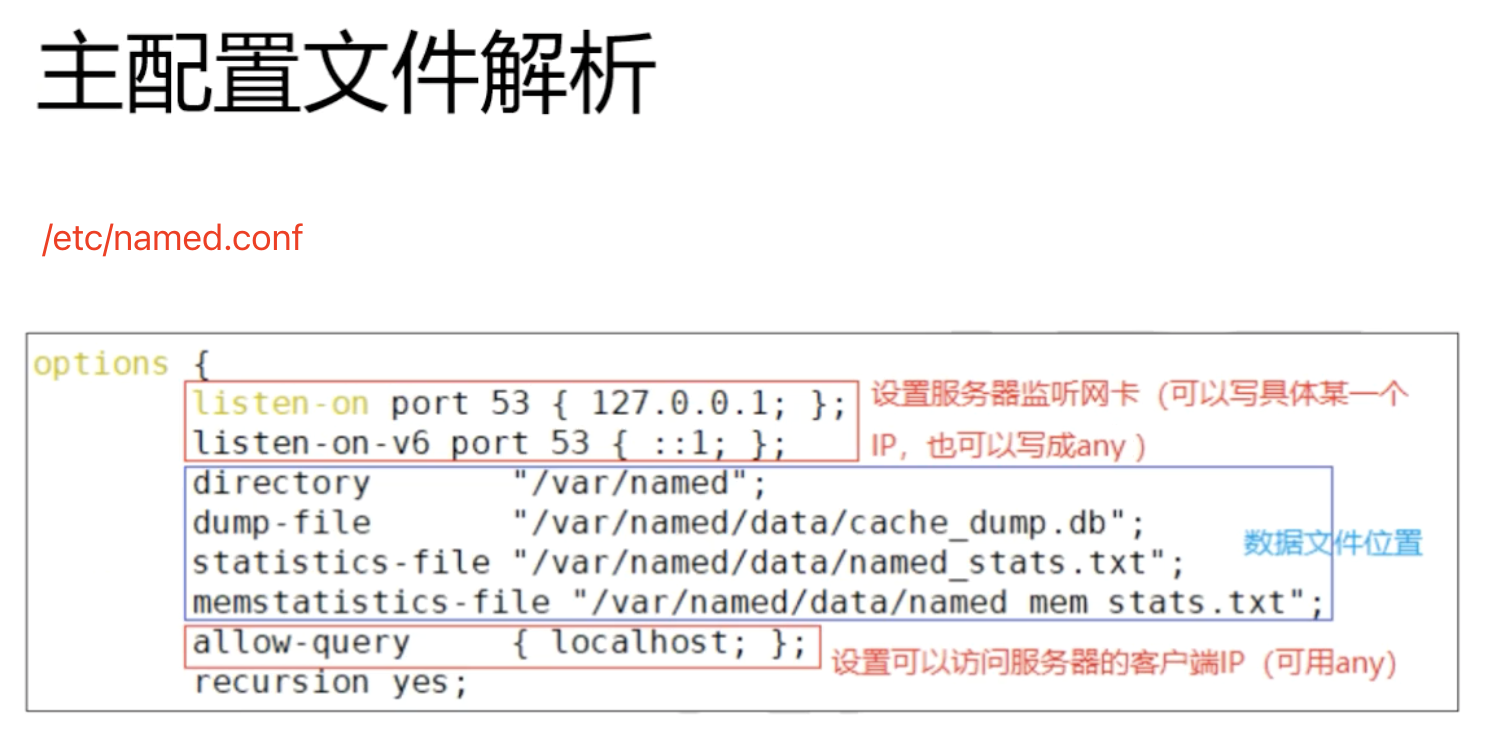
主配置文件
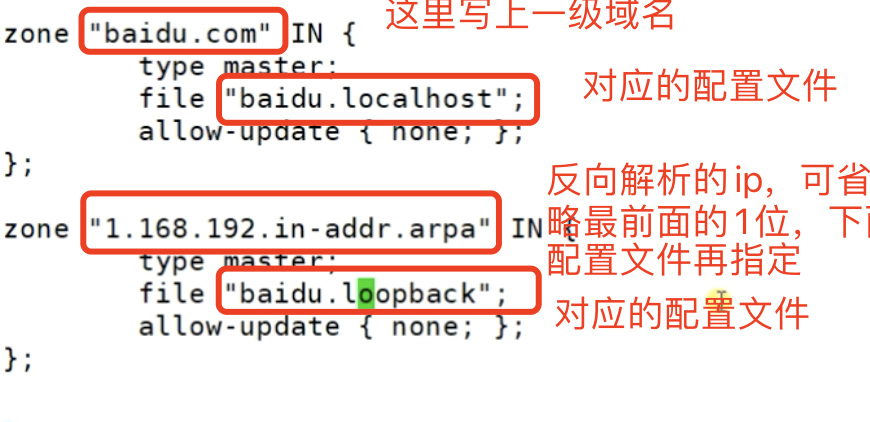
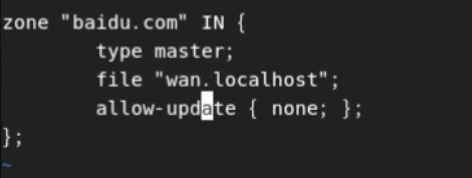
区域配置文件
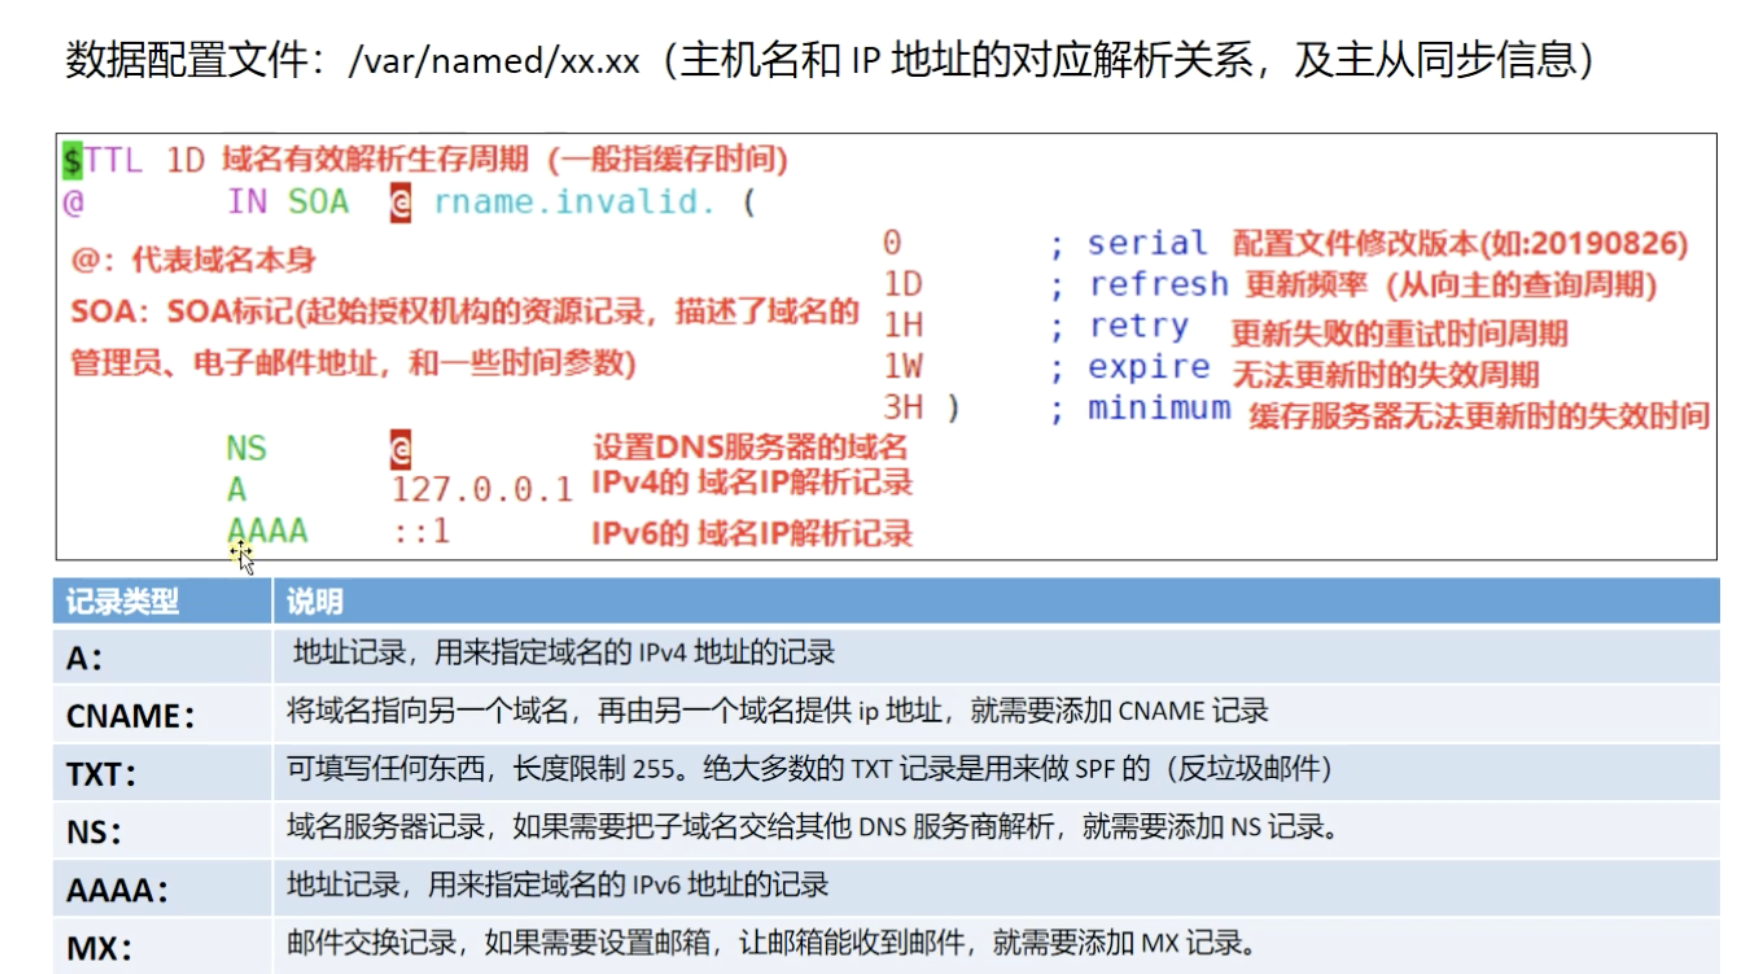
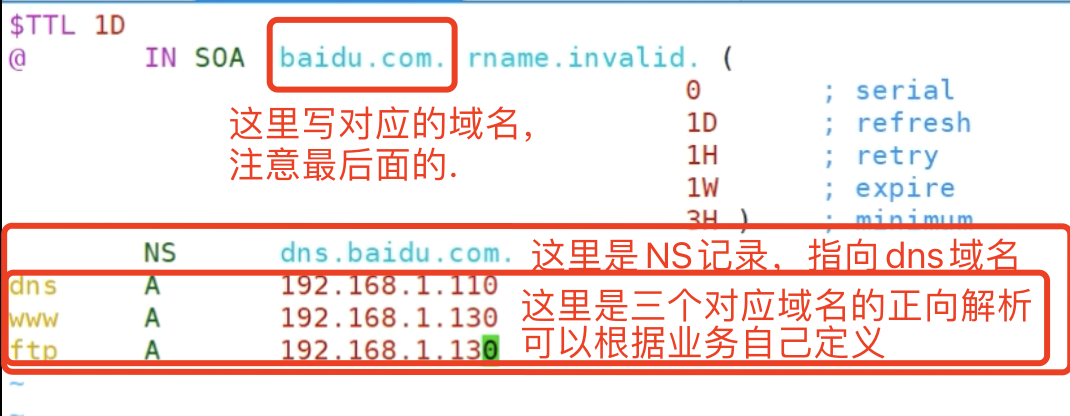
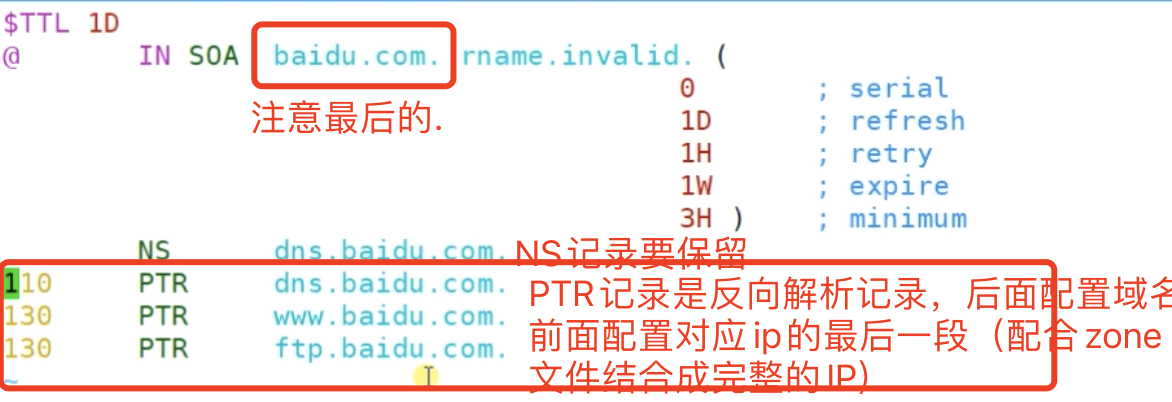
数据配置文件
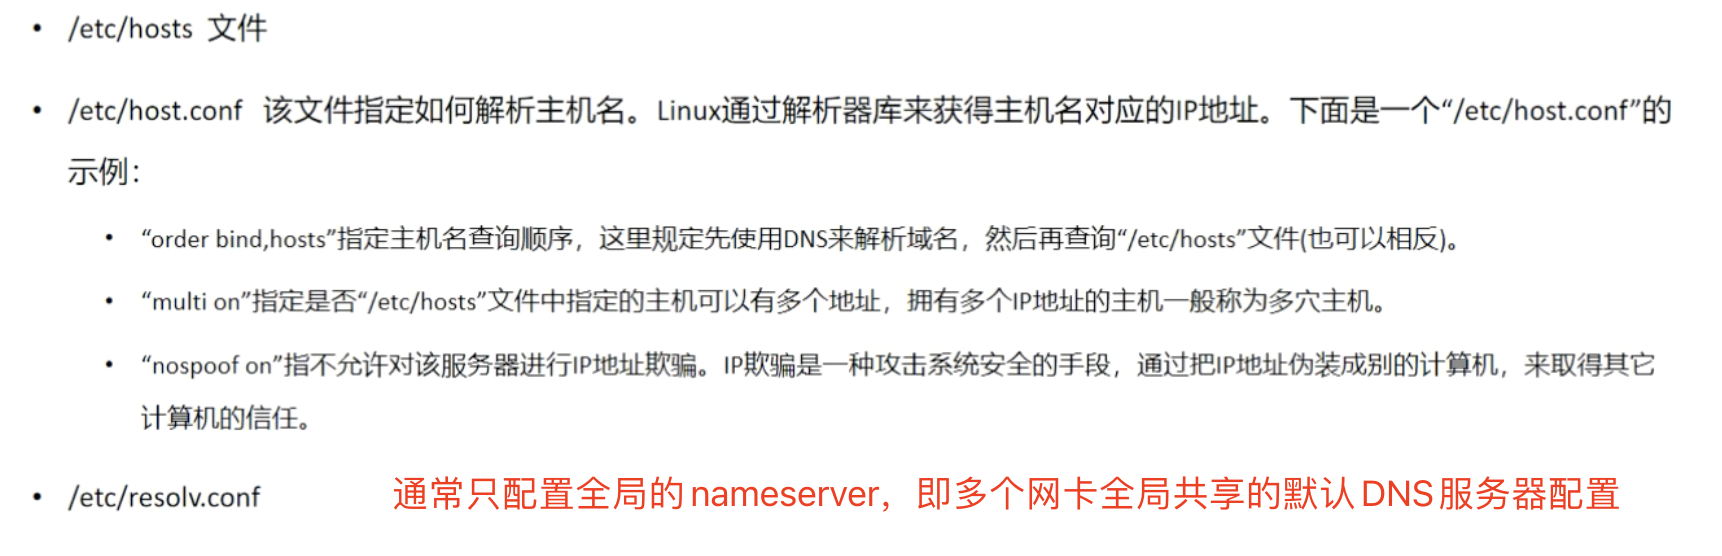
三个相关文件
实战
单机配置
/etc/named.conf


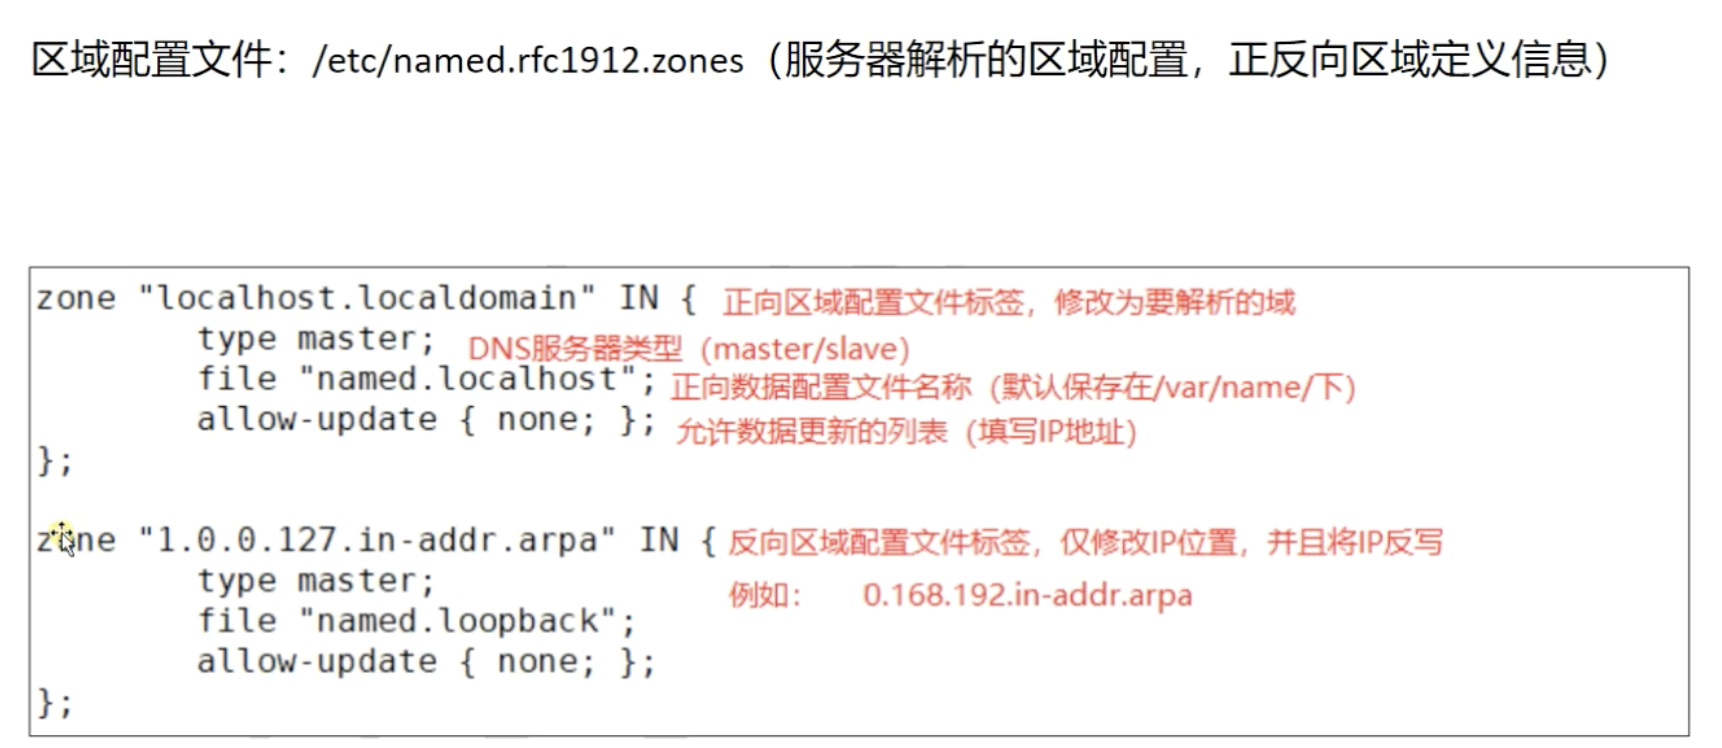

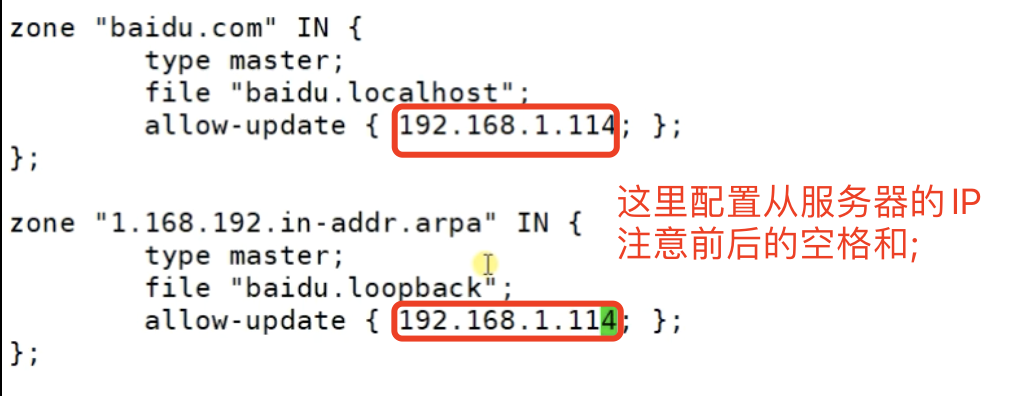
- /etc/named.rfc1912.zones(一个正向解析,一个反向解析)
- /var/named/xx.xx(一个正向解析,一个反向解析)
- cp -a named.localhost baidu.localhost
- cp -a named.loopback baidu.loopback
- cp -a named.localhost baidu.localhost
- 启动服务 ```shell systemctl stop firewalld
systemctl start named
netstat -tunlp | grep 53
- 测试```shell# 配置DNS指向自己的服务/etc/resolv.conf# 测试pingnslookupcurl
主从配置
- 在单机配置的基础上(单机即为主)做以下修改
- 主服务器只需改动如下配置文件
- /etc/named.rfc1912.zones
- 从服务器配置
- yum install -y bind
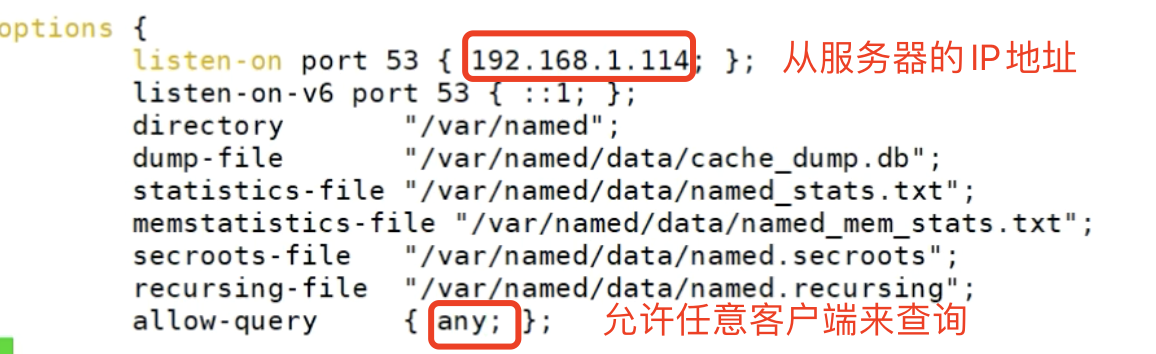
- /etc/named.conf
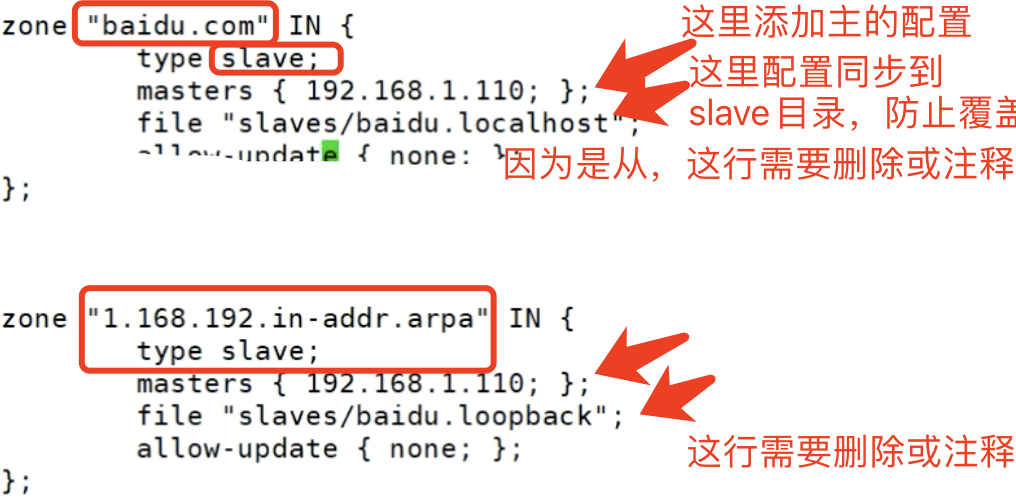
- /etc/named.rfc1912.zones
systemctl stop firewalld
- 客户端测试```shell# 配置DNS为从的IP/etc/resolv.conf# 测试pingnslookupcurl
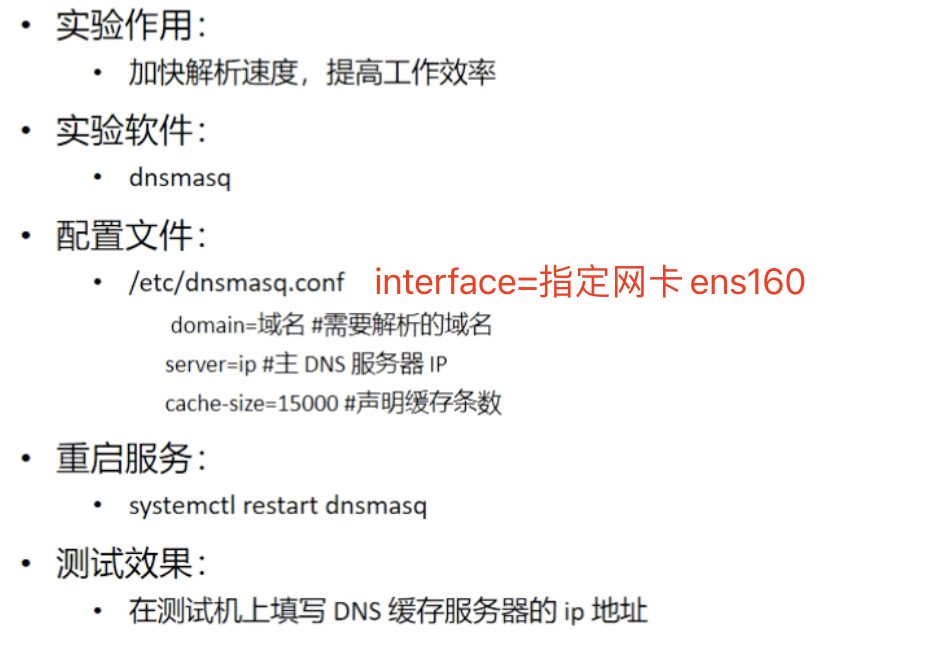
缓存配置
- 缓存服务器可以集成多个渠道的查询结果
- 配置的主DNS服务器
- 缓存服务器本身的DNS服务器
- 缓存服务器本身的/etc/hosts配置
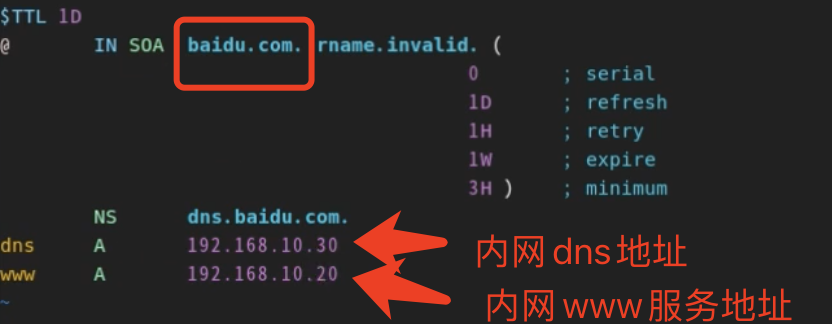
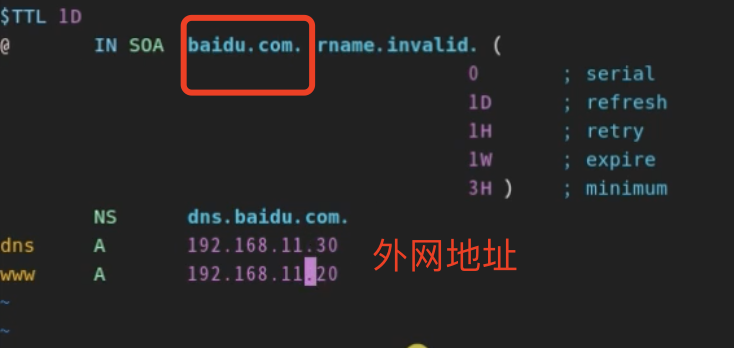
智能解析
运营商分离
主要效果
- 内网访问时解析到内网IP
- 外网访问时解析到外网IP
主要配置
- 主要是通过DNS主配置文件的view段区分不同配置文件
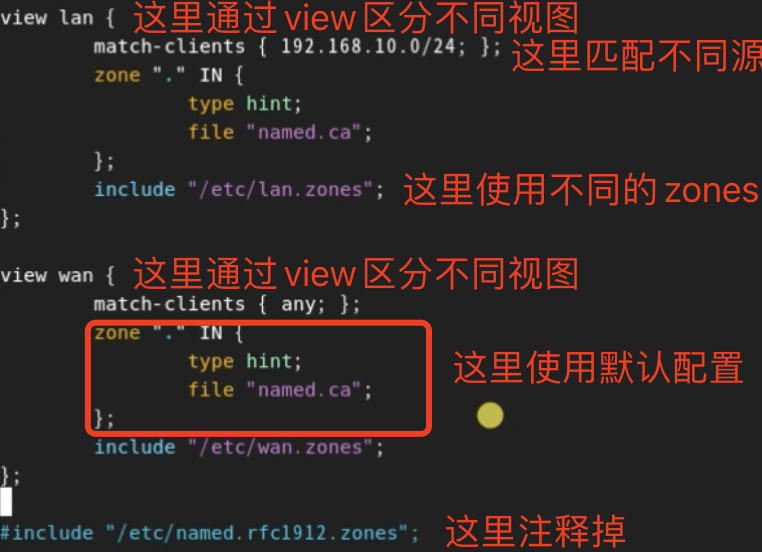
对应的zones配置
cp -a /etc/named.rfc1912.zones /etc/lan.zonescp -a /etc/named.rfc1912.zones /etc/wan.zones
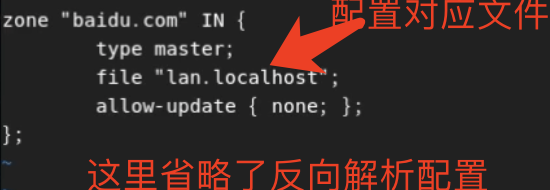
对应数据配置文件
cp -a /var/named/named.localhost /var/named/lan.localhostcp -a /var/named/named.localhost /var/named/wan.localhost
-
PPT
Telnet
服务端
```shell yum i -y telnet-server systemctl start telnet
服务默认开启在23端口
<a name="oCJ6B"></a>## 客户端```shellyum i -y telnettelnet IP PORT # 测试指定IP和端口服务telnet IP # 默认请求IP的23端口# 登录到23端口,需要输入用户名、密码登录主机,类似ssh客户端工具可以远程操作,缺点是明文传输
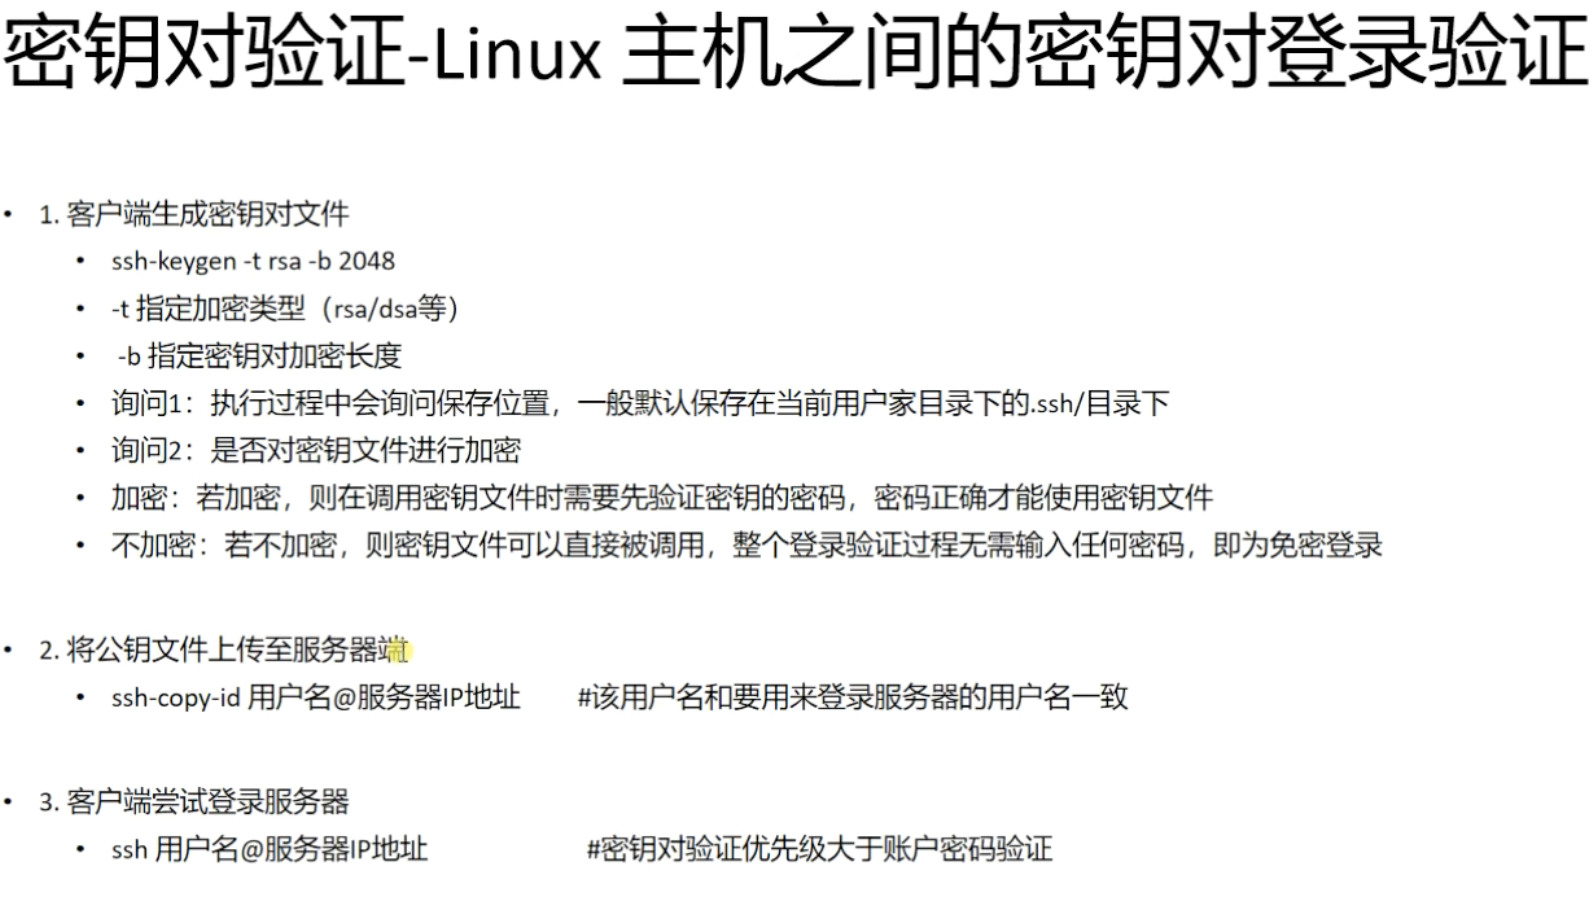
SSH
SSH客户端
- 客户端默认配置文件 /etc/ssh/ssh_config
- xshell
- terminal
- 配置免密
SFTP客户端
命令
ls lls
cd lcd
pwd lpwd
put get
quit
<a name="EQYUs"></a>## 服务端- 默认端口22- 默认配置文件 /etc/ssh/sshd_config```shell# 禁用密码登录PasswordAuthentication no# 禁用root远程登录PermitRootLogin no# 修改默认端口Port 55555# 修改绑定IPListenAddress IP
VSFTP
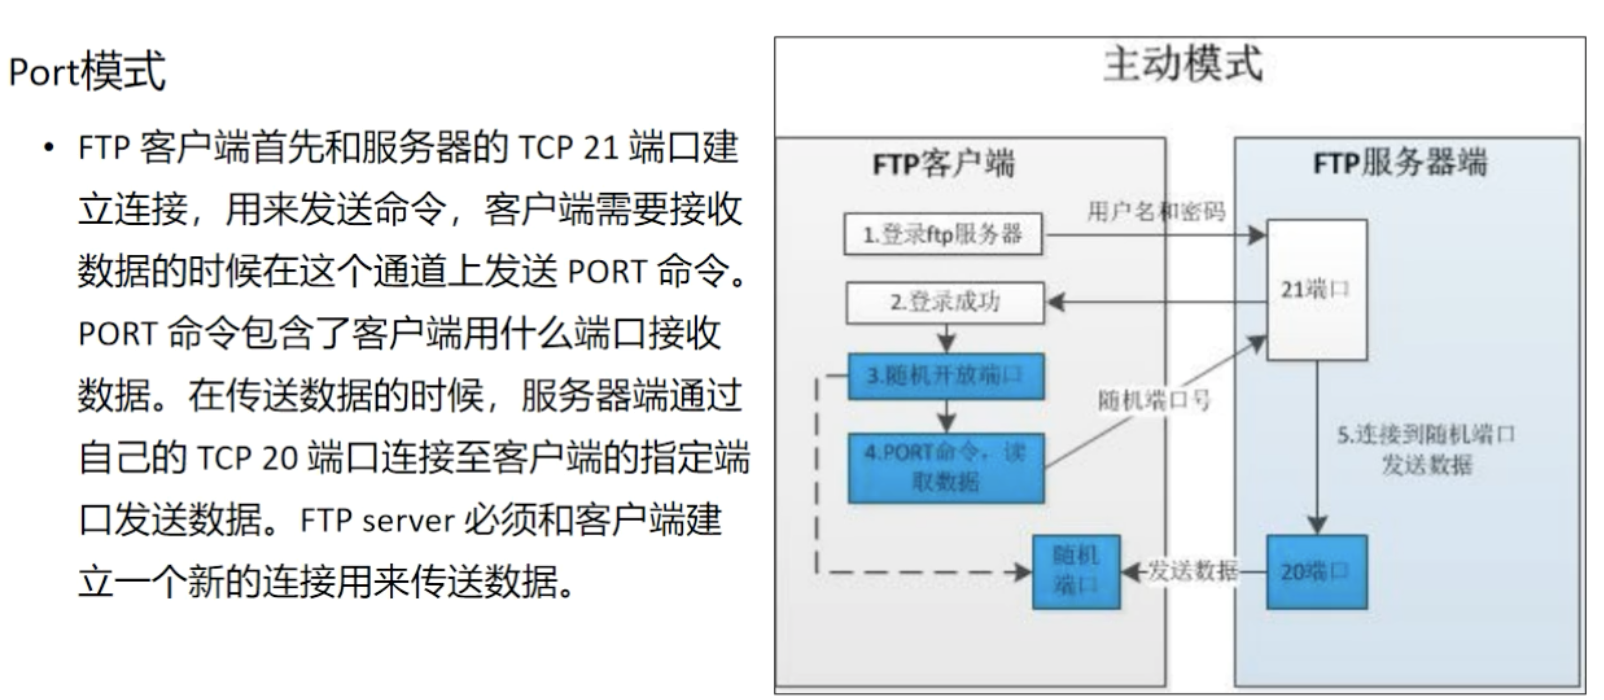
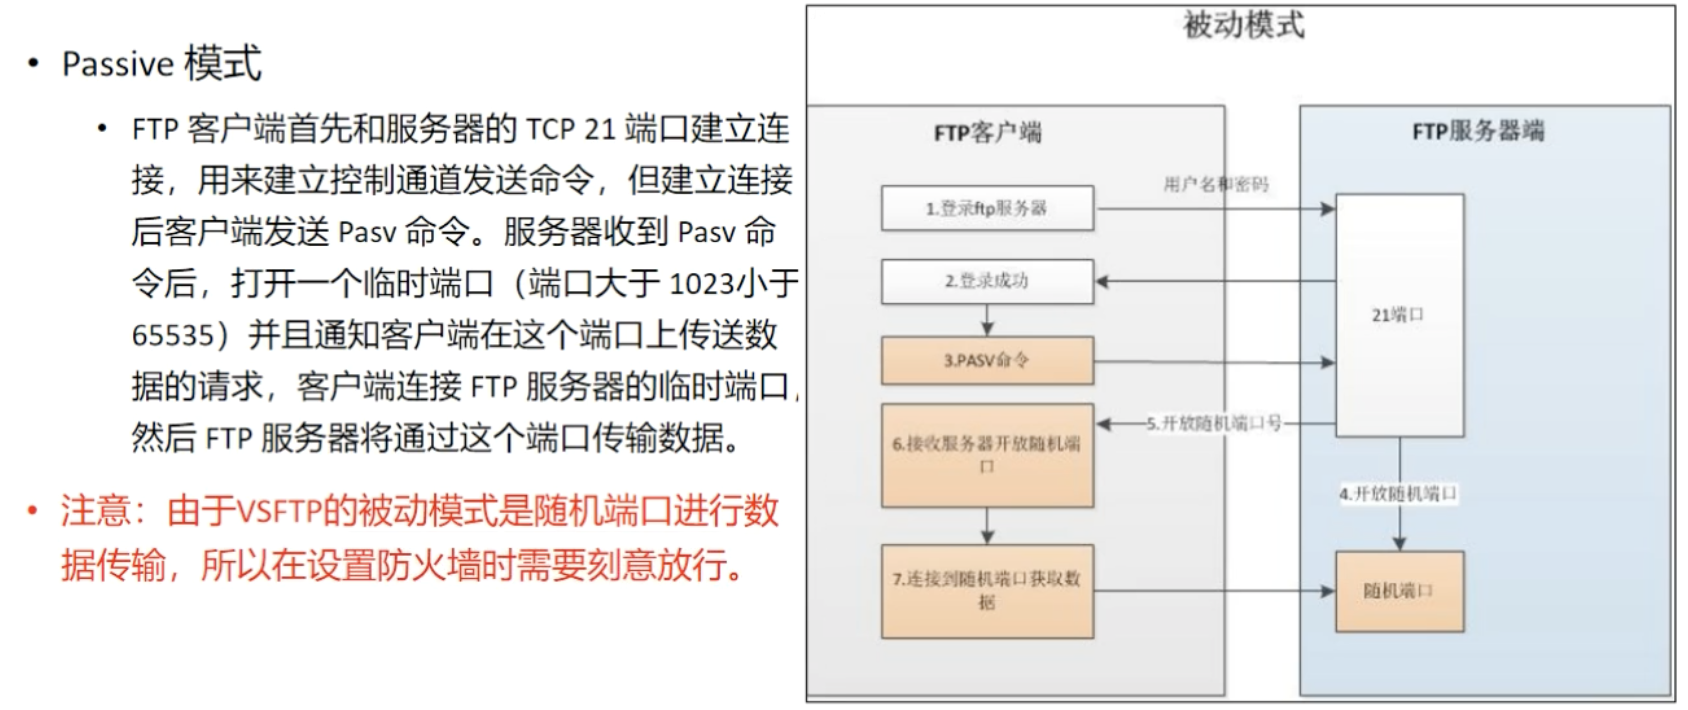
Passive
- 被动模式
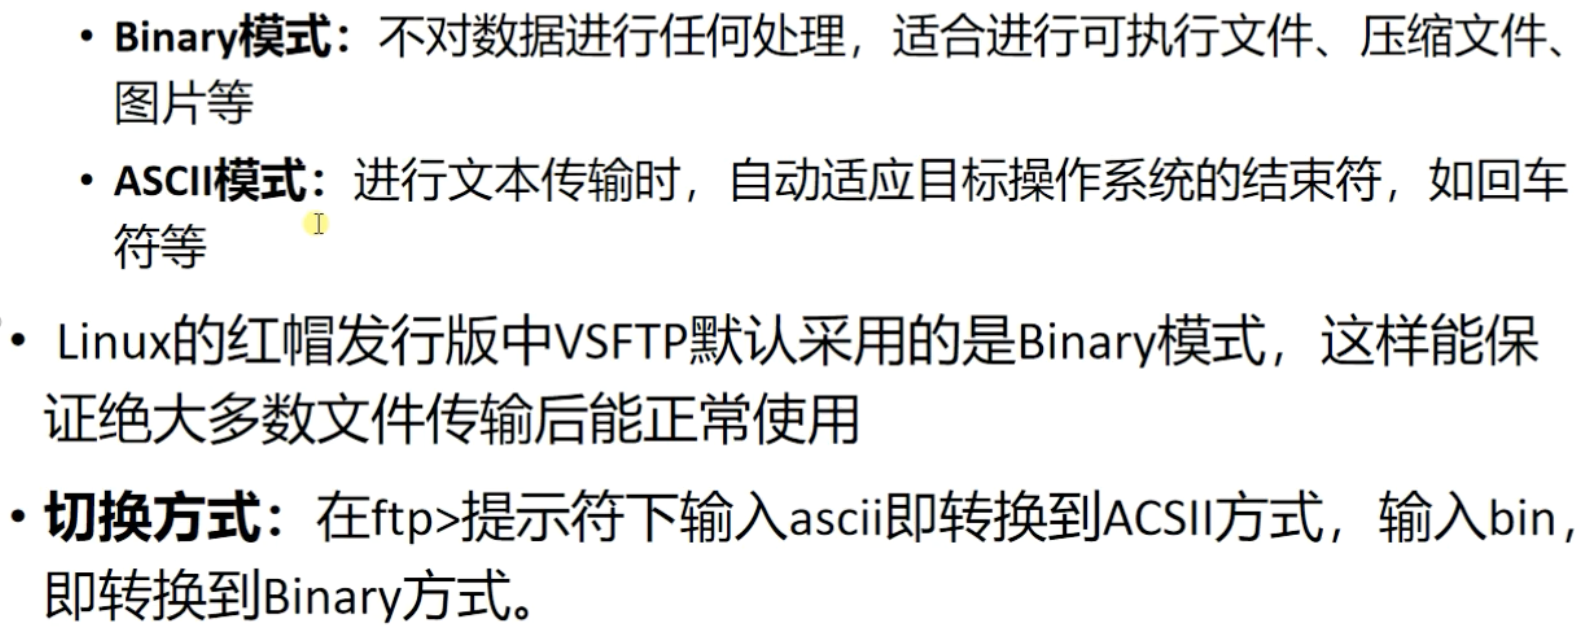
传输模式
Binary
ASCII
登录验证方式
匿名用户
- 账号
- ftp
- anonymous
- 密码
- 无
- 工作目录
- /var/ftp
默认权限
账号
- /etc/passwd中的系统用户
- 密码
- /etc/shadow中的对应的密码
- 工作目录
- 用户家目录
- 默认权限
- 家目录的最大权限
(特殊设置)
创建虚拟用户代替本地用户,减少本地用户曝光率
- 把虚拟用户的映射到本地用户,为虚拟用户提供工作目录和权限控制
-
客户端
GUI
xshell
- ftp://username:password@ip
CLI
```shell ftp IP用户名
密码
? # 查看帮助 put get
ascii binary
ls
quit
<a name="mbzWE"></a>## 服务端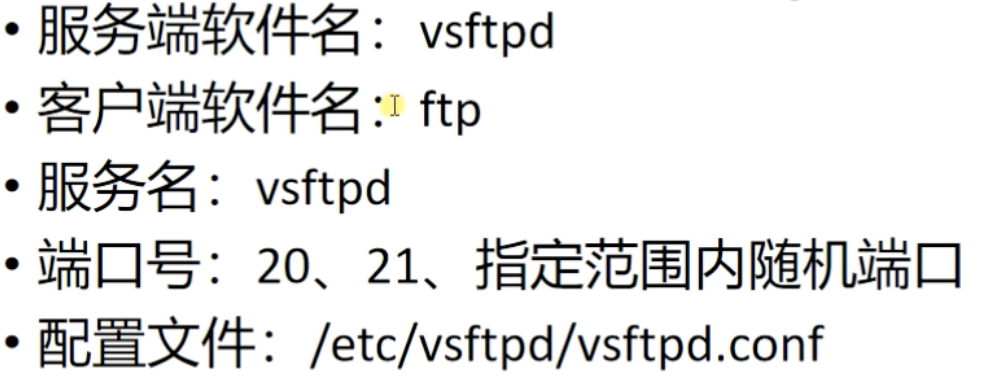<a name="KrjAo"></a>### 匿名用户相关配置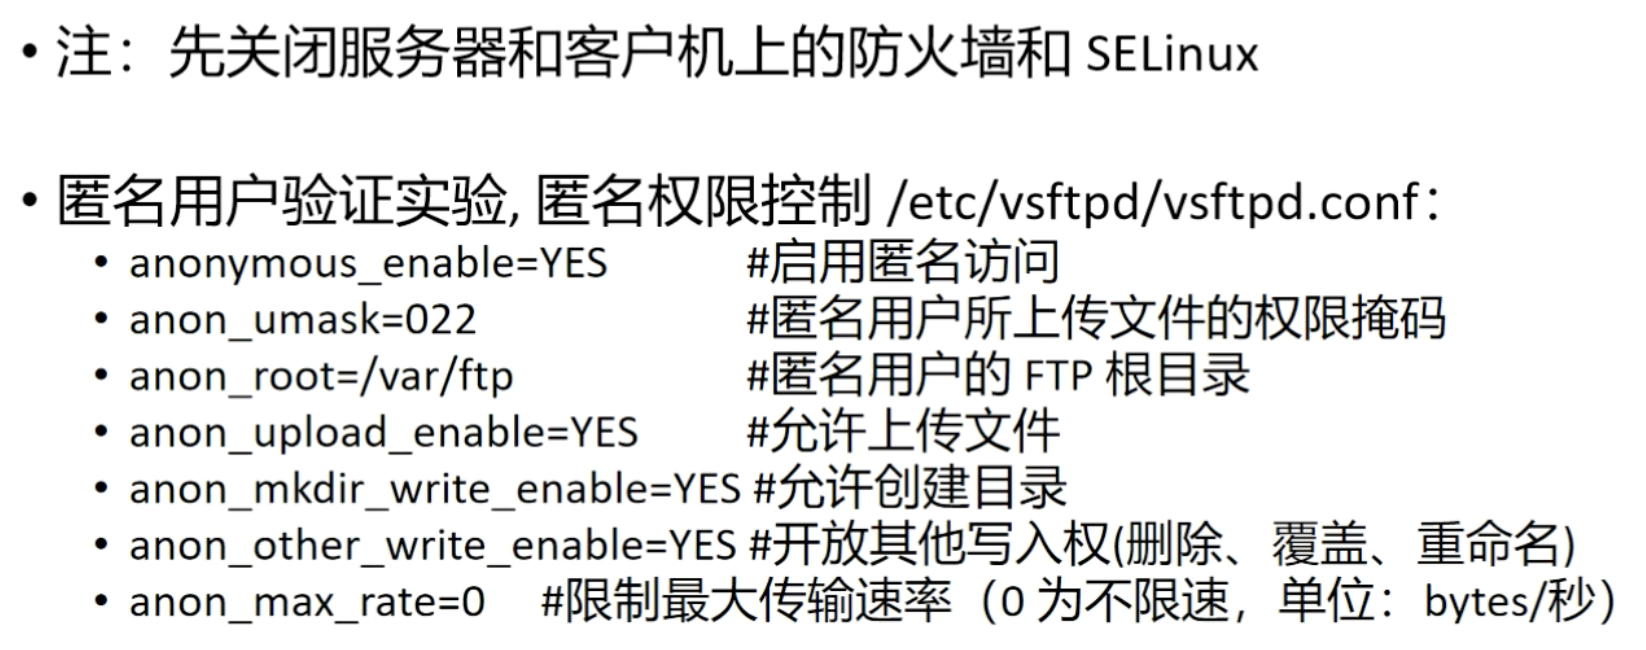<br />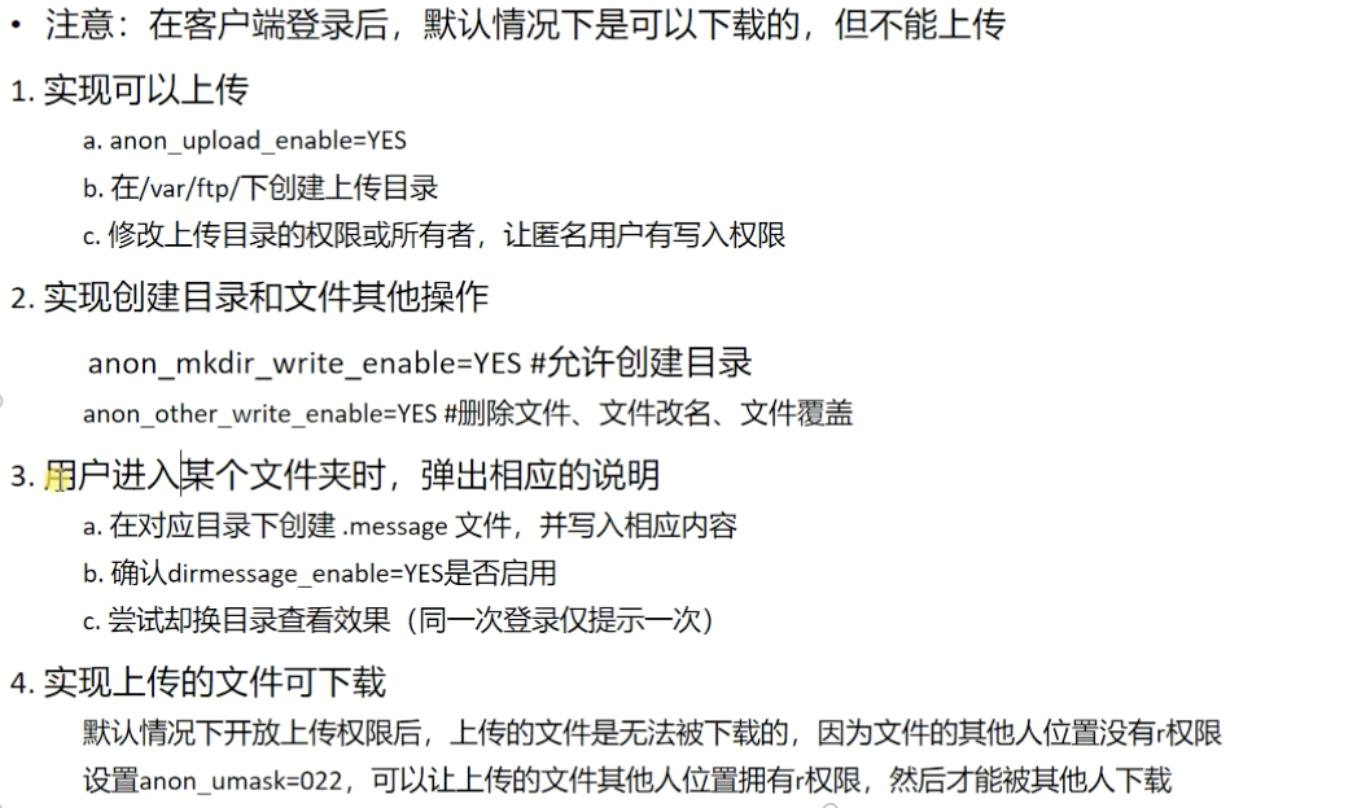<a name="rt1t8"></a>### 本地用户相关配置- **chroot_local_usser=YES # 将用户禁锢在家目录,防止切换到其他目录**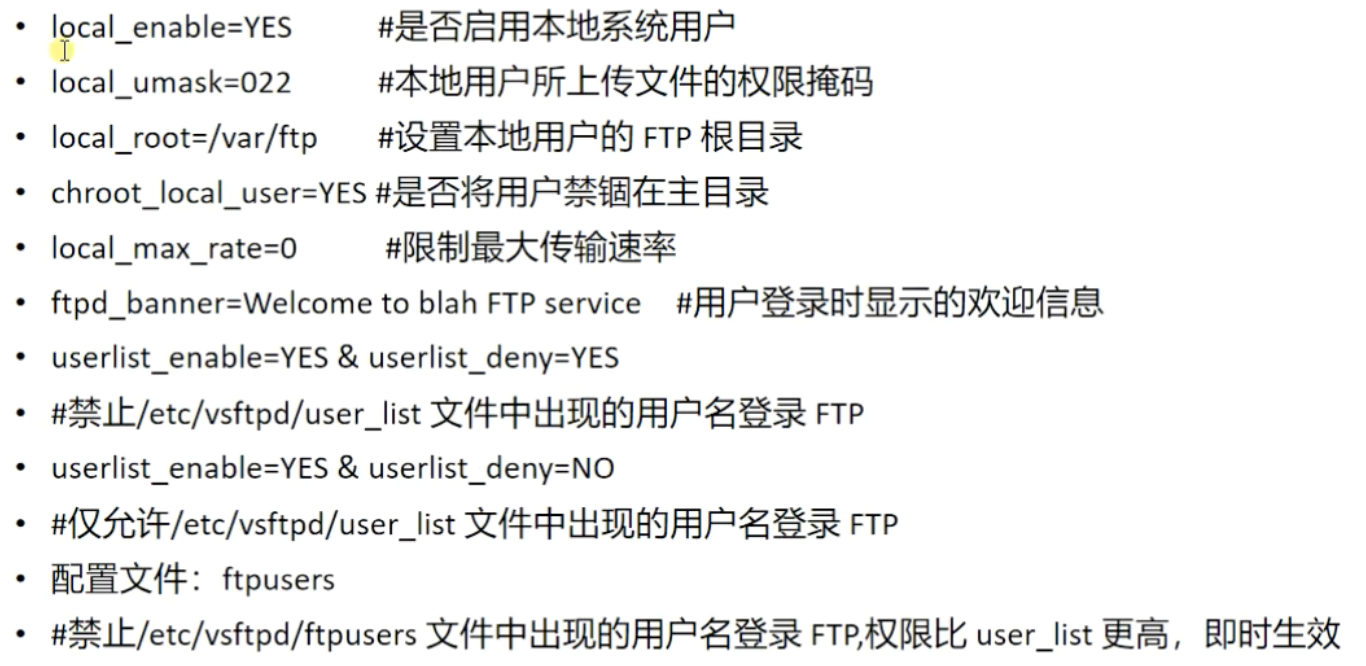<br />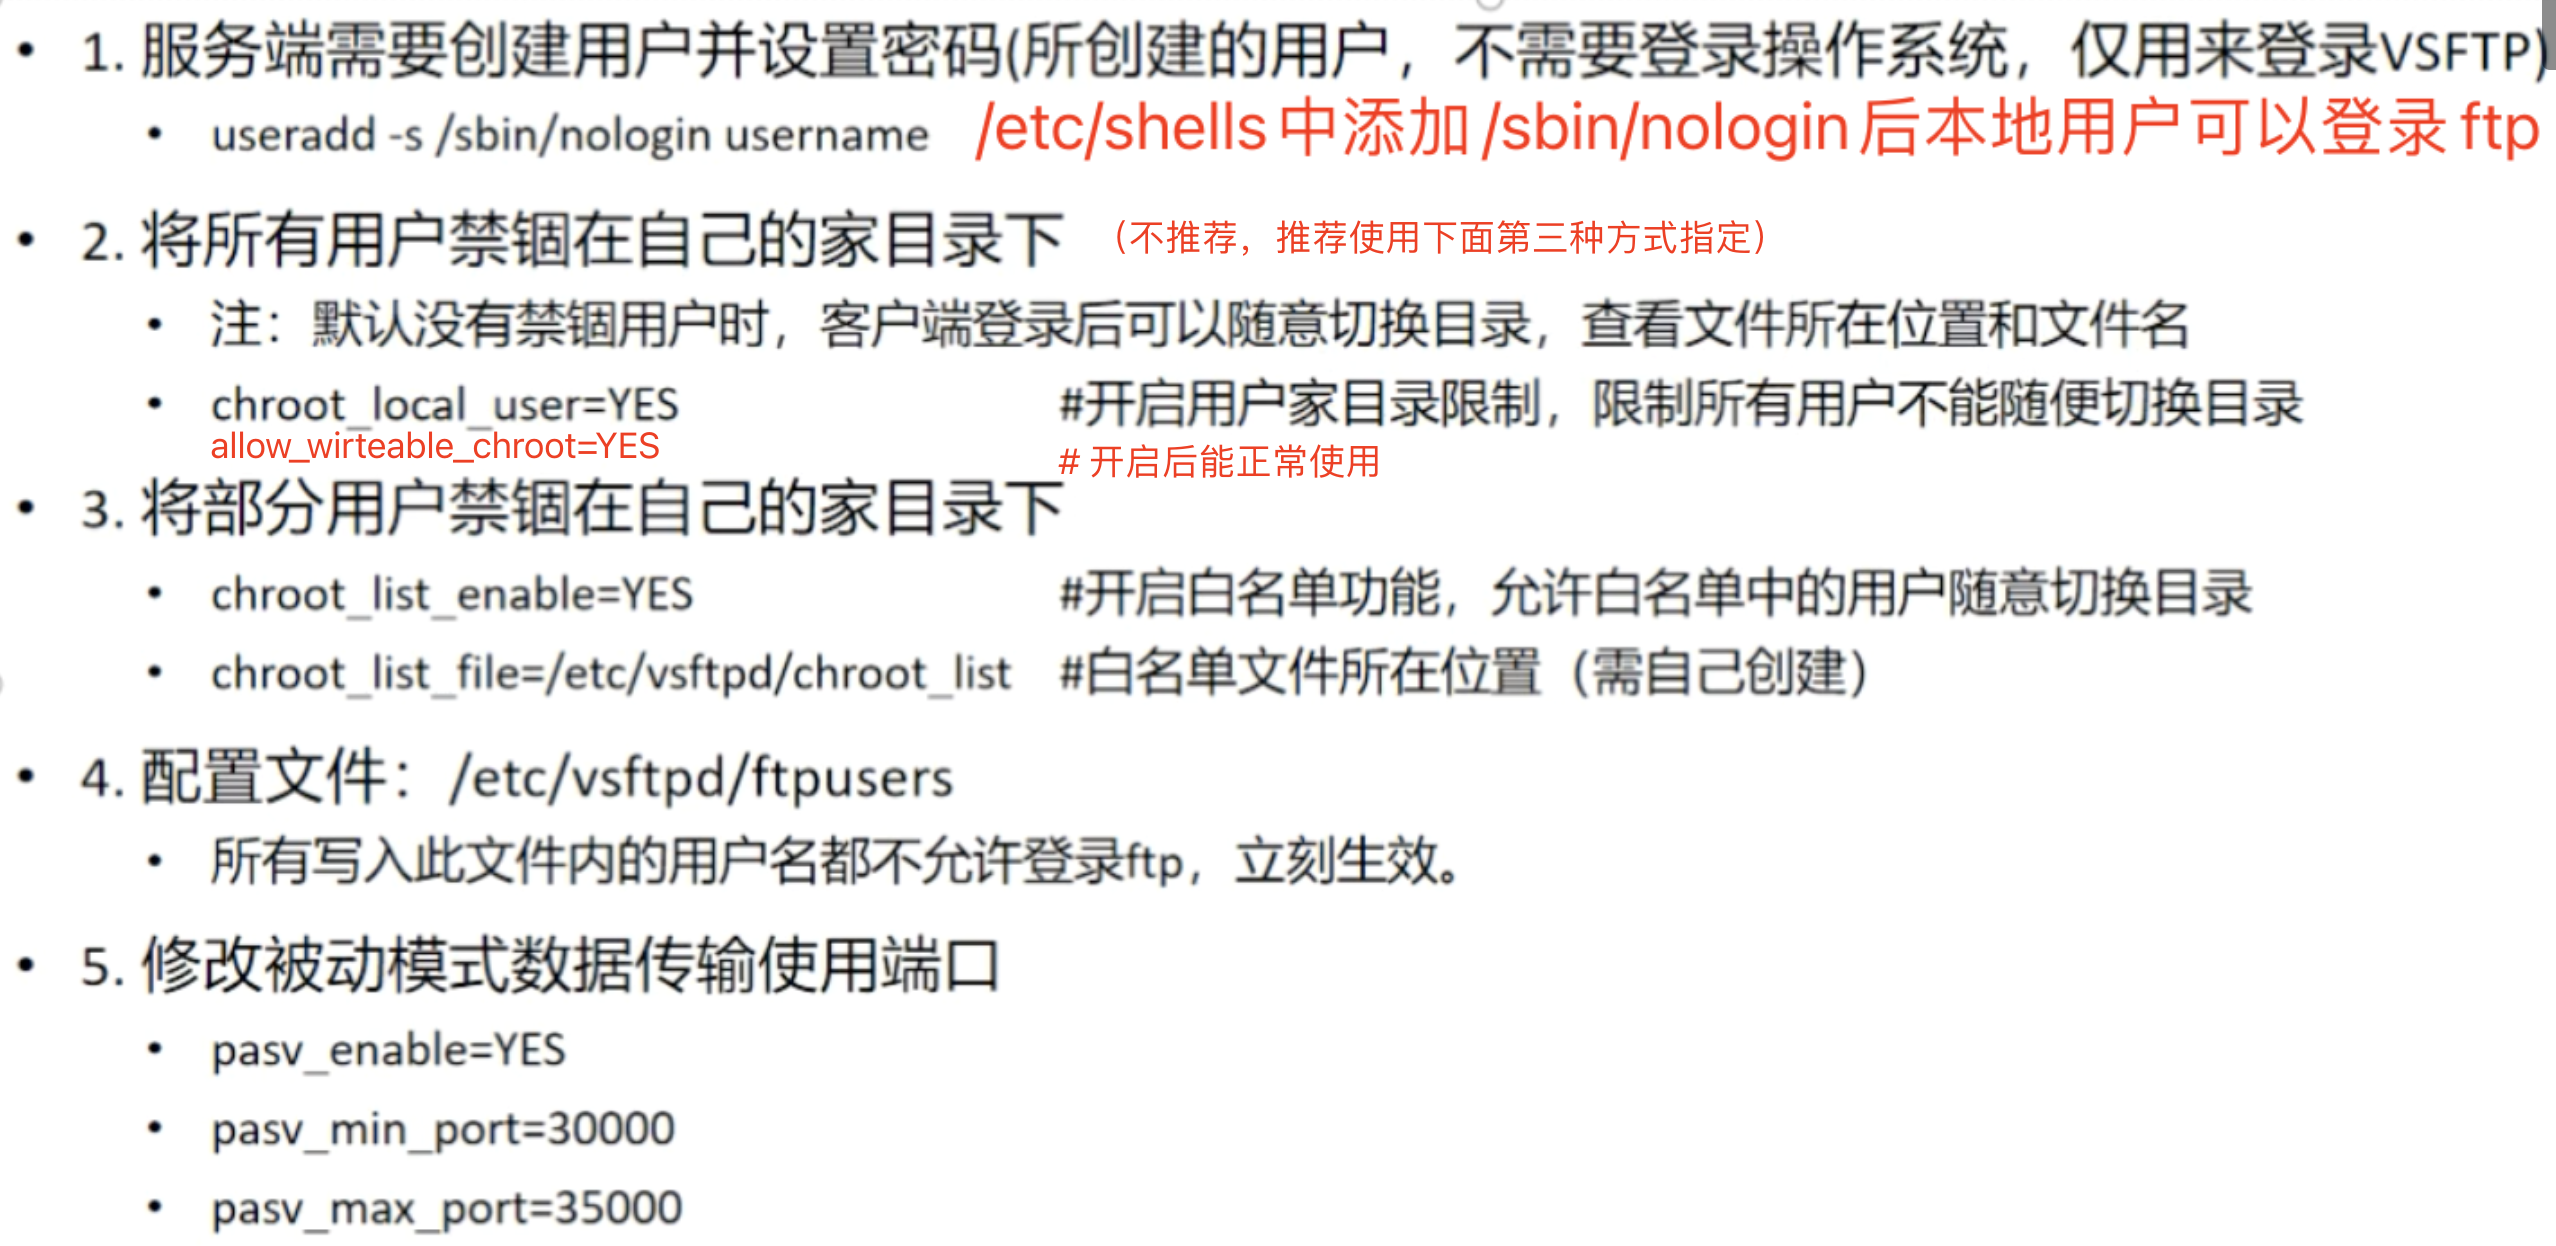<a name="VYRrN"></a>### 虚拟用户相关配置- 见PPT<a name="NdEAf"></a>## tcpdump抓包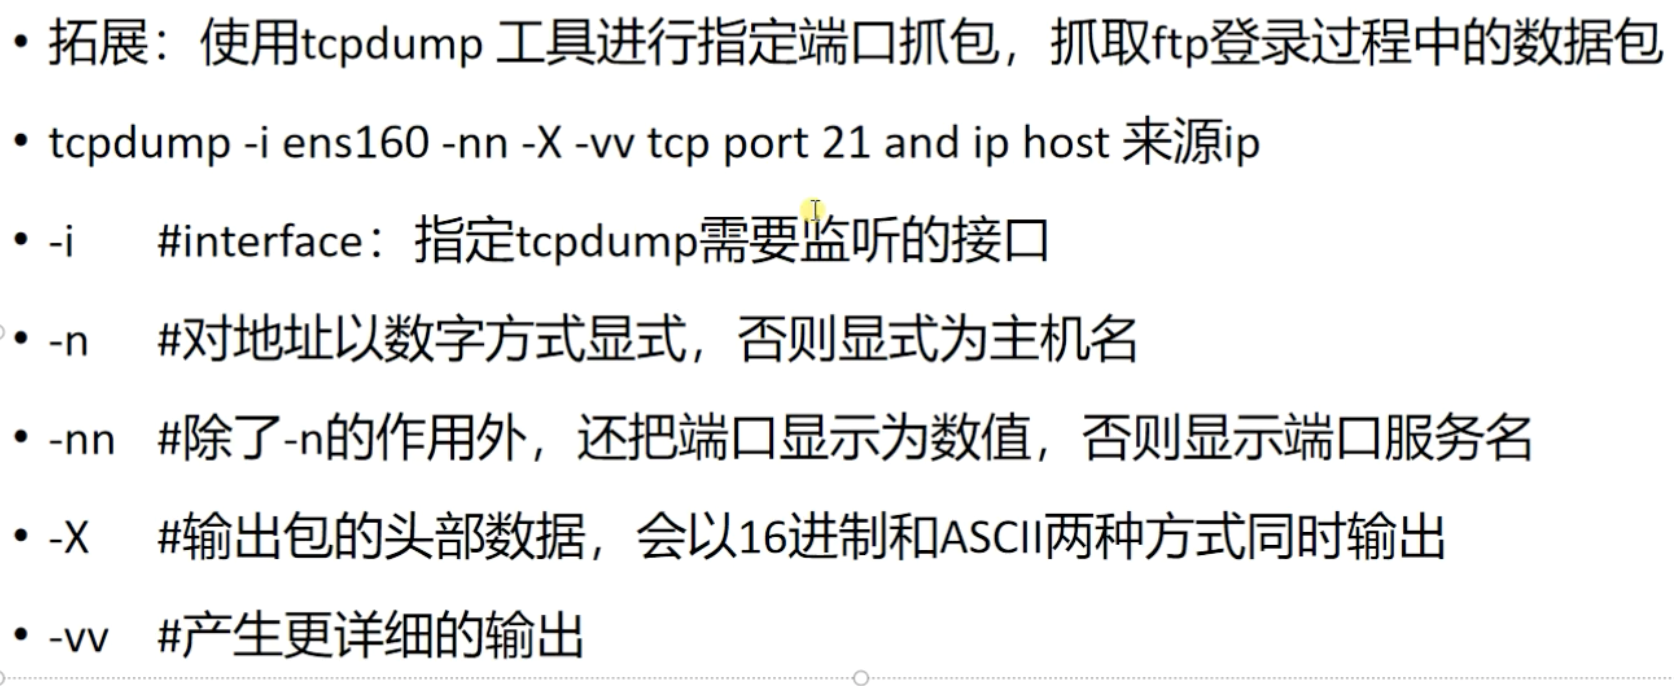<a name="MuRJ6"></a>## openssl+vsftp<a name="ensG3"></a>### 生成自签名证书```shellcd /etc/ssl/certs/# 生成私钥openssl genrsa -out vsftpd.key 2048# 创建CSRopenssl req -new -key vsftpd.key -out vsftpd.csr## 国家## 地区## 城市## 组织## 单位# 自签名openssl x509 -req -days 365 -sha256 -in vsftpd.csr -singkey vsftpd.key -out vsftpd.csr# 设置目录权限,防止误修改chmod 500 /etc/ssl/certs/
配置vsftp开启ssl
-
测试
重启服务
-
PPT
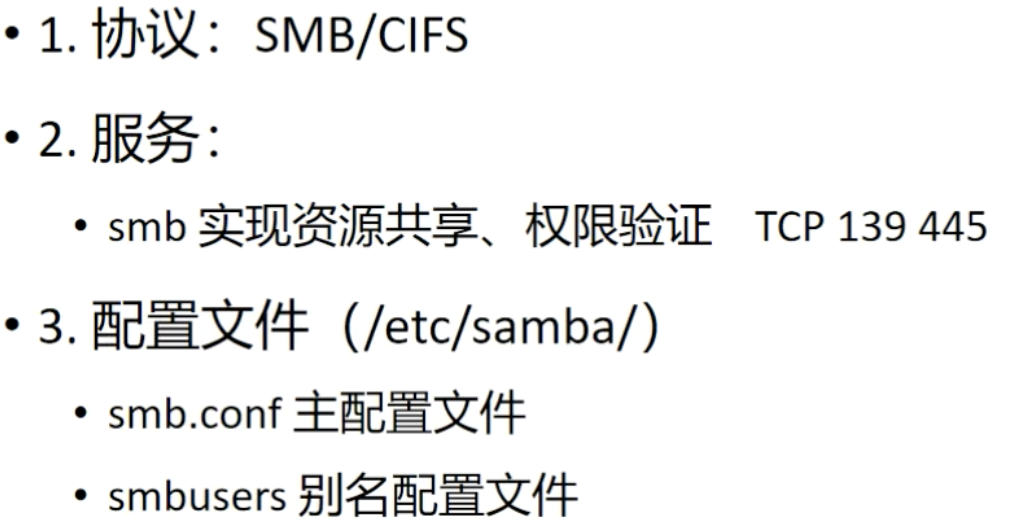
SAMBA
特性
使用SMB/CIFS协议、可跨平台
- SMB Server Messages Block 信息服务块
- CIFS Common Internet File System 程序可访问远程Internet上的文件
- 可实现文件系统挂载
- 可实现服务端修改文件
- 局域网内共享文件和打印机
服务相关信息
```shell yum install -y samba systemctl start smb
查看tcp 的2个端口
netstat -tunlp | grep -e 139 -e 445
<a name="Qo6ln"></a>## 登录验证模式<a name="SN4dl"></a>### share匿名验证- 不需要用户名密码<a name="rjOgV"></a>### user本地验证- 使用系统用户- 新增nologin的系统用户- useradd -s /sbin/nologin samba- 使用自定义密码- tdbsam,是使用一个数据库文件(passdb.tdb)来验证- pdbedit -a username # 新增用户(将系统用户转换为samba用户,并设置密码)- pdbedit -x username # 删除用户- pdbedit -L # 列出samba用户列表- samba默认的安全级别- 权限配置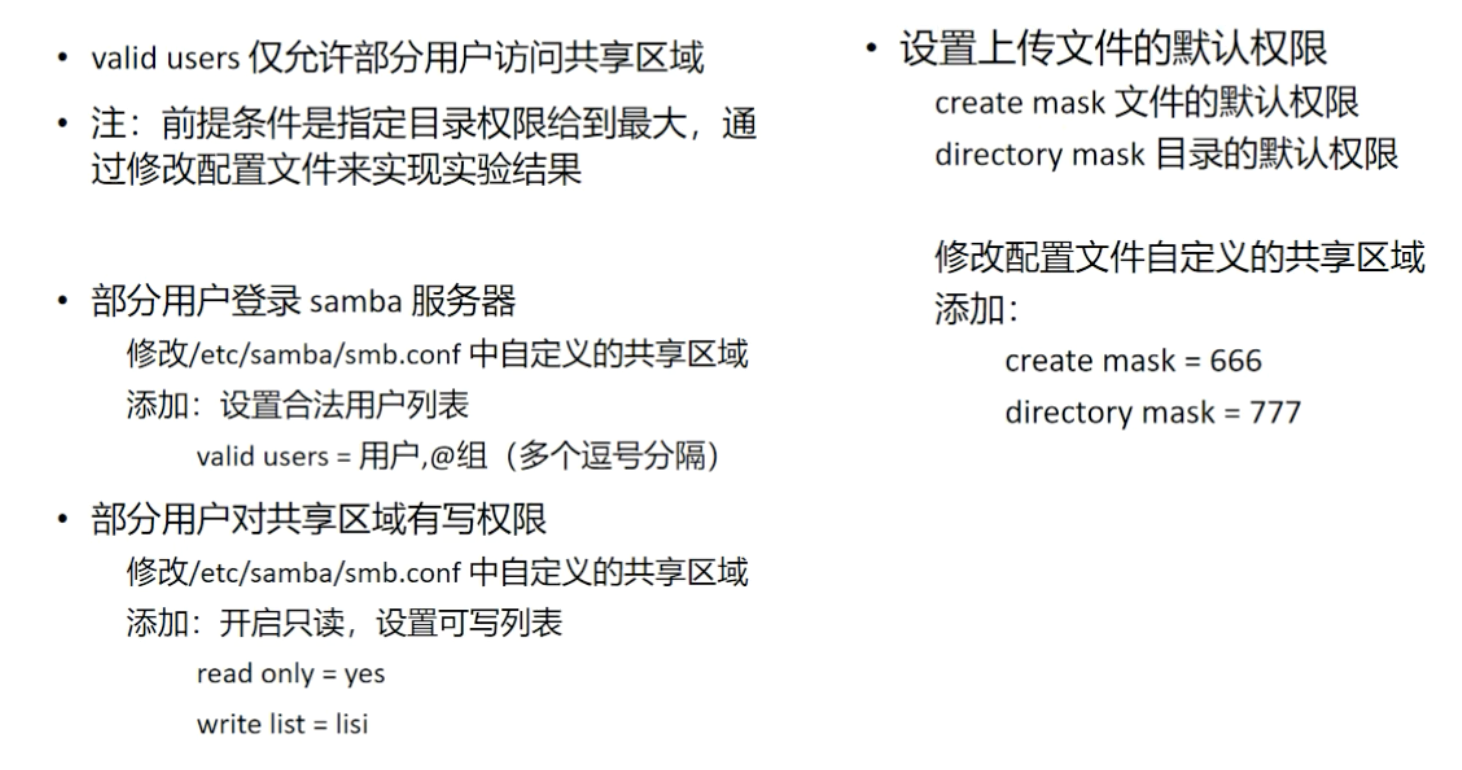<a name="Rdd8y"></a>### 别名用户访问- 给上面user本地用户的用户名创建一个别名,类似虚拟用户,防止过度暴露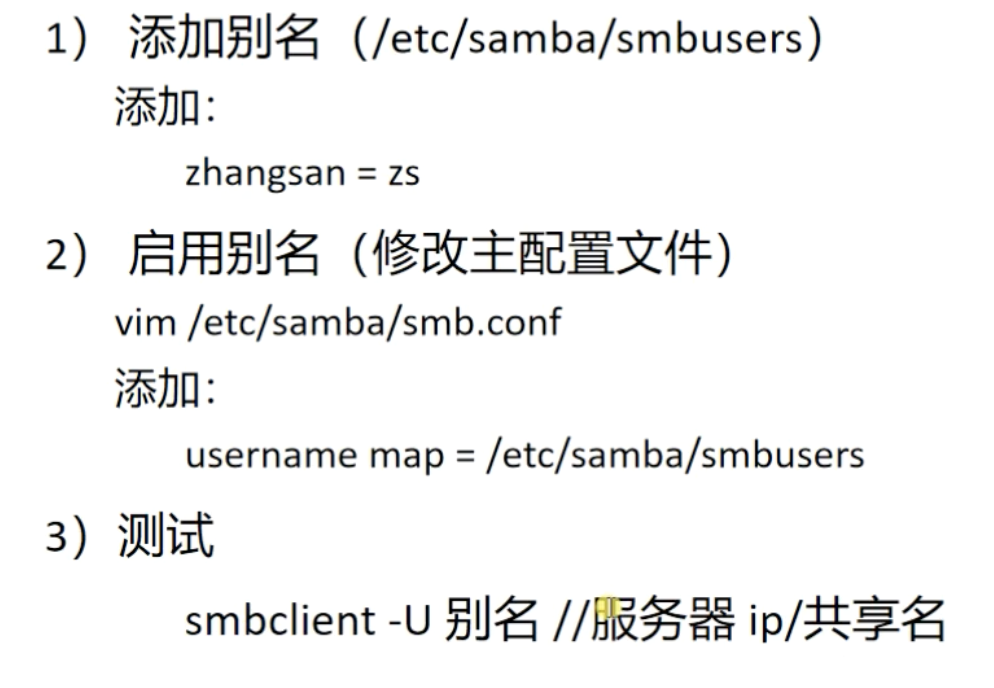<a name="lQgvF"></a>## 客户端<a name="kdN84"></a>### windows- 开启客户端支持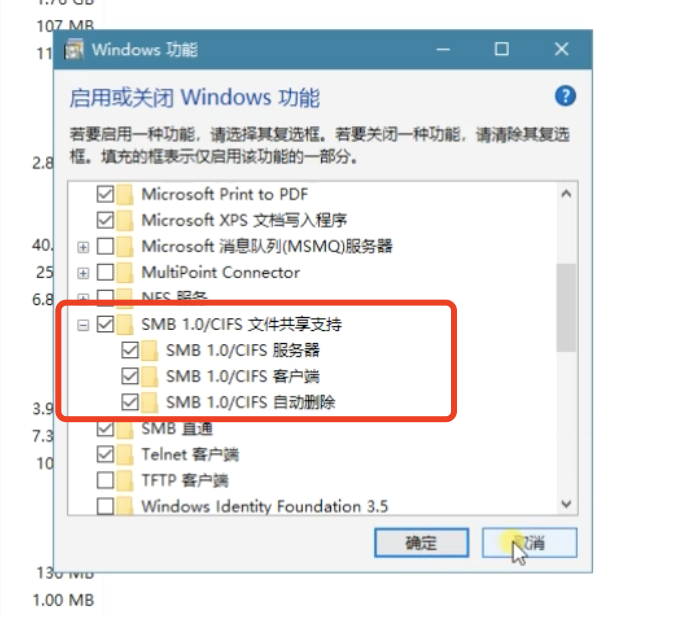- 开启临时挂载连接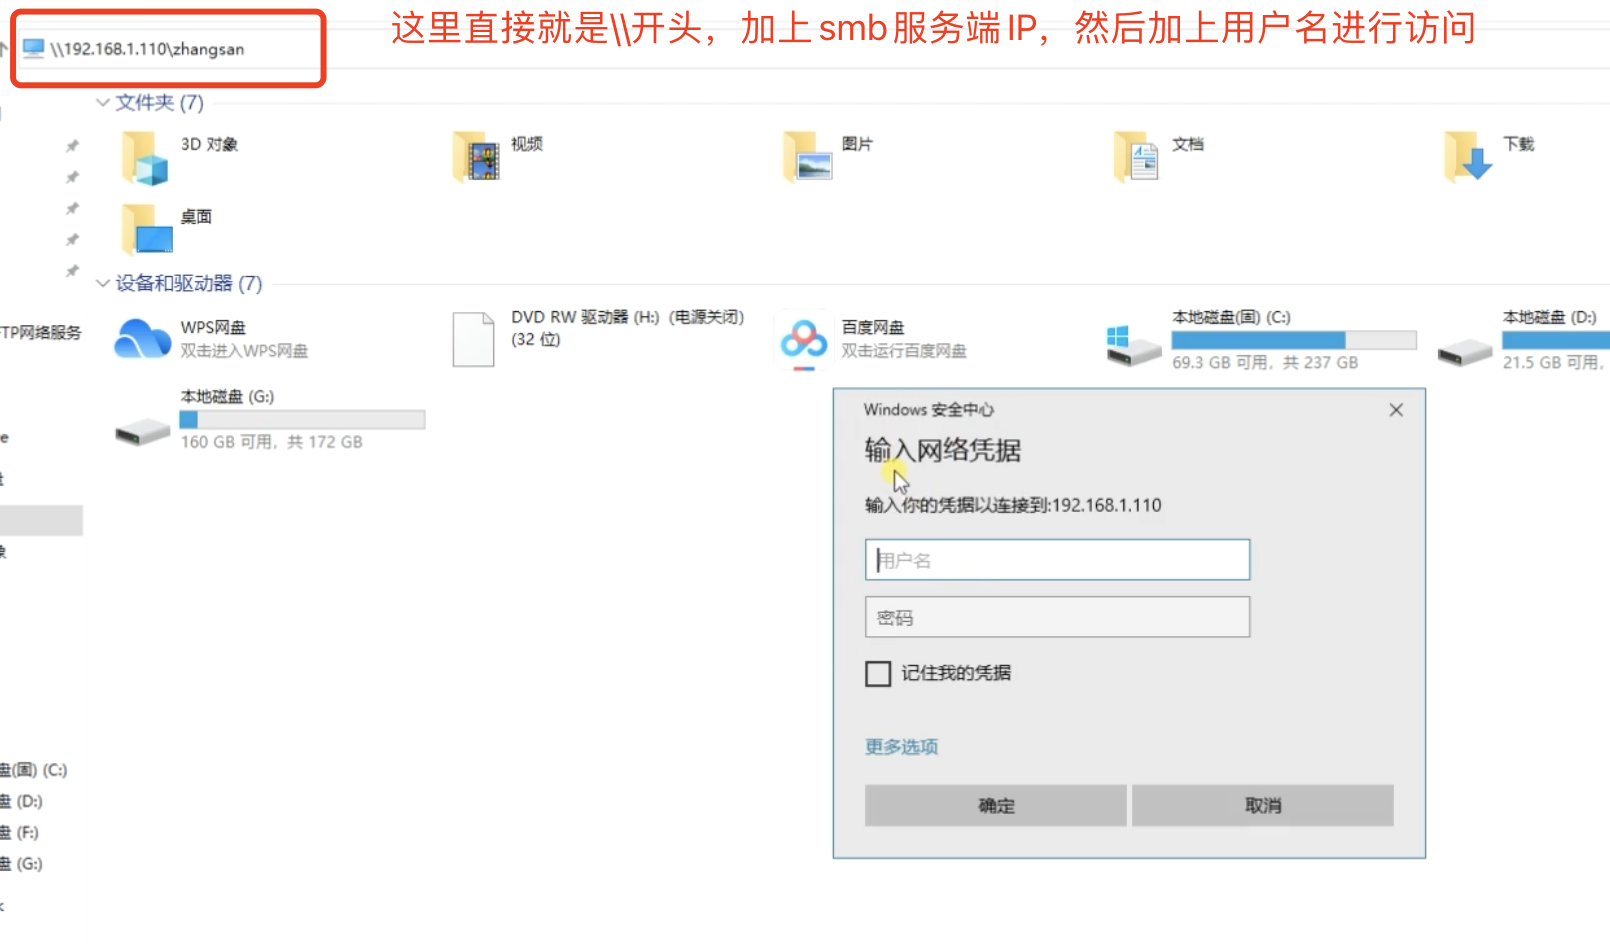- 开启挂载连接(映射网络驱动器)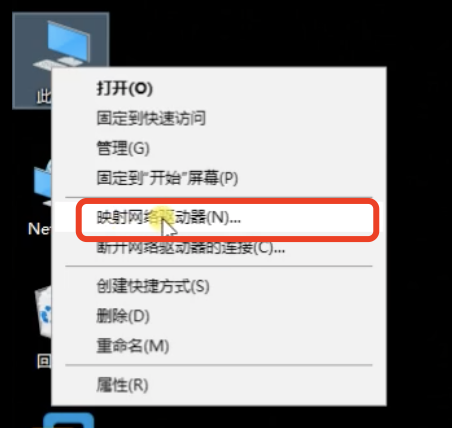<br />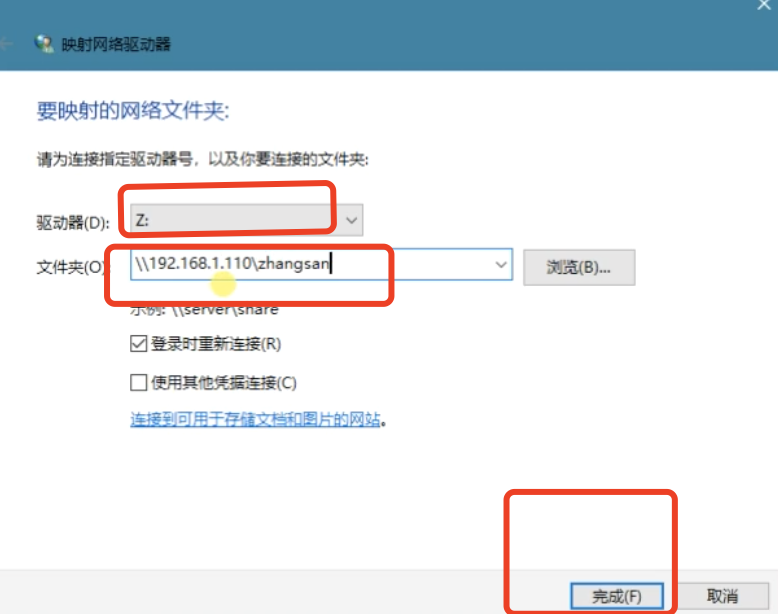<br />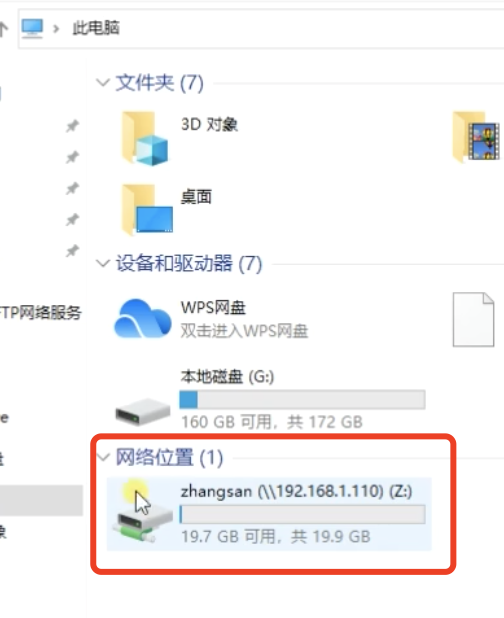- 清除缓存```shell# 清空登录缓存net use * /del
linux
yum -y install samba-client samba-common cifs-utils samba# 查看服务器共享smbclient -U username -L //serverIP# 登录服务器共享smbclient -U username //serverIP/shareNamesmb: \> ? # 查看帮助命令# 挂载## 临时挂载mount -t cifs -o username=xxx,password=xxx //serverIP/shareName /本地挂载目录## 永久挂载/etc/fstab//serverIP/shareName /本地挂载目录 cifs defaults,username=xxx,password=xxx 0 0mount -a
PPT
NFS
基础
- 一般用来存储和共享静态文件
- 区别与SAMBA可以windows、linux跨平台,NFS只在类unix平台上可用
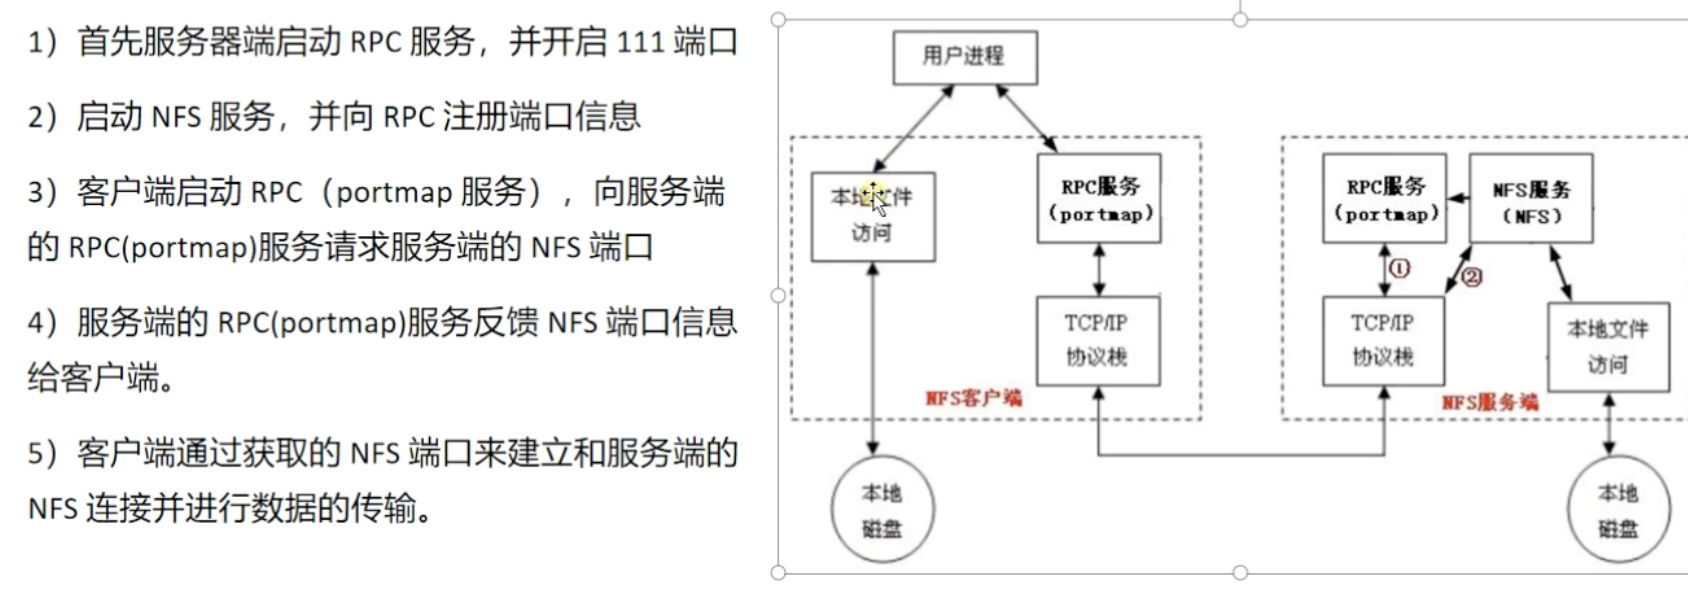
- 服务挂载通信原理
- Server
- 首先启动RPC服务(之前是portmap服务,现在是rpcbind)在111端口
- NFS服务启动在随机端口,启动后向RPC服务进行注册
- 如果RPC服务重启了,相关信息也会丢失,NFS服务也需要重启
- 为了防止频繁重启,一般修改NFS配置文件后,不需重启RPC,也不重启NFS,只需执行reload
- Client
- 首先启动RPC服务向Server的RPC通信,交换信息
- 和NFS服务端口进行通信
- Server
- 相关软件
- nfs-utils 包括nfs命令和监控程序
- rpcbind 支持安全NFS RPC服务的连接
- 通常是默认安装的
- centos6之前该软件叫portmap ```shell yum install -y rpcbind nfs-utils
systemctl start rpcbind systemctl enable rpcbind netstat -tunlp | grep 111
查看IP上rpcbind管理的端口号
rpcinfo -p IP
配置文件
/exportsdir *(rw)
systemctl start nfs-server systemctl status nfs-server systemctl reload nfs-server
查看nfs共享的目录
exportfs -v
相关命令
exportfs -a 全部挂载或卸载/etc/exports中的内容 -r 重新读取配置信息 -u 卸载单一目录(和-a一起使用为卸载/etc/exports文件中的目录)
## 常用-au 卸载所有共享目录-ar 重新共享所有目录
默认客户端是nobody用户角色进来,所以要注意exports出去的目录权限
chmod o+rw /exportsdir
client
在客户端机器这边查询服务端IP暴露的可以挂载的目录
showmount -e IP
ver3版本避免同步延迟
mount -o vers=3 IP:/exportsdir /data
查询
mount | grep nfs
卸载
umount /data
开机挂载
/etc/fstab IP:/dir /mountpoint nfs defaults,vers=3 0 0
mount -a
<a name="Uv12J"></a>## 配置文件- /etc/exports<br />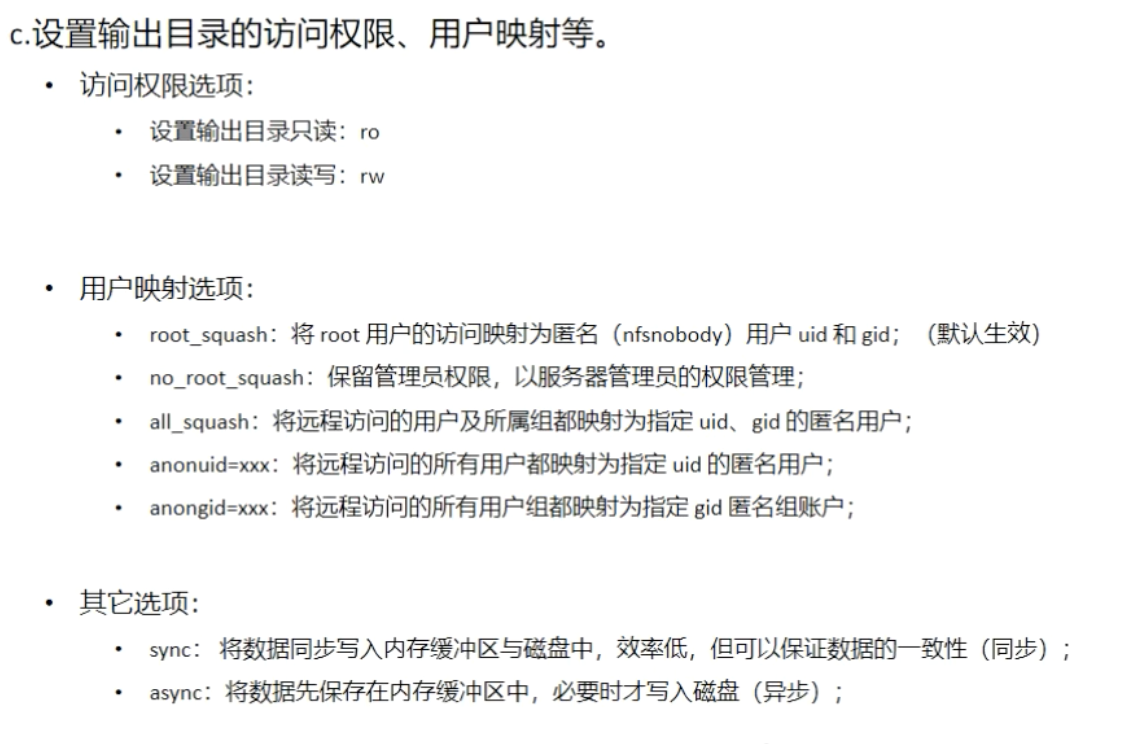<a name="GChTG"></a>## PPT[NFS.pptx](https://www.yuque.com/attachments/yuque/0/2022/pptx/1491874/1654499935106-f09702da-14a3-407e-8adc-b6bae05bbcd2.pptx?_lake_card=%7B%22src%22%3A%22https%3A%2F%2Fwww.yuque.com%2Fattachments%2Fyuque%2F0%2F2022%2Fpptx%2F1491874%2F1654499935106-f09702da-14a3-407e-8adc-b6bae05bbcd2.pptx%22%2C%22name%22%3A%22NFS.pptx%22%2C%22size%22%3A528053%2C%22type%22%3A%22%22%2C%22ext%22%3A%22pptx%22%2C%22source%22%3A%22%22%2C%22status%22%3A%22done%22%2C%22mode%22%3A%22title%22%2C%22download%22%3Afalse%2C%22taskId%22%3A%22u392082e4-57d1-4393-81ee-4e7200b18d8%22%2C%22taskType%22%3A%22upload%22%2C%22__spacing%22%3A%22both%22%2C%22id%22%3A%22u62584819%22%2C%22margin%22%3A%7B%22top%22%3Atrue%2C%22bottom%22%3Atrue%7D%2C%22card%22%3A%22file%22%7D)<a name="t6uyM"></a># Rsync<a name="be18a"></a>## 基础- 数据镜像备份工具- 支持全量备份和增量备份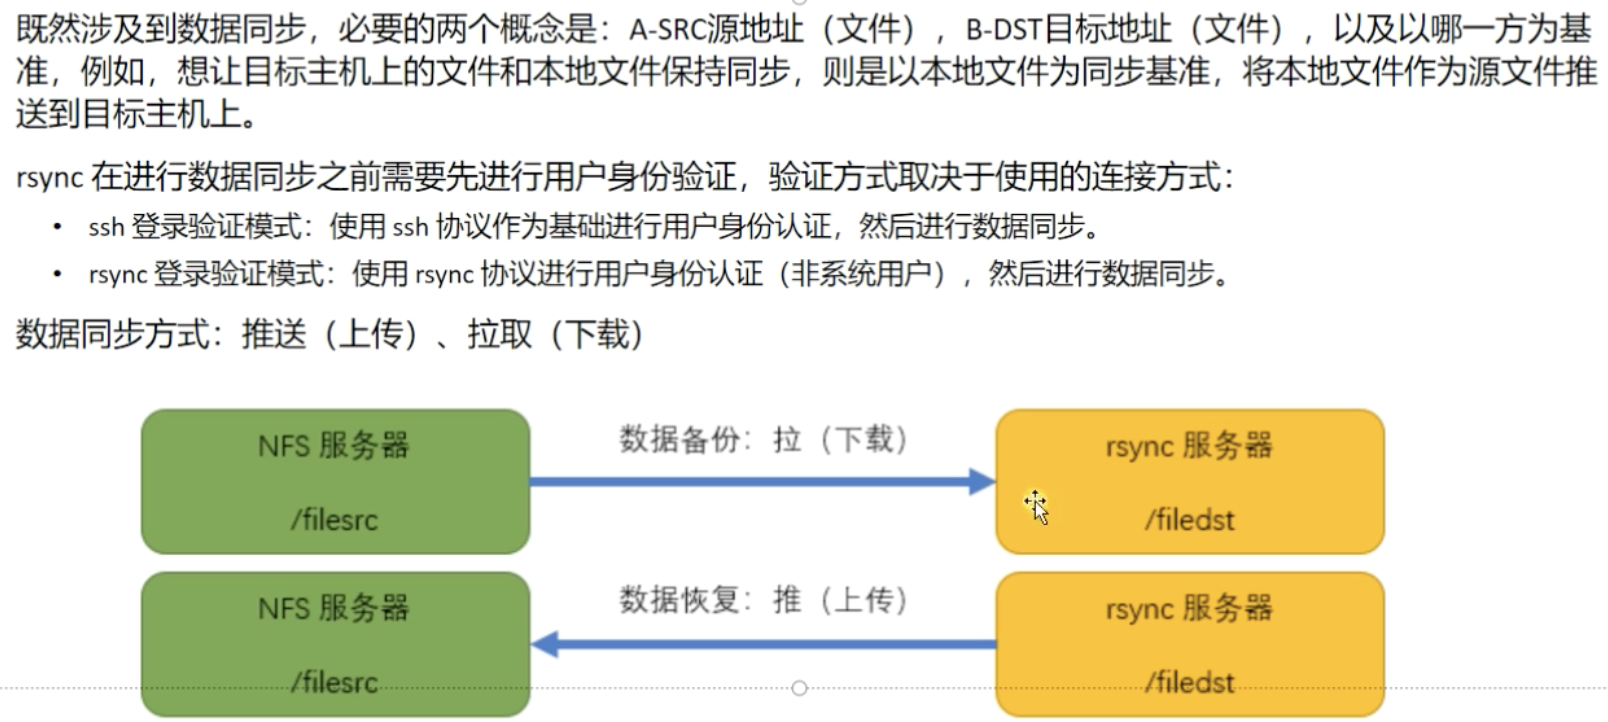<a name="nrJQo"></a>## 定期同步<a name="TEq4h"></a>### ssh协议- 使用ssh协议,就类似scp```shell# 配置免密# 下载rsync -avz --delete Username@SourceIP:/SRC /DEST# 上传rsync -avz /DEST Username@SourceIP:/SRC
rsync协议
用户名密码文件(明文)
/etc/rsyncd_users.db user1:123456
启动服务
rsync —daemon
查看端口
netstat -tunlp | grep 873
服务启动后使用rsync协议传输
下载
rsync -avz —delete rsync://user@SourceIP:/ShareName /DEST
上传
rsync -avz rsync:///DEST user@SourceIP:/ShareName
rsync协议免密
export RSYNC_PASSWORD=123456 rsync -avz —delete rsync://user@SourceIP:/ShareName /DEST
<a name="tpWcm"></a>## 实时同步- 实时性好- 如果无变化则不会备份,节省资源<a name="y3NGA"></a>### inotify- 是内核特性,监控文件系统的事件发出通知```shell# 两个监控命令inotifywait 持续监控,实时输出结果,常用inotifywatch 短期监控,任务完成后再出结果# 部署yum install -y gcc*tar xf inotify-tools-3.14.tar.gzcd inotify-tools-3.14./configuremake && make install
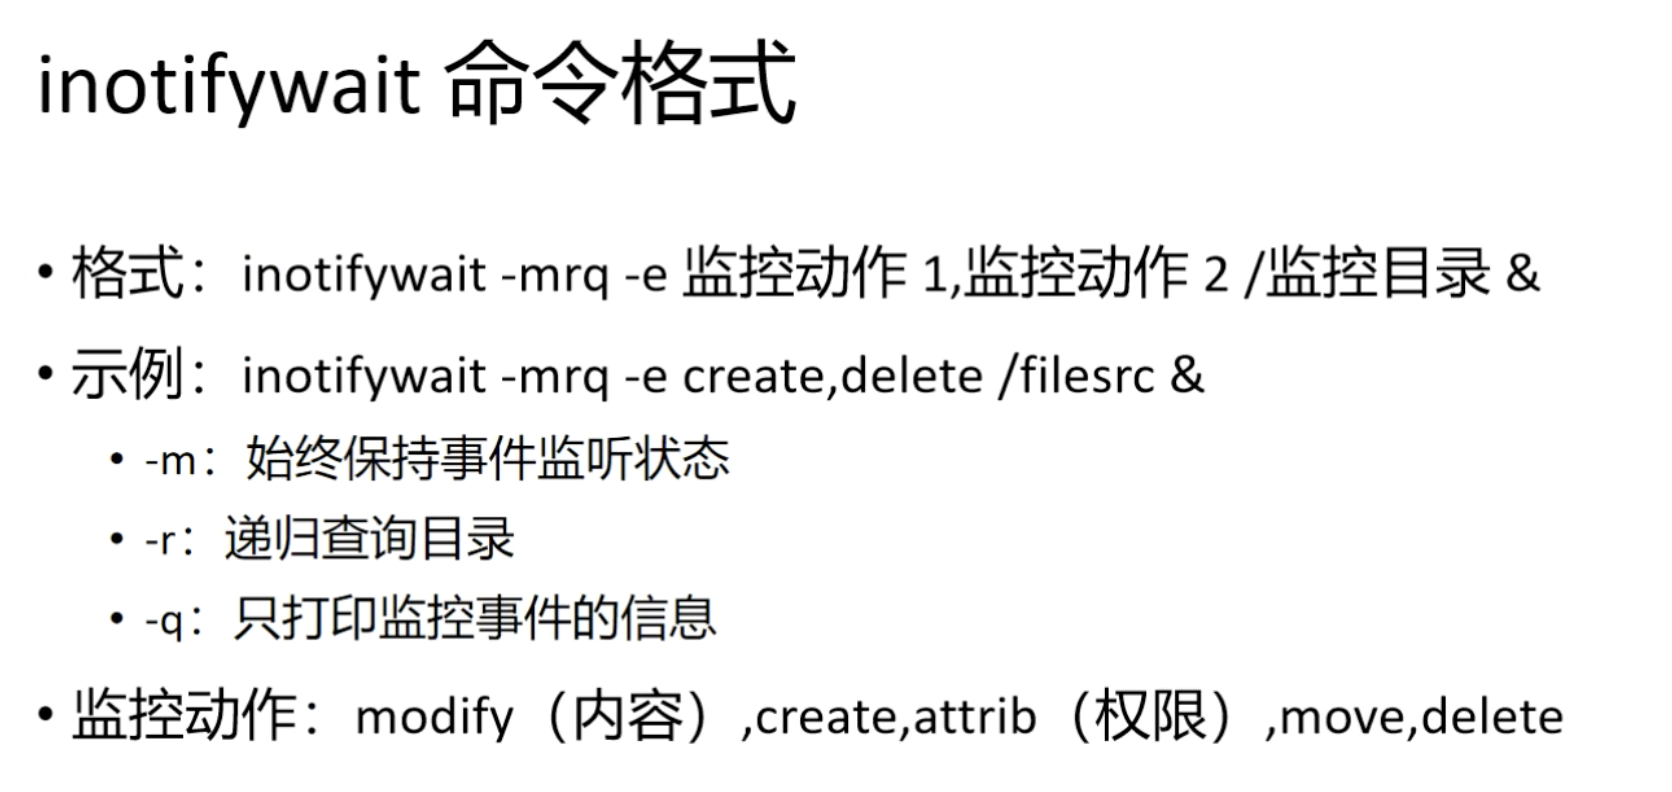
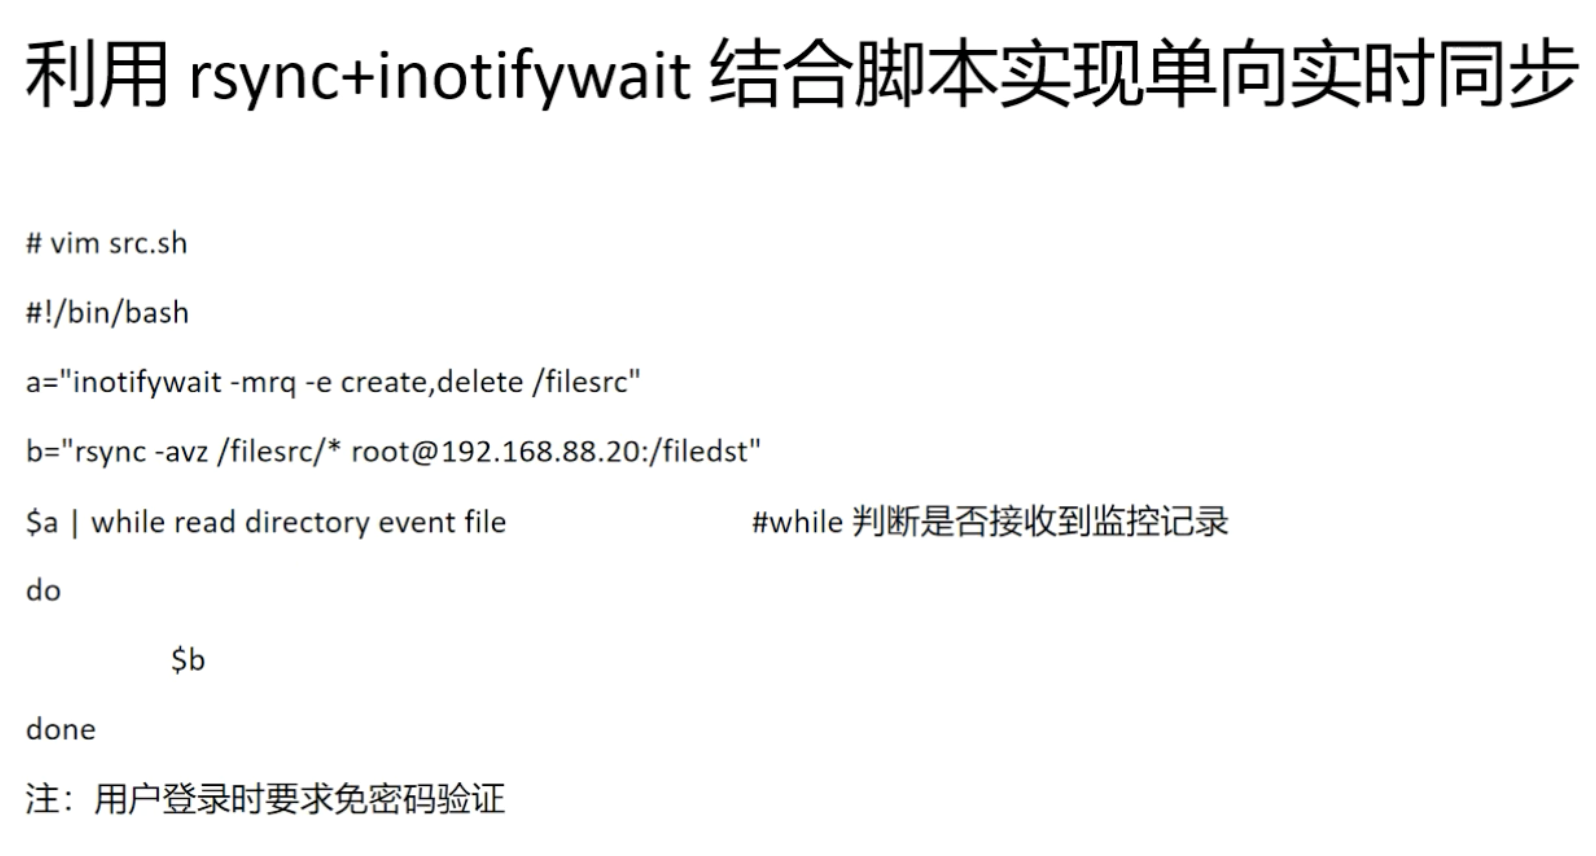
rsync+inotifywait单向同步
unison+inotify双向同步
- unison是双向同步工具,但效率欠佳
- 集成工具 http://github.com/bcpierce00/unison/release
手册
RSYNC.pptx

若有收获,就点个赞吧
0 人点赞
