1. Python并发
1.1 什么是并发?
并发的字典定义是同时发生。在Python中,同时发生的事物通过不同的名称(线程,任务,进程)进行调用,但在较高层次上,还是按顺序运行的指令序列。
| 并发类型 | 切换决定 | 处理器数量 |
|---|---|---|
抢先式多任务处理(threading) | 操作系统决定何时在Python外部切换任务 | 1个 | | 合作多任务处理(asyncio) | 这些任务决定何时放弃控制权 | 1个 | | 多重处理(multiprocessing) | 所有进程都同时在不同的处理器上运行 | 许多 |
1.2 并发适用场合
并发可以对两种类型的问题产生很大的影响,这两类问题通常称为CPU绑定和I / O绑定。
- CPU绑定 较为常见的是文件系统和网络连接
- I/O绑定 较为常见的是等待某些外部资源的输入/输出

在上图中,蓝色框显示了程序执行工作的时间,红色框是等待I / O操作完成所花费的时间。
该图未按比例绘制,因为Internet上的请求可能比CPU指令花费几个数量级,因此程序最终可能会花费大部分时间等待。
另一方面,有些程序类无需进行网络计算或访问文件即可进行大量计算。这些是与CPU绑定的程序,因为限制程序速度的资源是CPU,而不是网络或文件系统。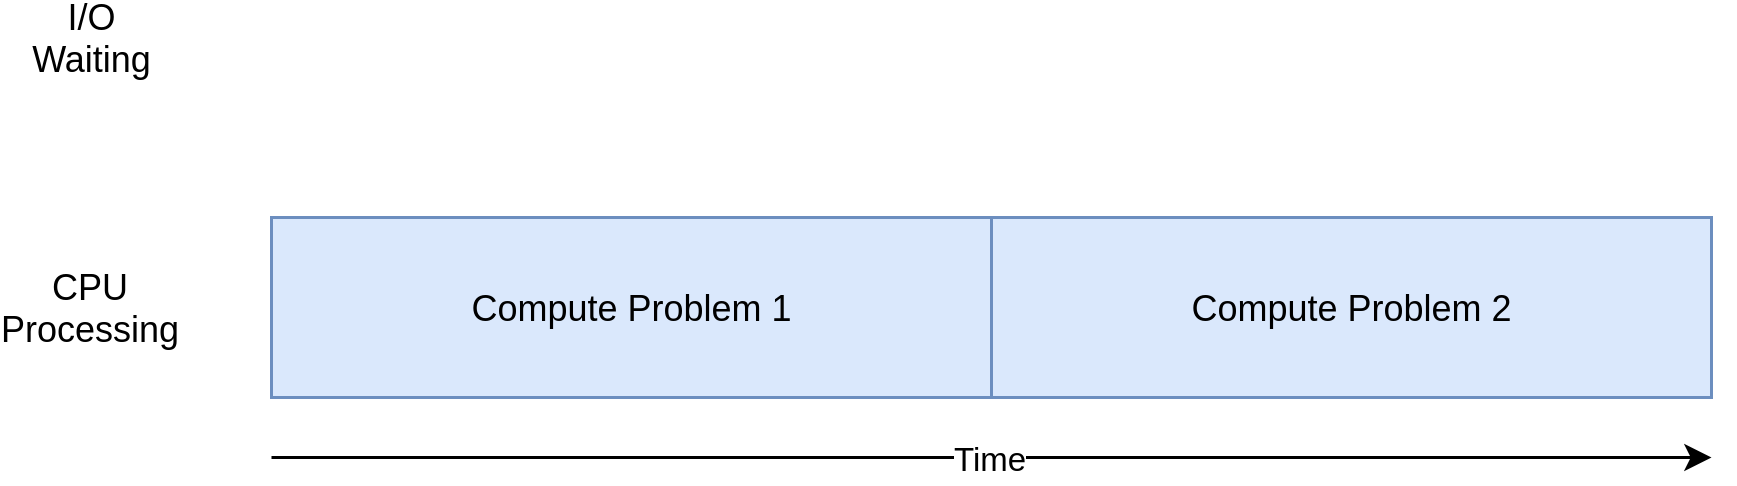
| I / O绑定过程 | CPU绑定进程 |
|---|---|
| 程序大部分时间都在与速度较慢的设备(例如网络连接,硬盘驱动器或打印机)进行通信。 | 您的程序大部分时间都花在CPU操作上。 |
| 加快速度涉及使等待这些设备所花费的时间重叠。 | 加快速度需要找到在相同的时间内进行更多计算的方法。 |
1.3 如何加快I/O限制程序
import requestsimport timedef download_site(url, session):with session.get(url) as response:print(f"Read {len(response.content)} from {url}")def download_all_sites(sites):with requests.Session() as session:for url in sites:download_site(url, session)if __name__ == "__main__":sites = ["https://www.jython.org","http://olympus.realpython.org/dice",] * 80start_time = time.time()download_all_sites(sites)duration = time.time() - start_timeprint(f"Downloaded {len(sites)} in {duration} seconds")
download_all_sites()创建Session,然后浏览网站列表,依次下载每个网站。最后,打印出此过程花费了多长时间。
Downloaded 160 in 30.927271127700806 seconds
如果你运行的程序花费时间仅数秒,并且很少运行,则可能不值得添加并发性,如果你的程序经常运行该怎么办?我们可以利用threading模块实现并发。
1.4 threading版本
利用threading模块进行改写
import concurrent.futuresimport requestsimport threadingimport timethread_local = threading.local()def get_session():if not hasattr(thread_local, "session"):thread_local.session = requests.Session()return thread_local.sessiondef download_site(url):session = get_session()with session.get(url) as response:print(f"Read {len(response.content)} from {url}")def download_all_sites(sites):with concurrent.futures.ThreadPoolExecutor(max_workers=5) as executor:executor.map(download_site, sites)if __name__ == "__main__":sites = ["https://www.jython.org","http://olympus.realpython.org/dice",] * 80start_time = time.time()download_all_sites(sites)duration = time.time() - start_timeprint(f"Downloaded {len(sites)} in {duration} seconds")
Downloaded 160 in 10.224606275558472 seconds
本例中,当添加时threading,总体结构是相同的,只需要进行一些更改即可。download_all_sites()从每个站点调用一次功能更改为更复杂的结构。
在改写的程序中创建了ThreadPoolExecutor,ThreadPoolExecutor= Thread+ Pool+ Executor。
- Pool对象将创建一个线程池,每个线程可以同时运行。
- Executor部分将控制池中每个线程的运行方式和时间。
Python标准库将ThreadPoolExecutor作为上下文管理器(context manager),因此可以使用with语法来管理创建和释放线程池。
一旦有了ThreadPoolExecutor,就可以使用map()方法。此方法在列表中的每个item上运行对应的函数。最重要的是,它使用正在管理的线程池自动并发运行它们。这里, 每个线程都需要创建自己的requests.Session()对象。
因为操作系统控制着您的任务何时被中断以及另一个任务的启动时间,所以线程之间共享的任何数据都需要受到保护,或者是线程安全的。
根据数据是什么以及如何使用数据,有几种使数据访问线程安全的策略。其中之一是使用线程安全的数据结构,例如QueuePythonqueue模块中的数据。
这里使用的另一种策略是称为线程本地存储。threading.local()创建一个看起来像全局对象但特定于每个单独线程的对象。
当get_session()被调用时,session它查找特定于其正在运行的特定线程。因此,每个线程将在第一次调用时创建一个会话get_session(),然后在整个生命周期中仅在随后的每个调用中使用该会话。
这里贴一张执行的图示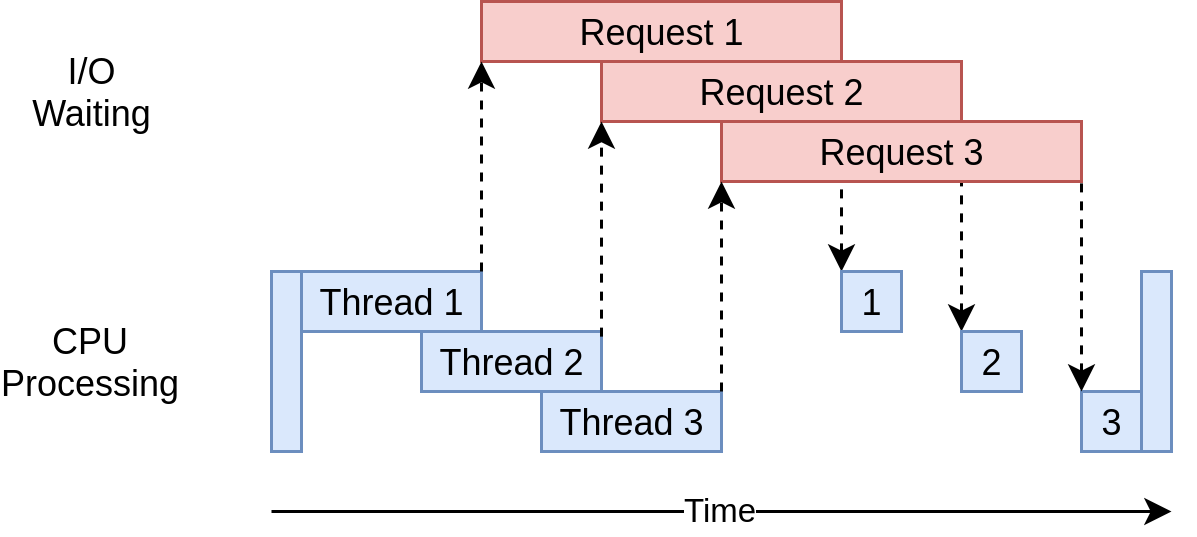
它使用多个线程来同时向网站发出多个打开的请求,从而使您的程序可以重叠等待时间,并更快地获得最终结果。
操作系统正在控制线程的运行时间以及何时将其换出以允许另一个线程运行。即使执行Python语句的子步骤,此线程也可以随时发生。
import concurrent.futurescounter = 0def increment_counter(fake_value):global counterfor _ in range(100):counter += 1if __name__ == "__main__":fake_data = [x for x in range(5000)]counter = 0with concurrent.futures.ThreadPoolExecutor(max_workers=5000) as executor:executor.map(increment_counter, fake_data)
此代码与您在threading上面的示例中使用的结构非常相似。不同之处在于每个线程都在访问相同的全局变量 counter并对其进行递增。Counter不受任何方式的保护,因此它不是线程安全的。
为了递增counter,每个线程都需要读取当前值,将其添加一个,然后将该值保存回该变量。发生在以下行中:counter += 1。
因为操作系统对您的代码一无所知,并且可以在执行过程中的任何时候交换线程,所以这种交换有可能在线程读取值之后但有机会将其写回之前发生。如果正在运行的新代码也被修改counter,则第一个线程将拥有陈旧的数据副本,随之而来的麻烦将随之而来。
1.5 asyncio版本
在写asyncio版本之前,我们先学习一个asyncio的基本工作原理。
1.5.1 asyncio原理
这里仅学习其基本原理,省略了许多细节。
asyncio的基本概念是一个Python object,调用event loop,控制每个task运行的时间与方法。event loop知道每个任务并知道其处于什么状态。task则有多种状态可能,但为了学习原理,这里仅假设每个task仅有以下两个状态:
- Ready状态,表示任务已经准备好运行
- Waiting状态,表示任务处于等待某些外部事件完成的状态
简化的event loop需要维护两个任务列表,分别是Ready任务列表和Waiting任务列表。
event loop选取一个Ready列表中的任务去执行,将该任务放置到Waiting任务列表中,同时遍历Waiting任务列表中的任务,查看是否有完成响应的任务。
在Ready列表中的任务,如果没有被event loop执行到,则其状态一直保持Ready。
1.6 multiprocessing版本
不同于前面的方法,multiprocessing版本的代码可以充分利用多个CPU。
import requestsimport multiprocessingimport timesession = Nonedef set_global_session():global sessionif not session:session = requests.Session()def download_site(url):with session.get(url) as response:name = multiprocessing.current_process().nameprint(f"{name}:Read {len(response.content)} from {url}")def download_all_sites(sites):with multiprocessing.Pool(initializer=set_global_session) as pool:pool.map(download_site, sites)if __name__ == "__main__":sites = ["https://www.jython.org","http://olympus.realpython.org/dice",] * 80start_time = time.time()download_all_sites(sites)duration = time.time() - start_timeprint(f"Downloaded {len(sites)} in {duration} seconds")
Pool会创建单独的PYthon解释器进程,对迭代目标进行执行,主进程与其他进程之间通过multiprocessing模块实现通信。
创建Pool的行值得您注意。 首先,它不是指定在池中创建多少个进程的方法,尽管这是一个可选参数。 默认情况下,multiprocessing.Pool()将确定计算机中的CPU数量并进行匹配。 这通常是最好的答案,就我们而言。
在Pool中的每个进程都有自己的memory space。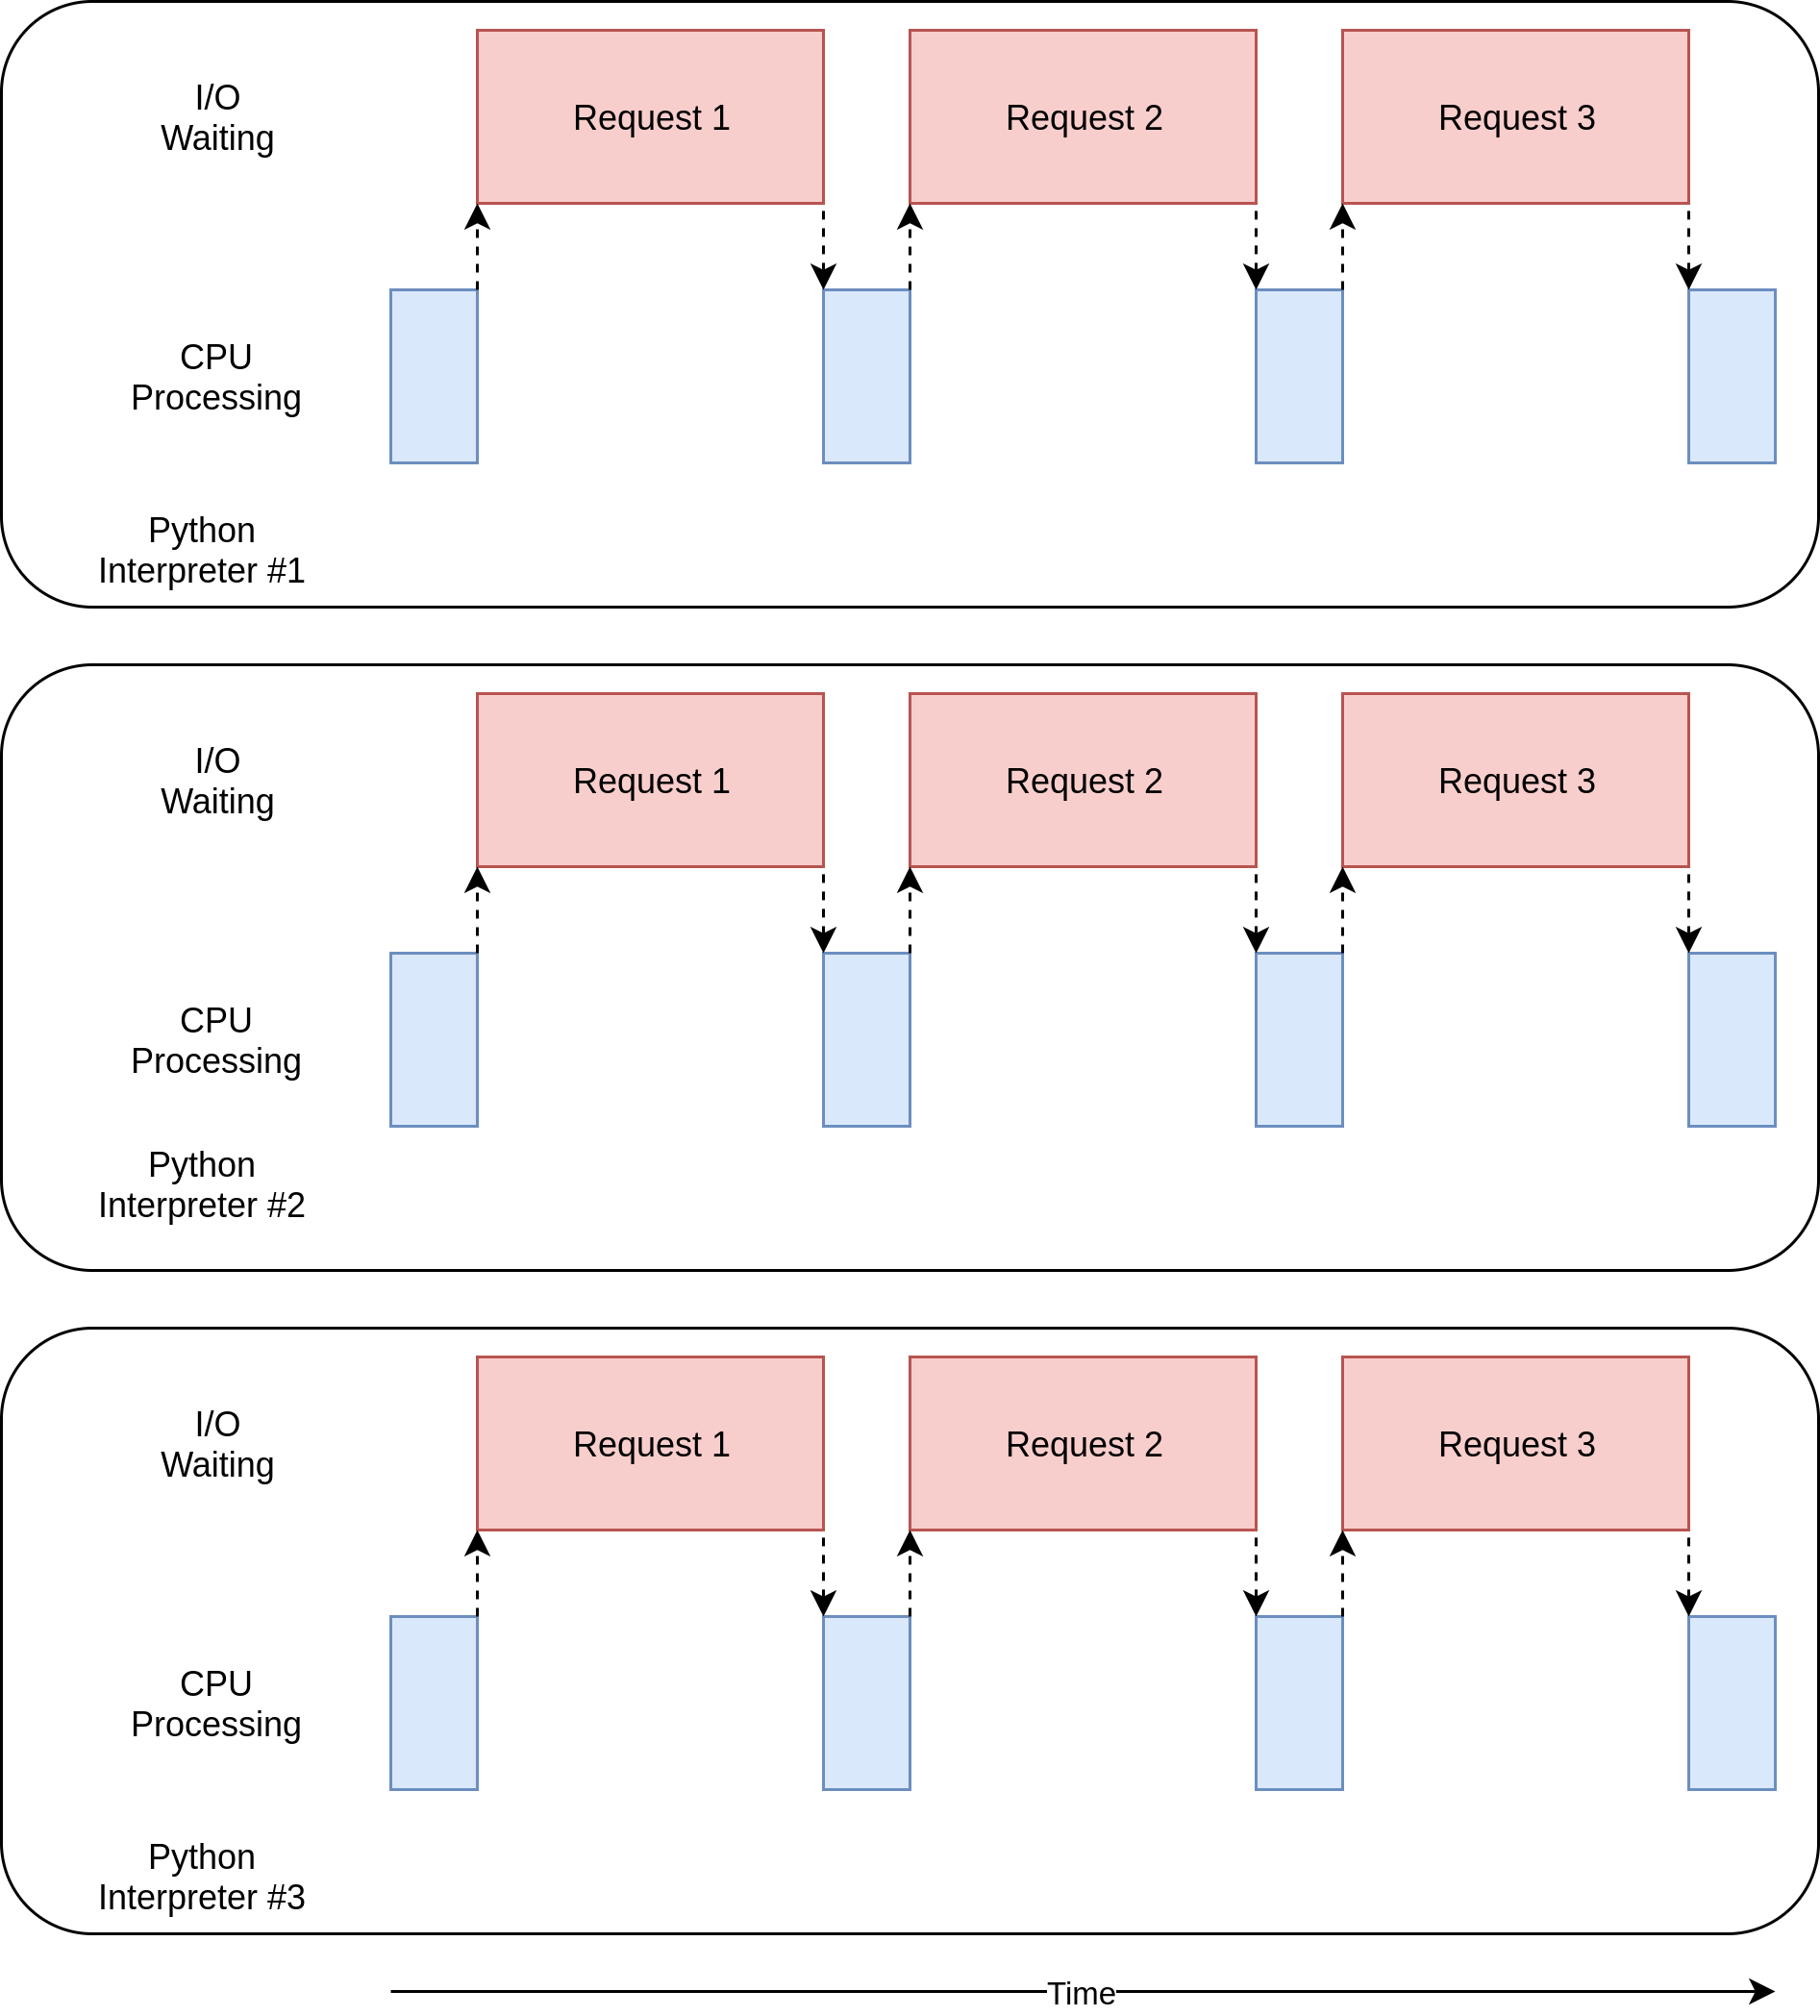
对于multiprocessing而言,在编程过程中需要思考哪些变量是需要被每个process都访问到的,需要设置部分全局变量,让multiprocess帮助你实现多进程间的通信。
需要注意的是,对于I/O限制的问题,multiprocessing不一定比threading快。
如何加速CPU限制的程序
对于I/O限制的程序,受限于等待外部操作,而对于CPU限制的问题,则取决于CPU的处理能力。
import timedef cpu_bound(number):return sum(i * i for i in range(number))def find_sums(numbers):for number in numbers:cpu_bound(number)if __name__ == "__main__":numbers = [5_000_000 + x for x in range(20)]start_time = time.time()find_sums(numbers)duration = time.time() - start_timeprint(f"Duration {duration} seconds")
1.7 multiprocessing模块
import multiprocessingimport timedef cpu_bound(number):return sum(i * i for i in range(number))def find_sums(numbers):with multiprocessing.Pool() as pool:pool.map(cpu_bound, numbers)if __name__ == "__main__":numbers = [5_000_000 + x for x in range(20)]start_time = time.time()find_sums(numbers)duration = time.time() - start_timeprint(f"Duration {duration} seconds")
使用multiprocessing模块会有一些缺点,如果线程之间需要通信,会使程序变得复杂。
注意: CPU限制型的程序,只有通过multiprocessing可以有效地降低执行时间,threading和asyncio模块对这类问题无济于事。
2. Thread
线程是单独的执行流程。这意味着你的程序可以同时执行两个任务。但是对于大多数Python 3实现,不同的线程实际上并不会同时执行:它们看上去只是在同时执行。
在进行I/O限制型程序,例如 UDP监听,串口监听、拷贝文件等,可以利用threading.Thread,将对应的监听或等待的程序开一个线程。
import loggingimport threadingimport timedef thread_function(name):logging.info("Thread %s: starting", name)time.sleep(2)logging.info("Thread %s: finishing", name)if __name__ == "__main__":format = "%(asctime)s: %(message)s"logging.basicConfig(format=format, level=logging.INFO,datefmt="%H:%M:%S")logging.info("Main : before creating thread")x = threading.Thread(target=thread_function, args=(1,))logging.info("Main : before running thread")x.start()logging.info("Main : wait for the thread to finish")# x.join()logging.info("Main : all done")
守护进程线程
daemon是在后台运行的进程。Python的threading对daemon有更明确的含义,当程序退出时,daemon thread会自动关闭。
如果一个程序运行Thread而不是daemons,那么程序会一直等待这些threads完成后才关闭。
要告诉一个线程等待另一个线程结束,请调用.join()。如果取消注释该行,则主线程将暂停并等待该线程x完成运行。
2.2 ThreadPoolExecutor
与上面看到的线程相比,有一种更简单的方法来启动一组线程。
它称为ThreadPoolExecutor,并且是concurrent.futures(自Python 3.2起)标准库的一部分。
创建它的最简单方法是作为上下文管理器,使用该with语句来管理池的创建和销毁。
import concurrent.futures# [rest of code]if __name__ == "__main__":format = "%(asctime)s: %(message)s"logging.basicConfig(format=format, level=logging.INFO,datefmt="%H:%M:%S")with concurrent.futures.ThreadPoolExecutor(max_workers=3) as executor:executor.map(thread_function, range(3))
该代码创建了ThreadPoolExecutor一个上下文管理器,告诉它在池中需要多少个工作线程。
注意:使用aThreadPoolExecutor可能会导致一些令人困惑的错误。 例如,如果调用不带参数的函数,但在.map()中将参数传递给,则线程将引发异常。 不幸的是,ThreadPoolExecutor将隐藏该异常,并且(在上述情况下)该程序将终止,没有任何输出。一开始调试起来可能会很混乱
2.3 竞争条件
当两个或多个线程访问共享的数据或资源时,可能会发生争用情况。
借助 threading.Lock()进行线程上锁,并通过with做上下文管理。
class FakeDatabase:def __init__(self):self.value = 0self._lock = threading.Lock()def locked_update(self, name):logging.info("Thread %s: starting update", name)logging.debug("Thread %s about to lock", name)with self._lock:logging.debug("Thread %s has lock", name)local_copy = self.valuelocal_copy += 1time.sleep(0.1)self.value = local_copylogging.debug("Thread %s about to release lock", name)logging.debug("Thread %s after release", name)logging.info("Thread %s: finishing update", name)
Process之间肯定是需要通信的,操作系统提供了很多机制来实现进程间的通信。Python的multiprocessing模块包装了底层的机制,提供了Queue、Pipes等多种方式来交换数据。
from multiprocessing import Process, Queueimport os, time, random#TODO: 写数据进程执行的代码def write(q):print('Process to write. {}'.format(os.getpid()))for value in ['A', 'B', 'C']:print('Put {} to queue...'.format(value))q.put(value)time.sleep(random.random())#TODO: 读数据进程执行的代码def read(q):print('Process to read. {}'.format(os.getpid()))while True:value = q.get(True)print('Get {} from queue.'.format(value))if __name__ == "__main__":# 父进程创建Queue,并传给各个子进程q = Queue()pw = Process(target=write, args=(q,))pr = Process(target=read, args=(q,))# 启动子进程pw.start()pr.start()pw.join()pr.terminate()
3. Context Manager
打开文件,可以使用
f = open('hello.txt', 'w')try:f.write('hello, world')finally:f.close()
当然,可以使用如下代码
with open('hello.txt', 'w') as f:f.write('hello, world!')
另一个实际的例子:
涉及到线程锁时
some_lock = threading.Lock()# Harmful:some_lock.acquire()try:# Do something...finally:some_lock.release()# Better:with some_lock:# Do something...
3.1 写一个自己的context manager
针对context manager,写 enter 和 exit 两个方法后的目标,可以作为context manager。
Python会调用这两个方法在资源管理的Cycle过程中。```
class ManagedFile:def __init__(self, name):self.name = namedef __enter__(self):self.file = open(self.name, 'w')return self.filedef __exit__(self, exc_type, exc_val, exc_tb):if self.file:self.file.close()
with ManagedFile('hello.txt') as f:f.write('hello, world!')f.write('bye now')
基于类的contexxt manger并不是唯一的方法,标准库中的 contextlib utility 模块提供了一些更加抽象的context manager protocol,便于更好地创建context manager
@contextmanagerdef managed_file(name):try:f = open(name, 'w')yield ffinally:f.close()>>> with managed_file('hello.txt') as f:... f.write('hello, world!')... f.write('bye now')
4. Generator
通过列表生成式,我们可以直接创建一个列表。但是,受到内存限制,列表容量肯定是有限的。而且,创建一个包含100万个元素的列表,不仅占用很大的存储空间,如果我们仅仅需要访问前面几个元素,那后面绝大多数元素占用的空间都白白浪费了。
所以,如果列表元素可以按照某种算法推算出来,那我们是否可以在循环的过程中不断推算出后续的元素呢?这样就不必创建完整的list,从而节省大量的空间。在Python中,这种一边循环一边计算的机制,称为生成器:generator。
要创建一个generator,有很多种方法。第一种方法很简单,只要把一个列表生成式的[]改成(),就创建了一个generator:
L = [x * x for x in range(10)]# generatorg = (x * x for x in range(10))
如果要打印g的每一个元素,可以使用 next函数逐一获取。
前面提到,generator保存的是算法,每次调用next(g),就计算出g的下一个元素的值,直到计算到最后一个元素,没有更多的元素时,抛出StopIteration的错误。
可以配合for循环进行元素的查看,所以,我们创建了一个generator后,基本上永远不会调用next(),而是通过for循环来迭代它,并且不需要关心StopIteration的错误。
如果一个函数定义中包含yield关键字,那么这个函数就不再是一个普通函数,而是一个generator。
generator的函数,在每次调用next()的时候执行,遇到yield语句返回,再次执行时从上次返回的yield语句处继续执行。
def fib(max):n, a, b = 0, 0, 1while n < max:yield ba, b = b, a + bn = n + 1return 'done'g = fib(6)while True:try:x = next(g)print('g:', x)except StopIteration as e:print('Generator return value:', e.value)break

若有收获,就点个赞吧
0 人点赞
