采用1主2从搭建Redis主从架构,版本使用redis6.2.1
本次采用一主二从
| 192.168.211.140 | master |
|---|---|
| 192.168.211.141 | replica1 |
| 192.168.211.142 | replica2 |
搭建编译环境,下载安装包并解压到OPT目录下并进入
yum install -y gcc gcc-c++ makewget https://download.redis.io/releases/redis-6.2.1.tar.gztar xzf redis-6.2.1.tar.gz -C /optcd /opt/redis-6.2.1
创建安装目录,小软件安装在/user/local中,大软件安装在opt中
mkdir /usr/local/redis
编译并安装到指定目录
make && make PREFIX=/usr/local/redis install
执行服务器安装脚本
cd /opt/redis-6.2.1/utils
#执行安装,如果出现保存则看下一步后在回来进行安装
./install_server.sh

回车四次,下一步需要手动输入
Please select the redis executable path   []   /usr/local/redis/bin/redis-server

#挂载软连接
如果出现错误无法安装执行下列操作
#进入安装文件
vim install_server.sh
#找到下面代码进行注释
#bail if this system is managed by systemd
#_pid_1_exe="$(readlink -f /proc/1/exe)"
#if [ "${_pid_1_exe##*/}" = systemd ]
#then
#       echo "This systems seems to use systemd."
#       echo "Please take a look at the provided example service unit files in this directory, and adapt and install them. Sorry!"
#       exit 1
#fi
配置文件详解
Master配置
# vim /etc/redis/6379.conf
bind 0.0.0.0                         # 修改bind 项,0.0.0.0监听所有网段
port:6379                           # 工作端口
protected-mode:no                   # 关闭保护模式
daemonize yes                       # 开启守护进程
logfile /var/log/redis_6379.log     # 指定日志文件目录
dir /var/lib/redis/6379             # 指定本地数据存放位置
appendonly yes                      # 开启AOF持久化功能
requirepass:pwdtest@2021           # 设置 redis 连接密码
masterauth:pwdtest@2021            # 设置slave 服务连接 master 的密码

/etc/init.d/redis_6379 restart  # 重启redis
Slave配置
# vim /etc/redis/6379.conf
bind 0.0.0.0                         # 修改bind 项,0.0.0.0监听所有网段
port:6379                           # 工作端口
protected-mode:no                   # 关闭保护模式
daemonize yes                       # 开启守护进程
logfile /var/log/redis_6379.log     # 指定日志文件目录
dir /var/lib/redis/6379             # 指定本地数据存放位置
appendonly yes                      # 开启AOF持久化功能
requirepass:pwdtest@2021           # 设置 redis 连接密码
masterauth:pwdtest@2021            # 设置slave 服务连接 master 的密码


/etc/init.d/redis_6379 restart  # 重启redis
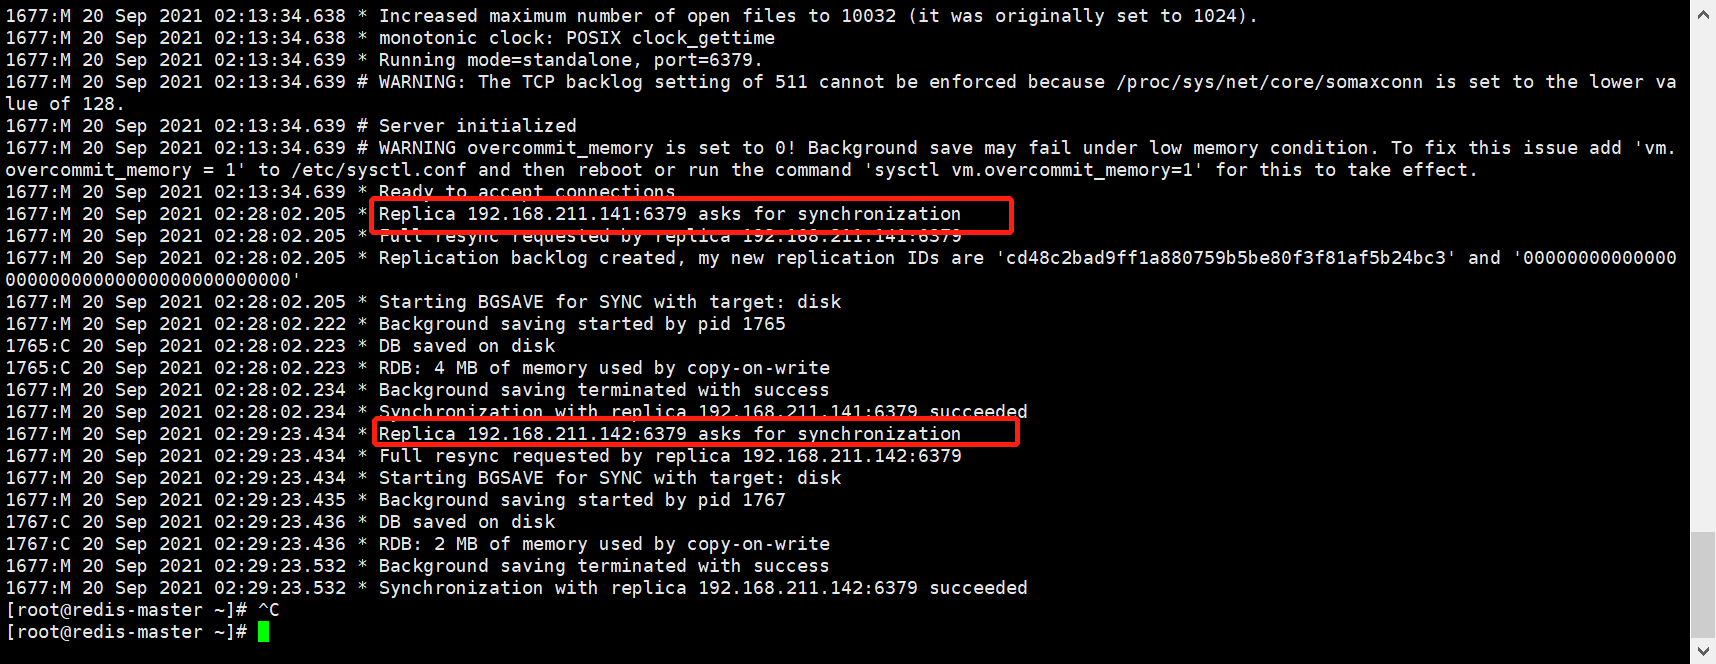
验证slave是否连接到master
cat /var/log/redis_6379.log
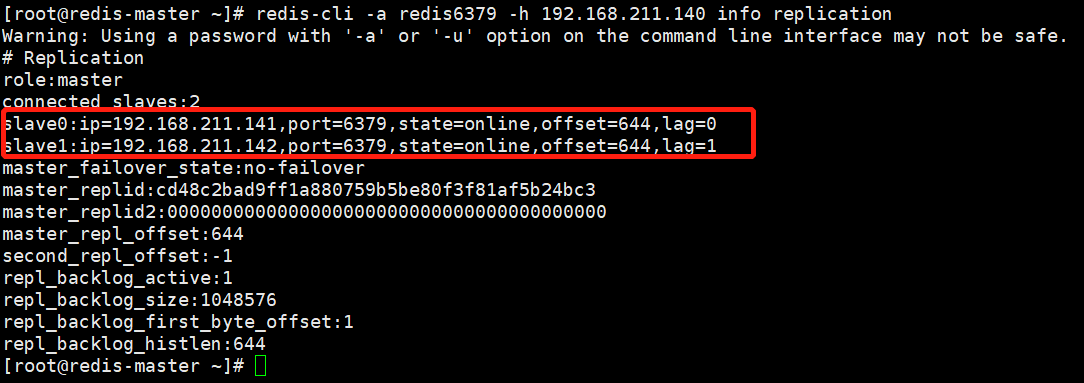
登录redis查看reids服务器信息也可验证

若有收获,就点个赞吧
0 人点赞
