环境准备
需求分析
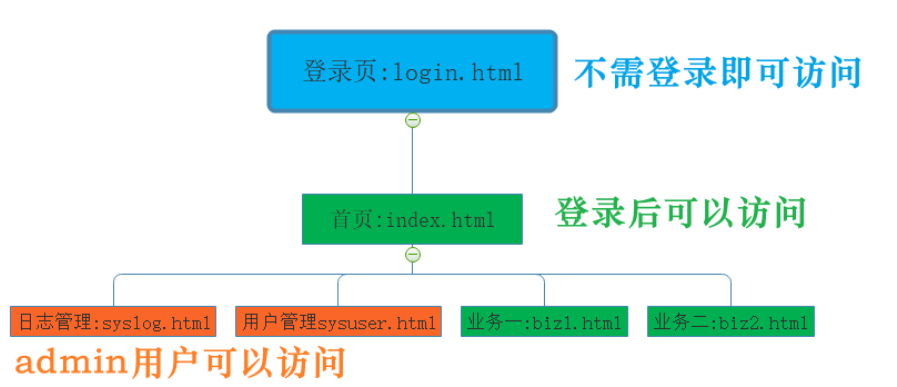
login.html 页面:不需要登录就可以访问
index.html 页面:登录后才能访问,在该页面中有 业务1,业务2、日志管理 和 用户管理 共4个连接
syslog.html 页面、sysuser.html 页面: 登录后,需要 admin用户才能访问
bizi1.html 页面、biz2.html 页面:登录后,就可以访问
创建父工程
父工程的工程名:spring-security-demo,在父工程中 声明使用 SpringBoot的版本号
<dependencyManagement><dependencies><dependency><groupId>org.springframework.boot</groupId><artifactId>spring-boot-starter-parent</artifactId><version>2.2.4.RELEASE</version><type>pom</type><scope>import</scope></dependency></dependencies></dependencyManagement>
创建子工程
子工程的工程名:basic-server,主要引入 web 和 thymeleaf 依赖
<dependency><groupId>org.springframework.boot</groupId><artifactId>spring-boot-starter-web</artifactId></dependency><dependency><groupId>org.springframework.boot</groupId><artifactId>spring-boot-starter-thymeleaf</artifactId></dependency>
创建 application.yml
在该文件中定义端口号
server:port: 9999
创建页面
页面存放的位置以及名称如图: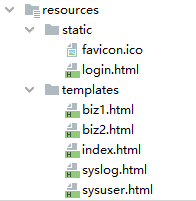
html 文件放在 static 和 templates 文件夹下的区别? html 文件放在 static 是不需要经过模板引擎的渲染,即可直接访问到 而放在 templates 下的html是经过模板引擎渲染的,也就是需要 controller 类中的方法返回字符串(视图名)
login页面
<!DOCTYPE html><html lang="en"><head><meta charset="UTF-8"><title>登录页面</title></head><body><form action="/login" method="post"><span>用户名称</span><input type="text" name="username" /> <br><span>用户密码</span><input type="password" name="password" /> <br><input type="submit" value="登陆"></form></body></html>
index页面
<!DOCTYPE html><html><head lang="en"><meta charset="UTF-8" /></head><body><br><a href="/syslog">日志管理</a><br><a href="/sysuser">用户管理</a><br><a href="/biz1">具体业务一</a><br><a href="/biz2">具体业务二</a></body></html>
业务1页面
<h1>具体业务一</h1>
业务2页面
<h1>具体业务二</h1>
日志管理页面
<h1>日志管理</h1>
用户管理页面
<h1>用户管理</h1>
main方法
@SpringBootApplicationpublic class Application {public static void main(String[] args) {SpringApplication.run(Application.class, args);}}
controller处理请求
@Controllerpublic class HelloController {// 首页@GetMapping("/index")public String index() {return "index";}// 日志管理@GetMapping("/syslog")public String showOrder() {return "syslog";}// 用户管理@GetMapping("/sysuser")public String addOrder() {return "sysuser";}// 具体业务一@GetMapping("/biz1")public String updateOrder() {return "biz1";}// 具体业务二@GetMapping("/biz2")public String deleteOrder() {return "biz2";}}
测试
访问登录页面:http://localhost:9999/login.html
访问首页:http://localhost:9999/index
HttpBasic模式登录认证
引入依赖
<dependency><groupId>org.springframework.boot</groupId><artifactId>spring-boot-starter-security</artifactId></dependency>
编写配置类
@Configurationpublic class SecurityConfig extends WebSecurityConfigurerAdapter {@Overrideprotected void configure(HttpSecurity http) throws Exception {http.httpBasic()//开启httpbasic认证.and().authorizeRequests().anyRequest().authenticated();//所有请求都需要登录认证才能访问}}
测试
运行 main 方法,访问页面此时我们会发现,之前能访问的页面都需要输入用户名、密码才能访问了
用户名为:user,密码在控制台打出:
自定义用户名密码
我们可以在 application.yml 文件中定义用户名和密码
spring:security:user:name: adminpassword: admin
重新运行 main 方法,然后使用上述定义好的用户名密码试试
formLogin登录认证模式
引入依赖
我们在之前步骤已经引入过了该依赖
<dependency><groupId>org.springframework.boot</groupId><artifactId>spring-boot-starter-security</artifactId></dependency>
删除自定义用户名、密码
我们在 HttpBasic 模式登录认证的时候,有在 application.yml 文件中定义用户名、密码。
spring:security:user:name: adminpassword: admin
配置类
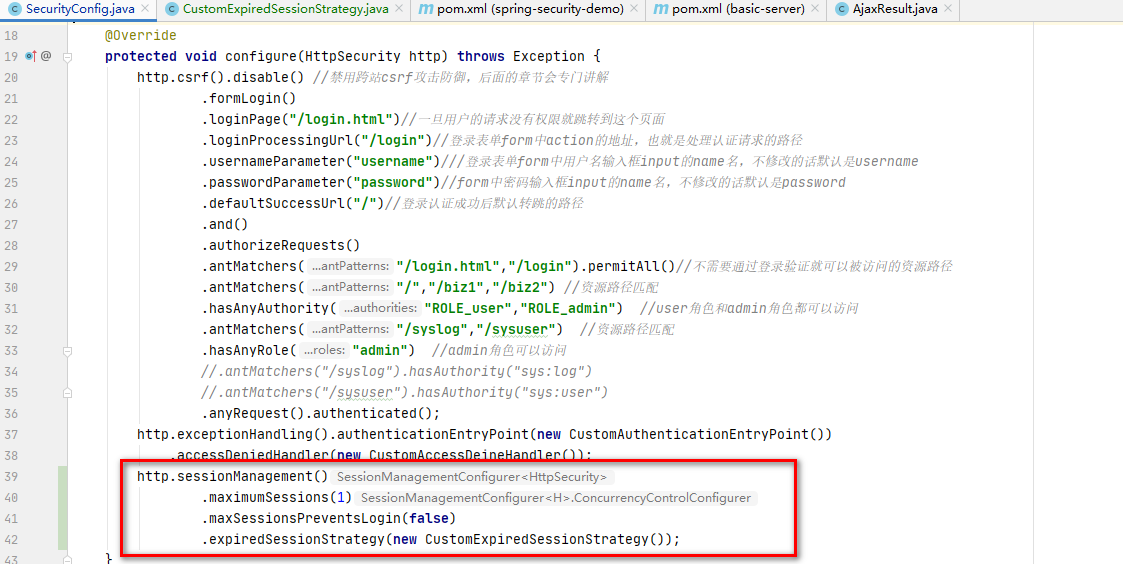
以下代码是修改后的配置类。主要做的几件事
①、加载用户信息到内存。我们这次使用的是硬编码,加载用户以及用户的角色、权限到内存。
②、往容器中注入密码的加密和校验的接口实现类。
③、定义了登录认证的逻辑(即接收登录参数、登录成功后逻辑)
④、定义了资源访问控制逻辑,即访问哪些资源,需要什么样的权限
@Configurationpublic class SecurityConfig extends WebSecurityConfigurerAdapter {@Overrideprotected void configure(HttpSecurity http) throws Exception {http.csrf().disable() //禁用跨站csrf攻击防御,后面的章节会专门讲解.formLogin().loginPage("/login.html")//一旦用户的请求没有权限就跳转到这个页面.loginProcessingUrl("/login")//登录表单form中action的地址,也就是处理认证请求的路径.usernameParameter("username")///登录表单form中用户名输入框input的name名,不修改的话默认是username.passwordParameter("password")//form中密码输入框input的name名,不修改的话默认是password.defaultSuccessUrl("/")//登录认证成功后默认转跳的路径.and().authorizeRequests().antMatchers("/login.html","/login").permitAll()//不需要通过登录验证就可以被访问的资源路径.antMatchers("/","/biz1","/biz2") //资源路径匹配.hasAnyAuthority("ROLE_user","ROLE_admin") //user角色和admin角色都可以访问.antMatchers("/syslog","/sysuser") //资源路径匹配.hasAnyRole("admin") //admin角色可以访问//.antMatchers("/syslog").hasAuthority("sys:log")//.antMatchers("/sysuser").hasAuthority("sys:user").anyRequest().authenticated();}@Overridepublic void configure(WebSecurity web) {//将项目中静态资源路径开放出来web.ignoring().antMatchers( "/css/**", "/fonts/**", "/img/**", "/js/**");}@Overridepublic void configure(AuthenticationManagerBuilder auth) throws Exception {auth.inMemoryAuthentication().withUser("user").password(passwordEncoder().encode("123456")).roles("user").and().withUser("admin").password(passwordEncoder().encode("123456"))//.authorities("sys:log","sys:user").roles("admin").and().passwordEncoder(passwordEncoder());//配置BCrypt加密}@Beanpublic PasswordEncoder passwordEncoder(){return new BCryptPasswordEncoder();}}
测试
重新运行 main 方法,访问其他页面,都会被跳转到登录页面
使用用户名(user/123456)登录,登录到首页,发现业务1、业务2正常访问。而日志管理、用户管理访问报错,如下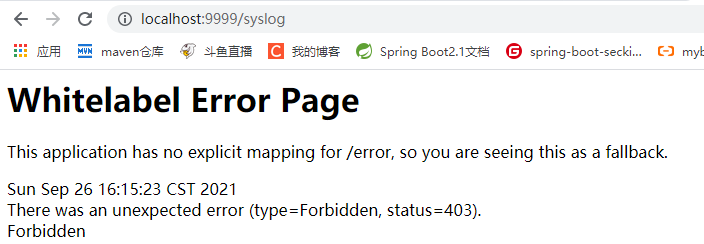
使用用户名(admin/123456),登录后可以访问所有资源。
自定义权限访问异常信息处理
当我们访问资源的时候,可能会出现这2种情况。
情况一: 未登录,直接访问资源。默认情况会跳转到登录页面。
情况二:登录系统,访问某些资源没有权限,默认情况会返回 403 的错误页面
解决方法:
情况一:返回 JSON 数据,告知需要先登录才能访问
情况二:返回 JSON 数据,告知权限不足
定义返回消息
public class AjaxResult extends HashMap<String, Object> {private static final long serialVersionUID = 1L;/*** 状态码*/public static final String CODE_TAG = "code";/*** 返回内容*/public static final String MSG_TAG = "msg";/*** 数据对象*/public static final String DATA_TAG = "data";/*** 状态类型*/public enum Type {/*** 成功*/SUCCESS(0),/*** 警告*/WARN(301),/*** 错误*/ERROR(500);private final int value;Type(int value) {this.value = value;}public int value() {return this.value;}}/*** 初始化一个新创建的 AjaxResult 对象,使其表示一个空消息。*/public AjaxResult() {}/*** 初始化一个新创建的 AjaxResult 对象** @param type 状态类型* @param msg 返回内容*/public AjaxResult(Type type, String msg) {super.put(CODE_TAG, type.value);super.put(MSG_TAG, msg);}/*** 初始化一个新创建的 AjaxResult 对象** @param type 状态类型* @param msg 返回内容* @param data 数据对象*/public AjaxResult(Type type, String msg, Object data) {super.put(CODE_TAG, type.value);super.put(MSG_TAG, msg);if (null != data && data != "") {super.put(DATA_TAG, data);}}/*** 方便链式调用** @param key 键* @param value 值* @return 数据对象*/@Overridepublic AjaxResult put(String key, Object value) {super.put(key, value);return this;}/*** 返回成功消息** @return 成功消息*/public static AjaxResult success() {return AjaxResult.success("操作成功");}/*** 返回成功数据** @return 成功消息*/public static AjaxResult success(Object data) {return AjaxResult.success("操作成功", data);}/*** 返回成功消息** @param msg 返回内容* @return 成功消息*/public static AjaxResult success(String msg) {return AjaxResult.success(msg, null);}/*** 返回成功消息** @param msg 返回内容* @param data 数据对象* @return 成功消息*/public static AjaxResult success(String msg, Object data) {return new AjaxResult(Type.SUCCESS, msg, data);}/*** 返回警告消息** @param msg 返回内容* @return 警告消息*/public static AjaxResult warn(String msg) {return AjaxResult.warn(msg, null);}/*** 返回警告消息** @param msg 返回内容* @param data 数据对象* @return 警告消息*/public static AjaxResult warn(String msg, Object data) {return new AjaxResult(Type.WARN, msg, data);}/*** 返回错误消息** @return*/public static AjaxResult error() {return AjaxResult.error("操作失败");}/*** 返回错误消息** @param msg 返回内容* @return 警告消息*/public static AjaxResult error(String msg) {return AjaxResult.error(msg, null);}/*** 返回错误消息** @param msg 返回内容* @param data 数据对象* @return 警告消息*/public static AjaxResult error(String msg, Object data) {return new AjaxResult(Type.ERROR, msg, data);}}
引入 fastjson
<dependency><groupId>com.alibaba</groupId><artifactId>fastjson</artifactId><version>1.2.76</version></dependency>
定义匿名访问的处理类
public class CustomAuthenticationEntryPoint implements AuthenticationEntryPoint {@Overridepublic void commence(HttpServletRequest request, HttpServletResponse response,AuthenticationException authException) throws IOException, ServletException {response.setCharacterEncoding("utf-8");response.setContentType("text/javascript;charset=utf-8");response.getWriter().print(JSONObject.toJSONString(AjaxResult.error("未登录,无法直接访问资源,请先登陆!")));}}
定义没有权限访问的处理类
public class CustomAccessDeineHandler implements AccessDeniedHandler {@Overridepublic void handle(HttpServletRequest request, HttpServletResponse response,AccessDeniedException accessDeniedException) throws IOException, ServletException {response.setCharacterEncoding("utf-8");response.setContentType("text/javascript;charset=utf-8");response.getWriter().print(JSONObject.toJSONString(AjaxResult.error("权限不足,无法访问!")));}}
修改配置类
在 SpringSecurity的配置类中,添加自定义权限的处理
同账号多端登录踢下线
描述:
例如账号 user,已经登陆了。此时该账号再别处再次登录时会将原来登录的账号踢出下线。
处理策略
此处提供2种策略方案。
第一种是针对 非前后端分离项目的,也就是当该账号再别处登录时,之前登录的账号再刷新后会跳转到登陆页面
第二中是针对 前后端分离项目,当别处登录时,返回 JSON 数据提示用户。
方案一
当账号已在别处登录时,原登录账号再刷新页面时重定向到登录页面
public class CustomExpiredSessionStrategy implements SessionInformationExpiredStrategy {//页面跳转的处理逻辑private RedirectStrategy redirectStrategy = new DefaultRedirectStrategy();@Overridepublic void onExpiredSessionDetected(SessionInformationExpiredEvent event) throws IOException, ServletException {// 是跳转html页面,url代表跳转的地址redirectStrategy.sendRedirect(event.getRequest(), event.getResponse(), "/login.html");}}
上面策略的代码只是做了页面重定向,如果想要在重定向之前弹窗提示用户,可以这么做:
public class CustomExpiredSessionStrategy implements SessionInformationExpiredStrategy {//页面跳转的处理逻辑//private RedirectStrategy redirectStrategy = new DefaultRedirectStrategy();@Overridepublic void onExpiredSessionDetected(SessionInformationExpiredEvent event) throws IOException, ServletException {HttpServletResponse response = event.getResponse();response.setContentType("text/html;charset=UTF-8");response.setCharacterEncoding("UTF-8");PrintWriter out = response.getWriter();out.println("<script>");out.println("alert('该账号已在别处登录,请重新登录!');");out.println("location.href='/login.html'");out.println("</script>");// 是跳转html页面,url代表跳转的地址// redirectStrategy.sendRedirect(event.getRequest(), event.getResponse(), "/login.html");}}
方案二
当账号已在别处登录时,原登录账号再刷新页面时 会得到 JSON数据提示
public class CustomExpiredSessionStrategy implements SessionInformationExpiredStrategy {//jackson的JSON处理对象private ObjectMapper objectMapper = new ObjectMapper();@Overridepublic void onExpiredSessionDetected(SessionInformationExpiredEvent event) throws IOException, ServletException {Map<String, Object> map = new HashMap<>();map.put("code", 403);map.put("msg", "您的登录已经超时或者已经在另一台机器登录,您被迫下线。"+ event.getSessionInformation().getLastRequest());// Map -> JsonString json = objectMapper.writeValueAsString(map);//输出JSON信息的数据event.getResponse().setContentType("application/json;charset=UTF-8");event.getResponse().getWriter().write(json);}}
配置策略
测试
重新运行 main 方法, 使用 user/123456 账号分别在 谷歌 和 火狐浏览器上登录,验证是否会别踢出下线!!
退出功能实现
简单实现
在首页添加如下代码:
<a href="/logout" >退出</a>
在 SpringSecurity 的配置类中添加退出配置
@Overrideprotected void configure(HttpSecurity http) throws Exception {....省略....http.logout();}
测试:
重新运行 main ,使用 user / 123456 登录系统中 index.html 页面,点击页面上 退出按钮后,即将跳转到登录页面
SpringSecurity退出功能默认做了哪些事
- 当前session失效,即:logout的核心需求,session失效就是访问权限的回收。
- 删除当前用户的 remember-me“记住我”功能信息
- clear清除当前的 SecurityContext
- 重定向到登录页面,loginPage配置项指定的页面
定制退出功能
我们可以对退出功能做一些个性化配置,如下:
http.logout().logoutUrl("/signout").logoutSuccessUrl("/aftersignout.html").deleteCookies("JSESSIONID")
如果还嫌不够的话,我们还可以实现 LogoutSuccessHandler 接口,来对我们退出功能进行深度化定制。
@Componentpublic class MyLogoutSuccessHandler implements LogoutSuccessHandler {@Overridepublic void onLogoutSuccess(HttpServletRequest request,HttpServletResponse response,Authentication authentication)throws IOException, ServletException {//这里书写你自己的退出业务逻辑// 重定向到登录页response.sendRedirect("/login.html");}}======================================================================================@Configuration@EnableWebSecuritypublic class SecSecurityConfig extends WebSecurityConfigurerAdapter {@Autowiredprivate MyLogoutSuccessHandler myLogoutSuccessHandler;@Overrideprotected void configure(final HttpSecurity http) throws Exception {http.logout().logoutUrl("/signout")//.logoutSuccessUrl(``"/aftersignout.html"``).deleteCookies("JSESSIONID")//自定义logoutSuccessHandler.logoutSuccessHandler(myLogoutSuccessHandler);}}
记住我功能实现
简单实现
登录表单
在登陆表单中添加记住我的复选框
<label><input type="checkbox" name="remember-me"/>记住密码</label>
配置记住我的功能
在 SpringSecurity的配置文件中,添加记住我的配置 http.rememberMe();
@Configurationpublic class SecurityConfig extends WebSecurityConfigurerAdapter {@Overrideprotected void configure(HttpSecurity http) throws Exception {http.rememberMe(); //实现记住我自动登录配置,核心的代码只有这一行}}
测试
重新运行 main 方法,先登录,然后重启浏览器,再次直接访问系统资源,发现不需要再次登录。
实现原理
- 当我们登陆的时候,除了用户名、密码,我们还可以勾选remember-me。
- 如果我们勾选了remember-me,当我们登录成功之后服务端会生成一个Cookie返回给浏览器,这个Cookie的名字默认是remember-me;值是一个token令牌。
- 当我们在有效期内再次访问应用时,经过RememberMeAuthenticationFilter,读取Cookie中的token进行验证。验正通过不需要再次登录就可以进行应用访问
个性化设置
@Configurationpublic class SecurityConfig extends WebSecurityConfigurerAdapter {@Overrideprotected void configure(HttpSecurity http) throws Exception {http.rememberMe().rememberMeParameter("remember-me-new").rememberMeCookieName("remember-me-cookie").tokenValiditySeconds(2 * 24 * 60 * 60);}}
设置了http.rememberMe() .rememberMeParameter(“remember-me-new”) 我们需要修改记住我复选框中的name属性值
Token令牌持久化功能
经过上述步骤,我们已经实现了记住我功能,但现在存在一个问题。就是 token 令牌与用户的对应关系 这些数据是存放在内存中的。也就是说当 我们的应用重启后,用户需要重新登录系统。
如何解决?
我们需要将用户和 token令牌的对应关系数据,存放到数据库中进行持久化即可。
引入依赖
<dependency><groupId>org.springframework.boot</groupId><artifactId>spring-boot-starter-jdbc</artifactId></dependency><dependency><groupId>mysql</groupId><artifactId>mysql-connector-java</artifactId></dependency>
主配置文件
在 application.yml 文件中,添加数据源基本信息
server:port: 9999# 数据库连接基本信息spring:datasource:url: jdbc:mysql://localhost:3306/security-demo?useUnicode=true&characterEncoding=utf8&zeroDateTimeBehavior=convertToNull&useSSL=true&serverTimezone=GMT%2B8driver-class-name: com.mysql.cj.jdbc.Driverusername: rootpassword: 123456
创建数据库
创建 security-demo 的数据库,字符编码 utf8mb4
创建表
CREATE TABLE `persistent_logins` (`username` varchar(64) NOT NULL,`series` varchar(64) NOT NULL,`token` varchar(64) NOT NULL,`last_used` timestamp NOT NULL DEFAULT CURRENT_TIMESTAMP ON UPDATE CURRENT_TIMESTAMP,PRIMARY KEY (`series`)) ENGINE=InnoDB DEFAULT CHARSET=utf8;
修改配置类
在 SpringSecurity的配置类中,我们需要注入 PersistentTokenRepository 类型的bean。同时需要对令牌持久化进行配置

测试
重新运行 main 方法,使用账号密码登录系统,然后重新运行main方法,此时发现在访问系统时不需要重新登录
另外,在数据库表中出现如下数据:

若有收获,就点个赞吧
0 人点赞
