安装
安装LuaJIT
# 下载LuaJIT安装包wget https://luajit.org/download/LuaJIT-2.0.5.tar.gz# 解压并安装到指定目录tar -zxvf LuaJIT-2.0.5.tar.gzcd LuaJIT-2.0.5.tar.gzmake PREFIX=/usr/local/luajit && make install PREFIX=/usr/local/luajig# 配置环境变量echo "/usr/local/luajit/lib" > /etc/ld.so.conf.d/usr_local_luajit_lib.confexport LUAJIT_LIB=/usr/local/luajit/libexport LUAJIT_INC=/usr/local/luajit/include/luajit-2.0# 可能需要ln -s /usr/local/luajit/lib/libluajit-5.1.so.2 /usr/lib64/libluajit-5.1.so.2
安装Nginx对应的Lua模块
#下载nginxLua模块需要的相关模块包wget https://github.com/simpl/ngx_devel_kit/archive/v0.3.0.tar.gztar -zxvf v0.3.0.tar.gzwget https://github.com/openresty/lua-nginx-module/archive/v0.10.20.tar.gztar -zxvf v0.10.20.tar.gz# 由于我已经安装好Nginx了,这里我不重装,仅仅只是重新编译,并替换nginx执行文件即可# 查看之前安装时相关的配置$ /usr/local/nginx/nginx -Vnginx version: nginx/1.20.2built by gcc 4.8.5 20150623 (Red Hat 4.8.5-44) (GCC)built with OpenSSL 1.0.2k-fips 26 Jan 2017TLS SNI support enabledconfigure arguments: --prefix=/usr/local/nginx --sbin-path=/usr/local/nginx/nginx --conf-path=/usr/local/nginx/nginx.conf --pid-path=/usr/local/nginx/nginx.pid --with-http_gzip_static_module --with-http_stub_status_module --with-file-aio --with-http_realip_module --with-http_ssl_module# 拿到configure arguments相关配置后,在其后拼接上我们需要添加的模块$ cd /home/data/nginx-1.20.2$ ./configure --prefix=/usr/local/nginx \--sbin-path=/usr/local/nginx/nginx \--conf-path=/usr/local/nginx/nginx.conf \--pid-path=/usr/local/nginx/nginx.pid \--with-http_gzip_static_module \--with-http_stub_status_module \--with-file-aio --with-http_realip_module \--with-http_ssl_module \--with-pcre --add-module=/home/data/lua-nginx-module-0.10.20 --add-module=/home/data/ngx_devel_kit-0.3.0# 注意,这里只是执行 make -j 2,并不执行 make install$ make -j 2# 备份原来的nginx执行文件$ mv /usr/local/nginx/nginx /usr/local/nginx/nginx.bak# 将objs/nginx文件copy到/usr/local/nginx中$ cp objs/nginx /usr/local/nginx/nginx# 并确定权限是否为755# 执行测试,是否成功$ ./nginx -V./nginx: error while loading shared libraries: libluajit-5.1.so.2: cannot open shared object file: No such file or directory# 修复上述错误$ find / -name libluajit-5.1.so.2/usr/local/luajit/lib/libluajit-5.1.so.2# 手动建立软连接$ ln -s /usr/local/luajit/lib/libluajit-5.1.so.2 /usr/lib64/# 再次测试$ ./nginx -Vnginx version: nginx/1.20.2built by gcc 4.8.5 20150623 (Red Hat 4.8.5-44) (GCC)built with OpenSSL 1.0.2k-fips 26 Jan 2017TLS SNI support enabledconfigure arguments: --prefix=/usr/local/nginx --sbin-path=/usr/local/nginx/nginx --conf-path=/usr/local/nginx/nginx.conf --pid-path=/usr/local/nginx/nginx.pid --with-http_gzip_static_module --with-http_stub_status_module --with-file-aio --with-http_realip_module --with-http_ssl_module --with-pcre --add-module=/home/data/lua-nginx-module-0.10.20 --add-module=/home/data/ngx_devel_kit-0.3.0# 重启nginx服务./nginx -s reload# 如果出现下列报错nginx: [alert] detected a LuaJIT version which is not OpenResty's; many optimizations will be disabled and performance will be compromised (see https://github.com/openresty/luajit2 for OpenResty's LuaJIT or, even better, consider using the OpenResty releases from https://openresty.org/en/download.html)nginx: [alert] failed to load the 'resty.core' module (https://github.com/openresty/lua-resty-core); ensure you are using an OpenResty release from https://openresty.org/en/download.html (reason: module 'resty.core' not found:no field package.preload['resty.core']no file './resty/core.lua'no file '/usr/local/luajit/share/luajit-2.0.5/resty/core.lua'no file '/usr/local/share/lua/5.1/resty/core.lua'no file '/usr/local/share/lua/5.1/resty/core/init.lua'no file '/usr/local/luajit/share/lua/5.1/resty/core.lua'no file '/usr/local/luajit/share/lua/5.1/resty/core/init.lua'no file './resty/core.so'no file '/usr/local/lib/lua/5.1/resty/core.so'no file '/usr/local/luajit/lib/lua/5.1/resty/core.so'no file '/usr/local/lib/lua/5.1/loadall.so'no file './resty.so'no file '/usr/local/lib/lua/5.1/resty.so'no file '/usr/local/luajit/lib/lua/5.1/resty.so'no file '/usr/local/lib/lua/5.1/loadall.so') in /usr/local/nginx/nginx.conf:117# 需要手动下载相关依赖库wget https://github.com/openresty/lua-resty-lrucache/archive/refs/tags/v0.11.tar.gzwget https://github.com/openresty/lua-resty-core/archive/refs/tags/v0.1.22.tar.gztar -zxvf v0.11.tar.gztar -zxvf v0.1.22.tar.gz# 并修改nginx.conf文件,在http块中添加:lua_package_path "/home/data/lua-resty-core-0.1.22/lib/?.lua;/home/data/lua-resty-lrucache-0.11/lib/?.lua;;";# 再次重启./nginx -s reload
Nginx使用Lua脚本
Nginx配置
http {...# 配置Lua外部库的搜索路径(;;表示默认路径)lua_package_path '/home/data/lua-resty-core-0.1.22/lib/?.lua;/home/data/lua-resty-lrucache-0.11/lib/?.lua;;';server {location /lua {# 设置MIME type,否则会被当成文件下载default_type 'text/plain';# 配置Lua相关脚本...}}}
NginxLua脚本相关
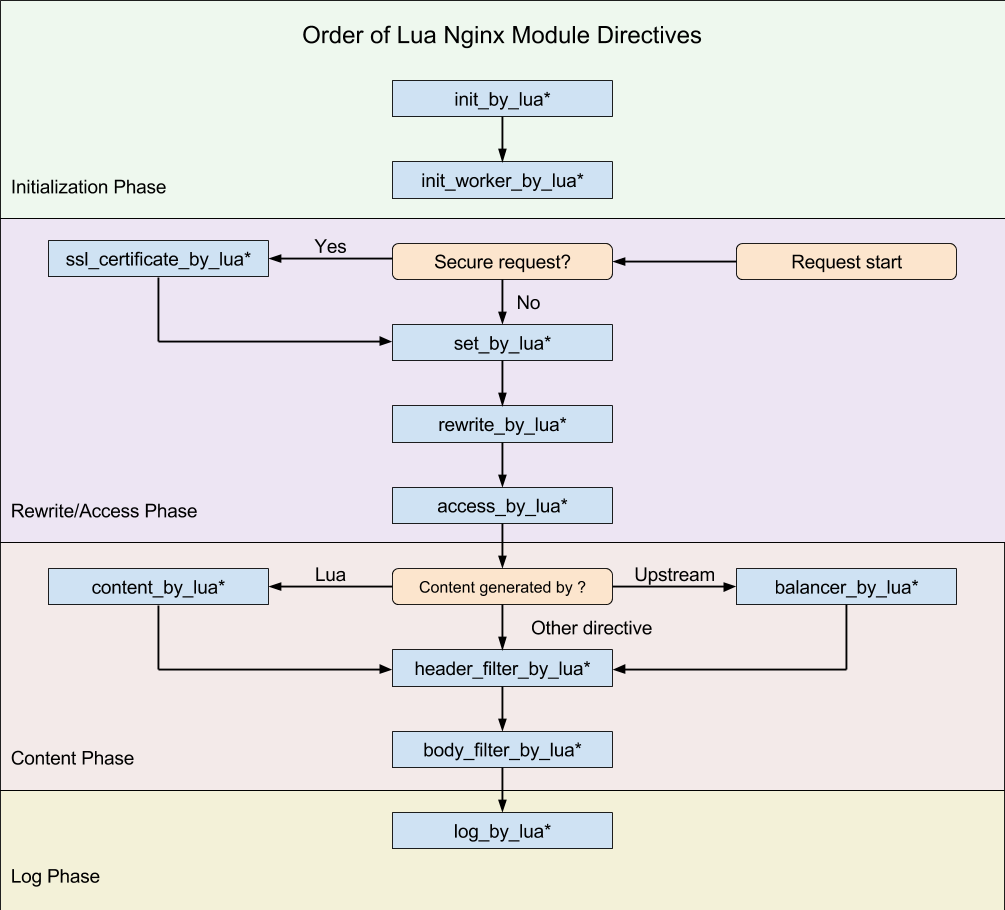
在nginx中使用lua相关指令,一定要注意执行的先后顺序!
NginxLua指令执行顺序
Nginx比较主要的Lua指令
content_by_lua_block
介绍:此指令会在nginx处理请求的内容生成阶段执行,不要在同一个位置使用此指令和其他内容处理程序指令,例如proxy_pass
语法:content_by_lua_block {lua代码}
位置:location, location if
示例:
content_by_lua_block {ngx.say("Hello World!")}
content_by_lua_file
介绍:与content_by_lua_block相同
语法:content_by_lua_file
位置:location, location if
示例:
location ~ ^/app/([-_a-zA-Z0-9/]+) {set $path $1;content_by_lua_file /path/to/lua/app/root/$path.lua;}
access_by_lua_block
介绍:此指令会在请求阶段执行,可以用他来进行黑名单过滤等前置操作。
语法:access_by_lua_block {lua代码}
位置:http, server, location, location if
示例:
location / {access_by_lua_block {-- 执行相关黑名单校验}content_by_lua_block {-- 只有通过access_by_lua_block 验证后,才会走到该方法中}}
access_by_lua_file
介绍:与access_by_lua_block相同
语法:access_by_lua_file
位置:http, server, location, location if

若有收获,就点个赞吧
0 人点赞
