github
一、koa 开始
环境准备
- 因为node.js v7.6.0开始完全支持async/await,不需要加flag,所以node.js环境都要7.6.0以上
- node.js环境 版本v7.6以上
- 直接安装node.js 7.6:node.js官网地址https://nodejs.org
- nvm管理多版本node.js:可以用nvm 进行node版本进行管理
- Mac系统安装nvm https://github.com/creationix/nvm#manual-install
- windows系统安装nvm https://github.com/coreybutler/nvm-windows
- Ubuntu系统安装nvm https://github.com/creationix/nvm
- npm 版本3.x以上
安装koa
初始化package.json
npm init
安装koa2
npm install koa
hello world 代码
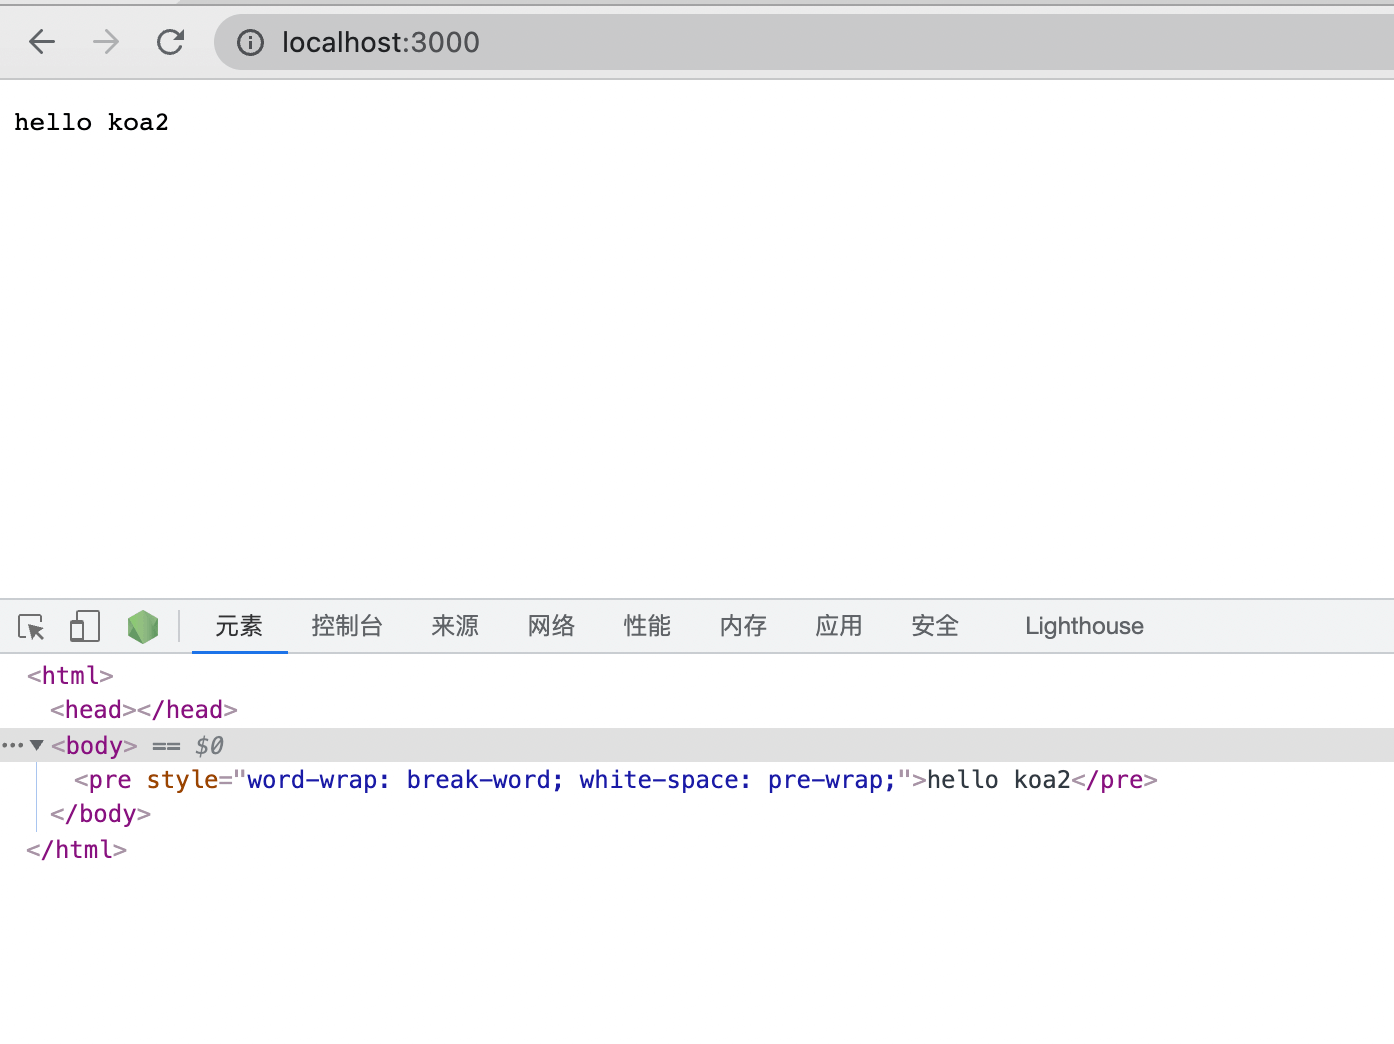
const Koa = require('koa')const app = new Koa()app.use( async ( ctx ) => {ctx.body = 'hello koa2'})app.listen(3000)console.log('[demo] start-quick is starting at port 3000')
koa2特性
- 只提供封装好http上下文、请求、响应,以及基于async/await的中间件容器。
- 利用ES7的async/await的来处理传统回调嵌套问题和代替koa@1的generator,但是需要在node.js 7.x的harmony模式下才能支持async/await。
中间件只支持 async/await 封装的,如果要使用koa@1基于generator中间件,需要通过中间件koa-convert封装一下才能使用。
koa 中间件使用
koa v1和v2中使用到的中间件的开发和使用
- generator 中间件开发在koa v1和v2中使用
- async await 中间件开发和只能在koa v2中使用
二、路由
koa2 原生路由实现
```javascript const Koa = require(‘koa’) const app = new Koa()
app.use( async ( ctx ) => { let url = ctx.request.url ctx.body = url }) app.listen(3000)
访问 [http://localhost:3000/hello/world](http://localhost:3000/hello/world) 页面会输出 /hello/world,也就是说上下文的请求request对象中url之就是当前访问的路径名称,可以根据ctx.request.url 通过一定的判断或者正则匹配就可以定制出所需要的路由。<a name="n4Tw1"></a>### 定制化的路由```javascriptconst Koa = require('koa')const fs = require('fs')const app = new Koa()/*** 用Promise封装异步读取文件方法* @param {string} page html文件名称* @return {promise}*/function render( page ) {return new Promise(( resolve, reject ) => {let viewUrl = `./view/${page}`fs.readFile(viewUrl, "binary", ( err, data ) => {if ( err ) {reject( err )} else {resolve( data )}})})}/*** 根据URL获取HTML内容* @param {string} url koa2上下文的url,ctx.url* @return {string} 获取HTML文件内容*/async function route( url ) {let view = '404.html'switch ( url ) {case '/':view = 'index.html'breakcase '/index':view = 'index.html'breakcase '/todo':view = 'todo.html'breakcase '/404':view = '404.html'breakdefault:break}let html = await render( view )return html}app.use( async ( ctx ) => {let url = ctx.request.urllet html = await route( url )ctx.body = html})app.listen(3000)console.log('[demo] route-simple is starting at port 3000')
koa-router中间件
如果依靠ctx.request.url去手动处理路由,将会写很多处理代码,这时候就需要对应的路由的中间件对路由进行控制,这里介绍一个比较好用的路由中间件koa-router
- 安装koa-router中间件
const Router = require(‘koa-router’)
let home = new Router()
// 子路由1
home.get(‘/‘, async ( ctx )=>{
let html = <ul>
<li><a href="/page/helloworld">/page/helloworld</a></li>
<li><a href="/page/404">/page/404</a></li>
</ul>
ctx.body = html
})
// 子路由2 let page = new Router() page.get(‘/404’, async ( ctx )=>{ ctx.body = ‘404 page!’ }).get(‘/helloworld’, async ( ctx )=>{ ctx.body = ‘helloworld page!’ })
// 装载所有子路由 let router = new Router() router.use(‘/‘, home.routes(), home.allowedMethods()) router.use(‘/page’, page.routes(), page.allowedMethods())
// 加载路由中间件 app.use(router.routes()).use(router.allowedMethods())
app.listen(3000, () => { console.log(‘[demo] route-use-middleware is starting at port 3000’) })
<a name="Kruwp"></a>## 三、请求数据获取<a name="LMIlh"></a>### GET请求数据获取在koa中,获取GET请求数据源头是koa中request对象中的query方法或querystring方法,query返回是格式化好的参数对象,querystring返回的是请求字符串,由于ctx对request的API有直接引用的方式,所以获取GET请求数据有两个途径。- 1.是从上下文中直接获取- 请求对象ctx.query,返回如 { a:1, b:2 }- 请求字符串 ctx.querystring,返回如 a=1&b=2- 2.是从上下文的request对象中获取- 请求对象ctx.request.query,返回如 { a:1, b:2 }- 请求字符串 ctx.request.querystring,返回如 a=1&b=2```javascriptconst Koa = require('koa')const app = new Koa()app.use( async ( ctx ) => {let url = ctx.url// 从上下文的request对象中获取// const { query, querystring } = ctx.request;// 从上下文中直接获取const { query, querystring } = ctx;ctx.body = {url,query,querystring}})app.listen(3000, () => {console.log('[demo] request get is starting at port 3000')})
POST请求参数获取
对于POST请求的处理,koa2没有封装获取参数的方法,需要通过解析上下文context中的原生node.js请求对象req,将POST表单数据解析成query string(例如:a=1&b=2&c=3),再将query string 解析成JSON格式(例如:{“a”:”1”, “b”:”2”, “c”:”3”})
注意:ctx.request是context经过封装的请求对象,ctx.req是context提供的node.js原生HTTP请求对象,同理ctx.response是context经过封装的响应对象,ctx.res是context提供的node.js原生HTTP响应对象。
具体koa2 API文档可见 https://github.com/koajs/koa/blob/master/docs/api/context.md#ctxreq
解析出POST请求上下文中的表单数据
// 解析上下文里node原生请求的POST参数function parsePostData( ctx ) {return new Promise((resolve, reject) => {try {let postdata = "";ctx.req.addListener('data', (data) => {postdata += data})ctx.req.addListener("end",function(){let parseData = parseQueryStr( postdata )resolve( parseData )})} catch ( err ) {reject(err)}})}// 将POST请求参数字符串解析成JSONfunction parseQueryStr( queryStr ) {let queryData = {}let queryStrList = queryStr.split('&')console.log( queryStrList )for ( let [ index, queryStr ] of queryStrList.entries() ) {let itemList = queryStr.split('=')queryData[ itemList[0] ] = decodeURIComponent(itemList[1])}return queryData}
举个🌰:
const Koa = require('koa')const app = new Koa()app.use( async ( ctx ) => {if ( ctx.url === '/' && ctx.method === 'GET' ) {// 当GET请求时候返回表单页面let html = `<h1>koa2 request post demo</h1><form method="POST" action="/"><p>userName</p><input name="userName" /><br/><p>nickName</p><input name="nickName" /><br/><p>email</p><input name="email" /><br/><button type="submit">submit</button></form>`ctx.body = html} else if ( ctx.url === '/' && ctx.method === 'POST' ) {// 当POST请求的时候,解析POST表单里的数据,并显示出来let postData = await parsePostData( ctx )ctx.body = postData} else {// 其他请求显示404ctx.body = '<h1>404!!! o(╯□╰)o</h1>'}})// 解析上下文里node原生请求的POST参数function parsePostData( ctx ) {return new Promise((resolve, reject) => {try {let postdata = "";ctx.req.addListener('data', (data) => {postdata += data})ctx.req.addListener("end",function(){let parseData = parseQueryStr( postdata )resolve( parseData )})} catch ( err ) {reject(err)}})}// 将POST请求参数字符串解析成JSONfunction parseQueryStr( queryStr ) {let queryData = {}let queryStrList = queryStr.split('&')console.log( queryStrList )for ( let [ index, queryStr ] of queryStrList.entries() ) {let itemList = queryStr.split('=')queryData[ itemList[0] ] = decodeURIComponent(itemList[1])}return queryData}app.listen(3000, () => {console.log('[demo] request post is starting at port 3000')})
koa-bodyparser中间件
- 对于POST请求的处理,koa-bodyparser中间件可以把koa2上下文的formData数据解析到ctx.request.body中
- 安装koa2版本的koa-bodyparser@3中间件
- npm install —save koa-bodyparser@3 ```javascript const Koa = require(‘koa’) const app = new Koa() const bodyParser = require(‘koa-bodyparser’)
// 使用ctx.body解析中间件 app.use(bodyParser())
app.use( async ( ctx ) => {
if ( ctx.url === ‘/‘ && ctx.method === ‘GET’ ) {
// 当GET请求时候返回表单页面
let html = <h1>koa2 request post demo</h1>
<form method="POST" action="/">
<p>userName</p>
<input name="userName" /><br/>
<p>nickName</p>
<input name="nickName" /><br/>
<p>email</p>
<input name="email" /><br/>
<button type="submit">submit</button>
</form>
ctx.body = html
} else if ( ctx.url === ‘/‘ && ctx.method === ‘POST’ ) {
// 当POST请求的时候,中间件koa-bodyparser解析POST表单里的数据,并显示出来
let postData = ctx.request.body
ctx.body = postData
} else {
// 其他请求显示404
ctx.body = ‘
404!!! o(╯□╰)o
‘ } })app.listen(3000, () => { console.log(‘[demo] request post is starting at port 3000’) })
<a name="poqFA"></a>## 四、静态资源加载<a name="ghYll"></a>### 原生koa2实现静态资源服务器一个http请求访问web服务静态资源,一般响应结果有三种情况- 访问文本,例如js,css,png,jpg,gif- 访问静态目录- 找不到资源,抛出404错误demo源码<br />[https://github.com/ChenShenhai/koa2-note/blob/master/demo/static-server/](https://github.com/ChenShenhai/koa2-note/blob/master/demo/static-server/)<a name="pEZPG"></a>### koa-static中间件使用demo源码<br />[https://github.com/ChenShenhai/koa2-note/blob/master/demo/static-use-middleware/](https://github.com/ChenShenhai/koa2-note/blob/master/demo/static-use-middleware/)> 安装koa-static npm i koa-static```javascriptconst Koa = require('koa'); // 导入koa包const serve = require('koa-static'); // 导入koa-static包const path=require('path'); // 导入path包 用于拼接路径const app = new Koa(); // 创建koa实例对象app.use(serve(path.join(__dirname+'/static'), // 开放的文件夹 __dirname为当前运行文件的目录 目前看来 只能开放文件夹 无法开放单独一个文件{index:false, // 默认为true 访问的文件为index.html 可以修改为别的文件名或者falsehidden:false, // 是否同意传输隐藏文件defer:true, // 如果为true,则在返回next()之后进行服务,从而允许后续中间件先进行响应}))app.listen(3000);
访问时不需要加上static,即 http://127.0.0.1:3000/文件名 这种形式即可访问
五、cookie/session
koa 使用 cookie
koa提供了从上下文直接读取、写入cookie的方法
- ctx.cookies.get(name, [options]) 读取上下文请求中的cookie
- ctx.cookies.set(name, value, [options]) 在上下文中写入cookie
koa2 中操作的cookies是使用了npm的cookies模块,源码在https://github.com/pillarjs/cookies,所以在读写cookie的使用参数与该模块的使用一致。
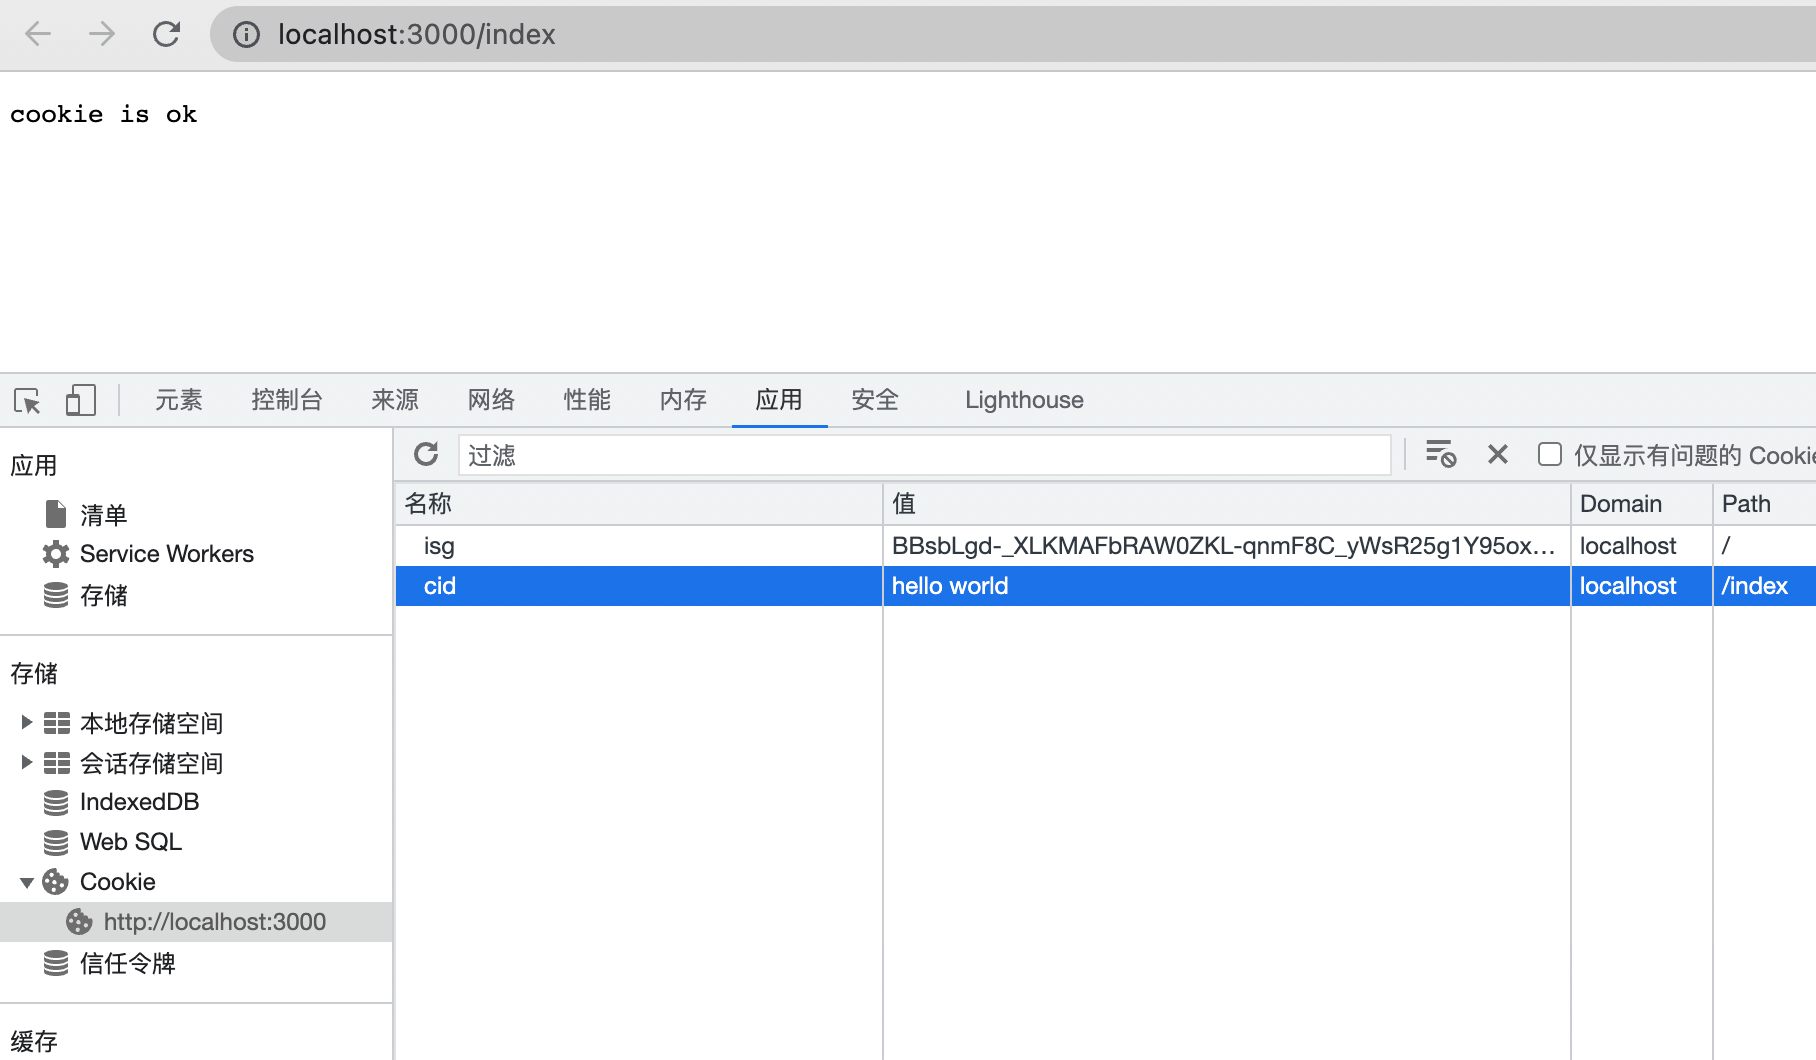
const Koa = require('koa')const app = new Koa()app.use( async ( ctx ) => {if ( ctx.url === '/index' ) {ctx.cookies.set('cid','hello world',{domain: 'localhost', // 写cookie所在的域名path: '/index', // 写cookie所在的路径maxAge: 10 * 60 * 1000, // cookie有效时长expires: new Date('2017-02-15'), // cookie失效时间httpOnly: false, // 是否只用于http请求中获取overwrite: false // 是否允许重写})ctx.body = 'cookie is ok'} else {ctx.body = 'hello world'}})app.listen(3000, () => {console.log('[demo] cookie is starting at port 3000')})
访问http://localhost:3000/index
- 可以在控制台的cookie列表中中看到写在页面上的cookie
- 在控制台的console中使用document.cookie可以打印出在页面的所有cookie(需要是httpOnly设置false才能显示)
koa 使用session
koa2原生功能只提供了cookie的操作,但是没有提供session操作。session就只用自己实现或者通过第三方中间件实现。在koa2中实现session的方案有一下几种
- 如果session数据量很小,可以直接存在内存中
如果session数据量很大,则需要存储介质存放session数据
数据库存储方案
将session存放在MySQL数据库中
- 需要用到中间件
- koa-session-minimal 适用于koa2 的session中间件,提供存储介质的读写接口 。
- koa-mysql-session 为koa-session-minimal中间件提供MySQL数据库的session数据读写操作。
- 将sessionId和对应的数据存到数据库
- 将数据库的存储的sessionId存到页面的cookie中
- 根据cookie的sessionId去获取对于的session信息 ```javascript const Koa = require(‘koa’) const session = require(‘koa-session-minimal’) const MysqlSession = require(‘koa-mysql-session’)
const app = new Koa()
// 配置存储session信息的mysql let store = new MysqlSession({ user: ‘root’, password: ‘abc123’, database: ‘koa_demo’, host: ‘127.0.0.1’, })
// 存放sessionId的cookie配置 let cookie = { maxAge: ‘’, // cookie有效时长 expires: ‘’, // cookie失效时间 path: ‘’, // 写cookie所在的路径 domain: ‘’, // 写cookie所在的域名 httpOnly: ‘’, // 是否只用于http请求中获取 overwrite: ‘’, // 是否允许重写 secure: ‘’, sameSite: ‘’, signed: ‘’,
}
// 使用session中间件 app.use(session({ key: ‘SESSION_ID’, store: store, cookie: cookie }))
app.use( async ( ctx ) => {
// 设置session if ( ctx.url === ‘/set’ ) { ctx.session = { user_id: Math.random().toString(36).substr(2), count: 0 } ctx.body = ctx.session } else if ( ctx.url === ‘/‘ ) {
// 读取session信息ctx.session.count = ctx.session.count + 1ctx.body = ctx.session
}
})
app.listen(3000) console.log(‘[demo] session is starting at port 3000’)
<a name="xE9zp"></a>## 六、模版引擎<a name="BHTKY"></a>### koa2加载模板引擎**安装模块**<br /># 安装koa模板使用中间件> npm install --save koa-views# 安装ejs模板引擎> npm install --save ejs**使用模板引擎**<br />**源码:**[https://github.com/ChenShenhai/koa2-note/blob/master/demo/ejs/](https://github.com/ChenShenhai/koa2-note/blob/master/demo/ejs/)<br />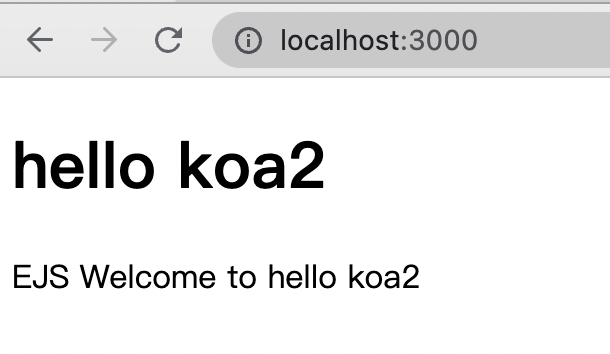<a name="YMVhR"></a>### ejs 模版引擎[https://github.com/mde/ejs](https://github.com/mde/ejs)<a name="RB9Gx"></a>## 七、文件上传<a name="j2eeY"></a>### busboy模块> 安装: npm install --save busboy> 简介: busboy 模块是用来解析POST请求,node原生req中的文件流```javascriptconst inspect = require('util').inspectconst path = require('path')const fs = require('fs')const Busboy = require('busboy')// req 为node原生请求const busboy = new Busboy({ headers: req.headers })// ...// 监听文件解析事件busboy.on('file', function(fieldname, file, filename, encoding, mimetype) {console.log(`File [${fieldname}]: filename: ${filename}`)// 文件保存到特定路径file.pipe(fs.createWriteStream('./upload'))// 开始解析文件流file.on('data', function(data) {console.log(`File [${fieldname}] got ${data.length} bytes`)})// 解析文件结束file.on('end', function() {console.log(`File [${fieldname}] Finished`)})})// 监听请求中的字段busboy.on('field', function(fieldname, val, fieldnameTruncated, valTruncated) {console.log(`Field [${fieldname}]: value: ${inspect(val)}`)})// 监听结束事件busboy.on('finish', function() {console.log('Done parsing form!')res.writeHead(303, { Connection: 'close', Location: '/' })res.end()})req.pipe(busboy)
更多详细API可以访问npm官方文档 https://www.npmjs.com/package/busboy
上传文件简单实现
安装: npm install —save busboy
busboy 是用来解析出请求中文件流
demo源码: https://github.com/ChenShenhai/koa2-note/blob/master/demo/upload/
异步上传图片实现
demo地址: https://github.com/ChenShenhai/koa2-note/tree/master/demo/upload-async
八、MySql
安装MySql
官网:https://www.mysql.com/downloads/
安装nodejs的mysql模块
npm install —save mysql
mysql模块是node操作MySQL的引擎,可以在node.js环境下对MySQL数据库进行建表,增、删、改、查等操作。
更多详细API可以访问npm官方文档 https://www.npmjs.com/package/mysql
async/await封装使用mysql
由于mysql模块的操作都是异步操作,每次操作的结果都是在回调函数中执行,现在有了async/await,就可以用同步的写法去操作数据库
Promise封装mysql模块
// async-db.jsconst mysql = require('mysql')const pool = mysql.createPool({host : '127.0.0.1',user : 'root',password : '123456',database : 'my_database'})let query = function( sql, values ) {return new Promise(( resolve, reject ) => {pool.getConnection(function(err, connection) {if (err) {reject( err )} else {connection.query(sql, values, ( err, rows) => {if ( err ) {reject( err )} else {resolve( rows )}connection.release()})}})})}module.exports = { query }// index.jsconst { query } = require('./async-db')async function selectAllData( ) {let sql = 'SELECT * FROM my_table'let dataList = await query( sql )return dataList}async function getData() {let dataList = await selectAllData()console.log( dataList )}getData()
建表初始化
通常初始化数据库要建立很多表,特别在项目开发的时候表的格式可能会有些变动,这时候就需要封装对数据库建表初始化的方法,保留项目的sql脚本文件,然后每次需要重新建表,则执行建表初始化程序就行
demo源码
https://github.com/ChenShenhai/koa2-note/blob/master/demo/mysql/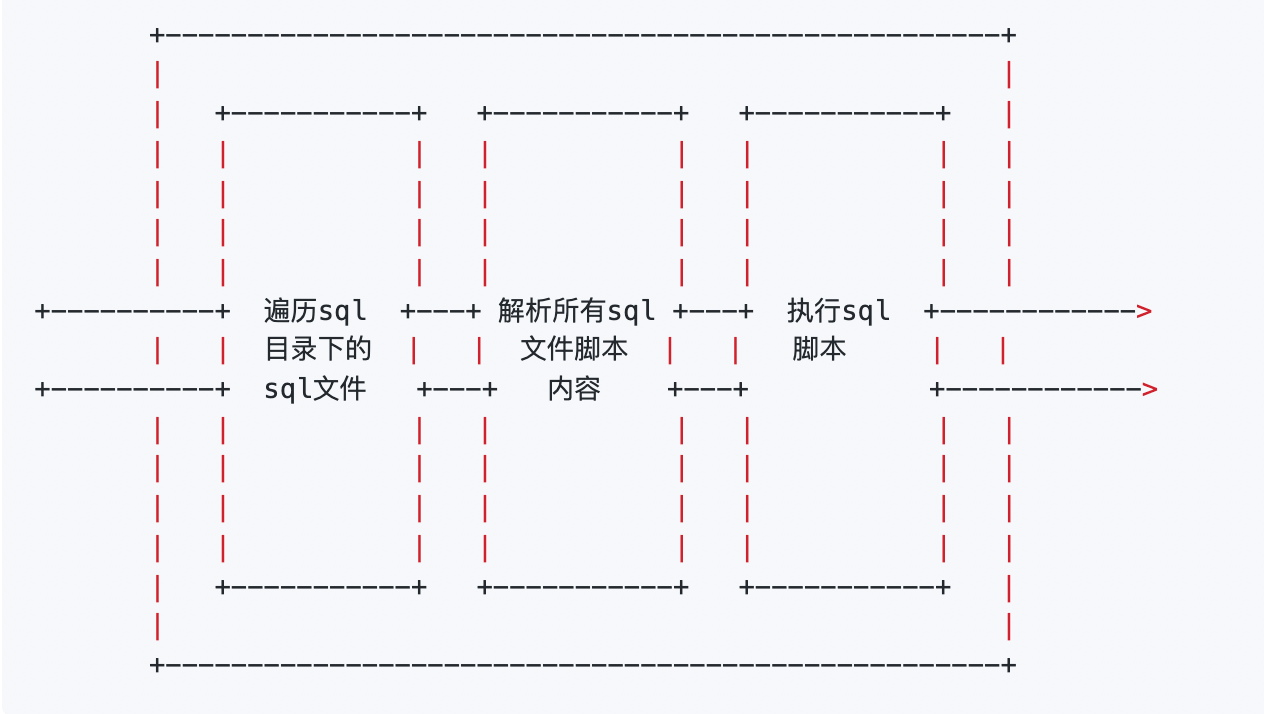
九、JSONP 实现
原生koa2 实现JSONP
在项目复杂的业务场景,有时候需要在前端跨域获取数据,这时候提供数据的服务就需要提供跨域请求的接口,通常是使用JSONP的方式提供跨域接口。
实现JSONP
demo地址 https://github.com/ChenShenhai/koa2-note/blob/master/demo/jsonp/
// 判断是否为JSONP的请求if ( ctx.method === 'GET' && ctx.url.split('?')[0] === '/getData.jsonp') {// 获取jsonp的callbacklet callbackName = ctx.query.callback || 'callback'let returnData = {success: true,data: {text: 'this is a jsonp api',time: new Date().getTime(),}}// jsonp的script字符串let jsonpStr = `;${callbackName}(${JSON.stringify(returnData)})`// 用text/javascript,让请求支持跨域获取ctx.type = 'text/javascript'// 输出jsonp字符串ctx.body = jsonpStr}
解析原理
- JSONP跨域输出的数据是可执行的JavaScript代码
- ctx输出的类型应该是’text/javascript’
- ctx输出的内容为可执行的返回数据JavaScript代码字符串
- 需要有回调函数名callbackName,前端获取后会通过动态执行JavaScript代码字符,获取里面的数据
koa-jsonp中间件
koa.js 官方wiki中也介绍了不少jsonp的中间件
其中koa-jsonp是支持koa2的,使用方式也非常简单,koa-jsonp的官方demo也很容易理解
快速使用
npm install —save koa-jsonp
简单🌰
const Koa = require('koa')const jsonp = require('koa-jsonp')const app = new Koa()// 使用中间件app.use(jsonp())app.use( async ( ctx ) => {let returnData = {success: true,data: {text: 'this is a jsonp api',time: new Date().getTime(),}}// 直接输出JSONctx.body = returnData})app.listen(3000, () => {console.log('[demo] jsonp is starting at port 3000')})
十、单元测试
测试是一个项目周期里必不可少的环节,开发者在开发过程中也是无时无刻进行“人工测试”,如果每次修改一点代码,都要牵一发动全身都要手动测试关联接口,这样子是禁锢了生产力。为了解放大部分测试生产力,相关的测试框架应运而生,比较出名的有mocha,karma,jasmine等。虽然框架繁多,但是使用起来都是大同小异。
准备工作
npm install —save-dev mocha chai supertest
- mocha 模块是测试框架
- chai 模块是用来进行测试结果断言库,比如一个判断 1 + 1 是否等于 2
- supertest 模块是http请求测试库,用来请求API接口
测试例子
demo地址:https://github.com/ChenShenhai/koa2-note/blob/master/demo/test-unit/ ```javascript const supertest = require(‘supertest’) const chai = require(‘chai’) const app = require(‘./../index’)
const expect = chai.expect const request = supertest( app.listen() )
// 测试套件/组 describe( ‘开始测试demo的GET请求’, ( ) => {
// 测试用例 it(‘测试/getString.json请求’, ( done ) => { request .get(‘/getString.json’) .expect(200) .end(( err, res ) => { // 断言判断结果是否为object类型 expect(res.body).to.be.an(‘object’) expect(res.body.success).to.be.an(‘boolean’) expect(res.body.data).to.be.an(‘string’) done() }) }) })
<a name="rs2dA"></a>#### 执行测试用例> # node.js <= 7.5.x> ./node_modules/.bin/mocha --harmony> # node.js = 7.6.0> ./node_modules/.bin/mocha> 注意:> 1. 如果是全局安装了mocha,可以直接在当前项目目录下执行 mocha --harmony 命令> 2. 如果当前node.js版本低于7.6,由于7.5.x以下还直接不支持async/awiar就需要加上--harmony会自动读取执行命令 ./test 目录下的测用例文件 inde.test.js,并执行。测试结果如下<br />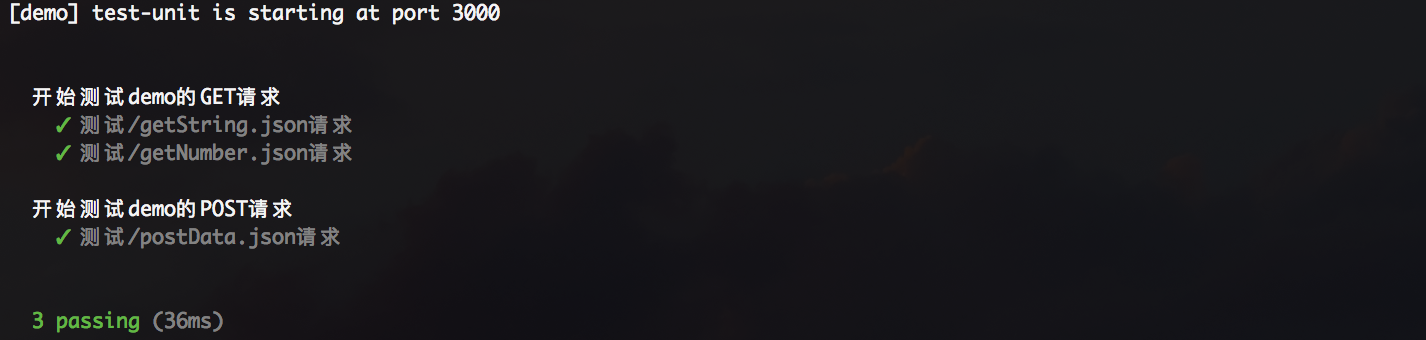<a name="t3R5K"></a>#### 用例详解**服务入口加载**<br />如果要对一个服务的API接口,进行单元测试,要用supertest加载服务的入口文件> const supertest = require('supertest')> const request = supertest( app.listen() )**测试套件、用例**- describe()描述的是一个测试套件- 嵌套在describe()的it()是对接口进行自动化测试的测试用例- 一个describe()可以包含多个it()```javascriptdescribe( '开始测试demo的GET请求', ( ) => {it('测试/getString.json请求', () => {// TODO ...})})
- supertest封装服务request,是用来请求接口
chai.expect使用来判断测试结果是否与预期一样
node环境 8.x +
- chrome 60+
启动脚本
调试demo
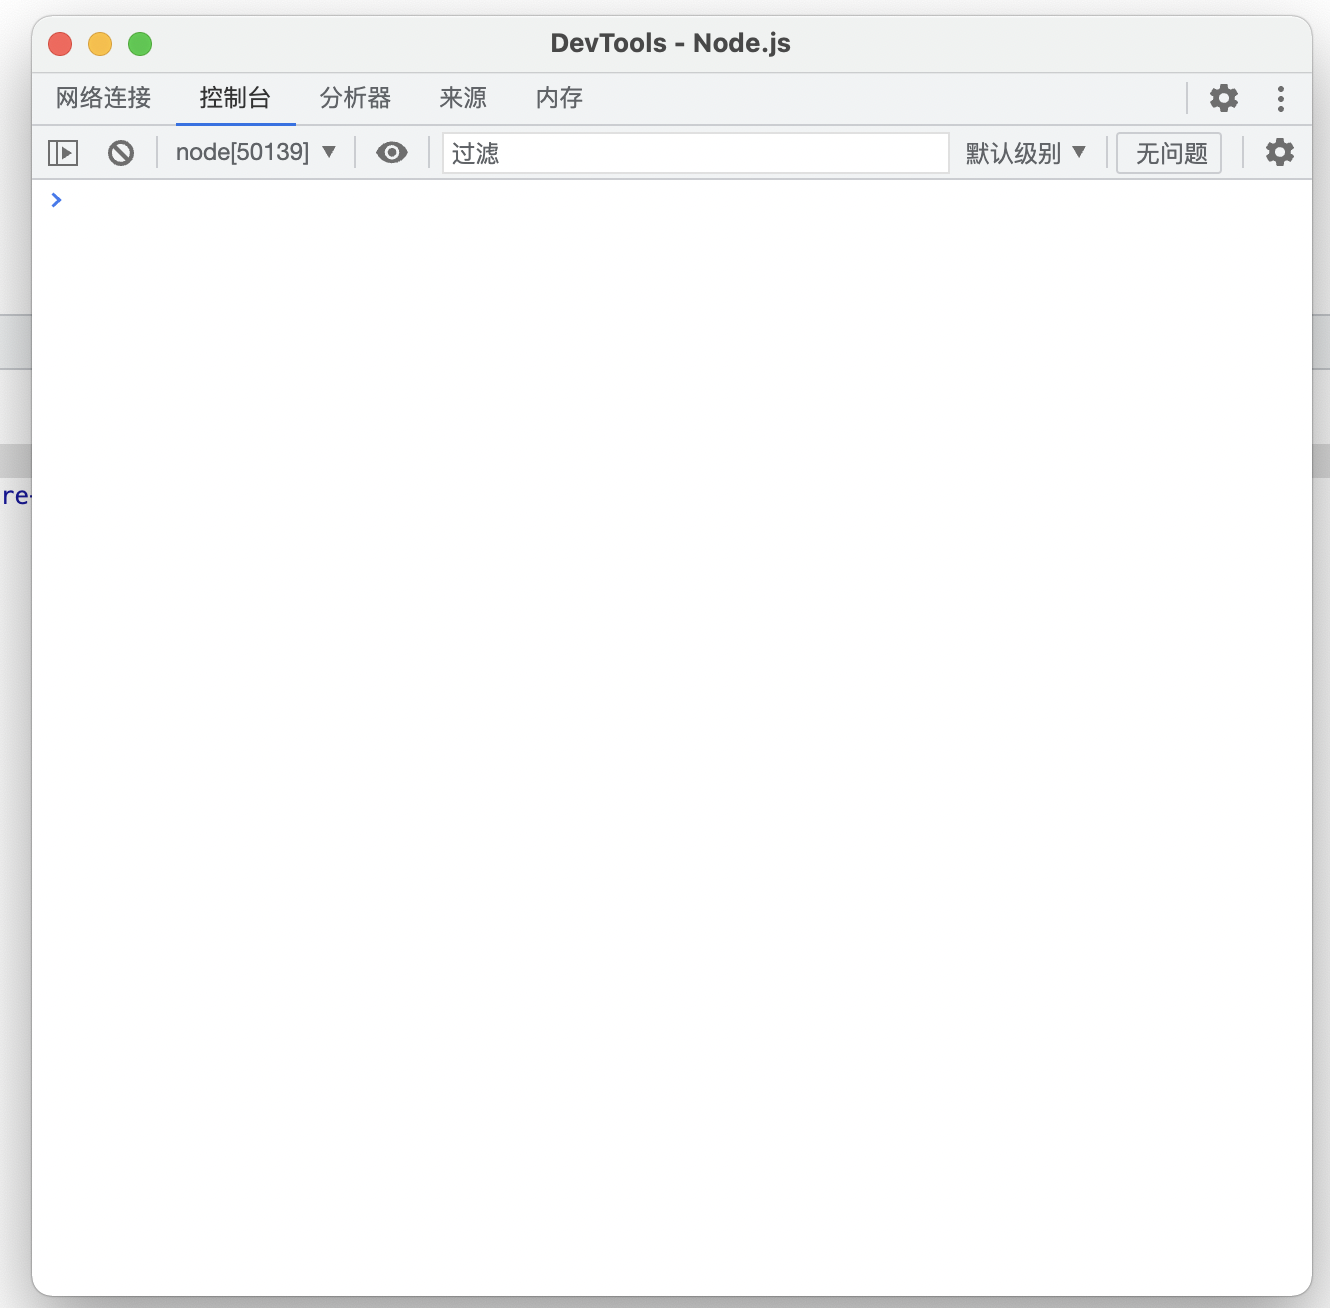
https://github.com/ChenShenhai/koa2-note/blob/master/demo/start-quick/node —inspect index.js
指令框显示
指令框就会出现以下字样
Debugger listening on ws://127.0.0.1:9229/4c23c723-5197-4d23-9b90-d473f1164abe For help see https://nodejs.org/en/docs/inspector

访问chorme浏览器调试server
打开浏览器调试窗口会看到一个node.js 的小logo
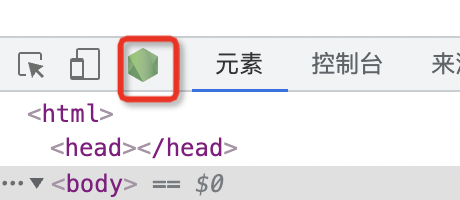
打开chrome浏览器的node调试窗口
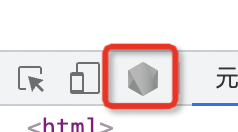
注意打开了node的调试窗口后,原来绿色的node�按钮会�变灰色,同时调试框会显示debug状态
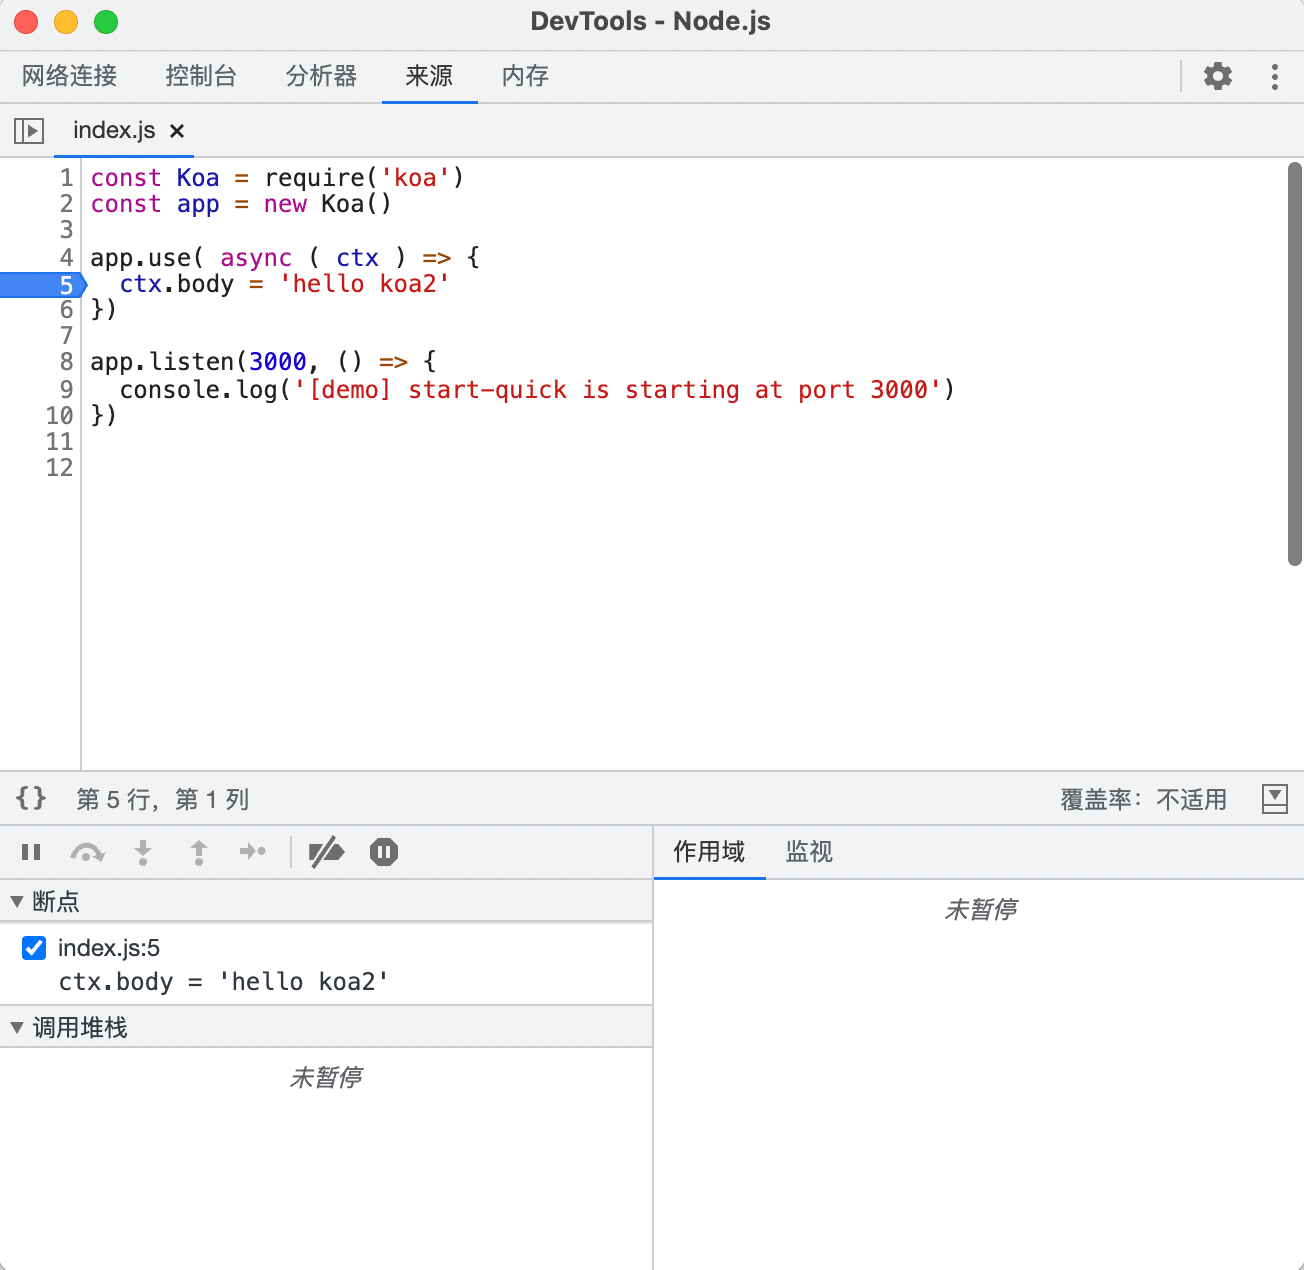
可以自定义打断点调试了
十二、项目框架搭建
快速启动
项目demo: https://github.com/ChenShenhai/koa2-note/blob/master/demo/project/
初始化数据库
- 安装MySQL5.6以上版本
创建数据库koa_demo
create database koa_demo;
配置项目config.js ```javascript const config = { // 启动端口 port: 3001,
// 数据库配置 database: { DATABASE: ‘koa_demo’, USERNAME: ‘root’, PASSWORD: ‘abc123’, PORT: ‘3306’, HOST: ‘localhost’ } }
启动脚本
安装淘宝镜像
cnpm npm install -g cnpm —registry=https://registry.npm.taobao.org # 安装依赖 cnpm install
数据建库初始化
npm run init_sql
编译react.js源码
npm run start_static
启动服务
npm run start_server
访问项目demo

若有收获,就点个赞吧
0 人点赞
