Apollo(阿波罗)是携程框架部门研发的分布式配置中心,能够集中化管理应用不同环境、不同集群的配置,配置修改后能够实时推送到应用端,并且具备规范的权限、流程治理等特性,适用于微服务配置管理场景。
服务端基于Spring Boot和Spring Cloud开发,打包后可以直接运行,不需要额外安装Tomcat等应用容器。
安装步骤
1、下载安装包 https://pan.baidu.com/s/1Ieelw6y3adECgktO0ea0Gg#list/path=%2F
2、解压,配置数据库连接地址 demo.sh
# apollo config db infoapollo_config_db_url=jdbc:mysql://localhost:3306/ApolloConfigDB?useUnicode=true&characterEncoding=UTF-8&userSSL=false&serverTimezone=Asia/Shanghai&allowMultiQueries=trueapollo_config_db_username=rootapollo_config_db_password=root# apollo portal db infoapollo_portal_db_url=jdbc:mysql://localhost:3306/ApolloPortalDB?useUnicode=true&characterEncoding=UTF-8&userSSL=false&serverTimezone=Asia/Shanghai&allowMultiQueries=trueapollo_portal_db_username=rootapollo_portal_db_password=root
3、配置数据库
- 创建数据库 ApolloConfigDB、执行 SQL 脚本 apolloconfigdb.sql
- 创建数据库 ApolloPortalDB、执行 SQL 脚本 apolloportaldb.sql
4、启动 demo.sh
$ D:/Development/apollo-quick-start-1.6.1/demo.sh startWindows new JAVA_HOME is: /d/Development/Java/jdk1.8.0_231==== starting service ====Service logging file is ./service/apollo-service.logStarted [1564]Waiting for config service startup...........Config service started. You may visit http://localhost:8080 for service status now!Waiting for admin service startup..Admin service started==== starting portal ====Portal logging file is ./portal/apollo-portal.logStarted [1637]Waiting for portal startup.......Portal started. You can visit http://localhost:8070 now!
访问:http://127.0.0.1:8070/signin 进入管理控制台界面,默认用户为 apollo,密码为 admin
架构设计
Apollo 架构模块的概览
Apollo 默认启动了三个服务
- 8070:管理控制台
- 8080:Eurka
- 8090:配置服务

上图简要描述了Apollo的总体设计,我们可以从下往上看:
- Config Service提供配置的读取、推送等功能,服务对象是Apollo客户端
- Admin Service提供配置的修改、发布等功能,服务对象是Apollo Portal(管理界面)
- Config Service和Admin Service都是多实例、无状态部署,所以需要将自己注册到Eureka中并保持心跳
- 在Eureka之上我们架了一层Meta Server用于封装Eureka的服务发现接口
- Client通过域名访问Meta Server获取Config Service服务列表(IP+Port),而后直接通过IP+Port访问服务,同时在Client侧会做load balance、错误重试
- Portal通过域名访问Meta Server获取Admin Service服务列表(IP+Port),而后直接通过IP+Port访问服务,同时在Portal侧会做load balance、错误重试
- 为了简化部署,我们实际上会把Config Service、Eureka和Meta Server三个逻辑角色部署在同一个JVM进程中
服务端架构设计
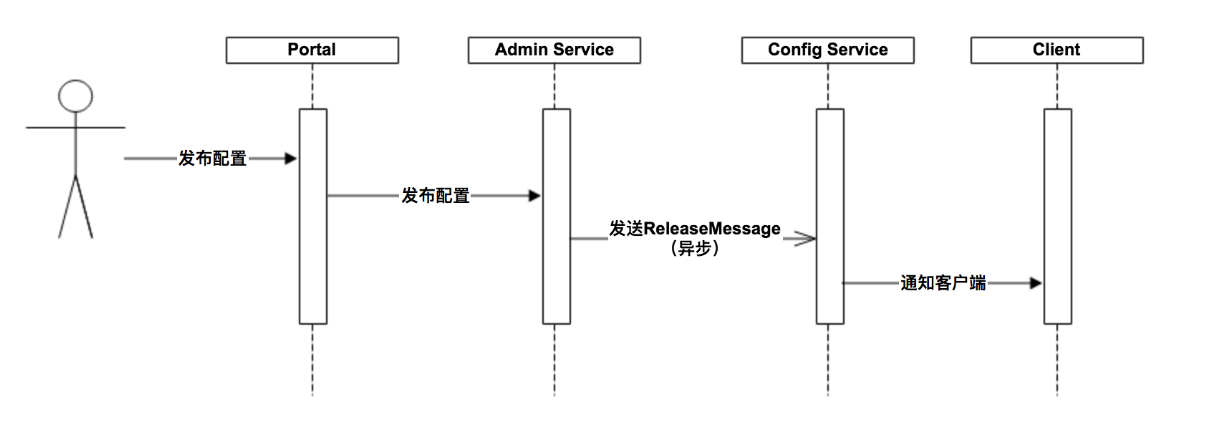
- 用户在Portal操作配置发布
- Portal调用Admin Service的接口操作发布
- Admin Service发布配置后,发送ReleaseMessage给各个Config Service
- Config Service收到ReleaseMessage后,通知对应的客户端
客户端架构设计

- 客户端和服务端保持了一个长连接,从而能第一时间获得配置更新的推送。(通过Http Long Polling实现)
- 客户端还会定时从Apollo配置中心服务端拉取应用的最新配置。
- 这是一个fallback机制,为了防止推送机制失效导致配置不更新
- 客户端定时拉取会上报本地版本,所以一般情况下,对于定时拉取的操作,服务端都会返回304 - Not Modified
- 定时频率默认为每5分钟拉取一次,客户端也可以通过在运行时指定System Property:
apollo.refreshInterval来覆盖,单位为分钟。
- 客户端从Apollo配置中心服务端获取到应用的最新配置后,会保存在内存中
- 客户端会把从服务端获取到的配置在本地文件系统缓存一份
- 在遇到服务不可用,或网络不通的时候,依然能从本地恢复配置
- 应用程序可以从Apollo客户端获取最新的配置、订阅配置更新通知

参数配置
Apollo 的相关参数配置,如:部门的添加、开发环境的添加,都是通过 key/value 的形式,往数据库的配置字段中添加的,库:apolloportaldb,表:serverconfig
我们可以通过 管理员工具 -> 系统参数 进行设置,也可以直接修改数据库
Java Client
依赖
<!-- https://mvnrepository.com/artifact/com.ctrip.framework.apollo/apollo-client --><dependency><groupId>com.ctrip.framework.apollo</groupId><artifactId>apollo-client</artifactId><version>1.7.0</version></dependency>
配置
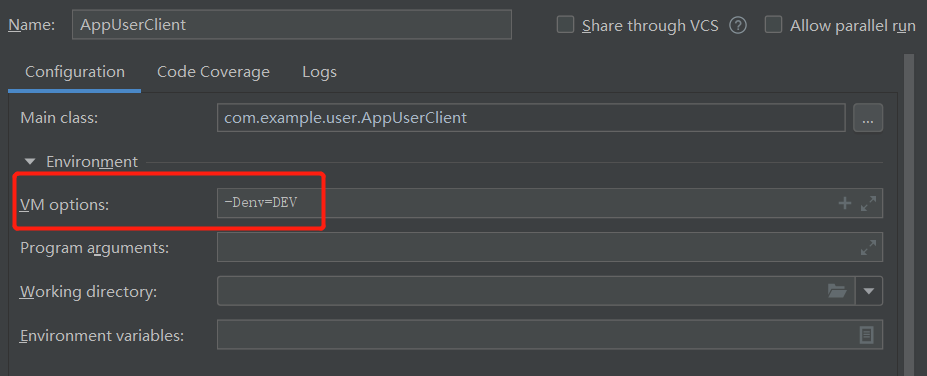
-Dapp.id=test -Dapollo.meta=http://localhost:8080 -Denv=DEV
代码
public class Test {

    public static void main(String[] args) {
        // 默认的 application namespace
        Config config = ConfigService.getAppConfig(); // config instance is singleton for each namespace and is never null
        String name = config.getProperty("name", null);
        System.out.println("name = " + name);

        // 我们自定义的 namespace
        Config test_namespace = ConfigService.getConfig("test_namespace");
        String username = test_namespace.getProperty("username", null);
        System.out.println("username = " + username);
    }

}
Spring Boot 整合
依赖
<!-- https://mvnrepository.com/artifact/com.ctrip.framework.apollo/apollo-client -->
<dependency>
  <groupId>com.ctrip.framework.apollo</groupId>
  <artifactId>apollo-client</artifactId>
  <version>1.7.0</version>
</dependency>
配置
app:
  id: TEST # apollo AppId
apollo:
  cluster: defalut # 集群名称
  meta: http://127.0.0.1:8080
  bootstrap:
    namesapces: application
    enable: true
代码
启动类上添加 @EnableApolloConfig 注解
@RestController
@RequestMapping("/test")
@SpringBootApplication
@EnableApolloConfig
public class ApolloBootClient {

    public static void main(String[] args) {
        SpringApplication.run(ApolloBootClient.class, args);
    }

    @Value("${timeout}")
    private long timeout;

    @Value("${salt}")
    private String salt;

    @RequestMapping("/load")
    public R load() {
        return R.success().set("timeout", timeout).set("salt", salt);
    }

}

若有收获,就点个赞吧
0 人点赞
