ro在React基础二阶段中,我们需要完成如下的学习
- 组件的进阶学习之。组件的通信
- 组件的进阶学习之。深入理解prop
- 组件的进阶学习之,组件的生命周期
- 再次理解prop的几种设计模式
- 高阶组件的封装
一、组件之间的通信
组件通信prpos
组件的是一个封闭的单元,如果要实现与外部的通信,就需要使用组件来进行通 接下来我们来看看,如何接受外部传入的数据
- 我们有两种方式来使用
- 在函数组件中使用props
- 在组件的标签上传入数据
- 在组件的内部获取数据 通过props (注意,这个获取到的是一个对象)
- 在类组件中使用prpos
- 传入数据
- 内部获取,注意这里是this.props
import React from 'react'import ReactDOM, { render } from 'react-dom'import './index.css'// React.Component必须继承 必须由返回值,必须由值// import Hello from './hello'// import {Commont} from './commonent'const Commonent = function (props) {return (<h1>props: {props} </h1>)}// 注意这个root是再public下的index中的根元素的ReactDOM.render(<Commont name="jack" age={18} />, document.getElementById('root'))// 如果使用的类组件import React from 'react'import ReactDOM, { render } from 'react-dom'import './index.css'// React.Component必须继承 必须由返回值,必须由值// import Hello from './hello'// import {Commont} from './commonent'class Commont extends React.Component {render() {return (<h1>props:{this.props}</h1>)}}// 注意这个root是再public下的index中的根元素的ReactDOM.render(<Commont name="jack" age={18} />, document.getElementById('root'))
组件通信的特点
组件通信的特点有下面的这些个特点需要认真的说明一下
- props是可以允许有任意属性类型的
- props是一个只读的属性
- 在类组件中,推荐把props写在构造器中
// prop可以是任意的类型// 注意这个root是再public下的index中的根元素的ReactDOM.render(<Commontname="jack"age={18}fmany={[1, 2, 3]}hehe={{ age: 'asdasd', sex: 'asdasd' }}jsx={<p>heheehee</p>}/>, document.getElementById('root'))// 注意要传递给superclass Commont extends React.Component {constructor(props){super(props)console.log(props);}render () {return (<h1>props:{this.props}</h1>)}}
组件的常见通信方式
父 =====> 子
实际上,父组件丢到子组件,就是利用的props属性
import React from 'react'import ReactDOM from 'react-dom'import './index.css'class Commont extends React.Component {constructor() { }state = {lastName: '王'}render () {return (<div><h1>props:{this.props}</h1><Childen props={this.state.lastName}></Childen></div>)}}const Childen = function (props) {return (<h1>父组件的数据 {props}</h1>)}// 注意这个root是再public下的index中的根元素的ReactDOM.render(<Commont />, document.getElementById('root'))
子 =====> 父
子到父要使用自定义事件,这个和vue中$emit有异曲同工之妙, 核心就是自定义事件
import React from 'react'import ReactDOM from 'react-dom'import './index.css'class Childen extends React.Component {constructor(props) {super(props)}handerClick = () => {this.props.getMessage('hehhehehehhe')}render () {return (<div><h1>点击发送数据到父组件 {}</h1><button onClick={this.handerClick}>点击发送信息</button></div>)}}class Commont extends React.Component {state = {lastName: '王',}// 自定义事件来触发getMessage = (data) => {console.log(data);this.setState({lastName: data})}render () {return (<div><h1>props:{this.state.lastName}</h1><Childen getMessage={this.getMessage}></Childen></div>)}}// 注意这个root是再public下的index中的根元素的ReactDOM.render(<Commont />, document.getElementById('root'))
兄弟组件之间的数据传递
兄弟之间的数据传递是一个非常重要的点 这里的核心思想,就是状态提升,提取到公共的方法上去就好了
import React from 'react'import ReactDOM from 'react-dom'import './index.css'class Childen1 extends React.Component {constructor(props) {super(props)}render () {return (<div><h1>数据 {this.props.conut}</h1></div>)}}class Childen2 extends React.Component {constructor(props) {super(props)}render () {return (<div><button onClick={() => this.props.incunment}>点击发送信息</button></div>)}}class Commont extends React.Component {state = {conut: 0}// 自定义事件来触发incunment = (data) => {this.setState({conut: conut + 1})}render () {return (<div><Childen1 count={this.state.conut}></Childen1><Childen2 incunment={this.incunment()}></Childen2></div>)}}// 注意这个root是再public下的index中的根元素的ReactDOM.render(<Commont />, document.getElementById('root'))
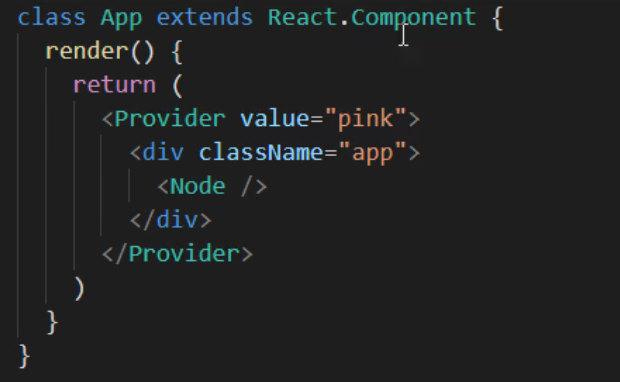
context上下文
这个东西的出现是解决了,多层次嵌套的问题 比如下面的这个例子,laozhuz => grandpa => father => son,这个时候我们就可以使用context这个组件进行数据传递了,
核心主要有两个
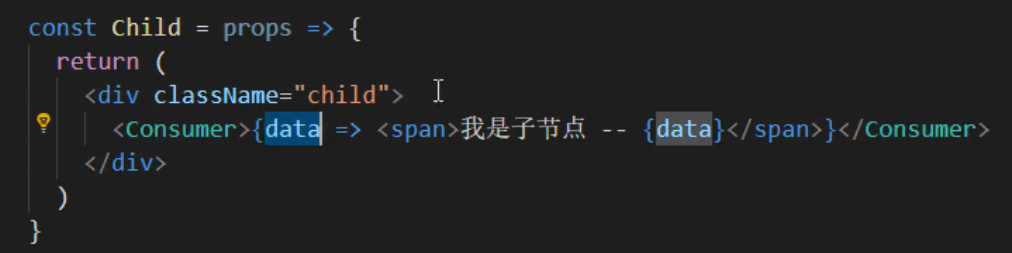
使用的时候就把在最近的一个父组件上,包裹一个Provider组件,在需要拿数据的地方拿一个Consumer包裹起来就好了
二、深入的理解prop
这里呢,我们来深入的了解一下我们的prop,实际上,这个prop还有更多的属性 还有方法,它的api也一直在更新迭代
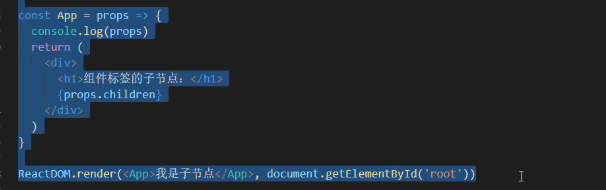
children属性
children属性很简单,表示的是组件标签的子节点,当组件有子节点的时候,prop就会有这个属性

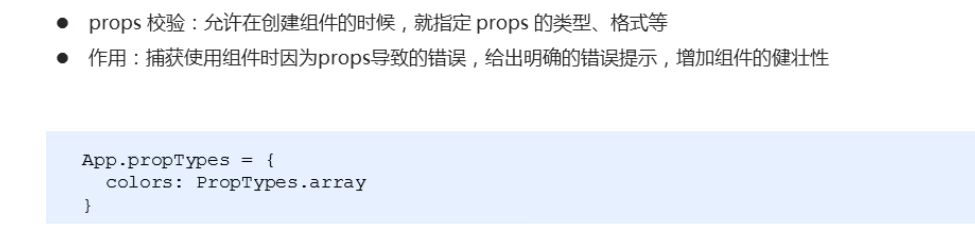
prop校验
这个东西。和我们的vue中的那个prop是基本上是一致的,我们需要对数据进行一些校验
- 如果组件不进行数据校验,那么就会有如下的情况发生
const App = props => {const arr = props.colorsconst lis = arr.map( ( item,index )=> <li key={index}> {item.name} </li> )return <ul> {lis} </ul>}//如果你传入的是不合法的属性,就会报错
- 使用说明
需要注意的是,我们的这个是另外需要引入的
npm install props-types
再代码中使用 ```javascript import PropTypes from ‘prop-types’
const App = prop => { const arr = props.colors const lis = arr.map( ( item,index )=>
- {lis}
ReactDOM.render (
<a name="F3uMT"></a>### props校验的类型有哪些?如何自定义校验规则?- 第一类,常见的类型:array bool func number object string- 第二类。React元素类型:element- 第三类。必填项isReqyured- 第四类。特点结构的对象:shape({})- 这里只是我们最常见的类型,还有很多的类型。请去查看官方的文档,官方有详细的介绍和说明> 接下来,我们通过一个案例去演示一下,这个东西的使用> 需求如下:```javascriptconst App = (prop)=> {return (<div><h1>prop校验:</h1></div>)}App.propTypes = {a: PropTypes.number,fn:PropTypes.func.isRequired,tag:PropTypes.element,filter:PropTypes.shape({area:PropTypes.string,price:PropTypes.number})}
props是由默认值的
从业务出发,如果我们要使用一个分页组件怎么搞?,我们希望有一个默认的值默认一页显示多少条,使用起来,非常的简单
const App = (prop)=> {return (<div><h1>prop的默认值:{prop.pageSize}</h1></div>)}App.defaultProps = {pageSize:10}
三、理解生命周期
所谓的声明周期特别好理解,无非就是某个阶段触发的一系列特殊的事件🐎。再vue中有13个钩子函数。在react中也是有生命钩子的,接下来,我们来看看,最常见的生命周期钩子函 下图是一个说明

创建阶段的生命周期钩子
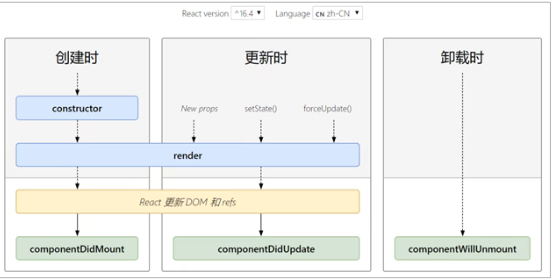
组件创建的时候触发的钩子,有主要的三个钩子函数
- 先执行,constructor
- 再执行 render
- 最后执行 componentDidMount
- 在这些生命钩子中,我们能做什么呢?
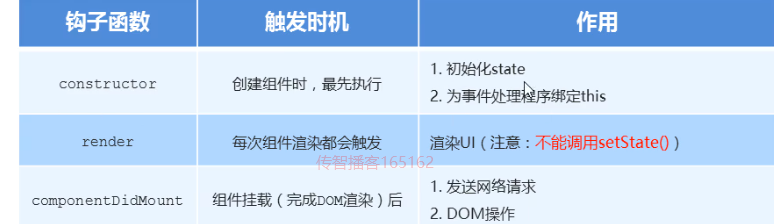
重点:render的时候不能调用setState()原因如下:
每次组件渲染都会触发render,因为setState
更新阶段的生命周期钩子
执行时机:
setState()、 forceUpdate()、 组件接收到新的props的时候都会触发这个生命钩子
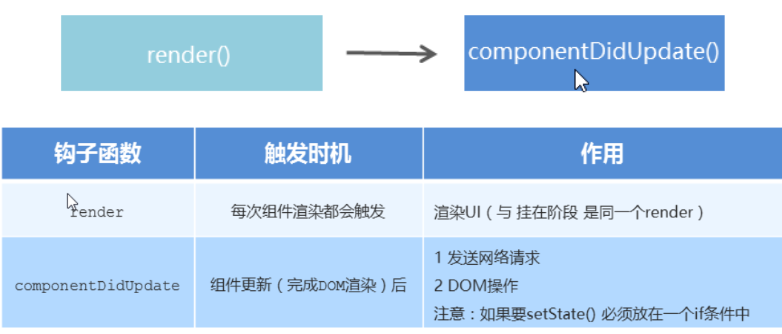
import React from 'react'import ReactDOM from 'react-dom'/*组件生命周期*/class App extends React.Component {constructor(props) {super(props)// 初始化statethis.state = {count: 0}}// 打豆豆handleClick = () => {this.setState({count: this.state.count + 1})}render() {return (<div><Counter count={this.state.count} /><button onClick={this.handleClick}>打豆豆</button></div>)}}class Counter extends React.Component {render() {console.warn('--子组件--生命周期钩子函数: render')return <h1 id="title">统计豆豆被打的次数:{this.props.count}</h1>}// 注意:如果要调用 setState() 更新状态,必须要放在一个 if 条件中// 因为:如果直接调用 setState() 更新状态,也会导致递归更新!!!componentDidUpdate(prevProps) {console.warn('--子组件--生命周期钩子函数: componentDidUpdate')// 正确做法:// 做法:比较更新前后的props是否相同,来决定是否重新渲染组件console.log('上一次的props:', prevProps, ', 当前的props:', this.props)if (prevProps.count !== this.props.count) {// this.setState({})// 发送ajax请求的代码}// 错误演示!!!// this.setState({})// 获取DOM// const title = document.getElementById('title')// console.log(title.innerHTML)}}ReactDOM.render(<App />, document.getElementById('root'))
销毁阶段的生命周期钩子
销毁的时候就非常的简单了,这里就不缀述了

import React from 'react'import ReactDOM from 'react-dom'/*组件生命周期*/class App extends React.Component {constructor(props) {super(props)// 初始化statethis.state = {count: 0}}// 打豆豆handleClick = () => {this.setState({count: this.state.count + 1})}render() {return (<div>{this.state.count > 3 ? (<p>豆豆被打死了~</p>) : (<Counter count={this.state.count} />)}<button onClick={this.handleClick}>打豆豆</button></div>)}}class Counter extends React.Component {componentDidMount() {// 开启定时器this.timerId = setInterval(() => {console.log('定时器正在执行~')}, 500)}render() {return <h1>统计豆豆被打的次数:{this.props.count}</h1>}componentWillUnmount() {console.warn('生命周期钩子函数: componentWillUnmount')// 清理定时器clearInterval(this.timerId)}}ReactDOM.render(<App />, document.getElementById('root'))
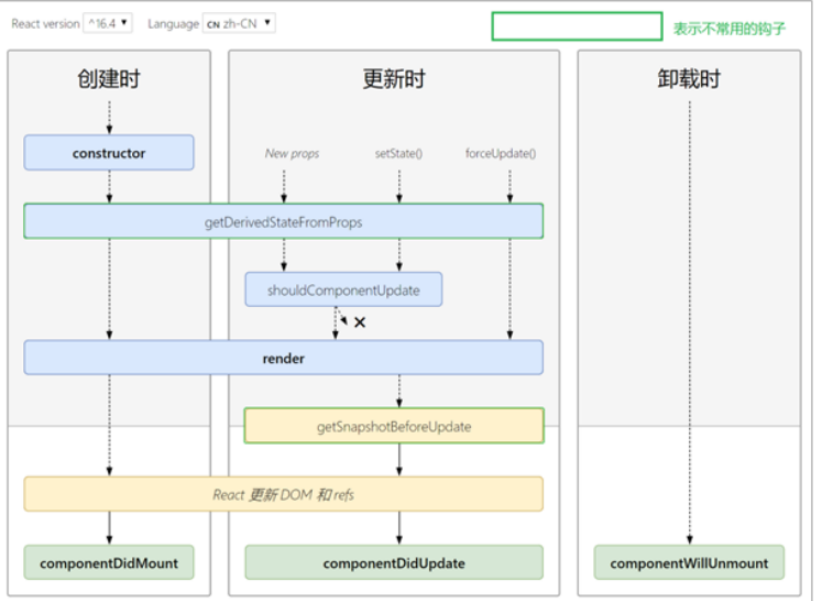
其它的生命周期钩子
除了上述的三大类的生命周期钩子,我们还有一些不常见的,但是在业务上是有可能会遇到的生命周期钩子,其中最重要的是一个叫做 附上一个相对比较完整的钩子函数
四、有关于组件还有业务逻辑代码的高度封装
如果存在某些组件需要复用,某些组件需要高度的封装,这个时候可以考虑采取使用如下的常见的两种方式去编写通用的组件还有通用的 复用什么?
- state
- 操作state的方法
prop的几种常见的设计模式
render-props 它可以把特定行为或功能封装成一个组件,提供给其他组件使用让其他组件拥有这样的能力
- 要实现这样的方式设计方式,首先我们需要使用 拿到公用的组件的状态state,在使用组件时,添加一个值为函数的prop,通过函数参数来获取需要被提取出来公共的状态

- 如何渲染任意的ui呢?也非常的简单,有了数据直接渲染就好了

class Mouse extends React.Component {// 鼠标位置状态state = {x: 0,y: 0}// 监听鼠标移动事件componentDidMount(){window.addEventListener('mousemove',this.handleMouseMove)}handleMouseMove = e => {this.setState({x: e.clientX,y: e.clientY})}render(){// 向外界提供当前子组件里面的数据,重点,使用这个方法的返回值,就能渲染任意结构的ui了!秒啊,而且也为逻辑的操作都是内部实现的!完全解耦return this.props.render(this.state)}}class App extends React.Component {render() {return (<div>App<Mouse render={mouse => {return <p>X{mouse.x}Y{mouse.y}</p>}}/></div>)}}ReactDOM.render(<App />,document.getElementById('root'))
- 优化注意事项
- 我们一般使用children来代替redner属性名
- 推荐把props添加上校验规则
- 性能角度 ,组件销毁的时候要解绑事件


class Mouse extends React.Component {// 鼠标位置状态state = {x: 0,y: 0}// 监听鼠标移动事件componentDidMount(){window.addEventListener('mousemove',this.handleMouseMove)}handleMouseMove = e => {this.setState({x: e.clientX,y: e.clientY})},componentWillUnmount(){window.removeEvenListener("mousemove",this.handleMouserMove)}render(){// 向外界提供当前子组件里面的数据,重点,使用这个方法的返回值,就能渲染任意结构的ui了!秒啊,而且也为逻辑的操作都是内部实现的!完全解耦return this.props.children(this.state)}}class App extends React.Component {render() {return (<div>App<Mouse children={mouse => {return <p>X{mouse.x}Y{mouse.y}</p>}}/></div>)}}ReactDOM.render(<App />,document.getElementById('root'))
高阶的组件封装
HOC高阶组件实际上是一个工具,实现状态逻辑复用,采取包装模式 高阶组件(HOC、Higher-Order Component) 是一个函数,接收要包装的组件,返回增强后的组件
核心技术


- 创建一个函数,名称约定以with开头
- 指定函数参数,参数应该以大写字母开头
- 在函数内部创建一个类组件,提供复用的状态逻辑代码,并返回
- 在该组件中,渲染参数组件,同时将状态通过prop传递给参数组件
- 调用该高阶组件,传入要增强的组件,通过返回值拿到增强后的组件,并将其渲染到页面
包装函数
// 定义一个函数,在函数内部创建一个相应类组件function withMouse(WrappedComponent) {// 该组件提供复用状态逻辑class Mouse extends React.Component {state = {x: 0,y: 0}// 事件的处理函数handleMouseMove = (e) => {this.setState({x: e.clientX,y: e.clientY})}// 当组件挂载的时候进行事件绑定componentDidMount() {window.addEventListener('mousemove', this.handleMouseMove)}// 当组件移除时候解绑事件componentWillUnmount() {window.removeEventListener('mousemove', this.handleMouseMove)}render() {// 在render函数里面返回传递过来的组件,把当前组件的状态设置进去return <WrappedComponent {...this.state} />}}return Mouse}
加强组件
function Position(props) {return (<p> // 这里的prop实际上就是我们的高阶函数里的stateX:{props.x}Y:{props.y}</p>)}// 把position 组件来进行包装let MousePosition = withMouse(Position)class App extends React.Component {constructor(props) {super(props)}render() {return (<div>高阶组件<MousePosition></MousePosition></div>)}}
优化和改进
使用高阶组件存在如下的问题,
- 存在两个同名称的组件,没法区分(在dev-tools中)
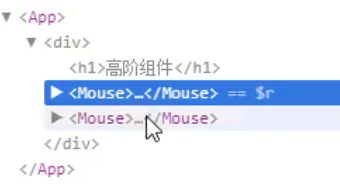
为什么出现这个问题?
// 在render函数里面返回传递过来的组件,把当前组件的状态设置进去return <WrappedComponent {...this.state} />}}return Mouse // 你看都返回了Mouse
解决方案,设置名字
这里的name就是组件的名称,注意啊,这个getDispalyName是不写在外面的!写在index中
import React from 'react'import ReactDOM from 'react-dom'/*高阶组件*/import img from './images/cat.png'// 创建高阶组件function withMouse(WrappedComponent) {// 该组件提供复用的状态逻辑class Mouse extends React.Component {// 鼠标状态state = {x: 0,y: 0}handleMouseMove = e => {this.setState({x: e.clientX,y: e.clientY})}// 控制鼠标状态的逻辑componentDidMount() {window.addEventListener('mousemove', this.handleMouseMove)}componentWillUnmount() {window.removeEventListener('mousemove', this.handleMouseMove)}render() {return <WrappedComponent {...this.state} />}}// 设置displayNameMouse.displayName = `WithMouse${getDisplayName(WrappedComponent)}`return Mouse}function getDisplayName(WrappedComponent) {return WrappedComponent.displayName || WrappedComponent.name || 'Component'}// 用来测试高阶组件const Position = props => (<p>鼠标当前位置:(x: {props.x}, y: {props.y})</p>)// 猫捉老鼠的组件:const Cat = props => (<imgsrc={img}alt=""style={{position: 'absolute',top: props.y - 64,left: props.x - 64}}/>)// 获取增强后的组件:const MousePosition = withMouse(Position)// 调用高阶组件来增强猫捉老鼠的组件:const MouseCat = withMouse(Cat)class App extends React.Component {render() {return (<div><h1>高阶组件</h1>{/* 渲染增强后的组件 */}<MousePosition /><MouseCat /></div>)}}ReactDOM.render(<App />, document.getElementById('root'))
- 我们还有问题,就是prop传参的是也是一个问题
- 问题:如果没有传递props,会导致props丢失问题
- 解决方式: 渲染WrappedComponent时,将state和props一起传递给组件

import React from 'react'import ReactDOM from 'react-dom'/*高阶组件*/// 创建高阶组件function withMouse(WrappedComponent) {// 该组件提供复用的状态逻辑class Mouse extends React.Component {// 鼠标状态state = {x: 0,y: 0}handleMouseMove = e => {this.setState({x: e.clientX,y: e.clientY})}// 控制鼠标状态的逻辑componentDidMount() {window.addEventListener('mousemove', this.handleMouseMove)}componentWillUnmount() {window.removeEventListener('mousemove', this.handleMouseMove)}render() {console.log('Mouse:', this.props)return <WrappedComponent {...this.state} {...this.props} />}}// 设置displayNameMouse.displayName = `WithMouse${getDisplayName(WrappedComponent)}`return Mouse}function getDisplayName(WrappedComponent) {return WrappedComponent.displayName || WrappedComponent.name || 'Component'}// 用来测试高阶组件const Position = props => {console.log('Position:', props)return (<p>鼠标当前位置:(x: {props.x}, y: {props.y})</p>)}// 获取增强后的组件:const MousePosition = withMouse(Position)class App extends React.Component {render() {return (<div><h1>高阶组件</h1><MousePosition a="1" /></div>)}}ReactDOM.render(<App />, document.getElementById('root'))
总结
- 组件通讯是构建React应用必不可少的一环
- props的灵活性让组件更加强大
- 状态提升是React组件的常用模式
- 组件生命周期有助于理解组件的运行过程
- 钩子函数让开发者可以在特定的时机执行某些功能
- render props 模式和高阶组件都可以实现组件状态逻辑的复用
- 组件极简模型: (state,props) => UI
关于部分的性能优化问题
我们可以通过一个特殊的生命周期函数,解决render多次非必要渲染所带来的性能问题,
shoulCompentUpadta(){}
如果这个函数返回的是fasle表示不会调用render函数进行页面的重新渲染,这个函数有两个参数
上一个的prop,最新的prop,我们只需要对比两个是不是一样就好了,不一样就渲染,一样就不渲染
目前这个东西,在React的更高版本中,好像是不能用了,于是还有另外的技术手段来解决这个问题
集成axios
安装都非常好
npm install -save axios
使用的时候也非常的简单,直接import的时候就可以了 ```javascript
improt axios from ‘axios’ componentDitMount(){ axios.get(‘www.baidu.com’).then( (res) => { ….在这里,实际上你就拿到了res数据,然后就可以使用setData的方式进行一系列的处理 }).catch() } // 当然了,你也可以是哟async awite来处理 ```
react动画到底怎么搞?
特效非常的简单,你可以使用css3提供的一些库,然后通过react中的state设置一个变量,条件性改变的这个css类名就好了
但是~,拿来主义不香吗?啊?!

若有收获,就点个赞吧
0 人点赞
