本地线程
Threading Local
为什么需要 Threading Local
在多线程环境下,每个线程都有自己的数据。一个线程使用自己的局部变量比使用全局变量好,因为局部变量只有线程自己能看见,不会影响其他线程,而全局变量的修改必须加锁。
但是局部变量也有问题,就是在函数调用的时候,传递起来很麻烦:
def process_student(name):std = Student(name)# std是局部变量,但是每个函数都要用它,因此必须传进去:do_task_1(std)do_task_2(std)def do_task_1(std):do_subtask_1(std)do_subtask_2(std)def do_task_2(std):do_subtask_2(std)do_subtask_2(std)
每个函数一层一层调用都这么传参数那还得了?用全局变量?也不行,因为每个线程处理不同的 Student 对象,不能共享。
如果用一个全局 dict 存放所有的 Student 对象,然后以 thread 自身作为 key 获得线程对应的 Student 对象如何?
global_dict = {}def std_thread(name):std = Student(name)# 把std放到全局变量global_dict中:global_dict[threading.current_thread()] = stddo_task_1()do_task_2()def do_task_1():# 不传入std,而是根据当前线程查找:std = global_dict[threading.current_thread()]...def do_task_2():# 任何函数都可以查找出当前线程的std变量:std = global_dict[threading.current_thread()]...
这种方式理论上是可行的,它最大的优点是消除了std对象在每层函数中的传递问题,但是,每个函数获取std的代码有点丑。
Threading Local 的使用
Threading Local 应运而生,不用查找 dict ,ThreadLocal 帮你自动做这件事:
import threading# 创建全局ThreadLocal对象:local_school = threading.local()def process_student():# 获取当前线程关联的student:std = local_school.studentprint('Hello, %s (in %s)' % (std, threading.current_thread().name))def process_thread(name):# 绑定ThreadLocal的student:local_school.student = nameprocess_student()t1 = threading.Thread(target= process_thread, args=('Alice',), name='Thread-A')t2 = threading.Thread(target= process_thread, args=('Bob',), name='Thread-B')t1.start()t2.start()t1.join()t2.join()
执行结果:
Hello, Alice (in Thread-A)Hello, Bob (in Thread-B)
全局变量 local_school 就是一个ThreadLocal对象,每个 Thread 读写的是自己线程的 student属性,互不影响,也不用管理锁的问题,ThreadLocal内部会处理。
可以理解为全局变量 local_school 是一个dict,key 为线程id,value 是线程局部变量的字典
ThreadLocal 最常用的地方就是为每个线程绑定一个数据库连接,HTTP请求,用户身份信息等,这样一个线程的所有调用到的处理函数都可以非常方便地访问这些资源。
Threading Local 的实现
Werkzeug Local
为什么需要 Werkzeug Local
使用 ThreadLocal 对象虽然可以基于线程存储全局变量,但是在Web应用中可能会存在如下问题:
- 有些应用使用的是
greenlet 协程,这种情况下无法保证协程之间数据的隔离,因为不同的协程可以在同一个线程当中 - 即使使用的是线程,WSGI应用也无法保证每个http请求使用的都是不同的线程,因为后一个http请求可能使用的是之前的http请求的线程,这样的话存储于
ThreadLocal中的数据可能是之前残留的数据
为了解决上述问题,Werkzeug开发了自己的local对象,这也是为什么我们需要Werkzeug的local对象
Werkzeug Local 的使用
先举一个简单的示例:
from werkzeug.local import Local, LocalManagerlocal = Local()local_manager = LocalManager([local])def application(environ, start_response):local.request = request = Request(environ)...# make_middleware会确保当request结束时,所有存储于local中的对象的reference被清除application = local_manager.make_middleware(application)
- 首先
Local对象需要通过LocalManager来管理,初次生成LocalManager对象需要传一个list类型的参数,list中是Local对象,当有新的Local对象时,可以通过local_manager.locals.append()来添加。而当LocalManager对象清理的时候会将所有存储于locals中的当前context的数据都清理掉 - 上例中当
local.request被赋值之后,其可以在当前context中作为全局数据使用 - 所谓当前
context(the same context)意味着是在同一个greenlet(如果有)中,也就肯定是在同一个线程当中
那么Werkzeug的Local对象是如何实现这种在相同的 context 环境下保证数据的全局性和隔离性的呢?
Werkzeug Local 的实现
我们先来看下源代码
# 有greenlet的情况下,get_indent实际获取的是greenlet的id# 没有greenlet的情况下获取的是thread idtry:from greenlet import getcurrent as get_identexcept ImportError:try:from thread import get_identexcept ImportError:from _thread import get_identclass Local(object):__slots__ = ('__storage__', '__ident_func__')def __init__(self):object.__setattr__(self, '__storage__', {})object.__setattr__(self, '__ident_func__', get_ident)def __iter__(self):return iter(self.__storage__.items())# 当调用Local对象时,返回对应的LocalProxydef __call__(self, proxy):"""Create a proxy for a name."""return LocalProxy(self, proxy)# Local类中特有的method,用于清空greenlet id或线程id对应的dict数据def __release_local__(self):self.__storage__.pop(self.__ident_func__(), None)def __getattr__(self, name):try:return self.__storage__[self.__ident_func__()][name]except KeyError:raise AttributeError(name)def __setattr__(self, name, value):ident = self.__ident_func__()storage = self.__storage__try:storage[ident][name] = valueexcept KeyError:storage[ident] = {name: value}def __delattr__(self, name):try:del self.__storage__[self.__ident_func__()][name]except KeyError:raise AttributeError(name)
- Werkzeug 使用了自定义的
__storage__保存不同线程下的状态- key使用的就是
get_indent函数获取的id(当有greenlet时使用greenlet id,没有则使用thread id - value 是一个dict,是 greenlet(或者线程) 对应的 local 存储空间
- key使用的就是
- 通过重新实现
__getattr__,__setattr__等魔术方法,我们在greenlet或者线程中使用local对象时,实际会自动获取greenlet id(或者线程id),从而获取到对应的 dict 存储空间,再通过name key就可以获取到真正的存储的对象。这个技巧实际上在编写线程安全或协程安全的代码时是非常有用的,即通过线程id(或协程id)来分别存储数据。 - Werkzeug 使用
get_ident函数来获取线程/协程标识符 - Werkzeug 提供了释放本地线程
local数据的release_local方法,如下>>> loc = Local()>>> loc.foo = 42>>> release_local(loc) # release_local实际调用local对象的__release_local__ 方法>>> hasattr(loc, 'foo')False
Werkzeug 基于自己实现的 Local 还实现了两种数据结果 :
- LocalStack : 基于
werkzeug.local.Local实现的栈结果 , 可以将对象推入 , 弹出 , 也可以快速拿到栈顶对象 - LocalProxy : 作用和名字一样 , 最标准的代理模式 , 构造此结构时接收一个可以调用的参数 (一般为函数) , 这个函数执行后就是通过
LocalStack实例化的栈的栈顶对象 ; 对于 LocalProxy 对象的操作实际上都会转发到这个栈顶对象 (也就是一个thread-local对象) 上面
Werkzeug LocalStack 的实现
LocalStack 与 Local 对象类似,都是可以基于 Greenlet 协程或者线程进行全局存储的存储空间(实际 LocalStack 是对 Local 进行了二次封装),区别在于其数据结构是栈的形式。示例如下:
>>> ls = LocalStack()>>> ls.push(42)>>> ls.top42>>> ls.push(23)>>> ls.top23>>> ls.pop()23>>> ls.top42
- 从示例看出
Local对象存储的时候是类似字典的方式,需要有 key 和 value,而LocalStack是基于栈的,通过push和pop来存储和弹出数据 - 另外,当我们想释放存储空间的时候,也可以调用release_local()
LocalStack 实现
class LocalStack(object):def __init__(self):self._local = Local()def __release_local__(self):self._local.__release_local__()@propertydef __ident_func__(self):return self._local.__ident_func__@__ident_func__.setterdef __ident_func__(self, value):object.__setattr__(self._local, "__ident_func__", value)def __call__(self):def _lookup():rv = self.topif rv is None:raise RuntimeError("object unbound")return rvreturn LocalProxy(_lookup)def push(self, obj):"""Pushes a new item to the stack"""rv = getattr(self._local, "stack", None)if rv is None:self._local.stack = rv = []rv.append(obj)return rvdef pop(self):"""Removes the topmost item from the stack, will return theold value or `None` if the stack was already empty."""stack = getattr(self._local, "stack", None)if stack is None:return Noneelif len(stack) == 1:release_local(self._local)return stack[-1]else:return stack.pop()@propertydef top(self):"""The topmost item on the stack. If the stack is empty,`None` is returned."""try:return self._local.stack[-1]except (AttributeError, IndexError):return None
LocalStack在Flask框架中会频繁的出现,其 Request Context 和 App Context 的实现都是基于 LocalStack。
Werkzeug LocalProxy
LocalProxy 用于代理 Local 对象和 LocalStack 对象,而所谓代理就是作为中间的代理人来处理所有针对被代理对象的操作,如下图所示:
LocalProxy 的使用
初始化 LocalProxy 有三种方式:
- 通过
Local或者LocalStack对象的__call__方法 ```python from werkzeug.local import Local l = Local()
these are proxies
request = l(‘request’) user = l(‘user’)
from werkzeug.local import LocalStack _response_local = LocalStack()
this is a proxy
response = _response_local()
当我们将对象作为函数调用时,实际调用的是`__call__` 方法,`__call__` 方法会返回一个 LocalProxy 对象- 通过 `LocalProxy` 类进行初始化```pythonl = Local()request = LocalProxy(l, 'request')
实际上这段代码跟第一种方式是等价的,但这种方式是最 原始 的方式,我们在 Local 的源代码实现中看到其__call__ 方法就是通过这种方式生成 LocalProxy 的
- 使用callable对象作为参数
request = LocalProxy(get_current_request())
通过传递一个函数,我们可以自定义如何返回 Local 或 LocalStack 对象
LocalProxy 实现
下面截取LocalProxy的部分代码,我们来进行解析
# LocalProxy部分代码@implements_boolclass LocalProxy(object):__slots__ = ('__local', '__dict__', '__name__', '__wrapped__')def __init__(self, local, name=None):object.__setattr__(self, '_LocalProxy__local', local)object.__setattr__(self, '__name__', name)if callable(local) and not hasattr(local, '__release_local__'):# "local" is a callable that is not an instance of Local or# LocalManager: mark it as a wrapped function.object.__setattr__(self, '__wrapped__', local)def _get_current_object(self):"""Return the current object. This is useful if you want the realobject behind the proxy at a time for performance reasons or becauseyou want to pass the object into a different context."""# 由于所有Local或LocalStack对象都有__release_local__ 方法# 所以如果没有该属性就表明self.__local为callable对象if not hasattr(self.__local, '__release_local__'):return self.__local()try:# 此处self.__local 为 Local 或 LocalStack 对象return getattr(self.__local, self.__name__)except AttributeError:raise RuntimeError('no object bound to %s' % self.__name__)@propertydef __dict__(self):try:return self._get_current_object().__dict__except RuntimeError:raise AttributeError('__dict__')def __getattr__(self, name):if name == '__members__':return dir(self._get_current_object())return getattr(self._get_current_object(), name)def __setitem__(self, key, value):self._get_current_object()[key] = valuedef __delitem__(self, key):del self._get_current_object()[key]if PY2:__getslice__ = lambda x, i, j: x._get_current_object()[i:j]def __setslice__(self, i, j, seq):self._get_current_object()[i:j] = seqdef __delslice__(self, i, j):del self._get_current_object()[i:j]# 截取部分操作符代码__setattr__ = lambda x, n, v: setattr(x._get_current_object(), n, v)__delattr__ = lambda x, n: delattr(x._get_current_object(), n)__str__ = lambda x: str(x._get_current_object())__lt__ = lambda x, o: x._get_current_object() < o__le__ = lambda x, o: x._get_current_object() <= o__eq__ = lambda x, o: x._get_current_object() == o
- 首先在
__init__方法中传递的local参数会被赋予属性_LocalProxy__local,该属性可以通过self.__local进行访问,关于这一点可以看 StackOverflow的问题回答 - LocalProxy通过
_get_current_object来获取代理的对象。需要注意的是当初始化参数为callable对象时,则直接调用以返回Local或LocalStack对象,具体看源代码的注释。 - 重载了绝大多数操作符,以便在调用LocalProxy的相应操作时,通过
_get_current_object方法来获取真正代理的对象,然后再进行相应操作
为什么要使用LocalProxy
可是说了这么多,为什么一定要用proxy,而不能直接调用Local或LocalStack对象呢?这主要是在有多个可供调用的对象的时候会出现问题,如下图: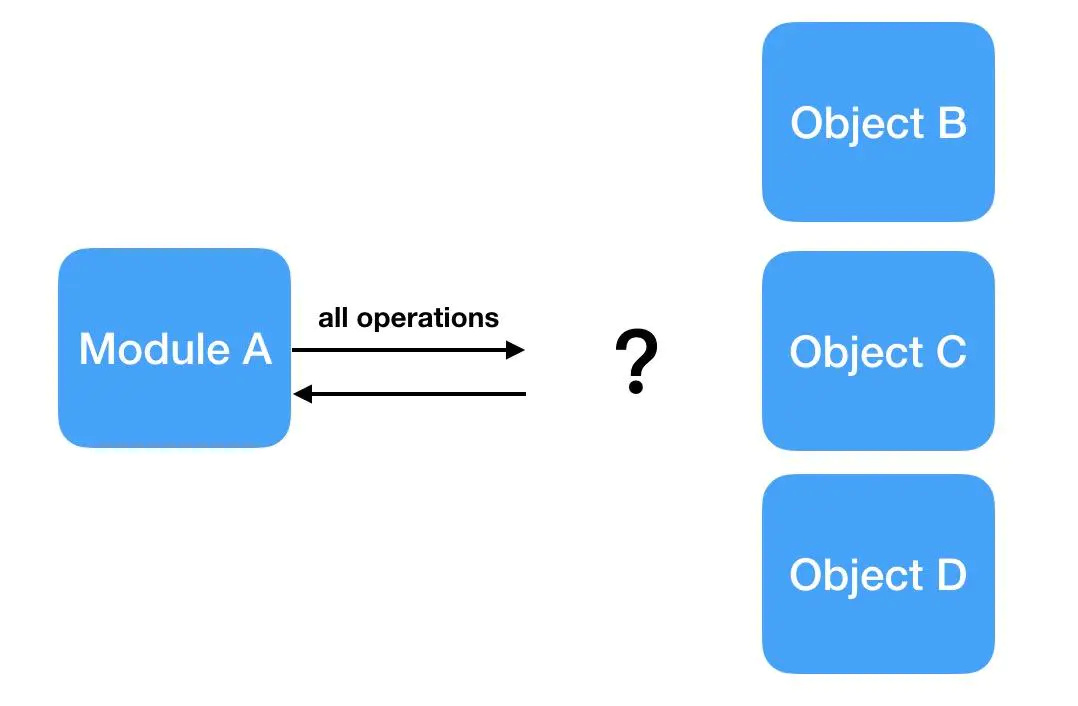
我们再通过下面的代码也许可以看出一二:
# use Local object directlyfrom werkzeug.local import LocalStackuser_stack = LocalStack()user_stack.push({'name': 'Bob'})user_stack.push({'name': 'John'})def get_user():# do something to get User object and return itreturn user_stack.pop()# 直接调用函数获取user对象user = get_user()print user['name']print user['name']
打印结果是:
JohnJohn
再看下使用LocalProxy
# use LocalProxyfrom werkzeug.local import LocalStack, LocalProxyuser_stack = LocalStack()user_stack.push({'name': 'Bob'})user_stack.push({'name': 'John'})def get_user():# do something to get User object and return itreturn user_stack.pop()# 通过LocalProxy使用user对象user = LocalProxy(get_user)print user['name']print user['name']
打印结果是:
JohnBob
怎么样,看出区别了吧,直接使用LocalStack对象,user一旦赋值就无法再动态更新了,而使用 Proxy,每次调用操作符(这里 []操作符 用于获取属性),都会重新获取user,从而实现了动态更新user的效果。见下图: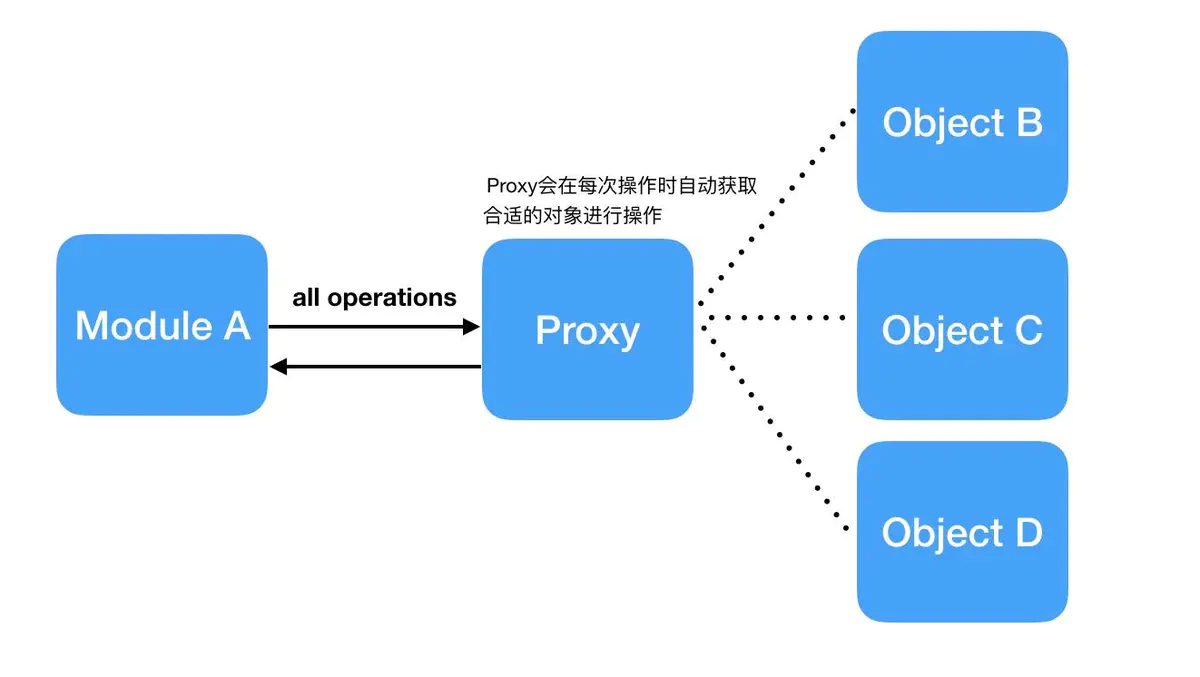
Flask以及Flask的插件很多时候都需要这种动态更新的效果,因此LocalProxy就会非常有用了。
上下文
本地线程是 Flask 中非常重要的一部分 , 因为在请求处理时 , 为了解决请求对象在每一个视图函数传递 (意味着每个视图函数需要像 Django 那样添加一个 request 参数) 的问题 , Flask 巧妙地使用上下文把某些对象变为全局可访问 (实际上是特定环境的局部对象的代理) , 再配合本地线程 , 这样每个线程看到的上下文对象都是不同的
在计算机中,相对于进程而言,上下文就是进程执行时的环境。具体来说就是各个变量和数据,包括所有的寄存器变量、进程打开的文件、内存信息等。可以理解上下文是环境的一个快照,是一个用来保存状态的对象。在程序中我们所写的函数大都不是单独完整的,在使用一个函数完成自身功能的时候,很可能需要同其他的部分进行交互,需要其他外部环境变量的支持,上下文就是给外部环境的变量赋值,使函数能正确运行。
Flask提供了两种上下文,一种是应用上下文(Application Context),一种是请求上下文(Request Context)。
请求上下文
请求上下文示例
from flask import request@app.route('/')def index():user_agent = request.headers.get('User-Agent')return '<p>Your browser is %s</p>' % user_agent
其流程是这样的 :
- 用户访问产生请求
- 在发生请求的过程中向
_request_ctx_stack推入这个请求上下文对象 , 它会变成栈顶 , request 就会成为这个请求上下文 , 也就包含了本次请求相关的信息和数据 - 在视图函数中就可以使用
request.args.get('User-Agent')获取请求信息
Flask 中四种请求hook
Flask 中有四种请求hook
- 第一次请求处理之前的 hook 函数,通过
before_first_request定义 - 每个请求处理之前的 hook 函数,通过
before_request定义 - 每个请求正常处理之后的 hook 函数,通过
after_request定义 - 不管请求是否异常都要执行的
teardown_requesthook 函数
from flask import Flask, g, requestapp = Flask(__name__)@app.before_requestdef before_request():print 'before request started'print request.url@app.before_requestdef before_request2():print 'before request started 2'print request.urlg.name="SampleApp"@app.after_requestdef after_request(response):print 'after request finished'print request.urlresponse.headers['key'] = 'value'return response@app.teardown_requestdef teardown_request(exception):print 'teardown request'print request.url@app.route('/')def index():return 'Hello, %s!' % g.nameif __name__ == '__main__':app.run(host='0.0.0.0', debug=True)
访问 http://localhost:5000/后,会在控制台输出:
before request startedhttp://localhost:5000/before request started 2http://localhost:5000/after request finishedhttp://localhost:5000/teardown requesthttp://localhost:5000/
请求上下文实现
当请求进入时,从Flask.__call__() 开始,然后会在 wsgi_app() 方法中调用 Flask.request_context() 方法实例化 RequestContext 类作为请求上下文对象,然后调用 RequestContext 实例的 push() 方法来推入请求上下文堆栈。
wsgi_app 源码:
def wsgi_app(self, environ, start_response):# 实例化请求上下文对象ctx = self.request_context(environ)error = Nonetry:try:# 将请求上下文对象压入栈中,在这之前会先将应用上下文压入栈中ctx.push()# 返回response对象response = self.full_dispatch_request()except Exception as e:error = eresponse = self.handle_exception(e)except:error = sys.exc_info()[1]raise# 调用BaseResponse的__call__方法# 交给WSGI服务器处理return response(environ, start_response)finally:if self.should_ignore_error(error):error = Nonectx.auto_pop(error)
RequestContext 类实例化方法主要实例化Request对象、Session对象(此时为 None,会在push() 时创建)以及将Request对象与URL连接
# ctx = self.request_context(environ)# environ是由WSGIRequestHandler.make_environ()制造而来class RequestContext(object):"""请求上下文中包含了请求相关的所有信息"""def __init__(self, app, environ, request=None):# Flask应用实例self.app = appif request is None:# 实例化Request对象request = app.request_class(environ)self.request = request# 为请求创建一个URL适配器self.url_adapter = app.create_url_adapter(self.request)self.flashes = Noneself.session = None# 一个隐式的应用上下文栈self._implicit_app_ctx_stack = []# 显示上下文是否被保留self.preserved = False# remembers the exception for pop if there is one in case the context# preservation kicks in.self._preserved_exc = None# 请求后执行函数self._after_request_functions = []# 将Request对象与URL连接self.match_request()
RequestContext.push() 并不是仅仅将请求上下文压入了栈中 , 同时它还生成了应用上下文并压入了栈中
事实上在 Web 应用环境中 , 请求上下文和应用上下文是一一对应的 , 请求上下文和应用上下文都是本地线程的
class RequestContext(object):"""请求上下文中包含了请求相关的所有信息"""...def push(self):"""Binds the request context to the current context."""# 获取栈顶top = _request_ctx_stack.topif top is not None and top.preserved:top.pop(top._preserved_exc)# Before we push the request context we have to ensure that there# is an application context.app_ctx = _app_ctx_stack.topif app_ctx is None or app_ctx.app != self.app:# 生成应用上下文AppContextapp_ctx = self.app.app_context()# 将应用上下文推入栈中app_ctx.push()self._implicit_app_ctx_stack.append(app_ctx)else:self._implicit_app_ctx_stack.append(None)if hasattr(sys, 'exc_clear'):sys.exc_clear()# 将请求上下文推入栈中_request_ctx_stack.push(self)# 创建session 对象if self.session is None:session_interface = self.app.session_interfaceself.session = session_interface.open_session(self.app, self.request)if self.session is None:self.session = session_interface.make_null_session(self.app)
对应 RequestContext.pop() 代码如下,请求上下文和应用上下文同时出栈
class RequestContext(object):"""请求上下文中包含了请求相关的所有信息"""...def pop(self, exc=_sentinel):app_ctx = self._implicit_app_ctx_stack.pop()try:clear_request = Falseif not self._implicit_app_ctx_stack:self.preserved = Falseself._preserved_exc = Noneif exc is _sentinel:exc = sys.exc_info()[1]# 执行所有使用teardown_request 钩子注册的函数self.app.do_teardown_request(exc)# If this interpreter supports clearing the exception information# we do that now. This will only go into effect on Python 2.x,# on 3.x it disappears automatically at the end of the exception# stack.if hasattr(sys, "exc_clear"):sys.exc_clear()request_close = getattr(self.request, "close", None)if request_close is not None:request_close()clear_request = Truefinally:rv = _request_ctx_stack.pop()# get rid of circular dependencies at the end of the request# so that we don't require the GC to be active.if clear_request:rv.request.environ["werkzeug.request"] = None# Get rid of the app as well if necessary.if app_ctx is not None:app_ctx.pop(exc)assert rv is self, "Popped wrong request context. (%r instead of %r)" % (rv,self,)def auto_pop(self, exc):# 异常发生时需要保持上下文以便进行相关操作,比如在页面的交互式调试器中执行操作或是测试if self.request.environ.get("flask._preserve_context") or (exc is not None and self.app.preserve_context_on_exception):self.preserved = Trueself._preserved_exc = exc# 没有异常发生时调用pop()方法移除上下文else:self.pop(exc)
既然是上下文对象 , 也就以为着在 RequestContext 中必然定义了 __enter__ 与 __exit__ :
def __enter__(self):# 将RequestContext对象压入栈中并返回self.push()return selfdef __exit__(self, exc_type, exc_value, tb):# 关闭上下文环境时从栈中弹出self.auto_pop(exc_value)if BROKEN_PYPY_CTXMGR_EXIT and exc_type is not None:reraise(exc_type, exc_value, tb)
所以我们可以使用 with 来开启上下文环境
from flask import Flaskfrom flask.globals import _request_ctx_stackapp = Flask(__name__)# 如果你在请求开始前或者请求结束后查看请求上下文栈中的stack# 很不幸,请求开始前还没有这一属性# 请求结束后,这一属性也被销毁,因为请求上下文对象销毁了with app.test_request_context('/?next=http://example.com/') as rqc:print(rqc.request)print(_request_ctx_stack._local.stack)"""执行结果:<Request 'http://localhost/?next=http:%2F%2Fexample.com%2F' [GET]>[<RequestContext 'http://localhost/?next=http:%2F%2Fexample.com%2F' [GET] of ex1>]"""
应用上下文
应用上下文会按需自动创建和销毁 , 如在将请求上下文对象压入栈中时 , 如果应用上下文栈中没有 , 则会先创建应用上下文 , 它不会在线程间移动 , 并且也不会在请求间共享。
应用上下文源码
class AppContext(object):def __init__(self, app):self.app = appself.url_adapter = app.create_url_adapter(None)self.g = app.app_ctx_globals_class()# 引用计数,以追踪被压入栈的次数self._refcnt = 0def push(self):"""Binds the app context to the current context."""self._refcnt += 1if hasattr(sys, "exc_clear"):sys.exc_clear()_app_ctx_stack.push(self)appcontext_pushed.send(self.app)def pop(self, exc=_sentinel):"""Pops the app context."""try:self._refcnt -= 1if self._refcnt <= 0:if exc is _sentinel:exc = sys.exc_info()[1]self.app.do_teardown_appcontext(exc)finally:rv = _app_ctx_stack.pop()assert rv is self, "Popped wrong app context. (%r instead of %r)" % (rv, self)appcontext_popped.send(self.app)def __enter__(self):self.push()return selfdef __exit__(self, exc_type, exc_value, tb):self.pop(exc_value)if BROKEN_PYPY_CTXMGR_EXIT and exc_type is not None:reraise(exc_type, exc_value, tb)
总结
- 需要保存请求相关的信息——有了请求上下文。
- 为了更好地分离程序的状态,应用起来更加灵活——有了程序上下文。
- 为了让上下文对象可以在全局动态访问,而不用显式地传入视图函数,同时确保线程安全——有了Local(本地线程)。
- 为了支持多个程序——有了Local Stack(本地堆栈)。
参考资料
flask 源码解析:上下文
Werkzeug(Flask)之Local、LocalStack和LocalProxy
Flask的Context(上下文)学习笔记
ThreadLocal

若有收获,就点个赞吧
0 人点赞
