1.Prometheus简介
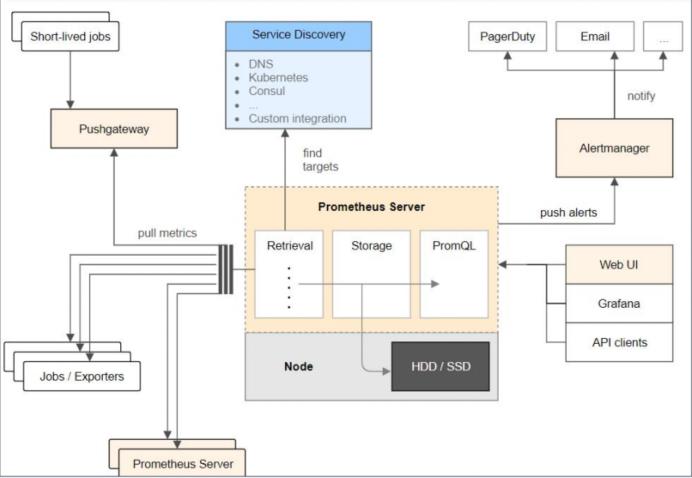
Prometheus 是一款基于时序数据库的开源监控告警系统,非常适合Kubernetes集群的监控。Prometheus的基本原理是通过HTTP协议周期性抓取被监控组件的状态,任意组件只要提供对应的HTTP接口就可以接入监控。不需要任何SDK或者其他的集成过程。这样做非常适合做虚拟化环境监控系统,比如VM、Docker、Kubernetes等。输出被监控组件信息的HTTP接口被叫做exporter 。目前互联网公司常用的组件大部分都有exporter可以直接使用,比如Varnish、Haproxy、Nginx、MySQL、Linux系统信息(包括磁盘、内存、CPU、网络等等)。Promethus有以下特点:
- 支持多维数据模型:由度量名和键值对组成的时间序列数据
- 内置时间序列数据库TSDB
- 支持PromQL查询语言,可以完成非常复杂的查询和分析,对图表展示和告警非常有意义
- 支持HTTP的Pull方式采集时间序列数据
- 支持PushGateway采集瞬时任务的数据
- 支持服务发现和静态配置两种方式发现目标
- 支持接入Grafana
1. Prometheus架构介绍
1.1 组件说明
- prometheus server是Prometheus组件中的核心部分,负责实现对监控数据的获取,存储以及查询。
- exporter简单说是采集端,通过http服务的形式保留一个url地址,prometheu sserver通过访问该exporter提供的endpoint端点,即可获取到需要采集的监控数据。
- AlertManager在prometheus中,支持基于PromQL创建告警规则,如果满足定义的规则,则会产生一条告警信息,进入AlertManager进行处理。可以集成邮件,微信或者通过webhook自定义报警。
- Pushgateway由于Prometheus数据采集采用pull方式进行设置的,内置必须保证prometheus-server和对应的exporter必须通信,当网络情况无法直接满足时,可以使用pushgateway来进行中转,可以通过pushgateway将内部网络数据主动push到gateway里面去,而prometheus采用pull方式拉取pushgateway中数据。
1.2 总结:
- prometheus负责从pushgateway和job中采集数据,存储到后端Storatge中,可以通过
PromQL进行查询,推送alerts信息到AlertManager。AlertManager根据不同的路由规则
进行报警通知
1.3 对比Zabbix
| Zabbix | Prometheus |
|---|---|
| 后端用 C 开发,界面用 PHP 开发,定制化难度很高。 | 后端用 golang 开发,前端是 Grafana,JSON 编辑即可解决。定制化难度较低。 |
| 集群规模上限为 10000 个节点。 | 支持更大的集群规模,速度也更快。 |
| 更适合监控物理机环境,以IP地址为监控标识 | 更适合云环境的监控,对 OpenStack,Kubernetes 有更好的集成。 |
| 监控数据存储在关系型数据库内,如 MySQL,很难从现有数据中扩展维度。 | 监控数据存储在基于时间序列的数据库内,便于对已有数据进行新的聚合。 |
| 安装简单,zabbix-server 一个软件包中包括了所有的服务端功能。 | 安装相对复杂,监控、告警和界面都分属于不同的组件。 |
| 图形化界面比较成熟,界面上基本上能完成全部的配置操作。 | 界面相对较弱,很多配置需要修改配置文件。 |
主要使用场景区别是,Zabbix适合用于虚拟机、物理机的监控,因为每个监控指标是以 IP 地址作为标识进行区分的。而Prometheus的监控指标是由多个 label 组成,IP地址并不是唯一的区分指标,Prometheus 强大在可以支持自动发现规则,因此适合于容器环境。
从自定义监控项角度而言,Prometheus 开发难度较大,zabbix配合shell脚本更加方便。Prometheus在监控虚拟机上业务时,可能需要安装多个 exporter,而zabbix只需要安装一个 Agent。
Prometheus 采用拉数据方式,即使采用的是push-gateway,prometheus也是从push-gateway拉取数据。而Zabbix可以推可以拉。
1.4 环境介绍
| 操作系统 | ip地址 | 主机名 | 应用 |
|---|---|---|---|
| CentOS 7.8 | 192.168.153.205 | grafana | grafana |
| CentOS 7.4 | 192.168.153.143 | prometheus | prometheus,alertmanager |
| CentOS 7.4 | 192.168.153.144 | node1 | node_exporter |
2.Prometheus部署
2.1 下载安装
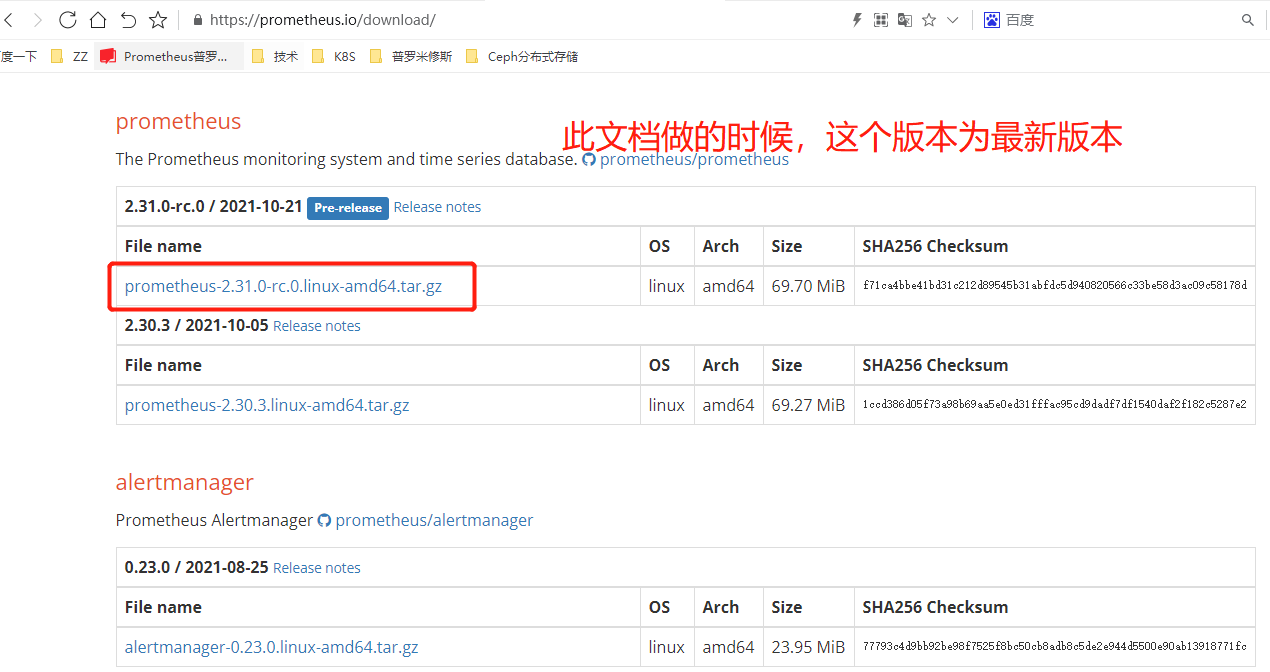
[root@prometheus ~]# wget https://github.com/prometheus/prometheus/releases/download/v2.31.0-rc.0/prometheus-2.31.0-rc.0.linux-amd64.tar.gz[root@prometheus ~]# tar -xzvf prometheus-2.31.0-rc.0.linux-amd64.tar.gz -C /usr/local/[root@prometheus local]# mv prometheus-2.31.0-rc.0.linux-amd64/ prometheus[root@prometheus local]# cd prometheus/[root@prometheus prometheus]# mkdir data #创建数据存放目录
2.2 配置systemctl管理
[root@prometheus prometheus]# vim /usr/lib/systemd/system/prometheus.service
[root@prometheus prometheus]# cat /usr/lib/systemd/system/prometheus.service
[Unit]
Description=https://prometheus.io

[Service]
Restart=on-failure
ExecStart=/usr/local/prometheus/prometheus --storage.tsdb.path=/usr/local/prometheus/data --config.file=/usr/local/prometheus/prometheus.yml

[Install]
WantedBy=multi-user.target
[root@prometheus prometheus]# cp prometheus.yml prometheus.yml.bak
[root@prometheus prometheus]# systemctl start prometheus

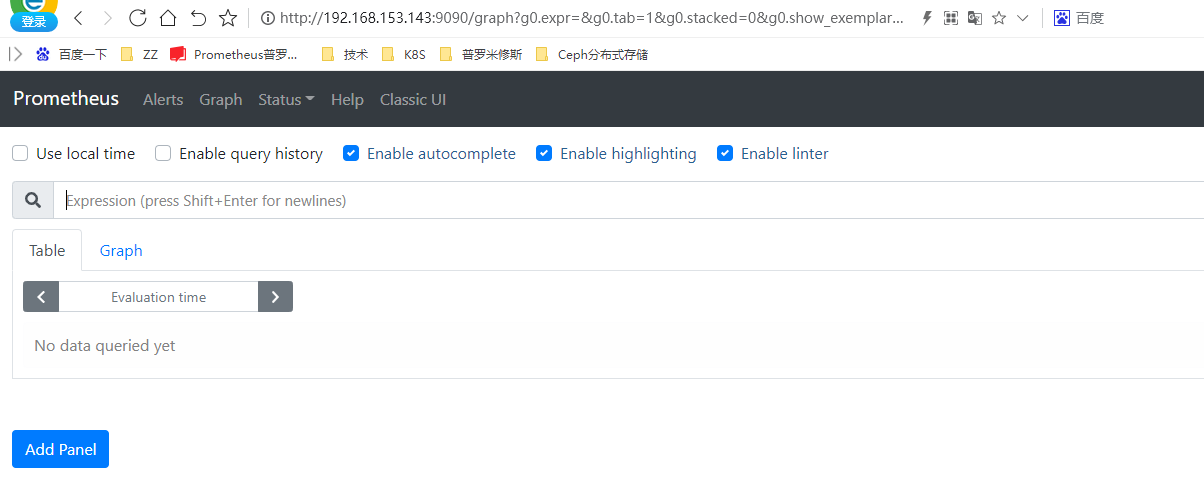

3.Prometheus配置文件介绍
global:此片段指定的是prometheus的全局配置,比如采集间隔,抓取超时时间等。
rule_files:此片段指定报警规则文件,prometheus根据这些规则信息,会推送报警信息到alertmanager中。
scrape_configs:此片段指定抓取配置,prometheus的数据采集通过此片段配置。
alerting:此片段指定报警配置,这里主要是指定prometheus将报警规则推送到指定的alertmanager实例地址。
remote_write:指定后端的存储的写入api地址。
remote_read:指定后端的存储的读取api地址。
3.1 Global配置参数
#Howfrequentlytoscrapetargetsbydefault.[scrape_interval:<duration>|default=1m] #抓取间隔
#Howlonguntilascraperequesttimesout.[scrape_timeout:<duration>|default=10s] #抓取超时时间
#Howfrequentlytoevaluaterules.[evaluation_interval:<duration>|default=1m] #评估规则间隔
3.2 scrapy_config片段主要参数
一个scrape_config片段指定一组目标和参数,目标就是实例,指定采集的端点,参数描述如何采集这些实例,主要参数如下:
scrape_interval:抓取间隔,默认继承global值。
scrape_timeout:抓取超时时间,默认继承global值。metric_path:抓取路径,默认是/metrics
*_sd_configs:指定服务发现配置
static_configs:静态指定服务job。
relabel_config:relabel设置。
4.PromQL介绍
Prometheus提供了一种名为PromQL(Prometheus查询语言)的函数式查询语言,允许用户实时选择和聚合时间序列数据。表达式的结果既可以显示为图形,也可以在Prometheus的表达式浏览器中作为表格数据查看,或者通过HTTPAPI由外部系统使用。
运算:  乘:*   除:/    加:+     减:-

常用函数:
sum()函数:求出找到所有value的值irate()函数:统计平均速率
by(标签名)
范围匹配
#5分钟之内
[5m]
4.1 查询指定mertic_name

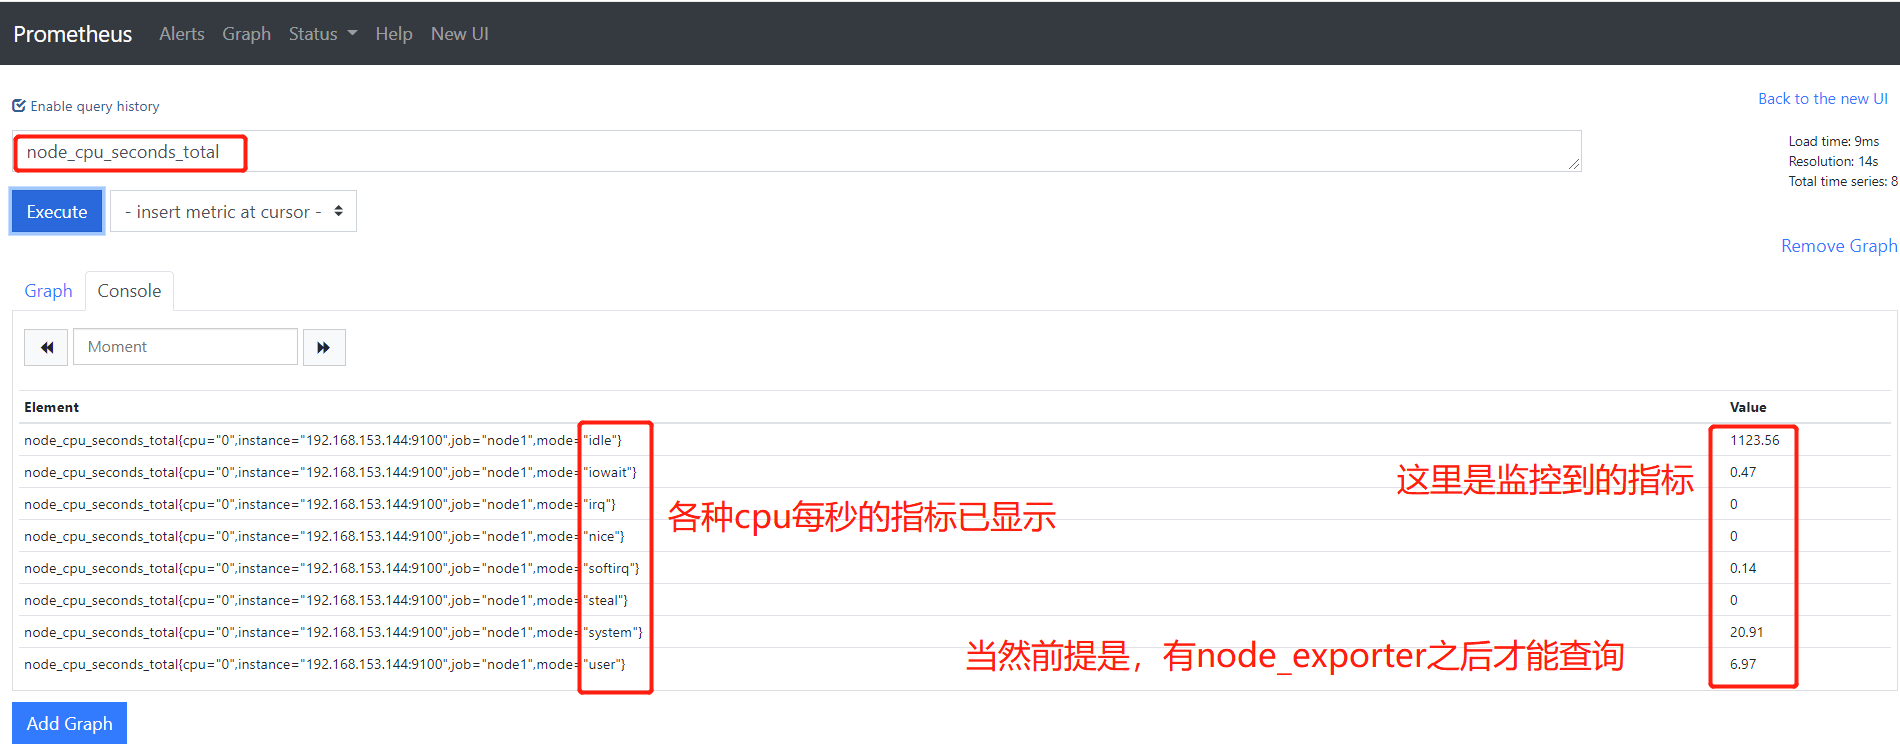
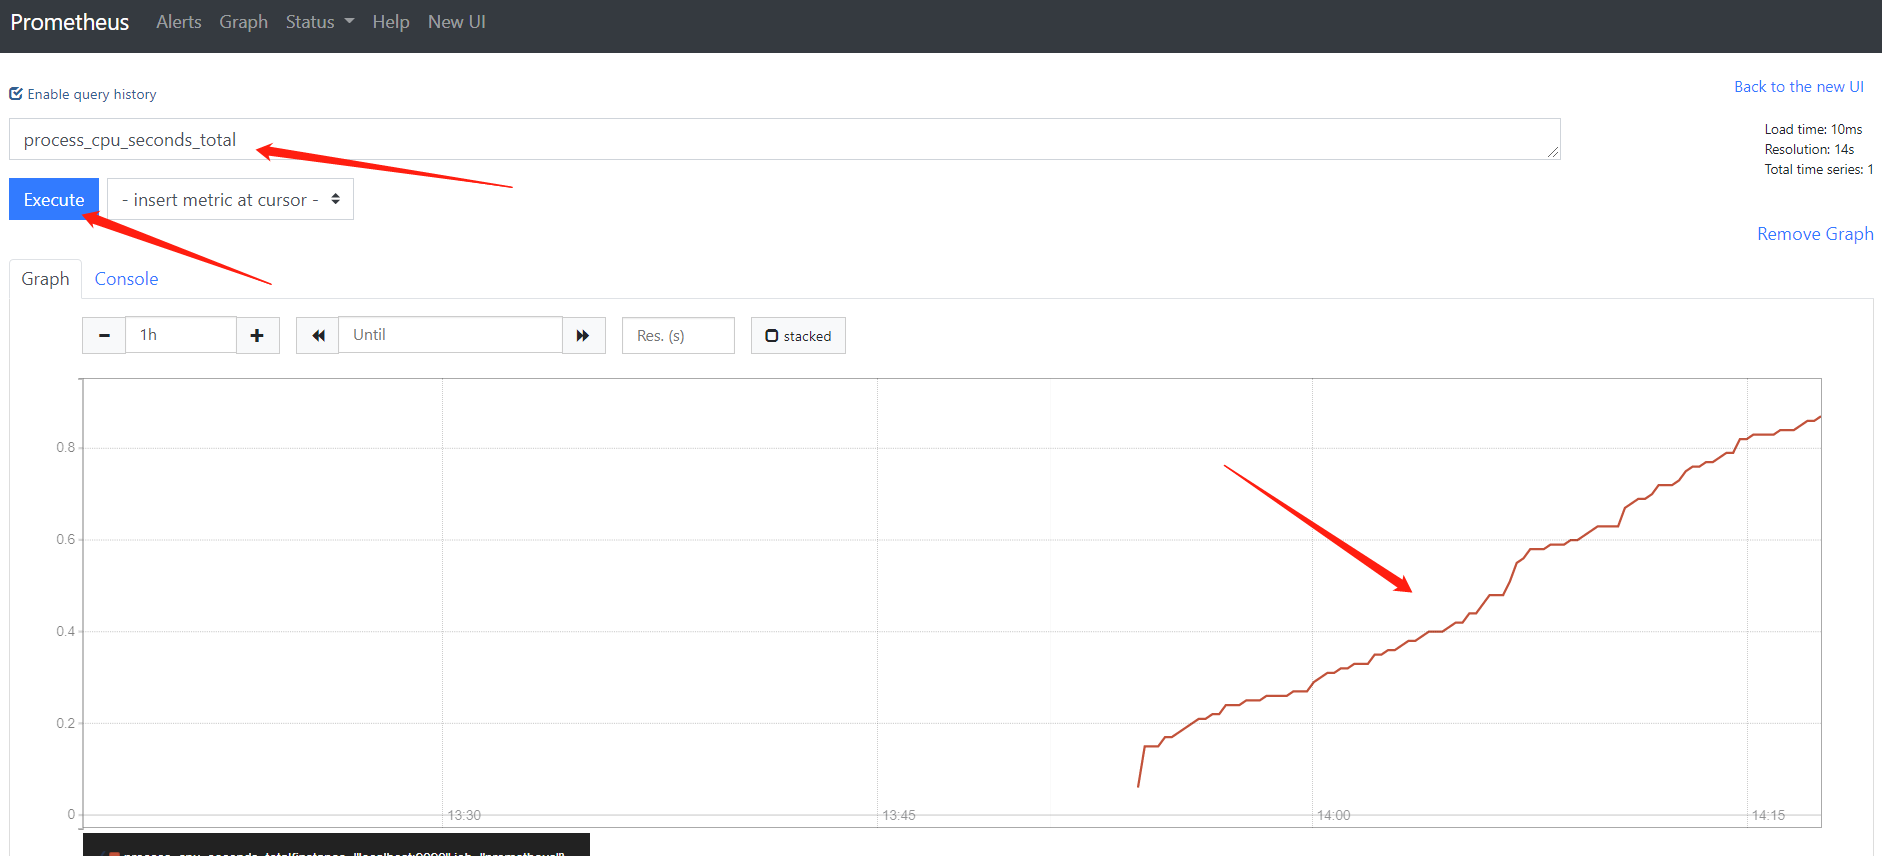
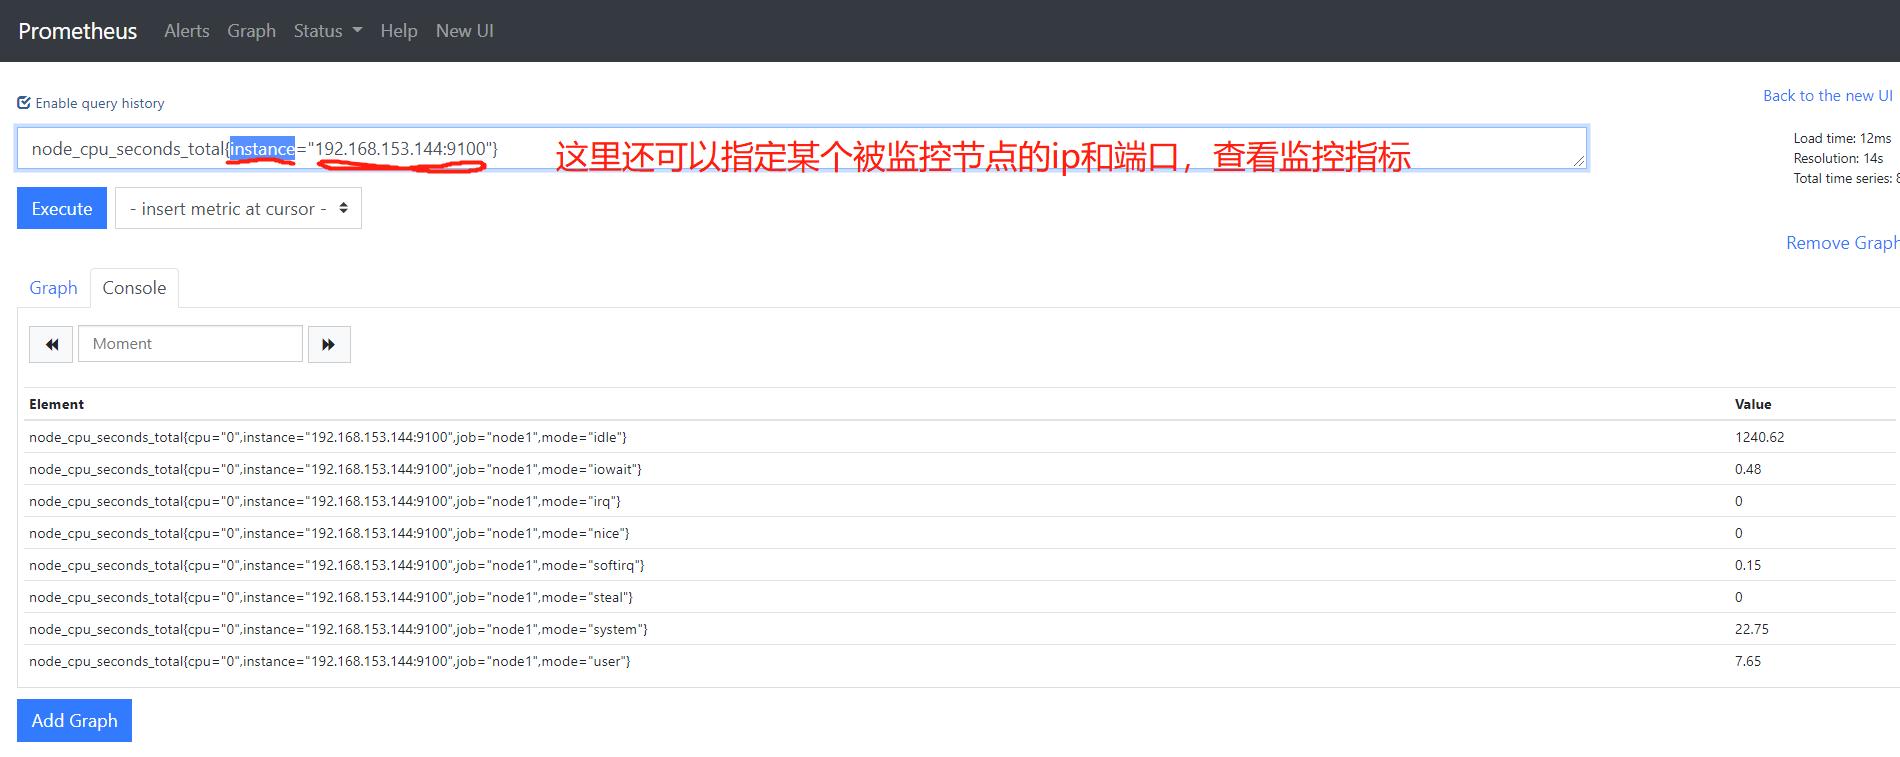
4.2 带标签的查询
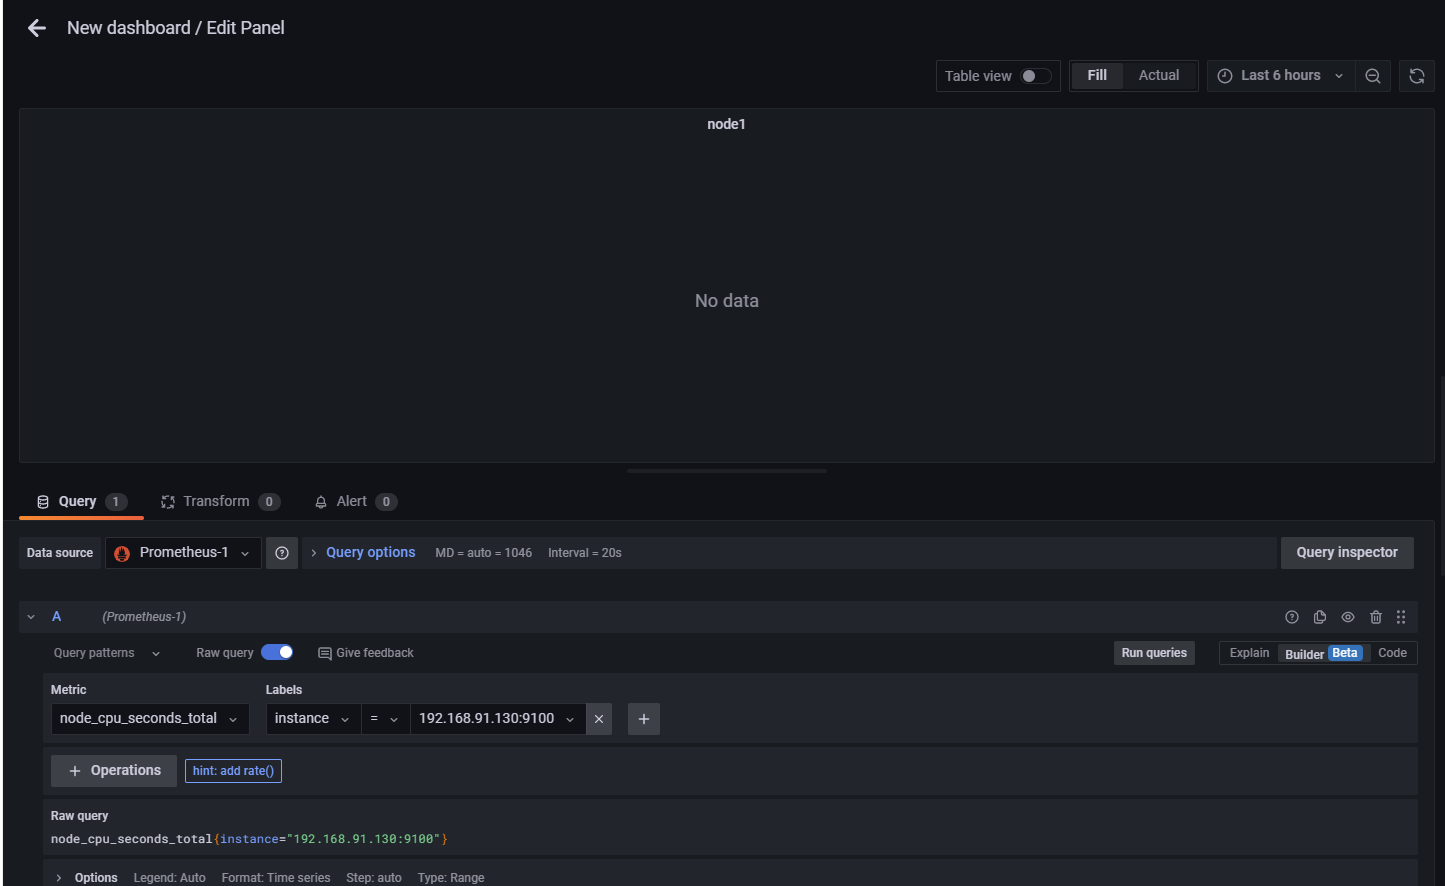
node_cpu_seconds_total{instance="192.168.153.144:9100"}
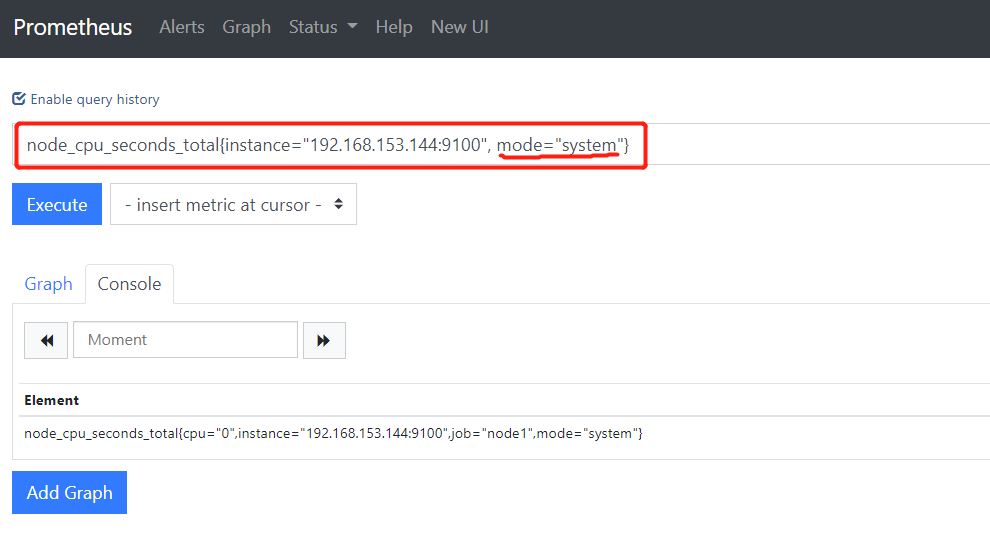
4.3 多标签查询
node_cpu_seconds_total{instance="192.168.153.144:9100", mode="system"}
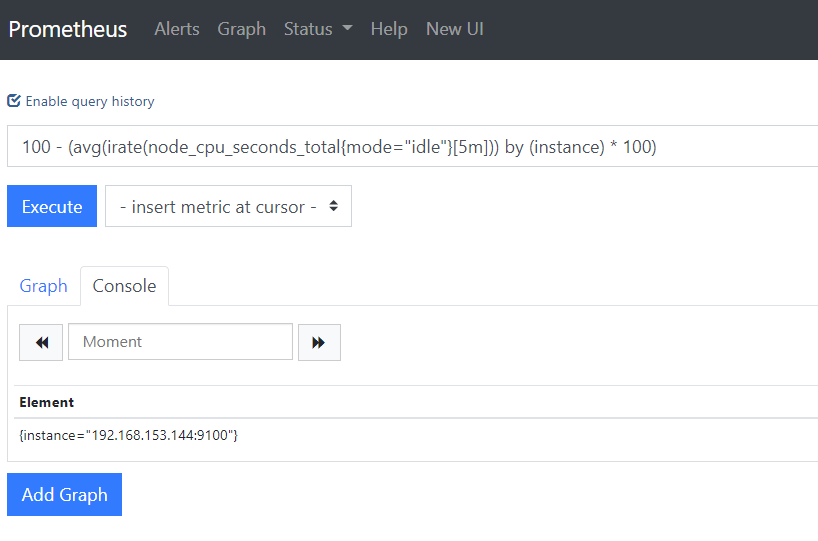
4.4 计算 CPU 使用率
100 - (avg(irate(node_cpu_seconds_total{mode="idle"}[5m])) by (instance) * 100)
5.监控远程Linux主机
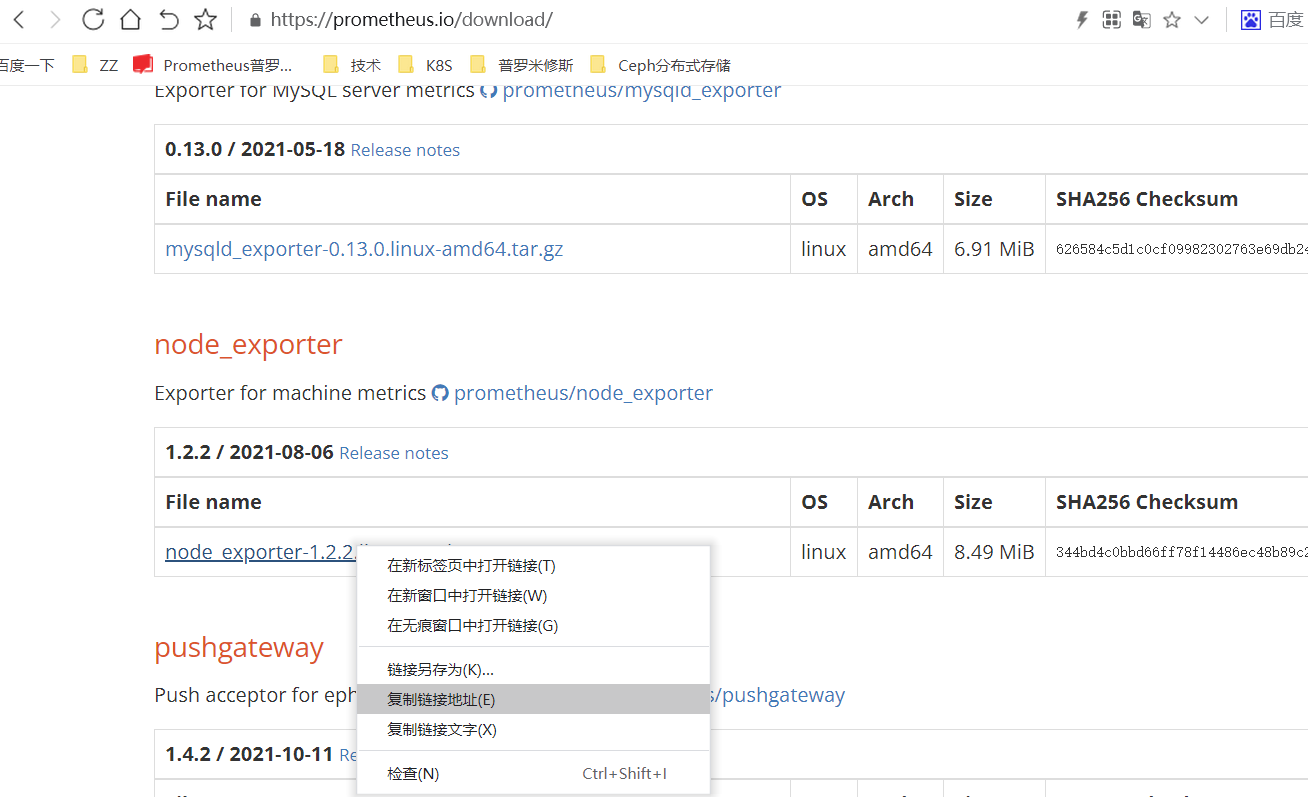
下载安装node_exporter
[root@node1 ~]# wget https://github.com/prometheus/node_exporter/releases/download/v1.2.2/node_exporter-1.2.2.linux-amd64.tar.gz #github网站连接时好时坏,不断的下载,一直到下载成功!
[root@node1 ~]# systemctl stop firewalld
[root@node1 ~]# setenforce 0
[root@node1 ~]# tar -xvzf node_exporter-1.2.2.linux-amd64.tar.gz  -C /usr/local/
[root@node1 ~]# cd /usr/local/
[root@node1 local]# mv node_exporter-1.2.2.linux-amd64/ node_exporter
[root@node1 node_exporter]# nohup ./node_exporter & #这样启动也可以,但是我不是
[root@node1 node_exporter]# netstat -tnlp

5.1 配置systemctl管理
[root@node1 node_exporter]# vim /usr/lib/systemd/system/node_exporter.service
[Unit]
Description=Prometheusnode_exporter

[Service]
User=nobody
ExecStart=/usr/local/node_exporter/node_exporter --log.level=error
ExecStop=/usr/bin/killallnode_exporter

[Install]
WantedBy=default.target
[root@node1 node_exporter]# systemctl start node_exporter  #配置完成之后,这样启动

5.2 配置监控
#来到监控节点
[root@prometheus prometheus]# pwd
/usr/local/prometheus
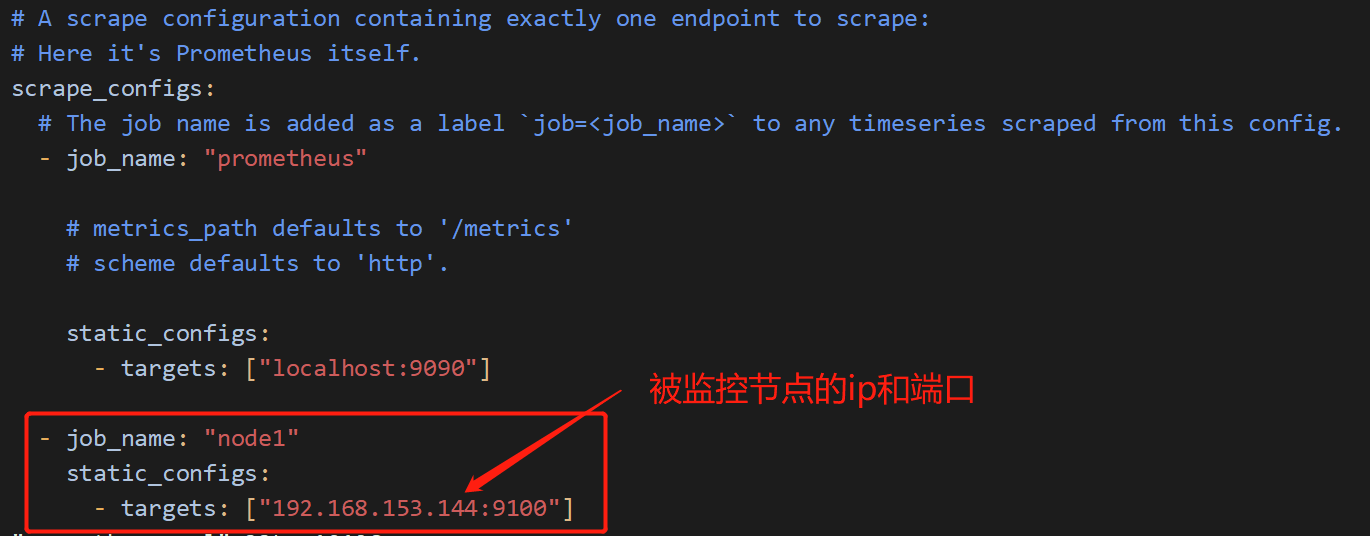
[root@prometheus prometheus]# vim prometheus.yml  #在最后面添加监控主机
  - job_name: "node1"
    static_configs:
      - targets: ["192.168.153.144:9100"]
[root@prometheus prometheus]# ./promtool check config prometheus.yml #检查配置文件语法有无问题

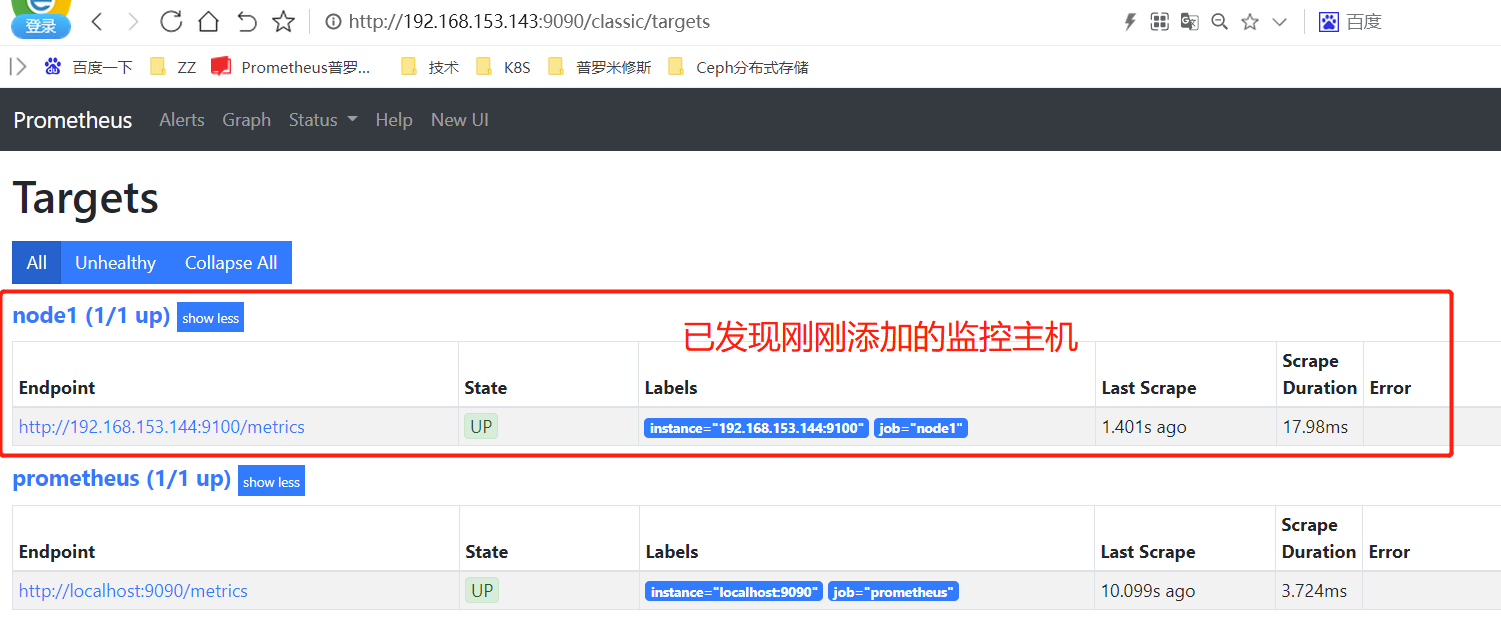
[root@prometheus prometheus]# systemctl restart prometheus
部署Grafana
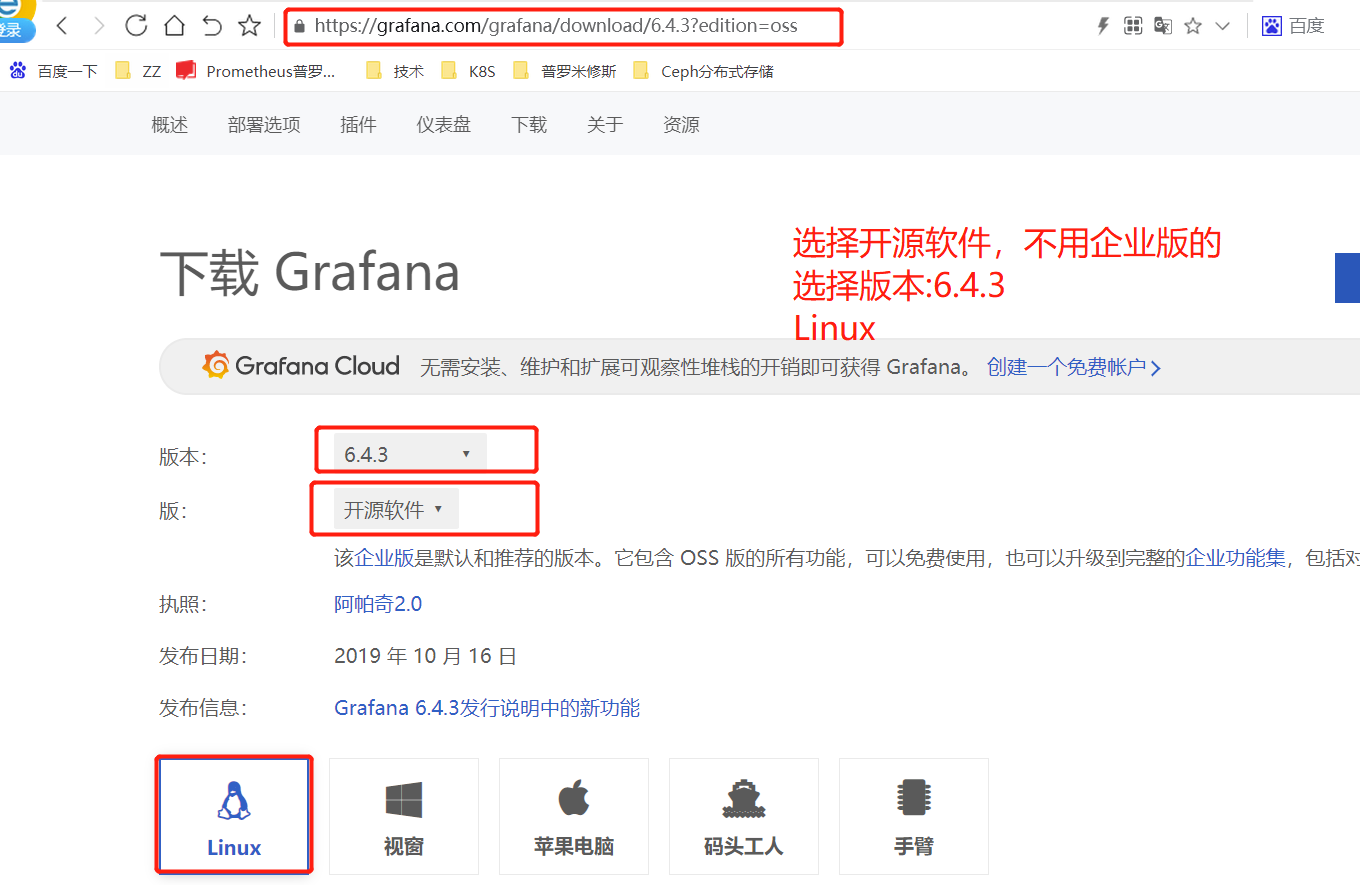
安装方式:
1.选择rpm安装。
2.二进制安装。
我这里是rpm安装
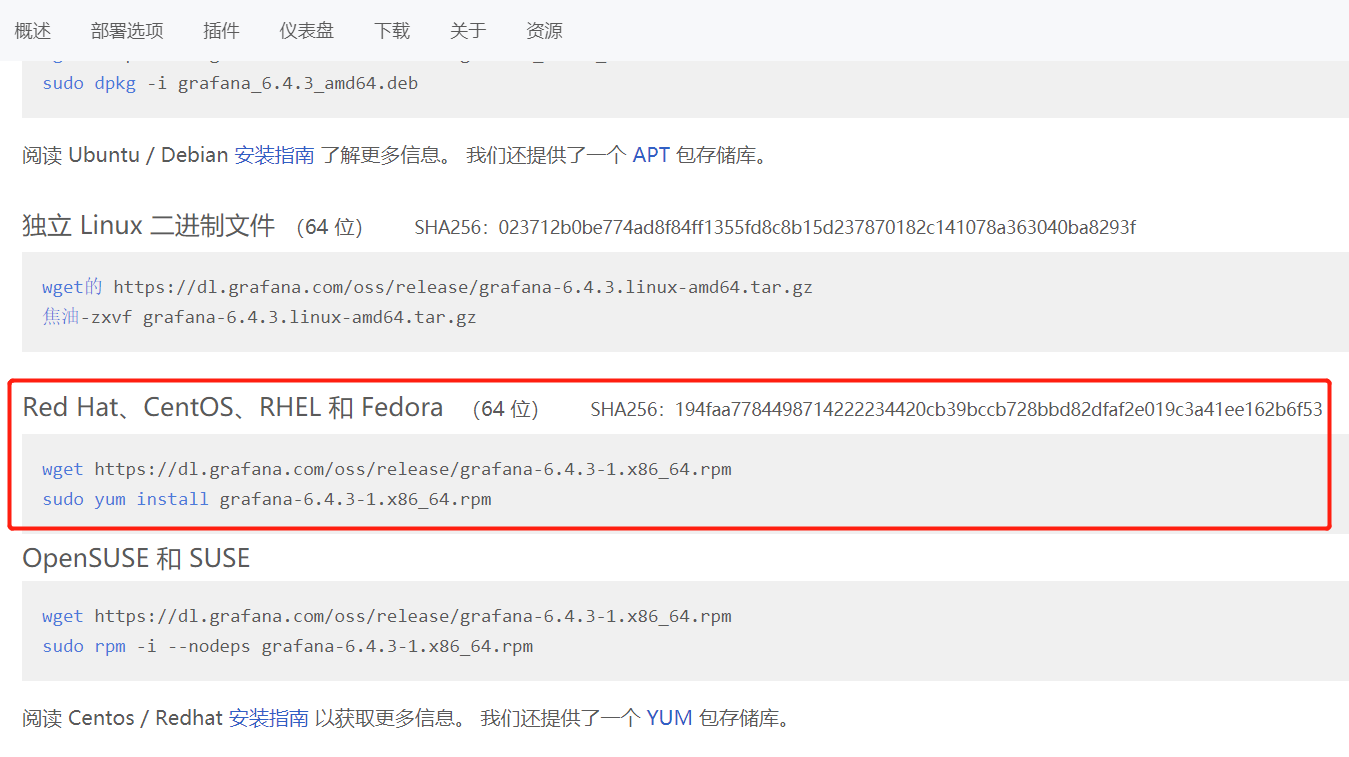
[root@grafana ~]# wget https://dl.grafana.com/oss/release/grafana-6.4.3-1.x86_64.rpm
[root@grafana ~]# yum -y install grafana-6.4.3-1.x86_64.rpm
[root@grafana ~]# systemctl start grafana-server
[root@grafana ~]# netstat -tnlp

默认账号:admin ; 默认密码:admin
登录之后,需要修改密码,自行修改即可
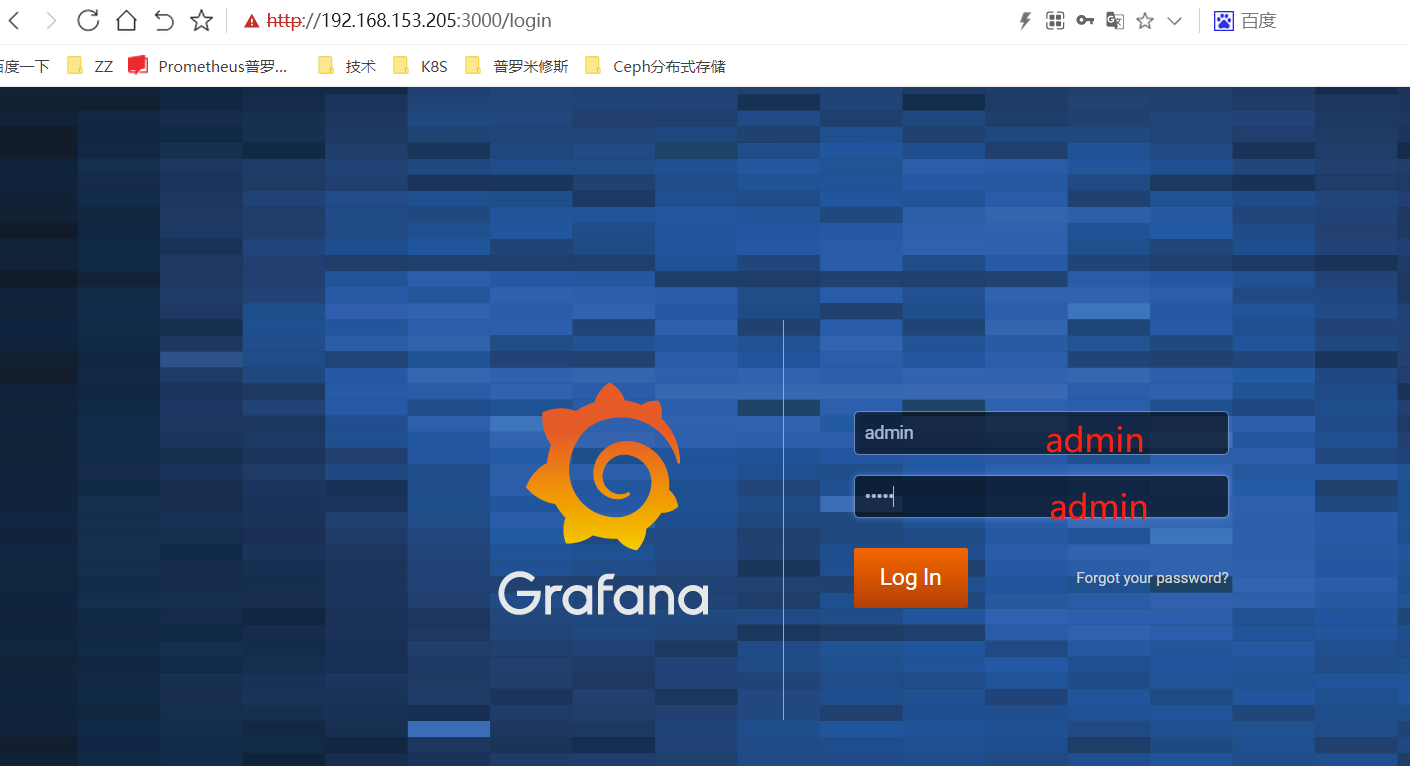
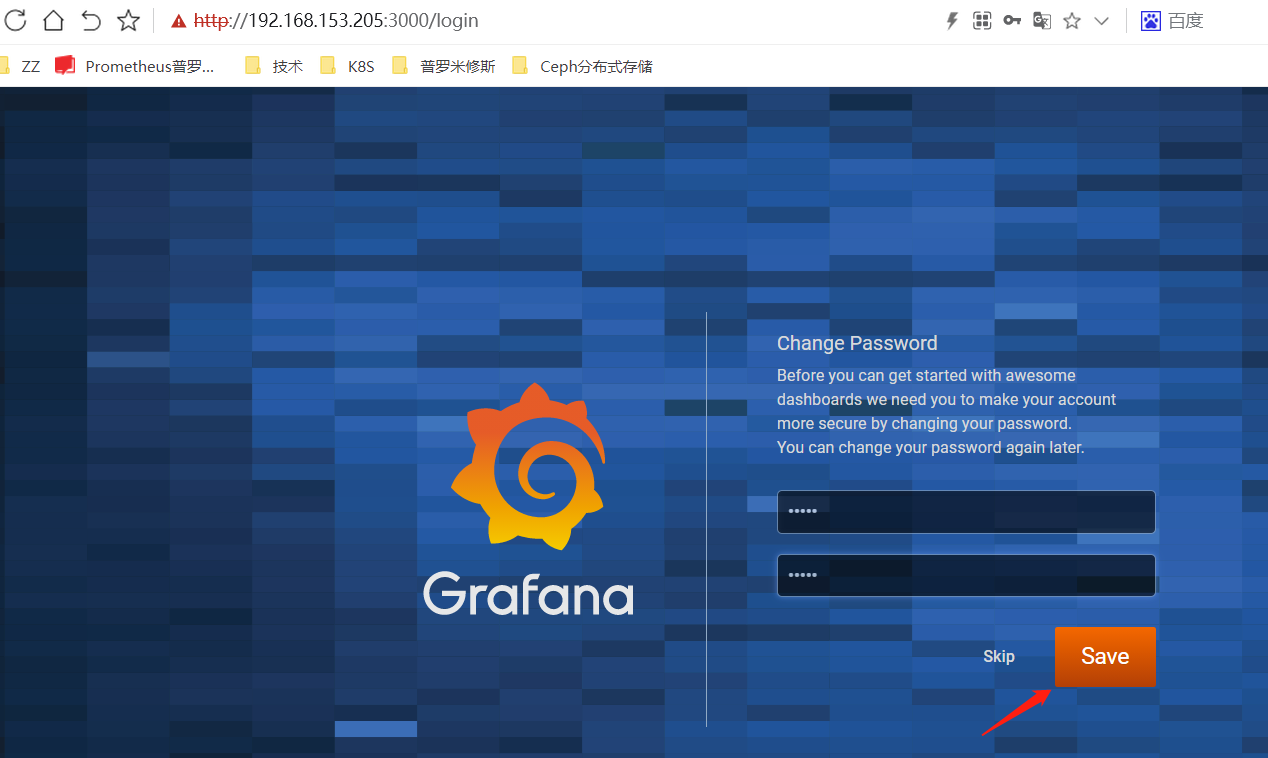
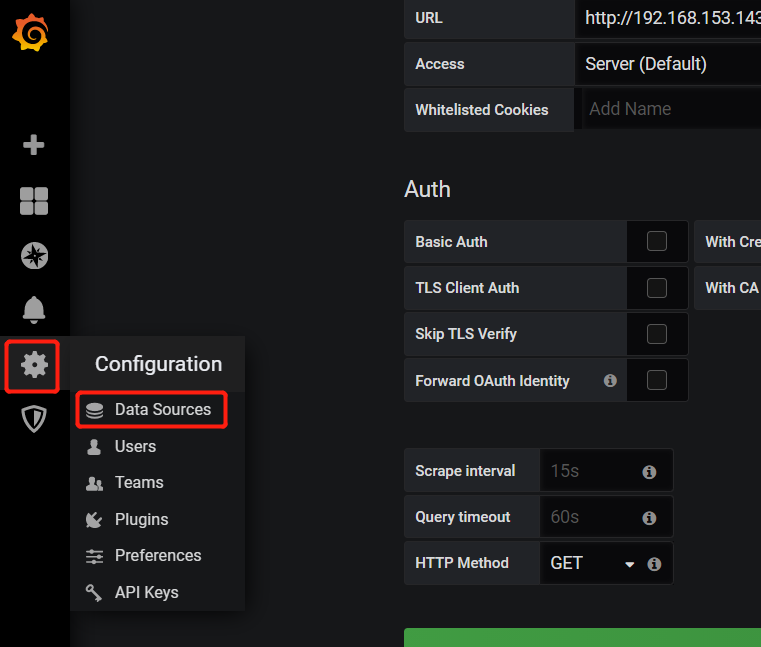
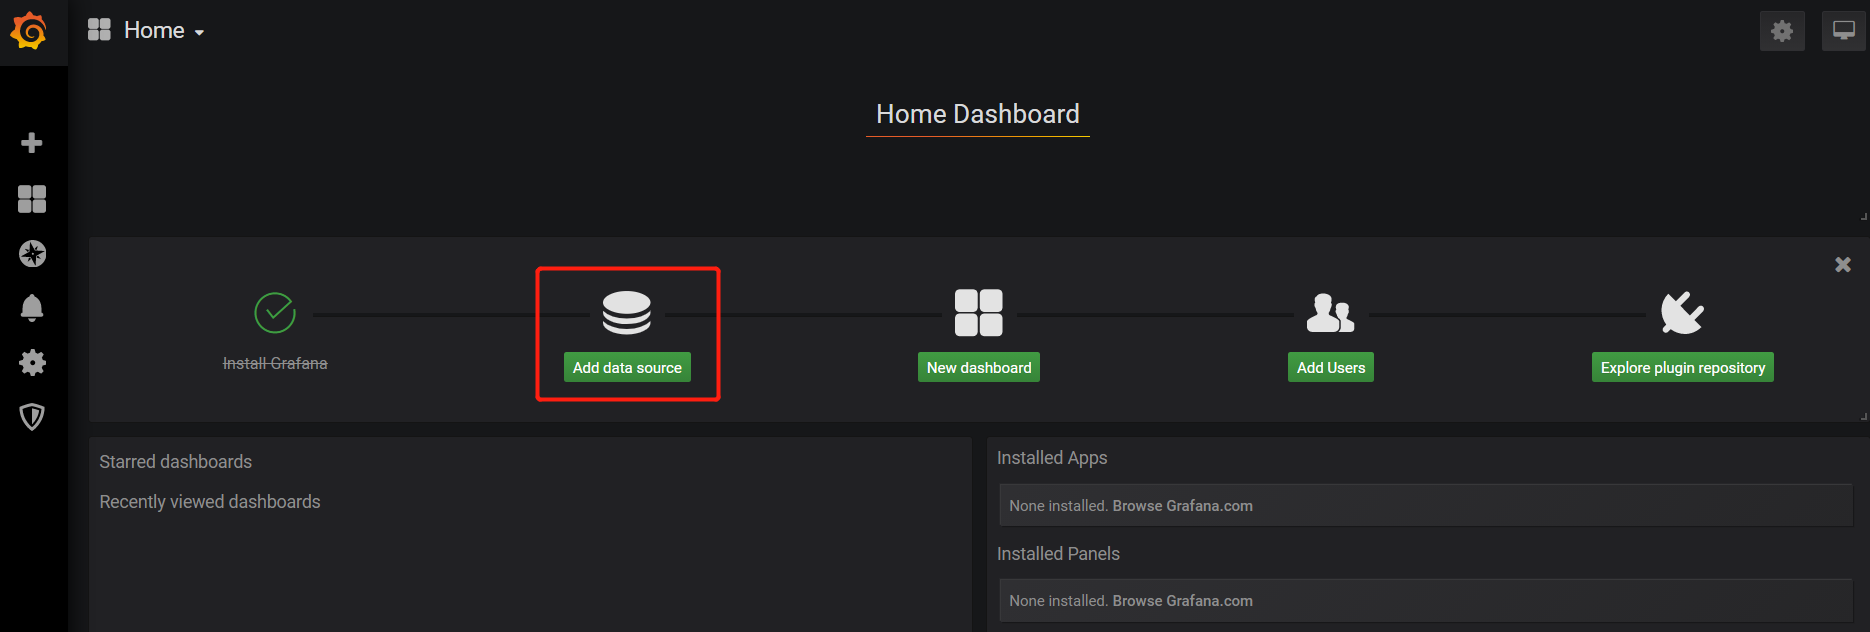
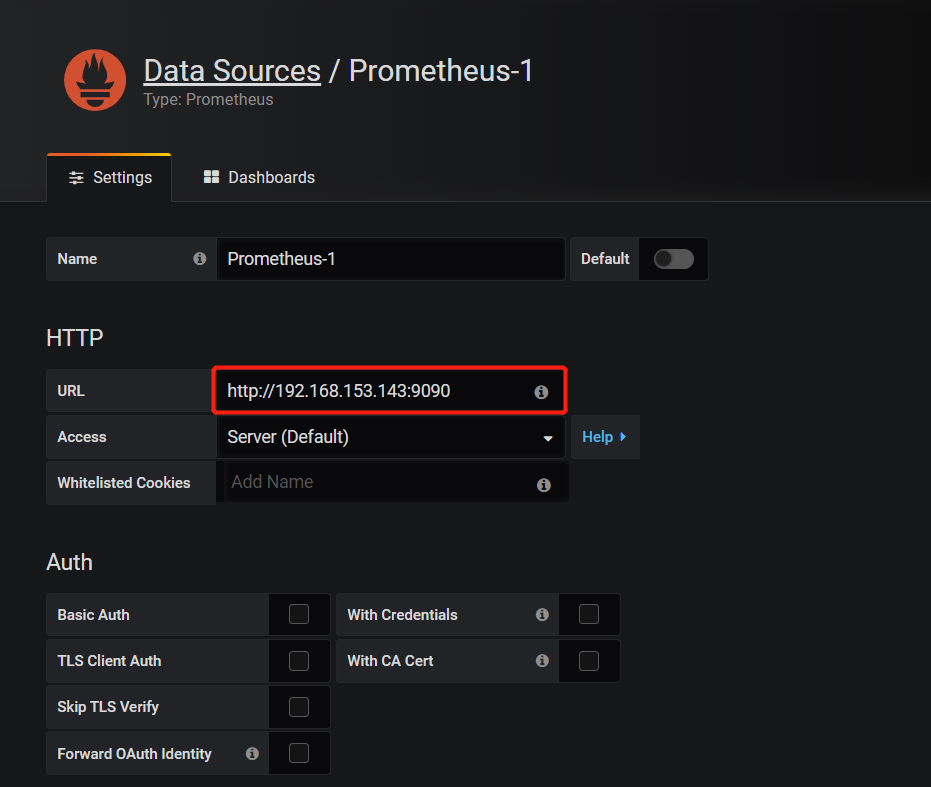
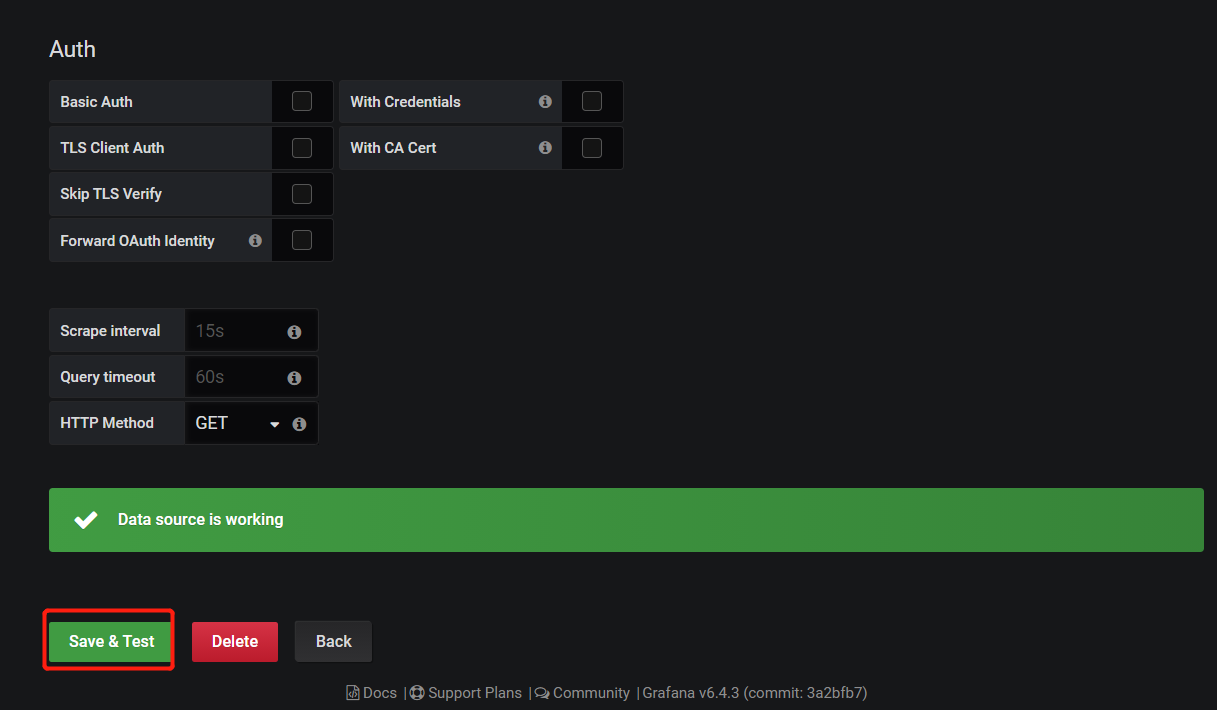
下面我们把prometheus服务器收集的数据做为一个数据源添加到 grafana,让grafana可以得到prometheus的数据。

告警方式
1.1. Prometheus 告警介绍
与Zabbix告警不同,Prometheus将告警分为两个部分:Prometheus 和 Alertmanager。其中Prometheus配置告警触发规则,对指标进行监控和计算,将再将告警信息发送到Alertmanager中。Alertmanager对告警进行管理,比如合并抑制等操作。

1.2. AlertManager介绍
Alertmanager处理由客户端应用程序(例如Prometheus服务器)发送的警报。它负责将重复数据删除,分组和路由到正确的接收者,通知方式有电子邮件、短信、微信等。它还负责沉默和禁止警报。Altermanager有以下几个功能点
- 分组
当机房网络故障时,或者机房断电时,会突然有大量相同的告警出现,此时就需要对告警进行分组聚合,整合成少量告警发出。每个告警信息中会列出受影响的服务或者机器。
- 抑制(Inhibition)
当集群故障时,会引发一系列告警,此时只需要通知集群故障,其它因为集群故障引起的告警应该被抑制,避免干扰判断。
- 静默(Silences)
当集群升级、服务更新的过程中,大概率导致告警。因此在升级期间,对这些告警进行静默,不再发送相关告警。
告警相关配置
2.1 altermanager配置文件
2.1.1 全局配置
# global 指定了默认的接收者配置项                YAML        复制代码
global:
  # 默认smtp 配置项,如果recivers中没有配置则采用全局配置项
  [ smtp_from: <tmpl_string> ]
  [ smtp_smarthost: <string> ]
  [ smtp_hello: <string> | default = "localhost" ]
  [ smtp_auth_username: <string> ]
  [ smtp_auth_password: <secret> ]
  [ smtp_auth_identity: <string> ]
  [ smtp_auth_secret: <secret> ]
  [ smtp_require_tls: <bool> | default = true ]

  # 企业微信告警配置
  [ wechat_api_url: <string> | default = "https://qyapi.weixin.qq.com/cgi-bin/" ]
  [ wechat_api_secret: <secret> ]
  [ wechat_api_corp_id: <string> ]

  # 默认http客户端配置,不推荐配置。参考官方文档: https://prometheus.io/docs/alerting/latest/clients/
  [ http_config: <http_config> ]

  # 如果警报不包含EndsAt,则ResolveTimeout是Alertmanager使用的默认值,经过此时间后,如果尚未更新,则可以将警报声明为已解决。
  # 这对Prometheus的警报没有影响,因为它们始终包含EndsAt。
  [ resolve_timeout: <duration> | default = 5m ]

# 定义通知模板,最好一个列表元素可以使用Linux通配符,如 *.tmpl
templates:
  [ - <filepath> ... ]

# 定义路由
route: <route>

# 定义通知的接收者
receivers:
  - <receiver> ...

# 告警抑制规则
inhibit_rules:
  [ - <inhibit_rule> ... ]
2.1.2. 路由配置
每个警报都会在已配置的顶级路由处进入路由树,该路由树必须与所有警报匹配(即没有任何已配置的匹配器)。然后遍历子节点。如果将continue设置为false,它将在第一个匹配的子项之后停止。如果在匹配的节点上true为true,则警报将继续与后续的同级进行匹配。如果警报与节点的任何子节点都不匹配(不匹配的子节点或不存在子节点),则根据当前节点的配置参数来处理警报。
# 告警接收者
[ receiver: <string> ]
# 告警根据标签进行分组,相同标签的作为一组进行聚合,发送单条告警信息。特殊值 '...' 表示告警不聚合
[ group_by: '[' <labelname>, ... ']' ]

# 告警是否匹后续的同级节点,如果为true还会继续进行规则匹配,否则匹配成功就截止
[ continue: <boolean> | default = false ]

# 报警必须匹配到labelname,否则无法匹配到该组路由,一般用于发送给不同联系人时使用
match:
  [ <labelname>: <labelvalue>, ... ]
match_re:
  [ <labelname>: <regex>, ... ]

# 第一次发送当前group报警等待的时间,目的是实现同组告警的聚合
[ group_wait: <duration> | default = 30s ]

# 当上一次group告警发送成功后,改组又出现新的告警,那么等待多久再发送,一般设置为5分钟或者更久
[ group_interval: <duration> | default = 5m ]

# 已经发送成功的告警,但是一直没消除,那么等待多久再发送。一般推荐三个小时以上
[ repeat_interval: <duration> | default = 4h ]

# 子路由
routes:
  [ - <route> ... ]
2.1.3. 接收者配置
# 接收者名称,唯一标识
name: <string>

# 接收方式
email_configs:
  [ - <email_config>, ... ]
pagerduty_configs:
  [ - <pagerduty_config>, ... ]
pushover_configs:
  [ - <pushover_config>, ... ]
slack_configs:
  [ - <slack_config>, ... ]
opsgenie_configs:
  [ - <opsgenie_config>, ... ]
webhook_configs:
  [ - <webhook_config>, ... ]
victorops_configs:
  [ - <victorops_config>, ... ]
wechat_configs:
  [ - <wechat_config>, ... ]
6.邮箱报警实战
6.1 开启邮箱SMTP

7.部署AlertManager报警
[root@prometheus ~]# wget https://github.com/prometheus/alertmanager/releases/download/v0.23.0/alertmanager-0.23.0.linux-amd64.tar.gz
[root@prometheus ~]# tar -xvzf alertmanager-0.23.0.linux-amd64.tar.gz  -C /usr/local/
[root@prometheus ~]# cd /usr/local/
[root@prometheus local]# mv alertmanager-0.23.0.linux-amd64/ alertmanager
[root@prometheus local]# vim alertmanager/alertmanager.yml
#route:
#  group_by: ['alertname']
#  group_wait: 30s
#  group_interval: 5m
#  repeat_interval: 1h
#  receiver: 'web.hook'
#receivers:
#- name: 'web.hook'
#  webhook_configs:
#  - url: 'http://127.0.0.1:5001/'
#inhibit_rules:
#  - source_match:
#      severity: 'critical'
#    target_match:
#      severity: 'warning'
#    equal: ['alertname', 'dev', 'instance']
global:
  resolve_timeout: 5m
  smtp_from: 'feigeyoungfit@163.com'
  smtp_smarthost: 'smtp.163.com:25'
  smtp_auth_username: 'feigeyoungfit@163.com'
  smtp_auth_password: 'LLWCLIXIADHVTPVJ' #这里要开启邮箱SMTP/POP3/IMAP认证,记录授权码
  smtp_require_tls: false
#  smtp_hello: '163.com'
route:
  group_by: ['alertname']
  group_wait: 20s
  group_interval: 5m
  repeat_interval: 5m
  receiver: 'email'
receivers:
- name: 'email'
  email_configs:
  - to: '908367919@qq.com'
    send_resolved: true
inhibit_rules:
  - source_match:
      severity: 'critical'
    target_match:
      severity: 'warning'
    equal: ['alertname', 'dev', 'instance']
========================================================================================
配置文件详解:
# 全局配置项
global:
  resolve_timeout: 5m #处理超时时间,默认为5min
  smtp_from: 'ayoungfit@163.com' # 发送邮箱名称
  smtp_smarthost: 'smtp.163.com:25' # 邮箱smtp服务器代理
  smtp_auth_username: 'ayoungfit@163.com' # 邮箱名称
  smtp_auth_password: 'LLWCLIXIADHVTPVJ' # 邮箱授权码

# 定义路由树信息
route:
  group_by: ['alertname'] # 报警分组依据
  group_wait: 10s # 最初即第一次等待多久时间发送一组警报的通知
  group_interval: 10s # 在发送新警报前的等待时间
  repeat_interval: 1m # 发送重复警报的周期 对于email配置中,此项不可以设置过低,否则将会由于邮件发送太多频繁,被smtp服务器拒绝
  receiver: 'email' # 发送警报的接收者的名称,以下receivers name的名称

# 定义警报接收者信息
receivers:
  - name: 'email' # 警报
    email_configs: # 邮箱配置
    - to: '908367919@qq.com'  # 接收警报的email配置
    send_resolved: true
# 一个inhibition规则是在与另一组匹配器匹配的警报存在的条件下,使匹配一组匹配器的警报失效的规则。两个警报必须具有一组相同的标签.
inhibit_rules: #抑制规则
  - source_match: #源标签
     severity: 'critical'
    target_match:
     severity: 'warning'
    equal: ['alertname', 'dev', 'instance']
[root@prometheus alertmanager]# ./amtool check-config alertmanager.yml #检测语法

#配置systemctl系统管理
[root@prometheus alertmanager]# cat /usr/lib/systemd/system/alertmanager.service
[Unit]
Description=alertmanager System
Documentation=alertmanager System

[Service]
ExecStart=/usr/local/alertmanager/alertmanager --config.file=/usr/local/alertmanager/alertmanager.yml

[Install]
WantedBy=multi-user.target

[root@prometheus alertmanager]# systemctl restart alertmanager.service
prometheus告警实战
修改 prometheus 配置文件
[root@prometheus local]# vim prometheus/prometheus.yml #添加如下内容


编写告警规则
[root@prometheus local]# mkdir prometheus/rules/
[root@prometheus local]# vim prometheus/rules/host_monitor.yml
groups:
- name: node-up
  rules:
  - alert: node-up
    expr: up == 0
    for: 10s
    labels:
      severity: warning
      team: node
    annotations:
      summary: "千锋郑州云计算飞哥的 {{ $labels.instance }} 服务已停止运行超过 10s!"

====================================================================================
# alert:告警规则的名称。
# expr:基于 PromQL 表达式告警触发条件,用于计算是否有时间序列满足该条件。
# for:评估等待时间,可选参数。用于表示只有当触发条件持续一段时间后才发送告警。在等待期间新产生告警的状态为 pending。
# labels:自定义标签,允许用户指定要附加到告警上的一组附加标签。
# annotations:用于指定一组附加信息,比如用于描述告警详细信息的文字等,annotations 的内容在告警产生时会一同作为参数发送到 Alertmanager。
# summary 描述告警的概要信息,description 用于描述告警的详细信息。
# 同时 Alertmanager 的 UI 也会根据这两个标签值,显示告警信息。
[root@prometheus local]# systemctl restart prometheus
测试报警
#来到node1上关闭node_exporter
[root@node1 node_exporter]# systemctl stop node_exporter
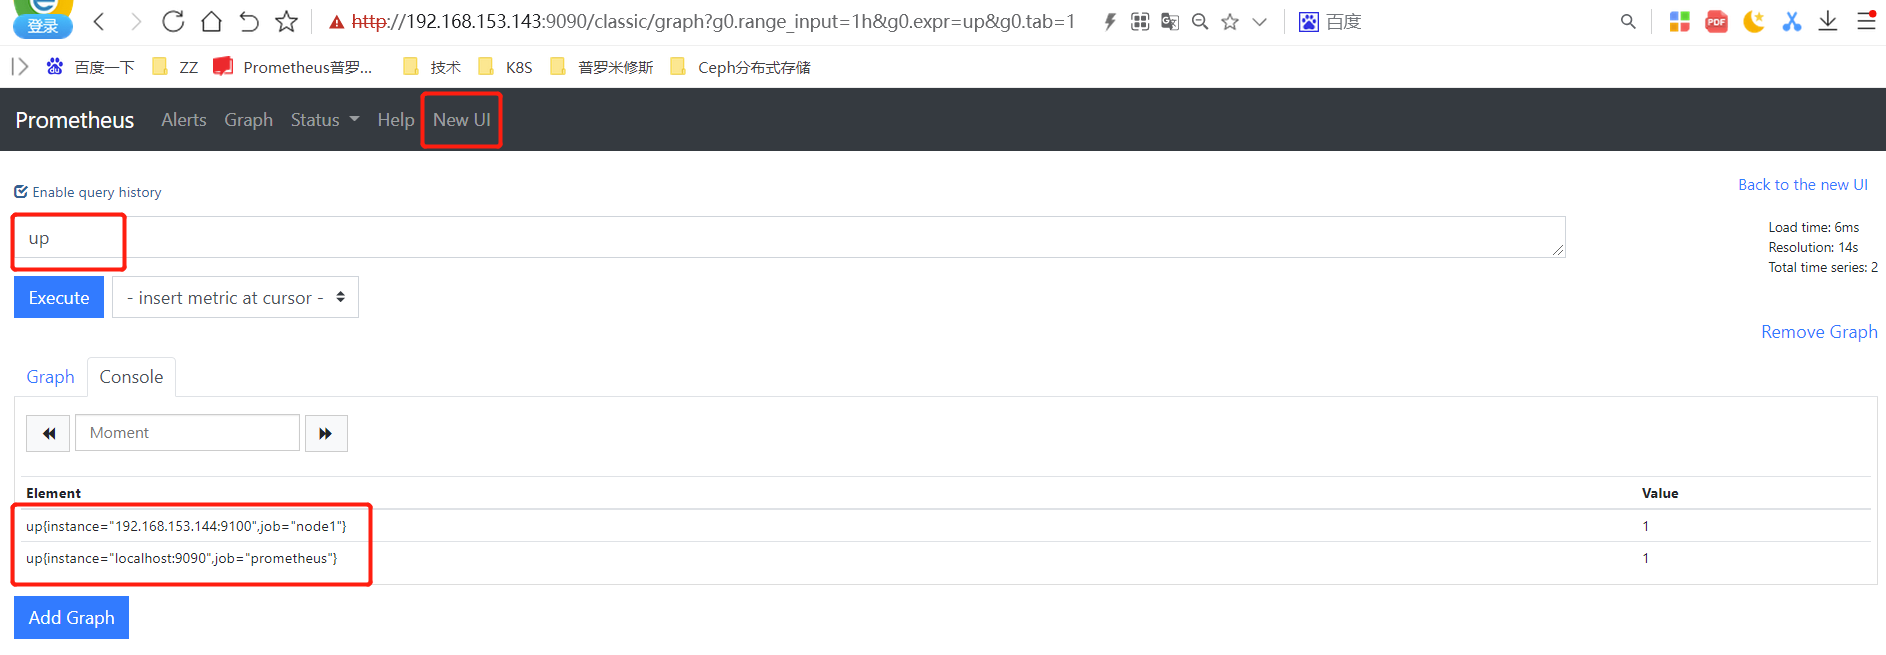
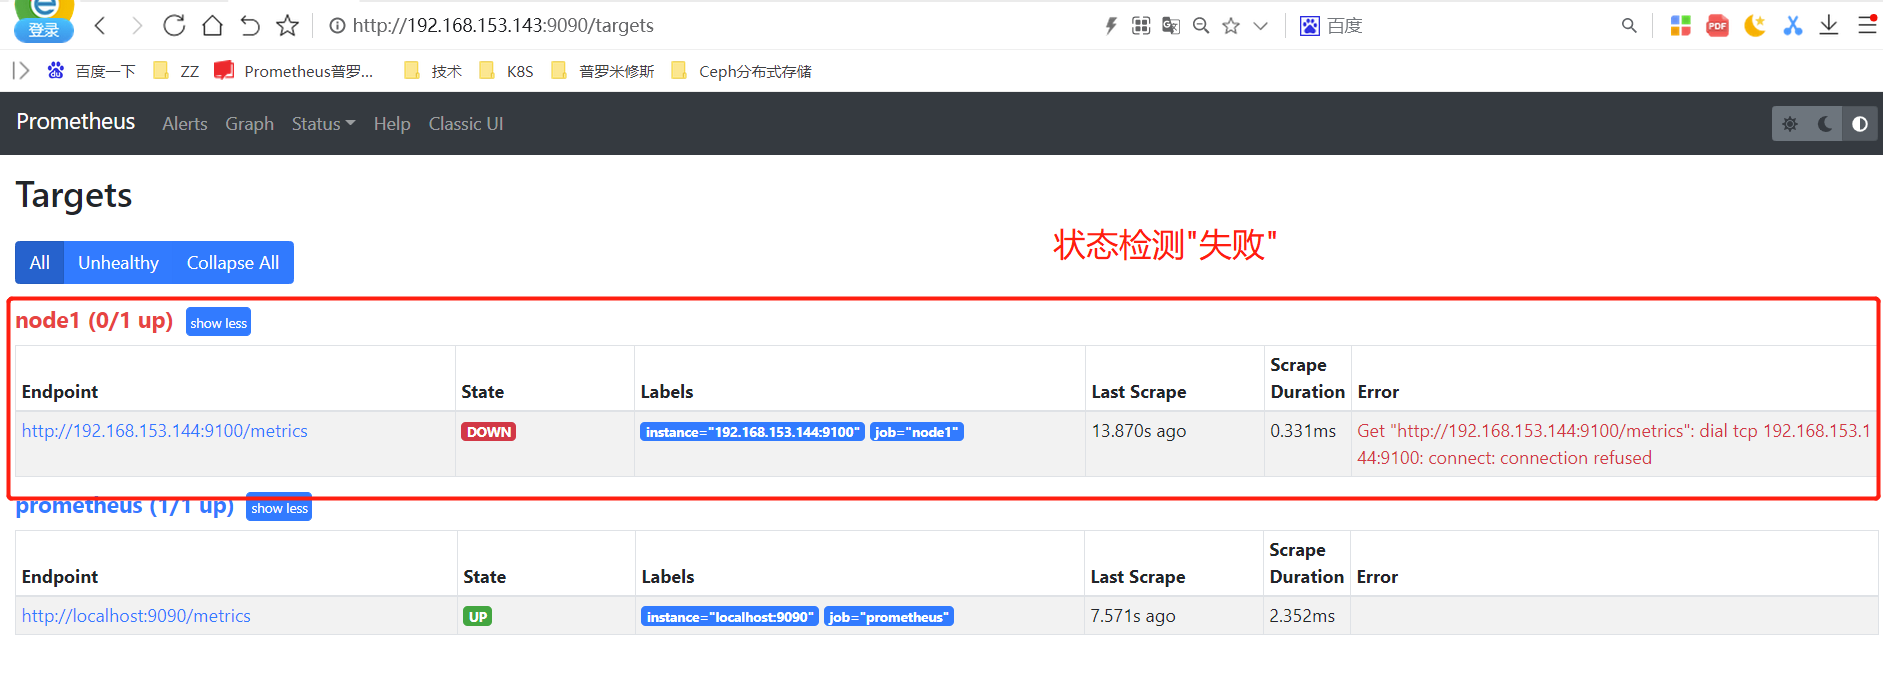
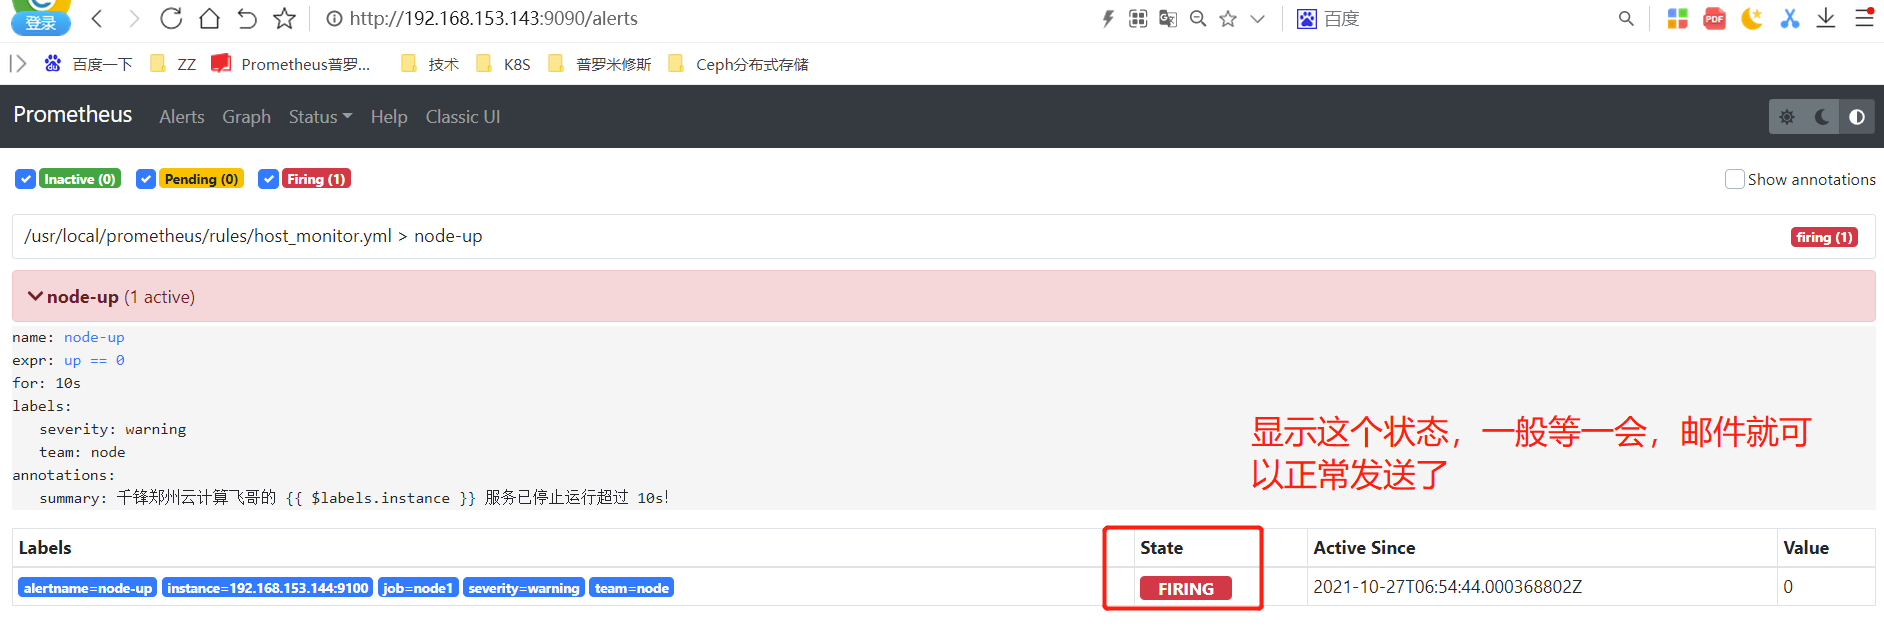
#查看Prometheus监控页面
状态说明
Prometheus Alert 告警状态有三种状态:Inactive、Pending、Firing。
1、Inactive:非活动状态,表示正在监控,但是还未有任何警报触发。
2、Pending:表示这个警报必须被触发。由于警报可以被分组、压抑/抑制或静默/静音,所 以等待验证,一旦所有的验证都通过,则将转到 Firing 状态。
3、Firing:将警报发送到 AlertManager,它将按照配置将警报的发送给所有接收者。一旦警 报解除,则将状态转到 Inactive,如此循环。
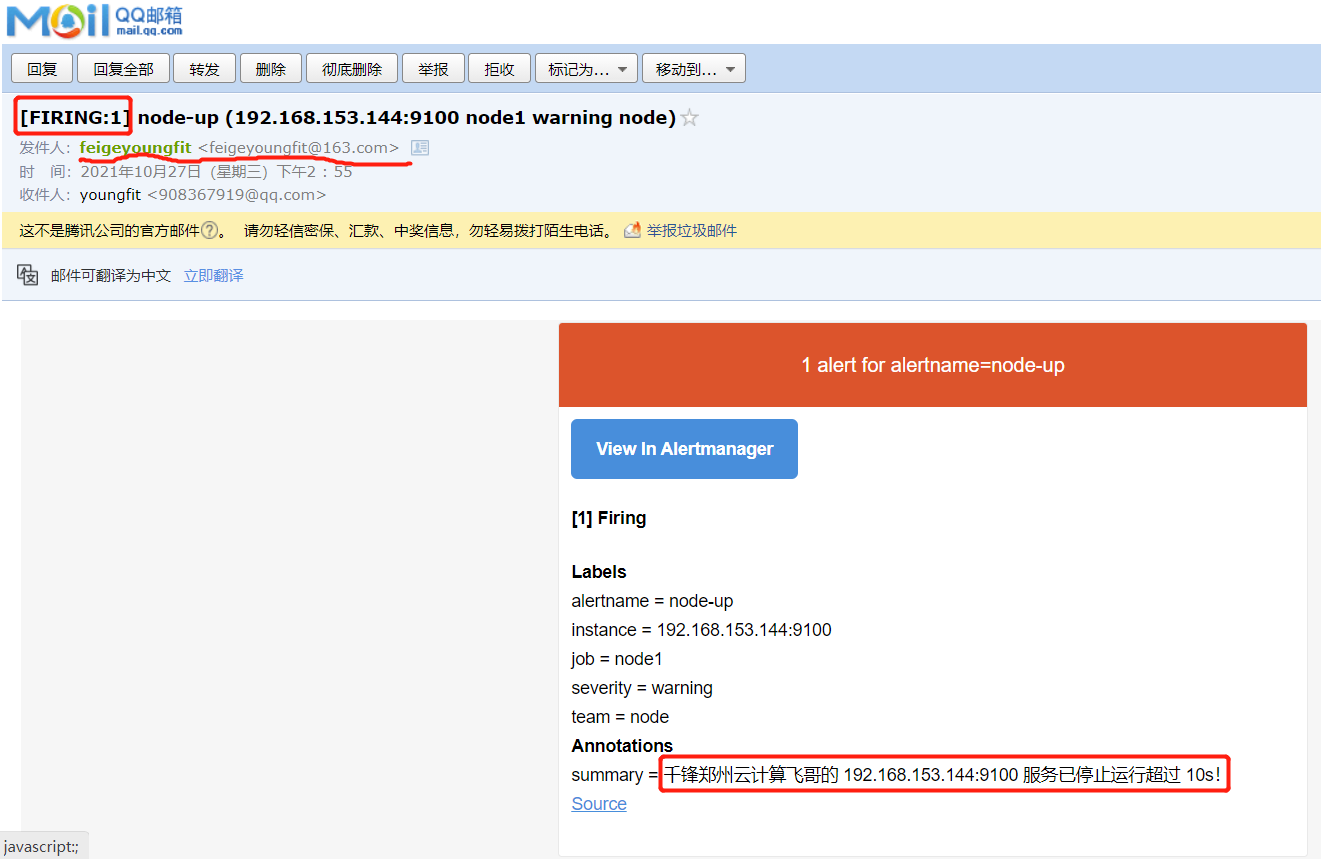
报警邮件:
#来到node1,恢复node_exporter应用
[root@node1 node_exporter]# systemctl start node_exporter
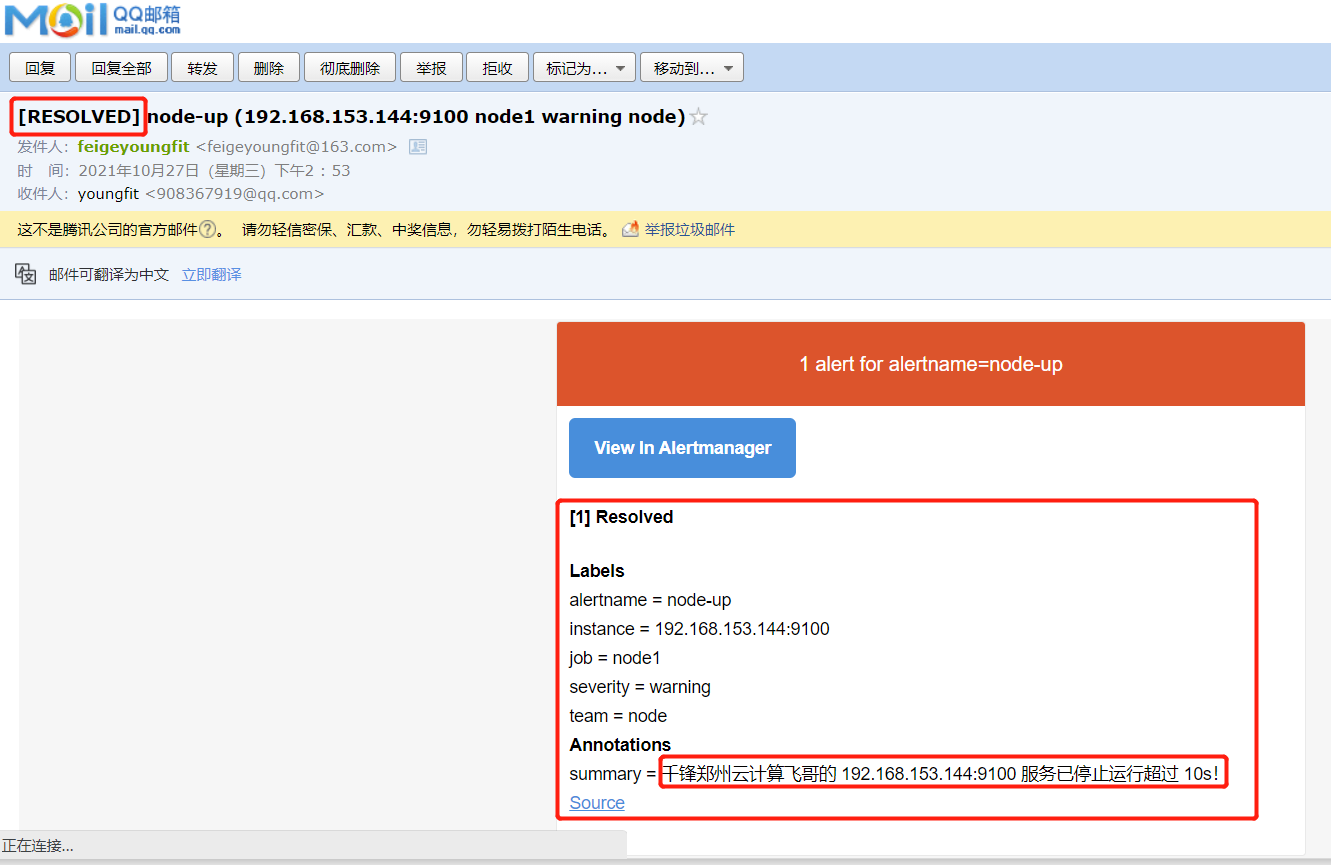
恢复邮件:
优化告警模板
新建模板文件
[root@prometheus alertmanager]# pwd
/usr/local/alertmanager
[root@prometheus alertmanager]# cat email.tmpl
{{ define "email.to.html" }}
{{- range $index, $alert := .Alerts -}}
======== 异常告警 ========
告警名称:{{ $alert.Labels.alertname }}
告警级别:{{ $alert.Labels.severity }}
告警机器:{{ $alert.Labels.instance }} {{ $alert.Labels.device }}
告警详情:{{ $alert.Annotations.summary }}
告警时间:{{ $alert.StartsAt.Format "2021-10-27 15:04:05" }}
========== END ==========
{{- end }}
{{- end }}
{{- if gt (len .Alerts.Resolved) 0 -}}
{{- range $index, $alert := .Alerts -}}
======== 告警恢复 ========
告警名称:{{ $alert.Labels.alertname }}
告警级别:{{ $alert.Labels.severity }}
告警机器:{{ $alert.Labels.instance }}
告警详情:{{ $alert.Annotations.summary }}
告警时间:{{ $alert.StartsAt.Format "2021-10-27 15:04:05" }}
恢复时间:{{ $alert.EndsAt.Format "2021-10-27 15:04:05" }}
========== END ==========
{{- end }}
{{- end }}
修改配置文件使用模板
[root@prometheus alertmanager]# pwd
/usr/local/alertmanager
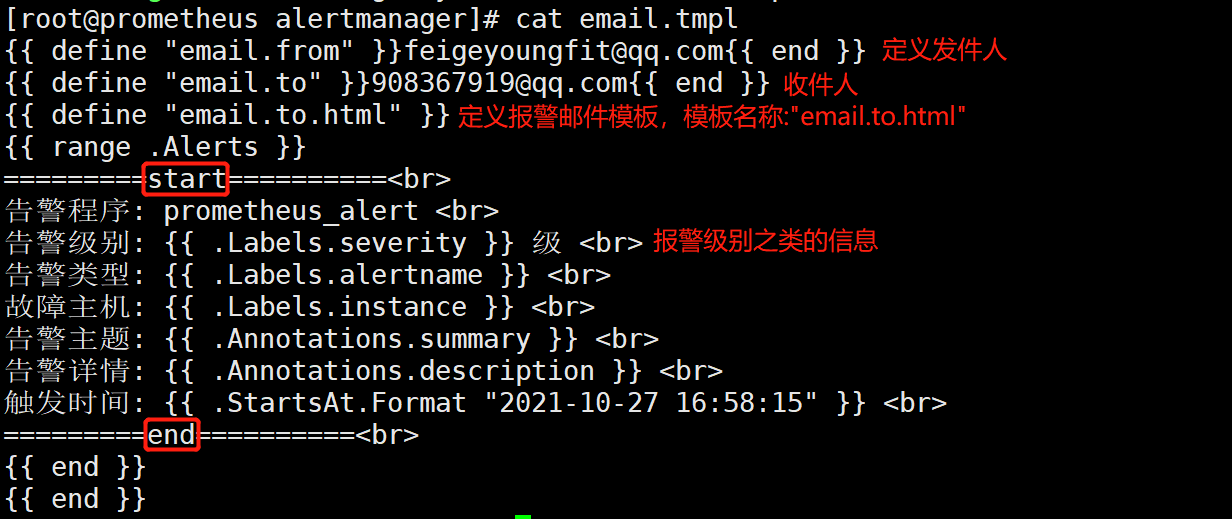
[root@prometheus alertmanager]# vim email.tmpl
[root@prometheus alertmanager]# cat email.tmpl
{{ define "email.from" }}feigeyoungfit@qq.com{{ end }}
{{ define "email.to" }}908367919@qq.com{{ end }}
{{ define "email.to.html" }}
{{ range .Alerts }}
=========start==========<br>
告警程序: prometheus_alert <br>
告警级别: {{ .Labels.severity }} 级 <br>
告警类型: {{ .Labels.alertname }} <br>
故障主机: {{ .Labels.instance }} <br>
告警主题: {{ .Annotations.summary }} <br>
告警详情: {{ .Annotations.description }} <br>
触发时间: {{ .StartsAt.Format "2021-10-27 16:58:15" }} <br>
=========end==========<br>
{{ end }}
{{ end }}
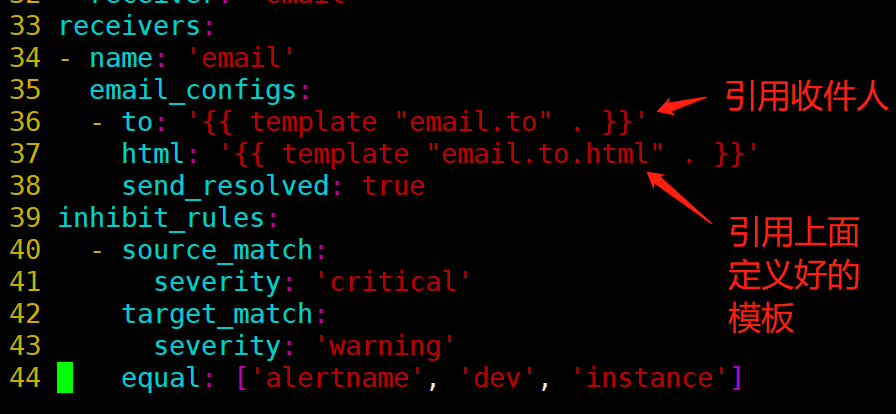
[root@prometheus alertmanager]# vim alertmanager.yml
===============================================
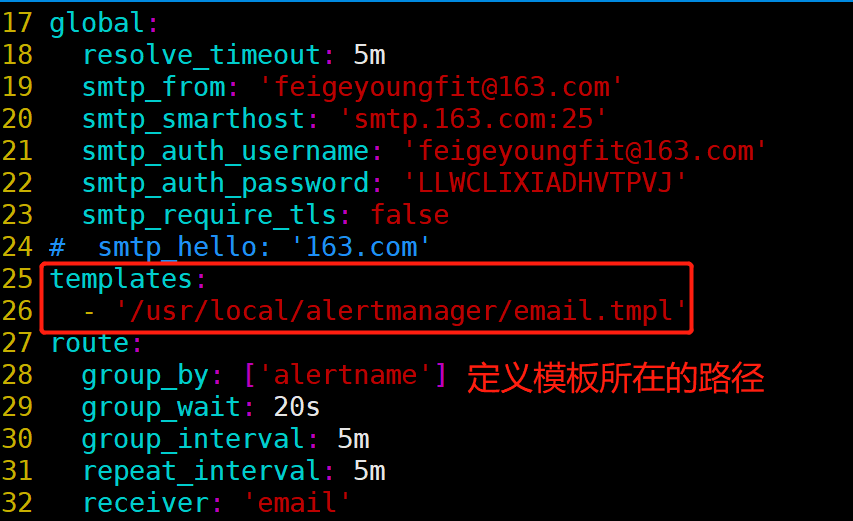
templates:
  - '/usr/local/alertmanager/email.tmpl'
===============================================
receivers:
- name: 'email'
  email_configs:
  - to: '{{ template "email.to" . }}'
    html: '{{ template "email.to.html" . }}'
    send_resolved: true
================================================
#再次停止node1上的node_exporter
[root@node1 node_exporter]# systemctl stop node_exporter
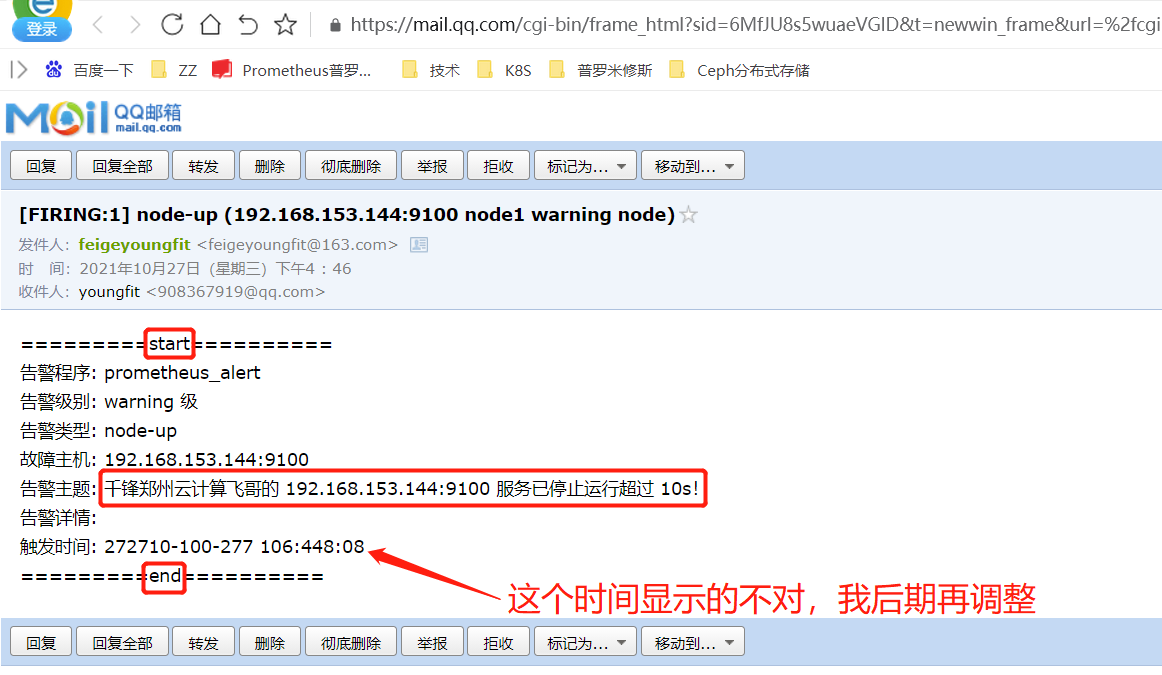
调整邮件时间
[root@prometheus alertmanager]# pwd
/usr/local/alertmanager
[root@prometheus alertmanager]# cat email.tmpl
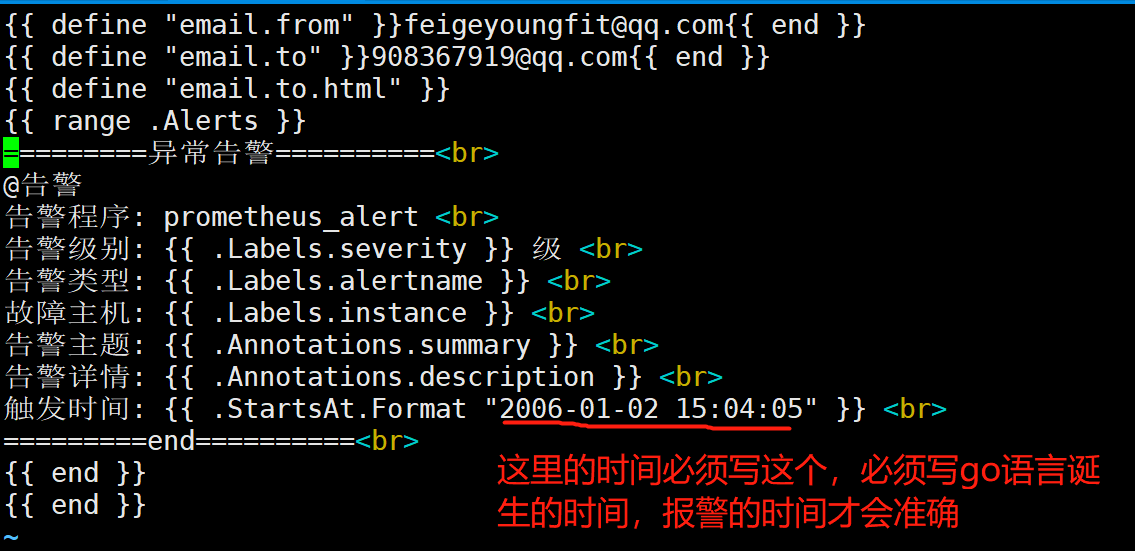
[root@prometheus alertmanager]# systemctl restart alertmanager
等待几分钟,它还会再次发送告警邮件
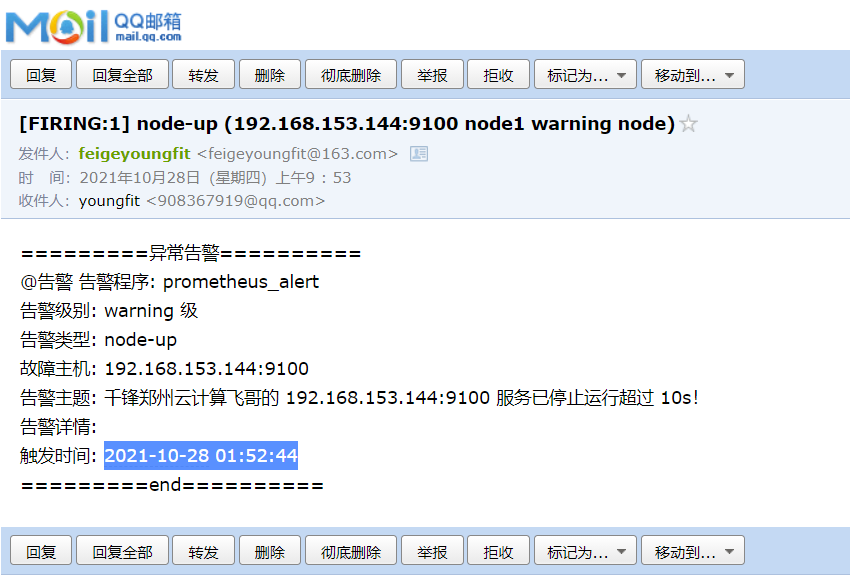
[root@node1 node_exporter]# systemctl start node_exporter
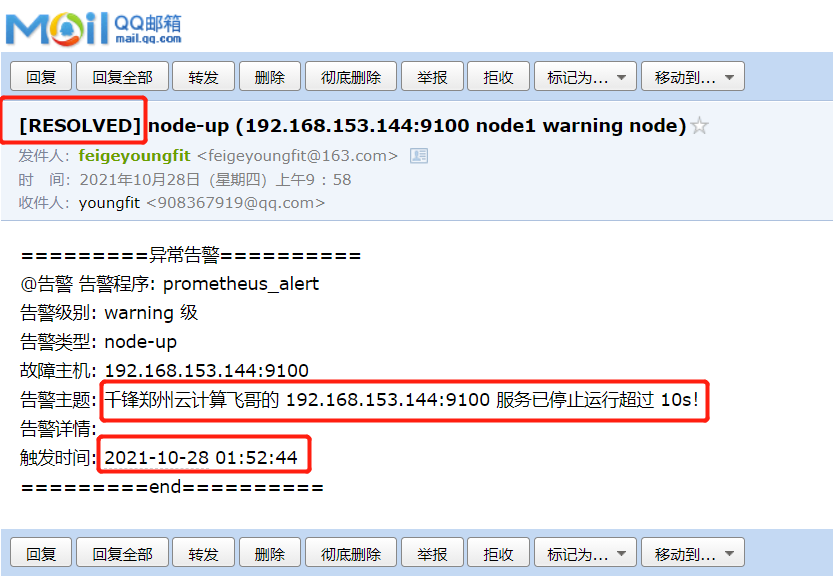
其实上面的报警时间仍然不对,显示的是utc时间,比北京时间慢了8个小时;可以进行如下修改:
[root@prometheus alertmanager]# vim email.tmpl
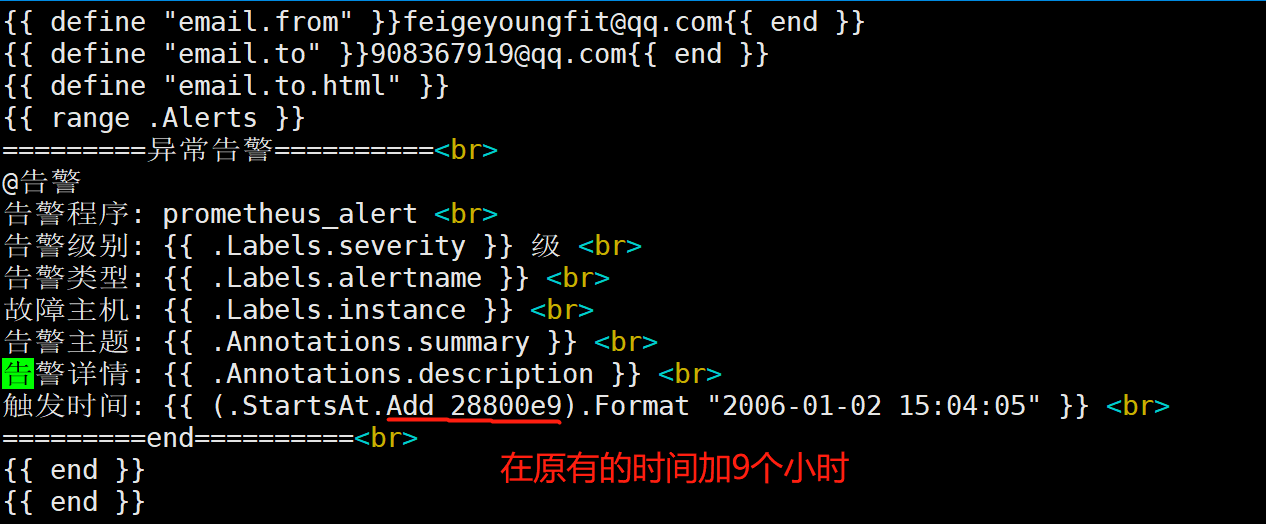
[root@prometheus alertmanager]# systemctl restart alertmanager #再次重启
[root@node1 ~]# systemctl stop node_exporter #再次停止
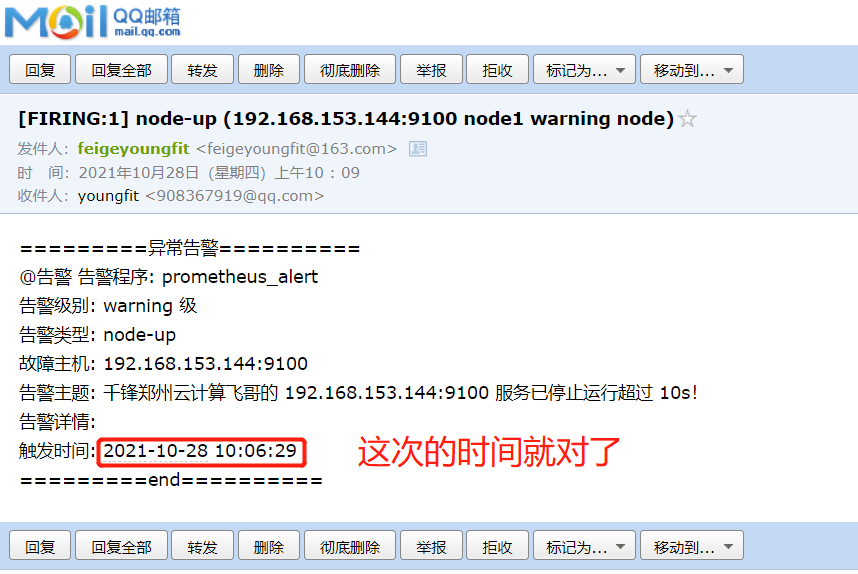
[root@node1 ~]# systemctl start node_exporter
恢复报警(可选)
[root@prometheus alertmanager]# pwd
/usr/local/alertmanager
[root@prometheus alertmanager]# cat email.tmpl
{{ define "email.from" }}feigeyoungfit@qq.com{{ end }}
{{ define "email.to" }}908367919@qq.com{{ end }}
{{ define "email.to.html" }}
{{ if gt (len .Alerts.Firing) 0 }}{{ range .Alerts }}
@告警: <br>
告警程序: prometheus_alert <br>
告警级别: {{ .Labels.severity }} 级 <br>
告警类型: {{ .Labels.alertname }} <br>
故障主机: {{ .Labels.instance }} <br>
告警主题: {{ .Annotations.summary }} <br>
告警详情: {{ .Annotations.description }} <br>
触发时间: {{ .StartsAt.Add 28800e9 }} <br>
{{ end }}
{{ end }}
{{ if gt (len .Alerts.Resolved) 0 }}{{ range .Alerts }}
@恢复: <br>
告警主机:{{ .Labels.instance }} <br>
告警主题:{{ .Annotations.summary }} <br>
恢复时间: {{ .EndsAt.Add 28800e9 }} <br>
{{ end }}
{{ end }}
{{ end }}
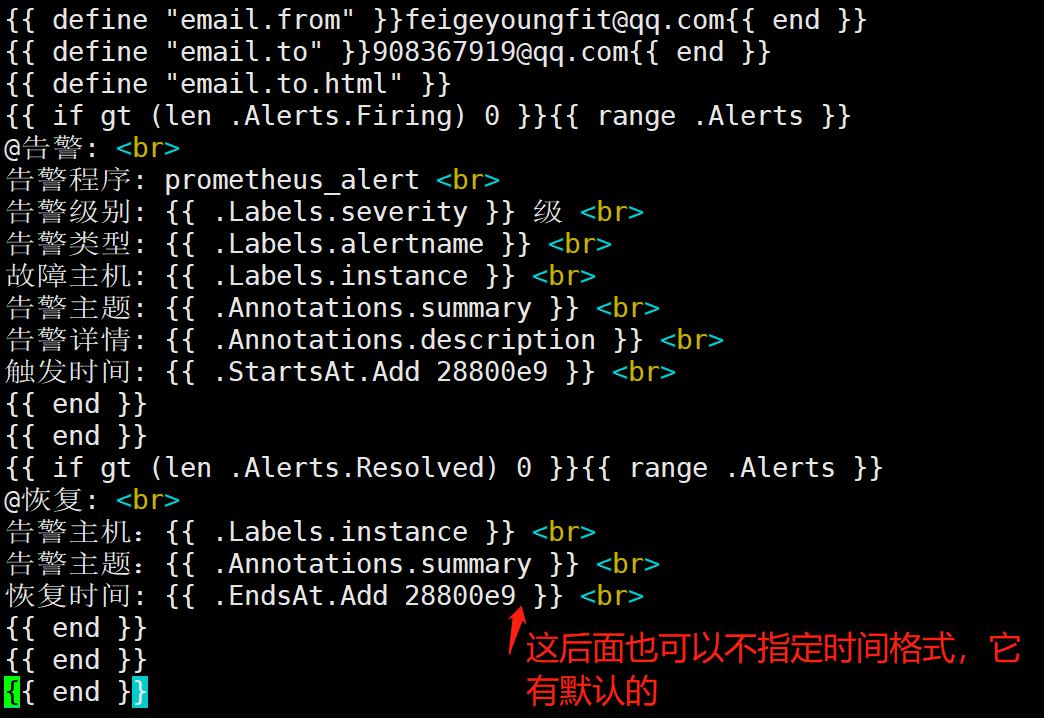
[root@prometheus alertmanager]# ./amtool check-config alertmanager.yml #每次改完配置,都可以检测一下配置文件,只检测alertmanager.yml即可,里面包含报警模板等配置文件

[root@node1 ~]# systemctl stop node_exporter
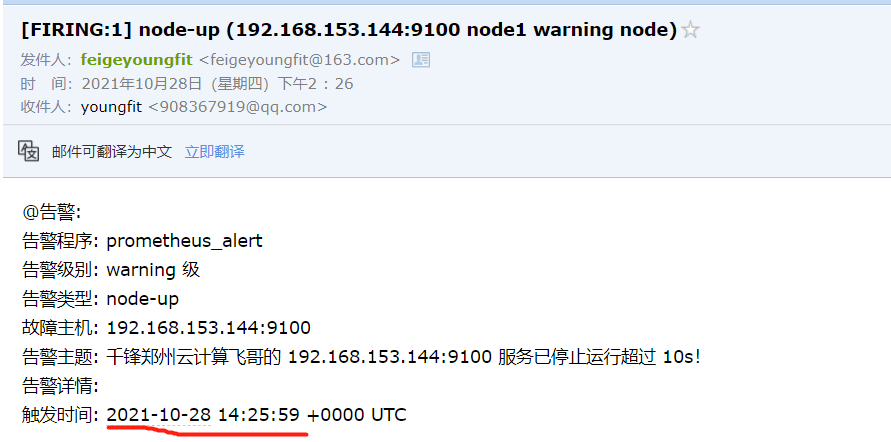 ·
·
[root@node1 ~]# systemctl start node_exporter
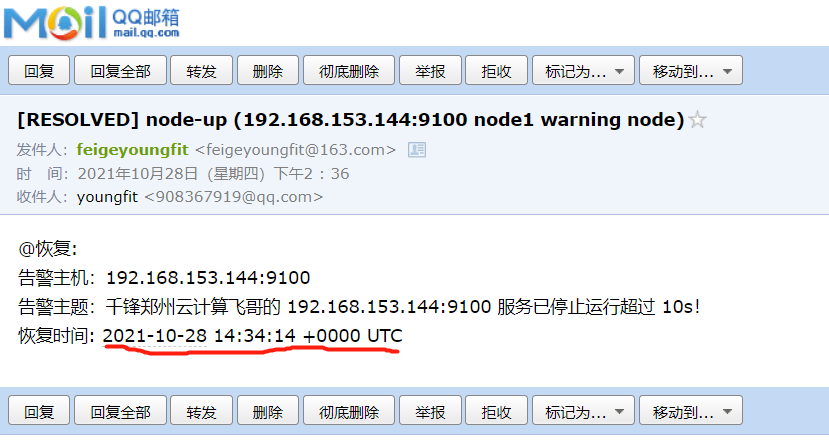
企业微信报警实战
手机下载企业微信,创建1个企业
百度“企业微信”
扫码登录->应用管理—>创建应用
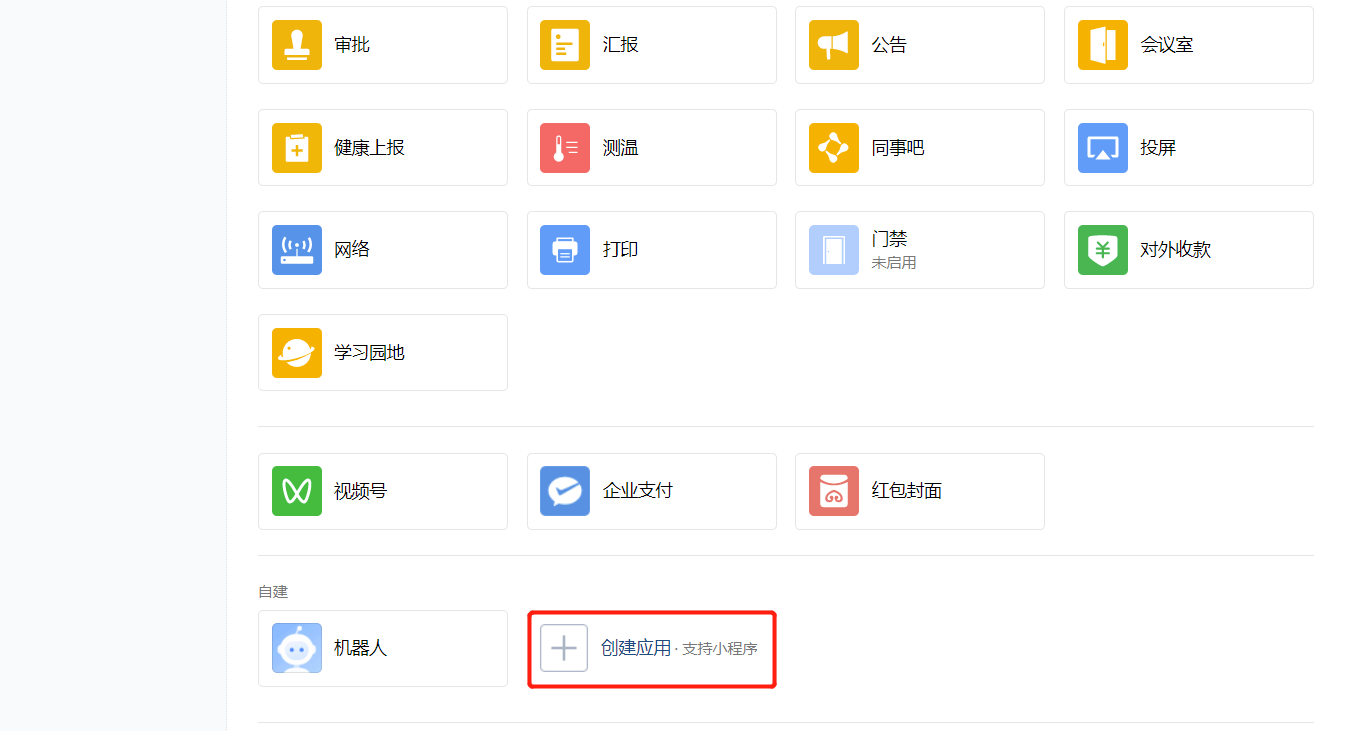
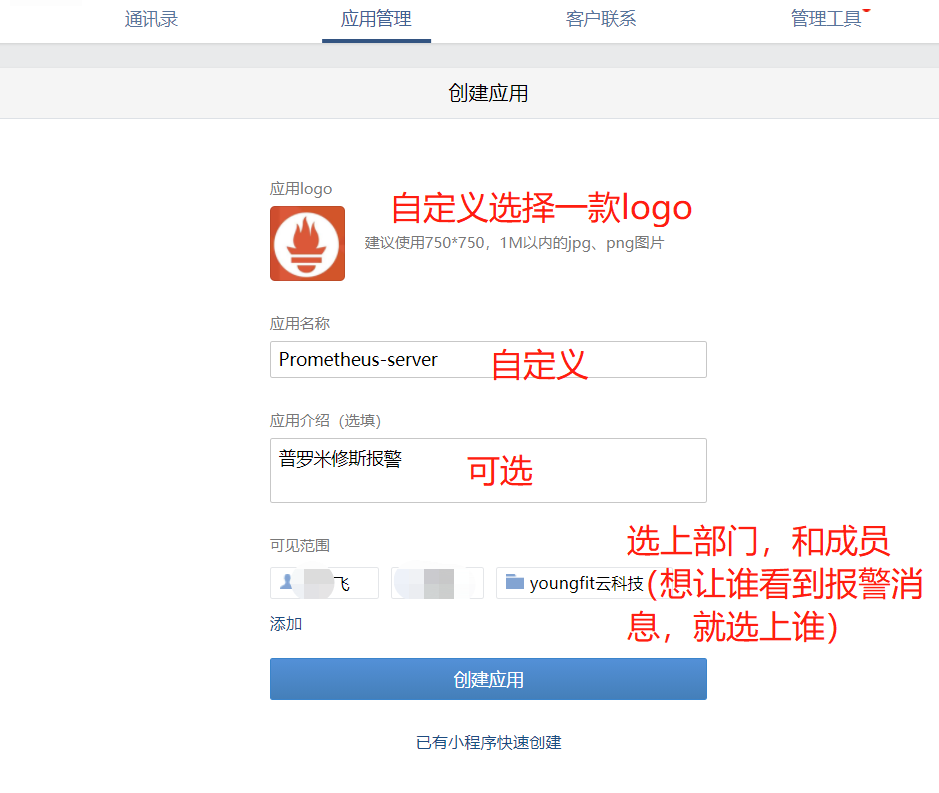

点击“我的企业”,记录企业ID

corp_id: 企业微信账号唯一 ID, 可以在我的企业中查看。
to_party: 需要发送的组(部门)。 可以在通讯录中查看
agent_id: 第三方企业应用的 ID
api_secret: 第三方企业应用的密钥
添加微信报警模板
[root@prometheus alertmanager]# pwd
/usr/local/alertmanager
[root@prometheus alertmanager]# cat wechat.tmpl
{{ define "wechat.tmpl" }}
{{- if gt (len .Alerts.Firing) 0 -}}{{ range .Alerts }}
@警报 <br>
实例: {{ .Labels.instance }} <br>
信息: {{ .Annotations.summary }} <br>
详情: {{ .Annotations.description }} <br>
时间: {{ (.StartsAt.Add 28800e9).Format "2006-01-02 15:04:05" }} <br>
{{ end }}{{ end -}}
{{- if gt (len .Alerts.Resolved) 0 -}}{{ range .Alerts }}
@恢复 <br>
实例: {{ .Labels.instance }} <br>
信息: {{ .Annotations.summary }} <br>
时间: {{ (.StartsAt.Add 28800e9).Format "2006-01-02 15:04:05" }} <br>
恢复: {{ (.EndsAt.Add 28800e9).Format "2006-01-02 15:04:05" }} <br>
{{ end }}{{ end -}}
{{- end }}
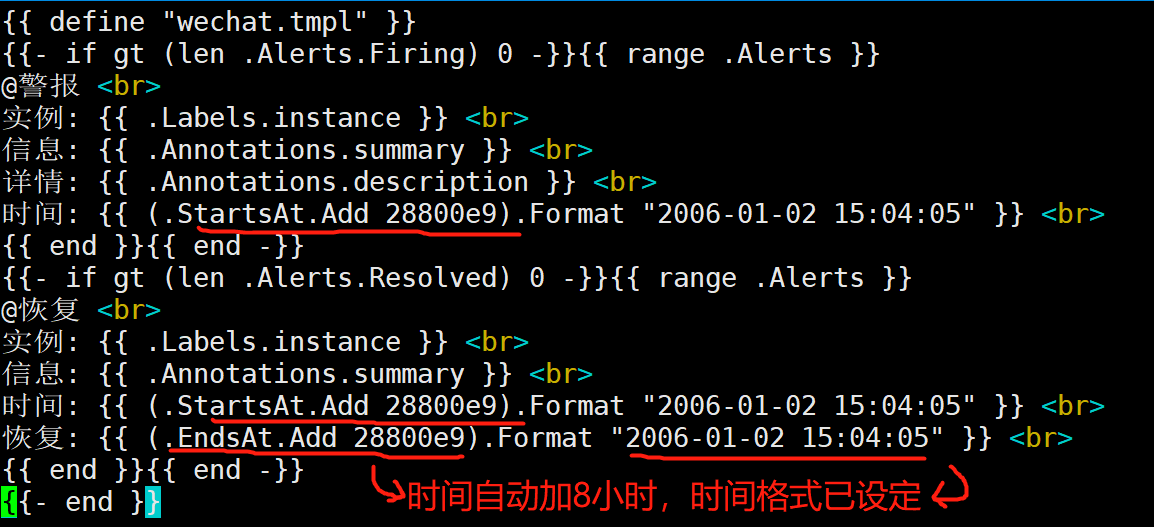
加入微信模板
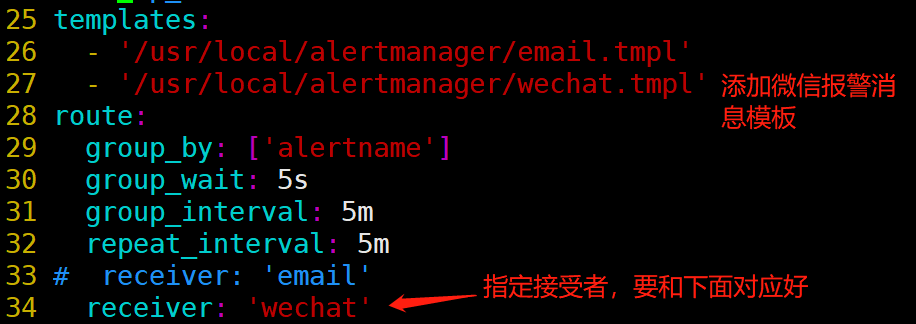
[root@prometheus alertmanager]# vim alertmanager.yml
========================================================
templates:
  - '/usr/local/alertmanager/email.tmpl'  #这行可以不要了
  - '/usr/local/alertmanager/wechat.tmpl' #加入定义好的微信模板
=========================================================
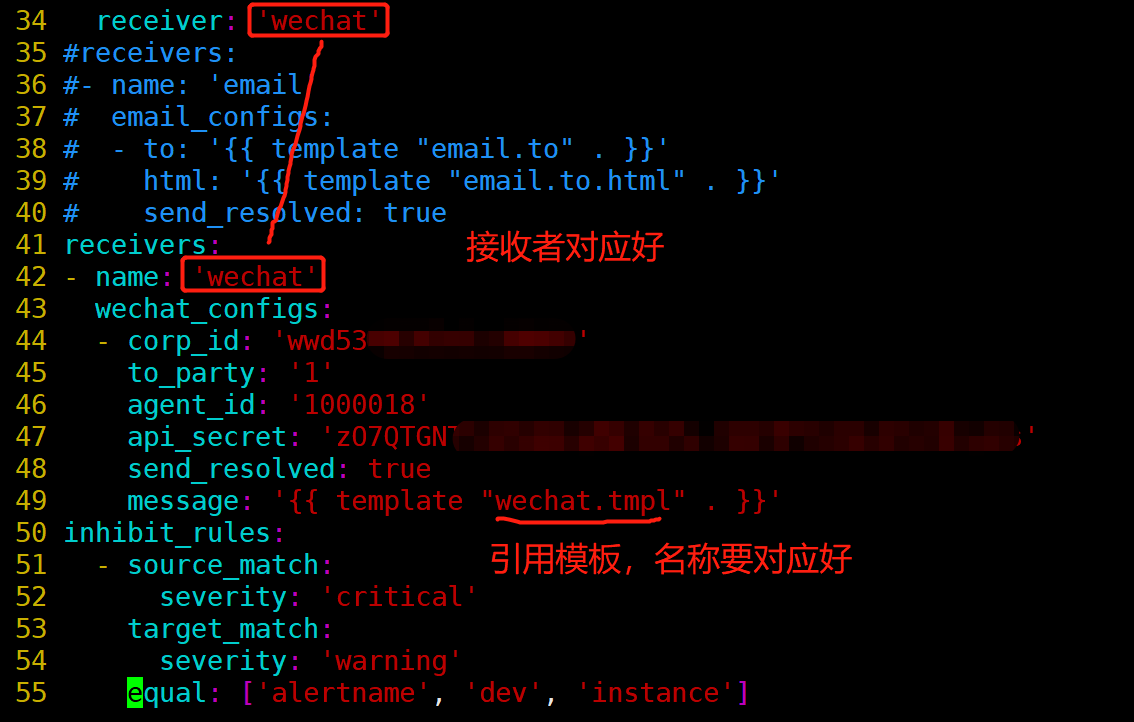
  wechat_configs:
  - corp_id: 'wwd5348195e1cdd999'
    to_party: '1'
    agent_id: '1000018'
    api_secret: 'zO7QTGNTS3ASQWnqNWl0d5s-8A0TFEnVkiU3J9W-abc'
    send_resolved: true
    message: '{{ template "wechat.tmpl" . }}  #应用上面已有的模板

[root@prometheus-server alertmanager]# systemctl restart alertmanager
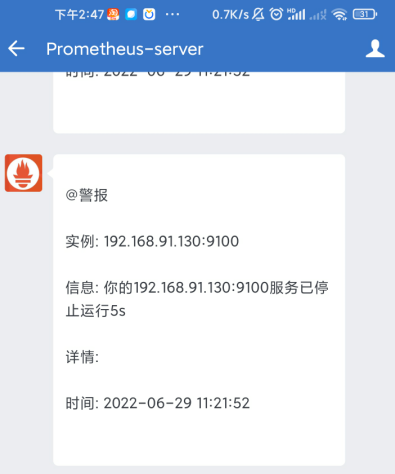
测试效果
[root@node1 ~]# systemctl stop node_exporter
[root@node1 ~]# systemctl start node_exporter
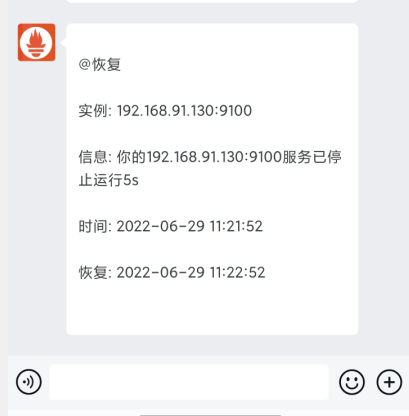
钉钉报警实战
在企业中,如果企业要求使用钉钉进行工作交流,那我们也可以使用钉钉接收报警消息;
钉钉会有群,我们可以创建1个云计算团队的钉钉群,在群里创建1个报警机器人;
这个机器人只要报警,在群里的云计算/运维人员都能看见
流程:创建群聊->群设置->智能群助手->添加机器人->自定义
创建钉钉报警机器人
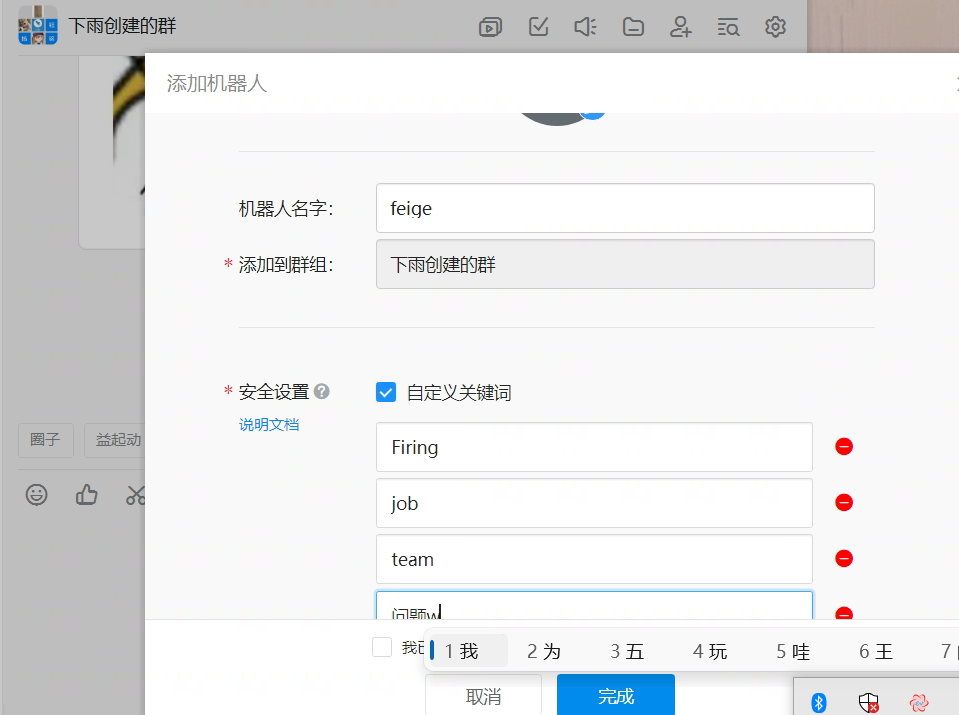
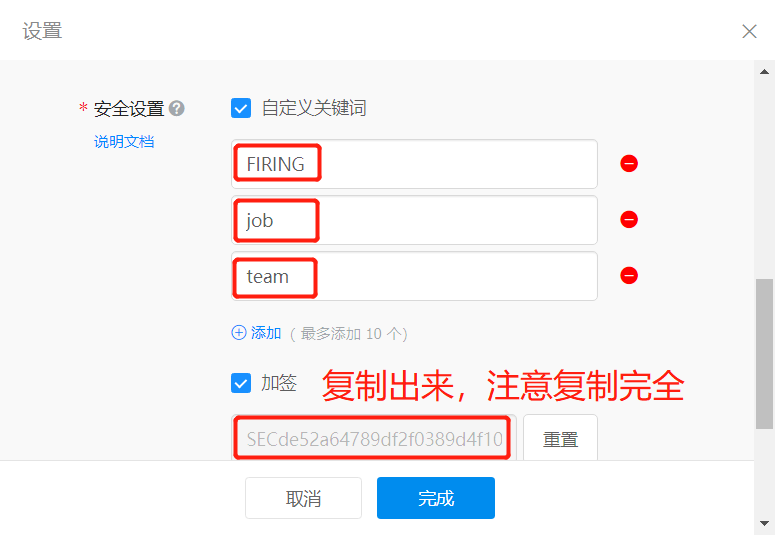
加签:是有过期时间的。要注意本地时间跟网络服务器进行同步
Webhook地址: https://oapi.dingtalk.com/robot/send?access_token=d3f1f891b45215fe63fdc9caddebf236746fd1d3642cfff2e79318e5339*****
加签Secret: SECde52a64789df2f0389d4f1089377a4b39f6908a80159ec36f86bfe77eff*****
Alertmanager 配置前的准备
需要额外安装钉钉报警的插件,从github官网上搜索即可
插件官网: https://github.com/timonwong/prometheus-webhook-dingtalk
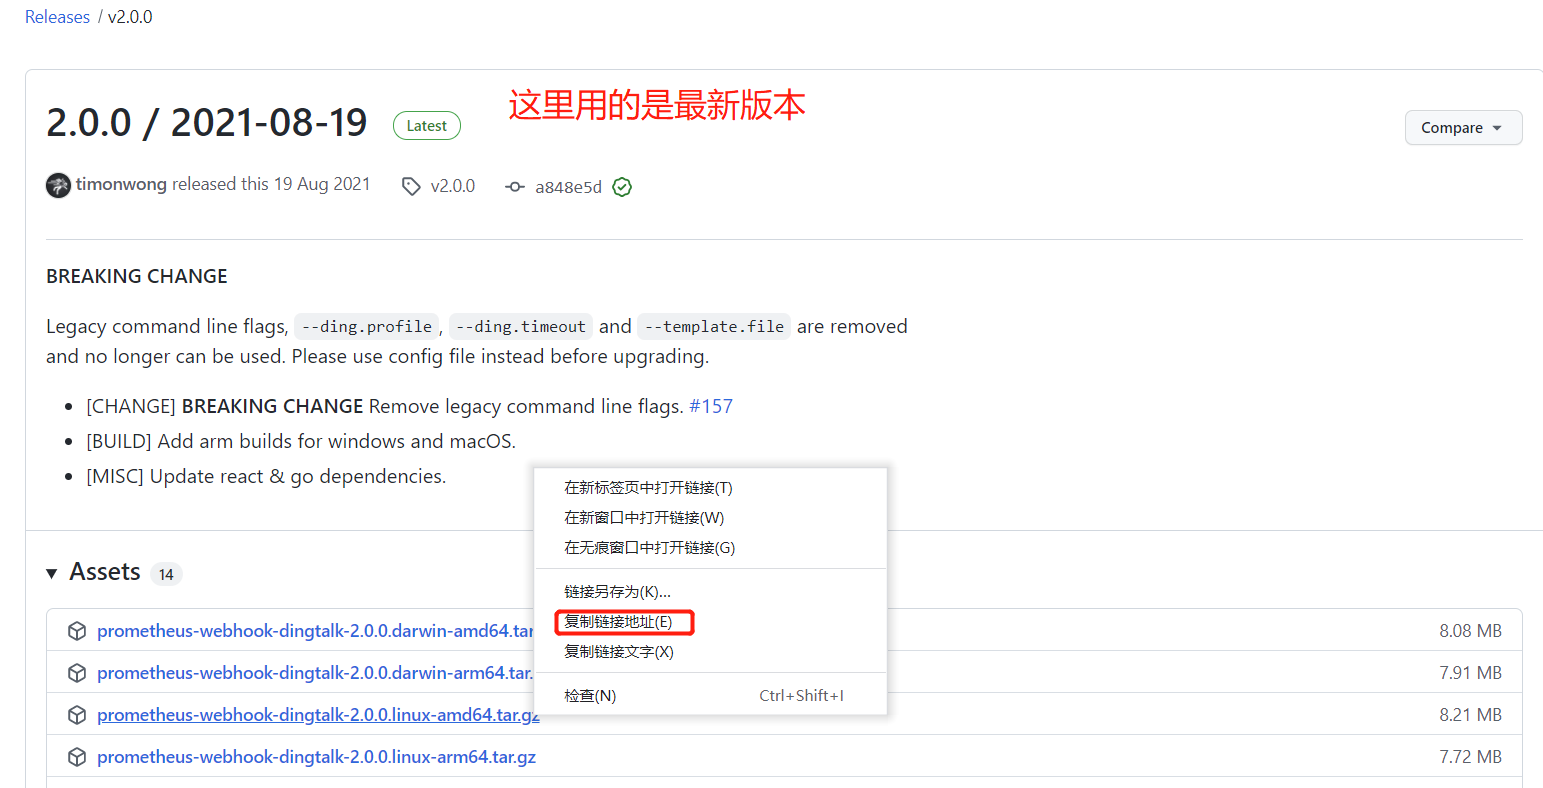
[root@prometheus alertmanager]# pwd
/usr/local/alertmanager
[root@prometheus alertmanager]# wget https://github.com/timonwong/prometheus-webhook-dingtalk/releases/download/v2.0.0/prometheus-webhook-dingtalk-2.0.0.linux-amd64.tar.gz
[root@prometheus alertmanager]# tar -xvzf prometheus-webhook-dingtalk-2.0.0.linux-amd64.tar.gz
[root@prometheus alertmanager]# cd prometheus-webhook-dingtalk-2.0.0.linux-amd64
[root@prometheus prometheus-webhook-dingtalk-2.0.0.linux-amd64]# cp config.example.yml config.yml
[root@prometheus prometheus-webhook-dingtalk-2.0.0.linux-amd64]# vim config.yml
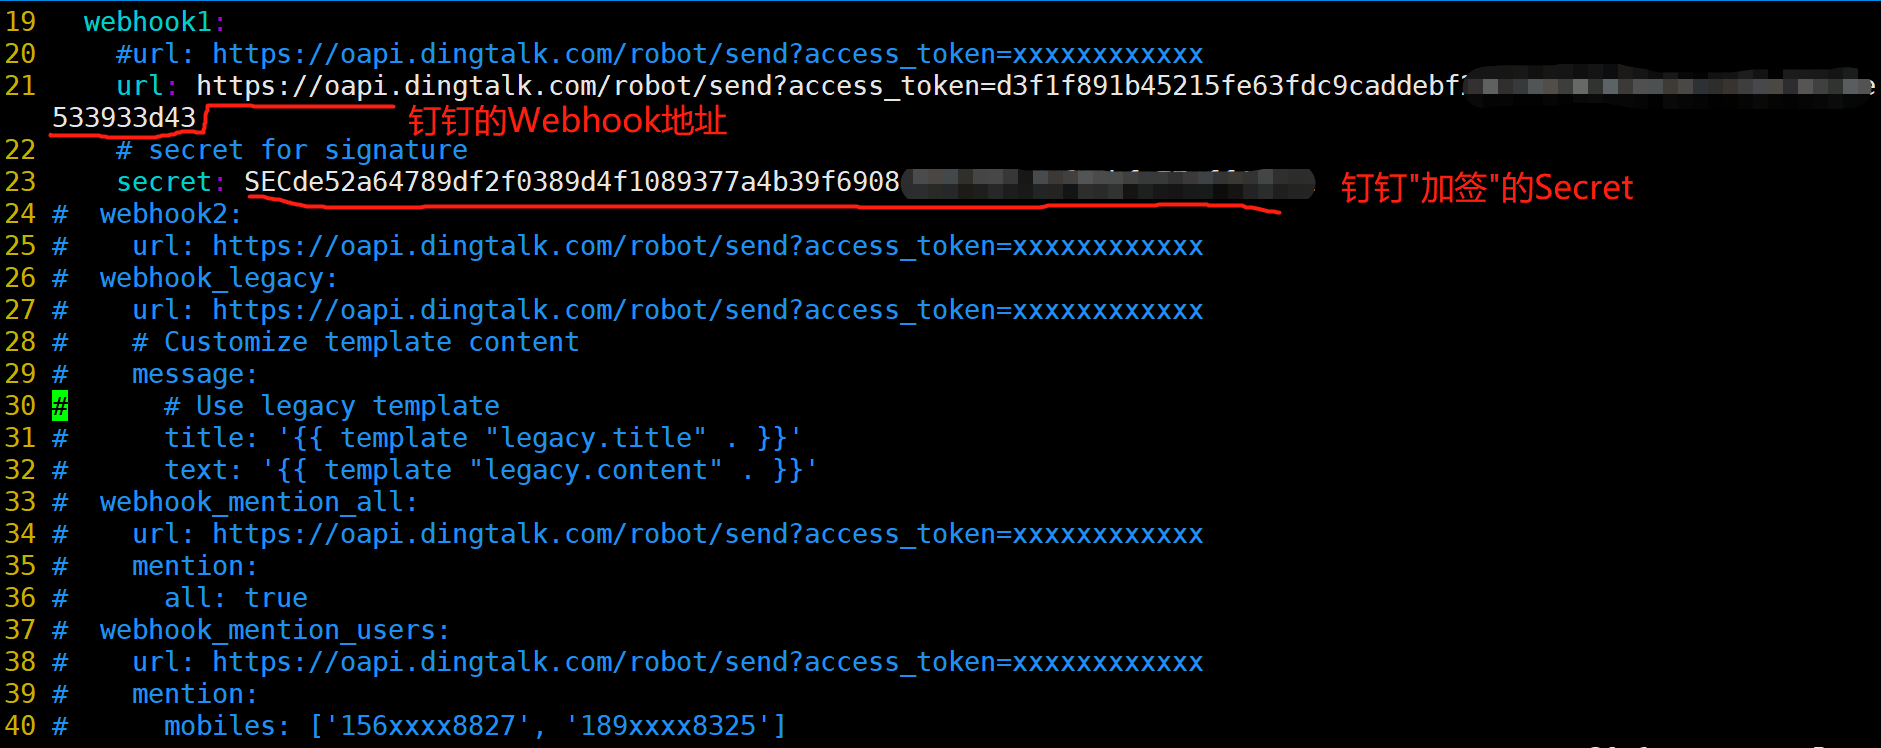
#启动
[root@prometheus prometheus-webhook-dingtalk-2.0.0.linux-amd64]# nohup ./prometheus-webhook-dingtalk --config.file=config.yml &   #回车即可,当前目录下会产生nohup.out的日志文件
[root@prometheus prometheus-webhook-dingtalk-2.0.0.linux-amd64]# tail -f nohup.out
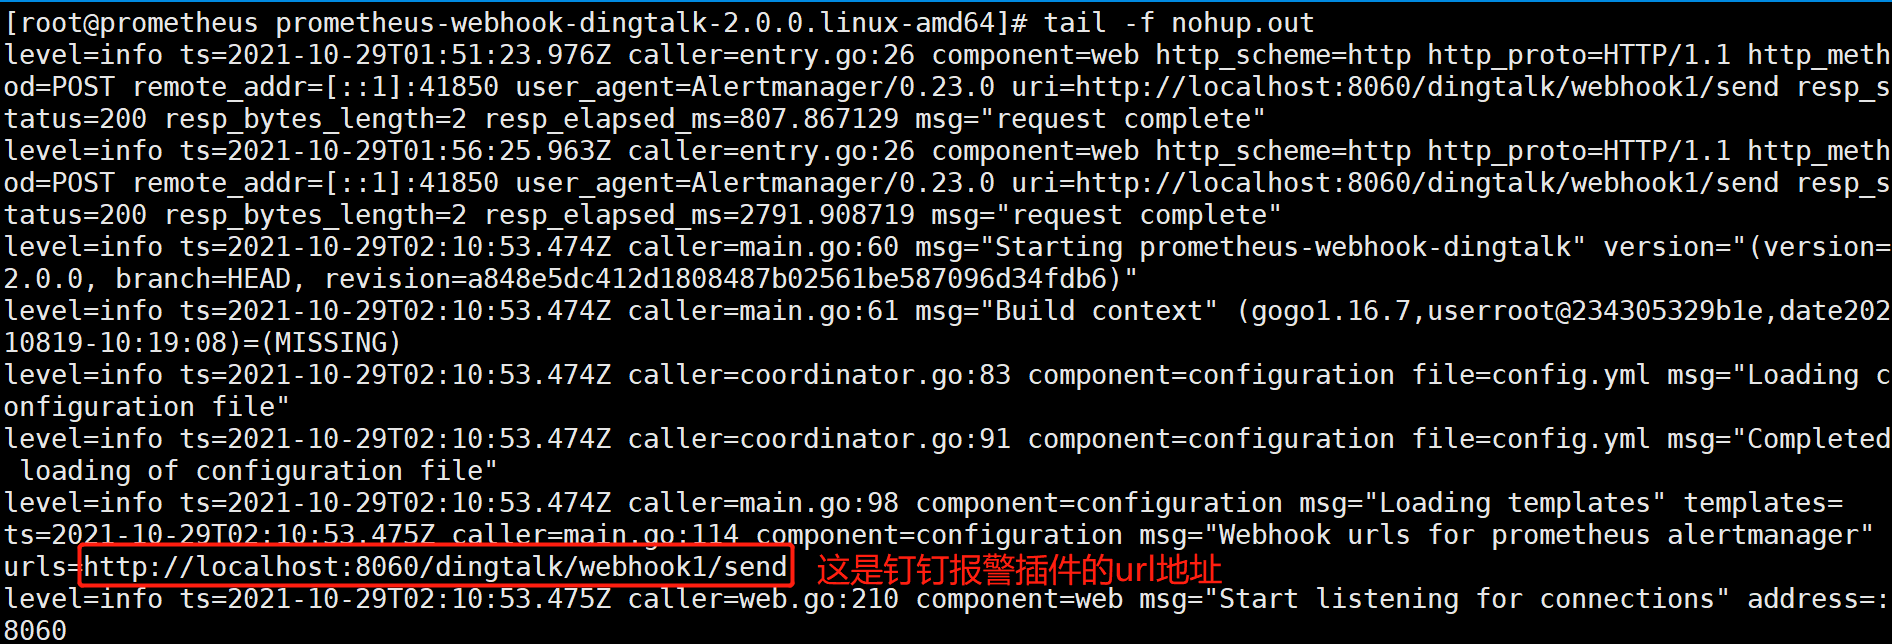
[root@prometheus alertmanager]# pwd
/usr/local/alertmanager
[root@prometheus alertmanager]# vim alertmanager.yml
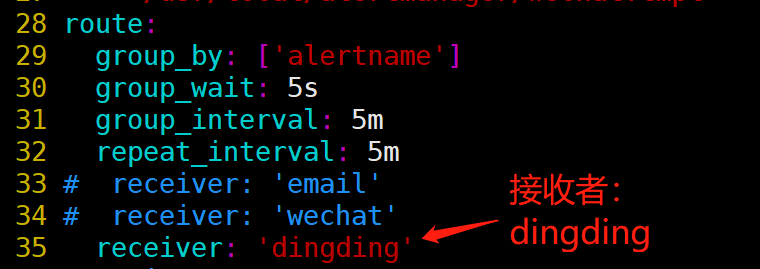
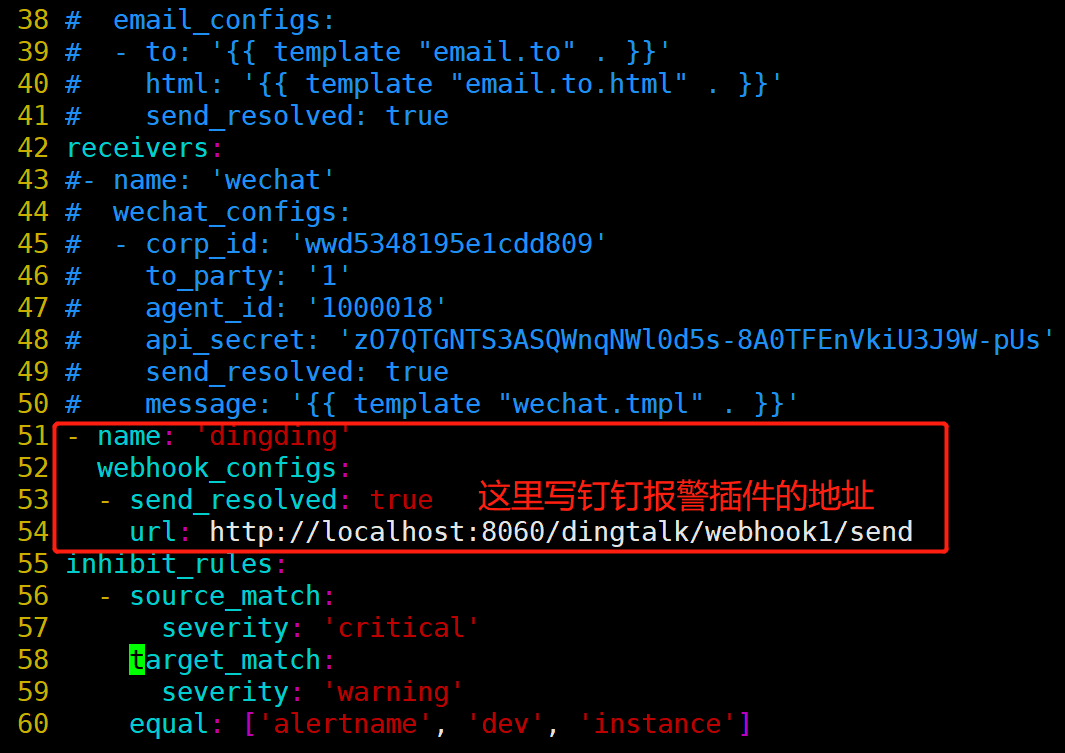

[root@prometheus alertmanager]# systemctl restart alertmanager
测试报警
[root@node1 ~]# systemctl stop node_exporter
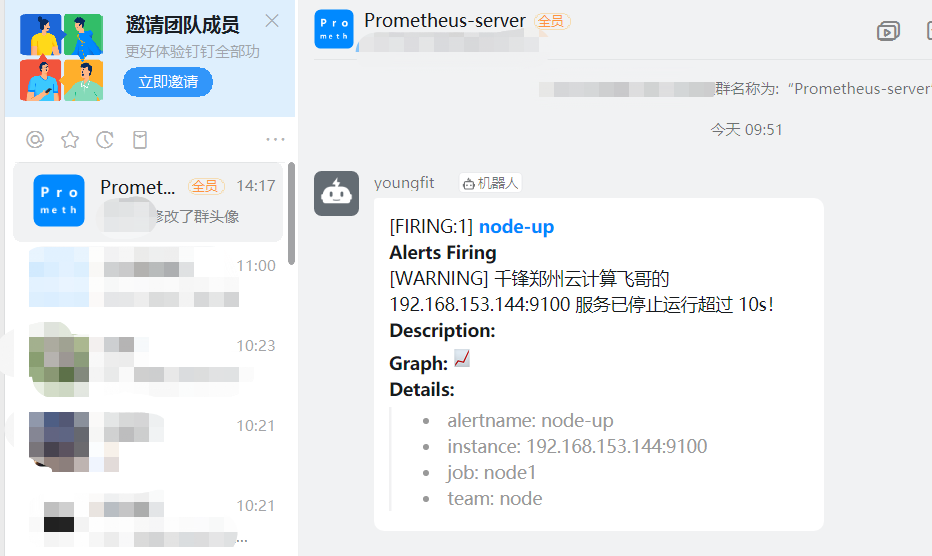
[root@node1 ~]# systemctl start node_exporter
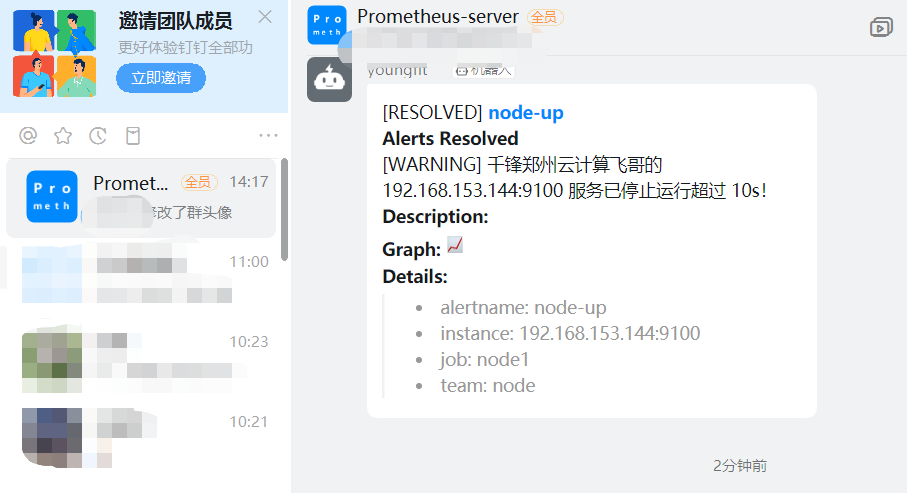
优化报警模板
钉钉报警插件默认使用的是最简单的模板
[root@prometheus-server prometheus-webhook-dingtalk-2.0.0.linux-amd64]# vim config.yml
自定义模板
[root@prometheus-server prometheus-webhook-dingtalk-2.0.0.linux-amd64]# cat ding.tmpl
{{ define "ding.link.content" }}
{{ if gt (len .Alerts.Firing) 0 -}}
告警列表:
-----------
{{ template "__text_alert_list" .Alerts.Firing }}
{{- end }}
{{ if gt (len .Alerts.Resolved) 0 -}}
恢复列表:
{{ template "__text_resolve_list" .Alerts.Resolved }}
{{- end }}
{{- end }}
[root@prometheus-server prometheus-webhook-dingtalk-2.0.0.linux-amd64]# vim config.yml


[root@node1 ~]# systemctl stop node_exporter
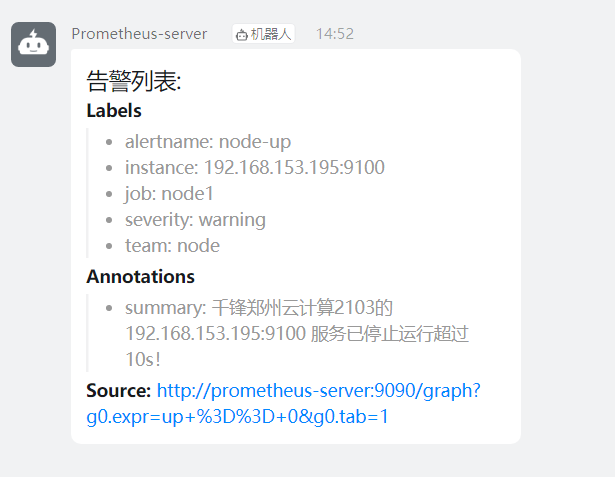
告警标签、路由、分组
标签:给每个监控项添加标签,记住“标签”,有大用!!!
[root@prometheus prometheus]# pwd
/usr/local/prometheus
[root@prometheus prometheus]# cat rules/host_monitor.yml
在定义报警规则的时候,每个监控,定义好一个可识别的标签,可以作为报警级别,比如
severity: error
severity: warning
severity: info
不同的报警级别,发送到不同的接收者;
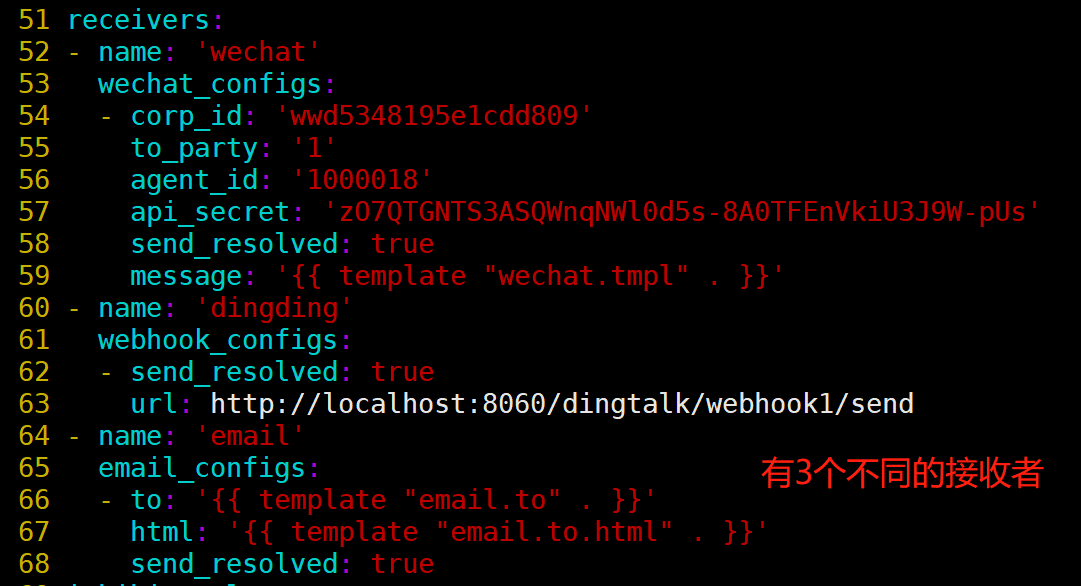
这里就以severity: warning为例,在应用场景中,也就是,不同的报警级别,发送到不同的接收者;

[root@prometheus alertmanager]# vim alertmanager.yml


[root@prometheus alertmanager]# systemctl restart alertmanager
说明:group by指定以什么标签进行分组,我这里指定的是severity;
默认接收者是dingding,如果报警信息中没有severity类的标签,匹配不到,会默认发送给dingdind接收者;
常规匹配到severity: warning,发送到wechat接收者;
正则匹配到severity: warning或者severity: critical,发送到email接收者;
接收者要定义好,按照如上配置,email,wechat接收者,会接收到报警消息;
测试报警
[root@node1 ~]# systemctl stop node_exporter
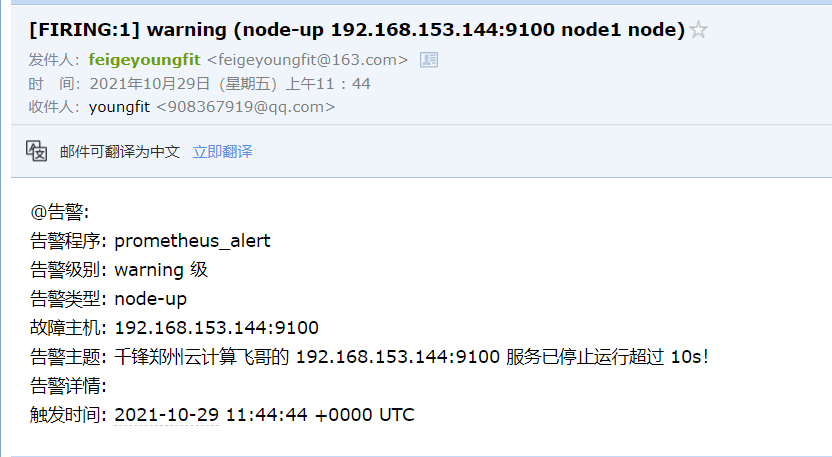
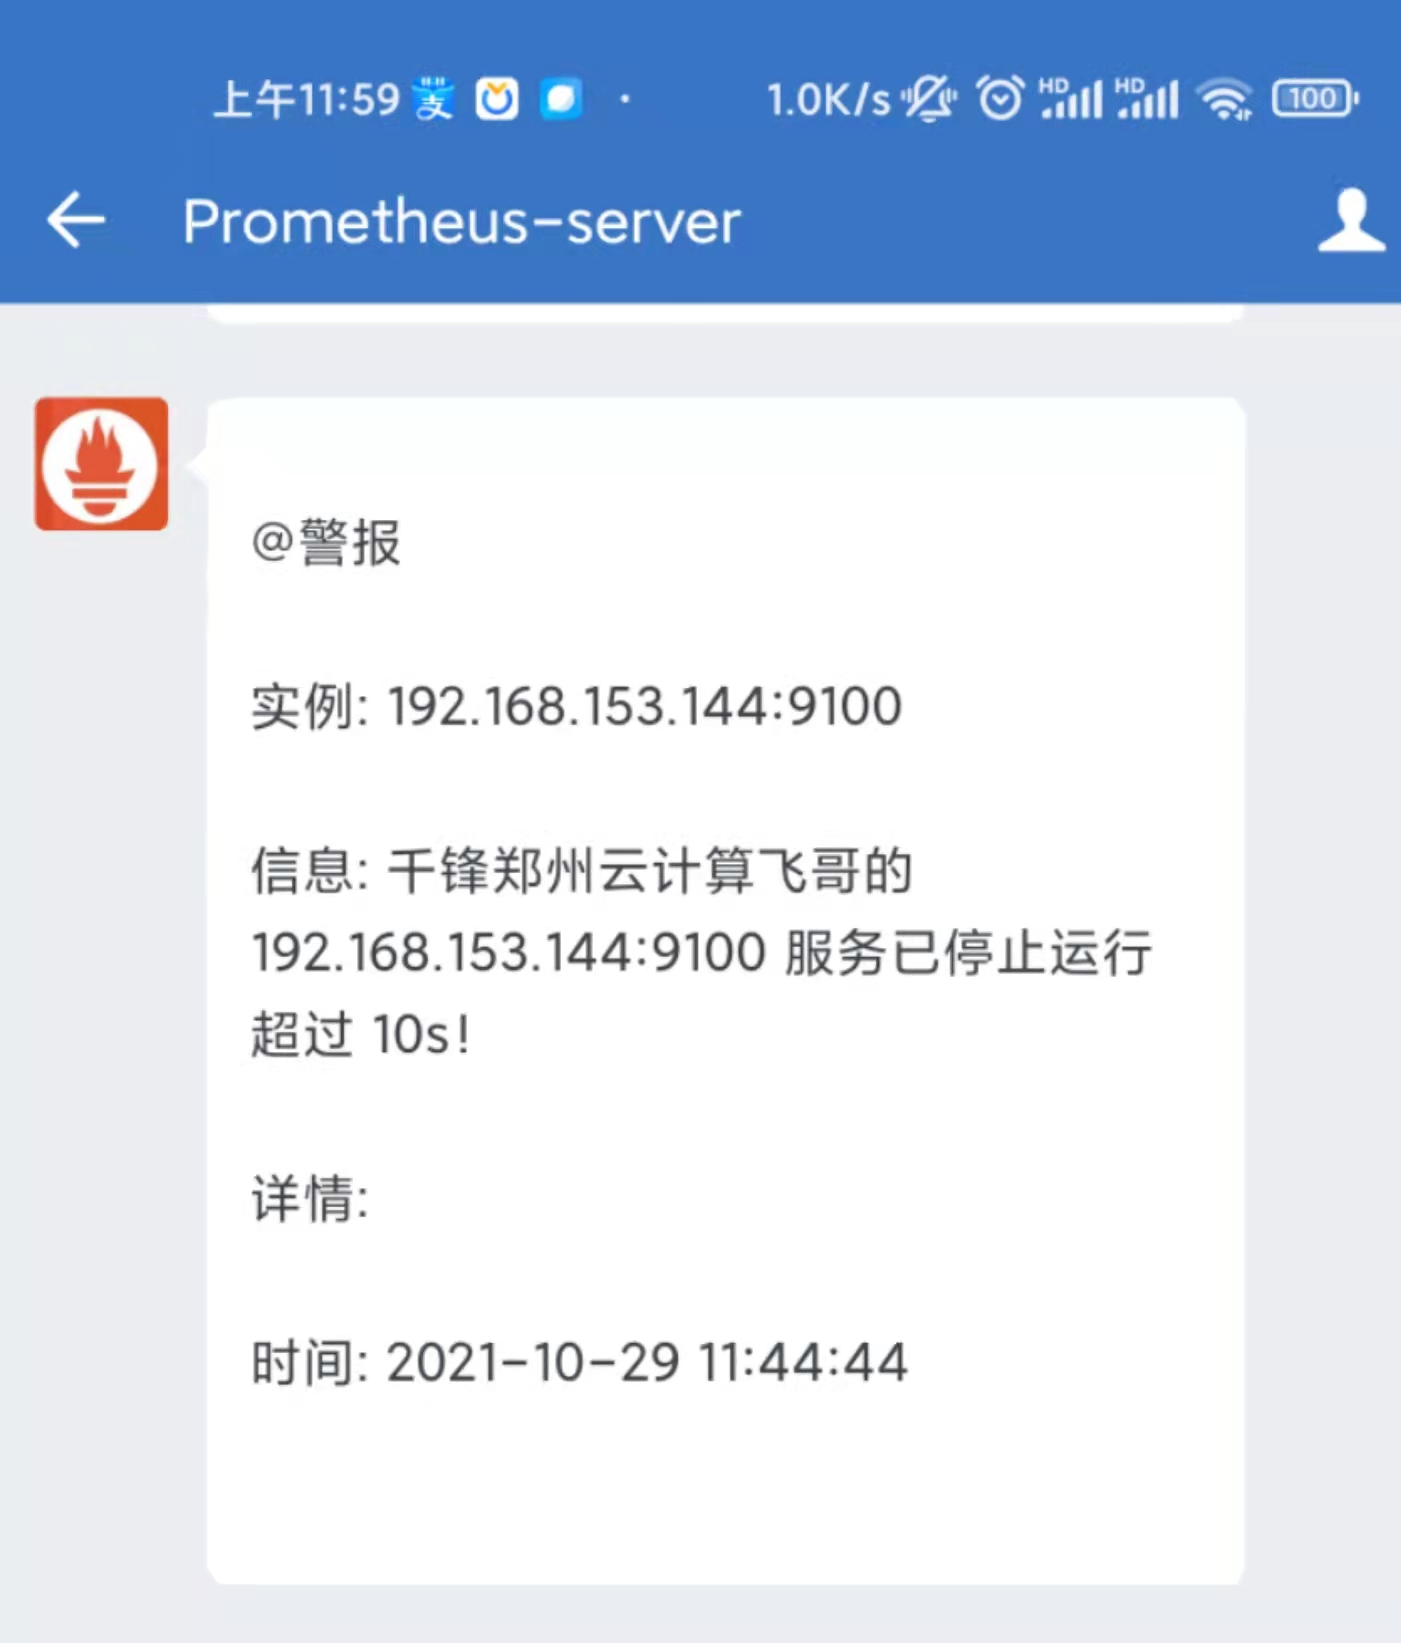
[root@node1 ~]# systemctl start node_exporter
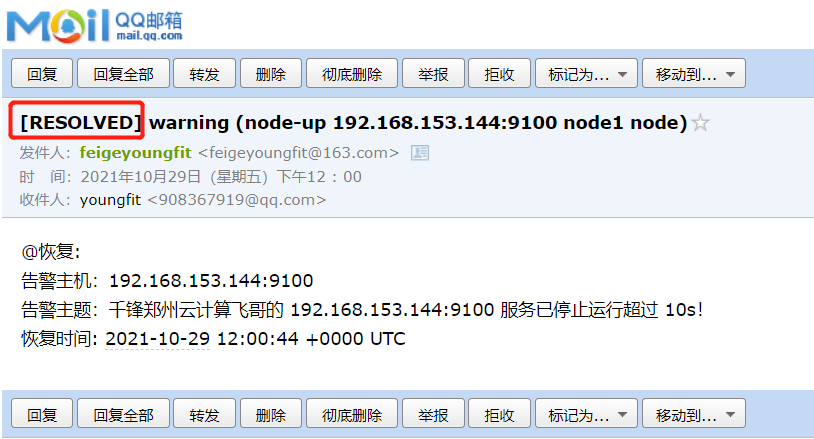
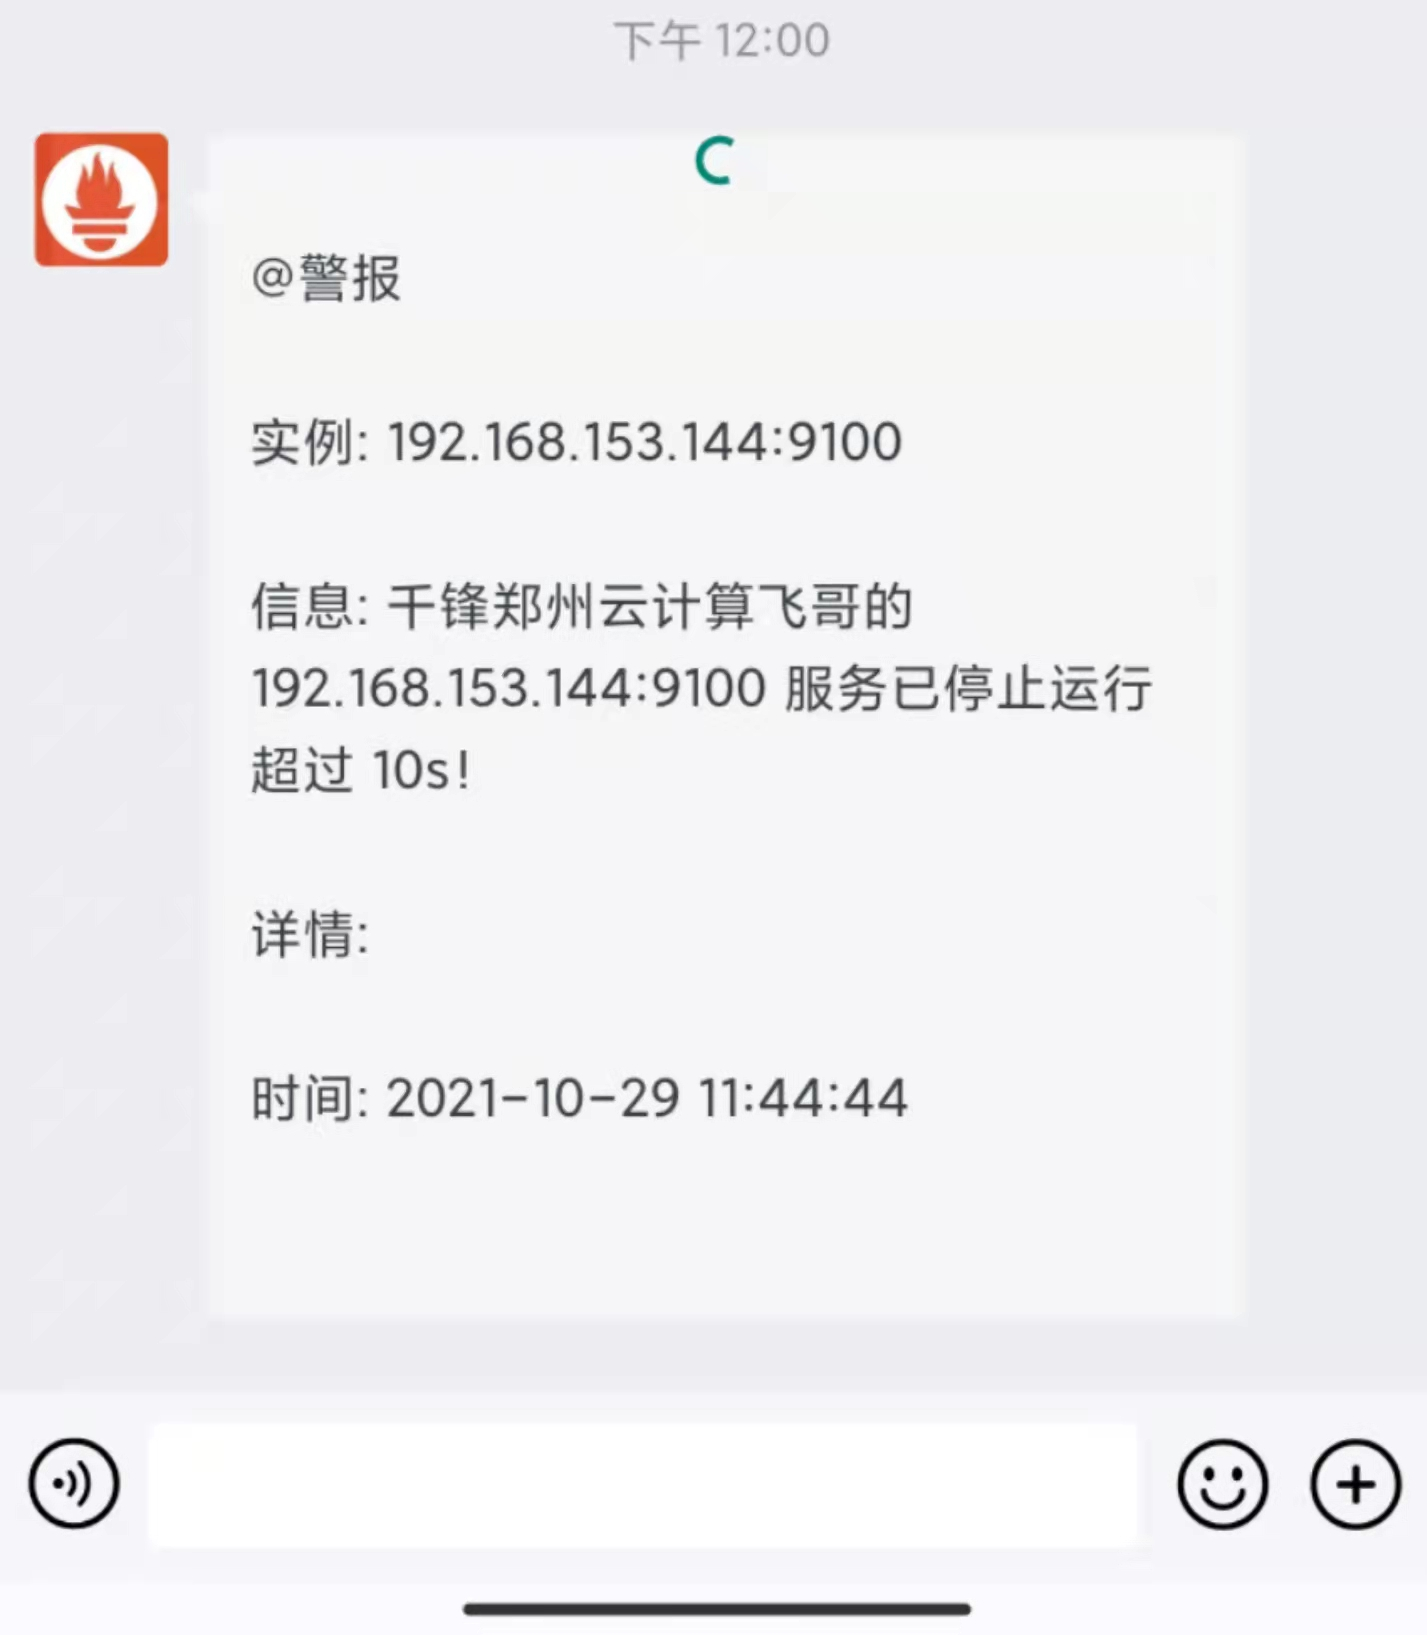
Mysql单机监控
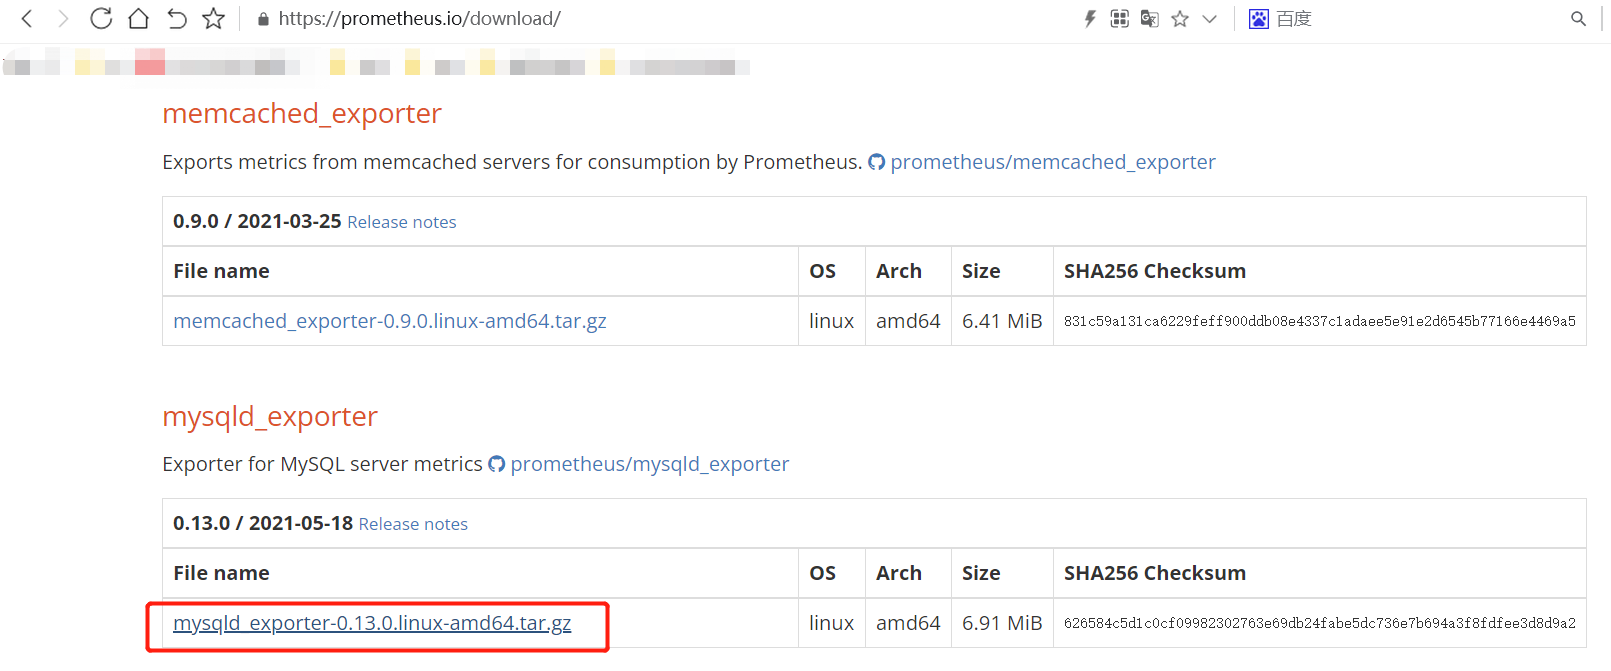
#node节点安装数据库
[root@node1 ~]# yum -y install mariadb-server
[root@node1 ~]# systemctl start mariadb
[root@node1 ~]# mysql
MariaDB [(none)]> grant select,process,super,replication client,reload on *.* to 'exporter'@'localhost' identified by '123456';

MariaDB [(none)]> flush privileges;

#被监控节点安装mysqld_exporter
[root@node1 ~]# wget https://github.com/prometheus/mysqld_exporter/releases/download/v0.13.0/mysqld_exporter-0.13.0.linux-amd64.tar.gz
[root@node1 ~]# tar -xvzf mysqld_exporter-0.13.0.linux-amd64.tar.gz  -C /usr/local/
[root@node1 ~]# cd /usr/local/mysqld_exporter-0.13.0.linux-amd64/
[root@node1 mysqld_exporter-0.13.0.linux-amd64]# vim $HOME/.my.cnf
[client]
host=localhost
user=exporter
password=123456
#socket=/tmp/mysql3306.sock
[root@node1 mysqld_exporter-0.13.0.linux-amd64]# nohup ./mysqld_exporter &

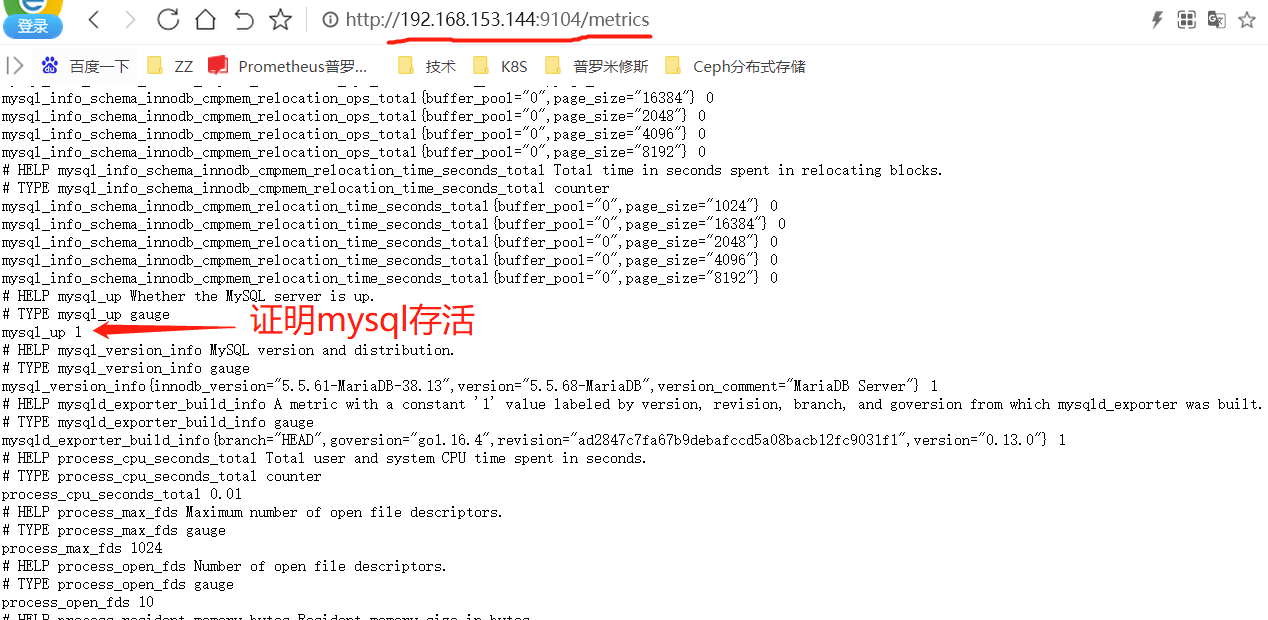
[root@prometheus prometheus]# pwd
/usr/local/prometheus
[root@prometheus prometheus]# vim prometheus.yml
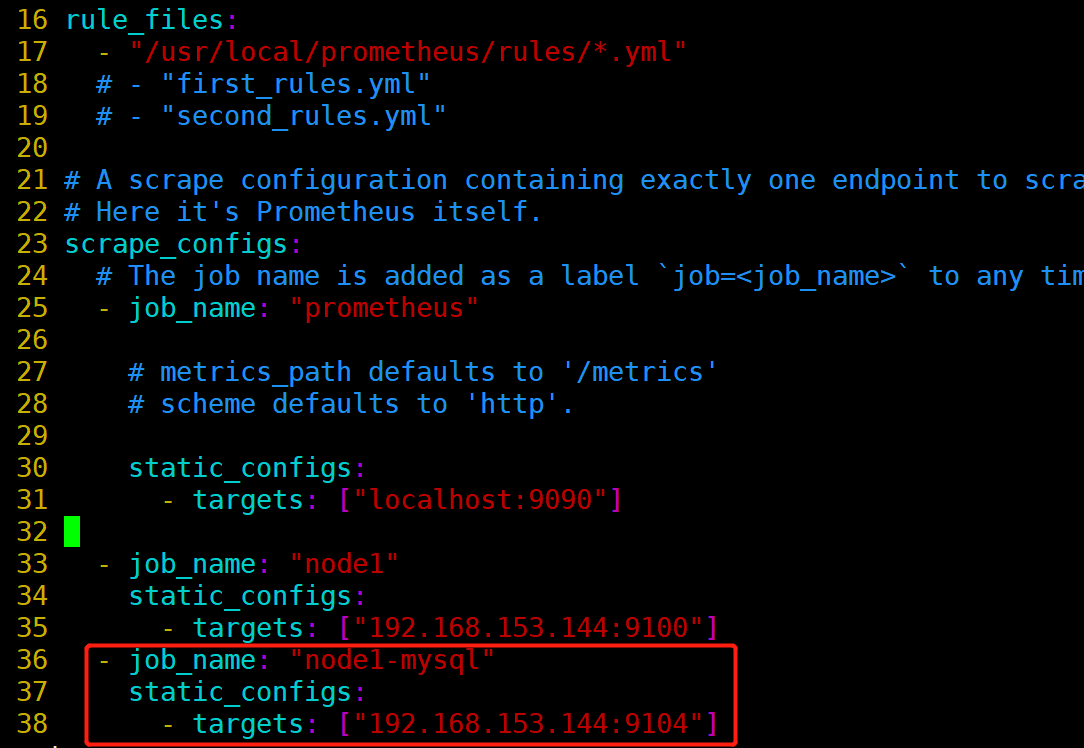
[root@prometheus prometheus]# systemctl restart prometheus
配置grafana
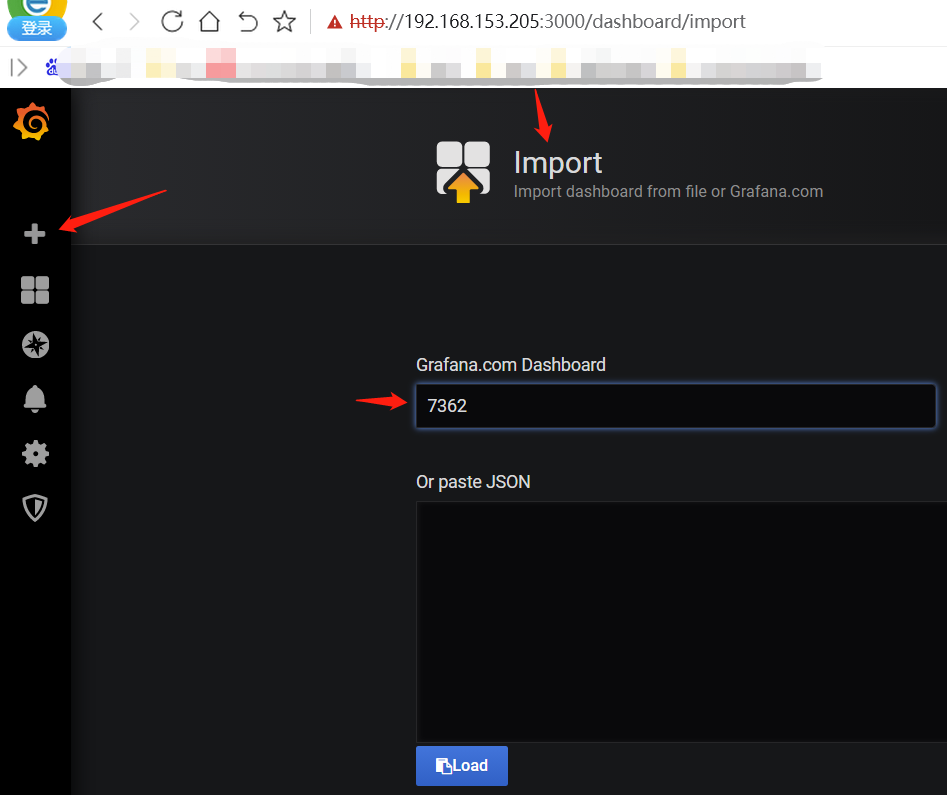
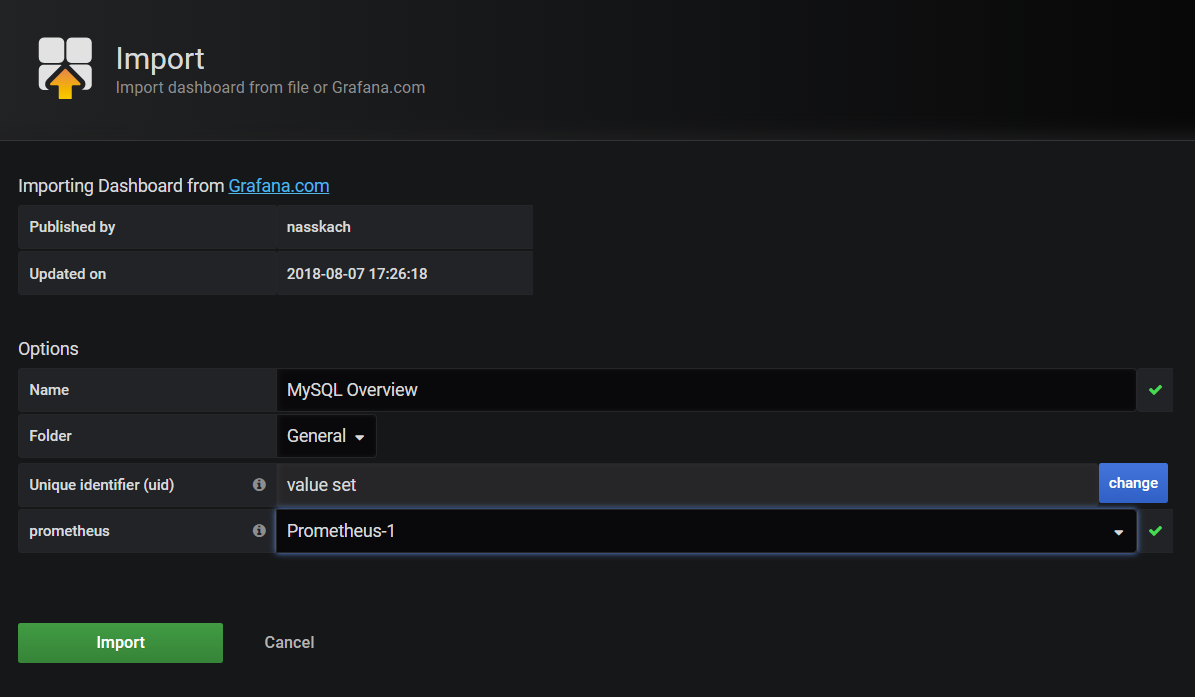
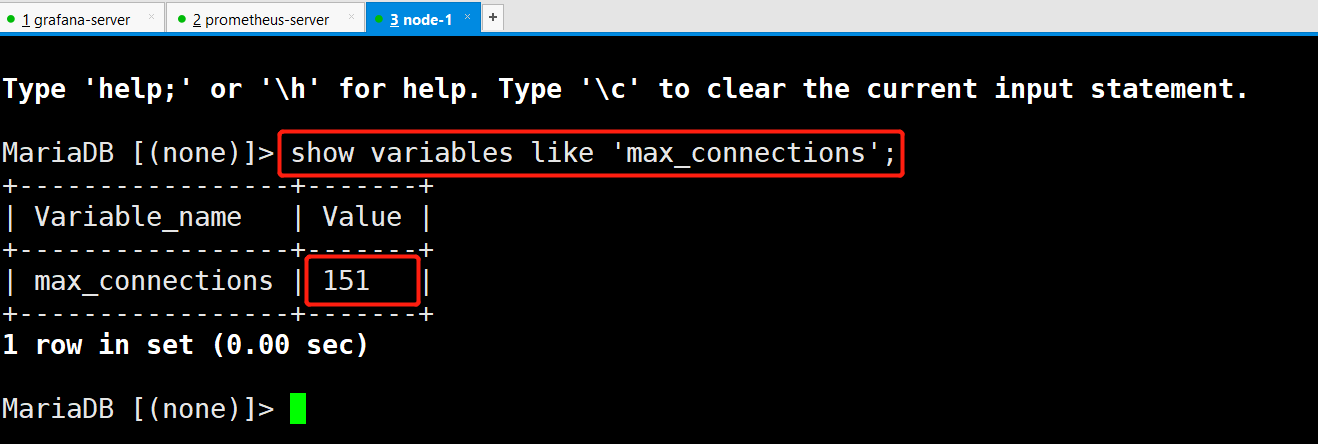
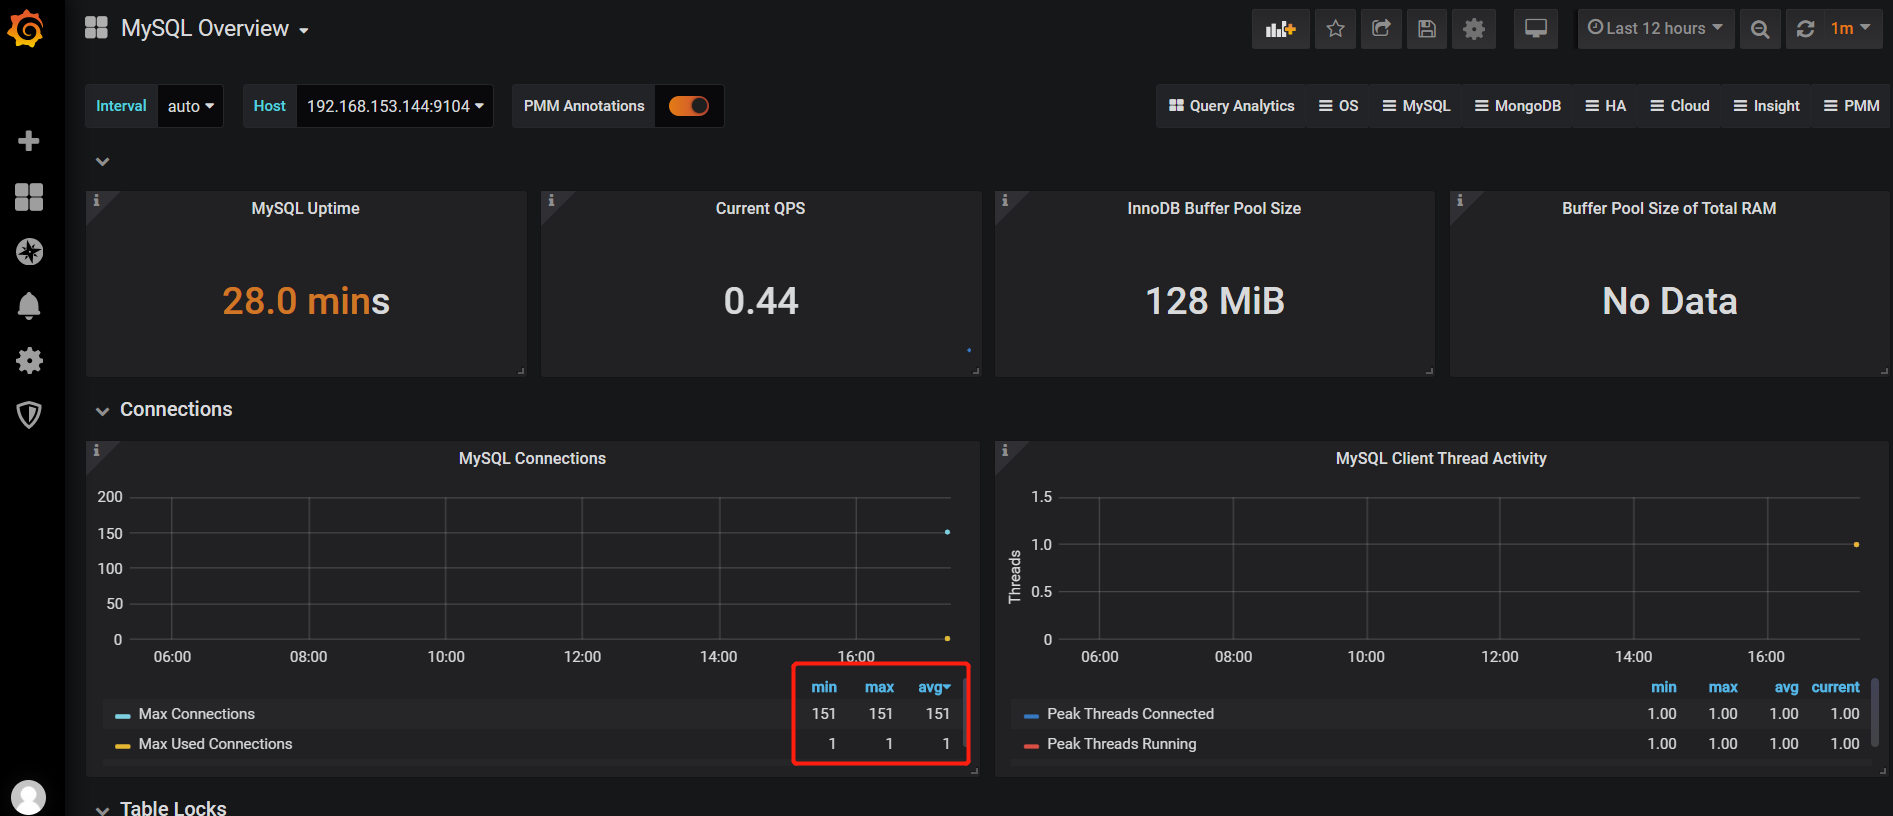
Mysql 主从监控
Mysql主从复制搭建
搭建过程: 略
主库从库,都需要安装mysqld_exporter,配置好配置文件之后,启动;

[root@node1 ~]# cat /root/.my.cnf
[client]
host=localhost
user=exporter
password=FeiGe@2021
#socket=/tmp/mysql3306.sock
[root@node2 ~]# cat /root/.my.cnf
[client]
host=localhost
user=exporter
password=FeiGe@2021
#socket=/tmp/mysql3306.sock
从库访问查看
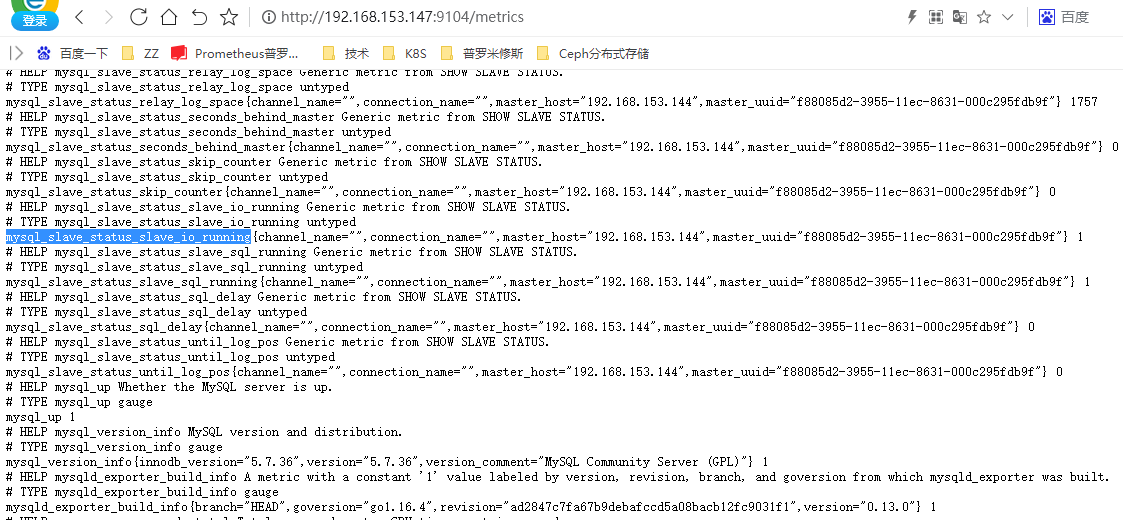
[root@prometheus prometheus]# vim prometheus.yml
  - job_name: "node2-mysql"
    static_configs:
      - targets: ["192.168.153.147:9104"]

[root@prometheus prometheus]# systemctl restart prometheus
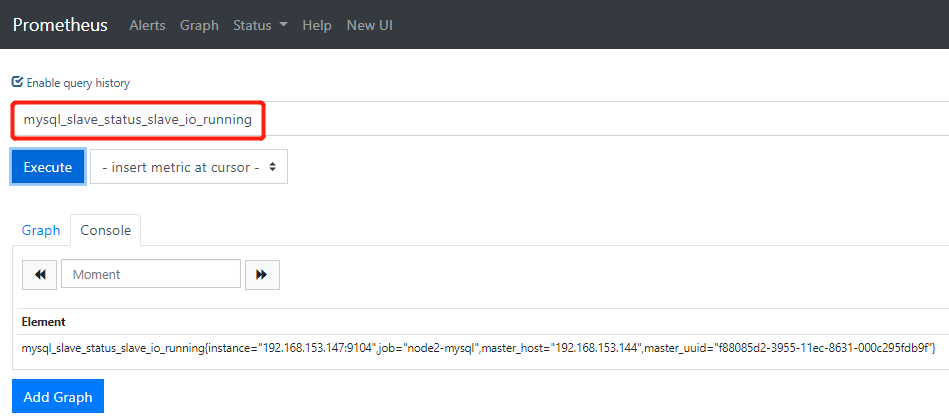
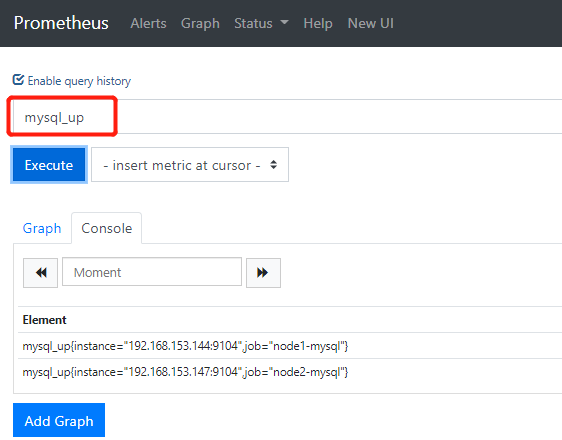
标签查询
mysql_slave_status_slave_io_running
mysql_up
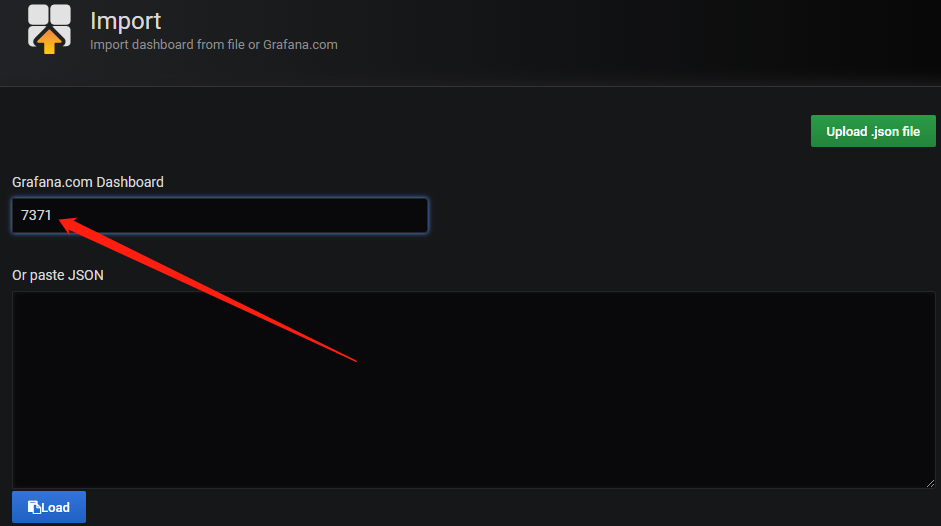
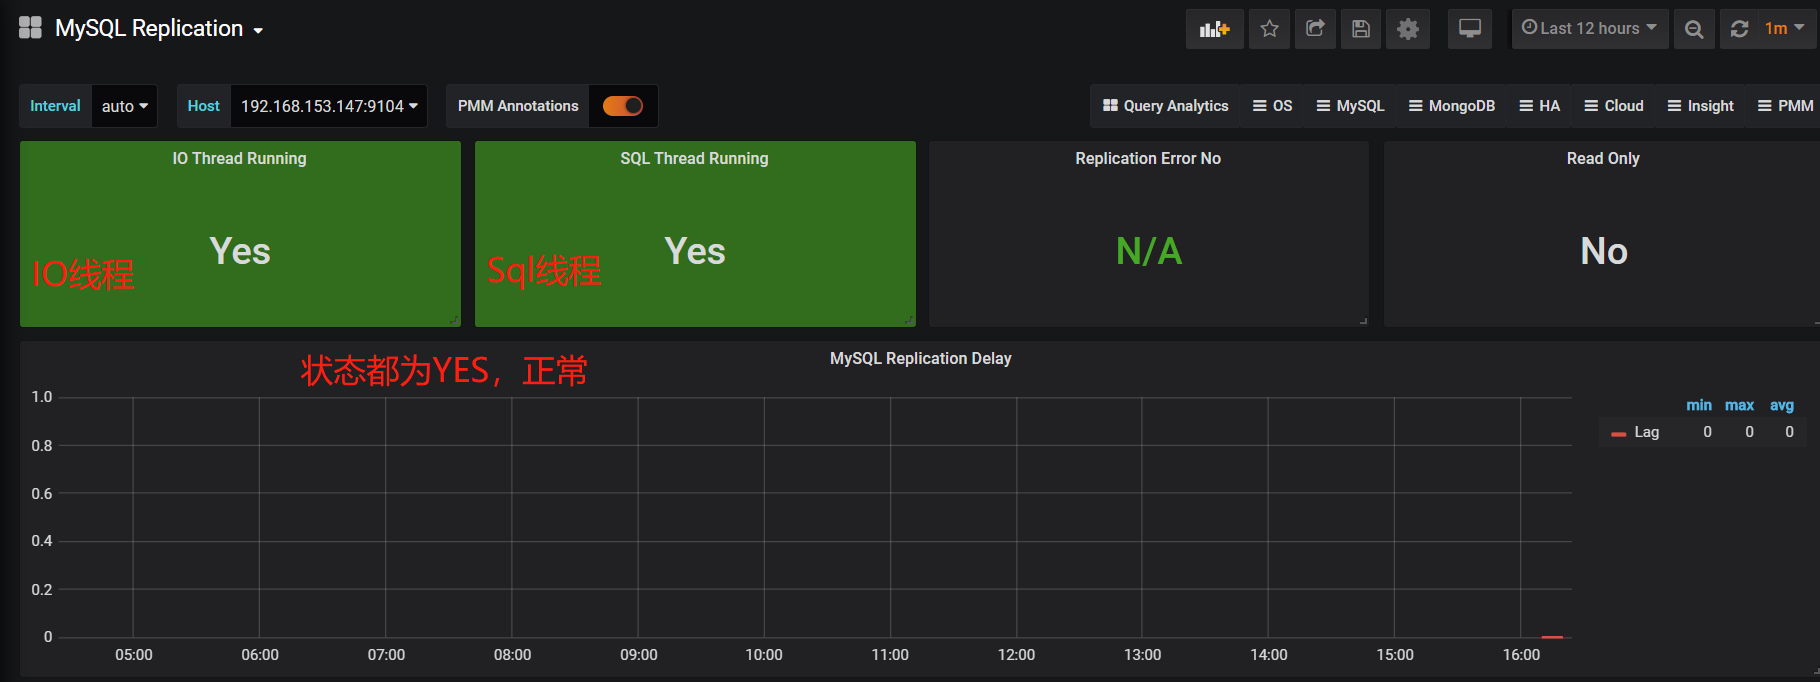
主从模板
7371
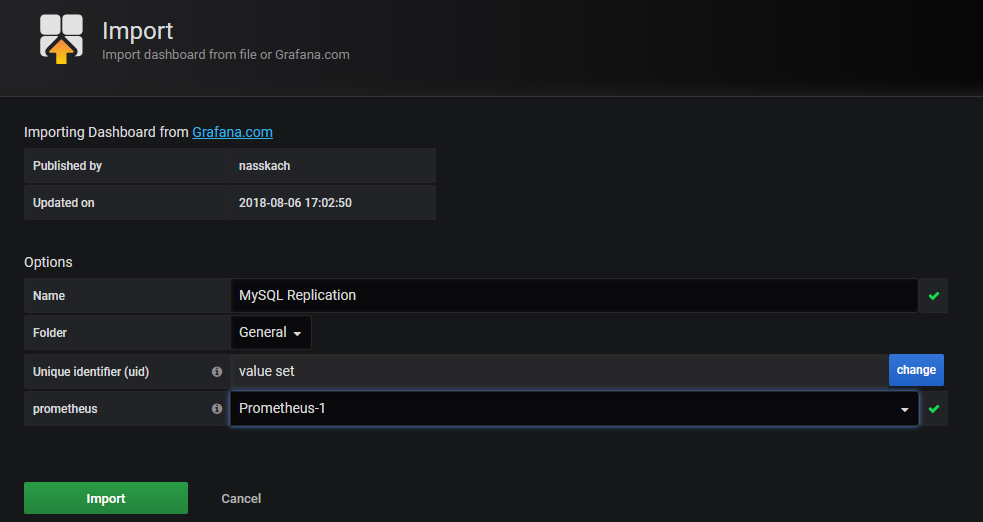
添加 MySQL 告警规则
[root@prometheus prometheus]# pwd
/usr/local/prometheus
[root@prometheus prometheus]# cat rules/mysql.yml
groups:
- name: Mysql-rules
  rules:
  - alert: Mysql status
    expr: up == 0
    for: 5s
    labels:
      severity: error
    annotations:
      summary: "千锋郑州云计算飞哥的 {{ $labels.instance }} 的Mysql已停止运行!"
      description: "Mysql数据库宕机,请检查"

  - alert: Mysql slave io thread status
    expr: mysql_slave_status_slave_io_running == 0
    for: 5s
    labels:
      severity: error
    annotations:
      summary: "千锋郑州云计算飞哥的 {{ $labels.instance }} Mysql slave io thread已停止"
      description: "Mysql主从IO线程故障,请检测"

  - alert: Mysql slave sql thread status
    expr: mysql_slave_status_slave_sql_running == 0
    for: 5s
    labels:
      severity: error
    annotations:
      summary: "千锋郑州云计算飞哥的 {{ $labels.instance }} Mysql slave sql thread已停止"
      description: "Mysql主从sql线程故障,请检测"

[root@prometheus local]# pwd
/usr/local
[root@prometheus local]# vim alertmanager/alertmanager.yml


[root@prometheus-server prometheus]# systemctl restart alertmanager prometheus
测试报警
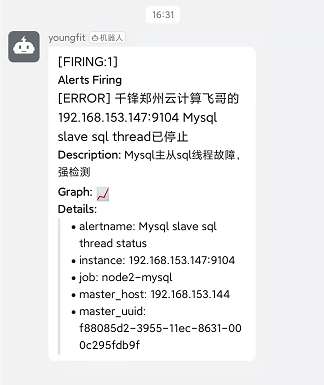
停止从库的sql线程观察
[root@node2 ~]# mysql -uroot -p'FeiGe@2021'
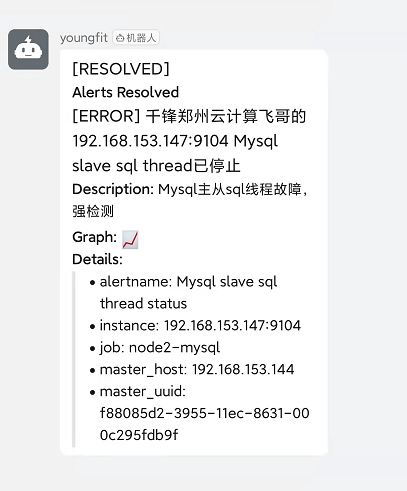
mysql> stop slave sql_thread;
mysql> start slave sql_thread;
Redis 监控
安装redis
[root@node1 ~]# vim /etc/redis.conf
bind 0.0.0.0
[root@node1 ~]# systemctl start redis
需要下载redis_exporter
https://github.com/oliver006/redis_exporter/releases/tag/v1.29.0
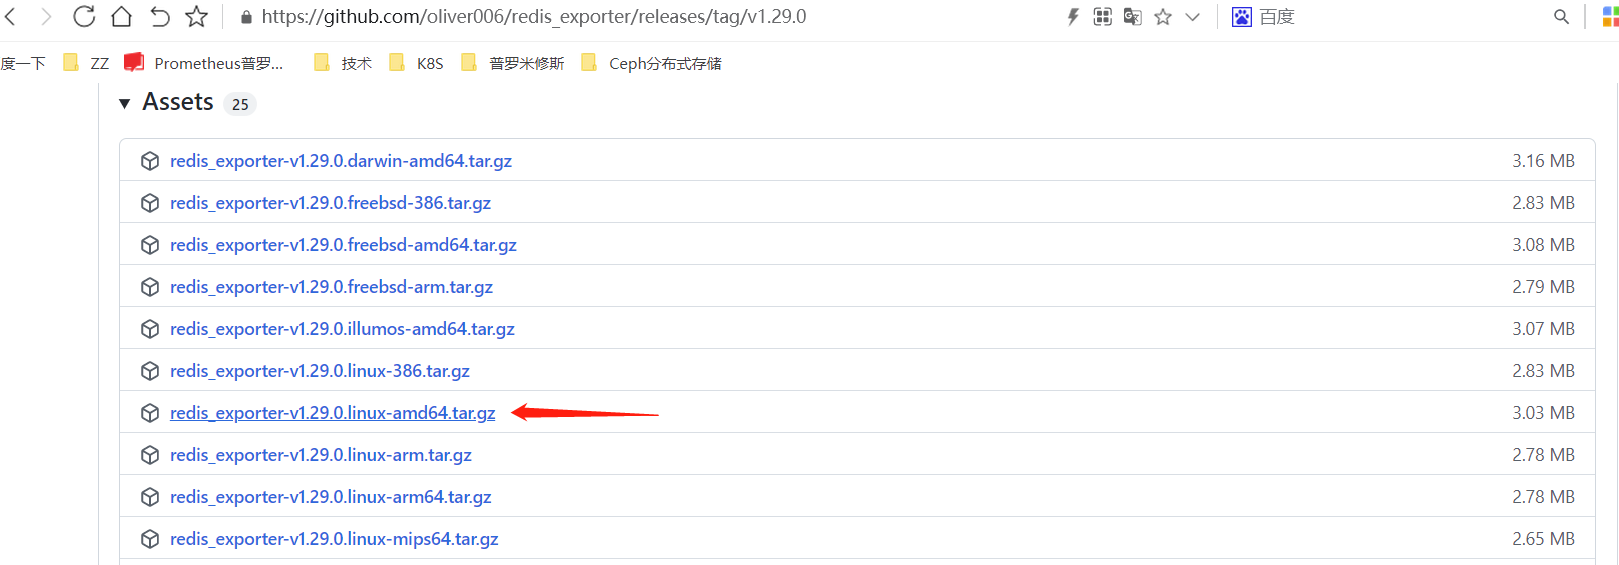
[root@node1 ~]# wget https://github.com/oliver006/redis_exporter/releases/download/v1.29.0/redis_exporter-v1.29.0.linux-amd64.tar.gz
[root@node1 ~]# cd /usr/local/redis_exporter-v1.29.0.linux-amd64/
解压后只有一个二进制程序就叫 redis_exporter 通过 -h 可以获取到帮助信息,
下面列出一 些常用的选项:
-redis.addr:指明一个或多个 Redis 节点的地址,多个节点使用逗号分隔,默认为redis://localhost:6379
-redis.password:验证 Redis 时使用的密码;
-redis.file:包含一个或多个 redis 节点的文件路径,每行一个节点,此选项与
-redis.addr 互 斥。-web.listen-address:监听的地址和端口,默认为 0.0.0.0:9121
[root@node1 redis_exporter-v1.29.0.linux-amd64]# nohup ./redis_exporter -redis.addr 192.168.153.144:6379 &

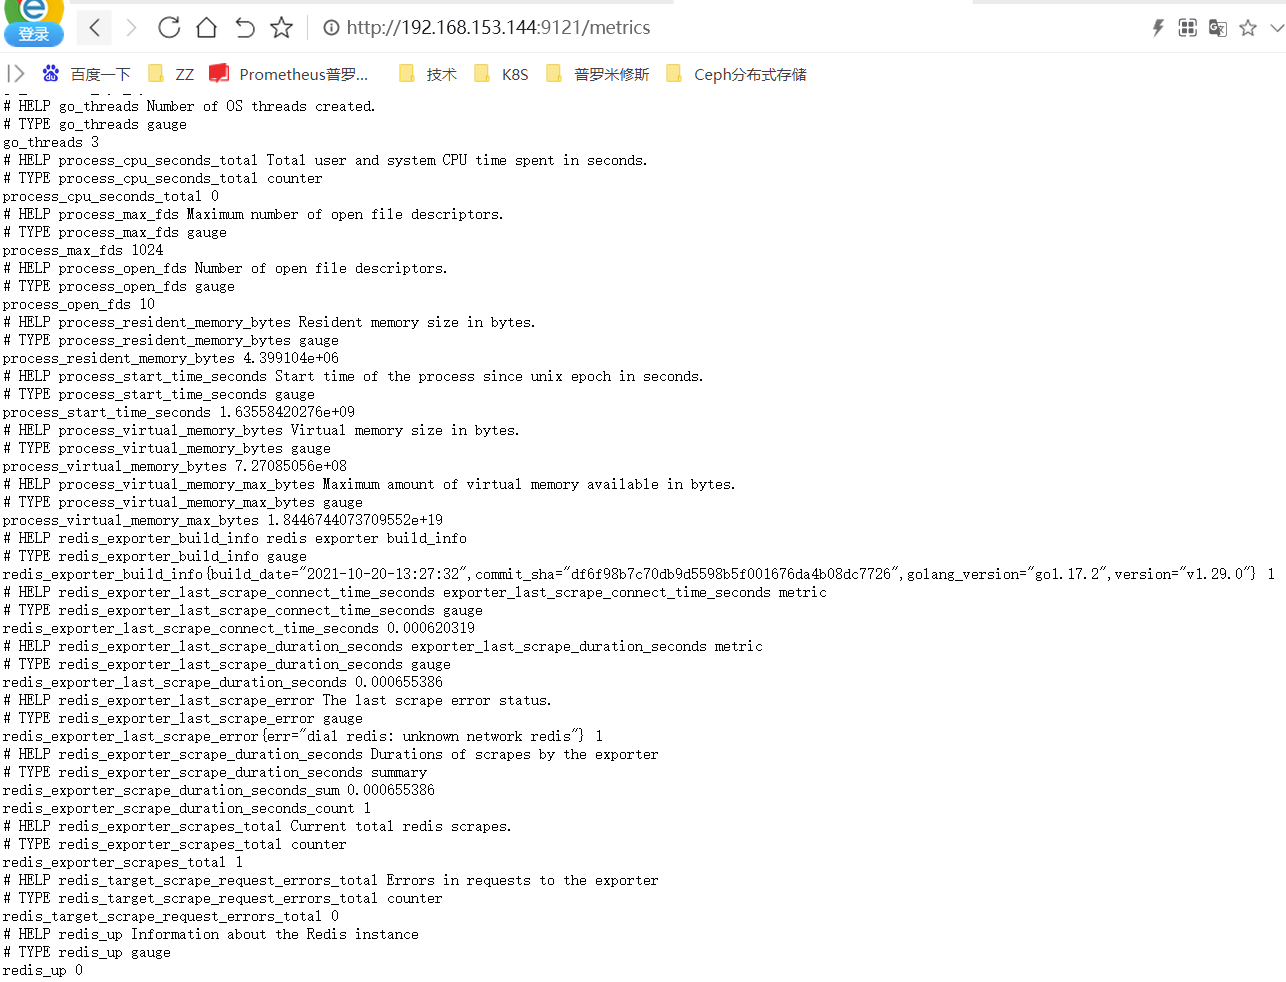
修改prometheus文件
[root@prometheus local]# pwd
/usr/local
[root@prometheus local]# vim alertmanager/alertmanager.yml
  - job_name: "node1-redis"
    static_configs:
      - targets: ["192.168.153.144:9121"]
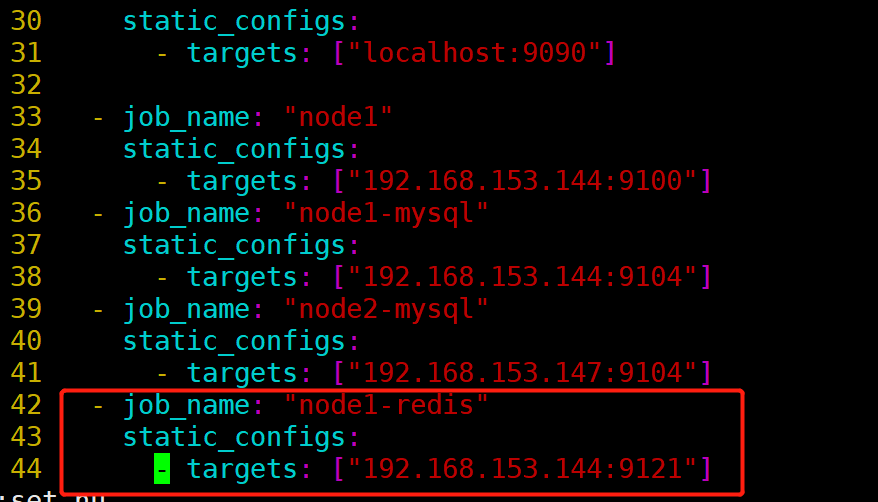

[root@prometheus local]# systemctl restart prometheus
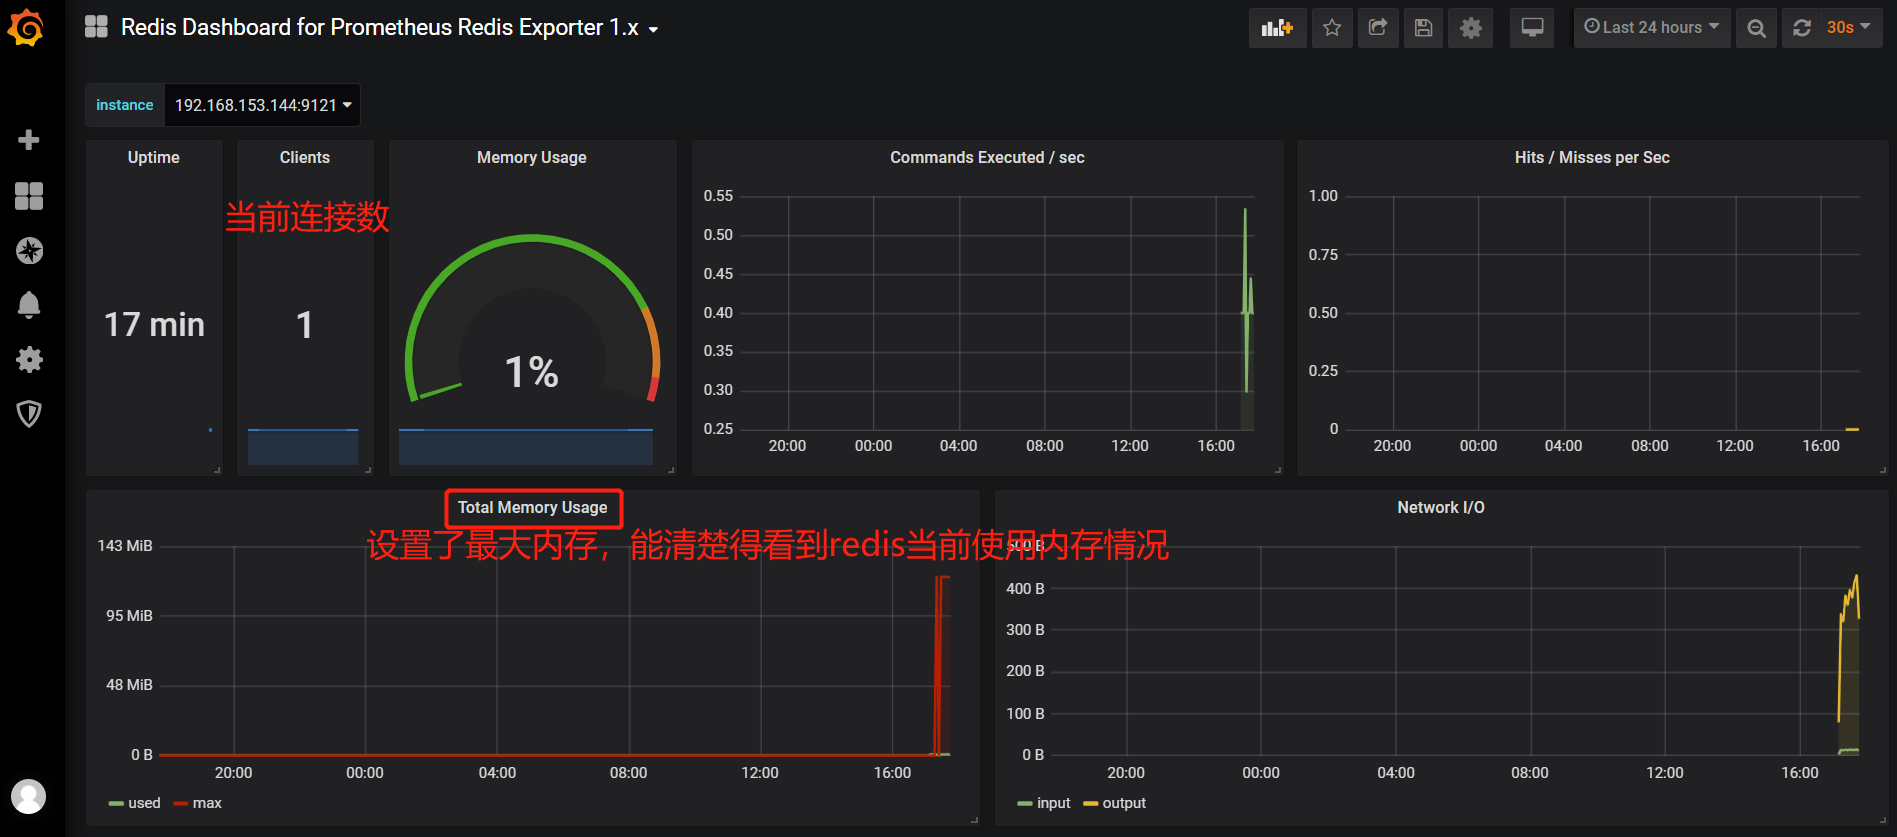
这里注意:如果 redis 没有配置内存 最大可用值
redis设置最大使用内存
[root@node1 local]# redis-cli
127.0.0.1:6379> CONFIG GET maxmemory
1) "maxmemory"
2) "0"
[root@node1 local]# vim /etc/redis.conf
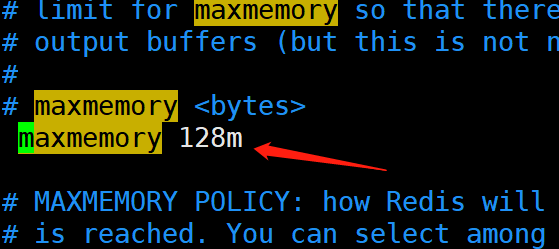
[root@node1 local]# systemctl restart redis
导入redis监控模板
763
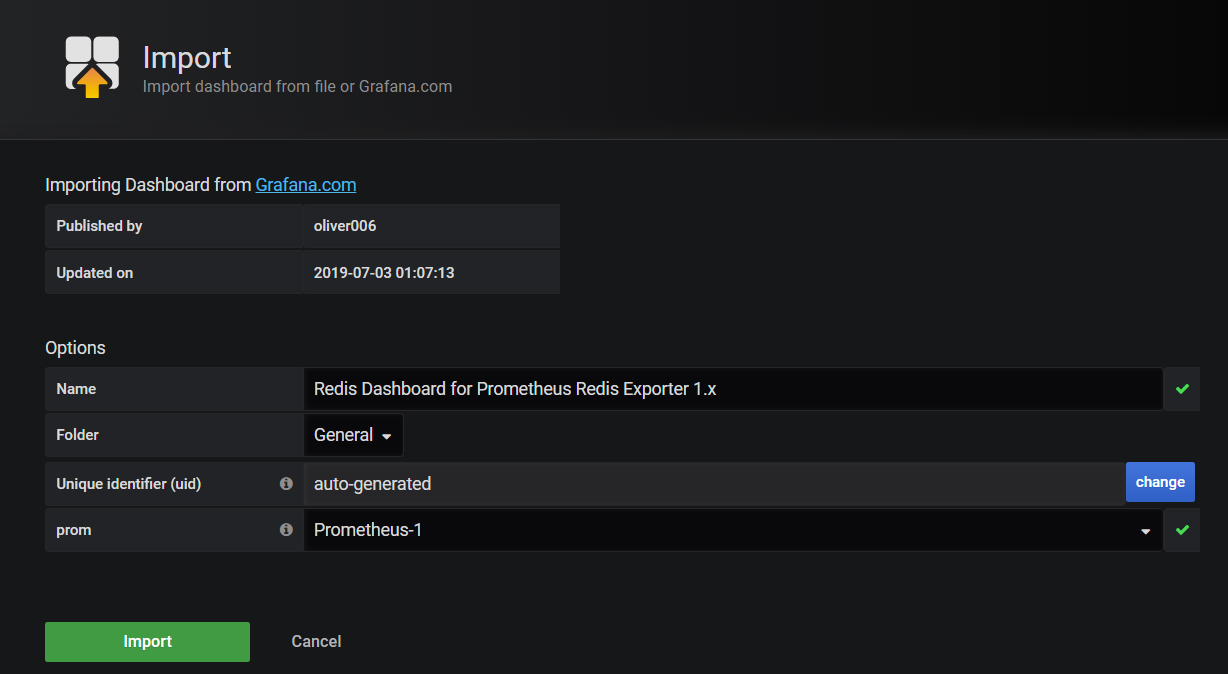
配置告警规则
#我这里就监控一下redis的客户端连接数;
[root@prometheus local]# cat prometheus/rules/redis.yml
groups:
- name: redis_instance
  rules:
#redis实例宕机 危险等级:5
  - alert: RedisInstanceDown
    expr: redis_up == 0
    for: 5s
    labels:
      severity: error
    annotations:
      summary: "Redis down (export {{ $labels.instance }})"
      description: "Redis instance is down\n VALUE = {{ $value }}\n INSTANCE: {{ $labels.addr }} {{ $labels.alias}}"
# redis 连接数过多 危险等级: 3
  - alert: RedisTooManyConnections
    expr: redis_connected_clients > 2 #设置为大于2就报警,为了看测试效果
    for: 5s
    labels:
      severity: warning
    annotations:
      summary: "Too many connections (export {{ $labels.instance }})"
      description: "Redis instance has too many connections\n VALUE = {{ $value }}\n INSTANCE: {{ $labels.addr }} {{ $
labels.alias}}"
[root@prometheus local]# systemctl restart prometheus
测试报警
将连接数搞成大于2

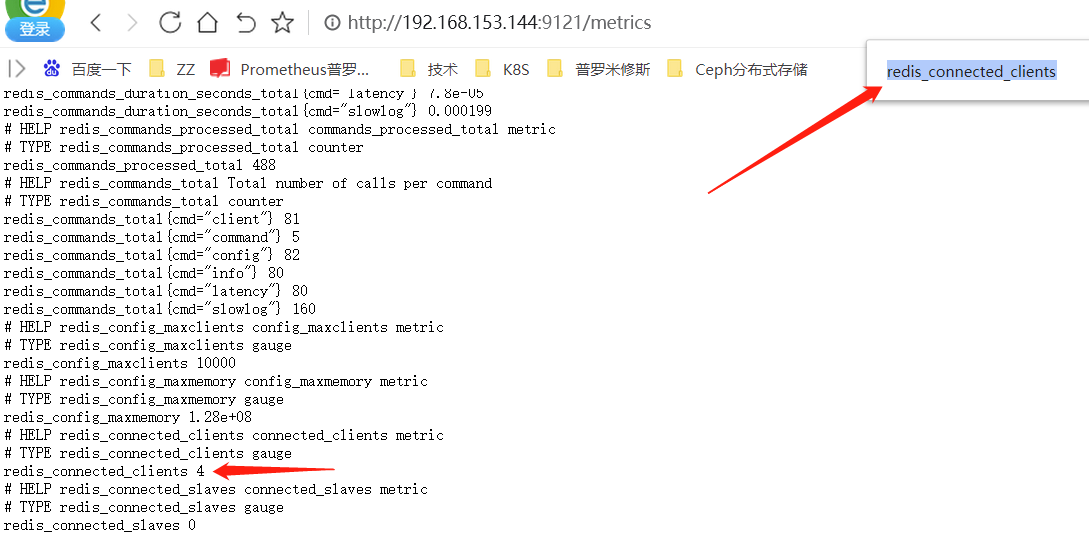
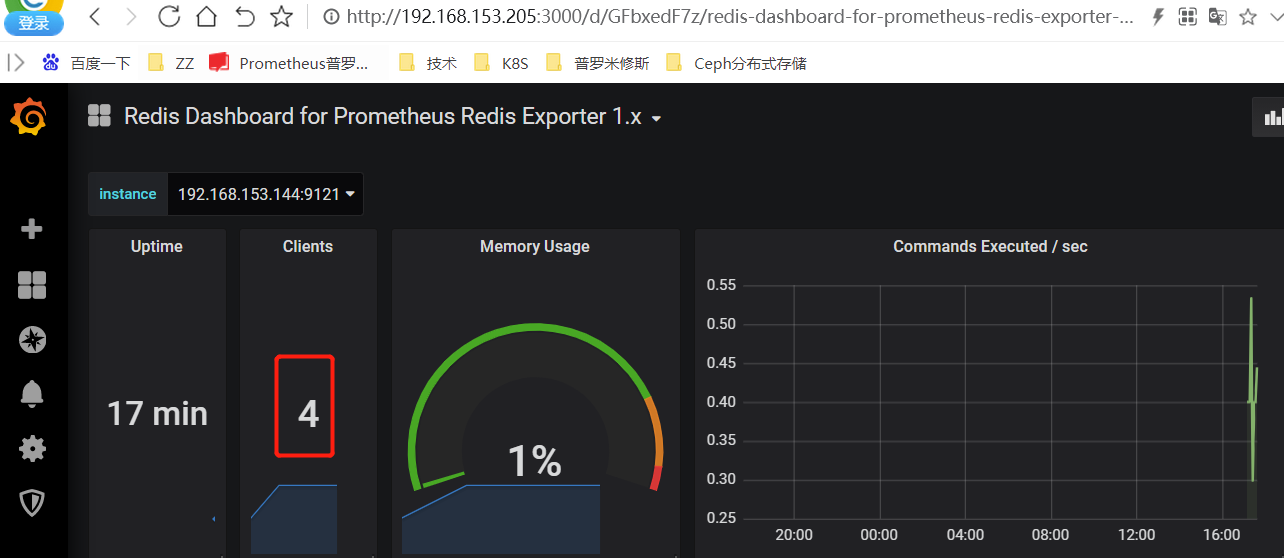
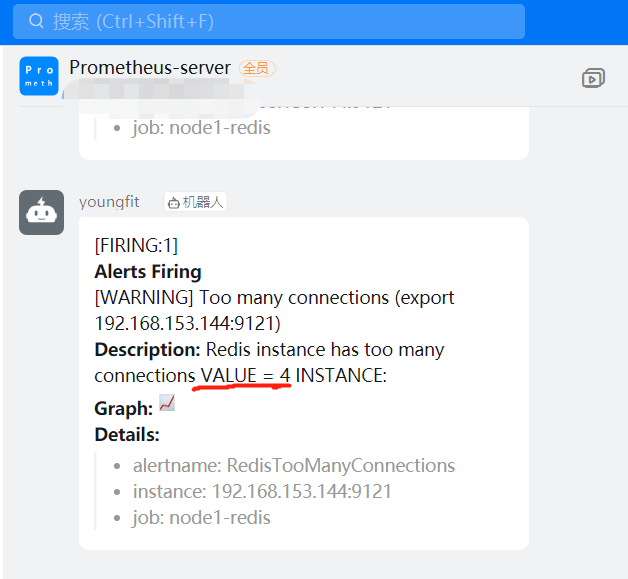
将连接数搞成小于等于2
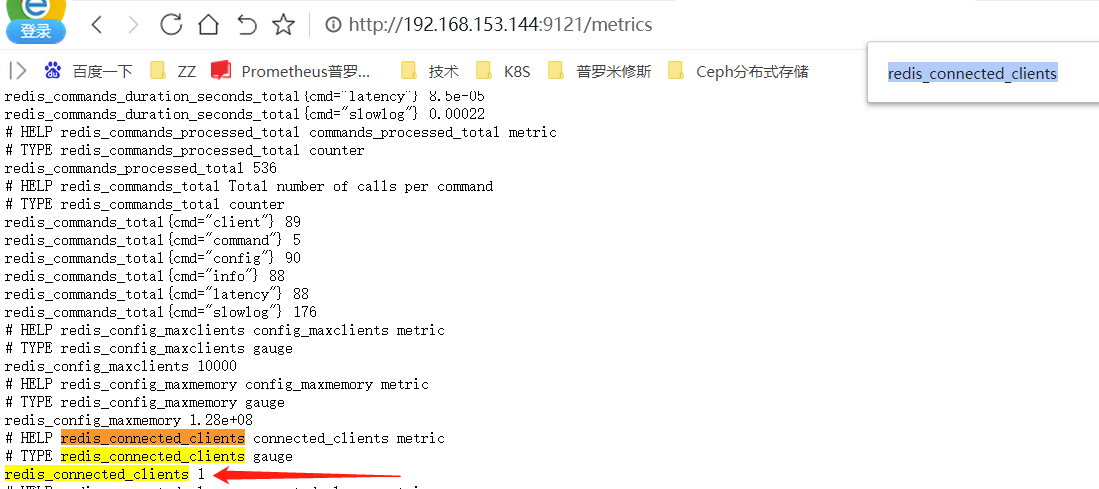
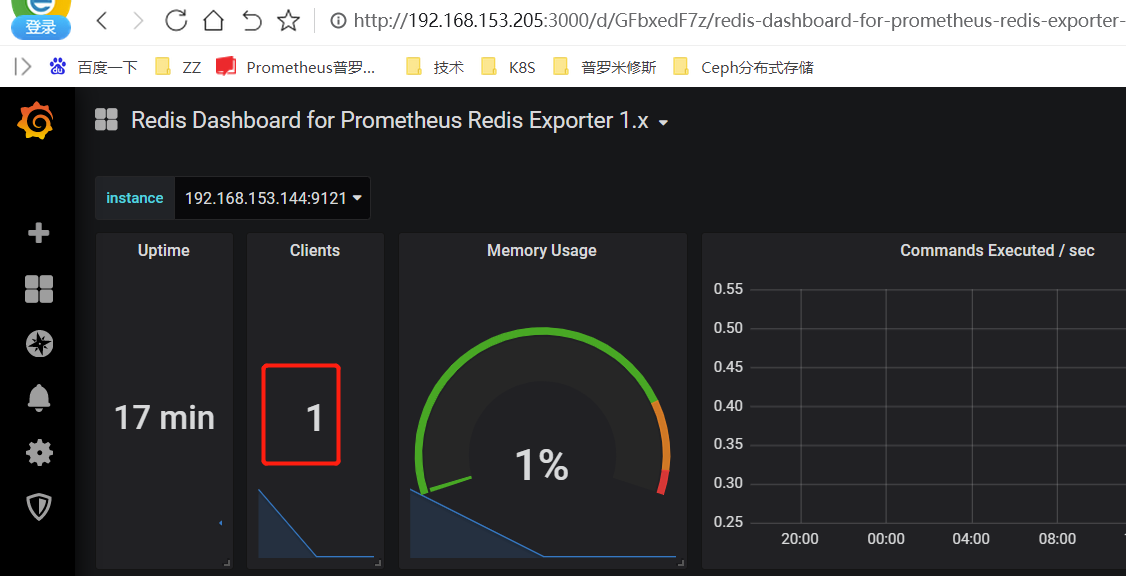
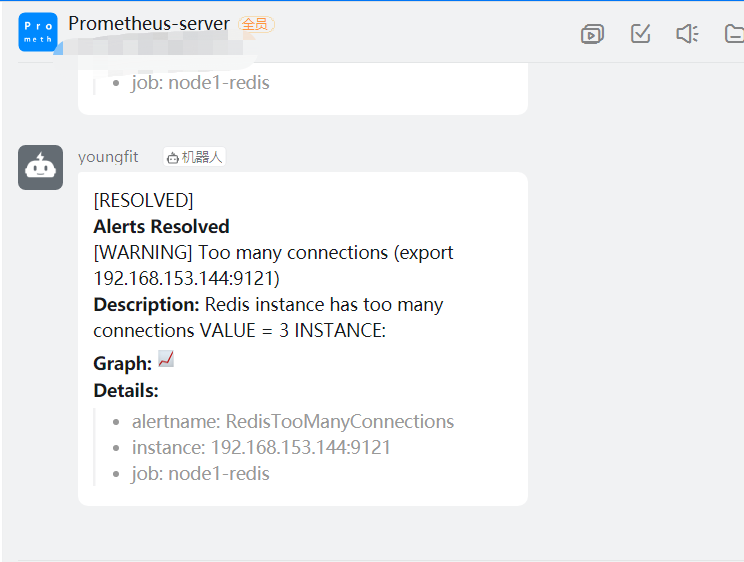
虽然说VALUE的值不正确。但是能正常报警;
Docker监控
[root@node1 ~]# wget https://mirrors.aliyun.com/docker-ce/linux/centos/docker-ce.repo
[root@node1 ~]# yum -y install docker-ce
[root@node1 ~]# systemctl start docker
[root@node1 ~]# docker run  --volume=/:/rootfs:ro \
--volume=/var/run:/var/run:ro \
--volume=/sys:/sys:ro  \
--volume=/var/   \
lib/docker/:/var/lib/docker:ro  \
--volume=/dev/disk/:/dev/disk:ro  \
--publish=8080:8080  \
--detach=true  \
--name=cadvisor \
google/cadvisor:latest
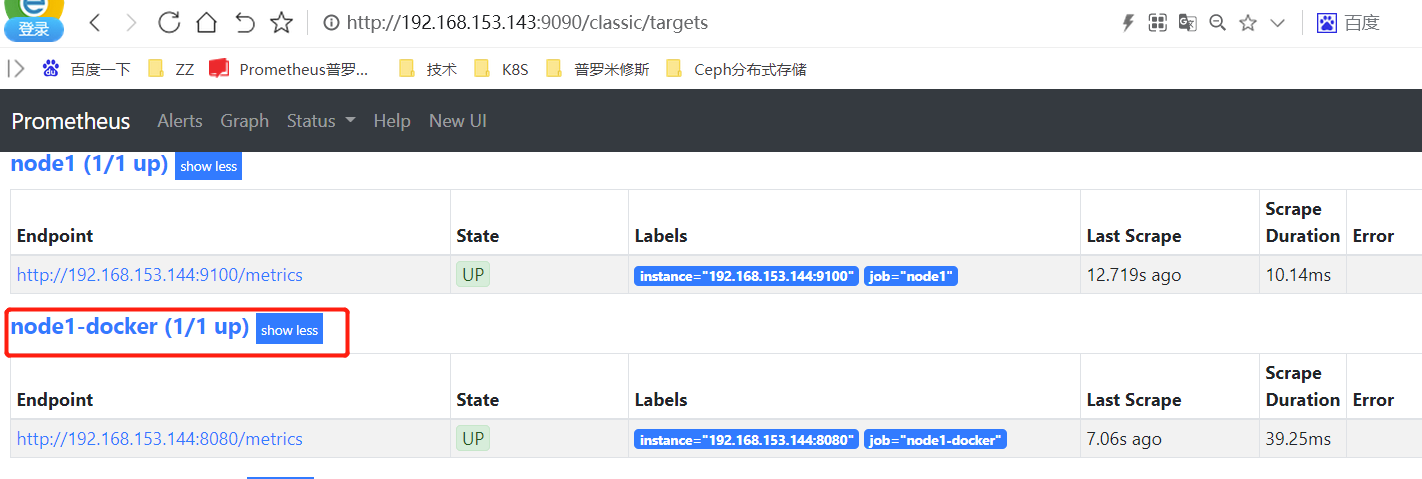
增加docker监控
[root@prometheus local]# vim prometheus/prometheus.yml
  - job_name: "node1-docker"
    static_configs:
      - targets: ["192.168.153.144:8080"]
[root@prometheus local]# systemctl restart prometheus
容器 CPU 使用率:
sum(irate(container_cpu_usage_seconds_total{image!=""}[1m])) without (cpu)

查询容器内存使用量(单位:字节):
container_memory_usage_bytes{image!=""}

查询容器网络接收量速率(单位:字节/秒):
sum(rate(container_network_receive_bytes_total{image!=""}[1m])) without (interface)

查询容器网络传输量速率(单位:字节/秒):
sum(rate(container_network_transmit_bytes_total{image!=""}[1m])) without (interface)

查询容器文件系统读取速率(单位:字节/秒):
sum(rate(container_fs_reads_bytes_total{image!=""}[1m])) without (device)

查询容器文件系统写入速率(单位:字节/秒):
sum(rate(container_fs_writes_bytes_total{image!=""}[1m])) without (device)

# grafana
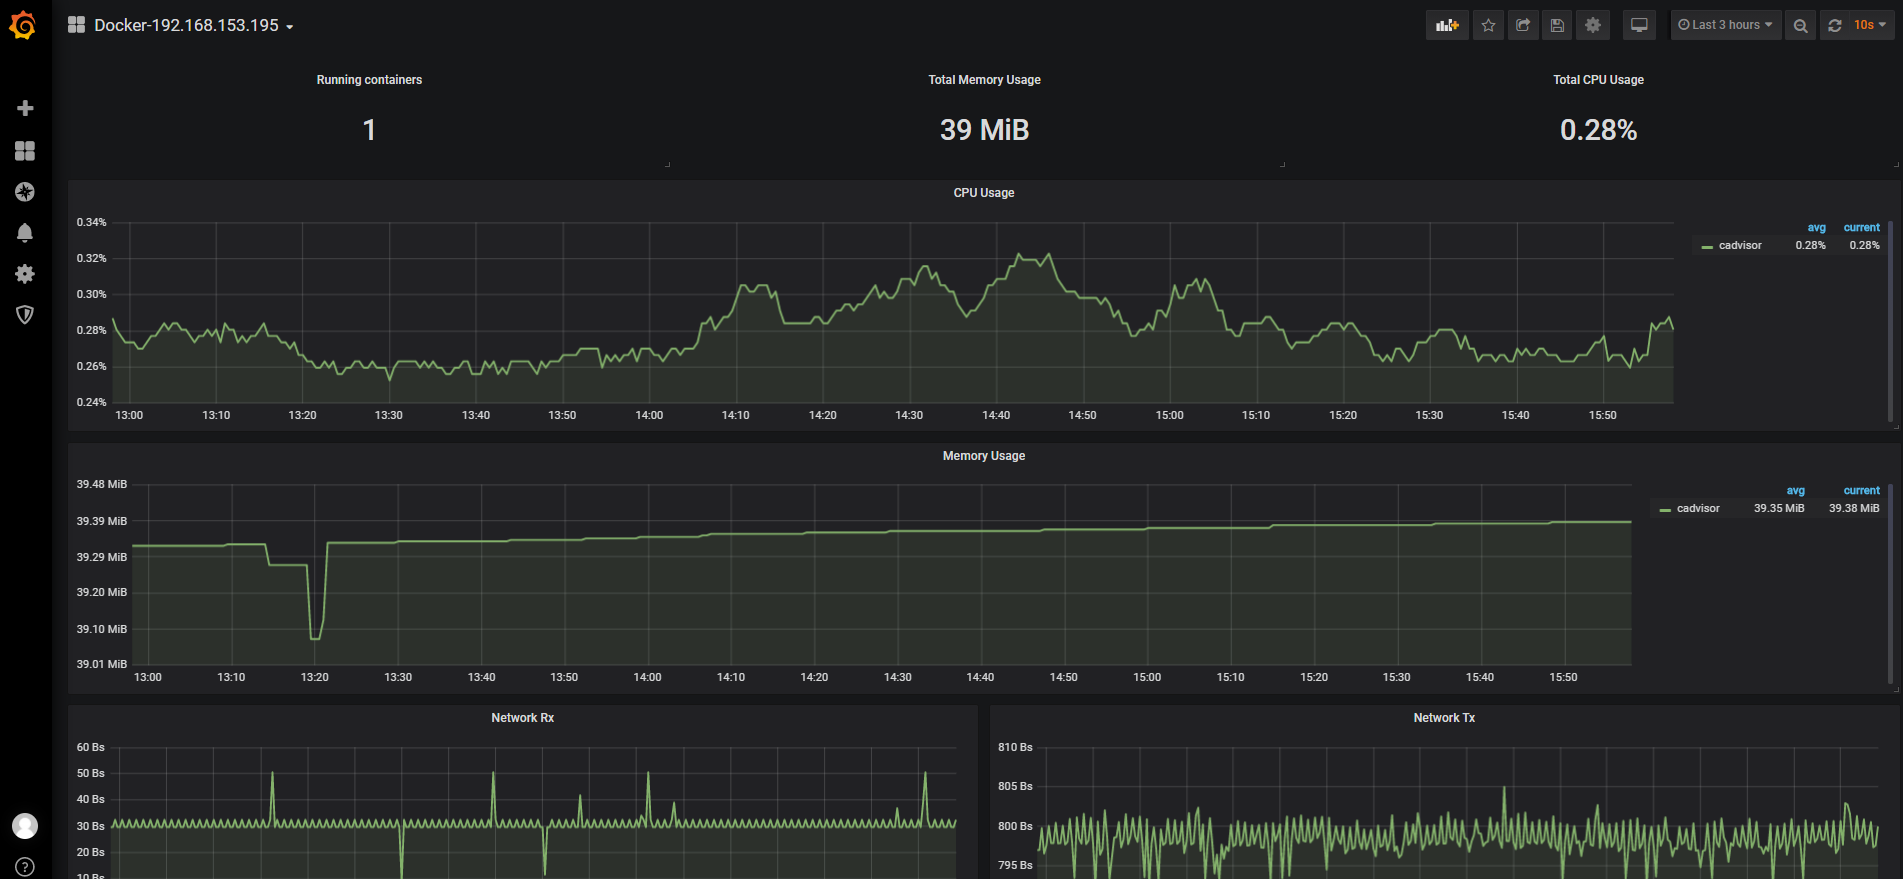
模板:193
添加报警规则
[root@prometheus-server prometheus]# cat rules/docker.yml
groups:
- name: docker_instance
  rules:
#redis实例宕机 危险等级:5
  - alert: docker_memory_out
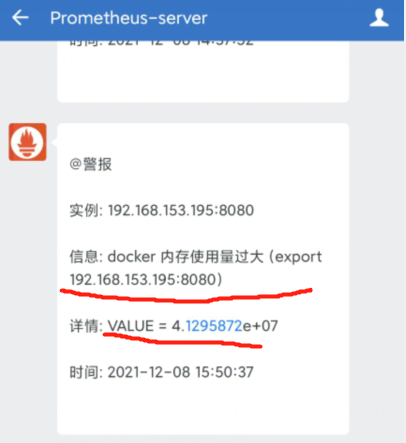
    expr: container_memory_usage_bytes{image!=""} > 10000  #这里设置为1000,是为了看效果
    for: 5s
    labels:
      severity: error
    annotations:
      summary: "docker 内存使用量过大 (export {{ $labels.instance }})"
      description: "VALUE = {{ $value }}"
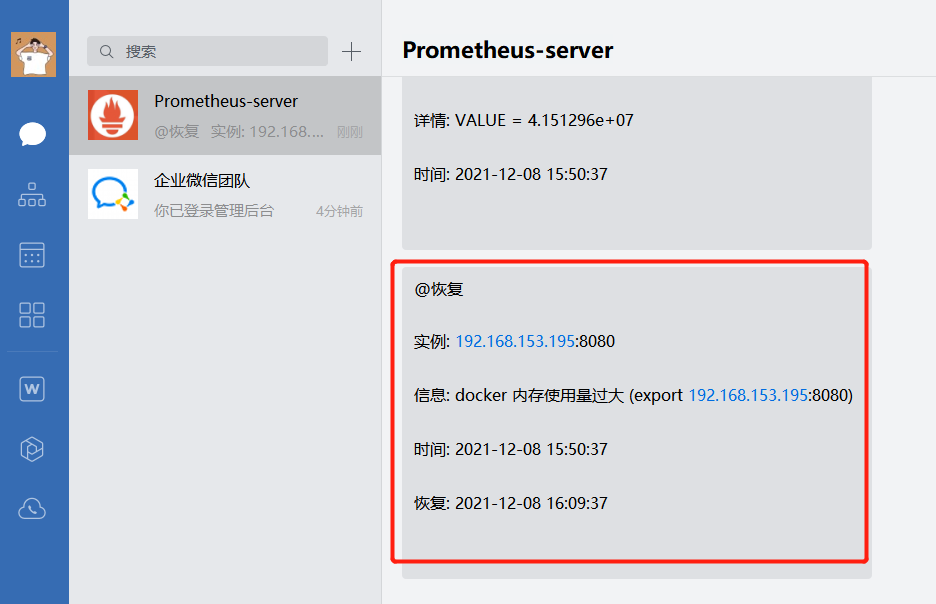
恢复报警
pushgaway 介绍
Pushgateway 是 Prometheus 生态中一个重要工具,使用它的原因主要是:
Prometheus 采用 pull 模式,可能由于不在一个子网或者防火墙原因,导致 Prometheus 无 法直接拉取各个 target 数据。
在监控业务数据的时候,需要将不同数据汇总, 由 Prometheus 统一收集。
由于以上原因,不得不使用 pushgateway,但在使用之前,有必要了解一下它的一些弊端:
将多个节点数据汇总到 pushgateway, 如果 pushgateway 挂了,受影响比多个 target 大。
Prometheus 拉取状态 up 只针对 pushgateway, 无法做到对每个节点有效。
Pushgateway 可以持久化推送给它的所有监控数据。
因此,即使你的监控已经下线,prometheus 还会拉取到旧的监控数据,需要手动清理 pushgateway 不 要的数据
数据流
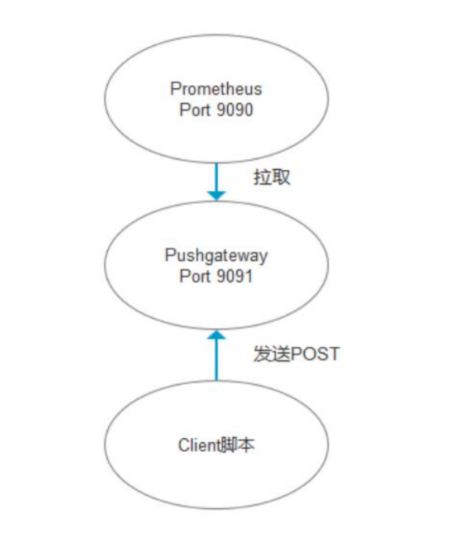
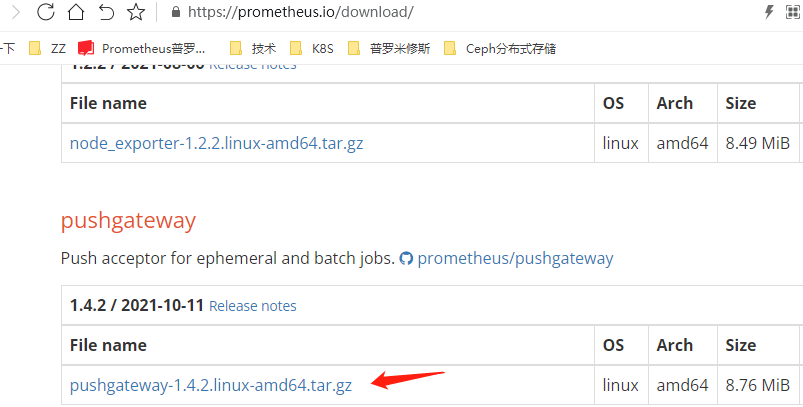
[root@node1 ~]# wget https://github.com/prometheus/pushgateway/releases/download/v1.4.2/pushgateway-1.4.2.linux-amd64.tar.gz
[root@node1 ~]# tar -xvzf pushgateway-1.4.2.linux-amd64.tar.gz  -C /usr/local/
[root@node1 ~]# cd /usr/local/pushgateway-1.4.2.linux-amd64
[root@node1 pushgateway-1.4.2.linux-amd64]# nohup ./pushgateway &

未整理完善,待后续。。。。
自动发现实战
Consul 部署
Consul 是基于 GO 语言开发的开源工具,主要面向分布式,服务化的系统提供服务注册、
服务发现和配置管理的功能。Consul 提供服务注册/发现、健康检查、Key/Value 存储、多数
据中心和分布式一致性保证等功能。Prometheus 通过 Consul 可以很方便的实现服务自动
发现和维护,同时 Consul 支持分布式集群部署,将大大提高了稳定性,通过 Prometheus 跟
Consul 集群二者结合起来,能够高效的进行数据维护同时保证系统稳定。
[root@grafana ~]# wget https://releases.hashicorp.com/consul/1.10.3/consul_1.10.3_linux_amd64.zip
[root@grafana ~]# mv consul_1.10.3_linux_amd64.zip /usr/local/
[root@grafana local]# unzip consul_1.10.3_linux_amd64.zip

[root@grafana local]# mkdir -p /data/consul /opt/logs/consul
[root@grafana local]# nohup consul agent -dev -client=0.0.0.0 -data-dir=/data/consul -bind=0.0.0.0 -log-file=/opt/logs/consul/consul.log -log-rotate-max-files=3 &
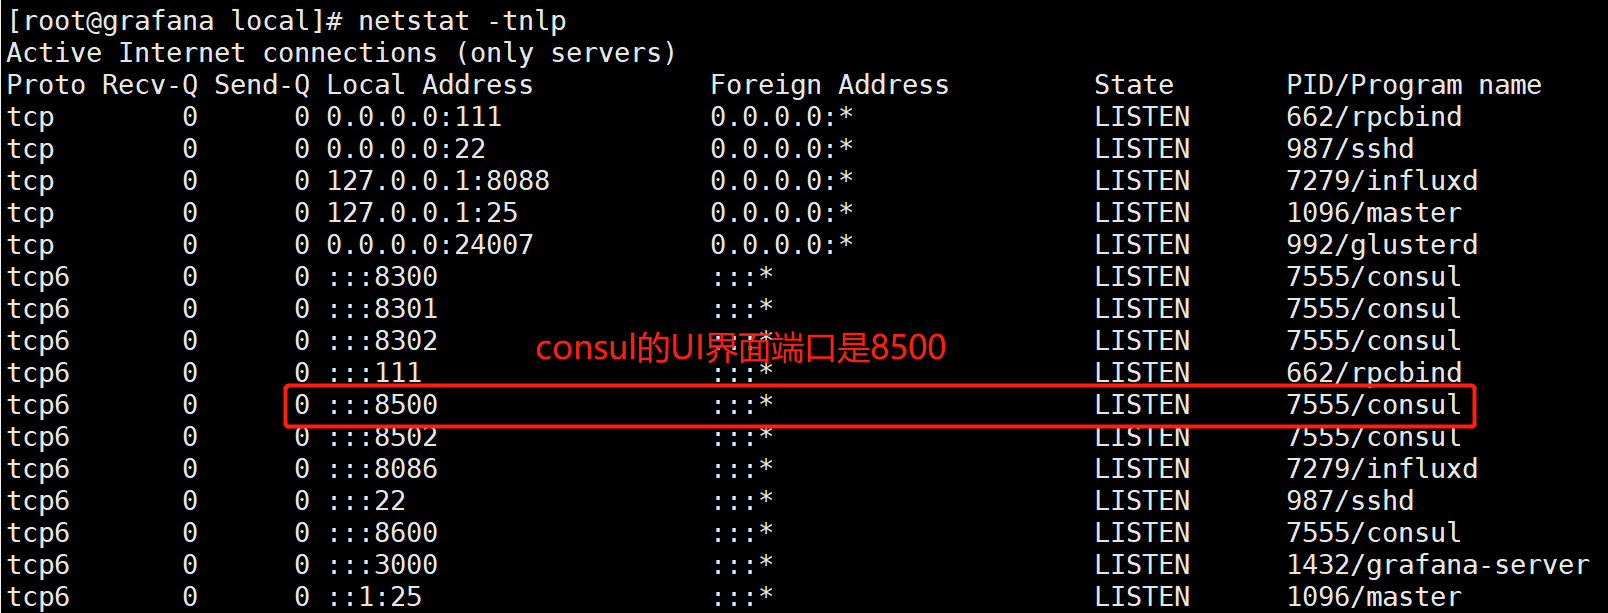
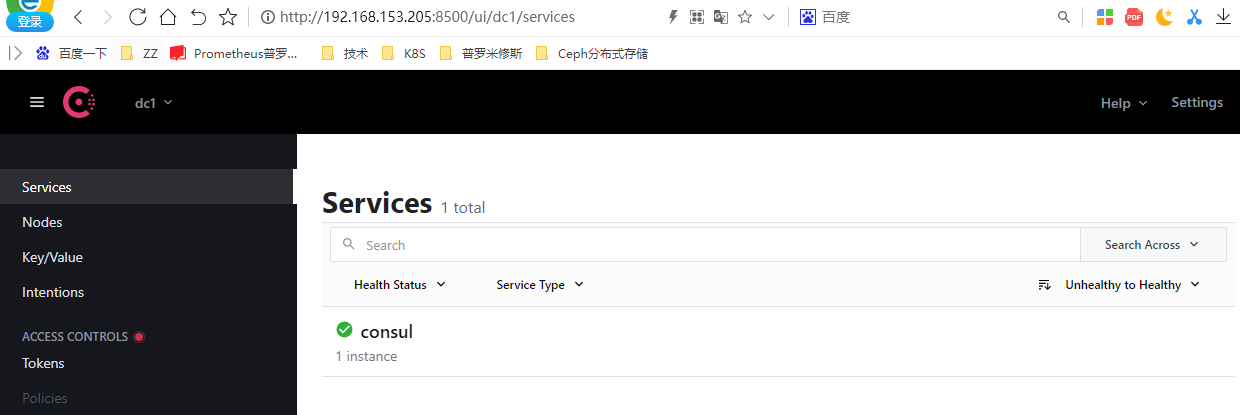
prometheus加入
[root@prometheus prometheus]# cat /tmp/request.json
{
    "ID":"prometheus-143", #自定义
    "Name":"monitor",    #自定义
    "Address":"192.168.153.143",  #写自己服务的ip
    "Port": 9090,    #写自己服务的port
    "Tags": ["prometheus"],
    "Check":{
        "HTTP":"http://192.168.153.143:9090/-/healthy",  #写自己服务的ip和端口
        "Interval":"10s" #每10s一检测
    }
}

[root@prometheus ~]# curl -XPUT http://192.168.153.205:8500/v1/agent/service/register -d@/tmp/request.json  #注册服务
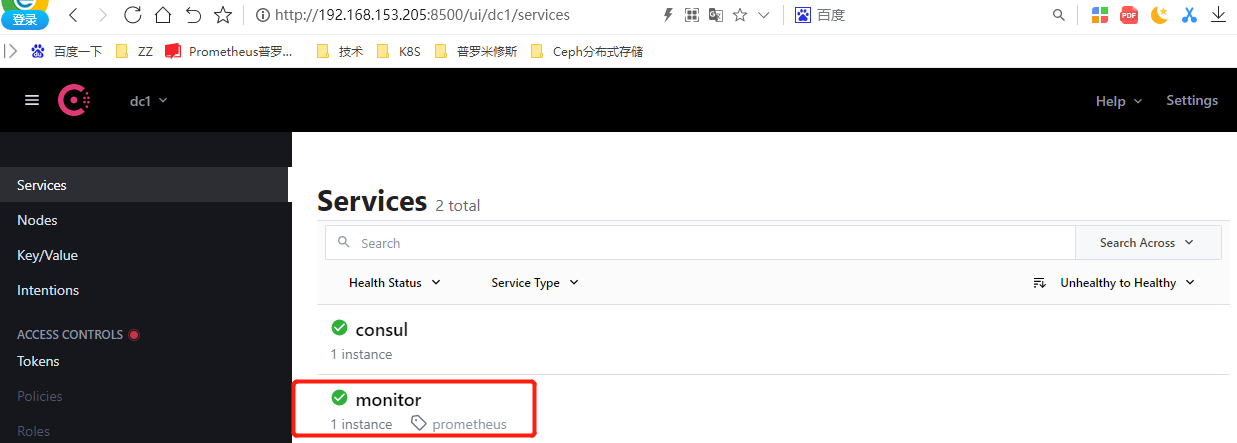
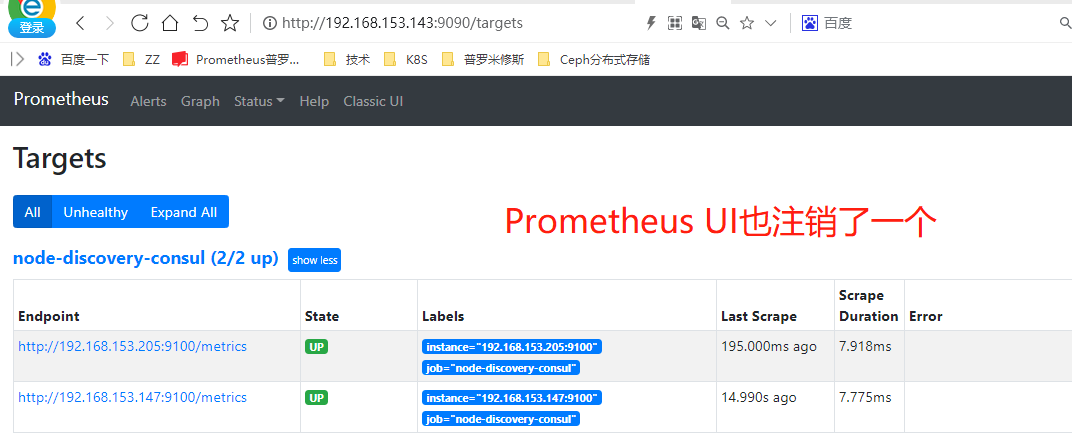
[root@prometheus prometheus]# curl -XPUT http://192.168.153.205:8500/v1/agent/service/deregister/prometheus-143 -d@/tmp/request.json
#取消注册
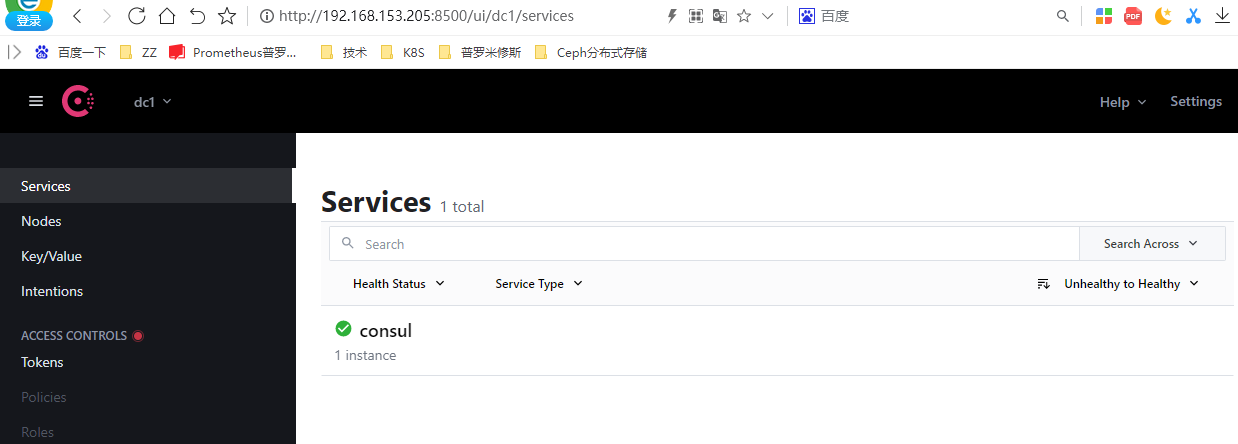
实现自动发现
#prometheus配置监控consule服务
[root@prometheus prometheus]# pwd
/usr/local/prometheus
[root@prometheus prometheus]# vim prometheus.yml
###consul自动发现
  - job_name: "node-discovery-consul"
    consul_sd_configs:
     - server: '192.168.153.205:8500'
       services: ["mysql-exporter"]
       tags: ["prometheus"]
       refresh_interval: 10s

[root@prometheus prometheus]# systemctl restart prometheus
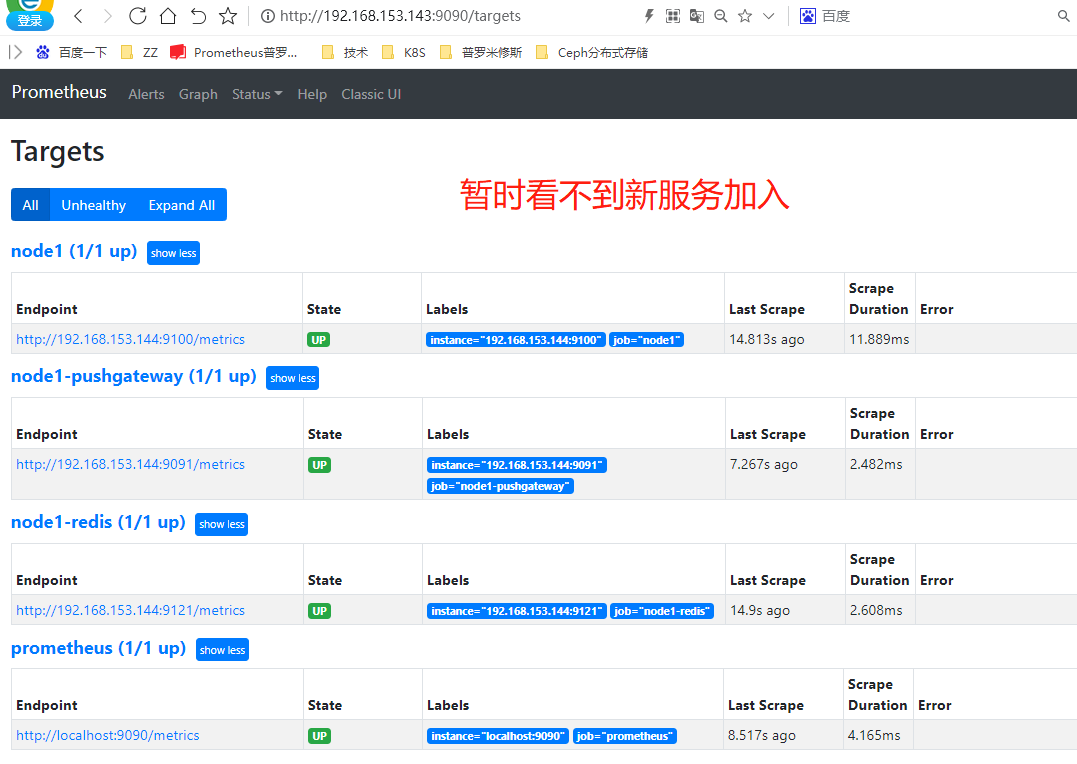
新机器自动加入
准备2台新机器
| 主机名 | IP | 服务 |
|---|---|---|
| consul-node2 | 192.168.153.147 | node-exporter |
| consul-node3 | 192.168.153.201 | node-exporter |


[root@consul-node2 ~]# tar -xvzf node_exporter-1.2.2.linux-amd64.tar.gz  -C /usr/local/
[root@consul-node2 ~]# cd /usr/local/node_exporter-1.2.2.linux-amd64/
[root@consul-node2 node_exporter-1.2.2.linux-amd64]# nohup ./node_exporter &
[root@consul-node2 ~]# vim /tmp/request.json
{
    "ID":"node-192.168.153.147",
    "Name":"node-exporter",
    "Address":"192.168.153.147",
    "Port": 9100,
    "Tags": ["prometheus"],
    "Check":{
        "HTTP":"http://192.168.153.147:9100/-/healthy",
        "Interval":"10s"
    }
}
[root@consul-node2 ~]# curl -XPUT http://192.168.153.205:8500/v1/agent/service/register -d@/tmp/request.json
[root@consul-node3 ~]# tar -xvzf node_exporter-1.2.2.linux-amd64.tar.gz  -C /usr/local/
[root@consul-node3 ~]# cd /usr/local/node_exporter-1.2.2.linux-amd64/
[root@consul-node3 node_exporter-1.2.2.linux-amd64]# nohup ./node_exporter &
[root@consul-node3 ~]# vim /tmp/request.json
{
    "ID":"node-192.168.153.201",
    "Name":"node-exporter",
    "Address":"192.168.153.201",
    "Port": 9100,
    "Tags": ["prometheus"],
    "Check":{
        "HTTP":"http://192.168.153.201:9100/-/healthy",
        "Interval":"10s"
    }
}
[root@consul-node3 ~]# curl -XPUT http://192.168.153.205:8500/v1/agent/service/register -d@/tmp/request.json
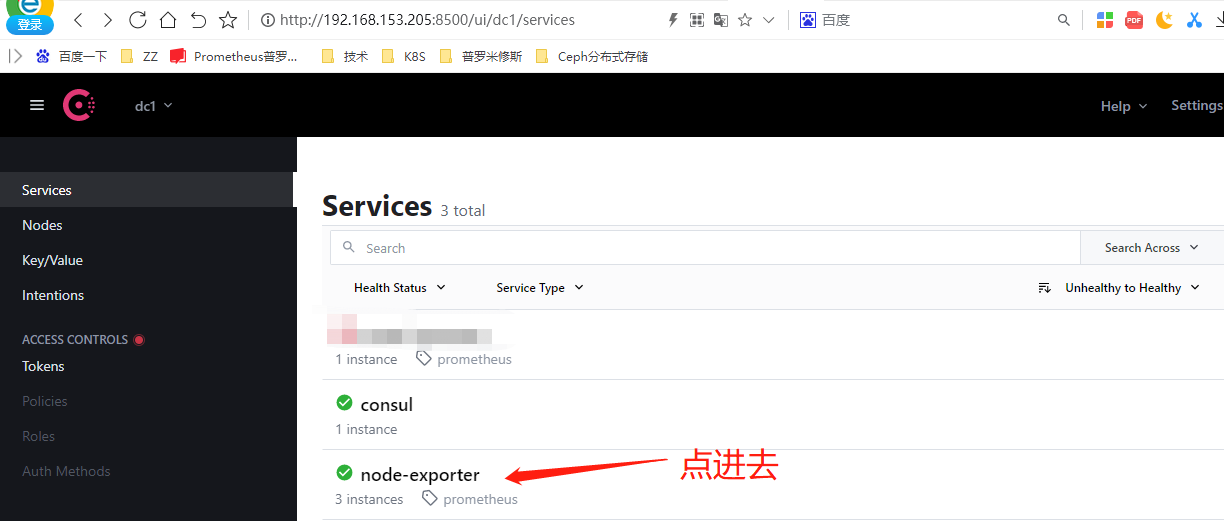
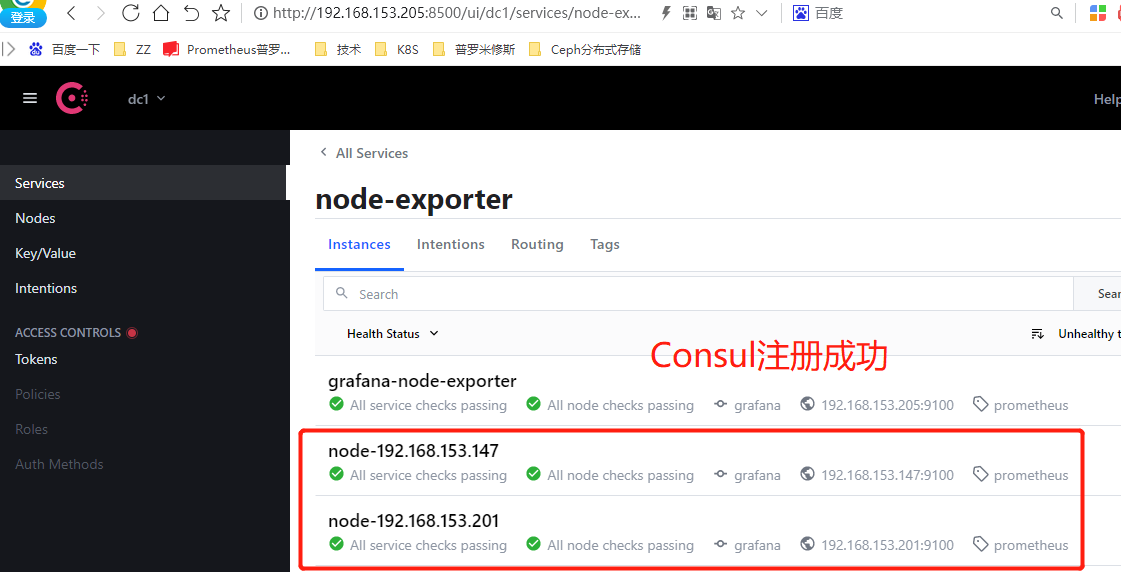
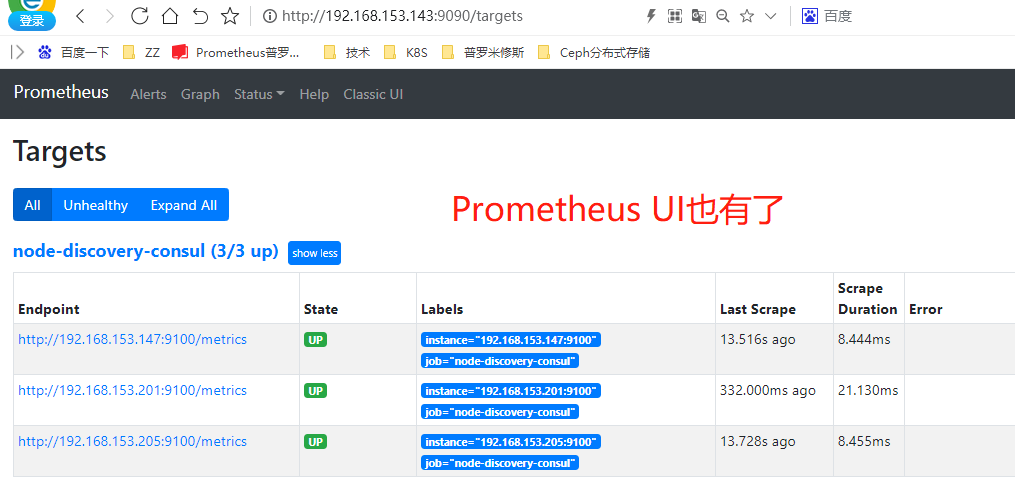
注销服务
[root@consul-node3 ~]# curl --request PUT http://192.168.153.205:8500/v1/agent/service/deregister/node-192.168.153.201
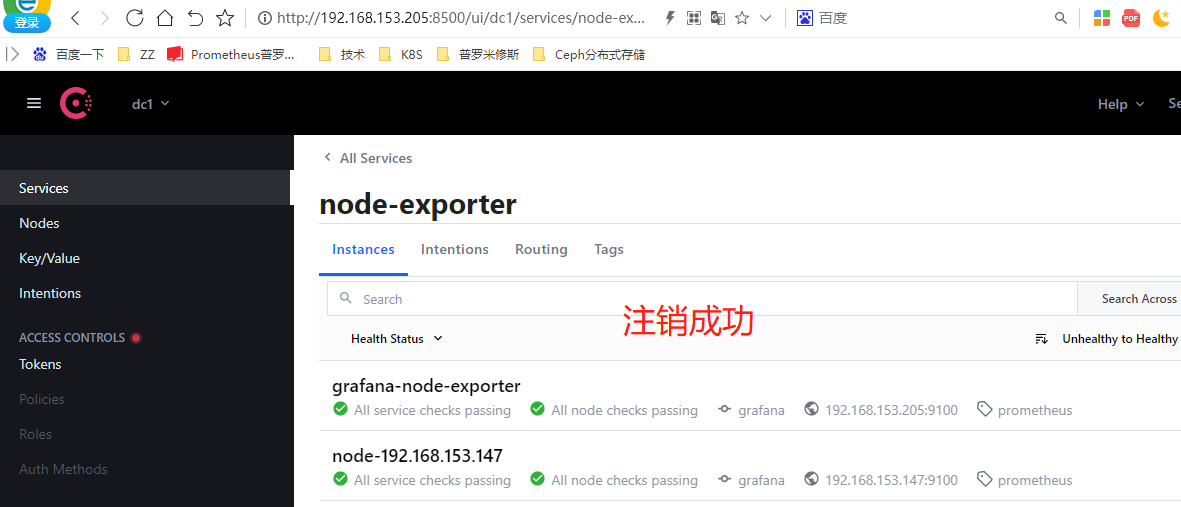
测试报警
[root@consul-node3 ~]# systemctl stop node_exporter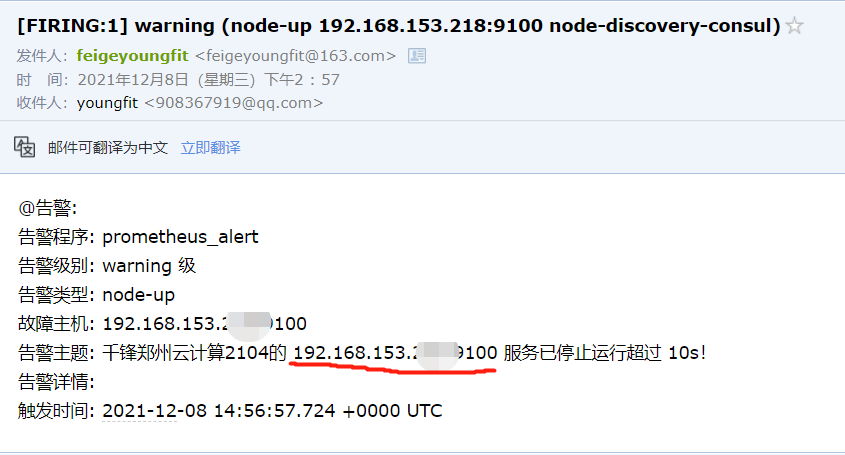
Prometheus 数据存储
本地存储
[root@prometheus data]# pwd
/usr/local/prometheus/data
[root@prometheus data]# tree /usr/local/prometheus/data/
/usr/local/prometheus/data/        # 数据存储目录
├── 01FK01XFQDAQ3C9APNKEFT18ZT    # 数据块
│   ├── chunks                    # 数据样本
│   │   └── 000001
│   ├── index                    # 索引文件
│   ├── meta.json                # 元数据文件
│   └── tombstones                # 逻辑数据
├── 01FM3SZ21W30R9N0W50KM4HKDA
│   ├── chunks
│   │   └── 000001
│   ├── index
│   ├── meta.json
│   └── tombstones
├── chunks_head
├── lock
├── queries.active
└── wal                        # 预写日志文件,即原始时间序列数据,还未压缩为块存储到本地磁盘
    ├── 00000086
    ├── 00000087
    ├── 00000088
    └── checkpoint.00000085
        └── 00000000
数据是不会占用过多的磁盘空间的,即使这样,Prometheus提供的远程存储的方式
远程存储
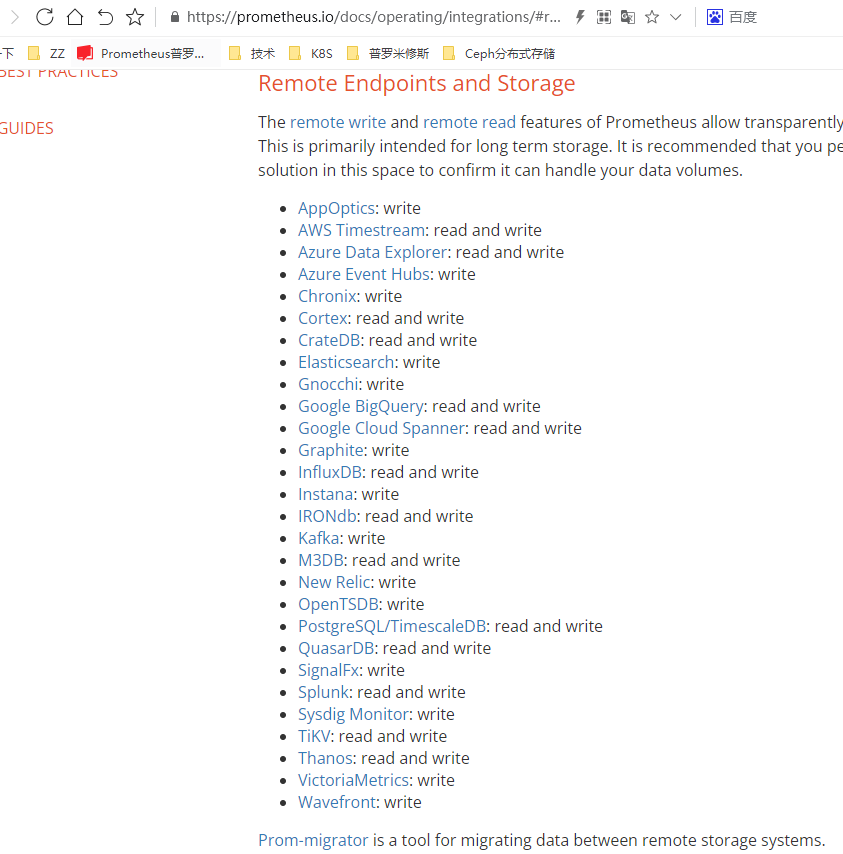
以上是官网支持的存储方式
Influxdb部署
https://docs.influxdata.com/influxdb/v1.8/introduction/install/?t=Red+Hat+%26amp%3B+CentOS
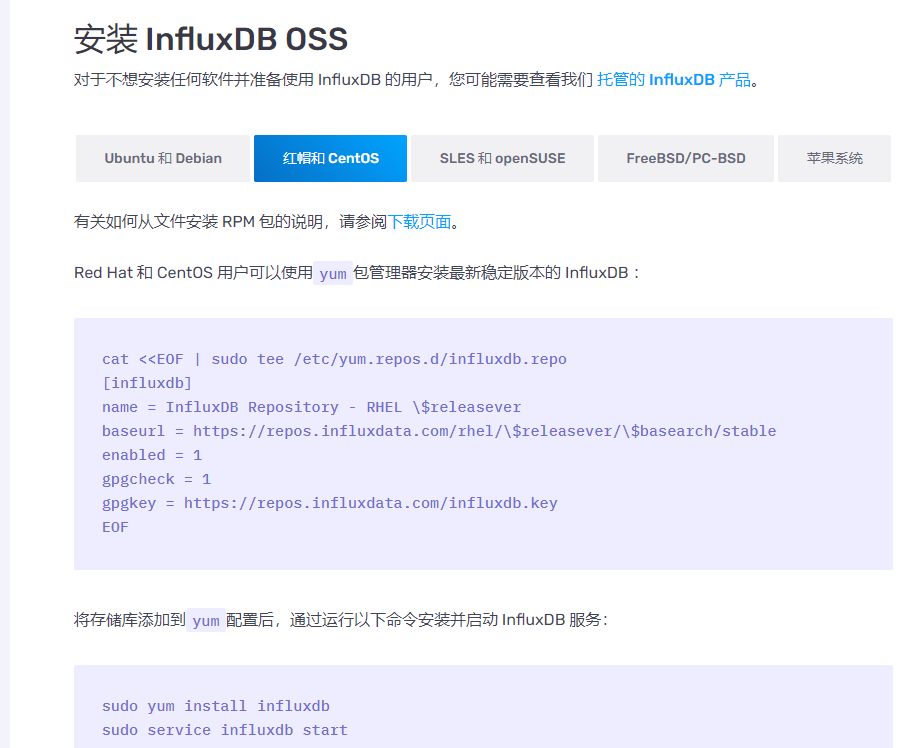
#我这里和Grafana安装在一台机器上了
[root@grafana ~]# cat <<EOF | sudo tee /etc/yum.repos.d/influxdb.repo
[influxdb]
name = InfluxDB Repository - RHEL \$releasever
baseurl = https://repos.influxdata.com/rhel/\$releasever/\$basearch/stable
enabled = 1
gpgcheck = 1
gpgkey = https://repos.influxdata.com/influxdb.key
EOF
[root@grafana ~]# yum install influxdb -y
[root@grafana ~]# systemctl start influxdb

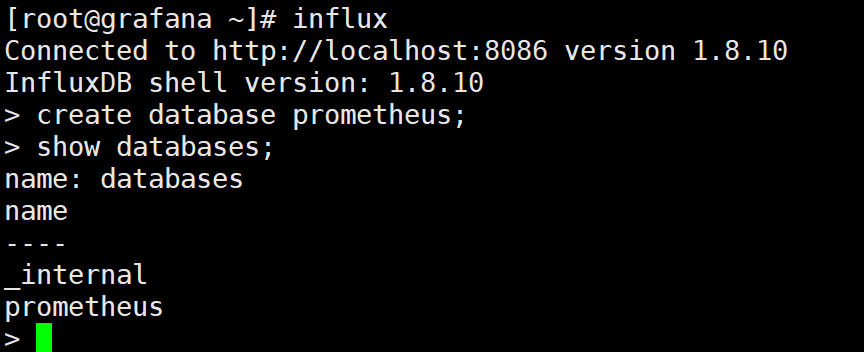
创建数据库

Prometheus指定存储路径
[root@prometheus prometheus]# vim /usr/lib/systemd/system/prometheus.service
--storage.tsdb.path=/usr/local/prometheus/data

[root@prometheus prometheus]# systemctl daemon-reload
[root@prometheus prometheus]# systemctl restart prometheus
添加远程读写
[root@prometheus prometheus]# pwd
/usr/local/prometheus
[root@prometheus prometheus]# vim prometheus.yml
#远程写入地址
remote_write:
  - url: "http://192.168.153.205:8086/api/v1/prom/write?db=prometheus"
#远程读取地址
remote_read:
  - url: "http://192.168.153.205:8086/api/v1/prom/read?db=prometheus"


[root@prometheus prometheus]# systemctl restart prometheus
验证influxdb数据
查看influxdb是否有数据写入
[root@grafana ~]# influx
> use prometheus
> show measurements  #会显示出来很多表
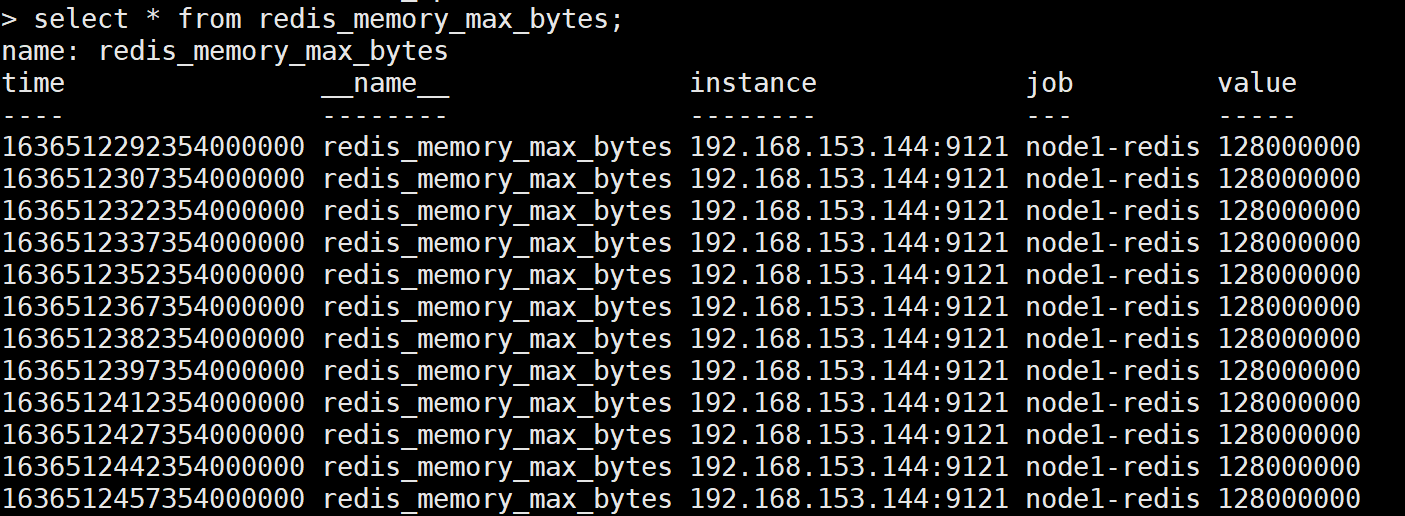
> select * from redis_memory_max_bytes; 查看这张表中是否有监控数据
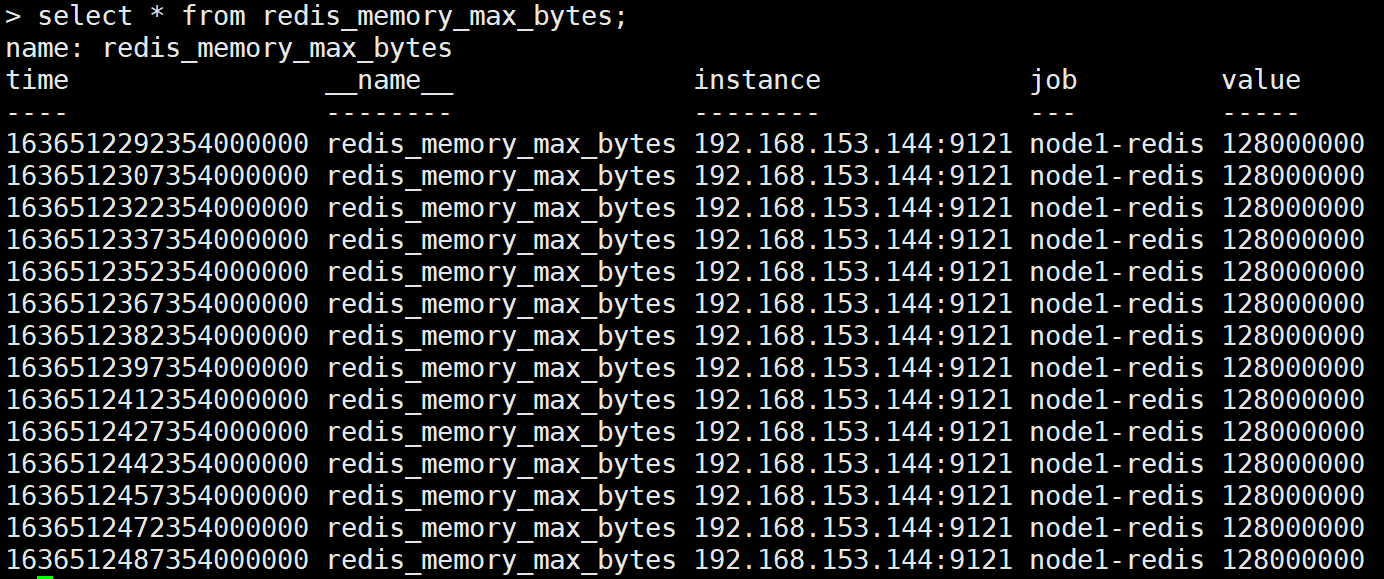
验证数据可靠性:
停止 Prometheus 服务。同时删除 Prometheus 的 data 目录,重启 Prometheus。打开 Prometheus
UI 如果配置正常,Prometheus 可以正常查询到本地存储以删除的历史数据记录。
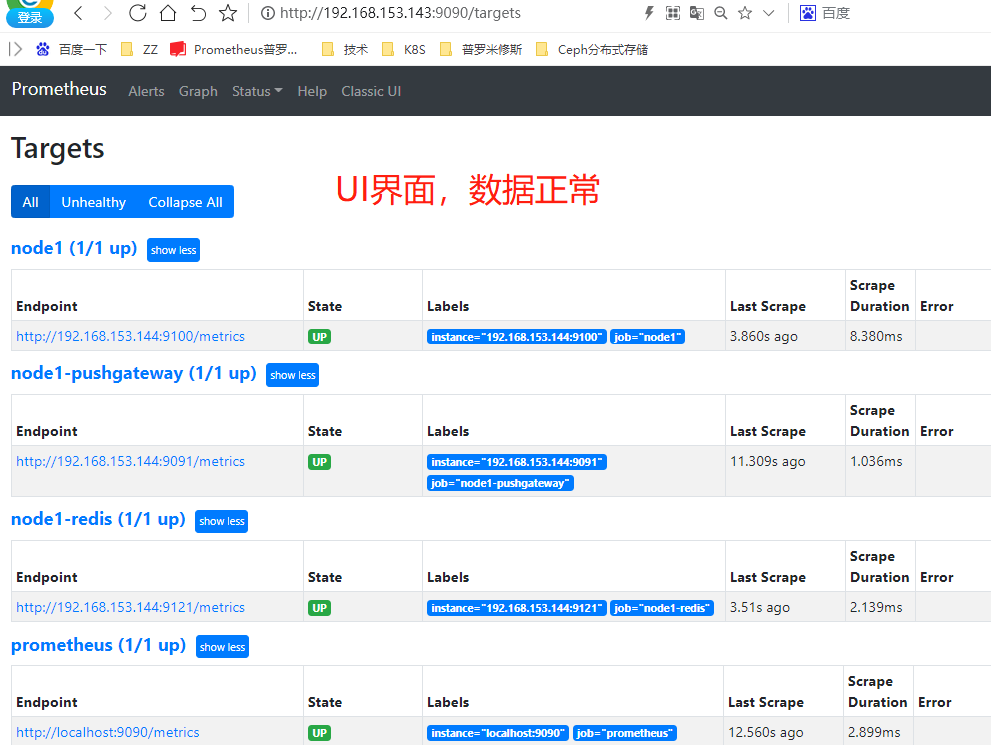
进入influxdb数据库,数据仍然存在;
