nexus repository oss 是免费的通用格式文件的存储库。
1.Docker安装
1.1 创建目录并授权
mkdir -p nexus3/sonatype-work/nexus3chmod -R 777 nexus3
1.2 创建docker-compose.yml并将文件放在根目录
version: '3.8'networks:nexus3:driver: bridgeservices:nexus3:image: sonatype/nexus3:3.37.3container_name: nexus3restart: alwaysenvironment:- "INSTALL4J_ADD_VM_PARAMS=-Xms1500m -Xmx1500m"volumes:- ./sonatype-work/nexus3:/nexus-dataports:- 8081:8081networks:- nexus3
注:首次启动需要加载超多配置,启动时间很长,请耐心等待,切记不要退出,否则再次启动时会出现各种诡异的问题。
2.Centos安装
2.1 下载安装包
https://www.sonatype.com/products/repository-oss-download
2.2 编辑配置文件
配置文件/nexus-3.xx.xx/etc/nexus-default.properties,默认开始http,可选开启https
## DO NOT EDIT - CUSTOMIZATIONS BELONG IN $data-dir/etc/nexus.properties### Jetty sectionnexus-context-path=/application-host=0.0.0.0# http端口#application-port=8081# http访问#nexus-args=${jetty.etc}/jetty.xml,${jetty.etc}/jetty-http.xml,${jetty.etc}/jetty-requestlog.xml# https端口application-port-ssl=8081# https访问nexus-args=${jetty.etc}/jetty.xml,${jetty.etc}/jetty-https.xml,${jetty.etc}/jetty-requestlog.xml# Nexus sectionnexus-edition=nexus-pro-editionnexus-features=\nexus-pro-feature
2.3 https配置(可选)
2.3.1 生成ssl证书
使用 nexus-ssl-generate-keystore.sh 生成ssl证书,将shell放在/nexus-3.xx.xx/根目录下。
nexus-ssl-generate-keystore.sh 脚本内容如下:
NEXUS_DOMAIN='Nexus'if [[ -z $1 ]]; thenecho 'please input your ip_address!'exitfiNEXUS_IP_ADDRESS=$1PASSWORD='password'keytool -genkeypair -keystore keystore.jks -storepass ${PASSWORD} -keypass ${PASSWORD} -alias nexus -keyalg RSA -keysize 2048 -validity 5000 -dname "CN=${NEXUS_DOMAIN}, OU=Nexus, O=Nexus, L=Beijing, ST=Beijing, C=CN" -ext "SAN=IP:${NEXUS_IP_ADDRESS}" -ext "BC=ca:true"mv keystore.jks etc/ssl/#keytool -export -alias nexus -keystore keystore.jks -file keystore.cer -storepass ${PASSWORD}#mv keystore.cer etc/ssl/
2.3.2 shell脚本使用方式
sh nexus-ssl-generate-keystore.sh {ip}
示例:
sh nexus-ssl-generate-keystore.sh 192.168.3.77
2.3.3 https证书
生成后的https证书存放位置:/nexus-3.xx.xx/etc/ssl/keystore.jks
2.4 启动
启动脚本:/nexus-3.xx.xx/bin/nexus
启动命令:./nexus {start | stop | run | run-redirect | status | restart | force-reload }
2.5 访问
3.nginx 域名映射
3.1 nginx配置maven私服
upstream nexus3.com {server 127.0.0.1:8081;}server {access_log /var/logs/nexus3.access.log main;error_log /var/logs/nexus3.error.log error;listen 443 ssl;server_name your domain; # 配置域名charset utf-8;ssl_certificate /path/ssl证书.pem; # 域名对应的ssl证书ssl_certificate_key /path/ssl证书.key; # 域名对应的ssl证书ssl_session_cache shared:SSL:1m;ssl_session_timeout 5m;#ssl_protocols TLSv1 TLSv1.1 TLSv1.2;# 阿里云加固建议ssl_protocols TLSv1.2;ssl_ciphers ECDHE-RSA-AES128-GCM-SHA256:ECDHE:ECDH:AES:HIGH:!NULL:!aNULL:!MD5:!ADH:!RC4;ssl_prefer_server_ciphers on;# 阿里云加固建议server_tokens off;location / {proxy_connect_timeout 60;proxy_send_timeout 60;proxy_read_timeout 60;proxy_pass https://nexus3.com/;proxy_set_header Host $host;proxy_set_header X-Real-IP $remote_addr;proxy_set_header X-Forwarded-For $proxy_add_x_forwarded_for;}}
4.开发环境集成Maven私服
4.1 开发环境maven配置
4.1.1 maven版本统一使用3.5.4
下载地址:https://dlcdn.apache.org/maven/maven-3/3.5.4/binaries/
4.1.2 配置maven环境变量
参考文档:https://www.runoob.com/maven/maven-setup.html
4.1.3 配置settings.xml,需要替换以下几个节点
4.1.3.1 maven依赖存放位置
<localRepository>/Users/username/repository</localRepository>
4.1.3.2 maven打包上传时需要验证管理员账号和密码
<server><id>private-maven-snapshots</id><username>username</username><password>password</password></server><server><id>private-maven-releases</id><username>username</username><password>password</password></server>
4.1.3.3 镜像替换,第1个为自己私服主用,第2个为阿里云私服备用
<mirror><id>privatenexus</id><name>privatenexus</name><mirrorOf>central</mirrorOf><url>https://your domain/repository/maven-public/</url></mirror><mirror><id>aliyun</id><name>aliyun</name><mirrorOf>central</mirrorOf><url>http://maven.aliyun.com/nexus/content/groups/public/</url></mirror>
4.2 maven项目开发配置
在pom.xml中增加以下配置
注:snapshotRepository和repository,这2个节点下的id要与4.1.3.2的server节点下的id一致,才可以使用deploy命令打包上传
<!-- 下载快照 --><repositories><repository><id>private-maven-public</id><name>private-maven-public</name><url>https://your domain/repository/maven-public/</url><snapshots><enabled>true</enabled></snapshots><releases><enabled>true</enabled></releases></repository></repositories><!-- 打包上传 --><distributionManagement><snapshotRepository><id>private-maven-snapshots</id><name>private-maven-snapshots</name><url>https://your domain/repository/maven-snapshots/</url></snapshotRepository><repository><id>private-maven-releases</id><name>private-maven-releases</name><url>https://your domain/repository/maven-releases/</url></repository></distributionManagement>
4.3 手动上传jar包到Maven私服
参考下方截图,请使用有管理员权限的账号登录。红框中的选项一定要勾选,否则在项目中引用不了。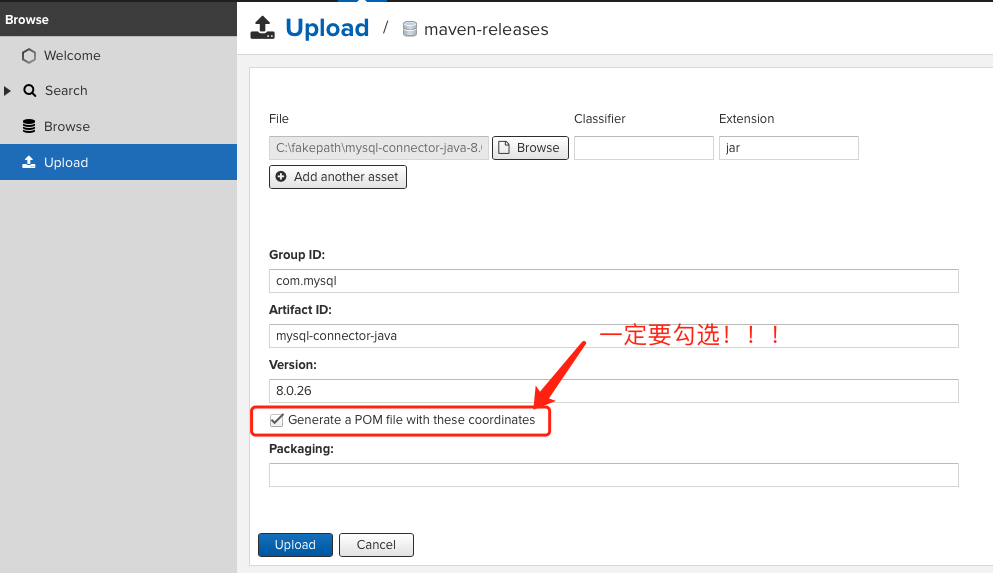

若有收获,就点个赞吧
0 人点赞
