Angular除了框架本身的优秀外,它的Cli工具也是强大的一批。其中原理图大家都用过,但并不是每个人都下功夫去了解过它。
那么原理图到底都能做什么呢?它可以做到以下几件事:
- 为Angular工程添加库
- 升级Angular工程中的库
- 生成代码
对,你没有看错,我们常用的ng new 、ng update 、 ng generate命令,都在使用原理图为我们生成文件。所以原理图的本体,就是一段代码生成器!!!
作为一条外包狗,日常crud码字工。在日常工作中如果可以合理的利用原理图来生成代码,可以有效提高50%左右的工作效率,降低浪费在重复代码上的时间!!!
原理图基础
为了便于我们创建属于自己的原理图,angular为我们提供了用于创建和调试原理图的cli,我们需要先安装它,基础部分的示例都基于schematics-cli进行讲述
# 安装原理图的clinpm install -g @angular-devkit/schematics-cli# 你可以使用它创建新的原理图schematics blank [你的原理图名字]# 也可以用他执行调试已有的原理图schematics [你原理图的路径]:[原理图的名称] [arguments]
使用schematic-cli创建出来的原理图大概结构如下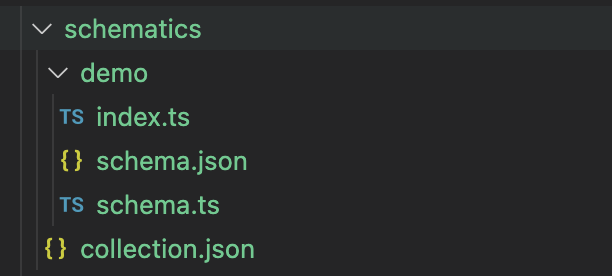
这里我们需要了先解下它的构成
collection.json
这是一个原理图的集合,其中记录了我们提供的所有原理图,其文件内容如下
{// 基础结构"$schema": "../node_modules/@angular-devkit/schematics/collection-schema.json",// 原理图集合"schematics": {// 一个叫demo的原理图"demo": {// 它的说明"description": "一个演示用的原理图",// 工厂函数 格式为 [文件路径]#入口函数名"factory": "./demo/index#entry",// 我们自定义的schema结构,schema用于规定参数以及交互"schema": "./demo/schema.json"}}}
[原理图]/index.ts
这是原理图的实现,其导出一个产生规则的入口函数,文件内容如下
import { Schema } from './schema';import { Rule, SchematicContext, Tree } from '@angular-devkit/schematics';/*** 入口函数* 可以拿到Schema提供的参数信息* 并返回一个Rule(规则)*/export function entry(options: Schema): Rule {// 这是Rule的定义 (tree:Tree,context:SchematicContext)=> Tree|Rulereturn (tree: Tree, context: SchematicContext) => {return tree;};}
我们原理图的最终实现,都会在这个函数里,这里相关的概念后边会慢慢讲,我们先来看下schema.json与schema.ts
schema.json
{// 同样 定义了基础结构的来源"$schema": "http://json-schema.org/schema",// 这个schema的唯一标识"id":"--demo-schematic",// 应用help函数时,显示的title"title": "一个演示用的原理图",// 属性列表,会映射到入口函数的options中"properties": {// 参数名称"name":{// 参数说明"description": "文件名",// 参数类型,支持 boolean number string array 与 object"type":"string",// 默认值"$default":{// 数据源 来自标准输入的参数列表"$source":"argv",// 索引1"index":0}}}}
schema.json的存在,会让我们在使用原理图的时候交互更加友好。比如提供了帮助文档,改变了参数的传入方式,以及可以进行部分交互操作,比如从列表中选择等。当然schema.json是可选的,如果不使用,我们仍然可以使用 —[参数名]=[值] 的方式去传递我们的参数。
schema.ts 则只是个简单的ts类型定义,帮助我们在开发中,使用参数。其内容如下
/** 对应schema.json的定义*/export interface Schema {// 文件名name: string;}
以上为一个完整原理图需要的相关文件,下面我们来看一下实现原理图需要了解的一些相关定义。
Rule(规则)
我们的每一个原理图,都是一个规则,在这个规则之后,可能合并了多个规则。最终原理图的运行,就是依赖规则进行的。
Rule本身是一个函数,它接受tree和context做为参数,并在最后期望返回Tree对象或者一个新的Rule函数,它的定义如下:
export declare type Rule = (tree: Tree, context: SchematicContext) => Tree | Observable<Tree> | Rule | Promise<void | Rule> | void;
在这个函数中,我们通过操作tree 或者 合并其他rule, 来实现我们的逻辑
Tree
tree是一个虚拟的文件树,它为我们提供了操作文件需要的方法。在tree上发生的变化,都会反映在tree上,但是不会发生在真正的文件系统中。
tree的定义如下:
export interface Tree {// 产生一个新的treebranch(): Tree;// 合并另一个treemerge(other: Tree, strategy?: MergeStrategy): void;// 只读 树根,也就是入口文件夹readonly root: DirEntry;// 在文件树中读取某一段内容read(path: string): Buffer | null;// 判断是否在文件树中已经存在exists(path: string): boolean;// 获取某个文件get(path: string): FileEntry | null;// 获取某个目录getDir(path: string): DirEntry;// 访问某个文件visit(visitor: FileVisitor): void;// 覆盖某个文件overwrite(path: string, content: Buffer | string): void;// 更新beginUpdate(path: string): UpdateRecorder;// 提交更新commitUpdate(record: UpdateRecorder): void;// 创建一个虚拟文件create(path: string, content: Buffer | string): void;// 删除某个虚拟文件delete(path: string): void;// 抽命名某个虚拟文件rename(from: string, to: string): void;// 应用某个动作apply(action: Action, strategy?: MergeStrategy): void;// 动作列表readonly actions: Action[];}
SchematicsContext
schematicsContext为我们提供了原理图的执行上下文,它提供了一些全局配置,以及一些相关操作。这里我们比较常用的是其中的logger。
完善我们的入口函数
认识了Rule和Tree 我们就可以为我们的入口函数,增加一个生成html文件的逻辑了
/*** 入口函数* 可以拿到Schema提供的参数信息* 并返回一个Rule(规则)** @param options*/export function entry(options: Schema): Rule {return (tree: Tree, context: SchematicContext) => {// 使用logger输出一个信息context.logger.info(`create file name:${options.name}`);// 我们使用tree 创建一个tree.create(`./${options.name}.html`, '<h1>hello-world</h1>');return tree;};}
调试模式运行原理图
# 编译我们的原理图yarn run build // 实际为执行 tsc -p tsconfig.schematics.json# 调试模式运行原理图schematics ./schematics:hello test --dry-run=true# 输出内容# create file name:test# CREATE test.html (20 bytes)
此时我们已经可以看到原理图会创建一个叫 test.html的文件。至此我们的Demo原理图,已经实现了。
但是它还存在很多问题,比如并不会真正创建文件,比如创建后的文件路径问题,以及发布问题,等等,下面我们直接在angular库中创建一个原理图,并将其打包发布。
在Angular库中实现一个完整的原理图
angular的官方文档实际上介绍了如何创建一个库中的原理图,但是文档中的东西…… emm 总会有很多奇怪的情况……
创建项目
# 创建一个叫demo的 angular项目ng new demo# 创建一个叫schematics-lib的库 一会我们的原理图就实现在里面cd ./demo && ng g lib schematics-lib
创建原理图
现在在我们的库项目中创建一个叫schematics的文件夹,其内容格式与我们之前讲的原理图结构相同。
完整的原理图实现代码如下:
collection.json
{"$schema": "../../../node_modules/@angular-devkit/schematics/collection-schema.json","schematics": {"demo": {"description": "一个演示用的原理图","factory": "./demo/index#entry","schema": "./demo/schema.json"}}}
demo/index.ts
import { Schema } from './schema';import { Rule, SchematicContext, Tree } from '@angular-devkit/schematics';/*** 入口函数* 可以拿到Schema提供的参数信息* 并返回一个Rule(规则)** @param options*/export function entry(options: Schema): Rule {return (tree: Tree, context: SchematicContext) => {// 使用logger输出一个信息context.logger.info(`create file name:${options.name}`);tree.create(`./${options.name}.html`, '<h1>hello-world</h1>');return tree;};}
demo/schema.json
{"$schema": "http://json-schema.org/schema","id":"demo-schematic","title": "一个演示用的原理图","properties": {"name":{"description": "文件名","type":"string","$default":{"$source":"argv","index":0}}}}
demo/schema.ts
export interface Schema {name: string;}
由于我们这次是手动创建的原理图,因此我们需要自己新建一个tsconfig.schematics.json,代码如下
{"compilerOptions": {"baseUrl": ".","lib": ["es2018","dom"],"declaration": true,"module": "commonjs","moduleResolution": "node","noEmitOnError": true,"noFallthroughCasesInSwitch": true,"noImplicitAny": true,"noImplicitThis": true,"noUnusedParameters": true,"noUnusedLocals": true,"rootDir": "schematics",// 注意这里 我们需要配置ts文件编译后输出的位置"outDir": "../../dist/schematics-lib/schematics","skipDefaultLibCheck": true,"skipLibCheck": true,"sourceMap": true,"strictNullChecks": true,"target": "es6","types": ["jasmine","node"]},"include": ["schematics/**/*"],"exclude": ["schematics/*/files/**/*"]}
以及还需要在库项目的package.json中添加schematics的路径配置
{// 指向我们的原理图集合"schematics": "./schematics/collection.json"}
最后还要在库的package.json中配置一下scripts,以便于自动拷贝相关文件,这里有一个坑,就是官方文档给出的脚本只能运行在linux上,而mac和windows由于系统命令的不同,需要自行替换
这里贴出官方原版
{"scripts": {"build": "../../node_modules/.bin/tsc -p tsconfig.schematics.json","copy:schemas": "cp --parents schematics/*/schema.json ../../dist/my-lib/","copy:collection": "cp schematics/collection.json ../../dist/my-lib/schematics/collection.json","postbuild": "npm run copy:schemas && npm run copy:collection"},// 指向我们的原理图集合"schematics": "./schematics/collection.json"}
而我们的mac版本是这样的 用rsync 替换掉 cp —parents
{"scripts": {"build": "ng build schematics-lib --prod && ../../node_modules/.bin/tsc -p tsconfig.schematics.json","copy:schemas": "rsync -R schematics/*/schema.json ../../dist/schematics-lib/","copy:collection": "cp schematics/collection.json ../../dist/schematics-lib/schematics/collection.json","postbuild": "npm run copy:schemas && npm run copy:collection"},// 指向我们的原理图集合"schematics": "./schematics/collection.json"}
完成以上步骤之后 我们可以在库项目的目录下 运行 npm run build了。
一切完成之后,我们可以看到在demo项目的 /dist文件夹下已经有了schematics-lib文件夹 大概像这样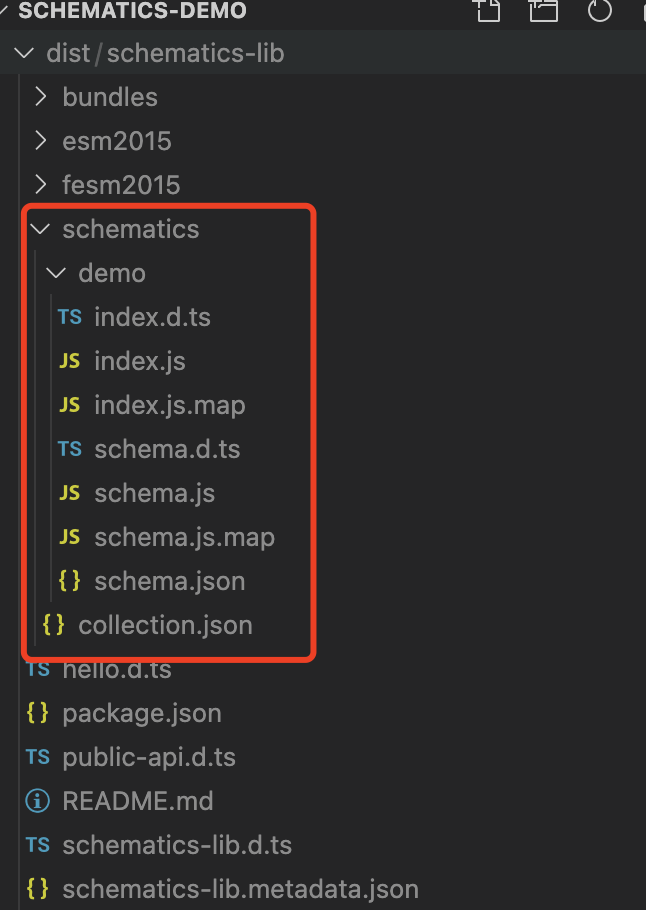
现在我们一定十分想再我们的angular项目中,使用我们的原理图了吧?
如果我们在项目根目录运行 ng g 那么我们的命令大概是这样的
ng g ./dist/schematics-lib:demo test
而我们在 /src/app下运行的话 则命令变成了这样
ng g ../../dist/schematics-lib:demo test
这样的使用方式恶心吗? 恶心,那是相当恶心了。 怎么解决呢?两种方式
- 将我们的dist 发布到npm上 , 在目标项目中 install回来
- 使用npm link 创建一个链接
这里我们来看一下npm link这个命令
npm link
npm link这个命令,会将当前文件夹在全局的node_modules文件夹下创建一个链接,使用方式像这样
# 到 dist/schematics-lib目录下cd dist/schematics-lib# 创建链接npm link# 这时候会再node_modules里 生成一个叫 schematics-lib的链接 指向当前文件夹
然后在我们目标的项目下 链接这个链接
# 退到我们的angular项目文件夹cd ../../# 创建与schematics-lib的链接npm link schematics-lib
此时我们就可以愉快的使用我们刚刚创建的原理图了,不管在哪个文件夹下 我们都可以使用
ng g schematics-lib:demo test
来创建我们的 test.html了。
路径问题
等等? 为什么我们的文件夹 永远与angular.json同级? 看看我们刚刚入口函数中的代码
tree.create(`./${options.name}.html`, '<h1>hello-world</h1>');
这里我们相对于tree的root,创建了一个文件。 然而这个tree的root,就是与angular.json平级的……
因此我们需要通过别的方式获取我们当前执行命令行的路径,这里我们可以在schema.json中,配置一个path
{"properties": {"name":{"description": "文件名","type":"string","$default":{"$source":"argv","index":0}},"path":{"type": "string","format": "path","description": "当前路径","visible": false}}}
这个path 是通过format方式获取的,我们在命令行中不能通过传参的方式进行修改,同时它对于最终用户也是不可见的。
另外我们还需要更新我们的schema.ts 与入口函数
// schema.tsexport interface Schema {name: string;path: string;}// index.tsexport function entry(options: Schema): Rule {return (tree: Tree, context: SchematicContext) => {tree.create(`${options.path}/${options.name}.html`, '<h1>hello-world</h1>');return tree;};}
我们再重新build,并且使用 ng g命令运行,我们会发现我们的文件已经可以输出到指定目录下了。
使用模板文件
我们解决了生成文件的路径问题,但是还是很不爽,因为我们有时候不是简简单单的只生成一个只有一句话的文件,我们可能要生成一系列的模板,这时候,我们就需要创建属于自己的模板文件了。
现在,我们在demo这个原理图下,创建一个files文件夹。为什么叫files呢?这是我们在刚刚的tsconfig中的约定,排除掉了/files文件夹中文件的编译。当然你也可以改成其他名字,只要同步修改tsconfig.json就可以了
我们的模板文件名字,也是可以替换的,它的约定有如下两种
- name
- name@dasherize
第一种,就是把你提供的name字符串原样替换,第二种,则将大写字母 替换成 -小写 的形式
下面我们来建2个模板文件
文件:name@dasherize.component.html.template
<h1> <%= classify(name) %> </h1>
文件:name@dasherize.component.ts.template
import {Component} from "@angular/core"@Component({templateUrl:"./<%= dasherize(name) %>.component.html",})export class <%= classify(name) %>Component{}
在这里 我们看到了几个特殊的语法
- <%= %>
- classify() dasherize() 等等
其中 <%= %>语法为变量绑定语法,用于绑定传入模板的变量值,还有更多的绑定语法,请参照官方文档。
而classify这些函数,则是处理字符串的函数,他们都是传入模板的变量。
下面我们来看看入口函数如何应用模板:
import { Schema } from './schema';import {apply,applyTemplates,mergeWith,move,Rule,SchematicContext,Tree,url,} from '@angular-devkit/schematics';import { strings, normalize } from '@angular-devkit/core';/*** 入口函数* 可以拿到Schema提供的参数信息* 并返回一个Rule(规则)** @param options*/export function entry(options: Schema): Rule {return (tree: Tree, context: SchematicContext) => {// 使用logger输出一个信息context.logger.info(`create file name:${options.name}`);// 模板文件的源const templateSource = url('./files');// 模板应用的规则列表const templateRules = [// 应用到模板中的变量applyTemplates({// 对应模板中的classify 用于将 -小写 转换为大写classify: strings.classify,// 对应模板中的dasherize 用于将大写字母转换为 -小写dasherize: strings.dasherize,// name变量name: options.name,}),// 移动模板文件到指定位置move(normalize(options.path)),];// 应用规则到source 并返回新的sourceconst templateApplySource = apply(templateSource, templateRules);// 应用合并后的规则并返回treereturn mergeWith(templateApplySource)(tree, context);};}
这里面 我们用到了很多辅助函数,帮助我们加载文件,处理相关规则。
用于操作tree 和rule的函数 都位于 @angular-devkit/schematics 这个包中。
而@angular-devkit/core这个包,则提供了大量用于操作路径、字符串、工作空间的辅助函数。
至此我们基于angular库的原理图,已经可以正常的跑起来了。虽然它没有那么完美,比如将我们生成的组件自动导入NgModule中。但是它已经可以生成绝大多数模板代码了,不是吗?
无论如何,我们需要记住。angular的原理图,是跑在node环境下的。因此node的包都可以安装进来使用,这就让原理图这个代码生成器有了无限的可能。
本人也是初学者,从入坑原理图,到写出这篇文章,整整在里面坑了三天,因此也希望更多的人可以对原理图感兴趣,并且共同交流,用好这个angular为我们带来的强大工具。

若有收获,就点个赞吧
0 人点赞
