原理
Object.defineProperty 实现双线数据绑定
function isObject(val) {return val !== null && typeof val === 'object';}function reactive(target) {if (!isObject(target)) return target;for (let key in target) {observer(target, key, target[key]);}target.__ob__ = true; // 标识是响应式数据}function observer(target, key, value) {reactive(value); // 递归监听Object.defineProperty(target, key, {get() {console.log('获取了数据');return value;},set(newVal) {if (newVal !== value) {console.log('数据更新了');value = newVal;}},});}function $set(target, key, value) {if (Array.isArray(target) && typeof key === 'number') {target.length = Math.max(target.length, key); // 设置长度target.splice(key, 1, value); // 然后设置值return value;}if (target[key] && !(key in Object.prototype)) {target[key] = value;return value;}const isObserver = target.__ob__;if (!isObserver) {target[key] = value;return value;}// 监听observer(target, key, value);// target[key] = value; // 触发一下return value;}const obj = {value: '111',arr: [1, 2, 3, 4],child: {value: '111',},};reactive(obj);
Proxy 实现代理
function reactive(obj) {if (obj == null || typeof obj !== 'object') {return obj; // 不是数组和对象,直接返回,不代理了}const proxyObj = new Proxy(obj, {set(target, key, newVal, receiver) {const oldValue = target[key];if (newVal !== oldValue) {if (oldValue != undefined || oldValue != null) {console.log('修改、触发依赖,更新视图');} else {console.log('新增、触发依赖,更新视图');}return Reflect.set(target, key, newVal, receiver);}// 没改动,默认返回truereturn true;},get(target, key, receiver) {// 监听到获取const value = Reflect.get(target, key, receiver);if (key !== 'length') {// 长度的时候不获取一下了,重复了console.log('获取数据,收集依赖');}// todo 如果防止value是对象,可以再包裹一层return reactive(value);},});return proxyObj;}const obj = reactive({ a: 1, b: 2 });
vue双向绑定及实现原理
vue数据双向绑定是通过数据劫持结合发布者-订阅者模式的方式来实现的,
思路分析
实现mvvm主要包含两个方面,数据变化更新视图,视图变化更新数据
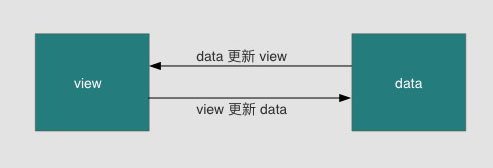
关键点在于data如何更新view,因为view更新data其实可以通过事件监听即可,比如input标签监听 ‘input’ 事件就可以实现了。所以我们着重来分析下,当数据改变,如何更新视图的。
数据更新视图的重点是如何知道数据变了,只要知道数据变了,那么接下去的事都好处理。如何知道数据变了,其实上文我们已经给出答案了,就是通过Object.defineProperty( )对属性设置一个set函数,当数据改变了就会来触发这个函数,所以我们只要将一些需要更新的方法放在这里面就可以实现data更新view了。
1.实现一个监听器Observer,用来劫持并监听所有属性,如果有变动的,就通知订阅者。
2.实现一个订阅者Watcher,可以收到属性的变化通知并执行相应的函数,从而更新视图。
3.实现一个解析器Compile,可以扫描和解析每个节点的相关指令,并根据初始化模板数据以及初始化相应的订阅器。
流程图如下: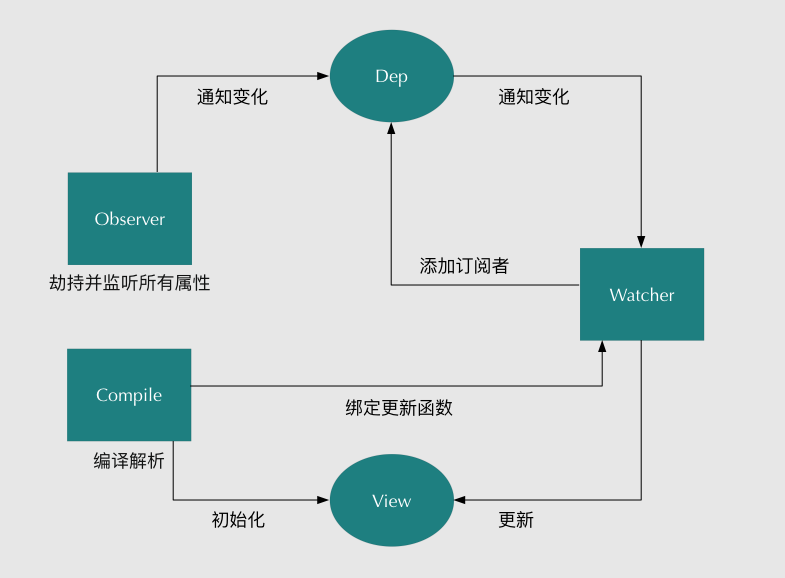
1.实现一个Observer
Observer是一个数据监听器,其实现核心方法就是前文所说的Object.defineProperty( )。如果要对所有属性都进行监听的话,那么可以通过递归方法遍历所有属性值,并对其进行Object.defineProperty( )处理。如下代码,实现了一个Observer。
function defineReactive(data, key, val) {observe(val); // 递归遍历所有子属性Object.defineProperty(data, key, {enumerable: true,configurable: true,get: function() {return val;},set: function(newVal) {val = newVal;console.log('属性' + key + '已经被监听了,现在值为:“' + newVal.toString() + '”');}});}function observe(data) {if (!data || typeof data !== 'object') {return;}Object.keys(data).forEach(function(key) {defineReactive(data, key, data[key]);});};var library = {book1: {name: ''},book2: ''};observe(library);library.book1.name = 'vue权威指南'; // 属性name已经被监听了,现在值为:“vue权威指南”library.book2 = '没有此书籍'; // 属性book2已经被监听了,现在值为:“没有此书籍”
思路分析中,需要创建一个可以容纳订阅者的消息订阅器Dep,订阅器Dep主要负责收集订阅者,然后再属性变化的时候执行对应订阅者的更新函数。所以显然订阅器需要有一个容器,这个容器就是list,将上面的Observer稍微改造下,植入消息订阅器:
function defineReactive(data, key, val) {observe(val); // 递归遍历所有子属性var dep = new Dep();Object.defineProperty(data, key, {enumerable: true,configurable: true,get: function() {if (是否需要添加订阅者) {dep.addSub(watcher); // 在这里添加一个订阅者}return val;},set: function(newVal) {if (val === newVal) {return;}val = newVal;console.log('属性' + key + '已经被监听了,现在值为:“' + newVal.toString() + '”');dep.notify(); // 如果数据变化,通知所有订阅者}});}function Dep () {this.subs = [];}Dep.prototype = {addSub: function(sub) {this.subs.push(sub);},notify: function() {this.subs.forEach(function(sub) {sub.update();});}};
从代码上看,我们将订阅器Dep添加一个订阅者设计在getter里面,这是为了让Watcher初始化进行触发,因此需要判断是否要添加订阅者,至于具体设计方案,下文会详细说明的。在setter函数里面,如果数据变化,就会去通知所有订阅者,订阅者们就会去执行对应的更新的函数。到此为止,一个比较完整Observer已经实现了,接下来我们开始设计Watcher。
2.实现Watcher
订阅者Watcher在初始化的时候需要将自己添加进订阅器Dep中,那该如何添加呢?我们已经知道监听器Observer是在get函数执行了添加订阅者Wather的操作的,所以我们只要在订阅者Watcher初始化的时候出发对应的get函数去执行添加订阅者操作即可,那要如何触发get的函数,再简单不过了,只要获取对应的属性值就可以触发了,核心原因就是因为我们使用了Object.defineProperty( )进行数据监听。这里还有一个细节点需要处理,我们只要在订阅者Watcher初始化的时候才需要添加订阅者,所以需要做一个判断操作,因此可以在订阅器上做一下手脚:在Dep.target上缓存下订阅者,添加成功后再将其去掉就可以了。订阅者Watcher的实现如下:
function Watcher(vm, exp, cb) {this.cb = cb;this.vm = vm;this.exp = exp;this.value = this.get(); // 将自己添加到订阅器的操作}Watcher.prototype = {update: function() {this.run();},run: function() {var value = this.vm.data[this.exp];var oldVal = this.value;if (value !== oldVal) {this.value = value;this.cb.call(this.vm, value, oldVal);}},get: function() {Dep.target = this; // 缓存自己var value = this.vm.data[this.exp] // 强制执行监听器里的get函数Dep.target = null; // 释放自己return value;}};
这时候,我们需要对监听器Observer也做个稍微调整,主要是对应Watcher类原型上的get函数。需要调整地方在于defineReactive函数:
function defineReactive(data, key, val) {observe(val); // 递归遍历所有子属性var dep = new Dep();Object.defineProperty(data, key, {enumerable: true,configurable: true,get: function() {if (Dep.target) {. // 判断是否需要添加订阅者dep.addSub(Dep.target); // 在这里添加一个订阅者}return val;},set: function(newVal) {if (val === newVal) {return;}val = newVal;console.log('属性' + key + '已经被监听了,现在值为:“' + newVal.toString() + '”');dep.notify(); // 如果数据变化,通知所有订阅者}});}Dep.target = null;
到此为止,简单版的Watcher设计完毕,这时候我们只要将Observer和Watcher关联起来,就可以实现一个简单的双向绑定数据了。因为这里没有还没有设计解析器Compile,所以对于模板数据我们都进行写死处理,假设模板上又一个节点,且id号为’name’,并且双向绑定的绑定的变量也为’name’,且是通过两个大双括号包起来(这里只是为了掩饰,暂时没什么用处),模板如下:
<body><h1 id="name">{{name}}</h1></body>
这时候我们需要将Observer和Watcher关联起来:
function SelfVue (data, el, exp) {this.data = data;observe(data);el.innerHTML = this.data[exp]; // 初始化模板数据的值new Watcher(this, exp, function (value) {el.innerHTML = value;});return this;}
然后在页面上new以下SelfVue类,就可以实现数据的双向绑定了:
<body><h1 id="name">{{name}}</h1></body><script src="js/observer.js"></script><script src="js/watcher.js"></script><script src="js/index.js"></script><script type="text/javascript">var ele = document.querySelector('#name');var selfVue = new SelfVue({name: 'hello world'}, ele, 'name');window.setTimeout(function () {console.log('name值改变了');selfVue.data.name = 'canfoo';}, 2000);</script>
这时候打开页面,可以看到页面刚开始显示了是’hello world’,过了2s后就变成’canfoo’了。到这里,总算大功告成一半了,但是还有一个细节问题,我们在赋值的时候是这样的形式 ‘ selfVue.data.name = ‘canfoo’ ‘ 而我们理想的形式是’ selfVue.name = ‘canfoo’ ‘为了实现这样的形式,我们需要在new SelfVue的时候做一个代理处理,让访问selfVue的属性代理为访问selfVue.data的属性,实现原理还是使用Object.defineProperty( )对属性值再包一层
function SelfVue (data, el, exp) {var self = this;this.data = data;Object.keys(data).forEach(function(key) {self.proxyKeys(key); // 绑定代理属性});observe(data);el.innerHTML = this.data[exp]; // 初始化模板数据的值new Watcher(this, exp, function (value) {el.innerHTML = value;});return this;}SelfVue.prototype = {proxyKeys: function (key) {var self = this;Object.defineProperty(this, key, {enumerable: false,configurable: true,get: function proxyGetter() {return self.data[key];},set: function proxySetter(newVal) {self.data[key] = newVal;}});}}
这下我们就可以直接通过’ selfVue.name = ‘canfoo’ ‘的形式来进行改变模板数据了。如果想要迫切看到现象的童鞋赶快来获取代码!
3.实现Compile
虽然上面已经实现了一个双向数据绑定的例子,但是整个过程都没有去解析dom节点,而是直接固定某个节点进行替换数据的,所以接下来需要实现一个解析器Compile来做解析和绑定工作。解析器Compile实现步骤:
1.解析模板指令,并替换模板数据,初始化视图
2.将模板指令对应的节点绑定对应的更新函数,初始化相应的订阅器
为了解析模板,首先需要获取到dom元素,然后对含有dom元素上含有指令的节点进行处理,因此这个环节需要对dom操作比较频繁,所有可以先建一个fragment片段,将需要解析的dom节点存入fragment片段里再进行处理:
function nodeToFragment (el) {var fragment = document.createDocumentFragment();var child = el.firstChild;while (child) {// 将Dom元素移入fragment中fragment.appendChild(child);child = el.firstChild}return fragment;}
接下来需要遍历各个节点,对含有相关指定的节点进行特殊处理,这里咱们先处理最简单的情况,只对带有 ‘{{变量}}’ 这种形式的指令进行处理,先简道难嘛,后面再考虑更多指令情况:
function compileElement (el) {var childNodes = el.childNodes;var self = this;[].slice.call(childNodes).forEach(function(node) {var reg = /\{\{(.*)\}\}/;var text = node.textContent;if (self.isTextNode(node) && reg.test(text)) { // 判断是否是符合这种形式{{}}的指令self.compileText(node, reg.exec(text)[1]);}if (node.childNodes && node.childNodes.length) {self.compileElement(node); // 继续递归遍历子节点}});},function compileText (node, exp) {var self = this;var initText = this.vm[exp];this.updateText(node, initText); // 将初始化的数据初始化到视图中new Watcher(this.vm, exp, function (value) { // 生成订阅器并绑定更新函数self.updateText(node, value);});},function (node, value) {node.textContent = typeof value == 'undefined' ? '' : value;}
获取到最外层节点后,调用compileElement函数,对所有子节点进行判断,如果节点是文本节点且匹配{{}}这种形式指令的节点就开始进行编译处理,编译处理首先需要初始化视图数据,对应上面所说的步骤1,接下去需要生成一个并绑定更新函数的订阅器,对应上面所说的步骤2。这样就完成指令的解析、初始化、编译三个过程,一个解析器Compile也就可以正常的工作了。为了将解析器Compile与监听器Observer和订阅者Watcher关联起来,我们需要再修改一下类SelfVue函数
function SelfVue (options) {var self = this;this.vm = this;this.data = options;Object.keys(this.data).forEach(function(key) {self.proxyKeys(key);});observe(this.data);new Compile(options, this.vm);return this;}
更改后,我们就不要像之前通过传入固定的元素值进行双向绑定了,可以随便命名各种变量进行双向绑定了:
<body><div id="app"><h2>{{title}}</h2><h1>{{name}}</h1></div></body><script src="js/observer.js"></script><script src="js/watcher.js"></script><script src="js/compile.js"></script><script src="js/index.js"></script><script type="text/javascript">var selfVue = new SelfVue({el: '#app',data: {title: 'hello world',name: ''}});window.setTimeout(function () {selfVue.title = '你好';}, 2000);window.setTimeout(function () {selfVue.name = 'canfoo';}, 2500);</script>
如上代码,在页面上可观察到,刚开始titile和name分别被初始化为 ‘hello world’ 和空,2s后title被替换成 ‘你好’ 3s后name被替换成 ‘canfoo’ 了。废话不多说,再给你们来一个这个版本的代码(v2),获取代码!
到这里,一个数据双向绑定功能已经基本完成了,接下去就是需要完善更多指令的解析编译,在哪里进行更多指令的处理呢?答案很明显,只要在上文说的compileElement函数加上对其他指令节点进行判断,然后遍历其所有属性,看是否有匹配的指令的属性,如果有的话,就对其进行解析编译。这里我们再添加一个v-model指令和事件指令的解析编译,对于这些节点我们使用函数compile进行解析处理:
function compile (node) {var nodeAttrs = node.attributes;var self = this;Array.prototype.forEach.call(nodeAttrs, function(attr) {var attrName = attr.name;if (self.isDirective(attrName)) {var exp = attr.value;var dir = attrName.substring(2);if (self.isEventDirective(dir)) { // 事件指令self.compileEvent(node, self.vm, exp, dir);} else { // v-model 指令self.compileModel(node, self.vm, exp, dir);}node.removeAttribute(attrName);}});}
上面的compile函数是挂载Compile原型上的,它首先遍历所有节点属性,然后再判断属性是否是指令属性,如果是的话再区分是哪种指令,再进行相应的处理,处理方法相对来说比较简单,这里就不再列出来,想要马上看阅读代码的同学可以马上点击这里获取。
最后我们在稍微改造下类SelfVue,使它更像vue的用法:
function SelfVue (options) {var self = this;this.data = options.data;this.methods = options.methods;Object.keys(this.data).forEach(function(key) {self.proxyKeys(key);});observe(this.data);new Compile(options.el, this);options.mounted.call(this); // 所有事情处理好后执行mounted函数}
这时候我们可以来真正测试了,在页面上设置如下东西:
<body><div id="app"><h2>{{title}}</h2><input v-model="name"><h1>{{name}}</h1><button v-on:click="clickMe">click me!</button></div></body><script src="js/observer.js"></script><script src="js/watcher.js"></script><script src="js/compile.js"></script><script src="js/index.js"></script><script type="text/javascript">new SelfVue({el: '#app',data: {title: 'hello world',name: 'canfoo'},methods: {clickMe: function () {this.title = 'hello world';}},mounted: function () {window.setTimeout(() => {this.title = '你好';}, 1000);}});</script>
nextTick
实现一个简单的 nextTick
let callbacks = []let pending = falsefunction nextTick (cb) {callbacks.push(cb)if (!pending) {pending = truesetTimeout(flushCallback, 0)}}function flushCallback () {pending = falselet copies = callbacks.slice()callbacks.length = 0copies.forEach(copy => {copy()})}可以看到,在简易版的 nextTick 中,通过 nextTick 接收回调函数,通过 setTimeout 来异步执行回调函数。通过这种方式,可以实现在下一个 tick 中执行回调函数,即在UI重新渲染后执行回调函数。
vue实现
// 回调函数队列const callbacks = []// 异步锁let pending = false// 执行回调函数function flushCallbacks () {// 重置异步锁pending = false// 防止出现nextTick中包含nextTick时出现问题,在执行回调函数队列前,提前复制备份,清空回调函数队列const copies = callbacks.slice(0)callbacks.length = 0// 执行回调函数队列for (let i = 0; i < copies.length; i++) {copies[i]()}}...// 我们调用的nextTick函数export function nextTick (cb?: Function, ctx?: Object) {let _resolve// 将回调函数推入回调队列callbacks.push(() => {if (cb) {try {cb.call(ctx)} catch (e) {handleError(e, ctx, 'nextTick')}} else if (_resolve) {_resolve(ctx)}})// 如果异步锁未锁上,锁上异步锁,调用异步函数,准备等同步函数执行完后,就开始执行回调函数队列if (!pending) {pending = trueif (useMacroTask) {macroTimerFunc()} else {microTimerFunc()}}// $flow-disable-line// 2.1.0新增,如果没有提供回调,并且支持Promise,返回一个Promiseif (!cb && typeof Promise !== 'undefined') {return new Promise(resolve => {_resolve = resolve})}}总体流程就是:接收回调函数,将回调函数推入回调函数队列中。同时,在接收第一个回调函数时,执行能力检测中对应的异步方法(异步方法中调用了回调函数队列)。如何保证只在接收第一个回调函数时执行异步方法?nextTick 源码中使用了一个异步锁的概念,即接收第一个回调函数时,先关上锁,执行异步方法。此时,浏览器处于等待执行完同步代码就执行异步代码的情况。打个比喻:相当于一群旅客准备上车,当第一个旅客上车的时候,车开始发动,准备出发,等到所有旅客都上车后,就可以正式开车了。当然执行 flushCallbacks 函数时有个难以理解的点,即:为什么需要备份回调函数队列?执行的也是备份的回调函数队列?因为,会出现这么一种情况:nextTick 的回调函数中还使用 nextTick。如果 flushCallbacks 不做特殊处理,直接循环执行回调函数,会导致里面 nextTick 中的回调函数会进入回调队列。这就相当于,下一个班车的旅客上了上一个班车。
前端路由
hash路由
hash路由一个明显的标志是带有#,我们主要是通过监听url中的hash变化来进行路由跳转。hash的优势就是兼容性更好,在老版IE中都有运行,问题在于url中一直存在#不够美观,而且hash路由更像是Hack而非标准,相信随着发展更加标准化的History API会逐步蚕食掉hash路由的市场。## 初始化class```jsclass Routers {constructor() {// 以键值对的形式储存路由this.routes = {};// 当前路由的URLthis.currentUrl = '';}}
实现路由hash储存与执行
在初始化完毕后我们需要思考两个问题:
- 将路由的hash以及对应的callback函数储存
- 触发路由hash变化后,执行对应的callback函数
class Routers {constructor() {this.routes = {};this.currentUrl = '';}// 将path路径与对应的callback函数储存route(path, callback) {this.routes[path] = callback || function() {};}// 刷新refresh() {// 获取当前URL中的hash路径this.currentUrl = location.hash.slice(1) || '/';// 执行当前hash路径的callback函数this.routes[this.currentUrl]();}}
监听对应事件
那么我们只需要在实例化Class的时候监听上面的事件即可
class Routers {constructor() {this.routes = {};this.currentUrl = '';this.refresh = this.refresh.bind(this);window.addEventListener('load', this.refresh, false);window.addEventListener('hashchange', this.refresh, false);}route(path, callback) {this.routes[path] = callback || function() {};}refresh() {this.currentUrl = location.hash.slice(1) || '/';this.routes[this.currentUrl]();}}
实现后退功能
需要创建一个数组history来储存过往的hash路由例如/blue,并且创建一个指针currentIndex来随着后退和前进功能移动来指向不同的hash路由。
class Routers {constructor() {// 储存hash与callback键值对this.routes = {};// 当前hashthis.currentUrl = '';// 记录出现过的hashthis.history = [];// 作为指针,默认指向this.history的末尾,根据后退前进指向history中不同的hashthis.currentIndex = this.history.length - 1;this.refresh = this.refresh.bind(this);this.backOff = this.backOff.bind(this);window.addEventListener('load', this.refresh, false);window.addEventListener('hashchange', this.refresh, false);}route(path, callback) {this.routes[path] = callback || function() {};}refresh() {this.currentUrl = location.hash.slice(1) || '/';// 将当前hash路由推入数组储存this.history.push(this.currentUrl);// 指针向前移动this.currentIndex++;this.routes[this.currentUrl]();}// 后退功能backOff() {// 如果指针小于0的话就不存在对应hash路由了,因此锁定指针为0即可this.currentIndex <= 0? (this.currentIndex = 0): (this.currentIndex = this.currentIndex - 1);// 随着后退,location.hash也应该随之变化location.hash = `#${this.history[this.currentIndex]}`;// 执行指针目前指向hash路由对应的callbackthis.routes[this.history[this.currentIndex]]();}}
可是出现了Bug,在后退的时候我们往往需要点击两下 问题在于,我们每次在后退都会执行相应的callback,这会触发refresh()执行,因此每次我们后退,history中都会被push新的路由hash,currentIndex也会向前移动,这显然不是我们想要的。
refresh() {this.currentUrl = location.hash.slice(1) || '/';// 将当前hash路由推入数组储存this.history.push(this.currentUrl);// 指针向前移动this.currentIndex++;this.routes[this.currentUrl]();}
完整实现hash Router
我们必须做一个判断,如果是后退的话,我们只需要执行回调函数,不需要添加数组和移动指针。
class Routers {constructor() {// 储存hash与callback键值对this.routes = {};// 当前hashthis.currentUrl = '';// 记录出现过的hashthis.history = [];// 作为指针,默认指向this.history的末尾,根据后退前进指向history中不同的hashthis.currentIndex = this.history.length - 1;this.refresh = this.refresh.bind(this);this.backOff = this.backOff.bind(this);// 默认不是后退操作this.isBack = false;window.addEventListener('load', this.refresh, false);window.addEventListener('hashchange', this.refresh, false);}route(path, callback) {this.routes[path] = callback || function() {};}refresh() {this.currentUrl = location.hash.slice(1) || '/';if (!this.isBack) {// 如果不是后退操作,且当前指针小于数组总长度,直接截取指针之前的部分储存下来// 此操作来避免当点击后退按钮之后,再进行正常跳转,指针会停留在原地,而数组添加新hash路由// 避免再次造成指针的不匹配,我们直接截取指针之前的数组// 此操作同时与浏览器自带后退功能的行为保持一致if (this.currentIndex < this.history.length - 1)this.history = this.history.slice(0, this.currentIndex + 1);this.history.push(this.currentUrl);this.currentIndex++;}this.routes[this.currentUrl]();console.log('指针:', this.currentIndex, 'history:', this.history);this.isBack = false;}// 后退功能backOff() {// 后退操作设置为truethis.isBack = true;this.currentIndex <= 0? (this.currentIndex = 0): (this.currentIndex = this.currentIndex - 1);location.hash = `#${this.history[this.currentIndex]}`;this.routes[this.history[this.currentIndex]]();}}
前进的部分就不实现了,思路我们已经讲得比较清楚了,可以看出来,hash路由这种方式确实有点繁琐,所以HTML5标准提供了History API供我们使用。
<a name="wjJQ4"></a>#### History```markdown## 常用的APIwindow.history.back(); // 后退window.history.forward(); // 前进window.history.go(-3); // 后退三个页面history.pushState用于在浏览历史中添加历史记录,但是并不触发跳转,此方法接受三个参数,依次为:state:一个与指定网址相关的状态对象,popstate事件触发时,该对象会传入回调函数。如果不需要这个对象,此处可以填null。title:新页面的标题,但是所有浏览器目前都忽略这个值,因此这里可以填null。url:新的网址,必须与当前页面处在同一个域。浏览器的地址栏将显示这个网址。history.replaceState方法的参数与pushState方法一模一样,区别是它修改浏览历史中当前纪录,而非添加记录,同样不触发跳转。popstate事件,每当同一个文档的浏览历史(即history对象)出现变化时,就会触发popstate事件。需要注意的是,仅仅调用pushState方法或replaceState方法 ,并不会触发该事件,只有用户点击浏览器倒退按钮和前进按钮,或者使用 JavaScript 调用back、forward、go方法时才会触发。另外,该事件只针对同一个文档,如果浏览历史的切换,导致加载不同的文档,该事件也不会触发。## 实现```jsclass Routers {constructor() {this.routes = {};// 在初始化时监听popstate事件this._bindPopState();}// 初始化路由init(path) {history.replaceState({path: path}, null, path);this.routes[path] && this.routes[path]();}// 将路径和对应回调函数加入hashMap储存route(path, callback) {this.routes[path] = callback || function() {};}// 触发路由对应回调go(path) {history.pushState({path: path}, null, path);this.routes[path] && this.routes[path]();}// 监听popstate事件_bindPopState() {window.addEventListener('popstate', e => {const path = e.state && e.state.path;this.routes[path] && this.routes[path]();});}}
<a name="bLih9"></a>## vue reactive```javascript// Dep moduleclass Dep {static stack = []static target = nulldeps = nullconstructor() {this.deps = new Set()}depend() {if (Dep.target) {this.deps.add(Dep.target)}}notify() {this.deps.forEach(w => w.update())}static pushTarget(t) {if (this.target) {this.stack.push(this.target)}this.target = t}static popTarget() {this.target = this.stack.pop()}}// reactivefunction reactive(o) {if (o && typeof o === 'object') {Object.keys(o).forEach(k => {defineReactive(o, k, o[k])})}return o}function defineReactive(obj, k, val) {let dep = new Dep()Object.defineProperty(obj, k, {get() {dep.depend()return val},set(newVal) {val = newValdep.notify()}})if (val && typeof val === 'object') {reactive(val)}}// watcherclass Watcher {constructor(effect) {this.effect = effectthis.update()}update() {Dep.pushTarget(this)this.value = this.effect()Dep.popTarget()return this.value}}// 测试代码const data = reactive({msg: 'aaa'})new Watcher(() => {console.log('===> effect', data.msg);})setTimeout(() => {data.msg = 'hello'}, 1000)

若有收获,就点个赞吧
0 人点赞
