1 自动清理构建目录产物
- 安装插件
npm i clean-webpack-plugin -D
const { CleanWebpackPlugin } = require("clean-webpack-plugin") // 注意{}写法plugins:[new CleanWebpackPlugin()]
2 CSS3的属性为什么需要前缀
- 浏览器不一致
使用postcss-loader和autoprefixer补全前缀
{
test: /.less$/,
 use: [
   MiniCssExtractPlugin.loader,
   "css-loader",
   "less-loader",
   {
     loader: "postcss-loader",
     options: {
       plugins: () => [
         require("autoprefixer")({
           overrideBrowserslist: [
             "Android 4.1",
             "iOS 7.1",
             "Chrome > 31",
             "ff > 31",
             "ie >= 8"
           ]
         })
       ]
     }
   }
 ]
},
3 移动端px自动转rem
安装插件
npm i px2rem-loader -D和npm i lib-flexible -S(不只是开发环境使用,所以-S)
module:{
    rules:[
      {
      test: /.less$/,
      use: [
        MiniCssExtractPlugin.loader,
        "css-loader",
        "less-loader",
        {
          loader: "postcss-loader",
          options: {
              postcssOptions: {
                plugins: [
                  [
                    "autoprefixer",
                    {
                      // Options
                    },
                  ],
                ],
              },
            },
        },
        {
          loader: "px2rem-loader",
          options: {
            remUnit: 75, // 面对750px的设计稿
            remPrecision: 8 // 小数点后保留8位
          }
        }
      ]
    },
  ]
}

- html和js内联
借助插件npm i raw-loader@0.5.1 -D``(注意版本)
在模版页面的改动
<head>
  ${ require('raw-loader!./meta.html') }
    <script>
    ${ require('raw-loader!../node_modules/lib-flexible/flexible.js') }
    </script>
</head>
如果raw-loader安装的是新版,则内联方式会有变化
<head>
  ${ require('raw-loader!./meta.html').default }
    <script>
    ${ require('raw-loader!../node_modules/lib-flexible/flexible.js').default }
    </script>
</head>
- css内联

安装插件npm i html-inline-css-webpack-plugin -D
添加new HTMLInlineCSSWebpackPlugin()插件
5 多页面打包思路
- 动态获取entry和设置html-webpack-plugin
- 利用glob插件
glob.sync(path.join(__dirname, './src/*/index.js'))
npm i glob -D
- 获取文件路径和模块名字
- 约定目录结构
src
    --index
         --img
    index.js
        index.html
        index.css
    --search
      --img
    index.js
        index.html
        index.css
const glob = require("glob");

const setMPA = () => {
  const entry = {};
  const htmlWebpackPlugins = [];

  // ['/Users/zhensir/Desktop/MyWebpackConfig/webpackGeek/src/index/index.js',]
  const entryFiles = glob.sync(path.join(__dirname, "src/*/index.js"));
  Object.values(entryFiles).forEach(file => {
    const match = file.match(/src\/(.*)\/index\.js/);
    const chunkName = match[1];
    entry[chunkName] = file;
    htmlWebpackPlugins.push(
      new HtmlWebpackPlugin({
        template: path.join(__dirname, `src/${chunkName}/index.html`),
        filename: `${chunkName}.html`,
        chunks: [chunkName],
        inject: true,
        minify: {
          html5: true,
          collapseWhitespace: true,
          preserveLineBreaks: false,
          minifyCSS: true,
          minifyJS: true,
          removeComments: false
        }
      })
    );
  });
  return {
    entry,
    htmlWebpackPlugins
  };
};

const { entry, htmlWebpackPlugins } = setMPA();

plugins: [].concat(htmlWebpackPlugins) // 拼接
6 使用source map
- 通过source map定位到源码
- 开发环境开启,先上环境关闭
- 线上排查问题可以讲sourcemap上传到错误监控系统
- 开发环境建议使用eval-source-map可以定位到源代码, 并且二次构建比source-map快
- 生产环境可以使用source-map,并将source-map限制为特定用户可以访问

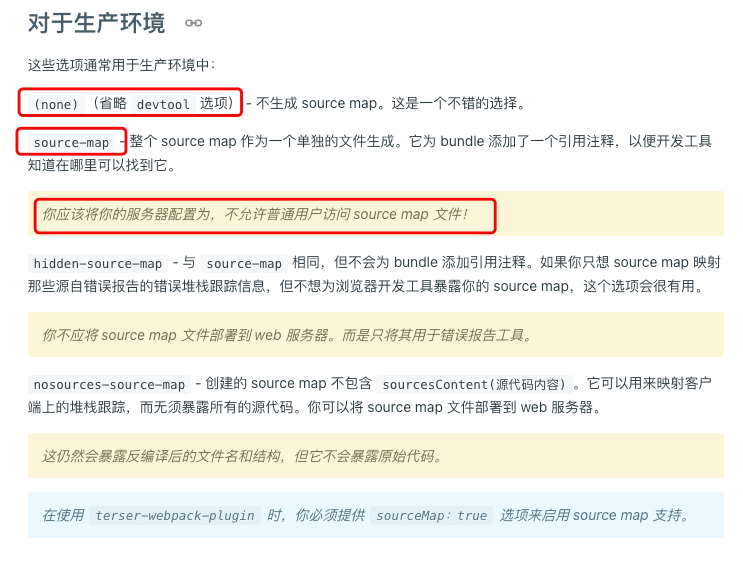

devtool: source-map
7 提取页面公共资源
- 安装
npm i html-webpack-externals-plugin -D
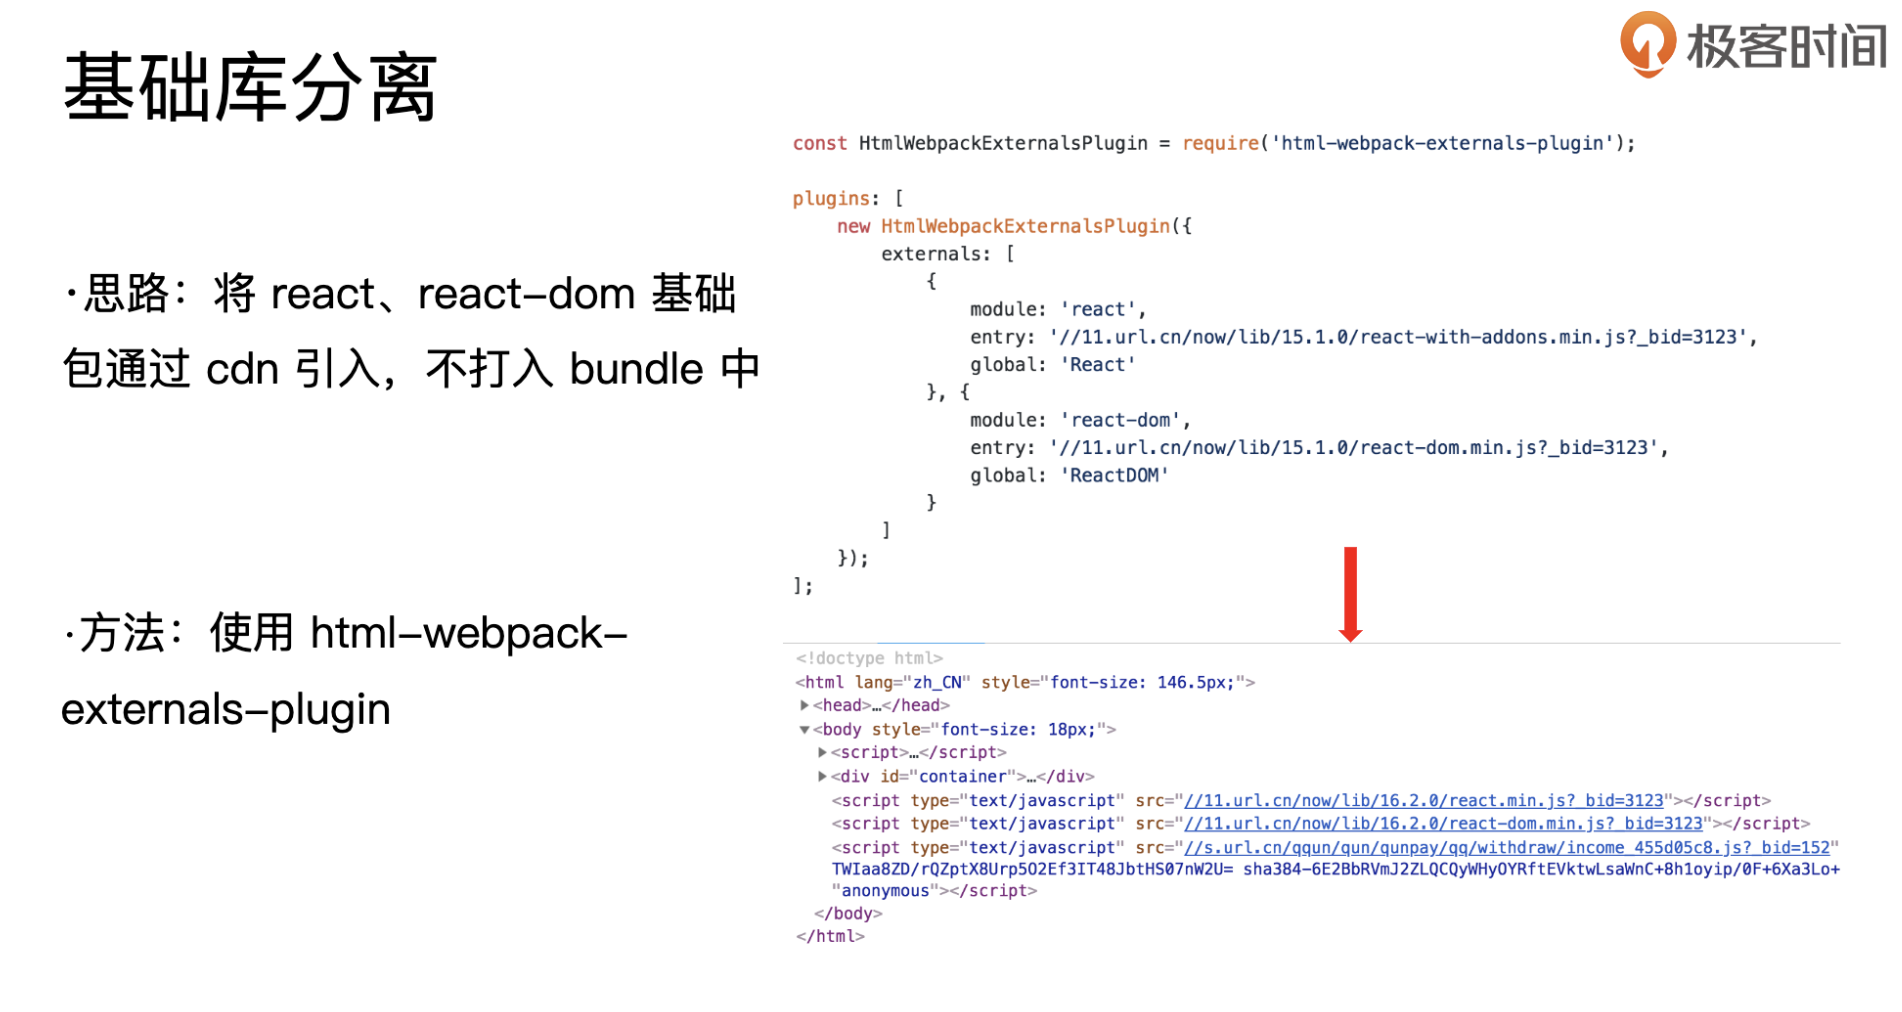
在inde.html中引入cdn文件

使用的时候将‘vendors’,添加到new HtmlWebpackPlugin({
chunks:[‘vendors’]
})
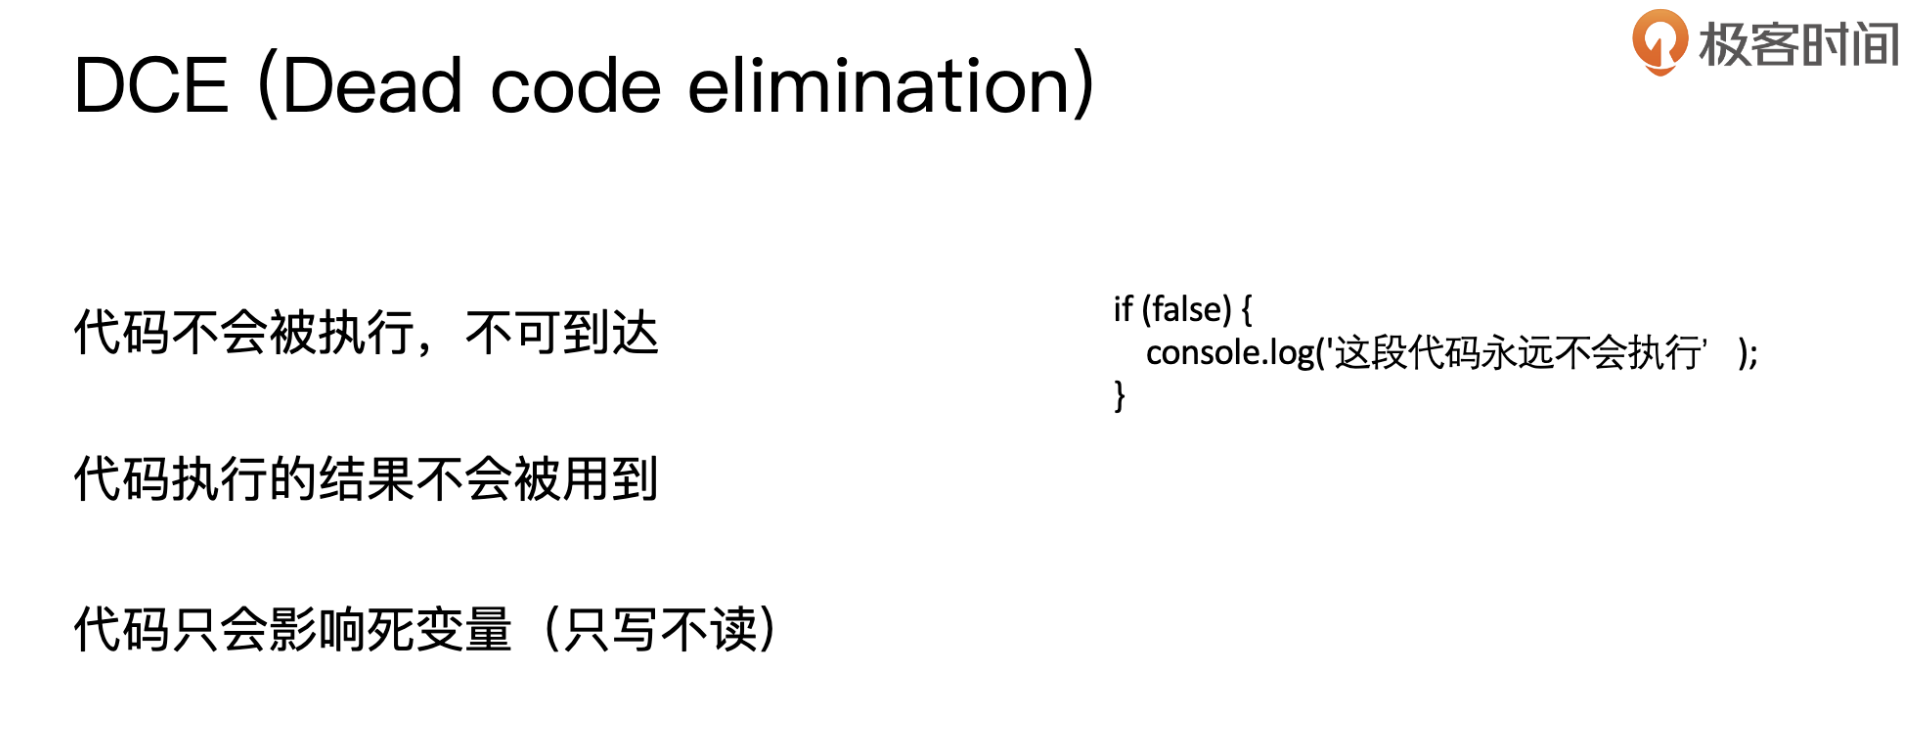
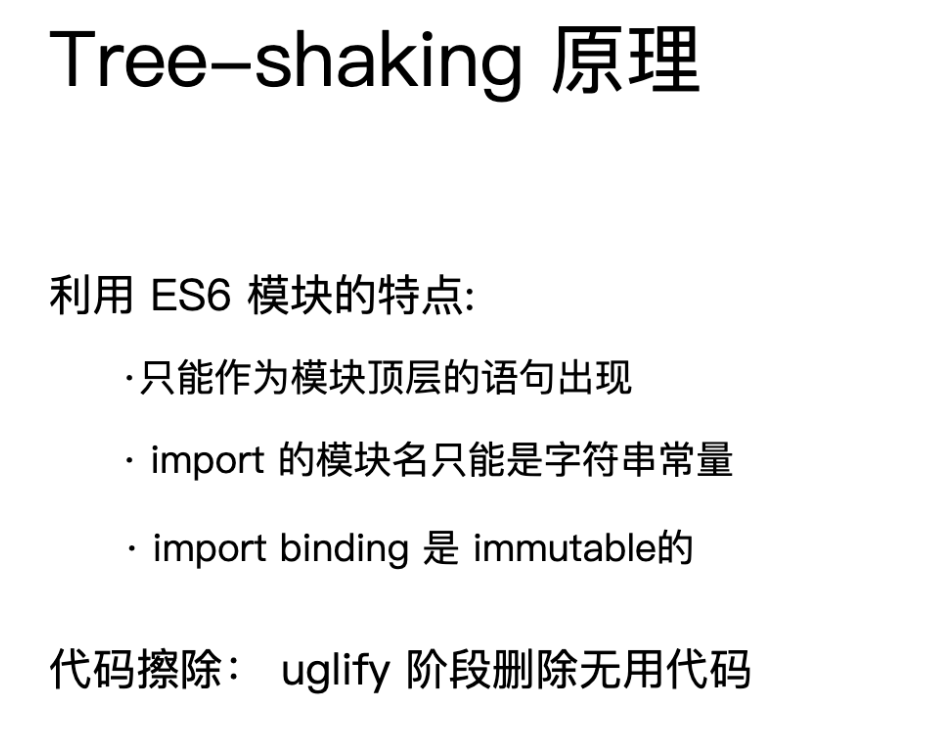
8 tree shaking
webpack 的mode 设置为production默认开启
9 Scope Hoisting使用和原理分析
production环境默认开启,使用的是ModuleConcatenationPlugin()


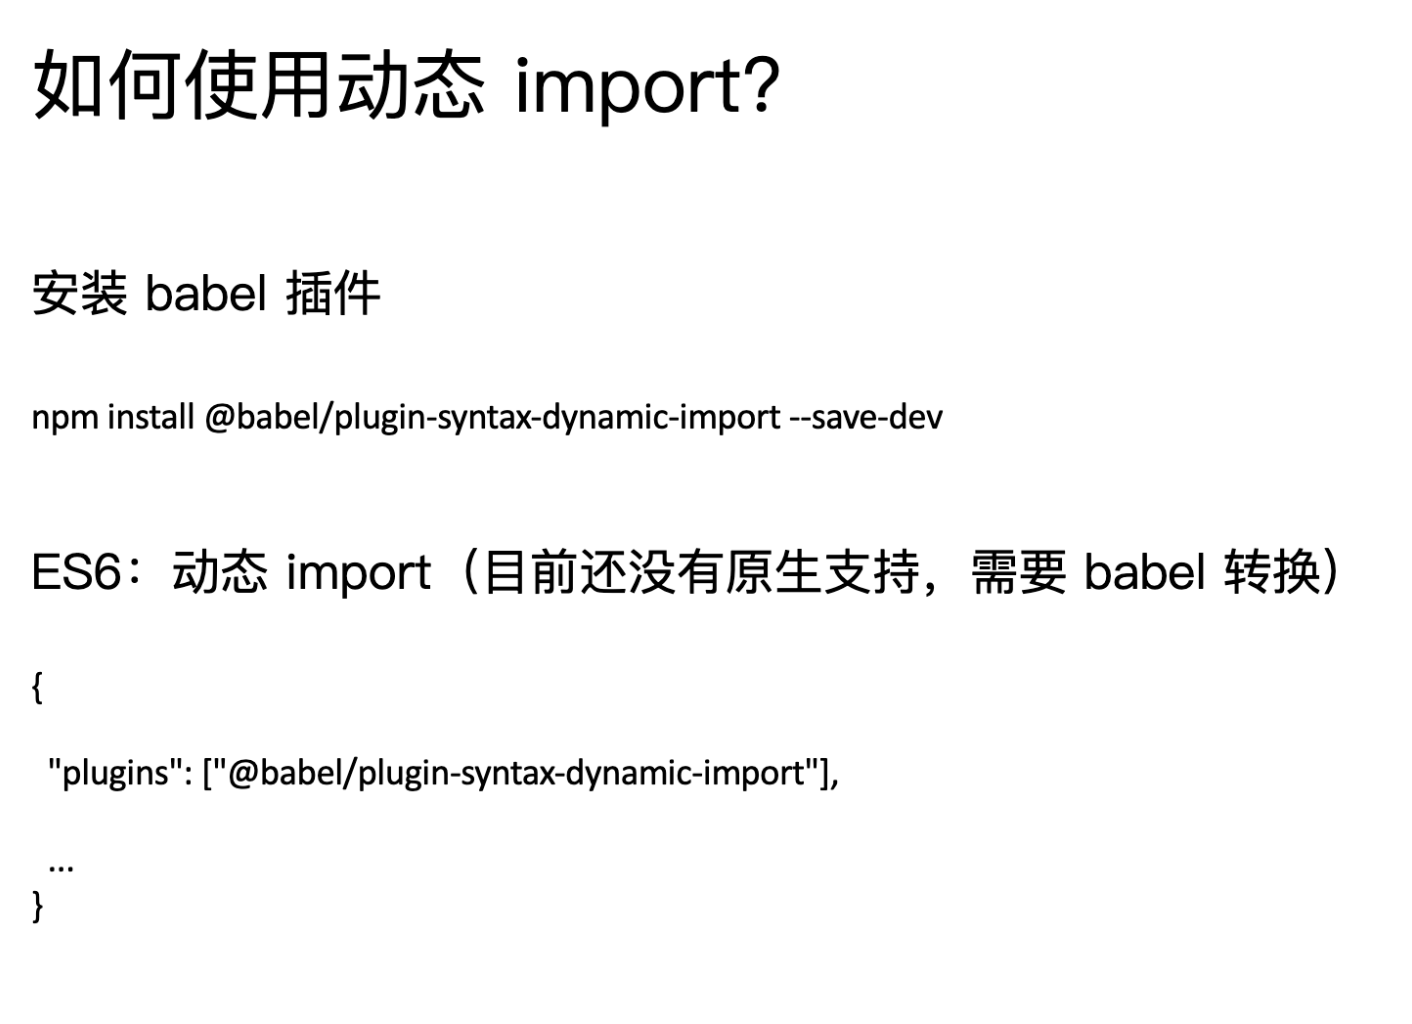
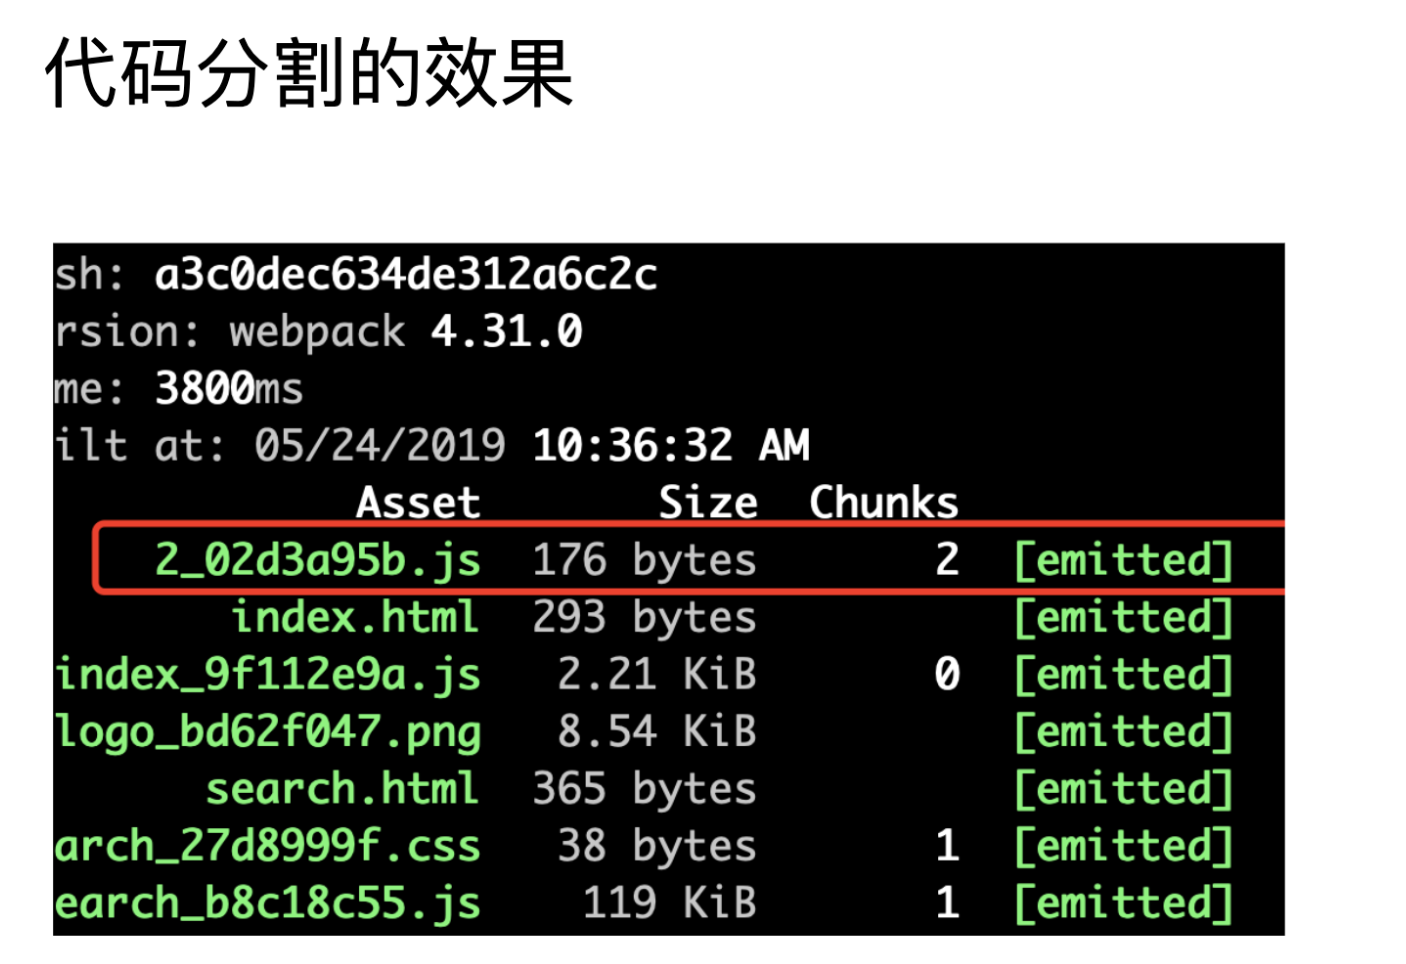
10 代码分割和动态import
安装插件npm i @babel/plugin-syntax-dynamic-import -D
"plugins": [
  "@babel/plugin-syntax-dynamic-import"
]
动态模块打包的内容 jsonp的方式
11 在webpack中使用ESLint
在编码时发现一些问题
如何集成落地


安装插件
npm i eslint eslint-plugin-import eslint-plugin-react eslint-plugin-jsx-a11y -D
npm i eslint-loader -D
npm i babel-eslint -D
npm i eslint-config-airbnb -D
// 修改webpack.config文件
{
  test: /\.js$/,
    use: ["babel-loader", "eslint-loader"]
},
配置规则
module.exports = {
    "parser": "babel-eslint",
    "extends": "airbnb",
    "env": {
        "browser": true,
        "node": true
    },
}
12 webpack打包组件和基础库
例子: 一个大整数相加的包,并发布。
- 要求输出一个压缩文件,一个未压缩文件。
- 引用此库的时候,测试环境使用为压缩文件,生产环境引用压缩文件。
const TerserPlugin = require('terser-webpack-plugin');

module.exports = {
  entry: {
    "large-number": "./src/index.js",
    "large-number.min": "./src/index.js"
  },
  output: {
    filename: "[name].js", // 这样就会输出large-number.js large-number.min.js
    library: "largeNumber", // 库的名字
    libraryTarget: "umd",// 可以使用esmodule cjs 方式引入
    libraryExport: "default"// 建议开启,不然使用的时候需要***.default的方式使用
  },
  mode: 'none', // 设置为none,可以自己设置压缩和未压缩文件
  optimization: {
      minimize: true,
      minimizer: [
        // webpack4的production环境默认使用此插件压缩,支持es6语法
          new TerserPlugin({
              include: /\.min\.js$/
          })
      ]
  }
};
{
  "name": "largeNumber",
  "version": "1.0.0",
  "description": "大整数加法练习geekdemo",// 库的说明书
  "main": "index.js", // 此文件可以设置用户引用的文件版本,压缩未压缩
  "scripts": {
    "test": "echo \"Error: no test specified\" && exit 1",
    "build": "webpack --config webpack.prod.js",
    "prepublish": "webpack --config webpack.prod.js"// 发布前构建
  },
  "keywords": [],
  "author": "",
  "license": "ISC",
  "devDependencies": {
    "terser-webpack-plugin": "^2.2.1",
    "webpack": "^4.41.2",
    "webpack-cli": "^3.3.10"
  }
}
index.js根目录下
if (process.env.NODE_ENV === 'production') {
    module.exports = require('./dist/large-number.min.js');
} else {
    module.exports = require('./dist/large-number.js');
}
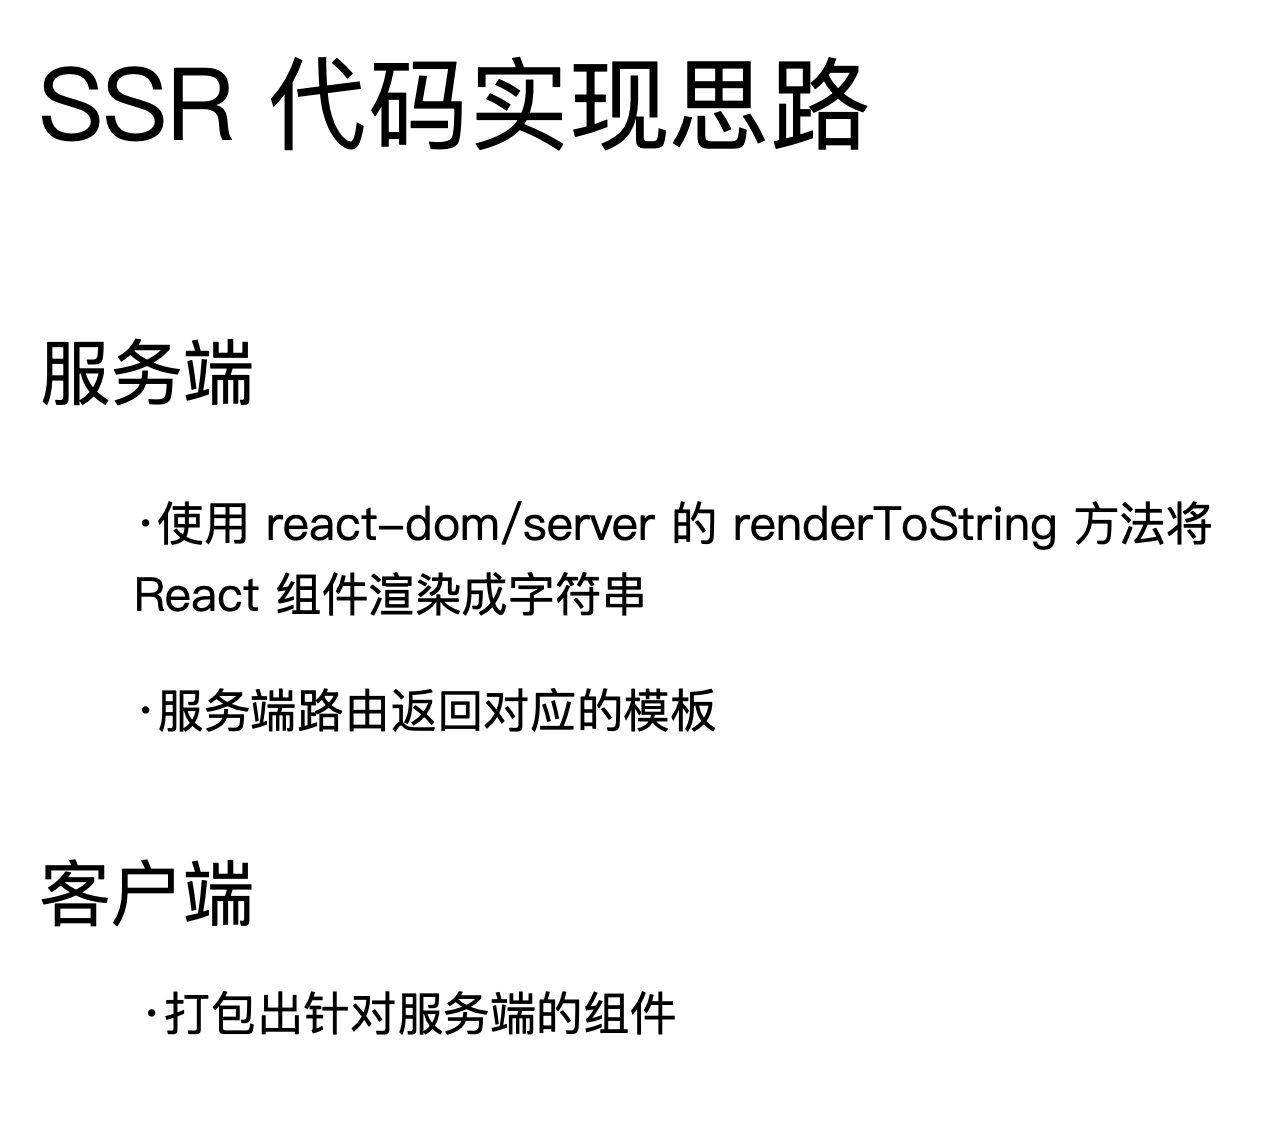
13 webpack实现SSR
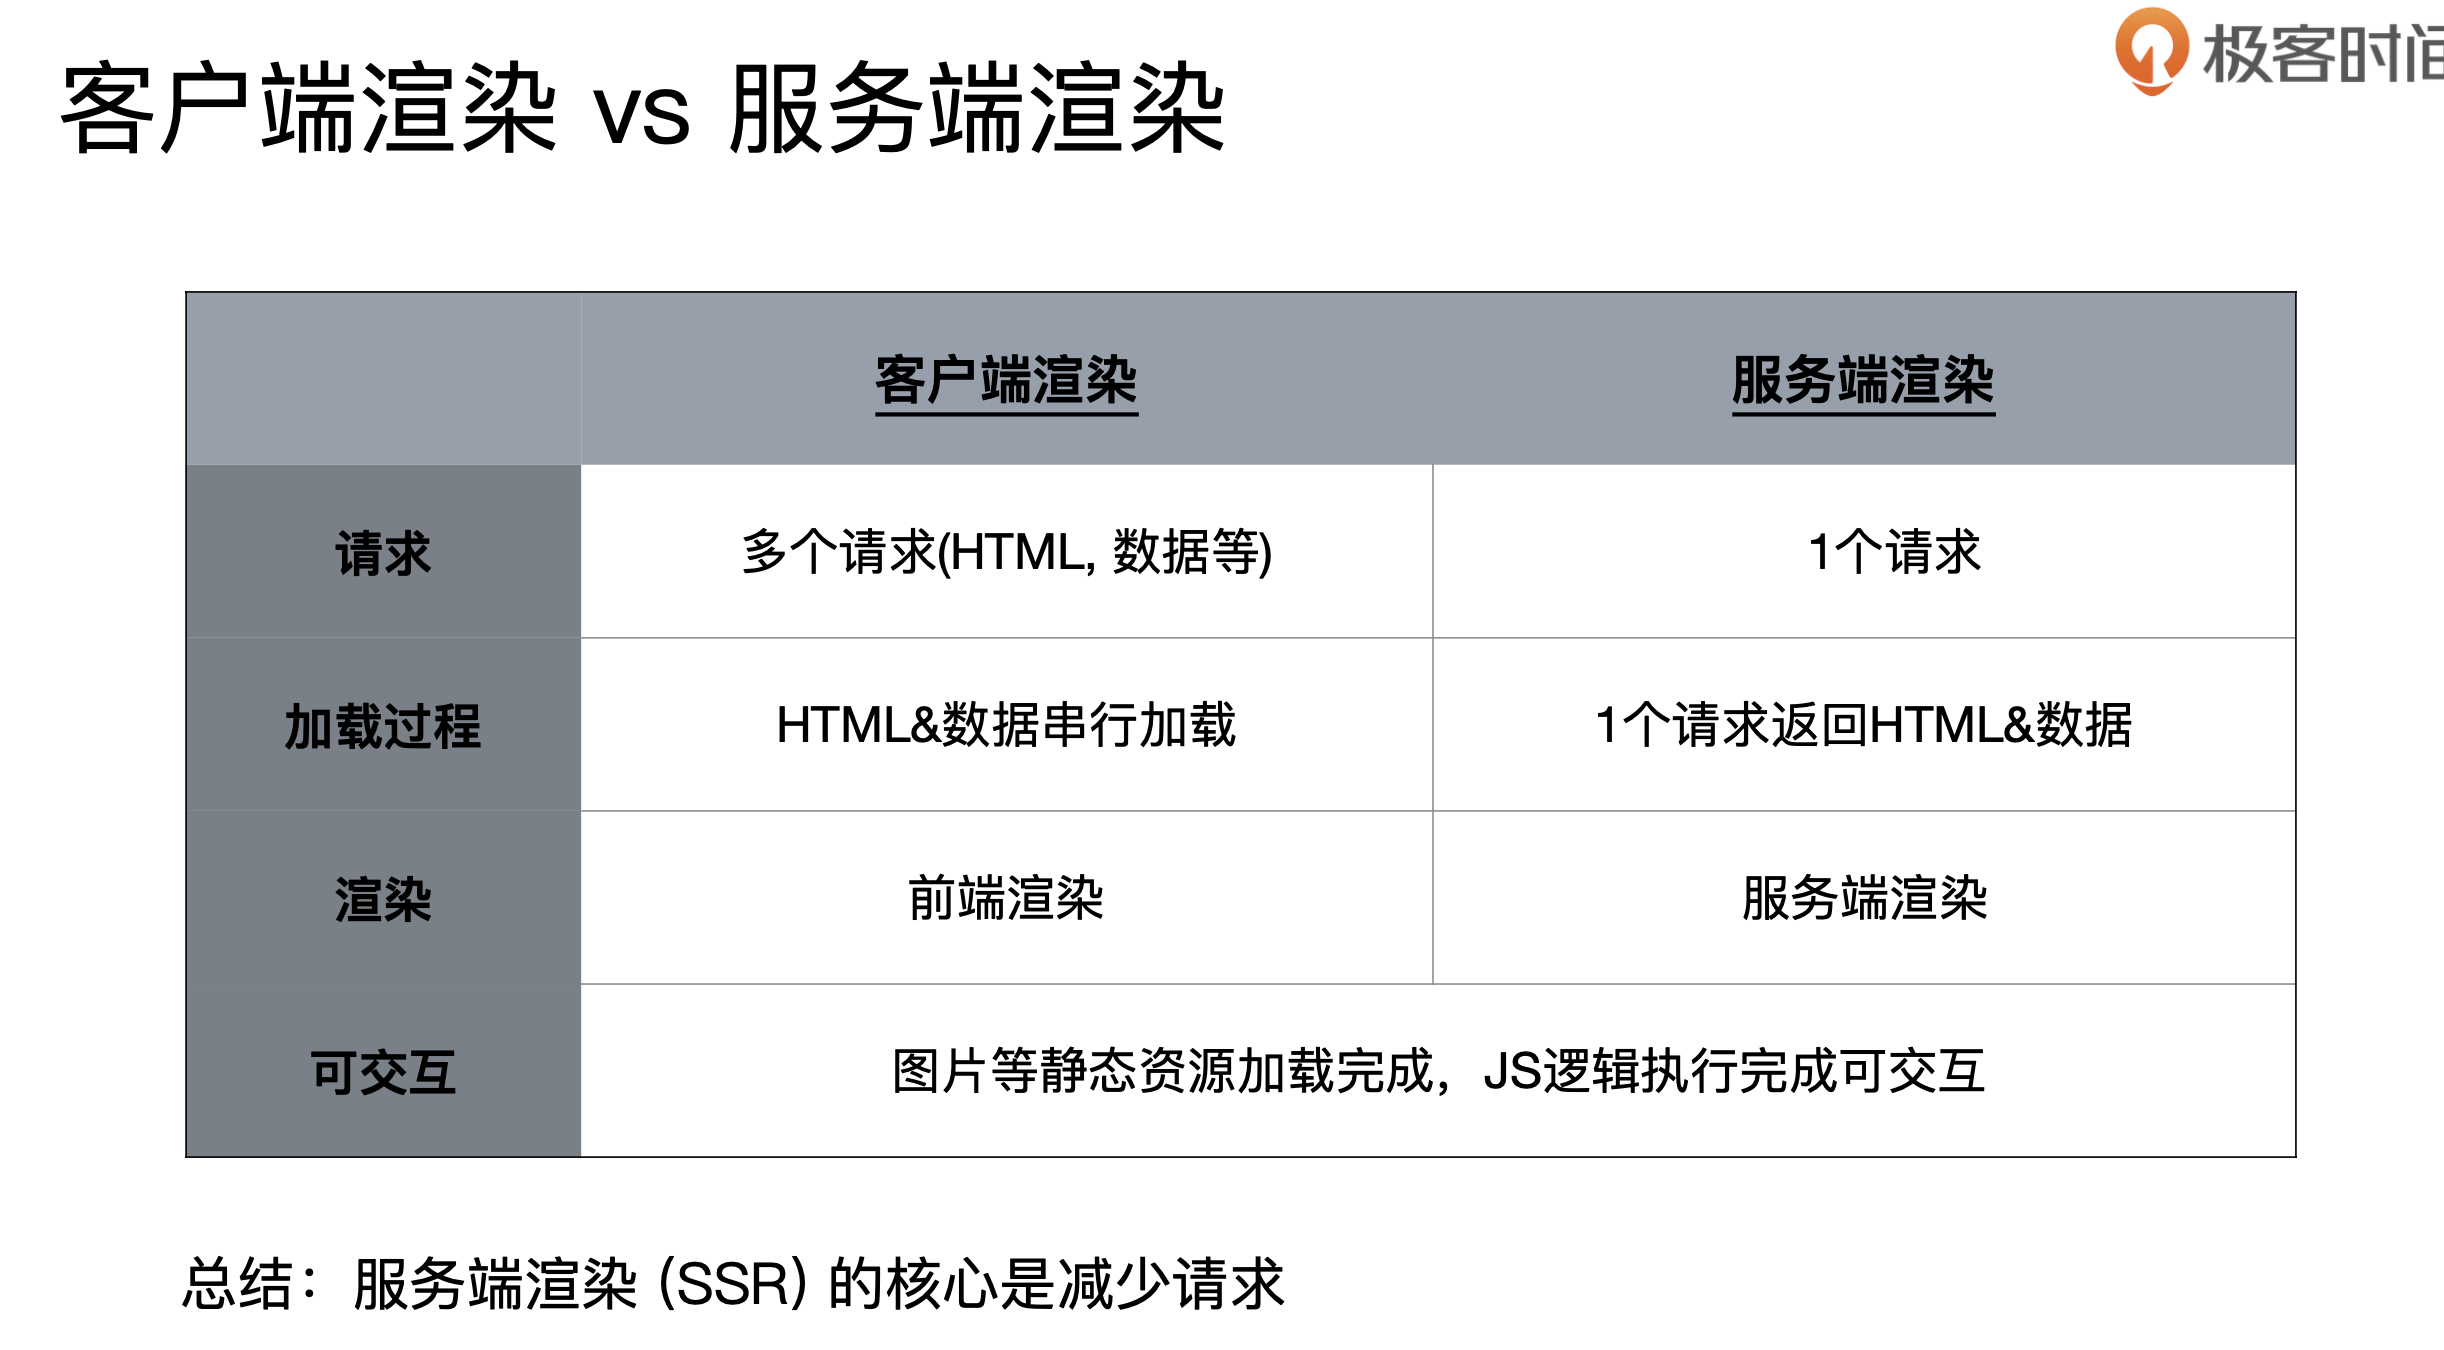
优势:
- 减少白屏时间
- 对SEO友好
代码时间思路
- 核心在于使用react-dom/server 的 renderToString 方法,读取组件。放到打包好的模版当中即可。
// node环境下没有window对象
if (typeof window === "undefined") {
  global.window = {};
}

const fs = require("fs");
const path = require("path");
const express = require("express");
const { renderToString } = require("react-dom/server");
// 获取需要渲染的组件
const SSR = require("../dist/index-server");
//读取打包好的文件模版
const template = fs.readFileSync(path.join(__dirname, '../dist/index.html'), "utf-8");

const server = port => {
  const app = express();
  app.use(express.static("../dist"));
  app.get("/index", (req, res) => {
    const html = renderMarkup(renderToString(SSR));
    res.status(200).send(html);
  });
  app.listen(port, () => {
    console.log("Server is running port:" + port);
  });
};

server(process.env.PORT || 8888);

const renderMarkup = str => {
  // 将占位符替换为要渲染的组件
  return template.replace("<!--HTML_PLACEHOLDER-->", str);
};
解决样式不限时问题。
<!DOCTYPE html>
<html lang="en">
  <head>
    <title>Document</title>
  </head>
  <body>
    <div id="root">
      <!--占位符,和server端商量一致即可-->
      <!--HTML_PLACEHOLDER-->
    </div>
  </body>
</html>

const data = require('./data.json')

const renderMarkup = str => {
  const dataStr = JSON.stringify(data)
  return template
    .replace("<!--HTML_PLACEHOLDER-->", str)
    .replace("<!--INITIAL_DATA_PLACEHOLDER-->", `<script>window.__initial_data=${dataStr}</script>`);
};
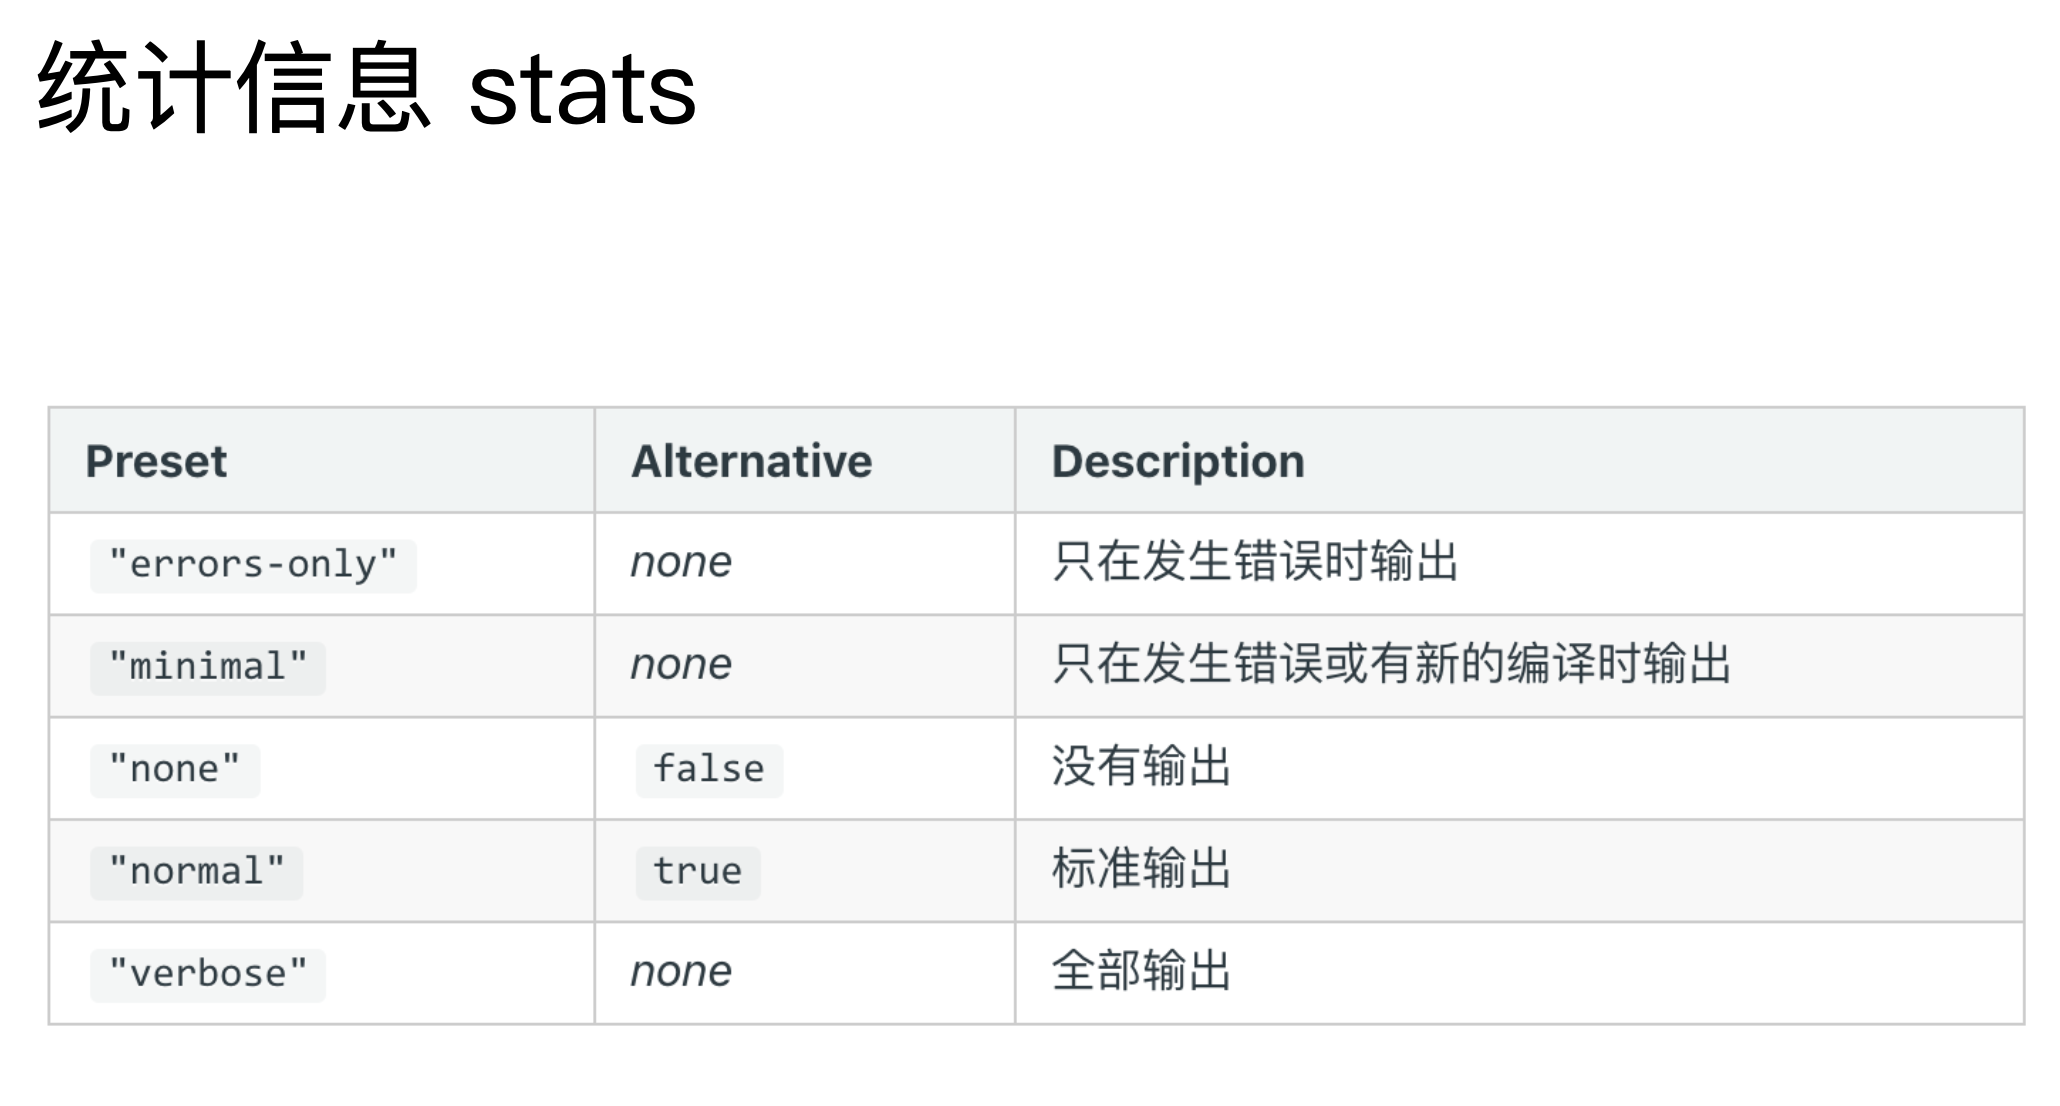
14 优化构建时命令行的显示日志

15 构建异常和中断处理
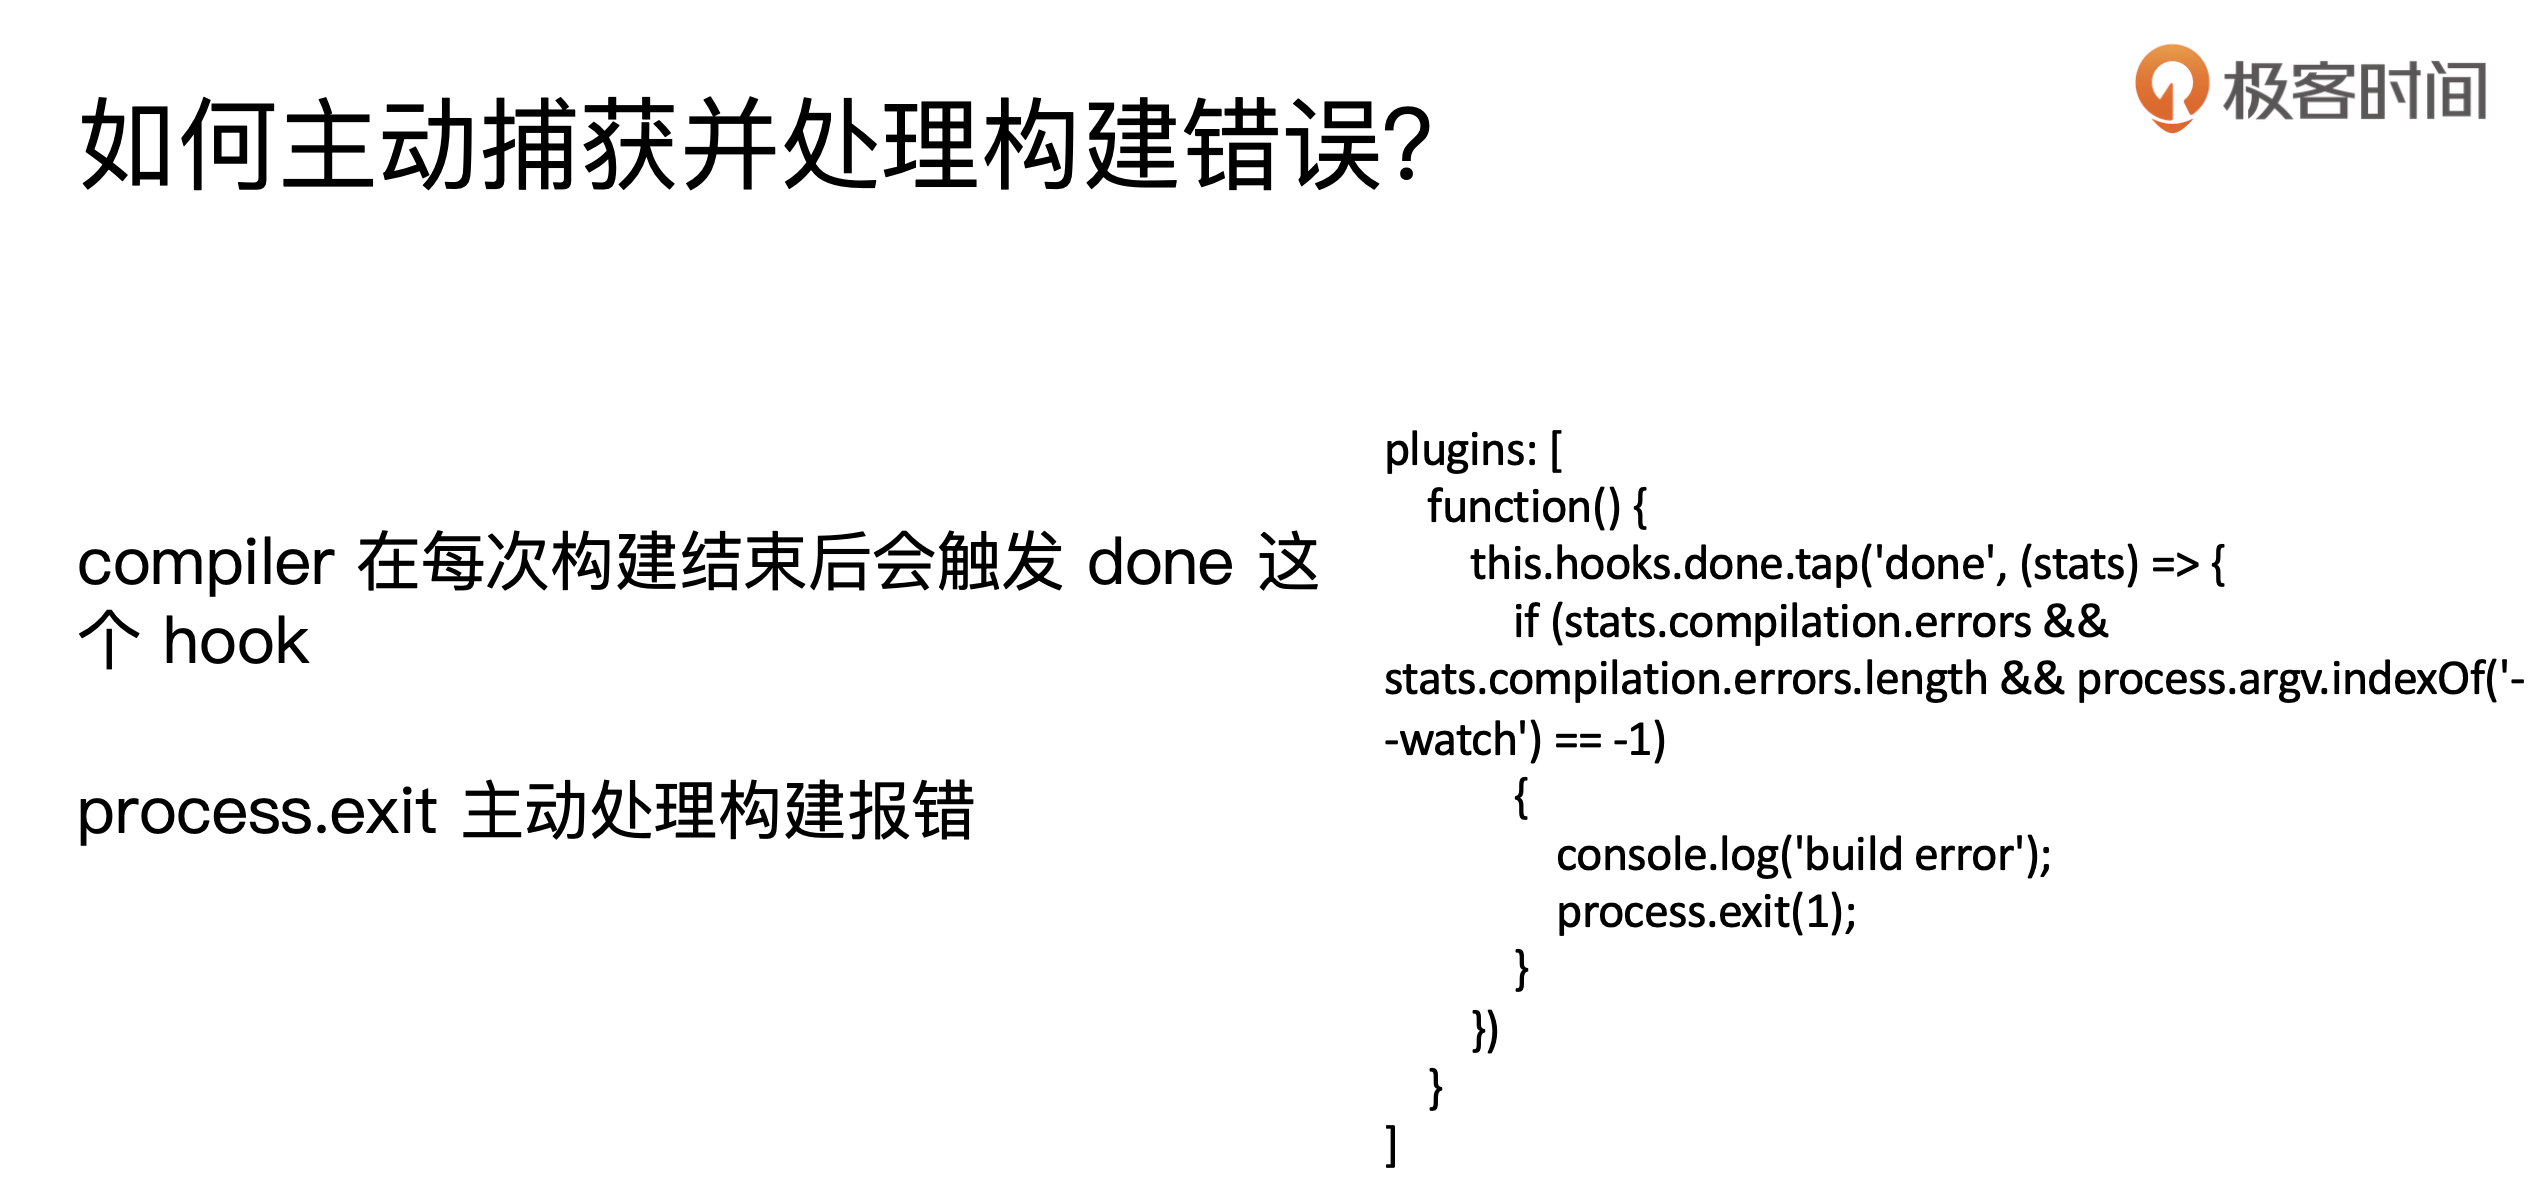
function() {
  this.hooks.done.tap("done", stats => {
    if (
      stats.compilation.errors &&
      stats.compilation.errors.length &&
      process.argv.indexOf("--watch" == -1)
    ) {
      console.log("build error");
      process.exit(-1);
    }
  });
}

若有收获,就点个赞吧
0 人点赞
