Spring Aop是通过代理模式实现的,动态代理实现有两种:①cglib(基于父子类)。②JDK自带动态代理(基于接口)。Spring封装后提供了几种创建AOP的方式:①ProxyFactoryBean ②ProxyFactory ③Auto-proxy(又可分为三种:BeanNameAutoProxyCreator、DefaultAdvisorAutoProxyCreator、AnnotationAwareAspectJAutoProxyCreator) 。这三种方法最终都会创建ProxyFactory,本教程主要以AnnotationAwareAspectJAutoProxyCreator为例,讲解Spring如果进行AOP的。
1、ProxyFactory用法介绍
因为上边介绍的几种Spring创建AOP的方式,最终都会去创建ProxyFactory,所以我们先来介绍下ProxyFactory的用法。
通过ProxyFactory,我们不用关心到底是用jdk还是cglib了,它会自己判断,如果代理的对象实现了接口,那么会用jdk动态代理,如果没有实现接口,则会用cglib技术。下面的例子,User类没有实现接口,所以底层走的是cglib。
@Componentpublic class User {@Autowiredprivate Dog dog;void say() {System.out.println("hi i am tom");}}
@Configuration@ComponentScan("com.ioc.tuing.impl")public class MainStart {public static void main(String[] args) {// ProxyFactoryUser target = new User();ProxyFactory proxyFactory = new ProxyFactory();proxyFactory.setTarget(target);proxyFactory.addAdvice(new MethodInterceptor() {@Overridepublic Object invoke(MethodInvocation invocation) throws Throwable {System.out.println("before...");Object result = invocation.proceed();System.out.println("after...");return result;}});User user = (User)proxyFactory.getProxy();user.say();}}
打印结果:
before...hi i am tomafter...
2、Spring AOP流程
我们在实际工作中,通常会用注解的方式来使用AOP,首先用@EnableAspectJAutoProxy注解开启AOP自动代理,然后配合@Aspect、@before、@Pointcut等注解使用,实际上这就是我们在上面说AnnotationAwareAspectJAutoProxyCreator方式。大致步骤如下图所示: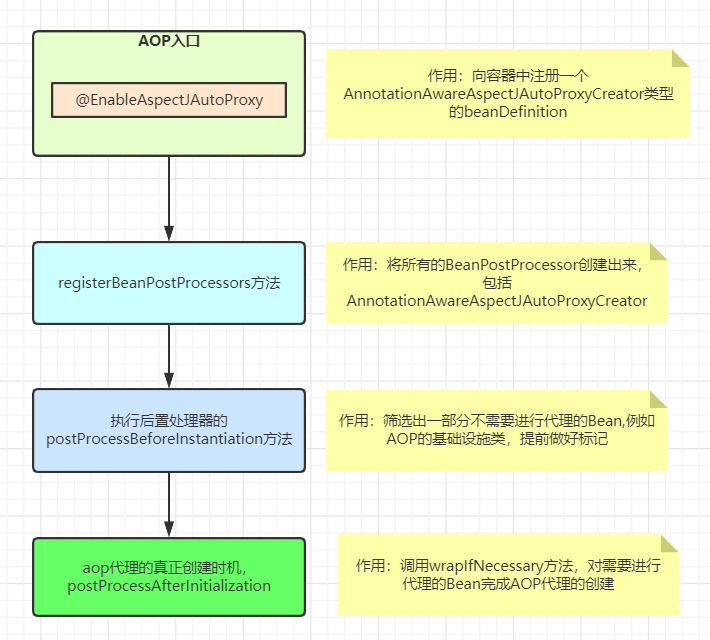
2.1、@EnableAspectJAutoProxy开启AOP
通过@EnableAspectJAutoProxy注解,导入配置类AspectJAutoProxyRegistrar,而AspectJAutoProxyRegistrar类会向容器中注册一个AnnotationAwareAspectJAutoProxyCreator的BeanDefinition,它本身也是一个BeanPostProcessor。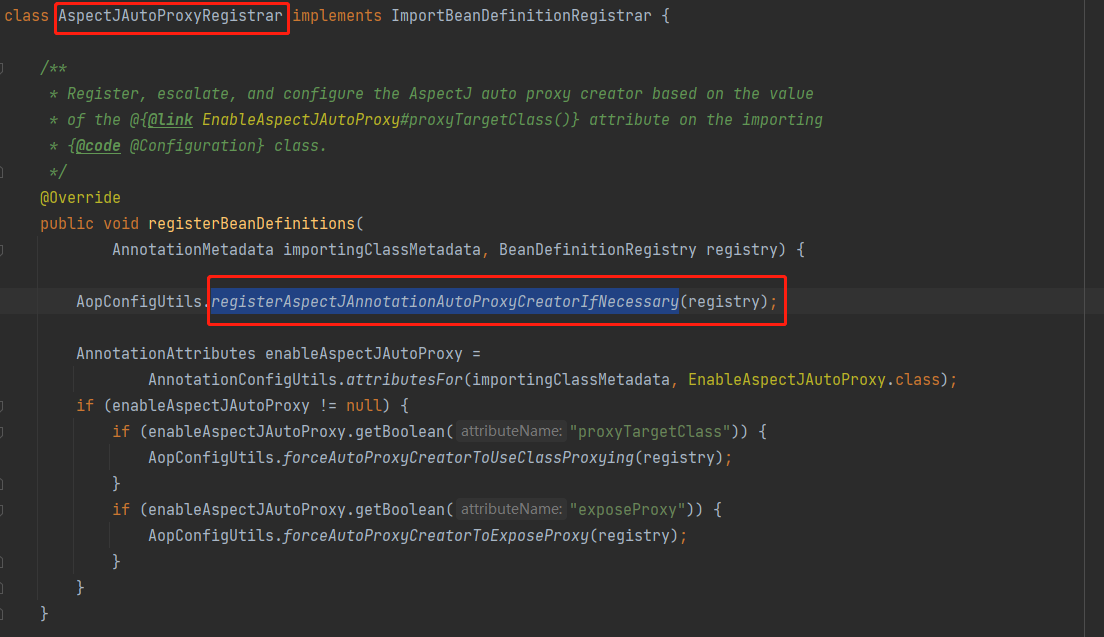
这个BeanDefinition会在org.springframework.context.support.AbstractApplicationContext#registerBeanPostProcessors这个方法中完成创建。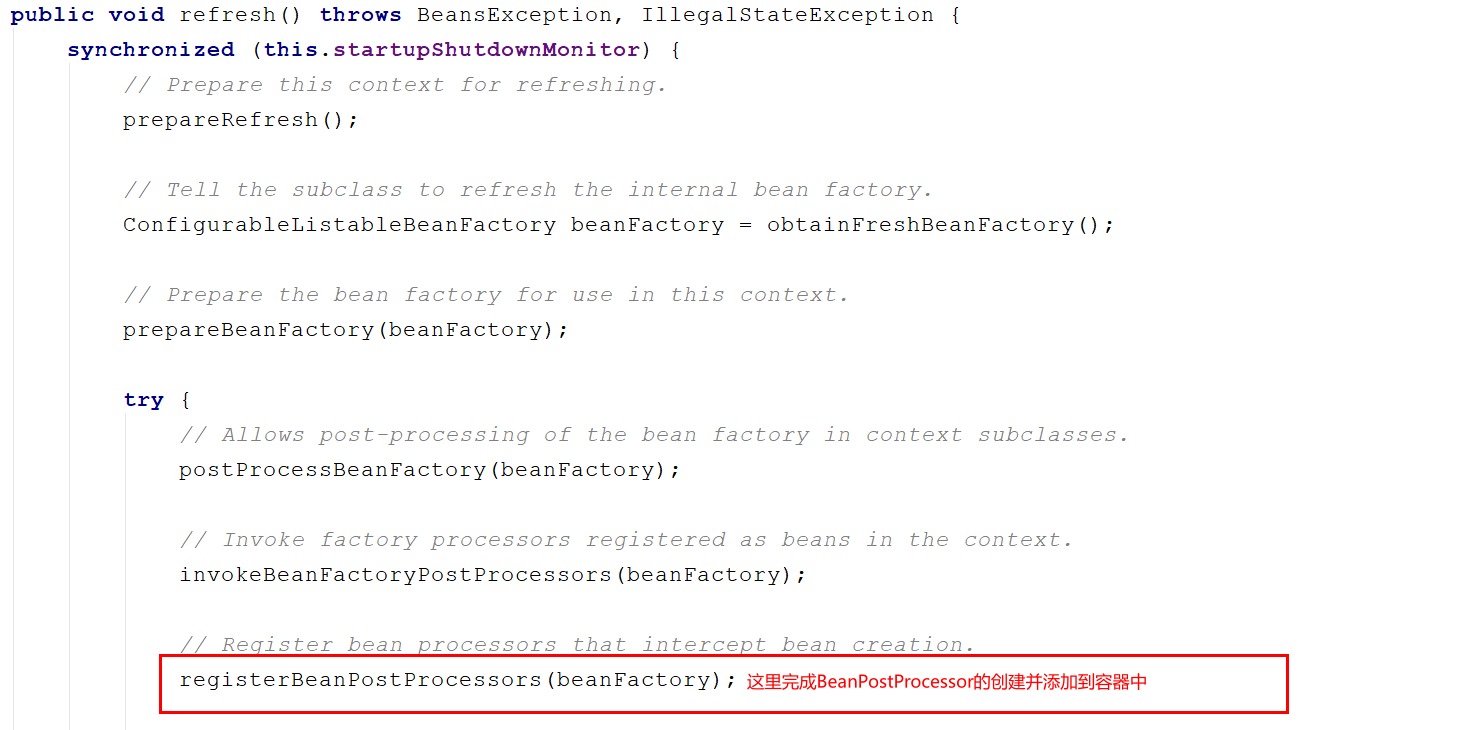
2.2、postProcessBeforeInstantiation方法执行
执行AnnotationAwareAspectJAutoProxyCreator的postProcessBeforeInstantiation方法,实际上就是父类AbstractAutoProxyCreator的postProcessBeforeInstantiation被执行。这个方法的作用就是:确定哪些类不需要被代理。
2.3、postProcessAfterInitialization方法执行
实际上也是执行父类AbstractAutoProxyCreator中的方法,其中wrapIfNecessary完成了AOP代理,对应源码如下:
public Object postProcessAfterInitialization(@Nullable Object bean, String beanName) {if (bean != null) {Object cacheKey = getCacheKey(bean.getClass(), beanName);// 什么时候这个判断会成立呢?// 如果发生循环依赖的话,这个判断就不会成立(这里不做详细分析)// 目前你只需要知道wrapIfNecessary完成了AOP代理if (this.earlyProxyReferences.remove(cacheKey) != bean) {// 需要代理的话,在这里完成的代理return wrapIfNecessary(bean, beanName, cacheKey);}}return bean;}
2.4、wrapIfNecessary方法执行,生成代理对象。
protected Object wrapIfNecessary(Object bean, String beanName, Object cacheKey) {// 在postProcessBeforeInstantiation方法中可能已经完成过代理了// 如果已经完成代理了,那么直接返回这个代理的对象if (StringUtils.hasLength(beanName) && this.targetSourcedBeans.contains(beanName)) {return bean;}// 在postProcessBeforeInstantiation方法中可能已经将其标记为不需要代理了// 这种情况下,也直接返回这个Beanif (Boolean.FALSE.equals(this.advisedBeans.get(cacheKey))) {return bean;}// 跟在postProcessBeforeInstantiation方法中的逻辑一样// 如果不需要代理,直接返回,同时在advisedBeans中标记成falseif (isInfrastructureClass(bean.getClass()) || shouldSkip(bean.getClass(), beanName)) {this.advisedBeans.put(cacheKey, Boolean.FALSE);return bean;}// 获取可以应用到这个Bean上的通知Object[] specificInterceptors = getAdvicesAndAdvisorsForBean(bean.getClass(), beanName, null);// 如果存在通知的话,说明需要被代理if (specificInterceptors != DO_NOT_PROXY) {this.advisedBeans.put(cacheKey, Boolean.TRUE);// 到这里创建代理,实际上底层就是new了一个ProxyFactory来创建代理的Object proxy = createProxy(bean.getClass(), beanName, specificInterceptors, new SingletonTargetSource(bean));this.proxyTypes.put(cacheKey, proxy.getClass());return proxy;}// 如果没有通知的话,也将这个Bean标记为不需要代理this.advisedBeans.put(cacheKey, Boolean.FALSE);return bean;}
3、AOP底层逻辑
前面我们只是介绍了Spring AOP的过程,结合bean的生命周期,讲了Spring如何、在何时进行的AOP。但是AOP的底层逻辑(比如怎么解析的通知)我们没做讲解,这些步骤很杂、很多,这里放出一张思维图,供大家参考:
https://www.processon.com/view/link/5faa4ccce0b34d7a1aa2a9a5

若有收获,就点个赞吧
0 人点赞
