1.docker环境搭建
官方手册网站 https://docs.docker.com/engine/install/centos/
1.安装必要的一些系统工具[root@node1-61 ~]# yum install -y yum-utils device-mapper-persistent-data lvm22.添加软件源信息[root@node1-61 ~]# yum-config-manager --add-repo https://mirrors.aliyun.com/docker-ce/linux/centos/docker-ce.repo[root@node1-61 ~]# yum repolist[root@node1-61 ~]# yum -y install docker-ce //ce社区版。ee企业版[root@node1-61 ~]# systemctl enable docker[root@node1-61 ~]# systemctl start docker[root@node1-61 ~]# docker version[root@docker1-60 ~]# docker info# 配置转发[root@docker1-60 ~]# vim /etc/sysctl.confnet.ipv4.ip_forward=1net.bridge.bridge-nf-call-ip6tables = 1net.bridge.bridge-nf-call-iptables = 1[root@docker1-60 ~]# sysctl -p #加载生效net.ipv4.ip_forward = 1net.bridge.bridge-nf-call-ip6tables = 1net.bridge.bridge-nf-call-iptables = 1
2.配置阿里云镜像加速器
[root@docker1-60 yum.repos.d]# mkdir -p /etc/docker
[root@docker1-60 yum.repos.d]# cat /etc/docker/daemon.json
{
  "registry-mirrors": ["https://rbuy3ojl.mirror.aliyuncs.com"]
}
[root@docker1-60 yum.repos.d]# systemctl daemon-reload
[root@docker1-60 yum.repos.d]# systemctl restart docker
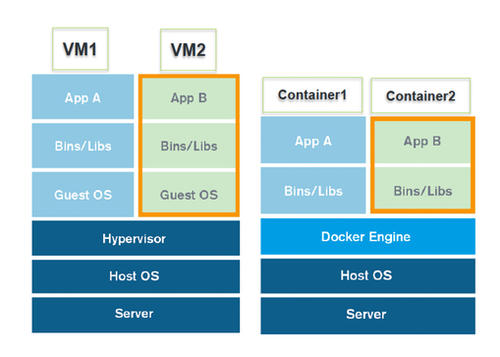
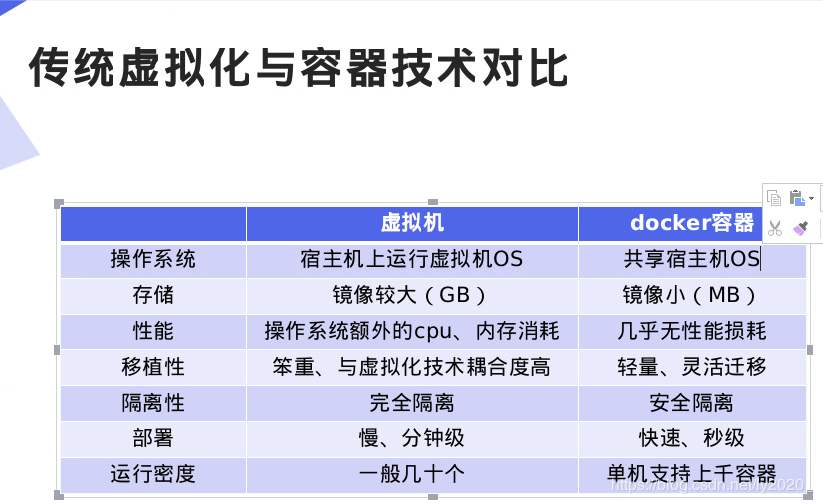
3.docker和vm比较
4.docker常用命令
帮助命令
帮助文档https://docs.docker.com/engine/reference/commandline/docker/
docker version       #显示版本
docker info          #显示docker的系统信息,包括镜像和容器的数量
docker 命令 --help  #帮助命令
镜像命令
[root@docker1-60 ~]# docker image ls     #查看镜像
REPOSITORY          TAG                 IMAGE ID            CREATED             SIZE
hello-world         latest              bf756fb1ae65        9 months ago        13.3kB
[root@docker1-60 ~]# docker image ls --help

Usage:  docker image ls [OPTIONS] [REPOSITORY[:TAG]]

List images

Aliases:
  ls, images, list

Options:
  -a, --all             Show all images (default hides intermediate images)
      --digests         Show digests
  -f, --filter filter   Filter output based on conditions provided
      --format string   Pretty-print images using a Go template
      --no-trunc        Don't truncate output
  -q, --quiet           Only show numeric IDs


  [root@docker1-60 ~]# docker pull mysql:5.7  #下载

删除镜像 docker rmi
[root@docker1-60 ~]# docker rmi 镜像id  #删除指定的镜像
[root@docker1-60 ~]# docker rmi 镜像id 容器id 容器id  #删除多个镜像
[root@docker1-60 ~]# docker rmi $(docker images -aq)    #删除全部镜像
容器命令
说明,下载一个centos镜像学习
[root@docker1-60 ~]# docker pull centos:centos7.5.1804
新建容器并启动
docker run [可选参数] image
#参数说明
--name="Name"  容器名字,mysql01,mysql02,用来区分容器
-d         后台运行
-it        使用交互式方式,进入容器查看内容
-p         指定容器端口, -p 3306:3306
        -p  ip:主机端口:容器端口
    -p  主机端口:容器端口
    -p 容器端口
-P     随机指定端口
#测试,启动容器并进入容器
[root@docker1-60 ~]# docker run -it centos:centos7.5.1804 /bin/bash
[root@66c3b9221cb2 /]# ls  #查看容器内的centos,基础版本,很多命令没有
bin  dev  etc  home  lib  lib64  media  mnt  opt  proc  root  run  sbin  srv  sys  tmp  usr  var
[root@66c3b9221cb2 /]#
#从容器退回到本机
[root@66c3b9221cb2 /]# exit   |ctrl + d    #退出后容器会关闭
exit
[root@docker1-60 ~]# ls
anaconda-ks.cfg
docker pull      //下载镜像
docker push    //上传镜像
docker image ls  //镜像查看
docker histroy  nginx    //查看镜像制作历史
docker inspect   nginx  //查看镜像底层信息(可以看镜像,容器,交换机)
docker ps      //查看运行中的docker
docker ps -a  //查看所有docker
docker rmi nginx //nginx为镜像名
docker stop|start|restart  0f //0f为容器ID
docker exec|attach -it 76 /bin/bash  // 进入容器
列出运行的容器
#  docker ps
        #列出正在运行的容器
-a  #列出所有容器(all)
-n=? #显示最近创建的容器
-q    #只显示容器的编号
[root@docker1-60 ~]# docker ps
CONTAINER ID        IMAGE                   COMMAND             CREATED             STATUS              PORTS               NAMES
b2485947f60c        centos:centos7.5.1804   "/bin/bash"         11 seconds ago      Up 10 seconds                           goofy_kirch
[root@docker1-60 ~]# docker ps -a
CONTAINER ID        IMAGE                   COMMAND             CREATED             STATUS                     PORTS               NAMES
b2485947f60c        centos:centos7.5.1804   "/bin/bash"         17 seconds ago      Up 16 seconds                                  goofy_kirch
66c3b9221cb2        centos:centos7.5.1804   "/bin/bash"         8 minutes ago       Exited (0) 5 minutes ago                       elastic_boyd
退出容器
exit  #退出容器,同时容器停止
ctrl + p + q    #不停止容器退出
删除容器
docer rm 容器id                     #删除指定的容器,但不能删除正在运行的容器,如果要删需要加 -f
docker rm -f $(docker ps -aq)       #删除所有的容器
docker ps -aq | xargs docker rm     #删除所有的容器
启动和停止容器的操作
docker start 容器id          #启动容器
docker restart 容器id        #重启容器
docker stop 容器id           #停止当前正在运行的容器
docker kill 容器id           #强制停止当前容器
5.其他命令
后台启动容器
# 命令 docker run -d 镜像名
[root@docker1-60 ~]# docker run -d centos:centos7.5.1804
3347083acd4a033720d560c7d0dd9fd30c6b5dc741e1bd191e86f850498e49b4
# 问题 docker ps ,发现centos停止了
#常见的坑,docke 容器使用后台运行,就必须要有一个前台进程,docker发现没有应用,就会自动停止
# nginx,容器启动后发此自己没有提供服务,就会立刻停止,就没有程序了
[root@docker1-60 ~]# docker ps
CONTAINER ID        IMAGE               COMMAND             CREATED             STATUS              PORTS               NAMES
[root@docker1-60 ~]# docker ps -a
CONTAINER ID        IMAGE                   COMMAND             CREATED             STATUS                      PORTS               NAMES
3347083acd4a        centos:centos7.5.1804   "/bin/bash"         27 seconds ago      Exited (0) 26 seconds ago                       hopeful_ishizaka
查看日志
docker logs -f -t --tail 容器,没有日志
# 自己编写一段shell脚本
[root@docker1-60 ~]# docker run -itd centos:centos7.5.1804 bash -c "while true;do echo 123 ;sleep 2; done"
c6bdb149fa9dce4e052679200d704278b281df07beae17f542938b47514ab87f

# 显示日志
 -tf #显示日志
 --tail number # 要显示的日志条数
[root@docker1-60 ~]# docker logs -tf --tail 10 c6bd
2020-10-07T05:02:57.173587582Z 123
2020-10-07T05:02:59.176738935Z 123
查看容器中进程信息和元数据 ps
# 命令 docker top 容器id
[root@docker1-60 ~]# docker top C6
Error response from daemon: No such container: C6
[root@docker1-60 ~]# docker top c
UID                 PID                 PPID                C                   STIME               TTY                 TIME                CMD
root                7123                7105                0                   13:01               pts/0               00:00:00            bash -c while true;do echo 123 ;sleep 2; done
root                8012                7123                0                   13:26               pts/0               00:00:00            sleep 2
# 命令 docker inspect 容器id
[root@docker1-60 ~]# docker inspect c6
进入当前正在运行的容器
# 我们通常容器都是后台运行的,需要进入容器,修改一些配置
# 方式1
# 命令
docker exec -it 容器 id bashshell

#测试
[root@docker1-60 ~]# docker exec -it c6 /bin/bash
[root@c6bdb149fa9d /]# ls
bin  dev  etc  home  lib  lib64  media  mnt  opt  proc  root  run  sbin  srv  sys  tmp  usr  var
[root@c6bdb149fa9d /]# ps -ef
UID        PID  PPID  C STIME TTY          TIME CMD
root         1     0  0 05:01 pts/0    00:00:00 bash -c while true;do echo 123 ;sleep 2; done
root       998     0  0 05:34 pts/1    00:00:00 /bin/bash
root      1022     1  0 05:34 pts/0    00:00:00 sleep 2
root      1023   998  0 05:34 pts/1    00:00:00 ps -ef
# 方式2
docker attach 容器id   进入容器
查看docker占用的系统资源
# 命令 docker stats
[root@docker1-60 ~]# docker stats
复制文件到容器
# 命令 docker cp 文件名 容器id:容器内路径    //拷贝文件到容器内
[root@docker1-61 ~]# docker cp tomcat-9.0.39.tar.gz 0cd080379c5a:/tmp/
# 命令 docker cp 容器id:容器内路径/文件 本机路径   //拷贝容器内文件到本机
小结
  attach      Attach local standard input, output, and error streams to a running container         #当前shell 下 attach 连接指定运行镜像
  build       Build an image from a Dockerfile                                                   # 通过Dockerfile 定制镜像
  commit      Create a new image from a container's changes                                                                            #提交当前容器为新的镜像
  cp          Copy files/folders between a container and the local filesystem                   #从容器中拷贝指定文件或者目录到宿主机中
  create      Create a new container                                                                                                                        #创建一个新的容器,通run,但不启动容器
  diff        Inspect changes to files or directories on a container's filesystem               #查看 docker 容器变化
  events      Get real time events from the server
  exec        Run a command in a running container
  export      Export a container's filesystem as a tar archive
  history     Show the history of an image
  images      List images
  import      Import the contents from a tarball to create a filesystem image
  info        Display system-wide information
  inspect     Return low-level information on Docker objects
  kill        Kill one or more running containers
  load        Load an image from a tar archive or STDIN
  login       Log in to a Docker registry
  logout      Log out from a Docker registry
  logs        Fetch the logs of a container
  pause       Pause all processes within one or more containers
  port        List port mappings or a specific mapping for the container
  ps          List containers
  pull        Pull an image or a repository from a registry
  push        Push an image or a repository to a registry
  rename      Rename a container
  restart     Restart one or more containers
  rm          Remove one or more containers
  rmi         Remove one or more images
  run         Run a command in a new container
  save        Save one or more images to a tar archive (streamed to STDOUT by default)
  search      Search the Docker Hub for images
  start       Start one or more stopped containers
  stats       Display a live stream of container(s) resource usage statistics
  stop        Stop one or more running containers
  tag         Create a tag TARGET_IMAGE that refers to SOURCE_IMAGE
  top         Display the running processes of a container
  unpause     Unpause all processes within one or more containers
  update      Update configuration of one or more containers
  version     Show the Docker version information
  wait        Block until one or more containers stop, then print their exit codes


docker run -it -p 80:80 -v /var/nginx/html:/usr/share/nginx/html/ docker.io/nginx:latest
docker run —network=docker1 -itd -p 82:80 -v /data:/var/www/html docker.io/myhttpd:v1
编写Dockerfile
Dockerfile语法格式:
– FROM:基础镜像
– MAINTAINER:镜像创建者信息(说明)
– EXPOSE:开放的端口
– ENV:设置环境变量
– ADD:复制文件到镜像
– RUN:制作镜像时执行的命令,可以有多个
– WORKDIR:定义容器默认工作目录
– CMD:容器启动时执行的命令,仅可以有一条CMD
FROM:
#####从头制作baseImage
FROM search
RUN: 执行命令,每执行一条run,多一个分层,一般用&&合并语句,反斜杠“\”换行
RUN yum -y update && yum -y install lrzsz \
     net-tools
RUN  apt-get -y update && apt-get -y install lrzsz \
    net-tools
RUN /bin/bash -c 'source $HOME/.bashrc;echo $HOME'
WORKDIR :进入或创建目录,使用绝对路径
#####进入/root 目录
  WORKDIR /root
 如果目录没有会自动创建
WORKDIR /test
WORKDIR demo
//输出:/test/demo
RUN pwd
ADD 和 COPY:将本地的文件,添加到image里
//将hello 添加到根目录下
ADD hello /
//将tar包直接解压到跟目录
ADD test.tar.gz
NNV: 增加Dockerfile 的可读性
//设置常量
ENV MYSQL_MAJOR 5.5
//使用常量

$MYSQL_MAJOR
RUN apt-get -y install mysql-server="${MYSQL_MAJOR}"
CMD和ENTRYPOINT   容器启动时执行的命令,一定会执行,不会被忽略
//shell 格式
RUN apt-get -y install lrzsz
CMD echo "hello world"
ENTRYPOINT echo "hello world"
//exec 格式
RUN ["apt-get","-y","lrzsz"]
CMD ["/bin/echo","hello world"]
ENTRYPOINT ["/bin/echo", "hello world"]
]# docker build -t docker.io/myos:http  Dockerfile目录
]# docker run -d docker.io/myos:http
docker网络
桥接网络
1.新建br1的网卡配置文件
[root@docker1-100 ~]# yum -y install bridge-utils   //先安装依赖
]# vim /etc/sysconfig/network-scripts/ifcfg-br1
TYPE=Bridge
PROXY_METHOD=none
BROWSER_ONLY=no
BOOTPROTO=static
DEFROUTE=yes
IPV4_FAILURE_FATAL=no
NAME=br1
DEVICE=br1
ONBOOT=yes
IPADDR=192.168.31.100
NETMASK=255.255.255.0
GATEWAY=192.168.31.1
]# vim /etc/sysconfig/network-scripts/ifcfg-eth1
TYPE=Ethernet
BOOTPROTO=static
NAME=eth0
DEVICE=eth0
ONBOOT=yes
BRIDGE=br1
]# systemctl restart network     //可能需要reboot
]# vim /etc/sysconfig/docker-network
# /etc/sysconfig/docker-network
DOCKER_NETWORK_OPTIONS="-b=br1"
DOCKER_NETWORK_OPTIONS="-b=br0"
]# systemctl restart docker
]# docker run -itd --net=none --name=myhttpd docker.io/myhttpd:v1
]# pipework br1 myhttpd  192.168.31.111/24@192.168.31.1

若有收获,就点个赞吧
0 人点赞
