默认静态资源配置
// 用於靜態資源的路徑模式。默认为/**spring.mvc.static-path-pattern=/**// 默认的静态资源位置// Locations of static resources. Defaults to classpath:[/META-INF/resources/, /resources/, /static/, /public/].spring.resources.static-locations=
静态资源配置原理
Springboot 2.x 对于静态资源的配置都是由 WebMvcAutoConfiguration 这个类完成的,我们这里选取 Springboot-2.4.4.RELEASE 这个版本来探究一下 Springboot 底层对于静态资源是如何进行配置的
首先来到 WebMvcAutoConfiguration 这个配置类,该类的声明如下
// 配置中各个组件没有依赖关系,为了加快效率,设置 proxyBeanMethods=false ,其默认值是 true@Configuration(proxyBeanMethods = false)// 当前是否是 Web 环境,并且类型是否是 SERVLET 类型的@ConditionalOnWebApplication(type = Type.SERVLET)// 系统中包含 Servlet、DispatcherServlet、WebMvcConfigurer 这几个类@ConditionalOnClass({Servlet.class, DispatcherServlet.class, WebMvcConfigurer.class})// 容器中不包含 WebMvcConfigurationSupport 这个组件@ConditionalOnMissingBean({WebMvcConfigurationSupport.class})// 自动配置排序,数值越低,优先级越高@AutoConfigureOrder(-2147483638)// 自动配置在 DispatcherServletAutoConfiguration、TaskExecutionAutoConfiguration 、ValidationAutoConfiguration 之后@AutoConfigureAfter({DispatcherServletAutoConfiguration.class, TaskExecutionAutoConfiguration.class, ValidationAutoConfiguration.class})public class WebMvcAutoConfiguration {public static final String DEFAULT_PREFIX = "";public static final String DEFAULT_SUFFIX = "";private static final String[] SERVLET_LOCATIONS = new String[]{"/"};public WebMvcAutoConfiguration() {}....注册各种组件}
如果 WebMvcAutoConfiguration 上的条件注解都满足的情况下才会执行该类里面的各种行为,在该类中我们可以发现存在一个静态内部类 WebMvcAutoConfigurationAdapter ,该类的具体声明如下
// 配置中各个组件没有依赖关系,为了加快效率,设置 proxyBeanMethods=false ,proxyBeanMethods 默认值是 true@Configuration(proxyBeanMethods = false)// 向容器中注册组件 EnableWebMvcConfiguration@Import({WebMvcAutoConfiguration.EnableWebMvcConfiguration.class})// 开启 WebMvcProperties、ResourceProperties 类上的 @ConfigurationProperties 注解,并且将这两个类注入 IOC 容器中@EnableConfigurationProperties({WebMvcProperties.class, ResourceProperties.class})// 排序@Order(0)public static class WebMvcAutoConfigurationAdapter implements WebMvcConfigurer {private static final Log logger = LogFactory.getLog(WebMvcConfigurer.class);// 1、静态资源配置类 ----> 详细见代码块一private final ResourceProperties resourceProperties;final WebMvcAutoConfiguration.ResourceHandlerRegistrationCustomizer resourceHandlerRegistrationCustomizer;public void addResourceHandlers(ResourceHandlerRegistry registry) {// 2、如果配置了 spring.resources.add-mappings=false ,那么 Springboot 就不会对静态资源和 webjars 进行自动配置// spring.resources.add-mappings 的默认值是 true,它就是一个是否开启 Springboot 对静态资源配置的开关,可以在// application.properties 中配置 debug=true ,然后就可以查看到 debug 级别的日志了if (!this.resourceProperties.isAddMappings()) {logger.debug("Default resource handling disabled");} else {// 3、获取缓存时间Duration cachePeriod = this.resourceProperties.getCache().getPeriod();// 4、获取缓存控制对象CacheControl cacheControl = this.resourceProperties.getCache().getCachecontrol().toHttpCacheControl();// 5、webjars 的映射规则 /webjars/** ----> classpath:/META-INF/resources/webjars/// 也就是比如我们访问 http://localhost:8080/webjars/aaa.js ,实际上就是访问当前项目类路径下// /META-INF/resources/webjars/aaa.js 这个资源if (!registry.hasMappingForPattern("/webjars/**")) {this.customizeResourceHandlerRegistration(registry.addResourceHandler(new String[]{"/webjars/**"}).addResourceLocations(new String[]{"classpath:/META-INF/resources/webjars/"}).setCachePeriod(this.getSeconds(cachePeriod)).setCacheControl(cacheControl));}// 6、staticPathPattern 默认值是 /** ,也可以在 application.properties 中配置 spring.mvc.static-path-pattern 来修改 Springboot 默认值String staticPathPattern = this.mvcProperties.getStaticPathPattern();// 7、静态资源映射规则if (!registry.hasMappingForPattern(staticPathPattern)) {this.customizeResourceHandlerRegistration(registry.addResourceHandler(new String[]{staticPathPattern})// 8、静态资源映射路径 ----> 详细见代码块二.addResourceLocations(WebMvcAutoConfiguration.getResourceLocations(this.resourceProperties.getStaticLocations())).setCachePeriod(this.getSeconds(cachePeriod)).setCacheControl(cacheControl));}}}}
代码块一、静态资源配置类
// 1、将 application.properties 中 spring.resources 开头的配置项与 ResourceProperties 类的属性进行绑定// 如果该类中有属性没有匹配到值,则抛出异常@ConfigurationProperties(prefix = "spring.resources",ignoreUnknownFields = false)public class ResourceProperties {// 2、Springboot 默认的静态资源路径private static final String[] CLASSPATH_RESOURCE_LOCATIONS = new String[]{"classpath:/META-INF/resources/","classpath:/resources/","classpath:/static/","classpath:/public/"};private String[] staticLocations;private boolean addMappings;private final ResourceProperties.Chain chain;private final ResourceProperties.Cache cache;public ResourceProperties() {// 2、Springboot 默认的静态资源路径this.staticLocations = CLASSPATH_RESOURCE_LOCATIONS;// 3、addMappings 默认值为 true,也就是 application.properties 中不配置// spring.resources.add-mappings 选项,那么就使用 Springboot 的默认值 truethis.addMappings = true;this.chain = new ResourceProperties.Chain();this.cache = new ResourceProperties.Cache();}public String[] getStaticLocations() {return this.staticLocations;}...........}
代码块二
WebMvcAutoConfiguration.getResourceLocations(this.resourceProperties.getStaticLocations())
this.resourceProperties.getStaticLocations():获取与 ResourceProperties 绑定的静态资源路径, Springboot 默认的静态资源路径如下:
private static final String[] CLASSPATH_RESOURCE_LOCATIONS = new String[]{"classpath:/META-INF/resources/","classpath:/resources/","classpath:/static/","classpath:/public/"}
如果我们手动在 application.properties 中配置了 spring.resources.static-locations ,那么它会覆盖 Springboot 的默认值
总结
1、Springboot webjars 的默认映射规则 /webjars/ ——> classpath:/META-INF/resources/webjars/
2、Springboot 静态资源的默认映射规则 / ——> { classpath:/META-INF/resources、classpath:/resources/、classpath:/static/、classpath:/public/ }
静态资源的映射路径,优先级顺序为:META-INF/resources > resources > static > public
3、可以通过修改 application.properties 配置文件中的配置项来改变 Springboot 默认的配置规则,或者手动注册组件的方式来额外增加配置规则(与默认规则一同生效)
案例
1、webjars : 以依赖的方式引入 CSS、JS 等
登录 webjars 官网
https://www.webjars.org/
选择你需要的资源,这里以 js 为例
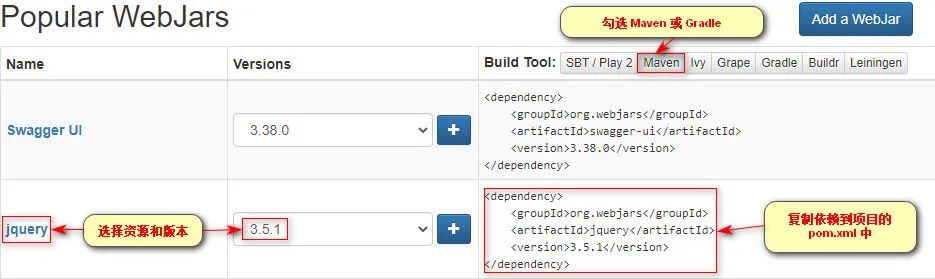
引入后的 webjars 依赖如下
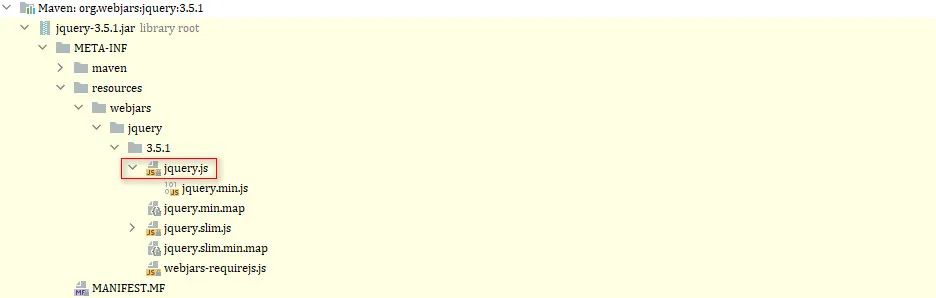
由于 webjars 的映射规则是 /webjars/** ——> classpath:/META-INF/resources/webjars/
如果我想访问上图中的 classpath:/META-INF/resources/webjars/jquery/3.5.1/jquery.js 这个资源
那么浏览器只需要访问 http://localhost:8080/webjars/jquery/3.5.1/jquery.js 即可
2、静态资源
Springboot 对静态资源的默认映射规则是 /** ——> { classpath:/META-INF/resources、classpath:/resources/、classpath:/static/、classpath:/public/ }
例如浏览器发起请求 http://localhost:8080/aaa.txt ,那么就会去 classpath:/META-INF/resources、classpath:/resources/、classpath:/static/、classpath:/public/ 这几个目录中寻找有没有 aaa.txt 这个资源,如果有就返回结果,没有显示 404
3、自定义对静态资源的处理
3.1 修改 application.properties 配置文件的方式
注意:如果在配置文件中进行如下配置,则 springboot 默认配置将被覆盖,原先默认的静态路径访问前缀 /** 和默认的静态资源文件目录都将失效
# 该配置项的默认值是 true,如果设置为 false 则代表关闭 Springboot 对 webjars 和静态资源的配置# 如果配置了该项的话,可以开启 debug 日志级别,控制台可以看到禁用了 Springboot 的默认配置spring.resources.add-mappings=false# 开启 debug 级别的日志信息debug=true# 修改静态资源访问前缀,配置了该选项之后,比如你想访问静态资源文件夹下的 aaa.txt,需要带上 bluefatty 前缀# 例如:http://localhost:8080/bluefatty/aaa.txt 就是访问静态资源文件夹下的 aaa.txt# 配置了该配置项之后,Springboot 默认的首页访问将失效spring.mvc.static-path-pattern=/bluefatty/**# 修改 Springboot 默认的静态资源文件夹,启用了该配置之后 Springboot 默认的静态资源文件夹将失效spring.resources.static-locations=classpath:/META-INF/resources02/,\classpath:/resources02/,\classpath:/static02/,\classpath:/public02/,\file:D://xiaomaomao/
3.2 代码注册的方式
注意:如果使用 WebMvcConfigurer 进行自定义规则,那么原先 Springboot 默认的配置和我们自定义的配置将一同起效
如果你不想使用配置文件,我们还可以通过代码的方式来进行自定义,具体步骤如下
自定义一个配置类 xxxWebMvcConfigurerAdapter extends WebMvcConfigurerAdapter(或者实现 WebMvcConfigurer ,其实是一个意思,因为 WebMvcConfigurerAdapter 实现了 WebMvcConfigurer 接口)
@Configurationpublic class MyWebMvcConfigurerAdapter extends WebMvcConfigurerAdapter {@Overridepublic void addResourceHandlers(ResourceHandlerRegistry registry){registry.addResourceHandler("/**")// 1、src/main/webapp/ 路径下.addResourceLocations("resources/", "static/", "public/","META-INF/resources/")// 2、src/main/resources/ 路径下.addResourceLocations("classpath:resources/", "classpath:static/","classpath:public/", "classpath:META-INF/resources/")// 3、绝对路径.addResourceLocations("file:D://xiaomaomao/");}}
上面的配置有三种路径方式 static/ (无前缀)、带有 classpath 前缀、绝对路径,这里来简单说明一下
1、无前缀 ——> “文档根目录”(一般指代 src/main/webapp 目录),例如 localhost:8080/index.html 定位至 src/main/webapp/static/index.html
2、存在前缀 classpath ——-> 类路径(一般指代 src/main/resources 目录)
3、存在前缀 file:// ——-> 文件系统路径(“绝对路径”)
接管Spring Boot的Web配置
如果Spring Boot提供的Sping MVC不符合要求,则可以通过一个配置类(注解有@Configuration的类)加上@EnableWebMvc注解来实现完全自己控制的MVC配置。
当然,通常情况下,Spring Boot的自动配置是符合我们大多数需求的。在你既需要保留Spring Boot提供的便利,有需要增加自己的额外的配置的时候,可以定义一个配置类并继承WebMvcConfigurerAdapter,无需使用@EnableWebMvc注解。
这里我们提到这个WebMvcConfigurerAdapter这个类,重写这个类中的方法可以让我们增加额外的配置,这里我们就介绍几个常用的。
自定义资源映射addResourceHandlers
比如,我们想自定义静态资源映射目录的话,只需重写addResourceHandlers方法即可。
@Configurationpublic class MyWebMvcConfigurerAdapter extends WebMvcConfigurerAdapter {/*** 配置静态访问资源* @param registry*/@Overridepublic void addResourceHandlers(ResourceHandlerRegistry registry) {registry.addResourceHandler("/my/**").addResourceLocations("classpath:/my/");super.addResourceHandlers(registry);}}
通过addResourceHandler添加映射路径,然后通过addResourceLocations来指定路径。
如果你想指定外部的目录也很简单,直接addResourceLocations指定即可,代码如下:
@Overridepublic void addResourceHandlers(ResourceHandlerRegistry registry) {registry.addResourceHandler("/my/**").addResourceLocations("file:E:/my/");super.addResourceHandlers(registry);}
addResourceLocations指的是文件放置的目录,addResoureHandler指的是对外暴露的访问路径
页面跳转addViewControllers
以前写SpringMVC的时候,如果需要访问一个页面,必须要写Controller类,然后再写一个方法跳转到页面,感觉好麻烦,其实重写WebMvcConfigurerAdapter中的addViewControllers方法即可达到效果了
/*** 以前要访问一个页面需要先创建个Controller控制类,再写方法跳转到页面* 在这里配置后就不需要那么麻烦了,直接访问http://localhost:8080/toLogin就跳转到login.jsp页面了* @param registry*/@Overridepublic void addViewControllers(ViewControllerRegistry registry) {registry.addViewController("/toLogin").setViewName("login");super.addViewControllers(registry);}
在这里重写addViewControllers方法,并不会覆盖WebMvcAutoConfiguration中的addViewControllers(在此方法中,Spring Boot将“/”映射至index.html),这也就意味着我们自己的配置和Spring Boot的自动配置同时有效,这也是我们推荐添加自己的MVC配置的方式。
拦截器addInterceptors
拦截器在我们项目中经常使用的,这里就来介绍下最简单的判断是否登录的使用。
要实现拦截器功能需要完成以下2个步骤:
- 创建我们自己的拦截器类并实现 HandlerInterceptor 接口
- 其实重写WebMvcConfigurerAdapter中的addInterceptors方法把自定义的拦截器类添加进来即可
首先,自定义拦截器代码:
package com.dudu.interceptor;public class MyInterceptor implements HandlerInterceptor {@Overridepublic boolean preHandle(HttpServletRequest request, HttpServletResponse response, Object handler) throws Exception {boolean flag =true;User user=(User)request.getSession().getAttribute("user");if(null==user){response.sendRedirect("toLogin");flag = false;}else{flag = true;}return flag;}@Overridepublic void postHandle(HttpServletRequest request, HttpServletResponse response, Object handler, ModelAndView modelAndView) throws Exception {}@Overridepublic void afterCompletion(HttpServletRequest request, HttpServletResponse response, Object handler, Exception ex) throws Exception {}}
这里我们简单实现了根据session中是否有User对象来判断是否登录,为空就跳转到登录页,不为空就通过。
接着,重写WebMvcConfigurerAdapter中的addInterceptors方法如下:
/*** 拦截器* @param registry*/@Overridepublic void addInterceptors(InterceptorRegistry registry) {// addPathPatterns 用于添加拦截规则// excludePathPatterns 用户排除拦截registry.addInterceptor(new MyInterceptor()).addPathPatterns("/**").excludePathPatterns("/toLogin","/login");super.addInterceptors(registry);}
addPathPatterns("/**")对所有请求都拦截,但是排除了/toLogin和/login请求的拦截。

若有收获,就点个赞吧
0 人点赞
