获取的下载下来的webm文件可以通过ffmpeg插件转成对应的文件格式
音频录制
获取全部音频设备
//获取全部外设window.onload = navigator.mediaDevices.enumerateDevices().then(res => {//res是全部的外设for (let i = 0; i < res.length; ++i) {if (res[i].kind === 'audioinput') {carema.push(res[i])}}deviceInfoId = carema[0];})
将audio标签进行实时播放 通过MediaRecorder对象进行录制 格式只能是webm mp3 mp4不支持但是生成生成连接下载时候可以下载成mp3 mp4
//点击开始按钮 进行实时播放且开始录制div.onclick = () => {navigator.mediaDevices.getUserMedia({video: false,audio: {deviceId: deviceInfoId.deviceId}}).then(res => {video.srcObject = res;video.play();//必须进行接受返回值 start开始录制num = new MediaRecorder(res, {mimeType: 'video/webm;codecs=h264'})num.start()})}
将录制的音频设置到其他audio 且下载下来
//点击结束按钮 获取录制好的二进制数据 生成url设置到新的audio标签上div1.onclick = () => {//结束录制num.stop();let s0 = null//当结束录制后触发该方法num.ondataavailable = e => {s0 = e.data;//获取到的blob数据video1.src = window.URL.createObjectURL(s0);//设置到一个新的video标签上//进行下载let a = document.createElement('a')a.href = window.URL.createObjectURL(s0)a.download = "音频.webm"document.body.appendChild(a)a.click()}
视频录制
和录制音频相同 就是标签不同 和获取的外设不同
获取全部摄像头
//获取全部外设window.onload = navigator.mediaDevices.enumerateDevices().then(res => {//res是全部的外设for (let i = 0; i < res.length; ++i) {if (res[i].kind === 'videoinput') {carema.push(res[i])}}deviceInfoId = carema[0];})
将video标签进行实时播放 通过MediaRecorder对象进行录制
//点击开始按钮 进行实时播放且开始录制div.onclick = () => {navigator.mediaDevices.getUserMedia({video: {deviceId: deviceInfoId.deviceId}//可以在获取音频设备设置上可以将声音也录制上}}).then(res => {video.srcObject = res;video.play();//必须进行接受返回值 start开始录制num = new MediaRecorder(res, {mimeType: 'video/webm;codecs=h264'})num.start()})}
将录制的视频设置到其他video且下载下来
//点击结束按钮 获取录制好的二进制数据 生成url设置到新的video标签上div1.onclick = () => {//结束录制num.stop();let s0 = null//当结束录制后触发该方法num.ondataavailable = e => {s0 = e.data;//获取到的blob数据video1.src = window.URL.createObjectURL(s0);//设置到一个新的video标签上//进行下载let a = document.createElement('a')a.href = window.URL.createObjectURL(s0)a.download = "视频.webm"document.body.appendChild(a)a.click()}
录制屏幕
获取屏幕且在video实时展示 getDisplayMedia获取屏幕流
div.onclick = () => {navigator.mediaDevices.getDisplayMedia().then(res => {video.srcObject = res;video.play();num = new MediaRecorder(res, {mimeType: 'video/webm;codecs=h264'})num.start()})}
//点击结束按钮 获取录制好的二进制数据 生成url设置到新的video标签上div1.onclick = () => {//结束录制num.stop();let s0 = null//当结束录制后触发该方法num.ondataavailable = e => {s0 = e.data;//获取到的blob数据video1.src = window.URL.createObjectURL(s0);//设置到一个新的video标签上//进行下载let a = document.createElement('a')a.href = window.URL.createObjectURL(s0)a.download = "屏幕.webm"document.body.appendChild(a)a.click()}
WebRTC
实现视频通话
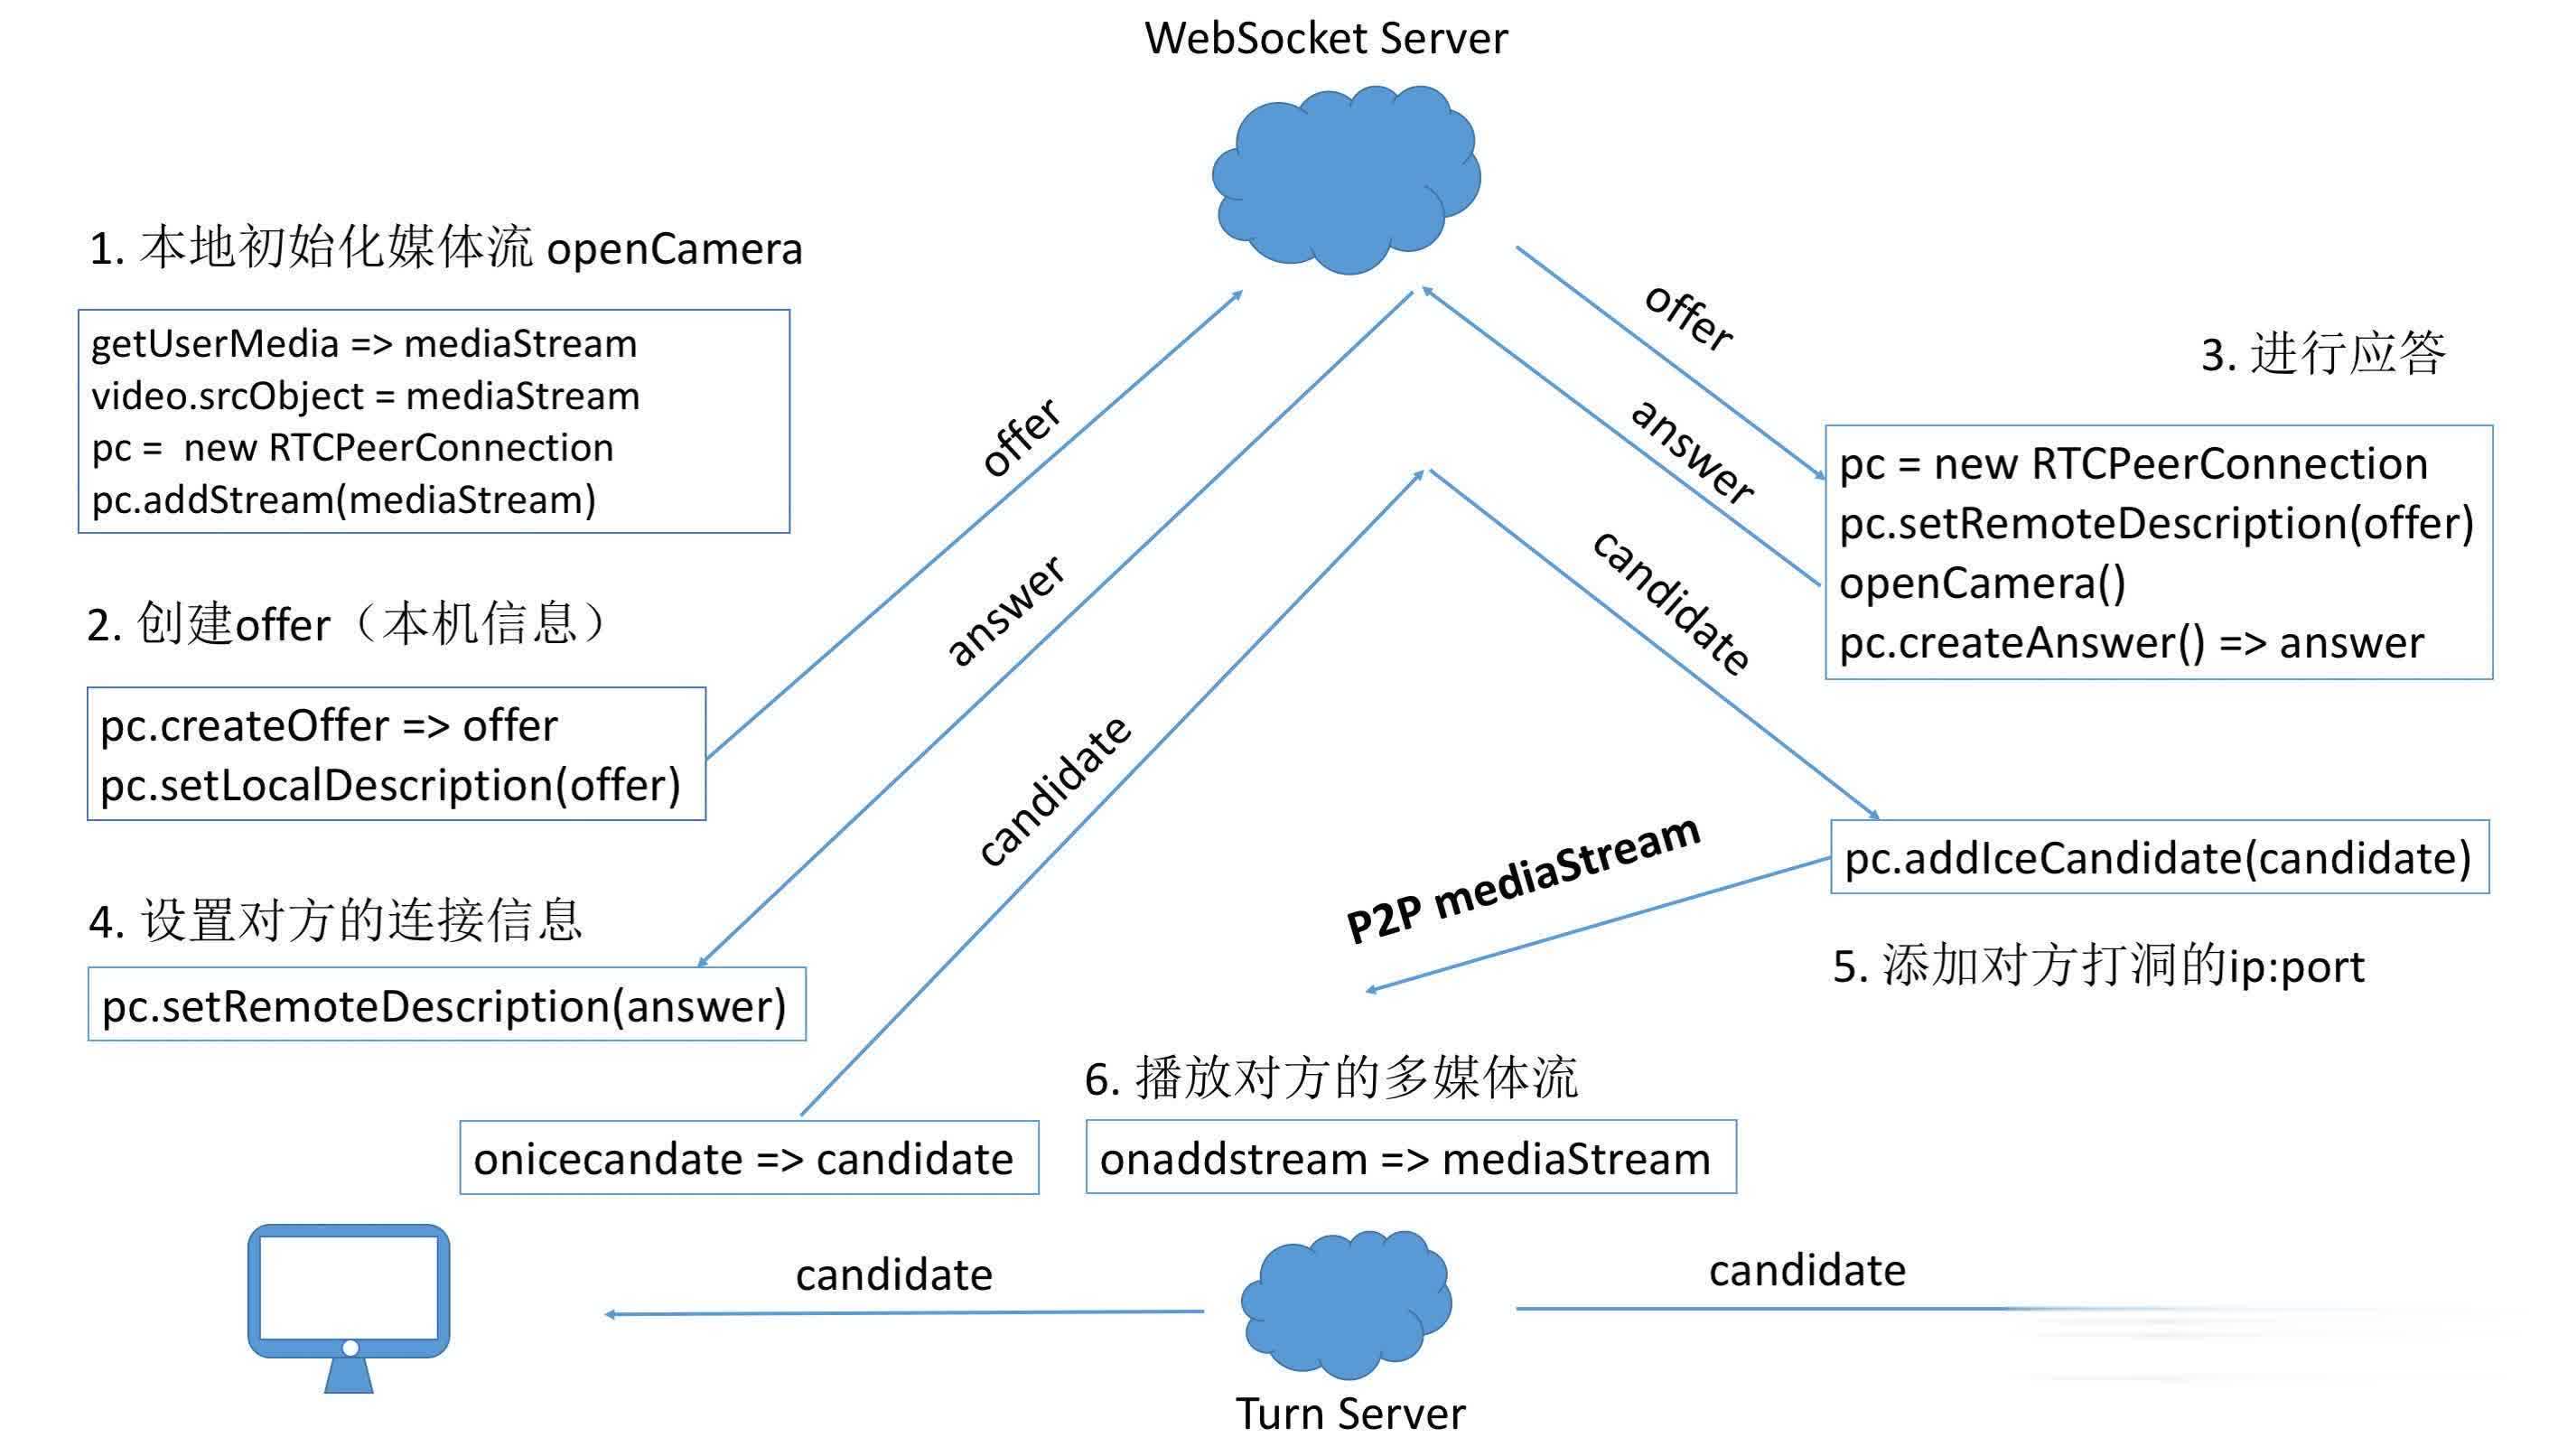
过程
- 教师端获取视频流 通过addTrack将流发送过去(注意:必须要前打开流 否则发送offer后需要在打开一次 这时流还没有发送过去)
- 创建RTCPeerConnection连接无参数使用默认的
- 通过onicecandidate监听事件获取信令(会在发送过去addicecandidate或者发送过去offer进行应答时触发)
- 教师端向学生端发送offer且自己通过setLocalDescription设置上 通过socket传输给学生端 学生端通过进行setRemoteDescription接收且创建answer进行应答通用学生端通过setLocalDescription进行设置,教师端通过setRemoteDescription设置学生端在将接收到的candidate通过addIceCandidate()设置上(注意在设置时要通过new RTCIceCandidate(res.obj)进行构建下)
- 这时候教师端的addTrack发送数据流了,学生端ontrack会监听到数据流进行输入到video上去
如果实现两边都互相直播的情况 可以在双方都进行offer answer互传,通过addTrack传输 两边进行onTrack监听
教师端
<body><video id="video" controls></video><video id="video1" controls></video><div id="div" style="background:rosybrown;width: 200px;height: 200px">开启摄像头</div><div id="div1" style="background:rosybrown;width: 200px;height: 200px">直播</div></body><script>var video = document.getElementById('video');var video1 = document.getElementById('video1');var div = document.getElementById('div');var div1 = document.getElementById('div1');var canvas = document.getElementById('canvas');var deviceInfoId = ""; //摄像头IDlet carema = []; //摄像头ID数组//在页面加载完成后获得设备ID数组window.onload = navigator.mediaDevices.enumerateDevices().then(res => {//res是全部的外设 找到摄像头的外设存下来for (let i = 0; i < res.length; ++i) {if (res[i].kind === 'videoinput') {carema.push(res[i])}}deviceInfoId = carema[0];})let webSocket = new WebSocket("ws://192.168.0.31:8888/webrtc?roomID=" + 100)webSocket.onopen = function (e) {console.log("打开连接了")}var configuration = {iceServers: [{url: "stun:stun1.l.google.com:19302"}]};let pc = new RTCPeerConnection(configuration);pc.onicecandidate = function (event) {console.log("onicecandidate:"+event)if (event.candidate) {webSocket.send(JSON.stringify({sys: "ice", obj: event.candidate}));}}div.onclick = () => {navigator.mediaDevices.getUserMedia({video: {deviceId: deviceInfoId.deviceId},audio: false}).then(res => {res.getTracks().forEach(e => {console.log(e)pc.addTrack(e,res);})video.srcObject = res;video.play();})}div1.onclick=()=>{pc.createOffer().then(e => {pc.setLocalDescription(e);console.log("offer教师:"+pc.setLocalDescription(e))if (webSocket.readyState == WebSocket.OPEN) {webSocket.send(JSON.stringify({sys: "offer", obj: e}))}})}// pc.ontrack = e => {// alert("11")// console.log(e)// video1.srcObject =e.streams[0]// }webSocket.onmessage = e => {let res = JSON.parse(e.data);console.log("接受到消息")if (res.sys == "offer") {pc.setRemoteDescription(res.obj);console.log("offer学生")pc.createAnswer().then(e => {pc.setLocalDescription(e)console.log("answer教师")webSocket.send(JSON.stringify({sys: "answer", obj: e}))})} else if (res.sys == "answer") {pc.setRemoteDescription(res.obj)console.log("answer学生")} else if (res.sys == "ice") {console.log("ice被调用")pc.addIceCandidate(new RTCIceCandidate(res.obj))}}</script>
学生端
<body><video id="video" controls></video><video id="video1" controls></video><div id="div" style="background:rosybrown;width: 200px;height: 200px">开启摄像头</div><div id="div1" style="background:rosybrown;width: 200px;height: 200px">拍照</div></body><script>var video = document.getElementById('video');var video1 = document.getElementById('video1');var div = document.getElementById('div');var div1 = document.getElementById('div1');var canvas = document.getElementById('canvas');var deviceInfoId = ""; //摄像头IDlet carema = []; //摄像头ID数组//在页面加载完成后获得设备ID数组window.onload = navigator.mediaDevices.enumerateDevices().then(res => {//res是全部的外设 找到摄像头的外设存下来for (let i = 0; i < res.length; ++i) {if (res[i].kind === 'videoinput') {carema.push(res[i])}}deviceInfoId = carema[0];})let webSocket = new WebSocket("ws://localhost:8888/webrtc?roomID=" + 100)webSocket.onopen = function (e) {console.log("打开连接了")}let pc = new RTCPeerConnection();//学生端如果不需要传输视频流不需要发送ice和offer//只需要教师端将offer给学生端 学生端给教师端一个answer应该就可以//学生端需要将教师端给的offer设置上同时返回给教师端个answer 将教师端给的ice添加上 监听ontrack就可以了pc.onicecandidate = function(event) {console.log("学生端ice被调用")if (event.candidate) {webSocket.send(JSON.stringify({sys: "ice", obj: event.candidate}));}}div.onclick = () => {navigator.mediaDevices.getUserMedia({video: {deviceId: deviceInfoId.deviceId},audio: false}).then(res => {video.srcObject = res;video.play();})}div1.onclick = () => {pc.createOffer().then(e => {pc.setLocalDescription(e);if (webSocket.readyState == WebSocket.OPEN) {webSocket.send(JSON.stringify({sys: "offer", obj: e}))}})}pc.ontrack = e => {video1.srcObject = e.streams[0]}webSocket.onmessage = e => {let res = JSON.parse(e.data);if (res.sys == "offer") {pc.setRemoteDescription(res.obj);pc.createAnswer().then(e => {pc.setLocalDescription(e)webSocket.send(JSON.stringify({sys: "answer", obj: e}))})} else if (res.sys == "answer") {console.log(res)pc.setRemoteDescription(new RTCSessionDescription(res.obj));} else if (res.sys == "ice") {pc.addIceCandidate(new RTCIceCandidate(res.obj))}}</script>
socket服务
// 只是简单的将收到的数据发送过去 在前端进行判断 可以在后端进行严谨判断--这里没有需要更改 完成复制可能失败@OnMessagepublic void onMessage(String message, Session session) throws IOException {String thisRoomID=session.getQueryString();//获取参数System.out.println(thisRoomID);for (Session session1 : list){System.out.println(session1==session);if (session1==session){continue;}System.out.println(message);session1.getBasicRemote().sendText(message);}

若有收获,就点个赞吧
0 人点赞
