栈(stack)又名堆栈,它是一种运算受限的线性表。限定仅在表尾进行插入和删除操作的线性表。这一端被称为栈顶,相对地,把另一端称为栈底。向一个栈插入新元素又称作进栈、入栈或压栈,它是把新元素放到栈顶元素的上面,使之成为新的栈顶元素;从一个栈删除元素又称作出栈或退栈,它是把栈顶元素删除掉,使其相邻的元素成为新的栈顶元素。
特点:先进后出,后进先出。(浏览器的前进后退就是基于栈实现的)
栈实现
核心方法
push进栈pop出栈peek取栈顶元素

数组实现栈
public class YKDStack {String[] data;int size;// 栈顶位置int top = -1;// 初始化栈,默认大小为20public YKDStack() {this.initData(20);}// 初始化栈,并传入栈空间大小public YKDStack(int size) {this.initData(size);}// 初始化数组private void initData(int size) {this.size = size;this.data = new String[this.size];}// 添加元素public boolean push(String value) {// 数组越界了if (this.top >= this.size - 1) {return false;}// top 栈顶 +1this.top++;// 设置栈顶元素this.data[this.top] = value;return true;}// 弹出栈顶元素public String pop() {if (this.top == -1) {return null;}String item = this.data[this.top];this.top--;return item;}// 获取栈顶元素public String peek() {if (this.top == -1) {return null;}return this.data[this.top];}public static void main(String[] args) {YKDStack stack = new YKDStack();System.out.println(stack.peek());System.out.println(stack.pop());stack.push("hello");System.out.println(stack.peek());stack.push("you");System.out.println(stack.pop());System.out.println(stack.peek());}}
链表实现栈
//节点public class Node {private String content;private Node next;public Node() {}public Node(String content) {this.content = content;}public Node(String content, Node next) {this.content = content;this.next = next;}//getter and setter}
public class YKDStack {Node header;public YKDStack() {}// 添加元素public boolean push(String value) {if (this.header == null) {// 当前为空的时候,添加headerthis.header = new Node(value);} else {// 当前不为空的时候,构建一个新的头部节点this.header = new Node(value, this.header);}return true;}// 弹出栈顶元素public String pop() {if (this.header == null) {return null;}// 删除链表头部节点Node node = this.header;this.header = node.getNext();node.setNext(null);return node.getContent();}// 获取栈顶元素public String peek() {if(this.header == null){return null;}return this.header.getContent();}public static void main(String[] args) {YKDStack stack = new YKDStack();System.out.println(stack.peek());System.out.println(stack.pop());stack.push("hello");System.out.println(stack.peek());stack.push("you");System.out.println(stack.pop());System.out.println(stack.peek());}}
常见算法题
括号匹配
栈的实现代码这里省略。
package algorithm;import java.util.Stack;/*** @ClassName Test* @Author 刘正星* @Date 2021/6/18 下午8:44* @Description*/public class Test {static boolean match(String input){Stack<Character> strings = new Stack<>();for (int i = 0; i < input.length(); i++) {char c = input.charAt(i);if (c=='('||c=='{'||c=='['){strings.push(c);// continue;}if (c==')'){if (strings.peek()!=null&&strings.peek()=='('){strings.pop();}else {return false;}}if (c=='}') {if (strings.peek() != null && strings.peek() == '{') {strings.pop();}else {return false;}}if (c==']'){if (strings.peek()!=null&&strings.peek()=='['){strings.pop();}else {return false;}}}return true;}public static void main(String [] args){System.out.println(match("[{{(())}}]"));System.out.println(match("[{{(()}}"));}}
标准答案
public class Demo {// 判断代码括号是否匹配public static boolean match(String code) {YKDStack<Character> stack = new YKDStack<>();for (int i = 0; i < code.length(); i++) {char c = code.charAt(i);if (c == '(' || c == '{' || c == '[') {stack.push(c);continue;}if (c == ')') {if (stack.peek() != null && stack.peek() == '(') {stack.pop();} else {return false;}}if (c == '}') {if (stack.peek() != null && stack.peek() == '{') {stack.pop();} else {return false;}}if (c == ']') {if (stack.peek() != null && stack.peek() == '[') {stack.pop();} else {return false;}}}return true;}public static void main(String[] args) {boolean result = match("()({()})");System.out.println("()({()}): " + result);result = match("{((}))");System.out.println("{((})): " + result);}}
行编辑器

标准答案
public class Demo {// 行编辑器的输入public static String input(String source) {YKDStack<Character> stack = new YKDStack<>();// 遍历每个字符for (int i = 0; i < source.length(); i++) {char c = source.charAt(i);// 遇到 # 则 popif (c == '#') {if (stack.peek() != null) {stack.pop();}continue;}// 遇到 @ 则清空,相当于重新 new YKDStack()。if (c == '@') {stack = new YKDStack<>();continue;}stack.push(c);}// 将栈中元素依次pop出来,拼接在字符串前面String result = "";while(stack.peek() != null){result = stack.pop() + result;}return result;}public static void main(String[] args) {System.out.println(input("abc#dd"));System.out.println(input("abc@dd"));System.out.println(input("a#b#d#ce"));System.out.println(input("ab##dce"));}}
public class Demo {// 行编辑器的输入public static String input(String source) {YKDStack<String> stack = new YKDStack();String [] strs = source.split("");for (String str:strs ){if (str.equals("#")){stack.pop();continue;}if(str.equals("@")){while(stack.peek()!=null){stack.pop();}continue;}stack.push(str);}String back = "";while(stack.peek()!=null){back=stack.pop()+back;}return back;}public static void main(String[] args) {System.out.println(input("abc#dd"));System.out.println(input("abc@dd"));System.out.println(input("a#b#d#ce"));System.out.println(input("ab##dce"));}}
简单寻路算法

自动寻路
地图简化三要素:可移动区域,不可以动区域,起点和终点。
把地图抽象成二维方格。

#表示不可移动区域,空格表示可移动区域,*表示移动路径。
思路
- 如何存储整个地图信息,包括障碍物,可移动区域。
- 如何存储寻找自动寻路路径。
地图信息
可以用二维数组存储。
获取第三行第四列信息。 ```java int row = 2; int column = 3;char[][] map = {{'#', '#', '#', '#', '#', '#', '#', '#', '#', '#'},{'#', ' ', ' ', '#', ' ', ' ', ' ', '#', ' ', '#'},{'#', ' ', ' ', '#', ' ', ' ', ' ', '#', ' ', '#'},{'#', ' ', ' ', ' ', ' ', '#', '#', ' ', ' ', '#'},{'#', ' ', '#', '#', '#', ' ', ' ', ' ', ' ', '#'},{'#', ' ', ' ', ' ', '#', ' ', ' ', ' ', ' ', '#'},{'#', ' ', '#', ' ', ' ', ' ', '#', ' ', ' ', '#'},{'#', ' ', '#', '#', '#', ' ', '#', '#', ' ', '#'},{'#', '#', ' ', ' ', ' ', ' ', ' ', ' ', ' ', '#'},{'#', '#', '#', '#', '#', '#', '#', '#', '#', '#'}};
// 第 3 行,第 4 列信息 char content = map[row][column]
整个游戏用`Game`类模拟,一个`map`属性保存地图信息。<br />`Point`类来存储位置信息。两个属性`row`和`column`<a name="IEWM7"></a>#### 方向我们站在某一个方格,都有四个方向可以进行探索:上下左右<br />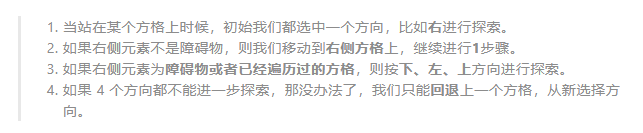<br />用向量去模拟方向。<br /><br />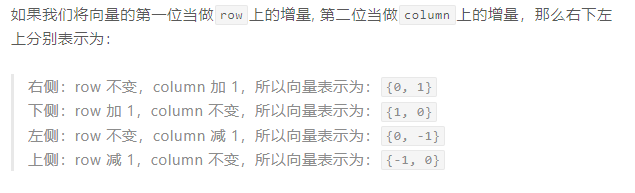```java// 存储4个方向private int[][] directions = {{0, 1}, {1, 0}, {0, -1}, {-1, 0}};
利用栈去储存路径,还要方便回退。
怎么标记方格是否访问过,方格是否是死路?
用@标记方格为死路
新建一个Title对象,表示在栈中的信息,包括方格位置,和遍历的方向。
public class Tile {// 方格位置private Point point;// 方格当前遍历的方向private int direction = 0;}
实战过程
第一步
站在起点,起点位置{1,1} 加入到step中,并将元素方向设置为-1,表示还未探索过。
第二步
- 获取栈顶元素,也就是{1,1}方格,将方格方向+1,也就是第一个的探索方向右
- 探索右侧方格{1,2},加入到steps 栈中,方向设置为-1。

第三步
- 获取栈顶元素,也就是{1,2}方格,将方格方向+1,
- 但是这里遇到#也就是障碍物,则调整方向继续+1,向下探索,
- 探索下册方格{2,2}加入steps中,方向设置为-1。

以此类推,可以达到以下情况。

方格{1,4}是死路,上下左右方向都不能继续探索了,我们将该方格设置为@,并弹出pop()方格。
继续观察方格{1,5}也是死路,同样上述操作。
直到如下场景:
获取栈顶元素{3,2},继续探索。
最终可以找到终点
路径回溯
栈中储存的就是起点到终点的路径,依次pop栈顶元素,然后倒叙即可。
完整代码
Game
import java.util.ArrayList;public class Game {private char[][] map;// 存储探索的路径节点private YKDStack<Tile> steps = new YKDStack<>();// 存储4个方向private int[][] directions = {{0, 1}, {1, 0}, {0, -1}, {-1, 0}};public Game(char[][] map) {this.map = map;}// 寻找路径public ArrayList<Point> findPath(Point start, Point end) {ArrayList<Point> path = new ArrayList<>();// 每次寻路之前将栈清空this.steps = new YKDStack<>();// 将起点添加到栈中,并将其标记为已访问this.steps.push(new Tile(start, -1));this.map[start.getRow()][start.getColumn()] = '*';// 循环到栈中元素结束,则表示从起点开始未能找到结束点while (this.steps.peek() != null) {// 获取栈顶元素Tile tile = this.steps.peek();Point tilePoint = tile.getPoint();// 判断是不是结束节点if (this.isSame(tilePoint, end)) {break;}// 修改栈顶元素的方向,准备进行探索tile.setDirection(tile.getDirection() + 1);// 当方向为 4 的时候,表示所有方向都已经遍历过了,所以标记为死路@,并弹出栈顶元素if (tile.getDirection() == 4) {this.map[tilePoint.getRow()][tilePoint.getColumn()] = '@';this.steps.pop();} else {// 否则探索目标方向的方格int[] direction = directions[tile.getDirection()];// 根据方向向量获取新方格的位置信息Point newPoint = new Point(tilePoint.getRow() + direction[0],tilePoint.getColumn() + direction[1]);// 如果可以通行,则将新探索的方格添加到栈中,并标记为已访问if (this.canStep(newPoint)) {Tile newTile = new Tile(newPoint, -1);this.map[newPoint.getRow()][newPoint.getColumn()] = '*';this.steps.push(newTile);}// 如果不可以通行,则不处理,再次获取栈顶元素,改变方向。}}// 从栈中以此回退方格信息,也就是整个访问路径信息while (this.steps.peek() != null) {path.add(0, this.steps.pop().getPoint());}return path;}private boolean isSame(Point point1, Point point2) {return point1.getRow() == point2.getRow() && point1.getColumn() == point2.getColumn();}private boolean canStep(Point point) {return this.map[point.getRow()][point.getColumn()] == ' ';}public static void main(String[] args) {char[][] map = {{'#', '#', '#', '#', '#', '#', '#', '#', '#', '#'},{'#', ' ', ' ', '#', ' ', ' ', ' ', '#', ' ', '#'},{'#', ' ', ' ', '#', ' ', ' ', ' ', '#', ' ', '#'},{'#', ' ', ' ', ' ', ' ', '#', '#', ' ', ' ', '#'},{'#', ' ', '#', '#', '#', ' ', ' ', ' ', ' ', '#'},{'#', ' ', ' ', ' ', '#', ' ', ' ', ' ', ' ', '#'},{'#', ' ', '#', ' ', ' ', ' ', '#', ' ', ' ', '#'},{'#', ' ', '#', '#', '#', ' ', '#', '#', ' ', '#'},{'#', '#', ' ', ' ', ' ', ' ', ' ', ' ', ' ', '#'},{'#', '#', '#', '#', '#', '#', '#', '#', '#', '#'}};Game game = new Game(map);Point start = new Point(1, 1);Point end = new Point(8, 8);ArrayList<Point> path = game.findPath(start, end);for (Point point : path) {System.out.println(point.getRow() + " - " + point.getColumn());}}}
Node
public class Node<T> {private T content;private Node<T> next;public Node() {}public Node(T content) {this.content = content;}public Node(T content, Node<T> next) {this.content = content;this.next = next;}// getter and setter}
Point
public class Point {//行private int row = 0;//列private int column = 0;public Point(int row, int column) {this.row = row;this.column = column;}//getter and setter}
Title
public class Tile {// 方格位置private Point point;// 方格当前遍历的方向private int direction = 0;public Tile(Point point, int direction) {this.point = point;this.direction = direction;}// getter and setter}
YKDStack
public class YKDStack<T> {Node<T> header;public YKDStack() {}// 添加元素public boolean push(T value) {if (this.header == null) {// 当前为空的时候,添加headerthis.header = new Node<T>(value);} else {// 当前不为空的时候,构建一个新的头部节点this.header = new Node<T>(value, this.header);}return true;}// 弹出栈顶元素public T pop() {if (this.header == null) {return null;}// 删除链表头部节点Node<T> node = this.header;this.header = node.getNext();node.setNext(null);return node.getContent();}// 获取栈顶元素public T peek() {if (this.header == null) {return null;}return this.header.getContent();}}
拓展
如果可以八个方向探索。代码怎么修改?

// 存储8个方向private int[][] directions = {{0, 1},{1,1}, {1, 0},{1,-1}, {0, -1},{-1,-1}, {-1, 0},{-1,1}};
// 当方向为 8 的时候,表示所有方向都已经遍历过了,所以标记为死路@,并弹出栈顶元素if (tile.getDirection() == 8) {this.map[tilePoint.getRow()][tilePoint.getColumn()] = '@';this.steps.pop();

若有收获,就点个赞吧
0 人点赞
