入门
Docker安装
拉取镜像
$ docker pull nginx:latest
查看本地镜像:
$ docker images
运行容器
$ docker run --name nginx-test -p 8080:80 -d nginx
参数说明:
- —name nginx-test:容器名称。
- -p 8080:80: 端口进行映射,将本地 8080 端口映射到容器内部的 80 端口。
- -d nginx: 设置容器在在后台一直运行。
安装成功
最后我们可以通过浏览器可以直接访问 8080 端口的 nginx 服务: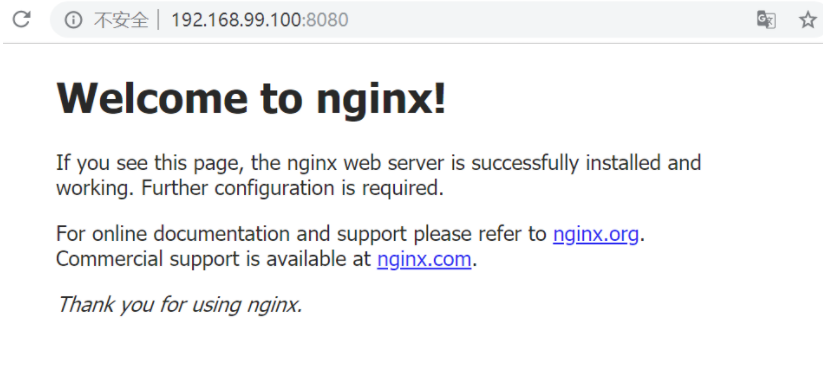
部署项目
挂载
我们可以看到的是我们每次修改nginx的配置文件需要复制出来,修改,然后复制回去。这样来说甚是麻烦。
我们可以通过挂载的方式来解决来回cp的问题。
我们把前面创建的nginx-test的default.conf放到一个文件夹里面。
比如:我们把default.conf 存放在~/home/nginx/default.conf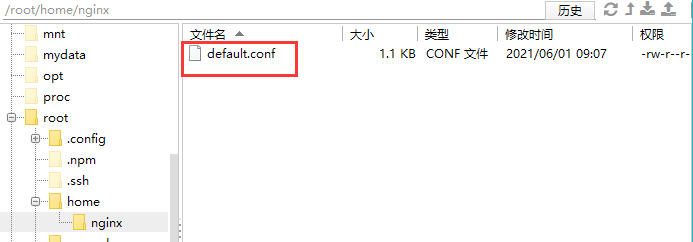
然后我们启动:(需要删除前面创建的容器,或者name跟前面的不一样也行)
$ docker run -d -p 8080:80 -v ~/home/nginx/default.conf:/etc/nginx/conf.d/default.conf --name nginx-test nginx
说明:
-v创建一个挂载,~/home/nginx/default.conf:/etc/nginx/conf.d/default.conf前面是宿主机的路径 后面的 是容器中的路径。
我们的default.conf配置文件是放在容器外部的,default.conf文件内容如下所示。
server {listen 80;listen [::]:80;server_name localhost;#access_log /var/log/nginx/host.access.log main;location / {root /usr/share/nginx/html;index index.html index.htm;}#error_page 404 /404.html;# redirect server error pages to the static page /50x.html#error_page 500 502 503 504 /50x.html;location = /50x.html {root /usr/share/nginx/html;}# proxy the PHP scripts to Apache listening on 127.0.0.1:80##location ~ \.php$ {# proxy_pass http://127.0.0.1;#}# pass the PHP scripts to FastCGI server listening on 127.0.0.1:9000##location ~ \.php$ {# root html;# fastcgi_pass 127.0.0.1:9000;# fastcgi_index index.php;# fastcgi_param SCRIPT_FILENAME /scripts$fastcgi_script_name;# include fastcgi_params;#}# deny access to .htaccess files, if Apache's document root# concurs with nginx's one##location ~ /\.ht {# deny all;#}}
添加静态文件index.html。
在home文件下新建index.html文件。
<!DOCTYPE html><html lang="en"><head><meta charset="UTF-8" /><link rel="icon" href="/favicon.ico" /><meta name="viewport" content="width=device-width, initial-scale=1.0" /><title>简历</title></head><body><h1>hello nginx -刘正星</h1></body></html>
我们想,如果我们将我们的静态文件夹存放在宿主机上,然后做一个挂载放在容器里这个路径,那么我们是不是修改宿主机上面的 静态文件,对应的容器的静态文件也会进行修改。
这个就是实现了我们前端页面用nginx显示的需求吗。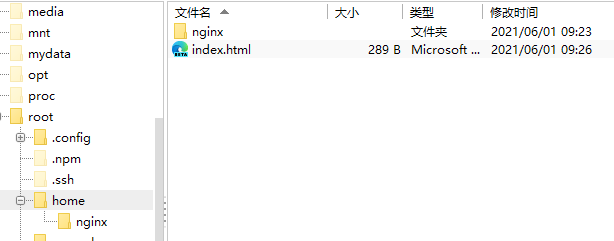
运行如下命令:
$ docker run -d -p 8080:80 -v ~/home/nginx/default.conf:/etc/nginx/conf.d/default.conf -v ~/home:/usr/share/nginx/html --name nginx-test nginx

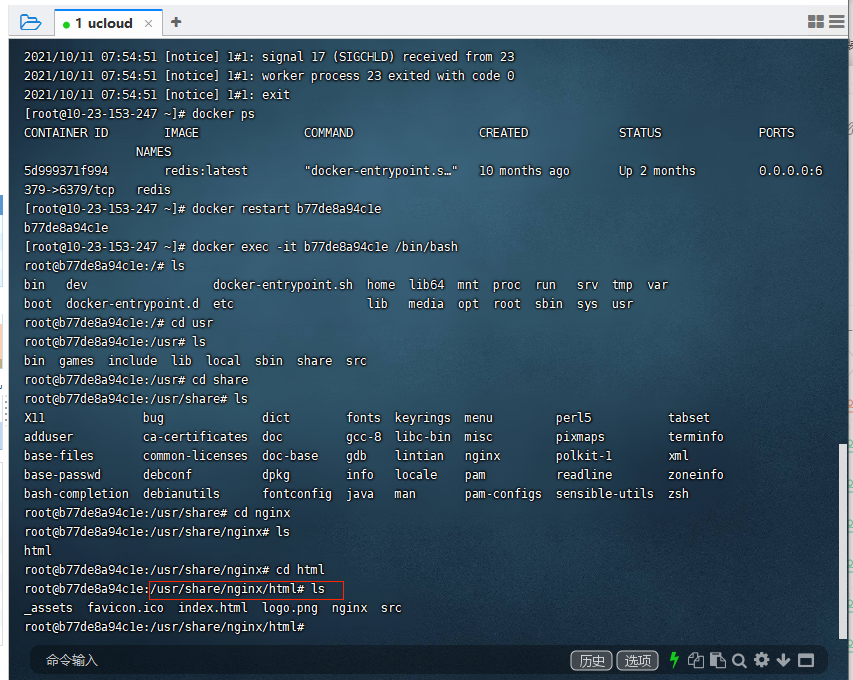
通过浏览器访问测试一下。
参考文章: https://blog.csdn.net/datouniao1/article/details/106442387 同一台机器多项目部署 https://zhuanlan.zhihu.com/p/69555541
问题
单页应用页面刷新404问题
原因
原因是因为web单页面开发模式,只有一个index.html入口,其他路径是前端路由去跳转的,nginx没有对应这个路径,当然就是404了。
解决方案
location / {root /usr/nginx/app/dist/;index index.html;try_files $uri $uri/ /index.html;}
总结
在配置中加上try_files,意思跟翻译差不多,“尝试读取文件”。u r i 这 个 是 n g i n x 的 一 个 变 量 , 存 放 着 用 户 访 问 的 地 址 , 例 如 h t t p : / / l o c a l h o s t : 8200 / c h o o s e S i z e 那 么 uri 这个是nginx的一个变量,存放着用户访问的地址,例如http://localhost:8200/chooseSize 那么uri这个是nginx的一个变量,存放着用户访问的地址,例如http://localhost:8200/chooseSize那么uri就是/chooseSize;u r i / 代 表 访 问 的 是 一 个 目 录 例 如 h t t p : / / l o c a l h o s t : 8200 / c h o o s e S i z e / 那 么 uri/ 代表访问的是一个目录 例如http://localhost:8200/chooseSize/ 那么uri/代表访问的是一个目录例如http://localhost:8200/chooseSize/那么uri/就是/chooseSize/;最后/index.html就是我们首页的地址。
最终上面的意思是如果第一个存在,直接返回;不存在的话读取第二个,如果存在,读取返回;如果还是不存在,就会fall back到 try_files 的最后一个选项 /index.html,发起一个内部 “子请求”,也就是相当于 nginx 发起一个 HTTP 请求http://localhost:8200/index.html,再通过前端路由到/chooseSize
[
](https://zhuanlan.zhihu.com/p/69555541)
Nginx配置详解
nginx配置
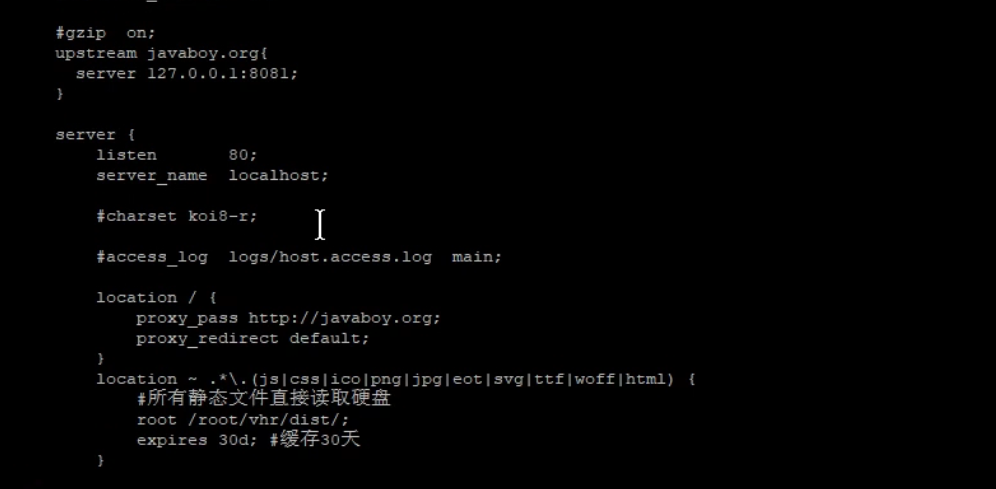
普通安装
参考:https://www.runoob.com/linux/nginx-install-setup.html
常用命令
/usr/local/webserver/nginx/sbin/nginx # 启动/usr/local/webserver/nginx/sbin/nginx -s reload # 重新载入配置文件/usr/local/webserver/nginx/sbin/nginx -s reopen # 重启 Nginx/usr/local/webserver/nginx/sbin/nginx -s stop # 停止 Nginx/usr/local/webserver/nginx/sbin/nginx -t # 检查配置文件nginx.conf的正确性/usr/local/webserver/nginx/sbin/nginx -v # 查看nginx版本
Nginx同一个server部署多个静态资源目录
一般情况,有时候业务需求,需要在一个server下面不同目录部署两个不同的项目。
比如 http://domain:port/admin 匹配的是 admin 项目
比如 http://domain:port/react 匹配的是 react 项目
我们在nginx.conf里面写一个新的server;
server {listen 6002;server_name **.**.**.**;gzip on;location /admin {alias /projects/admin/;#指定主页index index.html;#自动跳转autoindex on;}location /react {alias /projects/react/;#指定主页index index.html;#自动跳转autoindex on;}}
复制代码然后关闭 nginx
[root]# nginx -s stop
复制代码重启 nginx
[root]# nginx -c /etc/nginx/nginx.conf
复制代码总结:
这里需要注意的就是location中的路径匹配问题,root和 alias的区别;
错误写法,会报404
# 错误写法,会报404location /admin {root /projects/admin/;#指定主页index index.html;#自动跳转autoindex on;}location /react {root /projects/react/;#指定主页index index.html;#自动跳转autoindex on;}# 当你访问 http://***/admin# root ==> 实际指向的是 http://***/admin/projects/admin/, 这个时候肯定找不到index.html# alias ==> 实际指向的是 http://***/admin, 可以在/projects/admin/找到index.html
jsnu
default.conf
# For more information on configuration, see:# * Official English Documentation: http://nginx.org/en/docs/# * Official Russian Documentation: http://nginx.org/ru/docs/user nginx;worker_processes auto;error_log /var/log/nginx/error.log;pid /run/nginx.pid;# Load dynamic modules. See /usr/share/doc/nginx/README.dynamic.include /usr/share/nginx/modules/*.conf;events {worker_connections 1024;}http {log_format main '$remote_addr - $remote_user [$time_local] "$request" ''$status $body_bytes_sent "$http_referer" ''"$http_user_agent" "$http_x_forwarded_for"';access_log /var/log/nginx/access.log main;sendfile on;tcp_nopush on;tcp_nodelay on;keepalive_timeout 65;types_hash_max_size 2048;include /etc/nginx/mime.types;default_type application/octet-stream;# Load modular configuration files from the /etc/nginx/conf.d directory.# See http://nginx.org/en/docs/ngx_core_module.html#include# for more information.include /etc/nginx/conf.d/*.conf;server {listen 80;listen [::]:80;server_name localhost;#access_log /var/log/nginx/host.access.log main;location / {root /usr/share/nginx/html;index index.html index.htm;try_files $uri $uri/ /index.html;}#error_page 404 /404.html;# redirect server error pages to the static page /50x.html#error_page 500 502 503 504 /50x.html;location = /50x.html {root /usr/share/nginx/html;}# proxy the PHP scripts to Apache listening on 127.0.0.1:80##location ~ \.php$ {# proxy_pass http://127.0.0.1;#}# pass the PHP scripts to FastCGI server listening on 127.0.0.1:9000##location ~ \.php$ {# root html;# fastcgi_pass 127.0.0.1:9000;# fastcgi_index index.php;# fastcgi_param SCRIPT_FILENAME /scripts$fastcgi_script_name;# include fastcgi_params;#}# deny access to .htaccess files, if Apache's document root# concurs with nginx's one##location ~ /\.ht {# deny all;#}}# Settings for a TLS enabled server.## server {# listen 443 ssl http2 default_server;# listen [::]:443 ssl http2 default_server;# server_name _;# root /usr/share/nginx/html;## ssl_certificate "/etc/pki/nginx/server.crt";# ssl_certificate_key "/etc/pki/nginx/private/server.key";# ssl_session_cache shared:SSL:1m;# ssl_session_timeout 10m;# ssl_ciphers PROFILE=SYSTEM;# ssl_prefer_server_ciphers on;## # Load configuration files for the default server block.# include /etc/nginx/default.d/*.conf;## location / {# }## error_page 404 /404.html;# location = /40x.html {# }## error_page 500 502 503 504 /50x.html;# location = /50x.html {# }# }}
代理规则
location /api/ {proxy_pass http://49.234.54.97:8088; #项目启动地址}
实际请求 http://49.234.54.97:8088/api/xxx
location /api/ {proxy_pass http://49.234.54.97:8088/; #项目启动地址}
实际请求 http://49.234.54.97:8088/xxx
nginx——尚硅谷
最小配置
worker_processes
worker_processes 1; 默认为1,表示开启一个业务进程
worker_connections
worker_connections 1024; 单个业务进程可接受连接数
include mime.types;
include mime.types; 引入http mime类型
default_type application/octet-stream;
default_type application/octet-stream; 如果mime类型没匹配上,默认使用二进制流的方式传输。
sendfile on;
sendfile on; 使用linux的 sendfile(socket, file, len) 高效网络传输,也就是数据0拷贝。
未开启sendfile 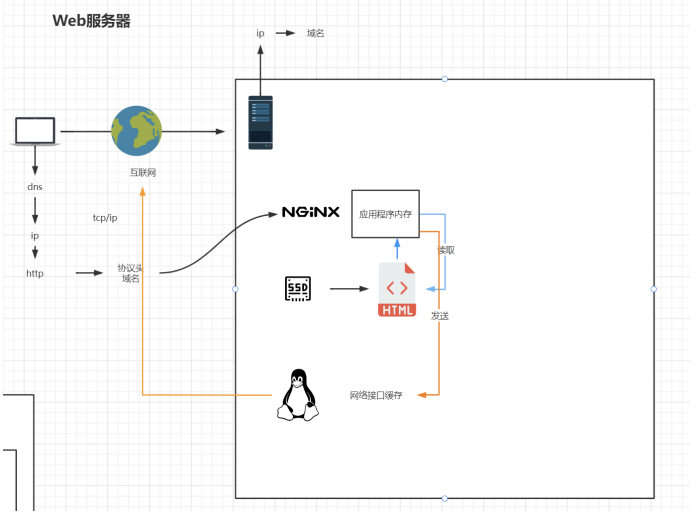
开启: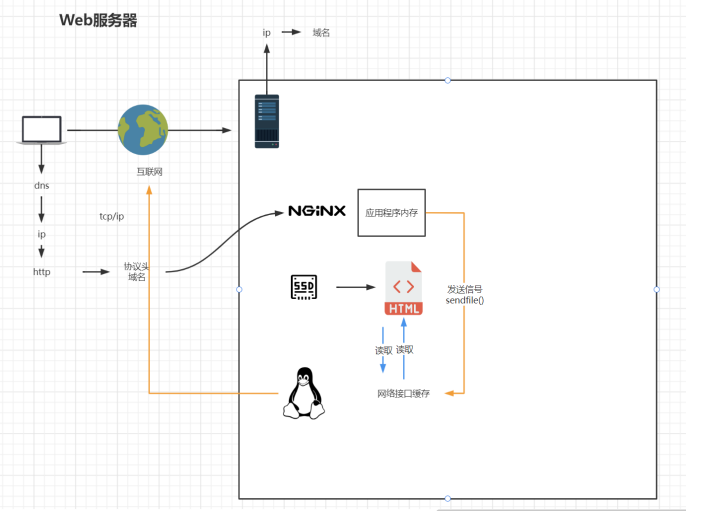 ##
##
keepalive_timeout 65;
server
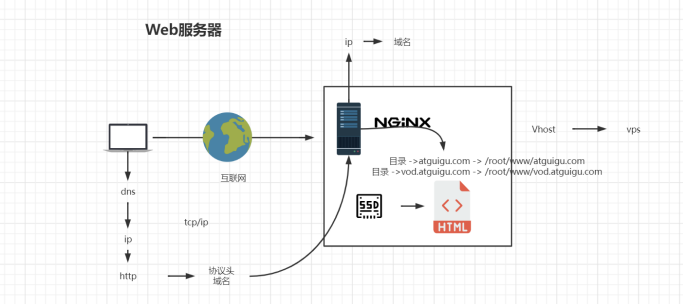
虚拟主机配置
server {listen 80; #监听端口号server_name localhost; #主机名location / { #匹配路径root html; #文件根目录index index.html index.htm; #默认页名称}error_page 500 502 503 504 /50x.html; #报错编码对应页面location = /50x.html {root html;}}
简版配置
worker_processes auto;events {worker_connections 1024;}http {sendfile on;keepalive_timeout 65;include /etc/nginx/mime.types;default_type application/octet-stream;#虚拟主机vhostserver {listen 80; #监听端口号server_name localhost;#主机名location / { #匹配路径root html; #文件根目录index index.html index.htm; #默认页名称}error_page 500 502 503 504 /50x.html; #报错编码对应页面location = /50x.html {root html;}}}


