[TOC]
https://github.com/stickgoal/little-fw
User.class <-> 表
| 类 User | 表 test_user |
| —- | —- |
| @Entity类名 | 表名 |
| @Id | 主键 |
| Field @Column注解 | 字段 |
拼装CRUD的SQL
insert into 表名(字段列表) values(字段列表长度个?)
执行操作(代入?的值)
save(user)
Idea
窗口
idea 的每个项目一个窗口
配置
配置不同,每个项目一个配置
File | Settings | Editor | File Encodings 字符编码集
安装方式: File | Settings | Plugins
lombok 简化代码神器 codota AI编程利器 key promoter x 快捷键提示工具 rainbow bracket 彩虹括号 restful tool 用于快速查看restful端点并发送请求 mybatisx mybatis开发插件,为你生成代码
alt+enter 万精油,根据上下文提示
idea vs eclipse
idea界面组成 常用配置 插件 创建项目 快捷键不同
linux : 部署程序
三阶段: 框架 将各类开发技能提升到实战水平
提供很多的现成的功能,提高开发效率
Spring Mybatis SpringMVC Hibernate Struts Spring-Boot Spring-Security
开发 -> 部署
自己实现- > 使用 第三方工具
Apache Maven是一个软件项目管理和理解工具。基于项目对象模型(POM)的概念,Maven可以从中央信息管理项目的构建,报告和文档。
依赖管理遇到的一些问题
项目存在大量的第三方依赖 依赖之间存在层级 版本冲突:某个时间点上的代码,固定了功能
增加功能 删除功能 修改功能,修改包路径
项目对象模型POM.xml
坐标 GAV
分组 Group 名字 ArtifactId 版本 Version 标识符 qualifer
依赖传递
A->B->C 那么 A也依赖C 最短路径原则
A->B->C(1.0) A->C(2.0) 最后选择 2.0
优先声明原则
A->B->C(1.0) A->D->C(2.0) 最后选择1.0 ,因为B先声明
下载: https://maven.apache.org/download.cgi 解压 配置环境变量
把Maven的bin目录配置到path中mvn -v 测试效果
Apache Maven 3.6.3 (cecedd343002696d0abb50b32b541b8a6ba2883f)
Maven home: D:\app\apache-maven-3.6.3\bin\..
Java version: 1.8.0_74, vendor: Oracle Corporation, runtime: C:\Progra
va\jdk1.8.0_74\jre
Default locale: zh_CN, platform encoding: GBK
OS name: "windows 7", version: "6.1", arch: "amd64", family: "windows"
配置maven maven安装目录下的/conf目录下的settings.xml (vs code / sublimetext)
本地仓库:jar存放的位置,不配置默认在{user.home}/.m2/repository
D:/UserData/repo
私服镜像 : 从国内的阿里云去下载jar包,速度快,否则从国外的中央仓库下载,龟速
<mirror>
    <id>alimaven</id>
<name>aliyun maven</name>
<url>http://maven.aliyun.com/nexus/content/groups/public/</url>
<mirrorOf>central</mirrorOf>
</mirror>
测试命令
创建项目
mvn archetype:generate -DarchetypeCatalog=internal -D groupId=com.woniuxy.build -DartifactId=demo
cd demo
执行项目
mvn clean compile exec:java -Dexec.mainClass="com.woniuxy.build.App"
思考:
安装的问题:
配置位置不对 win10 powershell 没有goal 解决: 在powershell中敲 cmd ,进入cmd再操作 jdk版本,在demo项目的pom的properties位置加入以下配置,指定为jdk11
<properties>
  <project.build.sourceEncoding>UTF-8</project.build.sourceEncoding>
  <java.version>11</java.version>
  <maven.compiler.source>11</maven.compiler.source>
  <maven.compiler.target>11</maven.compiler.target>
</properties>
下载jar报证书错误
<project xmlns="http://maven.apache.org/POM/4.0.0" xmlns:xsi="http://www.w3.org/2001/XMLSchema-instance"
  xsi:schemaLocation="http://maven.apache.org/POM/4.0.0 http://maven.apache.org/xsd/maven-4.0.0.xsd">
  <modelVersion>4.0.0</modelVersion>
  <!-- 自己的坐标 -->
  <groupId>com.woniuxy.build</groupId>
  <artifactId>demo</artifactId>
  <version>1.0-SNAPSHOT</version>
  <!-- 打包方式 jar war pom -->
  <packaging>jar</packaging>

  <!-- 项目信息 -->
  <!-- 项目名 -->
  <name>demo</name>
  <!-- 项目的URL -->
  <url>http://maven.apache.org</url>

  <!-- 属性 -->
  <properties>
    <project.build.sourceEncoding>UTF-8</project.build.sourceEncoding>
  </properties>

  <!-- 依赖 -->
  <dependencies>
    <!-- 单元测试依赖 -->
    <dependency>
      <groupId>junit</groupId>
      <artifactId>junit</artifactId>
      <version>3.8.1</version>
      <scope>test</scope>
    </dependency>
    <!-- https://mvnrepository.com/artifact/com.alibaba/fastjson -->
    <dependency>
        <groupId>com.alibaba</groupId>
        <artifactId>fastjson</artifactId>
        <version>1.2.73</version>
    </dependency>
    <!-- https://mvnrepository.com/artifact/com.alibaba/druid -->
    <dependency>
        <groupId>com.alibaba</groupId>
        <artifactId>druid</artifactId>
        <version>1.1.24</version>
    </dependency>

  </dependencies>

   <!--构建项目的配置-->
    <build>
        <!--构建用到的插件-->
        <plugins>
           <!--  <plugin>
                <groupId>org.springframework.boot</groupId>
                <artifactId>spring-boot-maven-plugin</artifactId>
            </plugin> -->
        </plugins>
    </build>

</project>
加依赖,从 这里 https://mvnrepository.com/ 搜索
─src 源码
本地仓库 本地文件夹 settings.xml > localRepository
下载依赖时,
构建:从源码 到 成品的构成称为构建初始化->编译->单元测试->打包->集成测试->安装->部署 (有先后顺序)
单元测试: 测试你的某个代码单元 集成测试:与其他系统联合测试 安装:安装到本地仓库 部署:发布到中央仓库
英文:
编译:compile 测试:test 打包:package 安装:install 部署:deploy 清理:clean
常用命令:
mvn clean compile
mvn clean package -Dmaven.test.skip=true
mvn clean install -Dmaven.test.skip=true

#  查看依赖树
mvn dependency:tree
# 查看生效的pom配置
mvn help:effective-pom
详细版参考下图
idea配置
archetype 项目骨架
——-
O : Java 对象
MyBatis 是一款优秀的持久层框架,它支持自定义 SQL、存储过程以及高级映射。MyBatis 免除了几乎所有的 JDBC 代码以及设置参数和获取结果集的工作。MyBatis 可以通过简单的 XML 或注解来配置和映射原始类型、接口和 Java POJO(Plain Old Java Objects,普通老式 Java 对象)为数据库中的记录。
package com.woniuxy.mybatis;

import java.sql.*;

/**
 * Hello world!
 *
 */
public class App
{
    public static void main( String[] args )
    {
        try {
            Class.forName("com.mysql.jdbc.Driver");

            Connection connection = DriverManager.getConnection("", "", "");
            //① sql 自己写,mybatis不管
            PreparedStatement pstmt = connection.prepareStatement("select * from user where username=? and password=?");
            //② ☆ 传值 user -> sql
            pstmt.setString(1,user.getUsername());
            pstmt.setString(2,user.getPassword());

            ResultSet resultSet = pstmt.executeQuery();

            while(resultSet.next()){
                //③ ☆ 取回返回结果  结果集-> 对象
                int userId = resultSet.getInt("user_id");
                String username = resultSet.getString("username");
                String password = resultSet.getString("password");

//                User user

            }


        } catch (ClassNotFoundException | SQLException e) {
            e.printStackTrace();
        }

    }
}
加依赖
<dependency>
   <groupId>org.mybatis</groupId>
   <artifactId>mybatis</artifactId>
   <version>3.5.5</version>
 </dependency>
 <dependency>
   <groupId>mysql</groupId>
   <artifactId>mysql-connector-java</artifactId>
   <version>5.1.49</version>
 </dependency>
配置 (创建resources目录)
- 单表配置
   - 手写的sql
```xml
<?xml version="1.0" encoding="UTF-8"?>
<!DOCTYPE mapper PUBLIC "-//mybatis.org//DTD Mapper 3.0//EN" "http://mybatis.org/dtd/mybatis-3-mapper.dtd">
<mapper namespace="woniuxy.class45">


</mapper>
启动代码
```java
package com.woniuxy.mybatis;
import org.apache.ibatis.io.Resources;
import org.apache.ibatis.session.SqlSession;
import org.apache.ibatis.session.SqlSessionFactory;
import org.apache.ibatis.session.SqlSessionFactoryBuilder;
import java.io.IOException;
import java.io.InputStream;
import java.sql.*;
/**
Hello world!
*/
public class App {
public static void main(String[] args) {
 //启动框架
 InputStream inputStream = null;

 try {
     //读配置文件
     inputStream = Resources.getResourceAsStream("mybatis-config.xml");
     //构建SQLSessionFactory
     SqlSessionFactory sqlSessionFactory = new SqlSessionFactoryBuilder().build(inputStream);
     //创建sqlSession
     SqlSession sqlSession = sqlSessionFactory.openSession();
    } catch (IOException e) {
        e.printStackTrace();
    }


}
}
字段与数据库列不一致,处理方式

1. 使用resultMap
```xml
<!--结果映射-->
    <resultMap id="userResultMap" type="com.woniuxy.mybatis.model.User">
        <result column="user_id" property="userId"/>
    </resultMap>
<select id="findAll" resultMap="userResultMap">
全局添加配置 <settings>
<setting name="mapUnderscoreToCamelCase" value="true"/>
</settings>
一个参数, #{变量} 变量可以随意写
 <select id="findById" resultType="com.woniuxy.mybatis.model.User">
     select * from user where user_id=#{abc}
 </select>
多个参数,用对象传值,#{变量} 引用参数对象的相应的属性
<!--#{username}从参数对象上获取名为username的属性-->
 <select id="findByUsernameAndPassword" resultType="com.woniuxy.mybatis.model.User">
     select * from user where username=#{username} and password=#{password}
 </select>
多个参数,可以用map封装对象,#{变量} 从参数对象上获取key为username的value值
注意sqlSession.commit()后才能生效
学生表
id,状态,用户名,密码,姓名,电话,毕业院校,身份证号,学历,专业,当前就读班级,当前就读阶段,咨询师,来源…. 建表,sql 使用mybatis对学生表进行增删改查
增:√新增学生(咨询老师) 改:√降级、√升级、√毕业、退学、休学 查:√登录、√查询学生列表分页、学生详情
学生表
id,状态,用户名,密码,姓名,电话,毕业院校,身份证号,学历,专业,当前就读班级,当前就读阶段,咨询师,来源…. 建表,sql 使用mybatis对学生表进行增删改查
增:√新增学生(咨询老师) 入学
判断是否重复 优先输入身份证,防止重复 密码 不输入
默认,不允许登录,第一次必须修改 : 通过状态: 未激活 没有密码,手机验证码登录(过期时间+验证一次过后失效) 手机发送短信随机密码(可能会有泄露问题)
状态:(预习 | 试学 | 在读 | 休学 | 退学 | 毕业 | 退费) 默认 阶段:默认一阶段 咨询师:以登录人为咨询老师 就读班级:方向(java)推断出最新一期的java班 身份证号=> 性别、籍贯、生日
改:√降级、√升级、√毕业、退学、休学
降级
一阶段不能再降 不能连续降两次 只能降1级 改班级
升级
四阶段不能再升级 班级一起升 只能升1级
退学
改状态 退费
休学
改状态+休学起止日期 考虑 复学流程
查:√登录、√查询学生列表分页、学生详情
休学=>复学
依赖管理
pom 坐标 GAV 依赖传递 仓库: 本地->私服->中央仓库 约定
构建
生命周期:初始化 编译 单元测试 打包 集成测试 安装 部署
安装: 安装到本地仓库 部署: 上传到中央仓库
ORM 概念 对象关系映射
依赖(mybatis+mysql-connector) 全局配置: mybatis-config.xml
settings
mapUnderscoreToCamelCase true
数据源配置 单表注册
单表配置:xxx.mapper.xml
parameterType 参数类型resultType 返回值类型 字段名和属性名能够完全匹配(完全相同,符合下划线转驼峰的规则)resultMap 声明的ID
数据库表的字段和类的属性名字映射适配
代码
启动 :
SqlSessionFactory factory = new SqlSessionFactoryBuilder().build(Resouces.getResourceAsStream(“mybatis-config.xml”))SqlSession session = factory.openSession();SqlSession
selectList
statement参数= namespace+id
selectOneupdatedeleteinsertcommit
接口式使用mybatis提供了一个通过接口使用的方式,支持按照dao的方式来编写代码。但是对Mapper接口和mapper.xml的要求如下:1)Mapper的方法、参数、返回值必须与mapper.xml中的完全一致2)mapper.xml的namespace必须与Mapper接口的全限定名一致
通过SQLSession的getMapper的方法来进行mapper代理的生成
UserMapper mapper = sqlSession.getMapper(UserMapper.class);
原理:mybatis自动生成一个动态代理类,实现了个这个接口,直接调用sqlSession的相应方法来执行sql。实现方式主要的问题在于 statement参数如何获得?解决方案 根据约定, 类全限定名+方法即为statetment参数
注解式使用
接口,通过方法上的注解来编写SQL,SQL的语法与xml是完全一致的
```java
package com.woniuxy.mybatis.dao;
import com.woniuxy.mybatis.model.User;
import org.apache.ibatis.annotations.*;
import java.util.List;
public interface UserMapper2 {
@Results(//相当于xml中的<resultMap>标签
{@Result(column = "user_id",property = "userId"), //相当于<result>
@Result(column = "username",property = "username") }
)
@Select("select * from user")
List<User> findAll();
@Select("select * from user where user_id=#{userId}")
User findById(int userId);
@Insert("insert into user(username,password) values(#{username},#{password})")
void add(User user);
@Delete("delete from user where username=#{username}")
void deleteByUsername(String username);
}
2. 需要将接口类加入到mybatis-config.xml的单表配置注册中去
```xml
<!--单表配置-->
<mappers>
...
<mapper class="com.woniuxy.mybatis.dao.UserMapper2"/>
</mappers>
UserMapper2 mapper = sqlSession.getMapper(_UserMapper2.class)_;
补充
1. 获取到自增id李果的外卖订单 66块 001 => 订单(订单id,总价,购买人,下单时间)
芋儿鸡 22块 1份 =>订单详情(订单id,商品名,单价,数量)牛杂 20块 1份火锅杯 24块 1份
xml方式
<insert id="add" parameterType="com.woniuxy.mybatis.model.User">
insert into user(username,password)
values(#{username},#{password})
<selectKey keyProperty="userId" resultType="int" >
select last_insert_id();
</selectKey>
</insert>
注解的方式
@Insert("insert into user(username,password) values(#{username},#{password})")
@Options(useGeneratedKeys = true,keyProperty = "userId")
void add(User user);
2. 多个参数传递
对象map@Param
3.多表关联查询 跟单表写法基本一致返回值可以使用对象存储
也可以使用 Map,但是map返回的key是数据库的字段名
{user_id=3, class_name=java45期, username=wangwu}
4. like语句怎么写?错误写法:@Select(“select * from user where username like ‘%#{keyword}%’”)没有?占位符,被解析成了字符串
使用$ , 直接代入,不使用PreparedStatement => 可能被sql注入;某些情况性能弱;使用concat函数
@Select(“select * from user where username like CONCAT(‘%’,#{keyword},’%’)”)
番外:#与$的区别是?会被翻译成?占位符,使用PreparedStatement$直接代入值,不会使用PreparedStatement,可能被sql注入,性能差
配置:
1. 开启日志 <!-- 开启日志 -->
<setting name="logImpl" value="STDOUT_LOGGING"/>
2. 指定包别名 <typeAliases>
<!--别名 -->
<!-- <typeAlias type="com.woniuxy.mybatis.model.User" alias="user"/>-->
<!-- 将指定包下的类全部注册为别名,规则为首字母小写 -->
<package name="com.woniuxy.mybatis.model"/>
</typeAliases>
3. 数据库字段名映射 <setting name="mapUnderscoreToCamelCase" value="true"/>
动态SQL前台: 给用户用的系统,用户体验,各种需求后台:给公司运营人员用的,数据展示,工作效率高,操作方便 直观CRUD
动态sql:
<where>
<if test="username!=''">
and username like concat('%',#{username},'%')
</if>
<if test="password!=''">
and password=#{password}
</if>
<if test="classId>0">
and class_id=#{classId}
</if>
</where>
如果没有任何条件不添加where 如果存在任何一个条件,自动添加where 并且自动去除 and前缀
<set>
<if test="username !=null">
username=#{username},
</if>
<if test="password!=null">
password=#{password}
</if>
</set>
如果存在条件则自动添加set 并且自动去除 逗号后缀
等价于where标签
<trim prefix="WHERE" prefixOverrides="AND |OR ">
...
</trim>
等价于set标签
<trim prefix="SET" suffixOverrides=",">
...
</trim>
循环
<select id="findIn" resultType="com.woniuxy.mybatis.model.User">
select * from user
where username in
<foreach collection="list" index="idx" item="n" open="(" close=")" separator=",">
#{n}
</foreach>
</select>
collection 迭代的类型item 迭代时的变量名open 开始输出close 结束输出seperator 迭代之间的分隔符
动态SQL的更多请见:https://mybatis.org/mybatis-3/zh/dynamic-sql.html
作业课程 subject
专业 major阶段 phrase课 course
数据专业 4个 Java 测试 前端 UI 每个专业有各自不同的阶段java 四个阶段( 阶段顺序 阶段名称 阶段描述)课 (名称,知识要点,目标)
45期 排课=> 某个讲师讲授某个阶段的课
排课 schedule班级表 class老师 teacher
排课流程:>输入班级(数字): 45>45期 是Java专业 当前是三阶段 >请您开始排课>输入四阶段老师:张三>输入错误,没有张三>输入四阶段老师:黎伟>输入正确,排课完成================45期 四阶段 java 黎伟
复习
接口方式使用mybatis
xml的namespace 必须是接口的全限定名xml的id跟接口方法名一致,参数,返回值一致XXXMapper mapper = sqlSession.getMapper(XXXMapper.class);
注解方式
@Select @Delete @Update @Insert@Results @Result@Param 给参数指定名字,多个参数时使用@Option 返回自增主键@Script @Bind
动态SQL
数据库设计经验法则:1:1 任意存,甚至双向都存1:n 存在多的一方m:n 关系表为了查询可以适当冗余数据
订单 1:n 订单详情(order_no)
Mybatis- Generatormybatis的代码生成器,自动生成实体类,mapper接口,mapper.xml,单表的操作全部自动生成1)加插件,放在pom.xml的根标签下
<build>
<plugins>
<plugin>
<groupId>org.mybatis.generator</groupId>
<artifactId>mybatis-generator-maven-plugin</artifactId>
<version>1.3.7</version>
<configuration>
<!--重复生成时,覆盖源文件-->
<overwrite>true</overwrite>
</configuration>
<executions>
<execution>
<id>Generate MyBatis Artifacts</id>
<goals>
<goal>generate</goal>
</goals>
</execution>
</executions>
<dependencies>
<dependency>
<groupId>mysql</groupId>
<artifactId>mysql-connector-java</artifactId>
<version>5.1.47</version>
</dependency>
</dependencies>
</plugin>
</plugins>
</build>
配置文件 resources/generatorConfig.xml
```xml
<?xml version=”1.0” encoding=”UTF-8”?>
<!DOCTYPE generatorConfiguration PUBLIC "-//mybatis.org//DTD MyBatis Generator Configuration 1.0//EN"
"http://mybatis.org/dtd/mybatis-generator-config_1_0.dtd">
3. 执行maven命令 生成代码
```bash
mvn compile
将生成mapper.xml注册到mybatis-config.xml测试
```java
package com.woniuxy.mybatis;
import com.woniuxy.mybatis.dao.ClazzMapper;
import com.woniuxy.mybatis.model.Clazz;
import com.woniuxy.mybatis.model.ClazzExample;
import org.apache.ibatis.io.Resources;
import org.apache.ibatis.session.SqlSession;
import org.apache.ibatis.session.SqlSessionFactory;
import org.apache.ibatis.session.SqlSessionFactoryBuilder;
import java.io.InputStream;
import java.util.List;
public class AppGen {
public static void main(String[] args) {
//启动框架
InputStream inputStream = null;
try {
//读配置文件
inputStream = Resources.getResourceAsStream("mybatis-config.xml");
//构建SQLSessionFactory
SqlSessionFactory sqlSessionFactory = new SqlSessionFactoryBuilder().build(inputStream);
//创建sqlSession
SqlSession sqlSession = sqlSessionFactory.openSession();
ClazzMapper mapper = sqlSession.getMapper(ClazzMapper.class);
System.out.println(mapper.selectByPrimaryKey(1));
//where条件生成器
ClazzExample clazzExample = new ClazzExample();
clazzExample.createCriteria()//开始构造条件
.andClassIdBetween(1,2)//等价于 class_id between 1 and 2
.andClassNameLike("%45%");//等价于 class_name like %45%
/**
* update woniu_class
* set class_name='Java450' , class_id=1 # record
* where class_name like '%45%' and class_id between 1 and 2; # example
*/
// Example 构造Where条件, Record 提供更新的数据
List<Clazz> clazzes = mapper.selectByExample(clazzExample);
System.out.println(clazzes);
Clazz record = new Clazz();
record.setClassName("Java450");
mapper.updateByExampleSelective(record,clazzExample);
}catch (Exception e){
e.printStackTrace();
}
}
}
总结:
- byPrimaryKey 根据主键操作
- Selective 动态sql,根据是否有值,决定生成sql
- Example
<a name="j3QpF"></a>
## Lombok
1. idea 装lombok插件
1. 项目的pom中添加依赖
```xml
<dependency>
<groupId>org.projectlombok</groupId>
<artifactId>lombok</artifactId>
<version>1.18.12</version>
</dependency>
注解 @Data @AllArgsConstructor @NoArgsConstructor
高级特性
缓存 Cache存储介质的速度:硬盘慢 内存快 ; 主要是解决查询慢的问题。使用场景: 1)查询多,修改极少2)存储介质更快的
mybatis有两级缓存:1)一级缓存,对应SqlSession (会话,理解成一次业务操作,下订单)2) 二级缓存,对应namespace (一个mapper,理解成对某一个表的所有操作)顺序,先访问 二级缓存 ,再访问一级缓存,再访问数据库
一级缓存配置:
配置在: settings > setting
<!-- 指定 SESSION(sqlSession对象)或者STATEMENT(一个语句,相当于关闭) -->
<setting name="localCacheScope" value="SESSION"/>
修改操作后缓存会失效;
MyBatis的一级缓存最大范围是SqlSession内部,有多个SqlSession或者分布式的环境下,数据库写操作会引起脏数据,建议设定缓存级别为Statement。
二级缓存配置:
配置
settings 打开CacheEnabled
<!-- 在mybatis-config中启动选项 -->
<setting name="cacheEnabled" value="true"/>
在mapper.xml中配置每个namespace的缓存配置
```xml
- `type`:cache使用的类型,默认是`PerpetualCache`,这在一级缓存中提到过。
- `eviction`: 定义回收的策略,常见的有FIFO,LRU。
- `flushInterval`: 配置一定时间自动刷新缓存,单位是毫秒。
- `size`: 最多缓存对象的个数。
- `readOnly`: 是否只读,若配置可读写,则需要对应的实体类能够序列化。
- `blocking`: 若缓存中找不到对应的key,是否会一直blocking,直到有对应的数据进入缓存。
特点:
- MyBatis的二级缓存相对于一级缓存来说,实现了SqlSession之间缓存数据的共享,同时粒度更加的细,能够到namespace级别,通过Cache接口实现类不同的组合,对Cache的可控性也更强。
- MyBatis在多表查询时,极大可能会出现脏数据,有设计上的缺陷,安全使用二级缓存的条件比较苛刻。
- 在分布式环境下,由于默认的MyBatis Cache实现都是基于本地的,分布式环境下必然会出现读取到脏数据,需要使用集中式缓存将MyBatis的Cache接口实现,有一定的开发成本,直接使用Redis、Memcached等分布式缓存可能成本更低,安全性也更高。
具体参考美团技术博客[文章](https://tech.meituan.com/2018/01/19/mybatis-cache.html)
<a name="6e06d1df"></a>
### 插件机制
方法拦截器,mybatis内部的某些方法上执行拦截
<a name="YkEIg"></a>
#### 支持拦截的方法
- 执行器Executor(update、query、commit、rollback等方法);
- 参数处理器ParameterHandler(getParameterObject、setParameters方法);
- 结果集处理器ResultSetHandler(handleResultSets、handleOutputParameters等方法);
- SQL语法构建器StatementHandler(prepare、parameterize、batch、update、query等方法);
<a name="NtceM"></a>
#### 拦截阶段
拦截器的拦截阶段指的是它执行的时机,下图是一个selectList执行的时序图。请留意红色部分,即为可以被拦截的位置<br />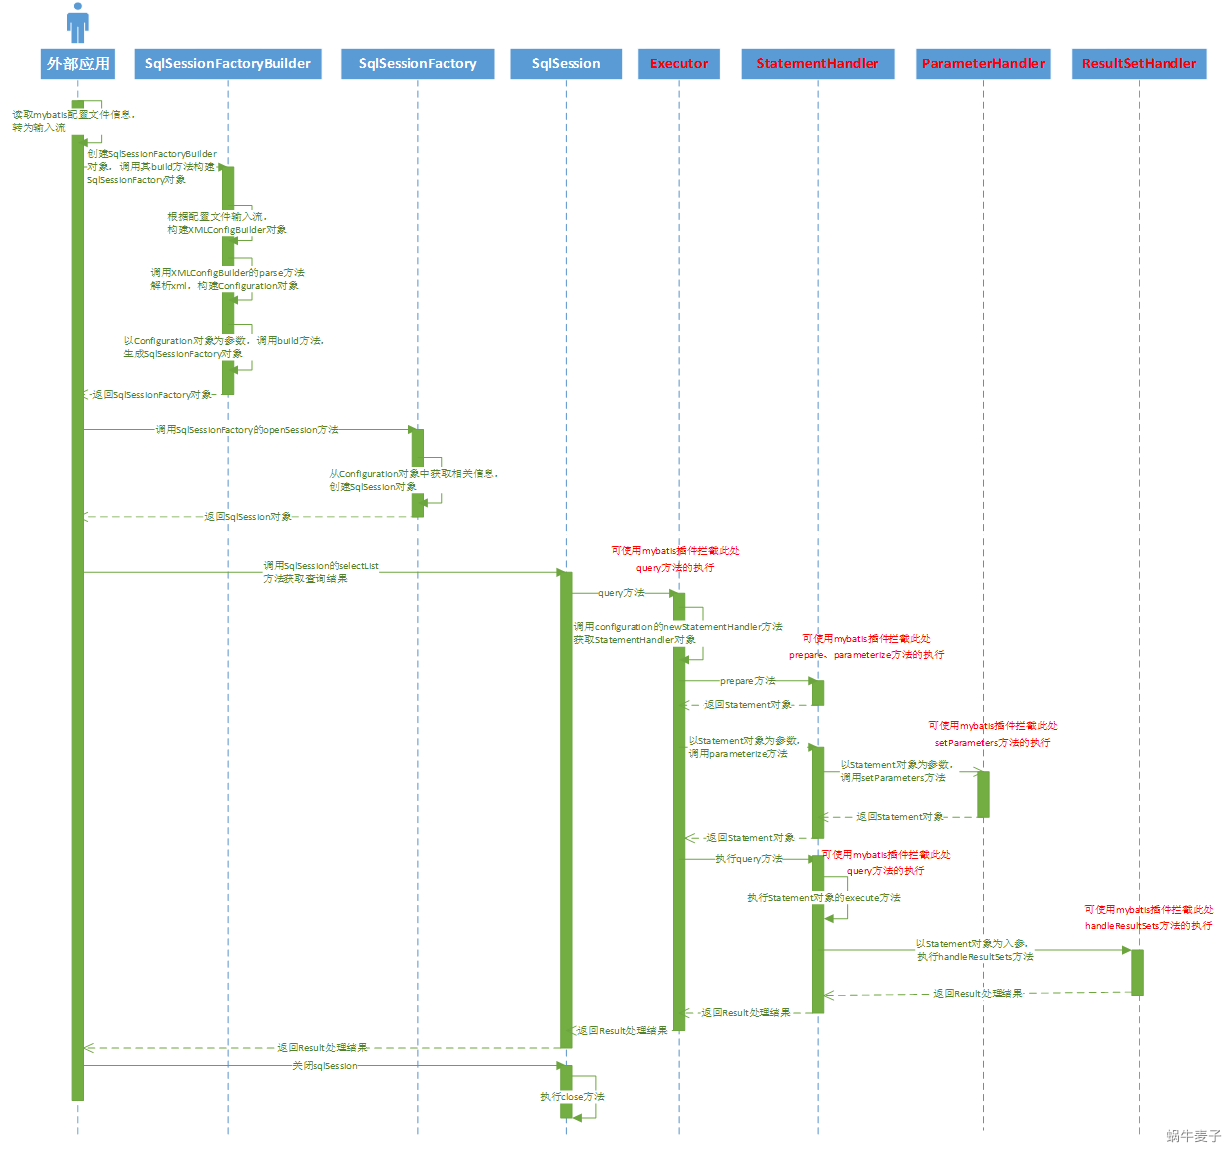<br />原理详情参考 风一样的码农的[博客文章](https://www.cnblogs.com/chenpi/p/10498921.html)<br />以下是简单地性能检测插件的实现
```java
package com.woniuxy.cq.mb.component;
import org.apache.ibatis.cache.CacheKey;
import org.apache.ibatis.executor.Executor;
import org.apache.ibatis.mapping.BoundSql;
import org.apache.ibatis.mapping.MappedStatement;
import org.apache.ibatis.plugin.Interceptor;
import org.apache.ibatis.plugin.Intercepts;
import org.apache.ibatis.plugin.Invocation;
import org.apache.ibatis.plugin.Signature;
import org.apache.ibatis.session.ResultHandler;
import org.apache.ibatis.session.RowBounds;
import java.lang.reflect.Method;
/**
* 数据库操作性能拦截器,记录耗时
* @Intercepts定义Signature数组,因此可以拦截多个,但是只能拦截类型为:
* Executor 执行器
* ParameterHandler 参数处理器
* StatementHandler 语句处理器
* ResultSetHandler 结果集处理器
* */
@Intercepts(value = {
@Signature(type= Executor.class,
method="update",
args={MappedStatement.class,Object.class}),
@Signature(type= Executor.class,
method="query",
args={MappedStatement.class,Object.class, RowBounds.class, ResultHandler.class,
CacheKey.class, BoundSql.class}),
@Signature(type=Executor.class,
method="query",
args={MappedStatement.class,Object.class,RowBounds.class,ResultHandler.class})})
public class MybatisPerformancePlugin implements Interceptor {
@Override
public Object intercept(Invocation invocation) throws Throwable {
long before = System.currentTimeMillis();
Object result = invocation.proceed();
long after = System.currentTimeMillis();
System.out.println("方法["+invocation.getMethod().getName()+"]执行时间为:"+(after-before)+"毫秒");
return result;
}
}
在mybatis-config.xml中注册插件
<plugins>
<plugin interceptor="com.woniuxy.cq.mb.component.MybatisPerformancePlugin"></plugin>
</plugins>
架构解析https://my.oschina.net/u/3753766/blog/1621728
Spring企业级: 数据量大,业务复杂,用户分布广泛EJB : 笨重,难以使用,侵入性高Spring生态
Spring 框架 事实上的JavaEE开发的标准Spring Boot 快速开发框架Spring Cloud 微服务开发工具集
Spring 框架解决的问题解决的问题: 集成(组合、拼装)
像Mybatis解决的特定领域的功能性的问题。电器卖场:将所有的电器的各大品牌集合到卖场中,让用户可以一站式的购买到所有的电器吸星大法
Spring如何实现集成? IOC / DI基本的设计模式 IoC / DI IoC Inversion of Control 控制反转调用方完全控制了被调用方,控制权在调用方。控制反转的意思是,控制权从调用方转移到了Spring容器
创建对象依赖注入
步骤
加依赖
<dependency>
<groupId>org.springframework</groupId>
<artifactId>spring-context</artifactId>
<version>5.2.9.RELEASE</version>
</dependency>
配置文件 applicationContext.xml
```xml
<?xml version=”1.0” encoding=”UTF-8”?>
3. 启动代码
```java
// 1)根据配置文件applicationContext.xml创建一个spring容器
// 2)并且实例化配置文件中的bean(为bean创建对象)
// 3)并且进行依赖注入
ClassPathXmlApplicationContext context = new ClassPathXmlApplicationContext("applicationContext.xml");
// 得到已经被装配完成的Bean,可以直接使用
UserController userController = context.getBean("userController",UserController.class);
userController.login("zhangsan","wohenbang");
解析配置一个 本质就是通知spring 实例化一个该类的对象对象中存在依赖(一个属性)是一个接口,需要填入合适的实例才能正常运作 指的是给改属性注入一个值(对象)
name Bean类的属性名称对应的setter ref 引用另一个Bean来注入该属性 对应的bean的id
从依赖关系从java代码转移到配置文件中,实现了类与类之间的解耦合,在接口不变的情况下,很方便的切换实现
Spring的优势
低侵入, 代码不需要额外实现接口或者继承父类松耦合,Spring的DI机制降低了业务对象替换的复杂性,提高了组件之间的解耦模块化,Spring高度模块化,而且并不强制应用完全依赖于Spring,开发者可以从各个层面上扩展spring,即自由选用Spring框架的部分或全部通过AOP提供灵活强大的系统级功能支持,Spring的AOP支持允许将一些通用任务如安全、事务、日志等进行集中式管理,从而提供了更好的复用提供常用企业级开发场景下的处理规范或者模块实现。比如Spring的ORM和DAO提供了与第三方持久层框架的良好整合,并简化了底层的数据库访问,通过Spring的MVC模块提供对WebMVC的支持
架构图
Beans :Spring IOC的基础实现,包含访问配置文件、创建和管理bean等。Context :在基础IOC功能上提供扩展服务。其扩展支持可用于MVC方面。Core :Spring的核心工具包SpEL :Spring表达式语言
AOP :Spring的面向切面编程,提供AOP(面向切面编程)的实现Aspects :Spring提供的对AspectJ框架的整合Instrumentation :Spring对字节码操作和类加载器的支持,用于特定的应用服务器Messaging : 用于支持基于消息的应用而提供的消息通信抽象
JDBC :对JDBC的简单封装ORM :整合第三方的orm实现,如hibernateOXM :Spring对于object/xml映射的支持,可以让JAVA与XML之间来回切换JMS : 提供JMS的消息的收发的特性,与 Messaging模块集成一起使用Transactions :为JDBC、Hibernate、JDO、JPA等提供的一致的声明式和编程式事务管理。Web :包含Web应用开发时,用到Spring框架时所需的核心类,包括自动载入WebApplicationContext特性的类、Struts与JSF集成类、文件上传的支持类、Filter类和大量工具辅助类。WebMVC :Spring提供的一个MVC模块,包含SpringMVC框架相关的所有类Test :对JUNIT等测试框架的封装,为测试Spring应用提供各种支持
依赖注入的更多用法
注入值(数字,字符串),value属性
```xml
zhangsan
lisi
hanmeimei
<!--注入外部类-->
<a name="GanMx"></a>
## 作业
1. 定义以下的类,并且通过spring的xml装配以下类,获取到Car对象打印内部结构
Car
- Wheel 轮胎 x 4
- diameter 直径
- Engine 发动机
- Piston活塞
- Cylinder 汽缸
- SteeringWheel 方向盘
- GearBox变速箱
- gear 档位
2. 复习今天的mybatis和spring的知识点
1. mybatis generator
1. mybatis cache
1. mybatis plugin
1. spring 作用
1. spring 优势
1. spring 架构图
Adblocker
<a name="gQMi9"></a>
# 2020年9月28日 Spring
<a name="24BN1"></a>
## 复习
<a name="QkpHk"></a>
### mybatis-generator
- example => where 条件
- 表生成 实体类、 Mapper接口、mapper.xml =>注册到mybatis-config.xml
<a name="OMWJY"></a>
### lombok
@Data
<a name="ysuDq"></a>
### mybatis缓存机制
一级缓存和二级缓存,一级缓存对应sqlSession,二级缓存对应namespace,<br />访问时先从二级缓存获取再从一级缓存获取,得不到则访问数据库<br />一级缓存 localCacheScope=statement<br />二级缓存 cacheEnabled=false
<a name="pu0zf"></a>
### 插件
方法的拦截器
<a name="ZRHhF"></a>
### Spring
- 解决的问题? 集成
- 如何实现集成?
- IoC(Inversion of Control) / DI(Dependency Injection 依赖注入) : 控制反转,控制权从调用方转移到Spring容器,Spring容器负责对象的创建及对象之间的依赖关系维护(依赖注入)
- spring主要做的两件事情:1) 创建对象 2)依赖注入
- Spring的优势
- 低侵入,不需要实现额外接口或者继承其他的类
- 松耦合,低成本的切换实现
- 模块化,Spring的源码高度的模块化,选择使用部分或者全部spring功能
- 使用SpringAOP可以实现系统级的功能,比如日志、事务管理、性能监控
- Spring提供了企业级开发的处理规范或者功能,Spring-ORM / Spring-WebMVC
- Spring基本模块
- ORM WEB
- AOP
- Core Container
- Test
- Spring的基本使用
- 加依赖 spring-context
- 建类
- 配置文件 applicationContext.xml
- <bean id="" class=""/>
- <property name="" value="" ref="" >
- <list>
- <bean>
- <value>
- <ref>
- <set>
- <map>
- <entry key="" value="" value-ref=""/>
- 声明外部的类 DruidDataSource
<a name="jjOEz"></a>
## 习题
1. 定义以下的类,并且通过spring的xml装配以下类,获取到Car对象打印内部结构
Car
- Wheel 轮胎 x 4
- diameter 直径
- Engine 发动机
- Piston活塞
- Cylinder 汽缸
- SteeringWheel 方向盘
- GearBox变速箱
- gear 档位
2. 复习今天的mybatis和spring的知识点
1. mybatis generator
1. mybatis cache
1. mybatis plugin
1. spring 作用
1. spring 优势
1. spring 架构图
<property name="a" value=""/> 基本类型 或者string<br /><property name="a" ref=""/> 引用类型
<a name="1otah"></a>
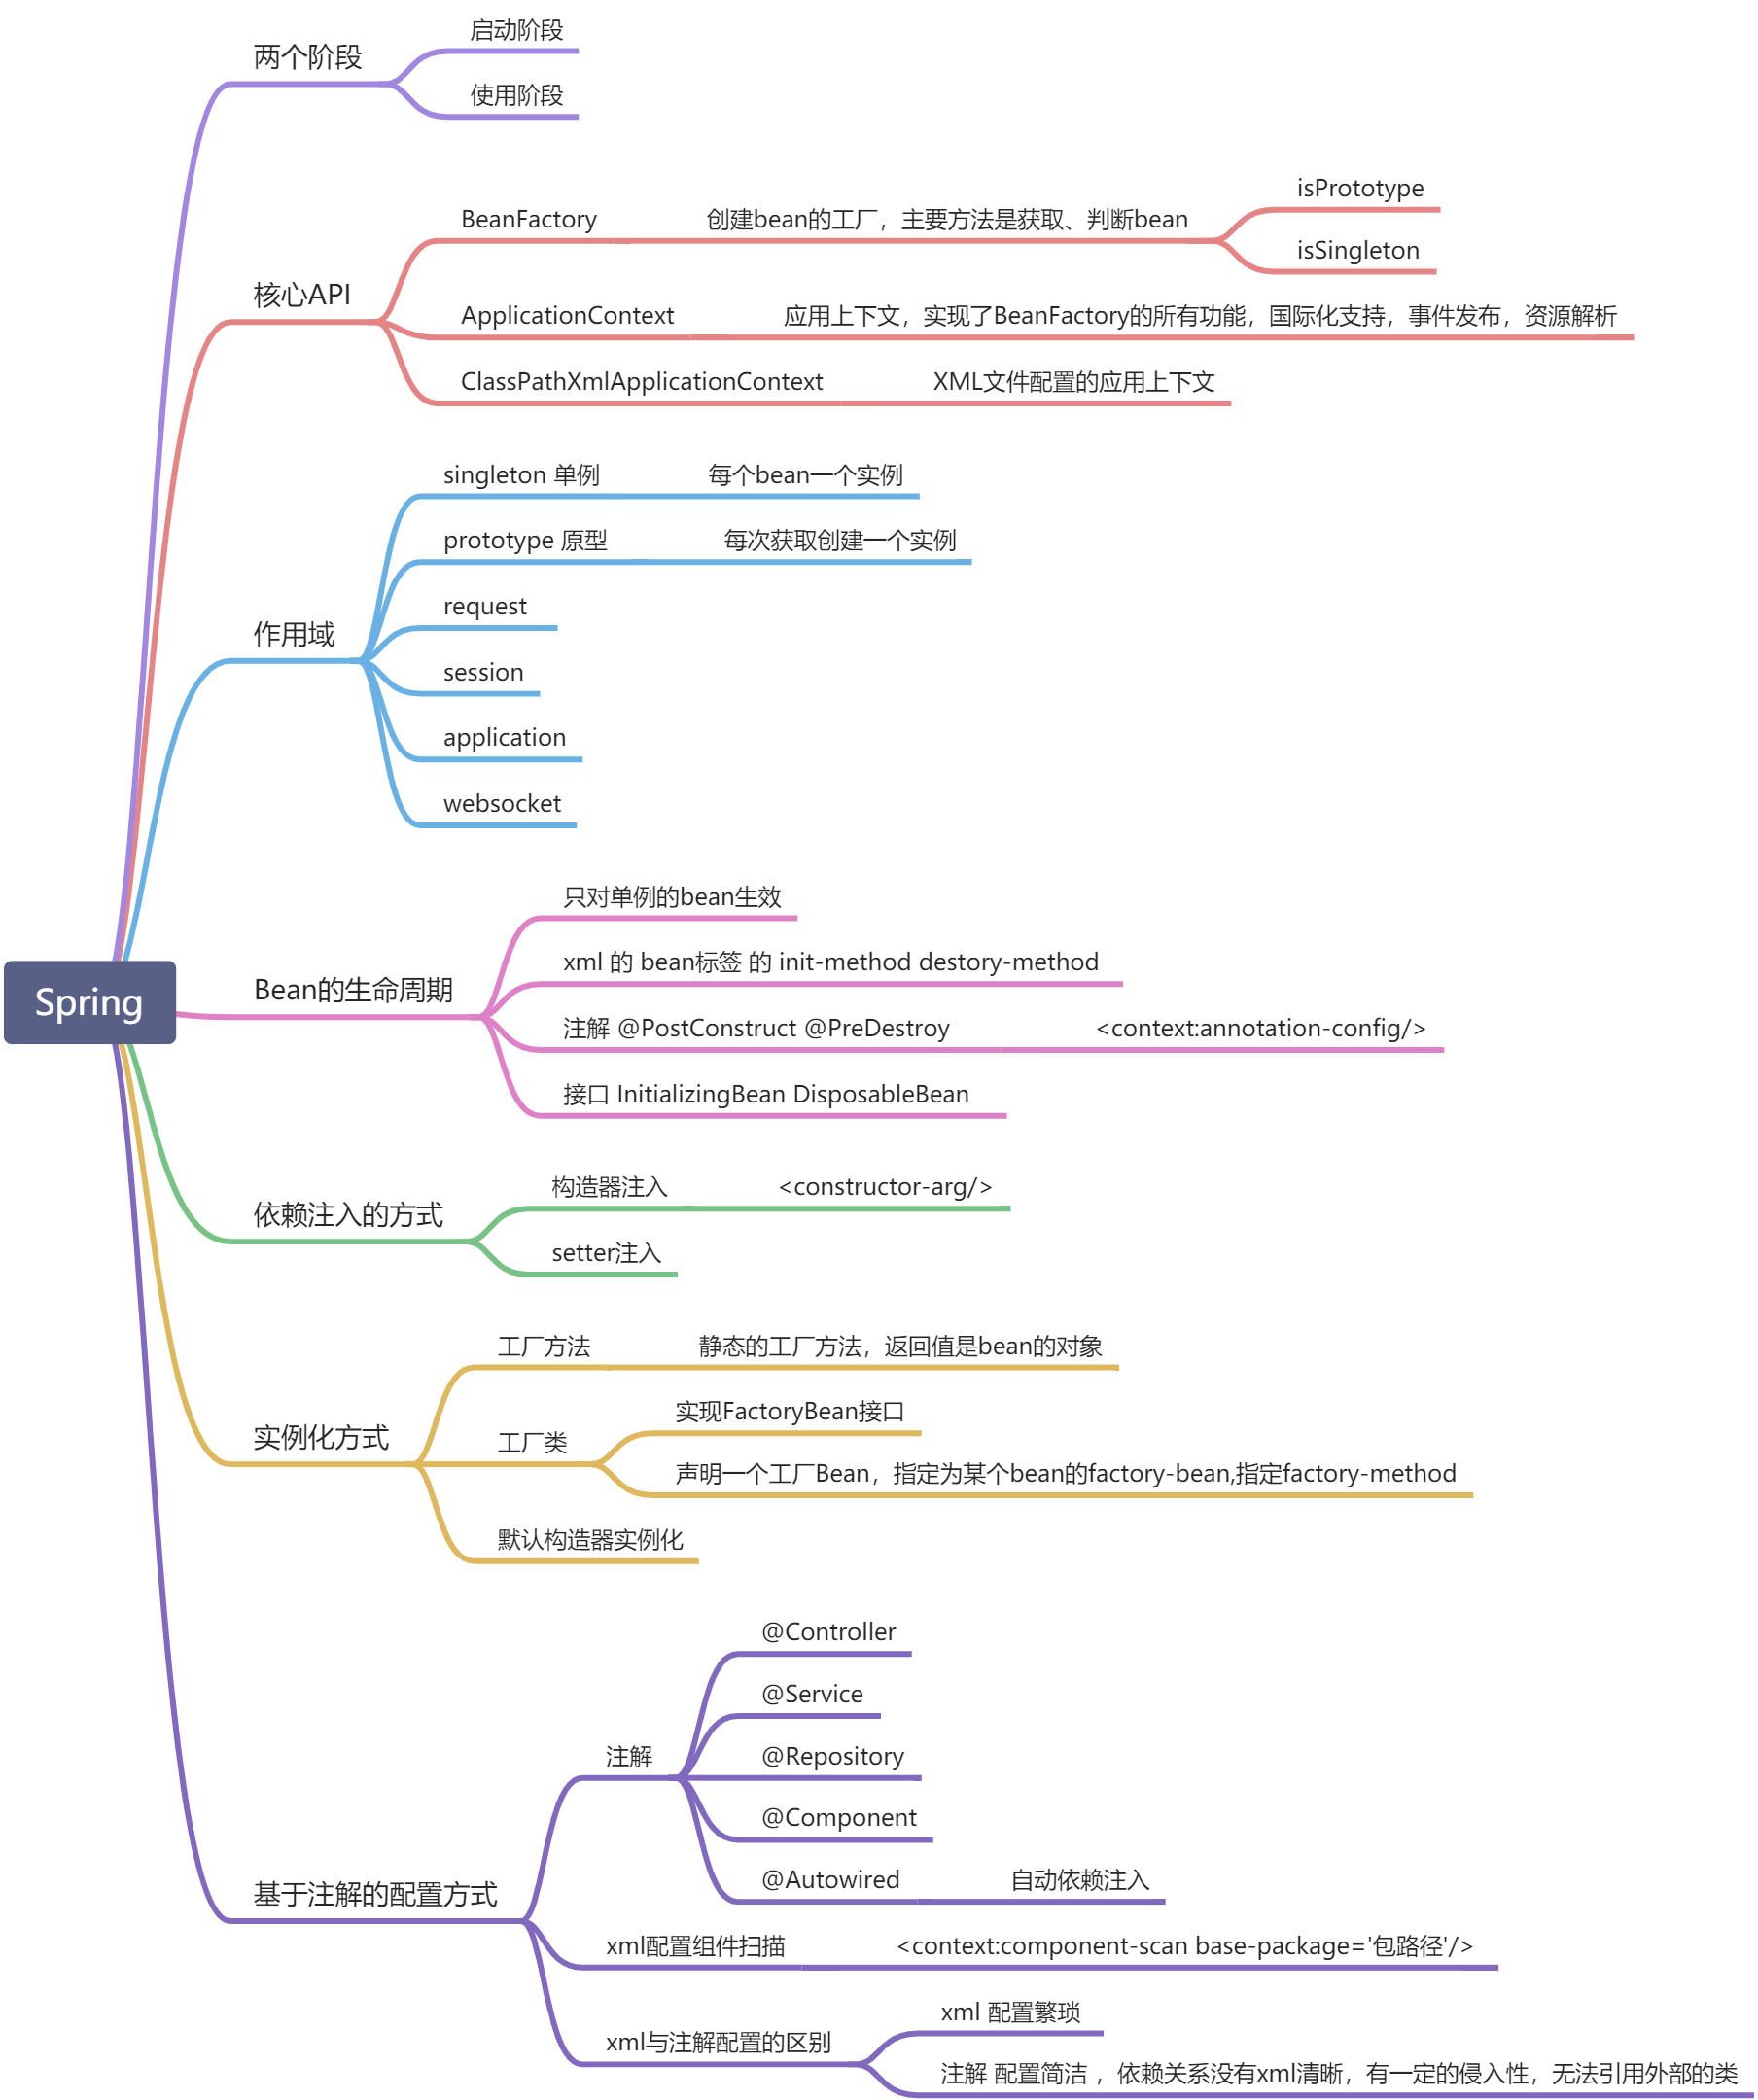
### Spring容器两个阶段
- 启动阶段 ClassPathXmlApplicationContext ctx = new ClassPathXmlApplicationContext_(_"car.xml"_)_;
- **完成读取配置文件,对象的创建及依赖注入**
- 创建abc对象,类型是com.woniuxy.spring.car.SteerWheel
- 创建cylinder对象,类型是com.woniuxy.spring.car.Cylinder
- 创建car对象,类型 Car
- 有一个属性名为steerWheel,调用setSteerWheel( abc )
- 使用阶段 Car car = ctx.getBean_(_"car", Car.class_)_;
<a name="fpVdd"></a>
## 核心API
BeanFactory 创建Bean的工厂,主要的功能是 获取、判断<br /> ↑<br />ApplicationContext 应用上下文<br /> ↑<br />ClassPathXmlApplicationContext xml文件配置的应用上下文
<a name="Cei5K"></a>
### BeanFactory
**getBean(name) 获取到Bean**<br />**getBean(name,type) 名字+类型**<br />getBean(name,args...) 参数<br />**getBean(type) 某个类型**<br />getBean(type,args...)<br />getBeanProvider<br />getBeanProvider<br />containsBean(name) 是否包含这个bean<br />isSingleton 判断bean是否为单例<br />isPrototype 是否为原型<br />isTypeMatch<br />isTypeMatch(name,type) 叫这个name的bean是否是这个type<br />getType<br />getType<br />getAliases<br />FACTORY_BEAN_PREFIX<br />BeanFactory的方法
<a name="SZWmI"></a>
### ApplicationContext 应用上下文
public interface ApplicationContext extends EnvironmentCapable, ListableBeanFactory, HierarchicalBeanFactory,<br /> MessageSource, ApplicationEventPublisher, ResourcePatternResolver
- ListableBeanFactory 可穷举的BeanFactory
- Map_<_String, T_> _getBeansOfType_(_@Nullable Class_<_T_> _type_) 获取到容器中某个特定类型的所有的bean_
- Map_<_String, Object_> _getBeansWithAnnotation_(_Class_<_? extends Annotation_> _annotationType_) _throws BeansException; _获取到容器中被某个特定注解标记的所有的bean_
- MessageSource 国际化支持
- ApplicationEventPublisher 事件发布器
- ResourcePatternResolver 资源模式解析器
- 跟BeanFactory的区别是
- ApplicationContext是BeanFactory,拥有BeanFactory的所有能力
- ApplicationContext具有BeanFactory没有的能力,比如 国际化支持,事件发布,资源解析
<a name="9JPB9"></a>
### ClassPathXmlApplicationContext xml文件配置的应用上下文
<a name="f24En"></a>
## 作用域
bean的创建的次数,使用的范围<br />默认是单例 singleton
| 作用域 | 描述 |
| --- | --- |
| [singleton](https://docs.spring.io/spring-framework/docs/current/spring-framework-reference/core.html#beans-factory-scopes-singleton) | (默认)一个容器中的Bean只有一个实例,以Bean单位而不是以类为单位 |
| [prototype](https://docs.spring.io/spring-framework/docs/current/spring-framework-reference/core.html#beans-factory-scopes-prototype) | 每个Bean的每次获取产生一个实例 |
| [request](https://docs.spring.io/spring-framework/docs/current/spring-framework-reference/core.html#beans-factory-scopes-request) | 对应一次Http请求,只在web容器中可用 |
| [session](https://docs.spring.io/spring-framework/docs/current/spring-framework-reference/core.html#beans-factory-scopes-session) | 对应一次会话,只在web容器中可用 |
| [application](https://docs.spring.io/spring-framework/docs/current/spring-framework-reference/core.html#beans-factory-scopes-application) | 对应一个`ServletContext`只在web容器中可用 |
| [websocket](https://docs.spring.io/spring-framework/docs/current/spring-framework-reference/web.html#websocket-stomp-websocket-scope) | 对应一个`WebSocket`.生命周期,只在web容器中可用 |
<a name="amZBO"></a>
## 依赖注入的方式
依赖注入指的是给属性设值
- setter注入
- 构造器注入
- <constructor-arg name index value ref>
文档: [https://docs.spring.io/spring-framework/docs/current/spring-framework-reference/](https://docs.spring.io/spring-framework/docs/current/spring-framework-reference/)
<a name="HSQZc"></a>
## 实例化的方式
实例化含义: 从bean的配置信息中创建一个实例 <br />三种
- 默认构造器实例化 调用默认构造器 近似的看做: Rocket rocket = new Rocket()
- 工厂方法 调用另一个的**类的静态方法作为工厂方法**来创建对象 近似的看做:
Rocket rocket = RocketCreator.create()
```xml
<bean id="rocket" class="com.woniuxy.spring.rocket.RocketCreator" factory-method="create"/>
class配置的是RocketCreator类,factory-method 静态方法 但是bean的类型时Rocket(create方法的返回值作为bean的实例和类型)
public class RocketCreator {
public static Rocket create(){
Rocket rocket = new Rocket();
rocket.setName("Flicon");
rocket.setLength(54);
rocket.setPayload(1000);
return rocket;
}
}
工厂类 调用工厂类的方法来创建对象。 近似的看做:
RocketFactory rocketFactory = new RocketFactory(); Rocket rocket = rocketFactory.make();
<!-- 工厂类 -->
<!--1)创建工厂 -->
<bean id="rocketFactory" class="com.woniuxy.spring.rocket.RocketFactory"/>
<!--2)使用工厂创建bean,make方法是一个实例方法 -->
<bean id="rocket2" factory-bean="rocketFactory" factory-method="make"/>
package com.woniuxy.spring.rocket;
public class RocketFactory {
public Rocket make(){
Rocket rocket = new Rocket();
rocket.setName("xxxx");
rocket.setLength(12.00);
rocket.setPayload(12);
return rocket;
}
}
Spring提供了FactoryBean接口 用于定义工厂Bean
```xml
```java
package com.woniuxy.spring.rocket;
import org.springframework.beans.factory.FactoryBean;
/**
* Spring的标准FactoryBean
*/
public class RocketFactoryBean implements FactoryBean<Rocket> {
@Override
public Rocket getObject() throws Exception {
Rocket rocket = new Rocket();
rocket.setName("大鹰");
rocket.setPayload(10);
rocket.setLength(100);
return rocket;
}
@Override
public Class<?> getObjectType() {
return Rocket.class;
}
}
Bean的生命周期回调
初始化 容器创建Bean完成后调用销毁 容器关闭前
三种方式:
xml配置
<bean class="com.woniuxy.spring.lifecycle.MilkTea" id="milkTea"
init-method="chushihua" destroy-method="xiaohui"/>
实现接口 InitializingBean, DisposableBean xml无须特殊配置
注解: 初始化:@PostConstruct 销毁前: @PreDestroy
xml 配置
<?xml version="1.0" encoding="UTF-8"?>
<beans xmlns="http://www.springframework.org/schema/beans"
xmlns:xsi="http://www.w3.org/2001/XMLSchema-instance"
xmlns:context="http://www.springframework.org/schema/context"
xsi:schemaLocation="http://www.springframework.org/schema/beans http://www.springframework.org/schema/beans/spring-beans.xsd http://www.springframework.org/schema/context https://www.springframework.org/schema/context/spring-context.xsd">
<context:annotation-config />
</beans>
package com.woniuxy.spring.lifecycle;
import javax.annotation.PostConstruct;
import javax.annotation.PreDestroy;
public class BlackTea {
@PostConstruct
public void csh(){
System.out.println("csh");
}
@PreDestroy
public void xh(){
System.out.println("xh");
}
}
如果是自己编写的类,选第3种,简单,方便,没有侵入如果是第三方的类,选第1种
例子: 数据库连接池的bean
启动时,创建链接销毁时,关闭链接
```xml
注意问题:<br />JDK9之后需要额外添加依赖
```xml
<dependency>
<groupId>javax.annotation</groupId>
<artifactId>javax.annotation-api</artifactId>
<version>1.3.2</version>
</dependency>
执行顺序: 构造器->依赖注入->初始化方法
其他配置方式xml配置方式的劣势是:配置量巨大
创建对象: 哪些类需要spring来管理依赖注入: 注入相应的依赖
基于注解的配置方式创建对象: 哪些类需要spring来管理 ,注解加载实现类上
@Controller Controller@Service Service@Repository DAO@Component 组件 其他需要spring管理的类
依赖注入: 注入相应的依赖,注解加在需要依赖注入的属性上
@Autowired 向spring容器请求注入一个属性对应的bean
配置组件扫描
```xml
<?xml version=”1.0” encoding=”UTF-8”?>
<beans xmlns=”http://www.springframework.org/schema/beans“ xmlns:xsi="http://www.w3.org/2001/XMLSchema-instance"
xmlns:context="http://www.springframework.org/schema/context"
xsi:schemaLocation="http://www.springframework.org/schema/beans http://www.springframework.org/schema/beans/spring-beans.xsd http://www.springframework.org/schema/context https://www.springframework.org/schema/context/spring-context.xsd">
```java
package com.woniuxy.spring;
import com.woniuxy.spring.controller.UserController;
import org.springframework.context.support.ClassPathXmlApplicationContext;
/**
* Hello world!
*
*/
public class App
{
public static void main( String[] args )
{
//1)读取配置
//2) 组件扫描指定的包,得到需要被管理的类(@Controller @Service @Repository @Component)以及需要被注入的属性(@Autowired)
//3)创建对象 + 注入依赖
ClassPathXmlApplicationContext ctx = new ClassPathXmlApplicationContext("applicationContext.xml");
UserController userController = ctx.getBean("userController", UserController.class);
userController.login("zhangsan","wohenbang");
}
}
基于注解的配置的优势:简化了配置; 劣势:1)依赖关系没有xml清晰 2)一定的侵入性 3)无法引入外部的类
FAQ:注解式配置如何解决作用域配置?
@Controller
@Scope("prototype")
public class UserController {
}
作业
使用基于注解配置的方式配置昨天的Car对象,获取并打印car的信息,car的四个轮子用不同的属性表示
```java
package com.woniuxy.spring;
import lombok.Data;
import org.springframework.beans.factory.annotation.Autowired;
import org.springframework.stereotype.Component;
@Component
@Data
public class Car {
@Autowired
private Wheel leftFront;
@Autowired
private Wheel rightFront;
@Autowired
private Wheel leftBack;
@Autowired
private Wheel rightBack;
}
2. 尝试集成mybatis, xml
1. 配置一个Mybatis的SqlSessionFactory的工厂Bean(使用FactoryBean接口的方式)
```java
//启动框架
InputStream inputStream = null;
try {
//读配置文件
inputStream = Resources.getResourceAsStream("mybatis-config.xml");
//构建SQLSessionFactory
SqlSessionFactory sqlSessionFactory = new SqlSessionFactoryBuilder().build(inputStream);
}catch(Exception e){...}
在UserDAOImpl中注入SqlSessionFactory并执行查询操作(User findById(int userId))
```java
//创建sqlSession SqlSession sqlSession = sqlSessionFactory.openSession();
UserMapper mapper = sqlSession.getMapper(UserMapper.class);
- [复习](#24BN1)
- [mybatis-generator](#QkpHk)
- [lombok](#OMWJY)
- [mybatis缓存机制](#ysuDq)
- [插件](#pu0zf)
- [Spring](#ZRHhF)
- [习题](#jjOEz)
- [Spring容器两个阶段](#1otah)
- [核心API](#fpVdd)
- [BeanFactory](#Cei5K)
- [ApplicationContext 应用上下文](#SZWmI)
- [ClassPathXmlApplicationContext xml文件配置的应用上下文](#9JPB9)
- [作用域](#f24En)
- [依赖注入的方式](#amZBO)
- [实例化的方式](#HSQZc)
- [Bean的生命周期回调](#x7qKD)
- [其他配置方式](#NzZhl)
- [基于注解的配置方式](#7UUKY)
- [作业](#Rzevp)
Adblocker
<a name="E8jFa"></a>
# 2020年9月29日 Spring3
<a name="nuWhu"></a>
## 复习
<br />Table 9. Feature Matrix
| Feature | `BeanFactory` | `ApplicationContext` |
| --- | --- | --- |
| Bean instantiation/wiring | Yes | Yes |
| Integrated lifecycle management | No | Yes |
| Automatic `BeanPostProcessor` registration | No | Yes |
| Automatic `BeanFactoryPostProcessor` registration | No | Yes |
| Convenient `MessageSource` access (for internalization) | No | Yes |
| Built-in `ApplicationEvent` publication mechanism | No | Yes |
<a name="mj21Y"></a>
## 习题
2. 尝试集成mybatis, xml
1. 配置一个Mybatis的SqlSessionFactory的工厂Bean(使用FactoryBean接口的方式)
```java
//启动框架
InputStream inputStream = null;
try {
//读配置文件
inputStream = Resources.getResourceAsStream("mybatis-config.xml");
//构建SQLSessionFactory
SqlSessionFactory sqlSessionFactory = new SqlSessionFactoryBuilder().build(inputStream);
}catch(Exception e){...}
在UserDAOImpl中注入SqlSessionFactory并执行查询操作(User findById(int userId))
```java
//创建sqlSession SqlSession sqlSession = sqlSessionFactory.openSession();
UserMapper mapper = sqlSession.getMapper(UserMapper.class);
<a name="kJfAJ"></a>
## 配置方式
- 创建对象
- 依赖注入
<a name="U8TBu"></a>
### 注解的方式
- 创建对象 @Controller @Service ...
- 依赖注入 @Autowired
<a name="R73uo"></a>
### 基于Java的配置方式
<a name="868FI"></a>
#### 概念 Java类分为两种
- 正常的Java类,实现功能.... Controller Service DAO Utils Model
- **配置类**,作为配置文件存在,等价于 xml 配置
<a name="fzPLq"></a>
#### 创建对象
- @Configuration 将一个类标注为配置类
- 创建对象:@Bean 声明一个bean ,等价于 xml中的<bean >标签
<a name="vPAeJ"></a>
#### 依赖注入
- 方法调用 _直接调用,不是真正的方法调用,而是向spring容器请求一个bean_
```java
/**
* <bean id="userController" class="com.woniuxy.spring.controller.UserController"/>
* 方法名 <=> id、name
* class <=> 返回值类型
* @Bean <=> <bean>
* @return
*/
@Bean
public UserController userController(){
UserController userController = new UserController();
//错误写法× 没有使用到spring进行依赖注入
// userController.setUserService(new UserServiceImpl());
userController.setUserService(userService());
return userController;
}
@Bean
public UserService userService(){
UserServiceImpl userService = new UserServiceImpl();
return userService;
}
- 方法参数
@Bean
public UserService userService2(UserDAO userDAO){
UserServiceImpl userService = new UserServiceImpl();
userService.setUserDAO(userDAO);
return userService;
}
@Bean
public UserDAO userDAO(){
return new UserDAOImpl();
}
AnnotationConfigApplicationContext ctx = new AnnotationConfigApplicationContext(_AnnoConfig.class)_;
引用正确的bean
需要注入的方法参数的名字 对应 @Bean的方法名调用相应的方法
生命周期@Bean(_initMethod = “onStart”,destroyMethod = “onStop”)_
作用域 @Scope(“prototype”)
包扫描@Configuration@ComponentScan(_basePackages = “com.woniuxy.spring”)public class AnnoConfig {}_
引入其他的配置类package com.woniuxy.spring.config;
import com.alibaba.druid.pool.DruidDataSource;
import org.springframework.context.annotation.Bean;
import org.springframework.context.annotation.ComponentScan;
import org.springframework.context.annotation.Configuration;
import org.springframework.context.annotation.Import;
@Configuration
@ComponentScan(basePackages = "com.woniuxy.spring")
@Import(DBConfig.class)
public class AnnoConfig {
@Bean(initMethod = "init",destroyMethod = "close")
public DruidDataSource druidDataSource(){
DruidDataSource ds = new DruidDataSource();
ds.setUrl("jdbc:mysql://localhost:3306/woniu_edu");
ds.setUsername("root");
ds.setPassword("root123");
return ds;
}
}
引用properties配置文件package com.woniuxy.spring.config;
import com.alibaba.druid.pool.DruidDataSource;
import org.springframework.beans.factory.annotation.Value;
import org.springframework.context.annotation.*;
@Configuration
@ComponentScan(basePackages = "com.woniuxy.spring")
@Import(DBConfig.class)
@PropertySource("classpath:db.properties")
public class AnnoConfig {
@Value("${jdbc.url}")//SpEL
private String url;
@Value("${jdbc.username}")
private String username;
@Value("${jdbc.password}")
private String password;
@Value("${jdbc.driverClassName}")
private String driverClassName;
@Bean(initMethod = "init",destroyMethod = "close")
public DruidDataSource druidDataSource(){
System.out.println(username);
DruidDataSource ds = new DruidDataSource();
ds.setUrl(url);
ds.setUsername(username);
ds.setPassword(password);
ds.setDriverClassName(driverClassName);
return ds;
}
}
AOP
需求背景aspect orentied programming 面向切面编程OOP 面向对象编程 以对象为基础单元
应用中的一类需求:
事务管理:多个业务场景: 下订单、退款、发布作品….性能监控:所有业务场景日志跟踪:所有业务场景权限管理:…
横跨多个业务场景(多个类),具有横切性质的系统级的功能一般情况下,我们的实现会出现如下情况:代码重复冗余,难以维护
AOPAOP(Aspect Oriented Programming) 面向切面编程是对OOP(Object Oriented Programming)的补充。OOP以类为单元来编程,也就是先定义类,通过类来创建实例,再使用这些实例来实现功能。而AOP则将多个类中的多个关注点(concern)看做一个编码单元,来统一编码和处理。关注点通常是方法,所以AOP又可以理解成,将多个类中的方法看做一个编码单元,统一对方法进行操作,增加一些额外的功能。比如在方法执行前判断是否有权限,在方法执行前打印日志等等。
基本概念AOP的目的对多个方法(切面)统一进行增加功能处理,比如:打印日志
定义切面,哪些方法需要增加功能功能实现加入到切面所指的方法中去
| 名词 | 描述 |
| —- | —- |
| 切面Aspect | 切面编程的完整定义模块,比如日志切面,包含了何时、对谁、如何等等所有的内容。 |
| 连接点Join point | 能够植入切面的部分,比如方法前后,抛出异常时都可以是连接点,spring只支持方法连接点 |
| 通知Advice | 要对切面添加的功能代码,比如 安全,事物,日志等功能代码。类型:before/after/around/after-returning/after-throwing |
| 切入点Pointcut | 针对哪些连接点植入通知,也就是指定具体的拦截地点。可以通过spEL指定连接点 |
| 引入Introduction | 对目标类添加新方法及属性 |
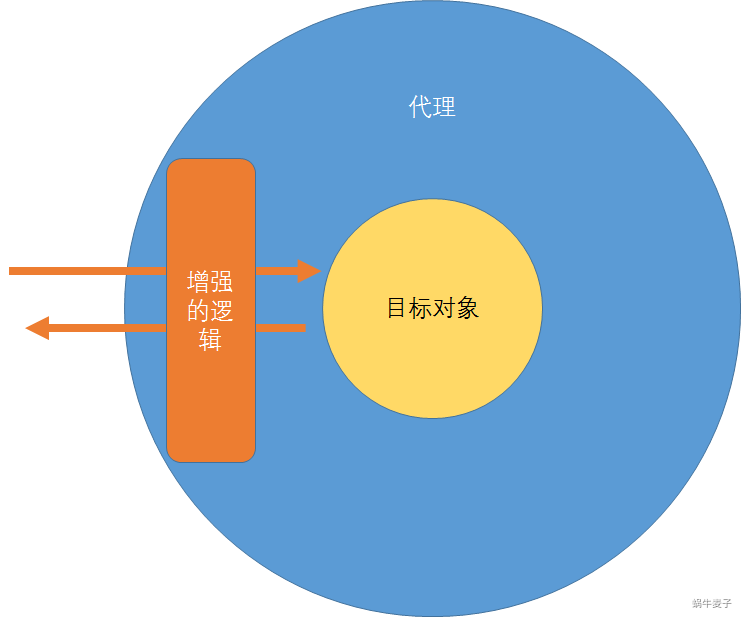
| 目标对象Targetobject | 被切面切的对象。真正的业务逻辑,完全不知道存在切面 |
| 代理proxy | 实现AOP的一种原理 |
| 织入Weaving | 把切面应用到目标对象来创建新的代理对象的过程。有3种方式,spring采用的是运行时。 |
添加依赖
```xml
UTF-8
1.8
1.8
1.8.9
4.1.6.RELEASE
….
org.springframework
spring-context
${spring.verion}
org.springframework
spring-aop
${spring.verion}
org.aspectj
aspectjrt
${aspectj.version}
org.aspectj
aspectjweaver
${aspectj.version}
2. 创建类,编写方法
2. 配置类 @Configuration @ComponentScan @EnableAspectJAutoProxy (启动自动代理实现AOP)
2. 编写AOP的切面类 @Component @Aspect
1. 切入点 @PointCutjava
/
定义切入点,名字是方法名
aspectj 的表达式
execution( com.woniuxy.spring.aop.service..(..))
第一个 任何返回值类型
第二个 所有的类
第三个 所有的方法
.. 任何参数类型
/
@Pointcut(“execution( com.woniuxy.spring.aop.service..(..))”)
public void logPointcut(){}
- 通知java
//前置通知
@Before(“logPointcut()”)
public void log(JoinPoint joinPoint){//参数是连接点信息
//执行方法 com.woniuxy.spring.service.UserServiceImpl.findById 参数为[1]
}
5. 测试,getBean 得到Service调用方法,观察是否有日志打印
<a name="PG10y"></a>
### 通知的类型
需要被织入的功能
- Before 前置通知 方法执行前
- After 后置通知 方法执行后
- Around 环绕通知 方法执行前后
- AfterReturning 返回通知 方法返回之后
- AfterThrowing 异常通知 抛出异常之后
@Around_(_"logPointcut()"_)_public Object performanceAdvice_(_ProceedingJoinPoint pjp_){_<br />long before = System._currentTimeMillis()_;<br />_//方法执行前操作_Object_[] _args = pjp.getArgs_()_;
try _{ //方法执行 //返回值代表的是被切的方法的返回值 _Object result = pjp.proceed_(_args_)_;<br /> System._out_.println_(_"result:==>"+result_)_;<br /> _//方法执行后操作 _long after = System._currentTimeMillis()_;
System._out_.println_(_pjp.getSignature_()_+"执行的时长为"+_(_after-before_)_+"ms"_)_;
return result;<br />_} _catch _(_Throwable throwable_) { _throwable.printStackTrace_()_;<br />_}_
}
<a name="WhfwD"></a>
## 实现原理 代理模式
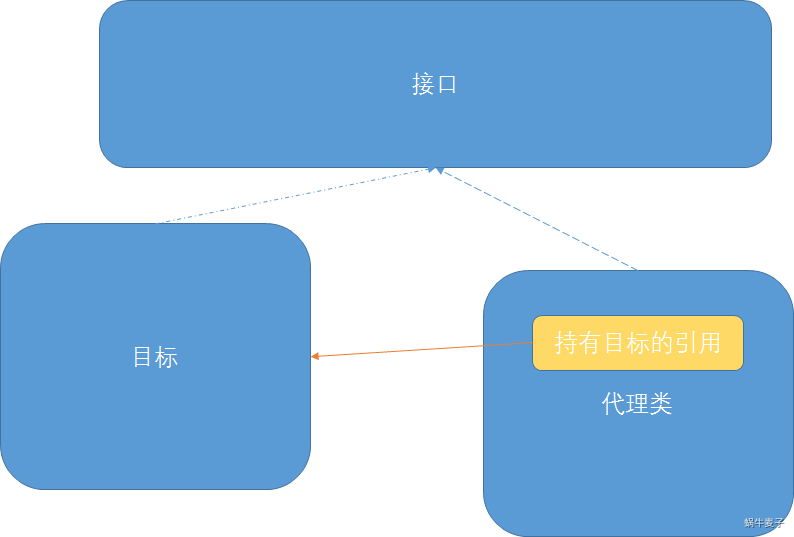
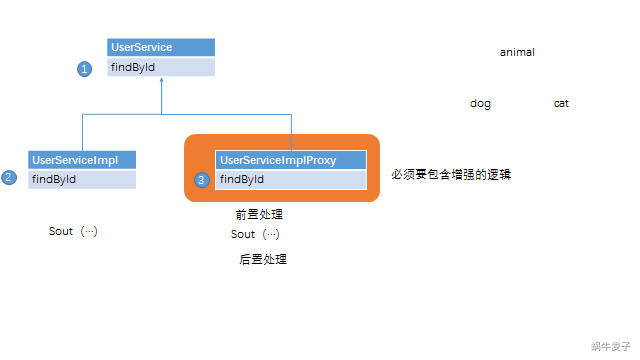
1. 代理类和被代理类要求有同样的接口或者父类
1. 代理类持有被代理类的是引用
1. 调用代理类的方法是会直接调用被代理的方法,而且可以在方法执行前后做一些操作处理
<a name="Uwavw"></a>
## 作业
1. 实现一个权限控制,要求所有的service的所有方法只能在下午5点到早上5点之间被访问,不在这个时间段则抛出异常NotRightTimeException
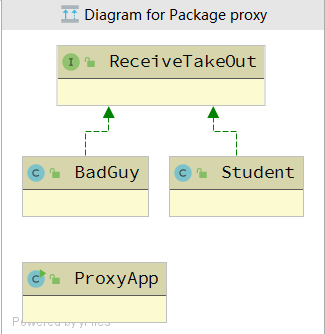
1. 卖火车票的黄牛,拿到的票是100块,卖给顾客是200块,使用代理模式实现
- [复习](#nuWhu)
- [习题](#mj21Y)
- [配置方式](#kJfAJ)
- [注解的方式](#U8TBu)
- [基于Java的配置方式](#R73uo)
- [概念 Java类分为两种](#868FI)
- [创建对象](#fzPLq)
- [依赖注入](#vPAeJ)
- [引用正确的bean](#62cgQ)
- [生命周期](#w6YLc)
- [作用域](#jJjsV)
- [包扫描](#HOabQ)
- [引入其他的配置类](#p3TLm)
- [引用properties配置文件](#dacSd)
- [AOP](#t02CR)
- [需求背景](#LWpg5)
- [基本概念](#aimOG)
- [通知的类型](#PG10y)
- [实现原理 代理模式](#WhfwD)
- [作业](#Uwavw)
<a name="hkVyd"></a>
## 复习
- 基于Java的配置方式
- @Configuration 标记为配置类 相等于xml配置文件
- @Bean 声明spring的bean,initMethod destroyMethod
- @Scope 声明作用域
- @ComponentScan 扫包
- @Import 导入其他的配置类
- @PropertySource 导入properties文件
- 依赖注入
- 参数
- 方法调用
- @EnableAspectjAutoProxy 启动动态代理
- 启动spring容器 AnnotationConfigApplicationContext 参数为配置类的class , AppConfig.class
- AOP 面向切面编程
- 将多个类中的多个关注点(方法)看作一个编码单元,即切面,进行统一的操作管理
- 概念
- 切面 aspect 所有的配置和代码
- 连接点 JoinPoint 切面可以切入的点,通常指方法
- 切入点 PointCut 选出的具体加入功能的连接点,表达式
- 通知 Advice 需要添加的功能
- 目标对象 Target 被切入的连接点所在的对象
- 代理 Proxy 实现AOP的原理
- 织入 Weaving 将通知加入到连接点的过程
- 引入 Introduction 为目标类添加新方法及属性
- 通知类型
- before
- after
- around
- afterReturning
- afterThrowing
- 切面写法
- aspectj + spring-aop
- 切面类java
@Aspect
@Component
public class MyAspect{
@PointCut(“execution( {包路径}..(..))”)
public void myPointCut(){}
@Before(“myPointCut()”)
public void log(JoinPoint joinPoint){
}
@Around(“myPointCut()”)
public Object aroundIt(ProceedingJoinPoint pjp){
//调用被代理的类的方法,返回值即为被代理类的方法的返回值
Object result = pjp.proceed(args);
return result;
}
}
- 代理模式
- 结构
- 被代理和代理类有同一个接口
- 代理类持有了被代理类的引用
- 调动代理类的方法时,代理类调用了被代理类相应的方法
- 多态:父类引用指向子类实例
- 静态代理
- 继承方式
<a name="qRyHI"></a>
## 动态代理
任意给定一个类,自动生成代理类。两种方式,一种是接口,一种是继承<br />Spring动态代理支持接口和继承。默认是接口。
- 接口动态代理用的是JDK动态代理实现
- 继承动态代理用的是Cglib
<a name="AtJ1r"></a>
### 接口方式
接口方式,对生成的代理类要求
- 实现同样的接口 被代理类要有接口
- 持有被代理类的引用 要把被代理类的实例传给代理类
- 增加功能 功能实现
<br />Proxy jdk中用于生成代理类的工具
- 静态方法 newProxyInstance 创建动态代理的实例
- ClassLoader 类加载器 保持跟目标类型同一个加载器
- Class<?> interfaces 代理类需要实现的共同的接口,必须要与目标类型的接口一致,从目标类型 getClass().getInterfaces();
- InvocationHandler
InvocationHandler 需要增加的代码逻辑
- invoke
- proxy 忽略
- method 目标类的方法
- args 目标类的方法的参数
method.invoke(target, args)java
package com.woniuxy.spring.aop.dyna;
import java.lang.reflect.InvocationHandler;
import java.lang.reflect.Method;
import java.lang.reflect.Proxy;
public class MyJdkProxy {
//目标实例,被代理的实例
private Object target;
public MyJdkProxy(Object target) {
this.target = target;
}
/
@return
*/
public Object newProxy(){
ClassLoader classLoader = target.getClass().getClassLoader();
Class<?>[] interfaces = target.getClass().getInterfaces();
return Proxy.newProxyInstance(classLoader, interfaces, new InvocationHandler() {
@Override
public Object invoke(Object proxy, Method method, Object[] args) throws Throwable {
System.out.println(“方法执行之前”);
// 执行的对象
// 参数
Object result = method.invoke(target, args);
System.out.println(“方法执行之后”);
return result;
}
});
}
}
<br />注意,获取代理实例时只能使用接口而不是实现类来接收java
UserServiceImpl target = new UserServiceImpl();
MyJdkProxy myJdkProxy = new MyJdkProxy(target);
UserService userService = (UserService) myJdkProxy.newProxy();
userService.findById(1);
<a name="KhIEr"></a>
### 继承方式
提供目标类,代理类继承目标类<br />Enhancer 增强器 ,生成代理类
- setSuperClass 指定父类
- setCallback 指定回调函数,方法拦截器
MethodInterceptor 方法拦截器,需要增加的代码逻辑
- intercept method.invoke(target,args);
- method
- args
Spring 默认使用接口,如果类没有接口,则尝试使用cglib的继承的方式 需要额外配置 org.springframework.context.annotation.EnableAspectJAutoProxy#proxyTargetClass = true
AOP 的原理使用了代理模式,动态代理的实现方式
- 接口 JDK 动态代理
- 继承 Cglib动态代理
<a name="4WJii"></a>
### SpringAOP的本质
SpringBean UserServiceImpl ---AOP--> UserServiceImpl$Proxy0 -> 设置到原来的Bean当中去<br />SpringAOP<br />通过AOP的切入点 通知,生成一个动态代理实例 将这个实例替换掉原来的springBean,实现增强<br />springBean已经不是原来的bean
AOP离不开IOC,IoC是AOP的基础
<a name="bljvF"></a>
### Spring AOP 典型应用场景
- 声明式事务管理 @Transactional
- 下订单
- 创建订单,插入订单数据
- 减少用户金额
- 增加商家金额
- 减少库存
- ....
@Transactional<br />OrderService#createOrder <br /> ①打开事务<br />OrderMapper#insert<br />UserMapper#decreaseBalance<br />MerchantMapper#increseBalance<br />ProductMapper#decreaseStock<br />②正常结束=>提交事务<br />③异常事务=>回滚事务java
@Pointcut(“@annotation(com.woniuxy.spring.aop.tx.anno.Transactional)”)
public void txPointcut(){}
@Around(“txPointcut()”)
public Object doTransaction(ProceedingJoinPoint pjp){
<a name="Isbe0"></a>
## Mybatis 与Spring的集成
mybatis-spring 用于将mybatis集成到spring中
- SqlSessionFactory <= SqlSessionFactoryBuilder + mybatis-config.xml
1. 加依赖xml
5.2.9.RELEASE
org.springframework
spring-context
${spring.verion}
org.springframework
spring-orm
${spring.verion}
<dependency>
<groupId>com.alibaba</groupId>
<artifactId>druid</artifactId>
<version>1.1.22</version>
</dependency>
<dependency>
<groupId>mysql</groupId>
<artifactId>mysql-connector-java</artifactId>
<version>5.1.48</version>
</dependency>
<dependency>
<groupId>org.mybatis</groupId>
<artifactId>mybatis</artifactId>
<version>3.5.5</version>
</dependency>
<dependency>
<groupId>org.mybatis</groupId>
<artifactId>mybatis-spring</artifactId>
<version>2.0.5</version>
</dependency>
2. AppConfig
- DataSource
- PlatformTransactionManager
- SqlSessionFactoryBean
```java
@Configuration //标记为配置类
@ComponentScan("com.woniuxy.spring") //组件扫描
@PropertySource("classpath:jdbc.properties")//读取配置文件
@MapperScan("com.woniuxy.spring.dao") //mapper扫描
@EnableTransactionManagement //开启自动事务管理
public class AppConfig {
//数据源
@Bean(initMethod = "init",destroyMethod = "close")
public DruidDataSource dataSource() {
//...
}
//事务管理
@Bean
public PlatformTransactionManager transactionManager(DataSource dataSource){
PlatformTransactionManager txManager = new DataSourceTransactionManager(dataSource);
//...
}
@Bean
public SqlSessionFactoryBean sqlSessionFactory(DataSource dataSource){
//替换了mybatis-config.xml
SqlSessionFactoryBean sqlSessionFactoryBean = new SqlSessionFactoryBean();
//...
org.apache.ibatis.session.Configuration configuration = new org.apache.ibatis.session.Configuration();
//...
try {
sqlSessionFactoryBean.setMapperLocations(new PathMatchingResourcePatternResolver().getResources("classpath*:mappers/**/*.xml"));
} catch (IOException e) {
e.printStackTrace();
}
}
}
作业
考试系统(mybatis+spring):自动组卷=>考试
学生题
类型:选择(单选,多选)、填空、简答、编程题答案分值,每个题有分数,默认选择2分,判断2分,填空2分,简答5分 编程30分 可修改关联阶段手工录入,也可以excel导入(JXL 或者 POI)
试卷
试卷名字阶段关联题(多对多关系)总分建议考试时长出卷人
考试
关联试卷考试时间: 10.9 9:20班级状态:未开始,进行中,结束
答卷 一个学生一次答卷记录
卷子题学生答案 A,B asdfasdf,asdfasdfsdf,asdfasdf
成绩
1)提交sql2)项目
复习
mybatis
使用xml注解接口动态sql缓存机制插件机制mybatis-generator
Spring
核心API
BeanFactory
ApplicationContext
ClassPathXmlApplicaitonContextAnnotationConfigApplicationContext
IoC
作用域生命周期 @PostConstruct @PreDestory 实例化的3种
默认构造器静态工厂方法实例工厂
FactoryBean接口
依赖注入的2种
setter构造器
使用方式
xmlxml+注解java(+注解)
AOP
概念案例实现:动态代理
继承
cglib
接口
jdk
spring集成mybatis
Spring事务管理
数据库事务:
一批DML(对于数据的增删改查 select update delete insert)同时成功同时失败不包括DDL(数据定义语言)通过 commit 语句提交 ,如果遇到ddl(truncate)或者dcl自动提交通过rollback语句回滚,如果数据库出现意外,自动回滚
四大特性
A 原子性 : 事务是最小的操作单元,不能分割,同时成功或者失败C 一致性 : 数据修改前后都保持一致的状态I 隔离性 : 每个事务之间是隔离的D 持久性 : 数据提交之后永久保存
隔离级别(事务并发,多个事务同时执行)
读未提交:本事务修改之后,其他事务可以读取到未提交的内容读已提交:事务可以读取到其他事务已经提交的数据(默认)可重复读:事务读取的数据始终是开始的状态串行化: 串行执行,没有事务并发
锁↓jdbc操作事务 Connection接口
setAutoCommit(false) 关闭自动提交commit() 提交rollback() 回滚
↓mybatis提供了事务管理的功能↓Spring事务管理支持
Spring的事务抽象事务管理器 PlatformTransactionManager
TransactionStatus getTransaction(TransactionDefinition) 打开事务,指定事务的属性commit(TransactionStatus ) 提交事务rollback(TransactionStatus ) 回滚事务
事务定义TransactionDefinition 定义事务的属性
name 名字isolation 隔离级别timeout 超时readOnly 只读propagationBehavior 传播行为
事务状态 TransactionStatus 表示事务的状态
isNewTransaction() 是否是新事务setRollbackOnly() 设置只回滚isRollbackOnly 是否只回滚isCompleted 是否已完成hasSavepoint 是否有保存点flush 冲刷事务
PlatformTransactionManager的子类,用于集成各种不同的事务管理机制
Spring事务管理的两种方式
声明式事务
通过@Transactional注解,在方法开始前打开事务,方法结束后提交事务,方法跑出异常时回滚事务Spring的AOP机制优势:使用方便
编程式事务spring提供的事务API(事务模板 TransactionTemplate)执行事务操作
优势:控制粒度比较细,灵活操作步骤
需要配置事务模板作为spring的bean
```java
@Bean
public TransactionTemplate txTemplate(PlatformTransactionManager platformTransactionManager){ return new TransactionTemplate(platformTransactionManager);
}
2. 在需要使用事务的方法中使用TransactionTemplate
```java
@Autowired
private TransactionTemplate txTemplate;
@Override
public Paper autoGeneratePaper2(AutoGenPaperInfo param) {
//使用事务模板执行事务操作
return txTemplate.execute(new TransactionCallback<Paper>() {
//事务内部操作代码
@Override
public Paper doInTransaction(TransactionStatus status) {
...}
}
通过 TransactionStatus的setRollbackOnly指定回滚//手动标记回滚
status.setRollbackOnly();
事务传播行为当事务发生嵌套时,内部的事务该如何处理
@Transactional
public void a(){
b();
}
@Transactional
public void b(){
}
传播行为
含义
PROPAGATION_REQUIRED
表示当前方法必须运行在事务中。如果当前事务存在,方法将会在该事务中运行。否则,会启动一个新的事务
PROPAGATION_SUPPORTS
表示当前方法不需要事务上下文,但是如果存在当前事务的话,那么该方法会在这个事务中运行
PROPAGATION_MANDATORY
表示该方法必须在事务中运行,如果当前事务不存在,则会抛出一个异常
PROPAGATION_REQUIRED_NEW
表示当前方法必须运行在它自己的事务中。一个新的事务将被启动。如果存在当前事务,在该方法执行期间,当前事务会被挂起。如果使用JTATransactionManager的话,则需要访问TransactionManager
PROPAGATION_NOT_SUPPORTED
表示该方法不应该运行在事务中。如果存在当前事务,在该方法运行期间,当前事务将被挂起。如果使用JTATransactionManager的话,则需要访问TransactionManager
PROPAGATION_NEVER
表示当前方法不应该运行在事务上下文中。如果当前正有一个事务在运行,则会抛出异常
PROPAGATION_NESTED
表示如果当前已经存在一个事务,那么该方法将会在嵌套事务中运行。嵌套的事务可以独立于当前事务进行单独地提交或回滚。如果当前事务不存在,那么其行为与PROPAGATION_REQUIRED一样。注意各厂商对这种传播行为的支持是有所差异的。可以参考资源管理器的文档来确认它们是否支持嵌套事务
Spring MVCPOJO plain old java object
Q: Servlet开发的弊端有哪些?
一个servlet对应一个请求,类太多 => 一个方法对应一个请求侵入性太强,必须继承HTTPServlet,必须覆盖doGet(HttpServletRequest,HttpServletResponse)\doPost(…) => POJO 无侵入重复代码多
request.getParameter(); => 绑定到方法参数类型转换 => 自动类型转换request / response.setCharacterEncoding(); => 简化统一的处理方式跳转
….
DRY: Do not Repeat Yourself 不要重复自己 正交性
注解
案例
创建项目
选择maven-archetype-webapp项目改头<?xml version="1.0" encoding="UTF-8"?>
<web-app xmlns:xsi="http://www.w3.org/2001/XMLSchema-instance"
xmlns="http://xmlns.jcp.org/xml/ns/javaee"
xsi:schemaLocation="http://xmlns.jcp.org/xml/ns/javaee http://xmlns.jcp.org/xml/ns/javaee/web-app_3_1.xsd"
version="3.1">
</web-app>
添加依赖
```xml
5.2.8.RELEASE
2.9.5
…
<!--webmvc-->
<dependency>
<groupId>org.springframework</groupId>
<artifactId>spring-webmvc</artifactId>
<version>${spring.version}</version>
</dependency>
<!-- json转换-->
<dependency>
<groupId>com.fasterxml.jackson.core</groupId>
<artifactId>jackson-databind</artifactId>
<version>${jackson.version}</version>
</dependency>
<dependency>
<groupId>com.fasterxml.jackson.core</groupId>
<artifactId>jackson-annotations</artifactId>
<version>${jackson.version}</version>
</dependency>
<!-- servlet API支持 -->
<dependency>
<groupId>javax.servlet</groupId>
<artifactId>javax.servlet-api</artifactId>
<version>3.1.0</version>
</dependency>
<!-- jstl支持 -->
<dependency>
<groupId>javax.servlet</groupId>
<artifactId>jstl</artifactId>
<version>1.1.2</version>
<type>jar</type>
</dependency>
<dependency>
<groupId>taglibs</groupId>
<artifactId>standard</artifactId>
<version>1.1.2</version>
<type>jar</type>
</dependency>
3. 编写配置文件
1. web.xml
1. listener
1. servlet
1. filter
```xml
<?xml version="1.0" encoding="UTF-8"?>
<web-app xmlns:xsi="http://www.w3.org/2001/XMLSchema-instance"
xmlns="http://xmlns.jcp.org/xml/ns/javaee"
xsi:schemaLocation="http://xmlns.jcp.org/xml/ns/javaee http://xmlns.jcp.org/xml/ns/javaee/web-app_3_1.xsd"
version="3.1">
<display-name>mvc45demo</display-name>
<!--listener:启动根容器,配置文件名为applicationContext.xml-->
<listener>
<listener-class>org.springframework.web.context.ContextLoaderListener</listener-class>
</listener>
<!-- servlet:启动web容器,配置文件名为 {servlet-name}-servlet.xml 例如 mvc45-servlet.xml -->
<servlet>
<servlet-name>mvc45</servlet-name>
<servlet-class>org.springframework.web.servlet.DispatcherServlet</servlet-class>
</servlet>
<servlet-mapping>
<servlet-name>mvc45</servlet-name>
<url-pattern>/</url-pattern>
</servlet-mapping>
<!-- filter -->
<filter>
<filter-name>characterEncodingFilter</filter-name>
<filter-class>org.springframework.web.filter.CharacterEncodingFilter</filter-class>
<init-param>
<param-name>encoding</param-name>
<param-value>utf-8</param-value>
</init-param>
</filter>
<filter-mapping>
<filter-name>characterEncodingFilter</filter-name>
<url-pattern>/*</url-pattern>
</filter-mapping>
</web-app>
mvc45-servlet.xml 放在WEB-INF下
包扫描注解驱动视图解析器
```xml
<?xml version=”1.0” encoding=”UTF-8”?>
1. applicationContext.xml 放在WEB-INF下
4. 编写请求处理代码
```java
package com.woniuxy.mvc.controller;
import org.springframework.stereotype.Controller;
import org.springframework.web.bind.annotation.RequestMapping;
import org.springframework.web.bind.annotation.ResponseBody;
@Controller
public class HelloController {
@RequestMapping("/say")
@ResponseBody
public String sayHello(String username){
return "hello,"+username;
}
}
配置tomcat并运行
@ResponseBody 指定请求返回JSON格式的数据
Spring MVC的两个容器
MVC模式Model 模型 数据View 视图 渲染结果视图Controller 控制器 流程控制
职责明确独立扩展便于维护
流程DispatcherServlet : 前端控制器 中央控制器
特性
JSON处理:@ResponseBody静态资源处理
<!--静态资源-->
<mvc:resources mapping="/css/**" location="/static/css/"/>
Restful风格
FAQ:
解决JSON返回中文乱码问题
在请求映射注解上加produce
```java
@RequestMapping(value = “/login”,produces = “application/json;charset=utf-8”)
2. 欢迎页无法打开。只支持jsp,index.jsp放在webapp目录下
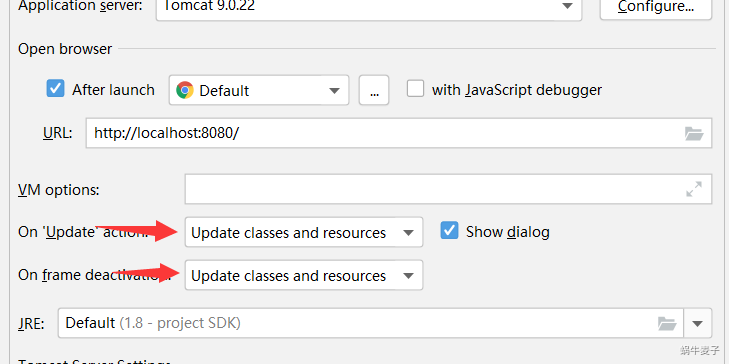
2. 静态页面修改后不需要重启
<a name="89sr6"></a>
## 作业
1. 国庆作业的web层写出来
- 功能
- 添加题目
- 自动组卷
- 安排考试
- 考试
- controller和html 接口和页面
[https://v3.bootcss.com/getting-started/](https://v3.bootcss.com/getting-started/)
<a name="s2CgT"></a>
## 复习
- Spring事务
- 两种事务管理方式
- 声明式事务管理
- @Transactional
- AOP 环绕通知
- 优势:简单
- 编程式事务管理
- TransactionTemplate 事务模板
- txTemplate.execute(
- new TransactionCallback<>(){
- public T doInTransaction(TransactionStatus status){
- status.setRollbackOnly();
- }
- });
- 优势:灵活
- Spring的事务抽象
- *PlatformTransactionManager 事务管理器
- new DataSourceTransactionManager
- commit
- rollback
- TransactionStatus getTransaction(TransactionDefinition def)
- *TransactionDefinition 事务的定义
- 隔离级别 mysql 可重复读
- 传播行为
- 超时
- 是否只读
- 名字
- TransactionStatus 事务的状态
- *setRollbackOnly
- isRollbackOnly
- isCompleted
- flush
- 事务传播行为
- Required 有事务加入事务,无事务自己开启事务
- Required_new 有事务将事务挂起,新开事务,无事务新开事务
- Nested 新开事务
- Mandatory 必须有事务,无则抛异常
- Never 不能有事务,有则抛异常
- Supports 有加入,无则无事务运行
- Not_supported 不支持事务 有则将事务挂起
<a name="vegHT"></a>
## SpringMVC
<a name="Nxcvn"></a>
### Web层框架
<a name="bebk8"></a>
### Servlet的弊端
- 一个servlet对应一个请求,造成类多 -> 请求映射到方法
- 侵入性强 -> POJO
- 重复代码 -> 参数绑定(Http请求参数绑定到处理方法的参数) 类型转换
- -> 字符编码集提供过滤器
- -> JSON转换
- -> 映射配置
-----
<a name="hlcle"></a>
### SpringMVC案例
1. 创建项目,web项目
1. web.xml换个头
2. 加依赖
1. SpringMVC
1. servlet-api + JSTL Web支持的API
1. Jackson json转换
3. 配置文件
1. web.xml
1. listener ContextLoaderListener 启动根容器
1. servlet DispatcherServlet 启动Web容器
1. filter CharacterEncodingFilter 字符编码集过滤器,统一设置成UTF-8
2. xxx-servlet.xml
1. 包扫描 扫controller
1. 注解驱动 mvc:annotaion-driven
1. 视图解析器 viewResolver
1. 静态资源映射 mvc:resource
3. applicationContext.xml
4. 代码
```java
@Controller//声明是Spring的Bean
public class HelloController{
@RequestMapping("{请求URI}")//映射请求
@ResponseBody//将返回结果自动转换为JSON字符串
//不加@ResponseBody,将返回结果视作视图名字,根据视图解析器的配置渲染成真正的视图
public String sayHello(String name){
//处理逻辑
return "success";
}
@RequestMapping("hello")
public String hello(String name,String username,String password,ModelMap modelMap){
//通过modelMap给jsp传值
modelMap.put(k,v)
return "hello";
}
}
SpringMVC的执行流程—Q:
Controller获取不到参数? input 没有写name找不到jquery.js? 回调函数无法接受string类型
找到问题 F12 看不到 -> error回调 -> json格式转换问题解决方案
后端返回合法的json格式,返回对象前端将dataType改成text
参数过多,如何用一个对象来接受form表单?
编码规范: Controller层返回值必须是Result
特性
参数绑定
基本类型 String 绑定到对象 Form@RequestParam(_required = false,defaultValue = “10”)_
指定参数是否必填指定默认值是多少
类型转换自定义格式转换
```java
/**
初始化时的数据绑定@param binder
*/
@InitBinder
public void init(WebDataBinder binder){
//添加一个日期格式化类
binder.addCustomFormatter(new DateFormatter(“yyyy-MM-dd HH:mm:ss”),Date.class);
}
<a name="PS3TL"></a>
### 参数校验
1.加依赖
```xml
<dependency>
<groupId>org.hibernate.validator</groupId>
<artifactId>hibernate-validator</artifactId>
<version>6.1.5.Final</version>
</dependency>
加验证注解
```java
@NotNull
@Length(min = 6,max = 128,message = “长度必须在{min}到{max}”)
@Email(message = “用户名为电子邮箱”)
private String username;
@NotBlank
// @Pattern(regexp = “(^[1-9]\d{5}(18|19|20)\d{2}((0[1-9])|(10|11|12))(([0-2][1-9])|10|20|30|31)\d{3}[0-9Xx]$)|” +
// “(^[1-9]\d{5}\d{2}((0[1-9])|(10|11|12))(([0-2][1-9])|10|20|30|31)\d{3}$)”)
private String password;
//@Pattern
@NotBlank
private String mobile;
@Past
//@Future
private Date birthday;
3. 外部加@Valid
3. 解析验证结果。验证结果通过方法参数BindingResult传递。
```java
public Result validate(BindingResult bindingResult) {
if(bindingResult.hasErrors()){
List<FieldError> fieldErrors = bindingResult.getFieldErrors();
StringBuilder errorBuilder = new StringBuilder();
for (FieldError fieldError : fieldErrors) {
errorBuilder.append(fieldError.getField())
.append(":")
.append(fieldError.getDefaultMessage())
.append(";");
}
errorBuilder.deleteCharAt(errorBuilder.length()-1);
return Result.fail("参数异常:"+errorBuilder.toString());
}
return null;
}
注解大全:
@Valid
被注释的元素是一个对象,需要检查此对象的所有字段值
@Null
被注释的元素必须为 null
@NotNull
被注释的元素必须不为 null
@AssertTrue
被注释的元素必须为 true
@AssertFalse
被注释的元素必须为 false
@Min(value)
被注释的元素必须是一个数字,其值必须大于等于指定的最小值
@Max(value)
被注释的元素必须是一个数字,其值必须小于等于指定的最大值
@DecimalMin(value)
被注释的元素必须是一个数字,其值必须大于等于指定的最小值
@DecimalMax(value)
被注释的元素必须是一个数字,其值必须小于等于指定的最大值
@Size(max, min)
被注释的元素的大小必须在指定的范围内
@Digits (integer, fraction)
被注释的元素必须是一个数字,其值必须在可接受的范围内
@Past
被注释的元素必须是一个过去的日期
@Future
被注释的元素必须是一个将来的日期
@Pattern(value)
被注释的元素必须符合指定的正则表达式
注解
作用
@Email
被注释的元素必须是电子邮箱地址
@Length(min=, max=)
被注释的字符串的大小必须在指定的范围内
@NotEmpty
被注释的字符串的必须非空
@Range(min=, max=)
被注释的元素必须在合适的范围内
@NotBlank
被注释的字符串的必须非空
@URL(protocol=,host=, port=, regexp=, flags=)
被注释的字符串必须是一个有效的url
@CreditCardNumber
被注释的字符串必须通过Luhn校验算法,银行卡,信用卡等号码一般都用Luhn计算合法性
@ScriptAssert(lang=, script=, alias=)
要有Java Scripting API 即JSR 223(“Scripting for the JavaTM Platform”)的实现
@SafeHtml(whitelistType=,additionalTags=)
classpath中要有jsoup包
全局异常处理异常处理方式
打出来看看*往上抛
package com.woniuxy.mvc.controller.component;
import com.woniuxy.mvc.common.Result;
import org.springframework.web.bind.annotation.ControllerAdvice;
import org.springframework.web.bind.annotation.ExceptionHandler;
import org.springframework.web.bind.annotation.ResponseBody;
/**
* 全局异常处理器,拦截所有的Controller层处理请求的方法,如果出现异常则进行拦截并处理
*/
@ControllerAdvice
public class GlobalExceptionHandler {
@ExceptionHandler(Exception.class)
@ResponseBody
public Result handleException(Exception e){
e.printStackTrace();
return Result.fail("服务器开了小差,程序员小哥正在努力修复,具体信息【"+e.getMessage()+"】");
}
}
文件上传
加依赖
<!-- 文件上传 -->
<dependency>
<groupId>commons-fileupload</groupId>
<artifactId>commons-fileupload</artifactId>
<version>1.3.3</version>
</dependency>
配置一个bean
<bean class="org.springframework.web.multipart.commons.CommonsMultipartResolver" id="multipartResolver">
<property name="maxUploadSizePerFile" value="#{10*1024*1024}"/>
<property name="maxUploadSize" value="#{50*1024*1024}"/>
</bean>
页面
method=postenctype=multipart/form-datainput=file
Controller,接受参数是MultipartFile avatar,参数名与form中的匹配
getOriginalFilenamegetSizetransferTo
ajax 上传的页面 $(function(){
$("#doSubmit").click(function () {
//使用formdata重新封装文件对象
var data = new FormData();
// document.getElementById('avatar').files[0];
data.append("avatar",$("#avatar").prop('files')[0])
$.ajax({
url:'../upload',
type:'post',
dataType:'text',
data:data,
//jquery本身不处理数据,xhr会自行处理数据
processData:false,
//自动设置contentType
contentType:false,
success:function (resp) {
alert(resp);
},
error:function (x,s,e) {
console.log(e);
}
})
})
})
静态资源显示问题
nginx方案:使用nginx将某个路径发布成网络资源即可
oss存储,云服务器 https://gitee.com/maizdotme/dev-suggestions/blob/master/qiniu.md
nginx的配置在 conf/nginx.conf 修改88行的路径在nginx.exe 的目录下启动: nginx停止: nginx -s stop
作业:
注册,需要有头像
复习
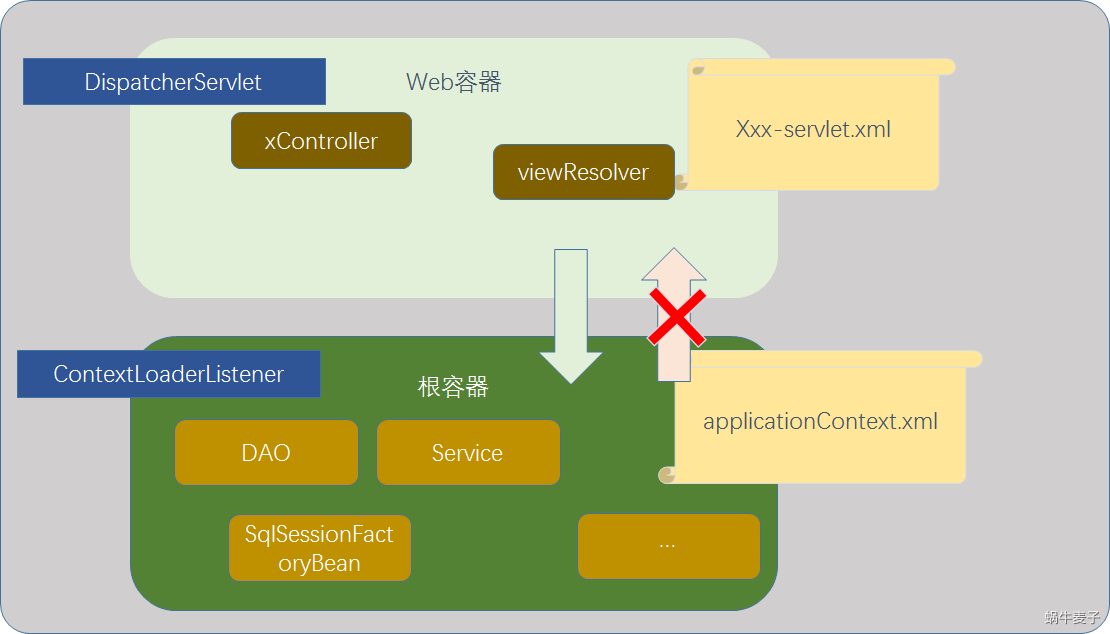
两个容器Web容器:
xxx-servlet.xml controller \viewResolver\multipartResolver…由DispatcherServlet启动
↓ (↑x)根容器
applicationContext.xmlDAO\Service\FactoryBean…由ContextLoaderListener
参数校验Hibernate-Validtor
注解
@NotNull@Length @Size@NotBlank@Email@Past @Future@Pattern(regexp=””)@Min @Max @NotEmpty@Valid
BindingResult
参数绑定对象接收
全局异常@ControllerAdvice 控制器层的通知@ExceptionHandler 异常处理器
文件上传bean: multiPartResolverajax:var data = new FormData();processData:false,contentType:false
查看上传的文件
nginx方案oss方案
类型转换@InitBinderWebDataBinderbinder.addCustomFormatter(new DateFormatter(“{格式}”),Date.class);
Restful风格两种web开发方式
传统方式
controller -> view视图的渲染在后端实现前端只负责展现
前后端分离方式
前端负责页面的渲染后端只负责提供数据接口
REST协议 基于HTTP协议的一种开发风格。表现层状态转移。利用HTTP的请求方法和URL表示应用程序的操作及实体,完成对实体操作。URL : 一个路径表示一个实体 www.maizi.com/product/1001请求方法:POST GET DELETE PUT 动词 用来表示对实体的操作
SpringMVC对Rest风格的支持@PathVariable@RequestBody@RestController 替代@Controller,指定该类为Controller,并且所有的请求处理方法都返回JSON@ResponseBody便捷的请求映射注解
@PostMapping@GetMapping@DeleteMapping@PutMapping
RestAPI设计https://gitee.com/api/v5/swagger#/getV5ReposOwnerRepoStargazers?ex=no
@ReqeustBody 直接在请求体中使用json传值
var product = {"productId":1,"productName":"张三","headImg":"asdfasdfasd"};
$.ajax({
url:"../product",
type:'post',
dataType:'json',
//使用JSON转换成字符串
data:JSON.stringify(product),
//设置contentType
contentType:'application/json;charset=utf-8',
success:function (resp) {
alert(resp.success);
}
})
@PostMapping("product")
public Result addProduct(@RequestBody Product product) {
System.out.println(product);
return Result.success();
}
Java配置SpringMVC
新建项目,删除web.xml配置类
WebInitializer extends AbstractAnnotationConfigDispatcherServletInitializer
getRootConfigClasses 根容器的配置类getServletConfigClasses web容器的配置类getServletMappings DispatcherServlet的url-patterngetServletFilters 字符编码集过滤器
RootConfigWebConfig implements WebMvcConfigurer
@Configuration@ComponentScan(“com.woniuxy.mvc.controller”) //扫controller@EnableWebMvc//注解驱动
```java
/**
配置viewResolver视图解析器@param registry
*/
@Override
public void configureViewResolvers(ViewResolverRegistry registry) {
registry.enableContentNegotiation(new MappingJackson2JsonView());
}
/**
静态资源的处理@param registry
/
@Override
public void addResourceHandlers(ResourceHandlerRegistry registry) {
registry.addResourceHandler(“/css/“).addResourceLocations(“/static/css/“);
registry.addResourceHandler(“/js/“).addResourceLocations(“/static/js/“);
registry.addResourceHandler(“/images/*”).addResourceLocations(“/static/images/“);
registry.addResourceHandler(“/html/“).addResourceLocations(“/static/html/“);
}
@Bean
public MultipartResolver multipartResolver(){
CommonsMultipartResolver commonsMultipartResolver = new CommonsMultipartResolver();
commonsMultipartResolver.setMaxUploadSize(5010241024l);
commonsMultipartResolver.setMaxUploadSizePerFile(1010241024l);
return commonsMultipartResolver;
}
```
集成mybatis
加依赖配置mybatis
作业
完成考试系统的以下功能
添加题目自动组卷安排考试考试
复习
Restful风格
url表示实体,请求方法(post get delete put )表示操作@PostMapping @GetMapping @DeleteMapping @PutMapping @RestController @RequestBody( 请求的体为json对象,自动转换为java对象) @PathVariable @ResponseBody
Java配置SpringMVC
WebInitializer extends AbstractAnnotationConfigDispatcherServletInitilizer 替换web.xml
根容器配置类web容器的配置类DispatcherServlet的url映射Filter
根容器配置
@PropertySource 加载properties配置文件@Configuration@CompnentScan 扫根包@MapperScan 扫DAO层@EnableTransactionManagement 开启事务@Value => 获取jdbc.properties的值DataSource 数据源PlatformTransactionManagerSQLSessionFactoryBean mybatis
….
Web容器配置
@Configuration@ComponentScan 扫Controller层@EnableWebMVC配置类implements WebMvcConfigurer视图静态资源上传文件
Spring-Boot
自带tomcat?不配置?
集成mybatis <dependency>
<groupId>org.mybatis.spring.boot</groupId>
<artifactId>mybatis-spring-boot-starter</artifactId>
<version>2.1.3</version>
</dependency>
<dependency>
<groupId>mysql</groupId>
<artifactId>mysql-connector-java</artifactId>
<version>5.1.48</version>
</dependency>
application.properties
在XXXApplication上加入@MapperScan
概念Spring-Boot 是一个快速开发框架,Spring Boot使得开发独立的、产品级、基于spring的应用变得十分容易。特性:
Create stand-alone Spring applicationsEmbed Tomcat, Jetty or Undertow directly (no need to deploy WAR files)Provide opinionated ‘starter’ dependencies to simplify your build configurationAutomatically configure Spring and 3rd party libraries whenever possibleProvide production-ready features such as metrics, health checks, and externalized configurationAbsolutely no code generation and no requirement for XML configuration
应用独立,创建独立的Spring应用程序
内嵌Tomcat,直接嵌入Tomcat、Jetty或Undertow (无需部署WAR文件)Starter依赖,提供自包含的 “starter” 依赖项以简化您的构建配置自动配置,尽可能自动配置Spring和第3方库生产特性,提供可用于生产的功能,例如metrics、应用健康状况检查和外化配置绝对没有代码生成,也不需要XML配置
项目结构No Magic
pom.xml
parent -> Spring-boot-starter-parent
Spring-boot-starter-parent
parent -> spring-boot-dependencies(依赖管理的pom)java.versionmaven 插件
spring-boot-dependencies
管理了所有的主流依赖的版本,解决了版本冲突的问题 规定了版本,子项目不需要定义版本
properties少了一些内容依赖没有版本spring-boot-maven插件(没有版本)
Starter,提供了必须的依赖和自动配置功能提供了必要的依赖(maven依赖传递的特性引入)
自动配置,自动处理模板化的配置内容
外化配置,application.properties约定的配置文件名字只有 application 跟 bootstrap(启动阶段)
格式有两种,properties ,yml(yaml)
yml 通过缩进表达层次 冒号后有空格https://blog.csdn.net/vincent_hbl/article/details/75411243
spring:
datasource:
url: jdbc:mysql://localhost:3306/woniu_edu
username: root
password: root123
driver-class-name: com.mysql.jdbc.Driver
mvc:
format:
date-time: yyyy-MM-dd HH:mm:ss
jackson:
date-format: yyyy-MM-dd HH:mm:ss
mybatis:
configuration:
log-impl: org.apache.ibatis.logging.slf4j.Slf4jImpl
map-underscore-to-camel-case: true
type-aliases-package: com.woniuxy.boot.bootdemo452.model
mapper-locations: classpath:mappers/**/*.xml
启动类SpringBoot核心注解 @SpringBootApplication
@ComponentScan 没有指定basePackage,默认以类所在的目录为起始目录开始扫描@SpringBootConfiguration -> @Configuration 本类是配置类@EnableAutoConfiguration 启动自动配置
约定resources/static 存放静态资源,默认自动将文件夹注册为静态资源映射
resources/templates 存放模板文件,后端模板(模板引擎)
三大法宝
parent spring-boot-starter-parent 解决依赖版本starter
引入必须依赖自动配置
外化配置 application.properties
自定义Starter
在expresstracking项目执行mvn install,将项目安装到本地仓库中新建项目 expresstracking-spring-boot-starter( quickstart项目),添加依赖
```xml
2.2.6.RELEASE
<dependency>
<groupId>org.springframework.boot</groupId>
<artifactId>spring-boot-starter</artifactId>
<version>${spring-boot.version}</version>
</dependency>
<dependency>
<groupId>org.springframework.boot</groupId>
<artifactId>spring-boot</artifactId>
<version>${spring-boot.version}</version>
</dependency>
<dependency>
<groupId>org.springframework.boot</groupId>
<artifactId>spring-boot-autoconfigure</artifactId>
<version>${spring-boot.version}</version>
</dependency>
<dependency>
<groupId>org.springframework.boot</groupId>
<artifactId>spring-boot-configuration-processor</artifactId>
<version>${spring-boot.version}</version>
<optional>true</optional>
</dependency>
<dependency>
<groupId>me.maiz.tool</groupId>
<artifactId>expresstracking</artifactId>
<version>1.0-SNAPSHOT</version>
</dependency>
3. 在resources目录下新建META-INF,新建spring.factories,内容为
```xml
org.springframework.boot.autoconfigure.EnableAutoConfiguration=com.woniuxy.boot.starter.ExpressTrackingAutoConfiguration
指向自动配置类
编写自动配置类
```java
package com.woniuxy.boot.starter;
import me.maiz.tool.ExprsTrackConfig;
import me.maiz.tool.KuaiDiNiaoQueryAPI;
import org.springframework.beans.factory.annotation.Autowired;
import org.springframework.boot.autoconfigure.condition.ConditionalOnClass;
import org.springframework.boot.context.properties.ConfigurationProperties;
import org.springframework.boot.context.properties.EnableConfigurationProperties;
import org.springframework.context.annotation.Bean;
import org.springframework.context.annotation.Configuration;
@ConditionalOnClass(KuaiDiNiaoQueryAPI.class)//指定,当有这个类时启动该配置
@Configuration
@EnableConfigurationProperties(ExpressTrackingProperties.class)//指定外化配置的属性类
public class ExpressTrackingAutoConfiguration {
@Autowired
private ExpressTrackingProperties expressTrackingProperties;
@Bean
public KuaiDiNiaoQueryAPI kuaiDiNiaoQueryAPI(){
ExprsTrackConfig config = new ExprsTrackConfig();
config.setUserKey(expressTrackingProperties.getUserKey());
config.setUserSecret(expressTrackingProperties.getUserSecret());
config.setApiUrl(expressTrackingProperties.getApiUrl());
KuaiDiNiaoQueryAPI kuaiDiNiaoQueryAPI = new KuaiDiNiaoQueryAPI(config);
return kuaiDiNiaoQueryAPI;
}
}
5. 编写自动配置的属性类
```java
package com.woniuxy.boot.starter;
import org.springframework.boot.context.properties.ConfigurationProperties;
@ConfigurationProperties(prefix = "expresstracking")
public class ExpressTrackingProperties {
private String userKey;
private String userSecret;
private String apiUrl = "http://api.kdniao.com/Ebusiness/EbusinessOrderHandle.aspx";
public String getUserKey() {
return this.userKey;
}
public void setUserKey(String userKey) {
this.userKey = userKey;
}
public String getUserSecret() {
return this.userSecret;
}
public void setUserSecret(String userSecret) {
this.userSecret = userSecret;
}
public String getApiUrl() {
return this.apiUrl;
}
public void setApiUrl(String apiUrl) {
this.apiUrl = apiUrl;
}
}
将starter安装到本地仓库使用
加依赖
<dependency>
<groupId>com.woniuxy.boot.starter</groupId>
<artifactId>exprestracking-spring-boot-starter</artifactId>
<version>1.0-SNAPSHOT</version>
</dependency>
添加配置
expresstracking:
user-key: "1663793"
user-secret: "0d253737-fc22-4064-87cd-5052fc6af857"
注入及使用
```java
package com.woniuxy.boot.bootdemo452.controller;
import com.woniuxy.boot.bootdemo452.common.Result;
import me.maiz.tool.KuaiDiNiaoQueryAPI;
import org.springframework.beans.factory.annotation.Autowired;
import org.springframework.web.bind.annotation.GetMapping;
import org.springframework.web.bind.annotation.RestController;
@RestController
public class KdnController {
@Autowired
private KuaiDiNiaoQueryAPI kuaiDiNiaoQueryAPI;
@GetMapping("kuaidi")
public Result get(String code,String num) throws Exception {
String kuaidi = kuaiDiNiaoQueryAPI.getOrderTracesByJson(code,num);
return Result.success(kuaidi);
}
}
<a name="IIMGM"></a>
## 作业
1. 完成自定义starter
1. 完成一个spring-boot的自动生成卷子的功能
<a name="BaZ6G"></a>
## 复习
- 入门
- springboot+web
- 集成mybatis
- 加依赖 mybatis-spring-boot-starter
- application.properties/ yml
- spring.datasource.XXXX
- mybatis
- @MapperScan
- Spring-Boot的项目结构
- pom.xml
- parent 依赖的版本管理
- starter依赖
- maven插件
- 注解 @SpringBootApplication
- 加在启动类上面
- @ComponentScan 扫包,启动类所在的包
- @Configuration 标记本类为配置类
- @EnableAutoConfiguration 启动自动配置
- 配置文件
- 命名:application / bootstrap
- 格式:properties / yml
- 加载配置属性的顺序
- starter
- 引入必须的依赖
- 自动配置
- 插件
- Starter的原理
- @EnableAutoConfiguration
- 启动时扫描,/META-INF/spring.factories 获得自动配置类
- 自动配置类本身是配置类(@Configuration) , 提供所需要的bean 的配置
- 关联一个外化配置的属性类(@EnableConfigurationProperties),可以读取到外化配置application.properties里的相关配置属性
<a name="nhtP0"></a>
## Spring-boot-maven插件
- 运行 mvn spring-boot:run 运行spring-boot项目
- 打包 mvn package , maven插件会对springboot项目重新打包(repackage),将war转换成jar包,但是这种格式的jar包与一般的jar的格式不同,称为Fat Jar。
<a name="REzVP"></a>
## Profile机制
以什么身份运行<br />环境
- 开发环境:(开发用)非正式数据;对于各种资源没有特殊要求(数据库能跑就行)
- 数据库: 192.168.120.111
- 用户名:root
- 密码:root123
- 静态资源服务器:192.168.120.66
- 测试环境:(测试用)
- 数据库:177.120.120.120
- 用户名:test
- 密码:testverynice
- 静态资源服务器:177.110.110.110
- 生产环境:(部署用)正式数据;要求应用服务器性能,数据库,网络等等资源要求比较高
- 数据库:db.woniuxy.com
- 用户名:${db.username}
- 密码:${db.password}
- 静态资源服务器:static.woniuxy.com
提供多套配置,根据不同的环境自动选用特定的配置<br />配置文件命名规则:<br />application-{profile}.yml<br />激活的环境用:
```yaml
spring:
profiles:
active: production
Thymeleaf模板引擎,类似于JSP,本质是后端模板,是java类渲染自然模板 Natural Template <=> 解决UI 跟后端开发沟通的问题,可以用浏览器打开,同时可以用作后端模板
集成
加依赖
<dependency>
<groupId>org.springframework.boot</groupId>
<artifactId>spring-boot-starter-thymeleaf</artifactId>
</dependency>
提供一个提供数据的controller (不要RestController 不要ResponseBody 要ModelMap)
模板
```html
<!DOCTYPE html >
欢迎您,游客
小伙子真帅
老哥身体还行
菜单
好吃的菜
<a name="w0bqm"></a>
## 网络路径
绝对路径: <br />/ 网络的根路径<br />/css <br />相对路径:没有 `/`<br />默认的相对路径是当前层级的路径,跟所在的位置有关系<br />通过base标签将相对路径指向了根路径
```html
<!--通过base标签将相对路径指向了根路径-->
<base href="/"/>
Spring-Data-JPAhibernate
创建springboot项目,选择 spring-data-jpa\web\lombok\mysql(改版本)配置数据源配置jpa
spring:
jpa:
generate-ddl: true
show-sql: true
模型
```java
package com.woniuxy.boot.jpademo45.model;
import lombok.Data;
import javax.persistence.*;
import java.util.Date;
@Entity
@Table(name = “teacher123”)
@Data
public class Teacher {
@Id
@GeneratedValue(strategy = GenerationType.IDENTITY)
private int teacherId;
@Column(name = "t_name",unique = true)
private String teacherName;
private String gender;
private String level;
private Date birthday;
}
5. public interface TeacherRepository extends JpaRepository<Teacher,Integer> {
5. 调用
<a name="hcamR"></a>
## Hibernate简介
全自动的ORM框架,不需要手动编写SQL<br />作者:Gavin King<br />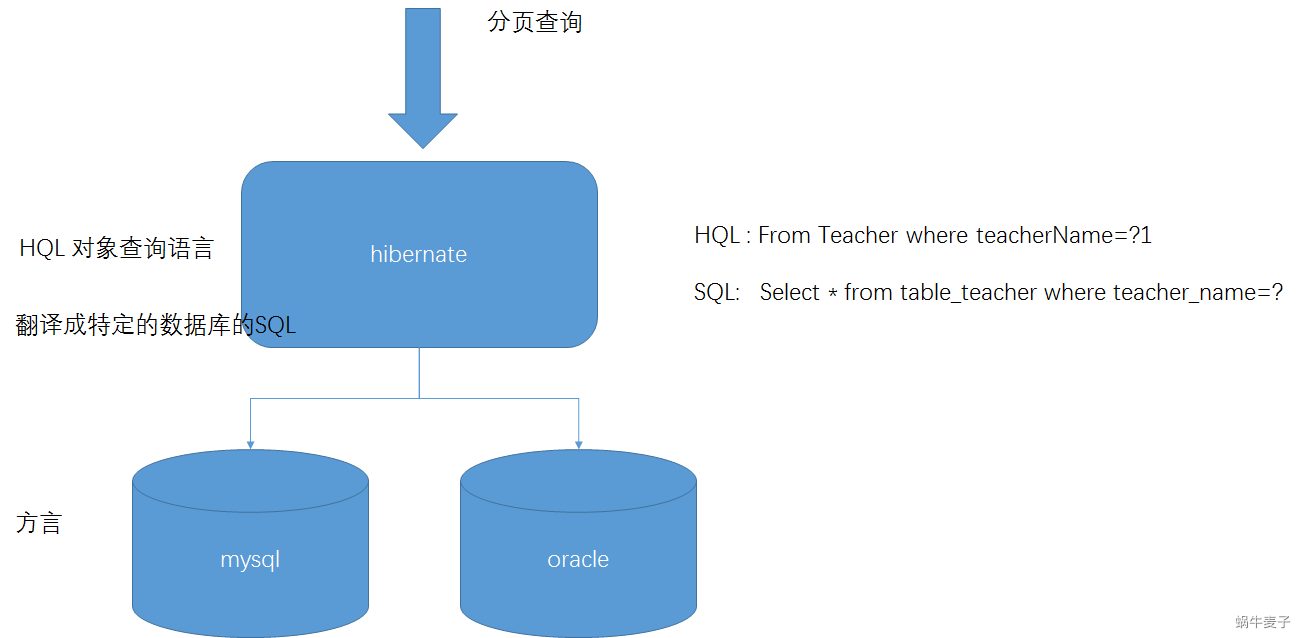
<a name="l2zD9"></a>
### hibernate vs mybatis的区别
1. hibernate 自动生成SQL,不需要用户编写sql,mybatis需要用户手写SQL
1. hibernate理论上迁移成本较低,mybatis与数据库绑定, 迁移成本高
1. hibernate自动生成sql,无法进行性能调优;mybatis手写sql,支持性能调优
1. hibernate单表操作趋于完美,但是多表操作困难 ,适用于单表操作比较多的系统比如后台管理系统;mybatis手写,支持多表,灵活,适用于业务复杂多变的场景,比如互联网行业
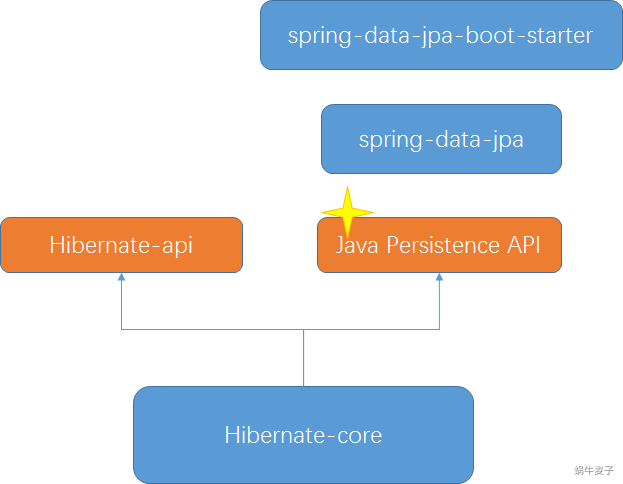
<a name="TOTwl"></a>
## Mybatis-Plus
官网: [https://mybatis.plus/](https://mybatis.plus/)
1. 加依赖
```xml
<dependency>
<groupId>com.baomidou</groupId>
<artifactId>mybatis-plus-boot-starter</artifactId>
<version>3.4.0</version>
</dependency>
配置同mybatis,唯一需要修改配置: 在mybatis后加 -plusMapper接口继承BaseMapper实体类需要加注解
```java
package com.woniuxy.boot.mbpdemo45.model;
import com.baomidou.mybatisplus.annotation.IdType;
import com.baomidou.mybatisplus.annotation.TableId;
import com.baomidou.mybatisplus.annotation.TableName;
@TableName(“student”)
public class Student {
/*
* This field was generated by MyBatis Generator.
* This field corresponds to the database column student.student_id
*
* @mbg.generated Tue Oct 13 16:01:59 CST 2020
*/
@TableId(type = IdType.AUTO)
private Integer studentId;
/**
*
* This field was generated by MyBatis Generator.
* This field corresponds to the database column student.student_name
*
* @mbg.generated Tue Oct 13 16:01:59 CST 2020
*/
private String studentName;
/**
*
* This field was generated by MyBatis Generator.
* This field corresponds to the database column student.class_id
*
* @mbg.generated Tue Oct 13 16:01:59 CST 2020
*/
private Integer classId;
/**
* This method was generated by MyBatis Generator.
* This method returns the value of the database column student.student_id
*
* @return the value of student.student_id
*
* @mbg.generated Tue Oct 13 16:01:59 CST 2020
*/
public Integer getStudentId() {
return studentId;
}
/**
* This method was generated by MyBatis Generator.
* This method sets the value of the database column student.student_id
*
* @param studentId the value for student.student_id
*
* @mbg.generated Tue Oct 13 16:01:59 CST 2020
*/
public void setStudentId(Integer studentId) {
this.studentId = studentId;
}
/**
* This method was generated by MyBatis Generator.
* This method returns the value of the database column student.student_name
*
* @return the value of student.student_name
*
* @mbg.generated Tue Oct 13 16:01:59 CST 2020
*/
public String getStudentName() {
return studentName;
}
/**
* This method was generated by MyBatis Generator.
* This method sets the value of the database column student.student_name
*
* @param studentName the value for student.student_name
*
* @mbg.generated Tue Oct 13 16:01:59 CST 2020
*/
public void setStudentName(String studentName) {
this.studentName = studentName == null ? null : studentName.trim();
}
/**
* This method was generated by MyBatis Generator.
* This method returns the value of the database column student.class_id
*
* @return the value of student.class_id
*
* @mbg.generated Tue Oct 13 16:01:59 CST 2020
*/
public Integer getClassId() {
return classId;
}
/**
* This method was generated by MyBatis Generator.
* This method sets the value of the database column student.class_id
*
* @param classId the value for student.class_id
*
* @mbg.generated Tue Oct 13 16:01:59 CST 2020
*/
public void setClassId(Integer classId) {
this.classId = classId;
}
/**
* This method was generated by MyBatis Generator.
* This method corresponds to the database table student
*
* @mbg.generated Tue Oct 13 16:01:59 CST 2020
*/
@Override
public String toString() {
StringBuilder sb = new StringBuilder();
sb.append(getClass().getSimpleName());
sb.append(" [");
sb.append("Hash = ").append(hashCode());
sb.append(", studentId=").append(studentId);
sb.append(", studentName=").append(studentName);
sb.append(", classId=").append(classId);
sb.append("]");
return sb.toString();
}
}
<a name="EU48e"></a>
### 代码生成器
1. 加依赖
```xml
<!--mybatis 代码生成器-->
<dependency>
<groupId>com.baomidou</groupId>
<artifactId>mybatis-plus-generator</artifactId>
<version>3.4.0</version>
<scope>test</scope>
</dependency>
<dependency>
<groupId>org.apache.velocity</groupId>
<artifactId>velocity-engine-core</artifactId>
<version>2.2</version>
<scope>test</scope>
</dependency>
代码生成器类(放在test目录下)
```java
package com.woniuxy.boot.mbpdemo45;
import com.baomidou.mybatisplus.core.exceptions.MybatisPlusException;
import com.baomidou.mybatisplus.core.toolkit.StringPool;
import com.baomidou.mybatisplus.core.toolkit.StringUtils;
import com.baomidou.mybatisplus.generator.AutoGenerator;
import com.baomidou.mybatisplus.generator.InjectionConfig;
import com.baomidou.mybatisplus.generator.config.*;
import com.baomidou.mybatisplus.generator.config.po.TableInfo;
import com.baomidou.mybatisplus.generator.config.rules.NamingStrategy;
import com.baomidou.mybatisplus.generator.engine.VelocityTemplateEngine;
import org.junit.jupiter.api.Test;
import java.util.ArrayList;
import java.util.List;
import java.util.Scanner;
public class MybatisPlusGenerator {
/**
* <p>
* 读取控制台内容
* </p>
*/
public static String scanner(String tip) {
Scanner scanner = new Scanner(System.in);
StringBuilder help = new StringBuilder();
help.append("请输入" + tip + ":");
System.out.println(help.toString());
if (scanner.hasNext()) {
String ipt = scanner.next();
if (StringUtils.isNotEmpty(ipt)) {
return ipt;
}
}
throw new MybatisPlusException("请输入正确的" + tip + "!");
}
public static void main(String[] args) {
// 代码生成器
AutoGenerator mpg = new AutoGenerator();
// 全局配置
GlobalConfig gc = new GlobalConfig();
String projectPath = System.getProperty("user.dir");
gc.setOutputDir(projectPath + "/src/main/java");
gc.setAuthor("Lucas");
gc.setOpen(false);
// gc.setSwagger2(true); 实体属性 Swagger2 注解
mpg.setGlobalConfig(gc);
// 数据源配置
DataSourceConfig dsc = new DataSourceConfig();
//①数据源
dsc.setUrl("jdbc:mysql://localhost:3306/woniu_edu?useUnicode=true&useSSL=false&characterEncoding=utf8");
// dsc.setSchemaName("public");
dsc.setDriverName("com.mysql.jdbc.Driver");
dsc.setUsername("root");
dsc.setPassword("root123");
mpg.setDataSource(dsc);
// 包配置
PackageConfig pc = new PackageConfig();
//② 包,留意parent设置为上一级,moduleName最后一级
pc.setParent("com.woniuxy.boot");
pc.setModuleName("mbpdemo45");
pc.setController("controller");
pc.setService("service");
pc.setServiceImpl("service.impl");
pc.setMapper("dao");
pc.setXml("mappers");
pc.setEntity("model");
mpg.setPackageInfo(pc);
// 自定义配置
InjectionConfig cfg = new InjectionConfig() {
@Override
public void initMap() {
// to do nothing
}
};
// 如果模板引擎是 freemarker
// String templatePath = “/templates/mapper.xml.ftl”;
// 如果模板引擎是 velocity
String templatePath = “/templates/mapper.xml.vm”;
// 自定义输出配置
List<FileOutConfig> focList = new ArrayList<>();
// 自定义配置会被优先输出
focList.add(new FileOutConfig(templatePath) {
@Override
public String outputFile(TableInfo tableInfo) {
// 自定义输出文件名 , 如果你 Entity 设置了前后缀、此处注意 xml 的名称会跟着发生变化!!
return projectPath + "/src/main/resources/mappers" +
"/" + tableInfo.getEntityName() + "Mapper" + StringPool.DOT_XML;
}
});
/*
cfg.setFileCreate(new IFileCreate() {
@Override
public boolean isCreate(ConfigBuilder configBuilder, FileType fileType, String filePath) {
// 判断自定义文件夹是否需要创建
checkDir("调用默认方法创建的目录");
return false;
}
});
*/
cfg.setFileOutConfigList(focList);
mpg.setCfg(cfg);
// 配置模板
TemplateConfig templateConfig = new TemplateConfig();
// 配置自定义输出模板
//指定自定义模板路径,注意不要带上.ftl/.vm, 会根据使用的模板引擎自动识别
// templateConfig.setEntity(“templates/entity2.java”);
// templateConfig.setService();
// templateConfig.setController();
templateConfig.setXml(null);
mpg.setTemplate(templateConfig);
// 策略配置
StrategyConfig strategy = new StrategyConfig();
strategy.setNaming(NamingStrategy.underline_to_camel);
strategy.setColumnNaming(NamingStrategy.underline_to_camel);
// strategy.setSuperEntityClass(“com.baomidou.ant.common.BaseEntity”);
strategy.setEntityLombokModel(true);
strategy.setRestControllerStyle(true);
// 公共父类
// strategy.setSuperControllerClass(“com.baomidou.ant.common.BaseController”);
// 写于父类中的公共字段
// strategy.setSuperEntityColumns(“id”);
strategy.setInclude(scanner(“表名,多个英文逗号分割”).split(“,”));
strategy.setControllerMappingHyphenStyle(true);
strategy.setTablePrefix(“”);
mpg.setStrategy(strategy);
mpg.setTemplateEngine(new VelocityTemplateEngine());
mpg.execute();
}
}
<a name="h9HK7"></a>
## 作业
1. 完成题目相关功能
- 新增题目
- 导入题目

<a name="q7wga"></a>
## 复习
<a name="ljbOs"></a>
### Thymeleaf
- 传统模式 模板引擎 自然模板
- MVC中V
- @Controller String => 视图名字 => templates
- 约定优于配置
- 语法
<a name="IfLV7"></a>
### JPA
- Spring-Data-JPA
- 配置
- 实体类 @Entity @Table @Id @Column
- extends JpaRepository<ENTITY,ID>
- 根据方法名自动生成sql语句
<a name="rNMvJ"></a>
### Mybatis-Plus
- 配置上多加 `-plus`
- Mapper集成BaseMapper<T>
- 代码生成器
<a name="mpX8Y"></a>
## 分页
造数据<br />insert into student(student_name,class_id)<br />select student_name,class_id+1 from student;
1. 添加配置
```java
package com.woniuxy.boot.bootdemo452.config;
import com.baomidou.mybatisplus.annotation.DbType;
import com.baomidou.mybatisplus.autoconfigure.ConfigurationCustomizer;
import com.baomidou.mybatisplus.extension.plugins.MybatisPlusInterceptor;
import com.baomidou.mybatisplus.extension.plugins.PaginationInterceptor;
import com.baomidou.mybatisplus.extension.plugins.inner.PaginationInnerInterceptor;
import com.baomidou.mybatisplus.extension.plugins.pagination.optimize.JsqlParserCountOptimize;
import org.springframework.context.annotation.Bean;
import org.springframework.context.annotation.Configuration;
@Configuration
public class AppConfig {
/**
* 新的分页插件,一缓和二缓遵循mybatis的规则,需要设置 MybatisConfiguration#useDeprecatedExecutor = false 避免缓存出现问题
*/
@Bean
public MybatisPlusInterceptor mybatisPlusInterceptor() {
MybatisPlusInterceptor interceptor = new MybatisPlusInterceptor();
interceptor.addInnerInterceptor(new PaginationInnerInterceptor(DbType.H2));
return interceptor;
}
@Bean
public ConfigurationCustomizer configurationCustomizer() {
return configuration -> configuration.setUseDeprecatedExecutor(false);
}
}
使用时,mapper的参数必须有Page,返回值必须是IPage
```java
@Select(“select * from student order by student_id desc”)
IPage find123(Page page);
//Controller
@GetMapping(“getStudent2”)
public Result findStudentByPage2(@RequestParam(defaultValue = “1”)int currPage,@RequestParam(defaultValue = “10”)int pageSize){
Page<Student> pageParm = new Page<>();
pageParm.setCurrent(currPage);
pageParm.setSize(pageSize);
IPage<Student> studentIPage = studentMapper.find123(pageParm);
return Result.success(studentIPage);
}
```html
<!DOCTYPE html>
<html lang="zh-CN">
<head>
<meta charset="utf-8">
<meta http-equiv="X-UA-Compatible" content="IE=edge">
<meta name="viewport" content="width=device-width, initial-scale=1">
<!-- 上述3个meta标签*必须*放在最前面,任何其他内容都*必须*跟随其后! -->
<title>Bootstrap 101 Template</title>
<!-- Bootstrap -->
<link href="https://cdn.jsdelivr.net/npm/bootstrap@3.3.7/dist/css/bootstrap.min.css" rel="stylesheet">
<!-- HTML5 shim 和 Respond.js 是为了让 IE8 支持 HTML5 元素和媒体查询(media queries)功能 -->
<!-- 警告:通过 file:// 协议(就是直接将 html 页面拖拽到浏览器中)访问页面时 Respond.js 不起作用 -->
<!--[if lt IE 9]>
<script src="https://cdn.jsdelivr.net/npm/html5shiv@3.7.3/dist/html5shiv.min.js"></script>
<script src="https://cdn.jsdelivr.net/npm/respond.js@1.4.2/dest/respond.min.js"></script>
<![endif]-->
</head>
<body>
<div class="container">
<form action="">
<input type="text" placeholder="姓名模糊查询" name="name">
</form>
<table class="table">
<tr>
<td>ID</td>
<td>姓名</td>
<td>班级ID</td>
<td>操作</td>
</tr>
<tbody class="data">
</tbody>
</table>
<nav aria-label="Page navigation">
<ul class="pagination">
<li>
<a href="#" class="pageBtn" id="prev" data-index="1" aria-label="Previous">
<span aria-hidden="true">«</span>
</a>
</li>
<li id="last_page_nav">
<a href="#" class="pageBtn" id="next" data-index="3" aria-label="Next">
<span aria-hidden="true">»</span>
</a>
</li>
</ul>
</nav>
</div>
<!-- Modal -->
<div class="modal fade" id="myModal" tabindex="-1" role="dialog" aria-labelledby="myModalLabel">
<div class="modal-dialog" role="document">
<div class="modal-content">
<div class="modal-header">
<button type="button" class="close" data-dismiss="modal" aria-label="Close"><span aria-hidden="true">×</span>
</button>
<h4 class="modal-title" id="myModalLabel">Modal title</h4>
</div>
<div class="modal-body">
<form>
<div class="form-group">
<label for="exampleInputEmail1">Email address</label>
<input type="email" class="form-control" id="exampleInputEmail1" placeholder="Email">
</div>
<div class="form-group">
<label for="exampleInputPassword1">Password</label>
<input type="password" class="form-control" id="exampleInputPassword1" placeholder="Password">
</div>
<div class="form-group">
<label for="exampleInputFile">File input</label>
<input type="file" id="exampleInputFile">
<p class="help-block">Example block-level help text here.</p>
</div>
<div class="checkbox">
<label>
<input type="checkbox"> Check me out
</label>
</div>
<button type="button" id="gen" class="btn btn-default">生成卷子</button>
</form>
</div>
<!-- </div>-->
<!-- <div class="modal-footer">-->
<!-- <button type="button" class="btn btn-default" data-dismiss="modal">Close</button>-->
<!-- <button type="button" class="btn btn-primary">Save changes</button>-->
<!-- </div>-->
</div>
</div>
</div>
<!-- jQuery (Bootstrap 的所有 JavaScript 插件都依赖 jQuery,所以必须放在前边) -->
<script src="https://cdn.jsdelivr.net/npm/jquery@1.12.4/dist/jquery.min.js"></script>
<!-- 加载 Bootstrap 的所有 JavaScript 插件。你也可以根据需要只加载单个插件。 -->
<script src="https://cdn.jsdelivr.net/npm/bootstrap@3.3.7/dist/js/bootstrap.min.js"></script>
<script>
$(function () {
//启动时执行加载数据方法
load(1);
//加载数据的方法
function load(currPage) {
$.ajax({
url: 'getStudent',
type: 'get',
dataType: 'json',
data: {currPage: currPage},
success: function (resp) {
//往tbody加入内容
if (resp.success) {
var stus = resp.data.content;
var str = "";
for (var i = 0; i < stus.length; i++) {
str += "<tr>";
str += "<td>" + stus[i].studentId + "</td>"
str += "<td>" + stus[i].studentName + "</td>"
str += "<td>" + stus[i].classId + "</td>"
str += "<td> <button class='btn btn-sm btn-warning delete' data-id='" + stus[i].studentId + "'>删除</button> </td>"
str += "</tr>"
}
$(".data").empty().append(str);
//分页导航条
let totalPage = resp.data.totalPage;
let navStr = '';
let curr = resp.data.currPage;
for (let i = 0; i < totalPage; i++) {
let index = i + 1;
let classname = curr == index ? ' class="active"' : '';
navStr += '<li' + classname + '><a href="#" data-index="' + index + '" class="pageBtn generated">' + index + '</a></li>'
}
$(".generated").remove();
$("#last_page_nav").before(navStr);
//当前页currPage 多少页totalPage
if(curr==1){
$("#prev").parent().attr("disabled","disabled");
}else{
$("#prev").parent().removeAttr("disabled");
$("#prev").attr("data-index",curr-1);
}
if(curr==totalPage){
$("#next").parent().attr("disabled","disabled");
}else{
$("#next").parent().removeAttr("disabled");
$("#next").attr("data-index",curr+1);
}
}
}
});
}
$("#gen").click(function () {
//ajax
alert("发送ajax");
$("#myModal").modal("hide");
});
//给分页按钮增加点击事件
$(".pagination").on('click', '.pageBtn', function () {
let page = $(this).attr("data-index");
load(page);
});
})
</script>
</body>
</html>
日志logging:
level:
com.woniuxy.boot.bootdemo452: info
org.springframework: debug
需求:
报错需要打印日志,为了定位错误
系统错误:数据库连接失败;磁盘已满;内存不足;…业务错误:余额不足;权限不足;
跟踪执行流程,粒度作为数据源
日志级别
trace 跟踪 随意打debug 调试 为了调试info 信息 跟踪执行流程 <-warn 警告 业务错误error 错误 系统错误
从上到下,级别越来越高设置日志的级别,决定打印那个级别以上的日志;一般系统上线调低,一段时间后运行稳定,可以考虑调高一些warn日志可以按照级别来分文件存储,info.log error.log
要求:进入方法必须打印日志,级别是info
private final Logger log = LoggerFactory.getLogger(StudentController.class);
log.info("执行查询学生操作,参数为{},{}",currPage,pageSize);
try {
Page<Student> pageParm = new Page<>();
pageParm.setCurrent(currPage);
pageParm.setSize(pageSize);
IPage<Student> studentIPage = studentMapper.find123(pageParm);
//适配
PageInfo<Student> page = new PageInfo<>();
page.setContent(studentIPage.getRecords());
page.setCurrPage((int) studentIPage.getCurrent());
page.setPageSize((int) studentIPage.getSize());
page.setTotalCount(studentIPage.getTotal());
page.setTotalPage((int) studentIPage.getPages());
return Result.success(page);
}catch (Exception e){
log.warn("执行查询报错",e);
return Result.fail(e.getMessage());
}
可以用@Slf4j代替 日志的声明
Swagger
加依赖
<dependency>
<groupId>io.springfox</groupId>
<artifactId>springfox-swagger2</artifactId>
<version>2.9.2</version>
</dependency>
<dependency>
<groupId>io.springfox</groupId>
<artifactId>springfox-swagger-ui</artifactId>
<version>2.9.2</version>
</dependency>
配置
```java
@EnableSwagger2
public class AppConfig {
@Bean
public Docket api() {
return new Docket(DocumentationType.SWAGGER_2)
.select()
.apis(RequestHandlerSelectors.any())
.paths(PathSelectors.any())
.build();
}
}
```java
@RestController
@Slf4j
@Api(tags = "学生相关接口", description = "提供学生相关的 Rest API")
public class StudentController {
@Autowired
private StudentMapper studentMapper;
@ApiOperation("根据学生的ID定位到学生")
@GetMapping("/student/{id}")
public Result findStudentById(@PathVariable("id") int id){
return Result.success(studentMapper.findById(id));
}
}
访问:http://localhost:8080/swagger-ui.html
https://developer.ibm.com/zh/articles/j-using-swagger-in-a-spring-boot-project/
安全框架Shiro
Authentication 认证 (Authc) : 确定你是合法的用户Authorization 授权 (Authz) : 判断是否有操作某个资源的权限Session Management 会话管理 Cryptography 加密 MD5 SHA256Web支持缓存
用户 -> 角色 -> 权限 ->资源
一个用户可以有多个角色,反之也成立一个角色可以有多个权限,反之也成立研发经理是一个角色,包含 创建代码库,提交代码,拉取代码 升职 的权限研发人员是一个角色,包含 提交代码,拉取的权限授权时以角色为单位进行授权,这种方式成为RBAC role based acess control 基于角色的访问控制
demoquickstart
依赖
<dependency>
<groupId>org.apache.shiro</groupId>
<artifactId>shiro-core</artifactId>
<version>1.4.1</version>
</dependency>
<dependency>
<groupId>org.slf4j</groupId>
<artifactId>jcl-over-slf4j</artifactId>
<version>1.5.6</version>
</dependency>
<dependency>
<groupId>commons-logging</groupId>
<artifactId>commons-logging</artifactId>
<version>1.0</version>
</dependency>
配置 shiro.ini
```
; 格式 角色=权限1,权限2
[roles]
devmanager=repo::create,code::commit
dev=code::commit
; 格式 用户=密码,角色
[users]
smile=wohenshuai,devmanager
sunny=wohenbang,dev
3. 编码
```java
package com.woniuxy.shiro;
import org.apache.shiro.SecurityUtils;
import org.apache.shiro.authc.AuthenticationException;
import org.apache.shiro.authc.AuthenticationToken;
import org.apache.shiro.authc.UsernamePasswordToken;
import org.apache.shiro.config.IniSecurityManagerFactory;
import org.apache.shiro.subject.Subject;
import org.apache.shiro.util.Factory;
import org.apache.shiro.mgt.SecurityManager1231231;
/**
* Hello world!
*
*/
public class App
{
public static void main( String[] args )
{
try {
//加载配置文件,创建Factory
Factory<SecurityManager> factory = new IniSecurityManagerFactory("classpath:shiro.ini");
//获取到安全管理器
SecurityManager securityManager = factory.getInstance();
//将安全管理器设置到SecurityUtils
SecurityUtils.setSecurityManager(securityManager);
//得到Subject
Subject subject = SecurityUtils.getSubject();
subject.login(new UsernamePasswordToken("smile", "wohenshuai"));
//判断是否有权限
System.out.println("repo::create => " +subject.isPermitted("repo::create"));
System.out.println("devmanager => " +subject.hasRole("devmanager"));
subject.login(new UsernamePasswordToken("sunny", "wohenbang"));
System.out.println("devmanager => " +subject.hasRole("devmanager"));
System.out.println("dev => " +subject.hasRole("dev"));
System.out.println("repo::create=>"+subject.isPermitted("repo::create"));
System.out.println("code::commit=>"+subject.isPermitted("code::commit"));
System.out.println("login success");
}catch (AuthenticationException e){
e.printStackTrace();
System.out.println("login fail");
}
}
}
https://www.layui.com/
<!DOCTYPE html>
<html>
<head>
<meta charset="utf-8">
<meta name="viewport" content="width=device-width, initial-scale=1, maximum-scale=1">
<title>开始使用layui</title>
<link rel="stylesheet" href="css/layui.css">
</head>
<body>
<div class="layui-container">
<ul class="layui-nav" lay-filter="">
<li class="layui-nav-item"><a href="">最新活动</a></li>
<li class="layui-nav-item layui-this"><a href="">产品</a></li>
<li class="layui-nav-item"><a href="">大数据</a></li>
<li class="layui-nav-item">
<a href="javascript:;">解决方案</a>
<dl class="layui-nav-child"> <!-- 二级菜单 -->
<dd><a href="">移动模块</a></dd>
<dd><a href="">后台模版</a></dd>
<dd><a href="">电商平台</a></dd>
</dl>
</li>
<li class="layui-nav-item"><a href="">社区</a></li>
</ul>
<!-- 你的HTML代码 -->
<form class="layui-form" action="">
<h2>录入</h2>
<div class="layui-form-item">
<label class="layui-form-label">输入框</label>
<div class="layui-input-block">
<input type="text" name="title" required lay-verify="required" placeholder="请输入标题" autocomplete="off"
class="layui-input">
</div>
</div>
<div class="layui-form-item">
<label class="layui-form-label">密码框</label>
<div class="layui-input-inline">
<input type="password" name="password" required lay-verify="required" placeholder="请输入密码"
autocomplete="off" class="layui-input">
</div>
<div class="layui-form-mid layui-word-aux">辅助文字</div>
</div>
<div class="layui-form-item">
<label class="layui-form-label">选择框</label>
<div class="layui-input-block">
<select name="city" lay-verify="required">
<option value=""></option>
<option value="0">北京</option>
<option value="1">上海</option>
<option value="2">广州</option>
<option value="3">深圳</option>
<option value="4">杭州</option>
</select>
</div>
</div>
<div class="layui-form-item">
<label class="layui-form-label">复选框</label>
<div class="layui-input-block">
<input type="checkbox" name="like[write]" title="写作">
<input type="checkbox" name="like[read]" title="阅读" checked>
<input type="checkbox" name="like[dai]" title="发呆">
</div>
</div>
<div class="layui-form-item">
<label class="layui-form-label">开关</label>
<div class="layui-input-block">
<input type="checkbox" name="switch" lay-skin="switch">
</div>
</div>
<div class="layui-form-item">
<label class="layui-form-label">单选框</label>
<div class="layui-input-block">
<input type="radio" name="sex" value="男" title="男">
<input type="radio" name="sex" value="女" title="女" checked>
</div>
</div>
<div class="layui-form-item layui-form-text">
<label class="layui-form-label">文本域</label>
<div class="layui-input-block">
<textarea name="desc" placeholder="请输入内容" class="layui-textarea"></textarea>
</div>
</div>
<div class="layui-form-item">
<div class="layui-input-block">
<button class="layui-btn" lay-submit lay-filter="formDemo">立即提交</button>
<button type="reset" class="layui-btn layui-btn-primary">重置</button>
</div>
</div>
</form>
<div id="test1"></div>
<table id="demo" lay-filter="test"></table>
</div>
<script src="layui.js"></script>
<script>
//一般直接写在一个js文件中
layui.use(['layer', 'form', 'element', 'laypage', 'table'], function () {
var layer = layui.layer
, form = layui.form;
var element = layui.element;
var laypage = layui.laypage;
//执行一个laypage实例
laypage.render({
elem: 'test1' //注意,这里的 test1 是 ID,不用加 # 号
, count: 50 //数据总数,从服务端得到
, limit: 10
, curr: 2
, jump: function (obj, first) {
console.log(obj);
console.log(first);
//发ajax data.curr
alert("发ajax");
//修改数据
}
});
//监听提交
form.on('submit(formDemo)', function (data) {
console.log(data);
layer.msg(JSON.stringify(data.field));
return false;
});
//
//
var table = layui.table;
//
//第一个实例
table.render({
elem: '#demo'
, height: 312
, url: '/getStudent' //数据接口
, page: true //开启分页
,request: {
pageName: 'currPage' //页码的参数名称,默认:page
,limitName: 'pageSize' //每页数据量的参数名,默认:limit
}
, parseData: function (res) {
console.log(res)
return {
"code": res.success?0:1, //解析接口状态
"msg":res.message,
"count": res.data.totalCount, //解析数据长度
"data": res.data.content //解析数据列表
}
}
, cols: [[ //表头
{field: 'studentId', title: 'ID', width: 80, sort: true, fixed: 'left'}
, {field: 'studentName', title: '学生姓名', width: 80}
, {field: 'classId', title: '班级ID', width: 80, sort: true}
]]
});
});
</script>
</body>
</html>
作业
成绩录入
根据班级或名字查询学生,需要分页录入成绩
(选做)支持批量导入成绩
文件内容:名字,学号,成绩
(选做)计算综合成绩(四次周考平均成绩0.5+阶段考成绩0.5)
Adblocker
2020年10月19日 Shiro 2
Spring-boot 集成
mybatismybatis-plus
分页
jpathymeleaf 模板引擎: 自然模板swagger API文档工具日志的用法 slf4j
trace debug info warn error@Slf4j
Profile
TODO 多模块项目
Shiro安全框架功能:认证、授权、会话管理、加密认证:authc 确定是不是合法用户授权:authz 是否有权限访问特定的资源
数据源用ini (用户、角色、权限)RBAC:Role based access control 基于角色的访问控制授权是基于角色,不是基于权限
Factory factory = new IniSecurityManagerFactory<>(“shiro.ini”);SecurityManager sm = factory.getInstance();
SecurityUtils.setSecurityManager(sm);
Subject subject = SecurityUtils.getSubject();
subject.login(new UsernamePasswordToken(username,password));subject.isPermitted(“权限值”);subject.hasRole(“角色”);
异常体系ShiroException
AuthorizationException 授权异常AuthenticationException 认证异常
AccountException 账户异常
UnknownAccountException 未知账户异常ExcessiveAttemptsException 错误次数过多异常ConcurrentAccessException 并发访问异常DisabledAccountException 账户封停异常
LockedAccountException 账户锁定异常
CredentialsException 凭证异常
IncorrectCredentialsException 错误的凭证异常ExpiredCredentialsException 凭证过期异常
UnsupportedTokenException 不支持的Token异常
Account=> 账户Credentials => 凭证 : 密码
基于数据库自定义RealmRealm
RBAC
建表加依赖
<!-- 持久化 -->
<dependency>
<groupId>org.springframework</groupId>
<artifactId>spring-jdbc</artifactId>
<version>5.2.8.RELEASE</version>
</dependency>
<dependency>
<groupId>mysql</groupId>
<artifactId>mysql-connector-java</artifactId>
<version>5.1.48</version>
</dependency>
<dependency>
<groupId>com.alibaba</groupId>
<artifactId>druid</artifactId>
<version>1.1.22</version>
</dependency>
配置ini ,指定一个realm
myRealm=com.woniuxy.shiro.custom.MyRealm
securityManager.realms=$myRealm
自定义realm
extends AuthorizingRealm 实现doGetAuthenticationInfojdbcTemplate的使用
```java
package com.woniuxy.shiro.custom;
import com.alibaba.druid.pool.DruidDataSource;
import org.apache.shiro.authc.*;
import org.apache.shiro.authz.AuthorizationInfo;
import org.apache.shiro.realm.AuthorizingRealm;
import org.apache.shiro.subject.PrincipalCollection;
import org.springframework.jdbc.core.BeanPropertyRowMapper;
import org.springframework.jdbc.core.JdbcTemplate;
import java.util.List;
public class MyRealm extends AuthorizingRealm {
private JdbcTemplate jdbcTemplate;
{
jdbcTemplate = new JdbcTemplate();
DruidDataSource dataSource = new DruidDataSource();
dataSource.setUsername("root");
dataSource.setPassword("root123");
dataSource.setUrl("jdbc:mysql://localhost:3306/woniu_edu");
dataSource.setDriverClassName("com.mysql.jdbc.Driver");
jdbcTemplate.setDataSource(dataSource);
}
/**
* 得到授权信息
* @param principals
* @return
*/
@Override
protected AuthorizationInfo doGetAuthorizationInfo(PrincipalCollection principals) {
return null;
}
/**
* 得到认证信息
* @param token
* @return
* @throws AuthenticationException
*/
@Override
protected AuthenticationInfo doGetAuthenticationInfo(AuthenticationToken token) throws AuthenticationException {
//获取用户名
UsernamePasswordToken usernamePasswordToken = (UsernamePasswordToken) token;
String username = usernamePasswordToken.getUsername();
//从数据库中查询用户
List<User> users = jdbcTemplate.query("select * from user where username=?"//sql
,new Object[]{username}//参数
, new BeanPropertyRowMapper<User>(User.class));//自动数据库与对象映射
System.out.println(users);
if(users==null && users.size()==0){
throw new UnknownAccountException();
}else if(users!=null&&users.size()==1){
User user = users.get(0);
/*
* principal 主体(用户)
* credentials 凭证(密码)
* realmName 域名字
*/
return new SimpleAuthenticationInfo(user,user.getPassword(),getName());
}else{
throw new AuthenticationException("数据查询出现未知异常");
}
}
}
5. 测试代码
```java
package com.woniuxy.shiro.custom;
import org.apache.shiro.SecurityUtils;
import org.apache.shiro.ShiroException;
import org.apache.shiro.authc.AuthenticationException;
import org.apache.shiro.authc.UsernamePasswordToken;
import org.apache.shiro.authz.AuthorizationException;
import org.apache.shiro.config.IniSecurityManagerFactory;
import org.apache.shiro.mgt.SecurityManager;
import org.apache.shiro.subject.Subject;
import org.apache.shiro.util.Factory;
public class App {
public static void main(String[] args) {
try {
//加载配置文件,创建Factory
Factory<SecurityManager> factory = new IniSecurityManagerFactory("classpath:shiro-my.ini");
//获取到安全管理器
SecurityManager securityManager = factory.getInstance();
//将安全管理器设置到SecurityUtils
SecurityUtils.setSecurityManager(securityManager);
//得到Subject
Subject currUser = SecurityUtils.getSubject();
currUser.login(new UsernamePasswordToken("smile", "wohenshuai"));
} catch (
AuthenticationException e) {
e.printStackTrace();
System.out.println("login fail");
} catch (
AuthorizationException e) {
e.printStackTrace();
System.out.println("授权异常");
} catch (
ShiroException e) {
e.printStackTrace();
} catch (
Exception e) {
e.printStackTrace();
}
}
}
作业
补充自定义realm授权部分
```java
@Override
protected AuthorizationInfo doGetAuthorizationInfo(PrincipalCollection principals) { Object primaryPrincipal = principals.getPrimaryPrincipal();
SimpleAuthorizationInfo simpleAuthorizationInfo = new SimpleAuthorizationInfo();
// simpleAuthorizationInfo.setRoles();
Set permSet = new HashSet<>();
simpleAuthorizationInfo.setStringPermissions(permSet);
return simpleAuthorizationInfo;
}
- [Spring-boot 集成](#M6ArP)
- [Shiro](#CThpC)
- [异常体系](#vDes8)
- [基于数据库自定义Realm](#OMYZX)
- [作业](#g2RMu)
<a name="MlaT6"></a>
## 复习
- 异常体系
- ShiroException
- AuthenticationException 认证异常
- AccountException 账户异常
- UnknownAccountException
- Disabled
- ExcessiveAttempts
- ConcurrentAccess
- CredentialsException凭证异常
- IncorrectCredentials
- Exprired
- Shiro调用过程(菠萝)
程序代码 ---> Subject <br /> ↓<br /> SecurityManager<br />↓<br /> Realm(提供数据)<br />↓<br /> DB<br />
- 自定义Realm
- 继承AuthorizingRealm
- doGetAuthenticationInfo 获取认证信息
- 入参 AuthenticationToken
- 返回 AuthenticationInfo <= SimpleAuthenticationInfo(User,password,realmName )
- 通过用户名查找出用户,然后返回用户及用户密码
- doGetAuthorizationInfo 获取授权信息
Cridentials 凭证<br />Principal 主体
<a name="xUIVE"></a>
## 集成到Spring-boot
web集成<br />资源
- 不需要登录即可访问 匿名访问
- 需要登录才能访问 需要认证
- 需要特定的权限才能访问 得到授权
等价将网络资源转换为网络地址来理解<br />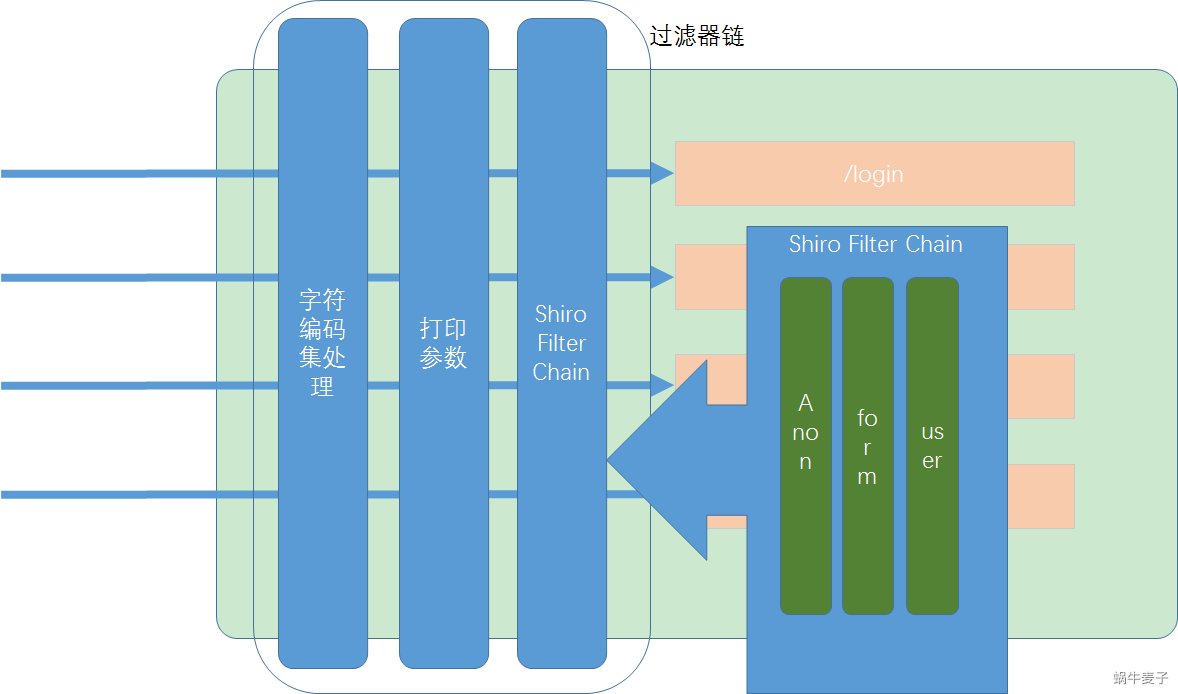<br />集成要做的事情
1. 过滤器,检查是否登录,没有登录则跳转到登录页面
1. 从登录页发起登录操作 subject.login
1. 编写Realm mybatis访问数据库
1. 过滤器,校验是否得到授权
1. 缓存、密码加密...
步骤
1. 依赖 web mybatis mysql
```xml
<dependency>
<groupId>org.apache.shiro</groupId>
<artifactId>shiro-spring-boot-web-starter</artifactId>
<version>1.4.1</version>
</dependency>
配置yml 数据源 mybatis
shiro.loginUrl=”/login.html”
配置Shiro的配置类
```java
package com.woniuxy.shiro.shiroboot45.config;
import com.woniuxy.shiro.shiroboot45.component.ShiroRealm;
import org.apache.shiro.realm.Realm;
import org.apache.shiro.spring.web.config.DefaultShiroFilterChainDefinition;
import org.apache.shiro.spring.web.config.ShiroFilterChainDefinition;
import org.springframework.context.annotation.Bean;
import org.springframework.context.annotation.Configuration;
@Configuration
public class ShiroConfig {
/**
* 自定义Realm 提供数据源
* @return
*/
@Bean
public Realm shiroRealm(){
return new ShiroRealm();
}
/**
* shiro的过滤器链
* @return
*/
@Bean
public ShiroFilterChainDefinition shiroFilterChainDefinition(){
DefaultShiroFilterChainDefinition sfcd = new DefaultShiroFilterChainDefinition();
//放行 使用
sfcd.addPathDefinition("/","anon");
sfcd.addPathDefinition("/login","anon");
sfcd.addPathDefinition("/css/**","anon");
sfcd.addPathDefinition("/js/**","anon");
sfcd.addPathDefinition("/images/**","anon");
sfcd.addPathDefinition("/fonts/**","anon");
sfcd.addPathDefinition("/html/**","anon");
//logout 登出
sfcd.addPathDefinition("/logout","logout");
//其他则需要认证
sfcd.addPathDefinition("/**","user");
return sfcd;
}
}
4. 登录页提交登录请求
4. controller处理
```java
package com.woniuxy.shiro.shiroboot45.controller;
import com.woniuxy.shiro.shiroboot45.common.Result;
import com.woniuxy.shiro.shiroboot45.controller.form.LoginForm;
import lombok.extern.slf4j.Slf4j;
import org.apache.shiro.SecurityUtils;
import org.apache.shiro.authc.AuthenticationException;
import org.apache.shiro.authc.UsernamePasswordToken;
import org.apache.shiro.subject.Subject;
import org.springframework.web.bind.annotation.PostMapping;
import org.springframework.web.bind.annotation.RestController;
import java.sql.ResultSet;
@RestController
@Slf4j
public class LoginController {
@PostMapping("login")
public Result login(LoginForm form){
log.info("登录:{}",form);
try {
Subject subject = SecurityUtils.getSubject();
subject.login(new UsernamePasswordToken(form.getUsername(),form.getPassword()));
}catch (AuthenticationException e){
log.info("登录失败",e);
return Result.fail("登录失败,用户名或者密码不正确");
}
return Result.success();
}
}
shiroRealm 直接注入mapper提供数据
```java
@Slf4j
public class ShiroRealm extends AuthorizingRealm {
@Autowired
private AuthMapper authMapper;
...
}
过滤器
| 配置缩写 | 对应的过滤器 | 功能 |
| --- | --- | --- |
| *anon | AnonymousFilter | 指定url可以匿名访问 |
| authc | FormAuthenticationFilter | 指定url需要form表单登录,默认会从请求中获取`username`<br />、`password`<br />,`rememberMe`<br />等参数并尝试登录,如果登录不了就会跳转到loginUrl配置的路径。我们也可以用这个过滤器做默认的登录逻辑,但是一般都是我们自己在控制器写登录逻辑的,自己写的话出错返回的信息都可以定制嘛。 |
| authcBasic | BasicHttpAuthenticationFilter | 指定url需要basic登录 |
| *logout | LogoutFilter | 登出过滤器,配置指定url就可以实现退出功能,非常方便 |
| noSessionCreation | NoSessionCreationFilter | 禁止创建会话 |
| perms | PermissionsAuthorizationFilter | 需要指定权限才能访问 |
| port | PortFilter | 需要指定端口才能访问 |
| rest | HttpMethodPermissionFilter | 将http请求方法转化成相应的动词来构造一个权限字符串,这个感觉意义不大,有兴趣自己看源码的注释 |
| roles | RolesAuthorizationFilter | 需要指定角色才能访问 |
| ssl | SslFilter | 需要https请求才能访问 |
| *user | UserFilter | 需要已登录或“记住我”的用户才能访问 |
<a name="Gob3R"></a>
## 使用密码加密
1. 配置CredentialsMatcher
```java
@Bean
public CredentialsMatcher hashedCredentialsMatcher(){
HashedCredentialsMatcher matcher = new HashedCredentialsMatcher(EncryptUtil.ALGORITHM_NAME);
matcher.setHashIterations(EncryptUtil.HASH_ITERATIONS);
return matcher;
}
/**
* 自定义Realm 提供数据源
* @return
*/
@Bean
public Realm shiroRealm(){
ShiroRealm shiroRealm = new ShiroRealm();
* shiroRealm.setCredentialsMatcher(hashedCredentialsMatcher());
return shiroRealm;
}
修改下ShiroRealm,返回的密码加上toCharArray
缓存的使用配置CacheManager并设置到Realm中
@Bean
public Realm shiroRealm(){
ShiroRealm shiroRealm = new ShiroRealm();
shiroRealm.setCredentialsMatcher(hashedCredentialsMatcher());
shiroRealm.setCacheManager(cacheManager());
//认证缓存默认关闭,打开授权缓存
shiroRealm.setAuthenticationCachingEnabled(true);
//授权缓存默认开启
return shiroRealm;
}
@Bean
public MemoryConstrainedCacheManager cacheManager(){
return new MemoryConstrainedCacheManager();
}
授权通过注解 // @RequiresPermissions(“destroy”) @RequiresRoles(“president”) 加在方法上用于指定有指定权限或者角色的用户才能访问该方法
使用全局异常处理器来处理认证失败的异常
package com.woniuxy.shiro.shiroboot45.controller;
import com.woniuxy.shiro.shiroboot45.common.Result;
import org.apache.shiro.authz.AuthorizationException;
import org.springframework.context.annotation.ComponentScan;
import org.springframework.stereotype.Controller;
import org.springframework.web.bind.annotation.ControllerAdvice;
import org.springframework.web.bind.annotation.ExceptionHandler;
import org.springframework.web.bind.annotation.ResponseBody;
@ControllerAdvice
public class GlobalExceptionHandler {
@ExceptionHandler(AuthorizationException.class)
@ResponseBody
public Result handleAuthzException(AuthorizationException e){
return Result.fail("您无权访问该路径");
}
}
路径上有AOP时注解失效,加上如下配置
@Bean
public static DefaultAdvisorAutoProxyCreator getDefaultAdvisorAutoProxyCreator(){
DefaultAdvisorAutoProxyCreator defaultAdvisorAutoProxyCreator=new DefaultAdvisorAutoProxyCreator();
/**
* setUsePrefix(false)用于解决一个奇怪的bug。在引入spring aop的情况下。
* 在@Controller注解的类的方法中加入@RequiresRole等shiro注解,会导致该方法无法映射请求,导致返回404。
* 加入这项配置能解决这个bug
*/
defaultAdvisorAutoProxyCreator.setUsePrefix(true);
return defaultAdvisorAutoProxyCreator;
}
作业
完成一个注册功能,尽量完善*完成一个登录功能,尽量完善
Adblocker
2020年10月21日 Linux注册:
校验手机号的格式图形验证码校验手机号是否存在短信验证码填写用户信息登录
登录
扫码密码开放登录 https://www.cnblogs.com/cwsheng/p/13511864.html
复习
Shiro集成到Spring-Boot
过滤器 => Shiro过滤器链 org.apache.shiro.web.filter.mgt.DefaultFilter
配置
shiro.loginUrlShiroConfig
RealmShiroFilterChainCacheManagerHashedCredentialsMatcher
LoginController
SecurityUtils.getSubject().login()
授权 用 注解 @RequiresRoles @RequiresPermissionsGlobalExceptionHandler AuthorizationException
部署学习Linux的几个目的
掌握软件生命周期,其中包含部署掌握部署软件的基本能力掌握linux的常用命令,可以查看日志
Window Linux MacOS UnixLinux 是操作系统内核,一类操作系统的简称Linux内核+软件=> 发行版Linux主要用于服务器领域(centos\redhat\UbuntuServer),在桌面操作系统(Ubuntu)和移动操作系统(Android)也有涉及开源、免费、可定制主要的发行版:
服务器:centos \ redhat \ ubuntu-server \ debian桌面:Ubuntu \ Deepin(深度) \ ElementryOS \ 红旗Linux 教育:SUSE安全: Kali
主要学习 Centos
安装
虚拟机 vmware workstation在虚拟机上装centos
自定义硬件> 网络 改成桥接模式,勾选启动时连接安装位置,点入,确定修改网络
安装参考 : https://blog.csdn.net/qq_44714603/article/details/88829423
问题解决: Intel VT-x 处于禁用状态 =>https://jingyan.baidu.com/article/fc07f98976710e12ffe519de.html
装xshell(windows),远程访问centos虚拟机
ls 查看当前目录下的文件cd 切换目录/ 根目录~ home目录- 切换上一次目录pwd 当前目录
查看网络状态ping baidu.comsystemctl status network
修改网络配置
修改配置文件 /etc/sysconfig/network-scripts/ifcfg-ens33nmtui => networkmanager tui
常用目录/ 根目录~ home目录 root用户的home目录为 /root 其他用户的目录在/home/{用户名} 下. 当前目录.. 上一级目录bin sbin 命令,可执行文件etc 配置文件所在的目录
命令实例
作用
重要性
~
表示用户的home目录
高
/
表示根目录,是绝对路径
高
./
表示当前目录,是相对路径
高
../
表示上一级目录,是相对路径
高
/root
root用户的主目录
高
/home/username
存放普通用户的个人配置文件
低
/bin
包含基本命令,如ls ,cp, mkdir等这个目录中的文件都是可执行的
中
/boot
LinuxI系统的内核及其引导系统程序所需要的文件
低
/dev
设备文件存储目录,应用程序通过对这些文件的读写和控制就可以访问实际的设备
低
/etc
系统配置文件的所在地,一些服务器的配置文件也在这里,如账户的账号及密码等配置文件
高
/sbin
放可执行文件,大多是设计系统管理的命令,是超级用户root的可执行命令存放地。普通用户没有权限执行这个目录下的命令
中
/lib
存放系统动态链接共享库
低
/opt
opt是可选的意思,有些软件包会被安装在这里,用户自己编译的软件包也可以安装在这个目录
高
/mnt
可临时将别的外部设备挂接在此目录下
低
/proc
存在系统内存中的信息
低
/usr
是系统存放程序的目录,比如命令、帮助文件等,它包含很多的文件和目录,Linux发行版提供的软件包大多数被安装在这里
低
/tmp
存放临时文件的目录
低
ls不加任何参数,列出当前文件夹下的文件,加路径的则列出指定路径的内容-a 显示所有-l 长列表,展示更多信息
文件操作创建文件 touch touch abc.txt查看文件 cat cat abc.txt移动文件/ 重命名文件 mv 原始文件路径 目标文件路径
mv ./HelloWorld.java /tmp/
mv /tmp/HelloWorld.java .
删除文件 rm -f 强制删除,不会询问-r 删除目录创建文件夹 mkdir -p 创建父级目录复制文件、文件夹 cp-r 拷贝目录
查看命令造数据
# 安装tree命令
yum -y install tree
# 将根目录下的文件全输出到longlong.txt
tree / >> longlong.txt
head 查看文件头部tail 查看文件的尾部-f follow 跟随 -n 后跟数字,表示看多少行
less 逐页查看q 退出j 向下滚动k 向上滚动gg 到头shift+g 到位/ 向下搜索 下一个 n 上一个 shift+n? 向上搜索 下一个 nkh lj
grep 搜索命令 grep 关键字 文件名-An 往下输出n行-Bn 往上输出n行-Cn 上下同时输出n行—color 着色-v 反向选择,排除注意1)关键字可以使用正则2) 同时搜索多个文件
132 grep -v a abcd.txt
133 grep a$ abcd.txt
134 grep ^a abcd.txt
135 grep [ab] abcd.txt
136 grep [ad] abcd.txt
137 grep [0-9] longlong.txt
138 grep ^[0-9] longlong.txt
139 grep ^[0-9] longlong*
148 grep a longlong.txt abcd.txt
管道|将一个命令的输出作为另一个命令的输入进行处理
# 查看根目录下有多少个文件夹
ls -l / | grep a
# 查看有多少进程
ls /proc/ | wc -w
查看帮助 -h / --help wc —helpman man wc
关机shutdown haltpoweroff
作业
显示/proc/meminfo 文件中以大小s 开头的行显示/etc/passwd 文件中不以/bin/bash 结尾的行执行以下操作
在/tmp目录下创建hello.txt在/home下创建abc目录,在abc目录下创建yello.txt将hello.txt和yello.txt交换位置(可以多条命令)
复习部署安装常用目录ls文件操作查看命令管道作业Adblocker
2020年10月21日 Linux注册:
校验手机号的格式
图形验证码校验手机号是否存在短信验证码填写用户信息登录
登录
扫码密码开放登录 https://www.cnblogs.com/cwsheng/p/13511864.html
复习
Shiro集成到Spring-Boot
过滤器 => Shiro过滤器链 org.apache.shiro.web.filter.mgt.DefaultFilter
配置
shiro.loginUrlShiroConfig
RealmShiroFilterChainCacheManagerHashedCredentialsMatcher
LoginController
SecurityUtils.getSubject().login()
授权 用 注解 @RequiresRoles @RequiresPermissionsGlobalExceptionHandler AuthorizationException
部署学习Linux的几个目的
掌握软件生命周期,其中包含部署掌握部署软件的基本能力掌握linux的常用命令,可以查看日志
Window Linux MacOS UnixLinux 是操作系统内核,一类操作系统的简称Linux内核+软件=> 发行版Linux主要用于服务器领域(centos\redhat\UbuntuServer),在桌面操作系统(Ubuntu)和移动操作系统(Android)也有涉及开源、免费、可定制主要的发行版:
服务器:centos \ redhat \ ubuntu-server \ debian桌面:Ubuntu \ Deepin(深度) \ ElementryOS \ 红旗Linux 教育:SUSE安全: Kali
主要学习 Centos
安装
虚拟机 vmware workstation在虚拟机上装centos
自定义硬件> 网络 改成桥接模式,勾选启动时连接安装位置,点入,确定修改网络
安装参考 : https://blog.csdn.net/qq_44714603/article/details/88829423
问题解决: Intel VT-x 处于禁用状态 =>https://jingyan.baidu.com/article/fc07f98976710e12ffe519de.html
装xshell(windows),远程访问centos虚拟机
ls 查看当前目录下的文件cd 切换目录/ 根目录~ home目录- 切换上一次目录pwd 当前目录
查看网络状态ping baidu.comsystemctl status network
修改网络配置
修改配置文件 /etc/sysconfig/network-scripts/ifcfg-ens33nmtui => networkmanager tui
常用目录/ 根目录~ home目录 root用户的home目录为 /root 其他用户的目录在/home/{用户名} 下. 当前目录.. 上一级目录bin sbin 命令,可执行文件etc 配置文件所在的目录
命令实例
作用
重要性
~
表示用户的home目录
高
/
表示根目录,是绝对路径
高
./
表示当前目录,是相对路径
高
../
表示上一级目录,是相对路径
高
/root
root用户的主目录
高
/home/username
存放普通用户的个人配置文件
低
/bin
包含基本命令,如ls ,cp, mkdir等这个目录中的文件都是可执行的
中
/boot
LinuxI系统的内核及其引导系统程序所需要的文件
低
/dev
设备文件存储目录,应用程序通过对这些文件的读写和控制就可以访问实际的设备
低
/etc
系统配置文件的所在地,一些服务器的配置文件也在这里,如账户的账号及密码等配置文件
高
/sbin
放可执行文件,大多是设计系统管理的命令,是超级用户root的可执行命令存放地。普通用户没有权限执行这个目录下的命令
中
/lib
存放系统动态链接共享库
低
/opt
opt是可选的意思,有些软件包会被安装在这里,用户自己编译的软件包也可以安装在这个目录
高
/mnt
可临时将别的外部设备挂接在此目录下
低
/proc
存在系统内存中的信息
低
/usr
是系统存放程序的目录,比如命令、帮助文件等,它包含很多的文件和目录,Linux发行版提供的软件包大多数被安装在这里
低
/tmp
存放临时文件的目录
低
ls不加任何参数,列出当前文件夹下的文件,加路径的则列出指定路径的内容-a 显示所有-l 长列表,展示更多信息
文件操作创建文件 touch touch abc.txt查看文件 cat cat abc.txt移动文件/ 重命名文件 mv 原始文件路径 目标文件路径
mv ./HelloWorld.java /tmp/
mv /tmp/HelloWorld.java .
删除文件 rm -f 强制删除,不会询问-r 删除目录创建文件夹 mkdir -p 创建父级目录复制文件、文件夹 cp-r 拷贝目录
查看命令造数据
# 安装tree命令
yum -y install tree
# 将根目录下的文件全输出到longlong.txt
tree / >> longlong.txt
head 查看文件头部tail 查看文件的尾部-f follow 跟随 -n 后跟数字,表示看多少行
less 逐页查看q 退出j 向下滚动k 向上滚动gg 到头shift+g 到位/ 向下搜索 下一个 n 上一个 shift+n? 向上搜索 下一个 nkh lj
grep 搜索命令 grep 关键字 文件名-An 往下输出n行-Bn 往上输出n行-Cn 上下同时输出n行—color 着色-v 反向选择,排除注意1)关键字可以使用正则2) 同时搜索多个文件
132 grep -v a abcd.txt
133 grep a$ abcd.txt
134 grep ^a abcd.txt
135 grep [ab] abcd.txt
136 grep [ad] abcd.txt
137 grep [0-9] longlong.txt
138 grep ^[0-9] longlong.txt
139 grep ^[0-9] longlong*
148 grep a longlong.txt abcd.txt
管道|将一个命令的输出作为另一个命令的输入进行处理
# 查看根目录下有多少个文件夹
ls -l / | grep a
# 查看有多少进程
ls /proc/ | wc -w
查看帮助 -h / --help wc —helpman man wc
关机shutdown haltpoweroff
作业
显示/proc/meminfo 文件中以大小s 开头的行显示/etc/passwd 文件中不以/bin/bash 结尾的行执行以下操作
在/tmp目录下创建hello.txt在/home下创建abc目录,在abc目录下创建yello.txt将hello.txt和yello.txt交换位置(可以多条命令)
复习部署安装常用目录ls文件操作查看命令管道作业
复习lscdcat / less / tail / headgreptouch mkdir / rm -rf / cp / mv|wcmantree关机:shutdown halt poweroff重启: shutdown -r / reboot
常用目录:etc : 配置文件所在目录bin sbin : 命令 二进制文件proc : 进程信息tmp home: 用户的主目录rootopt : 装软件usr :var : /log/日志devmntmedia
VI完整地文本编辑器。完全用键盘来操作
模式特点:有模式正常模式 Normal : 操作编辑模式 editing : 文本输入修改可视化模式 visual : 选择….
模式切换正常 -> 编辑 : ia 字符之后编辑A 移动行尾编辑s 删除光标所在的字符并进入编辑模式S 删除整行并进入编辑o 在下方新增一行并进入编辑O 在上方新增一行并进入编辑r 不进入编辑模式,修改某个字符编辑-> 正常 : esc正常->可视化模式 : v
编辑操作u 撤销ctrl+r 重做y{操作单元}
yy 复制一行 y2y 复制两行 yny 复制n行 ,n表示数字yw 复制单词 ynw y0 复制到行首y$ 复制到行尾
p 粘贴x 剪切d{操作单元}
dd 删除1行dw 删除1个单词
进入退出vi 已有文件 => 编辑该文件vi 不存在的文件=> 创建并编辑该文件进入默认在正常模式在正常模式下
没有修改时 输入 :q
修改了
:wq :x 保存退出:q! 放弃保存并退出
导航 k<br />h l<br /> j<br />gg 到头<br />G 到位<br />0 行首 $行尾<br />:行号 跳转到行数所在的行
配置:set nu 显示行号
windows下使用 gvim
关键的配置文件Shell 与内核(kernel)通信操作linux必须通过shell,使用最广泛地是bash (ksh\csh\zsh\fish)
配置命令的别名:~/.bashrc => bash启动时会加载的配置文件alias 给命令起别名vi ~/.bashrcsource ~/.bashrc
配置环境变量: /etc/profile
# 修改环境变量
vi /etc/profile
# profile内容添加以下
export handsome_boy=pbx
# 使之生效
source /etc/profile
#输出环境变量
echo $handsome_boy
findfind 路径 -name 名字 * ? 注意””-mtime 修改时间 24小时为单位,0表示24小时以内,1表示24-48小时-type 文件类型type:
File is of type c:
b block (buffered) special
c character (unbuffered) special
d directory 文件夹
p named pipe (FIFO)
f regular file 普通文件
l symbolic link; this is never true if the -L option or the -follow option is in effect,
unless the symbolic link is broken. If you want to search for symbolic links when -L
is in effect, use -xtype. 链接
s socket
D door (Solaris)
-exec 执行操作
# -exec 命令 {}占位符 \;结束
find . -name '*.java' -type f -exec grep --color class {} \;
find . -name '*.java' -type d -exec rm -rf {} \;
tar压缩解压缩选项-c 创建压缩包-x 解压-f 操作的文件,后跟文件名-t 查看压缩包内容-v 查看执行过程-z 以gzip再次压缩-C 指定解压文件到的目录
压缩 tar -cvf abc.tar 文件路径查看 tar -tf abc.tar 解压 tar -xvf abc.tar
tar -C /tmp/code -xzvf code.tar.gz
tar -czvf code.tar.gz longlong.txt longlong2.txt result.txt
tar -tf short.tar
xargs将前一个命令的结果作为后一个命令的参数(操作的对象)传递
跟管道的区别:
管道是将前一个的输出作为后一个输入,内容是文本,进行处理xargs 将前一的输出作为后一个参数来处理
```bash
ls | xargs tar -cvf all.tar
find . -name ‘*.java’ -type f | xargs tar -czvf java.tar.gz
find -name ‘*.java’ -type f -exec tar -czvf java2.tar.gz {} \;
ps kill
ps aux 查看所有进程<br />kill 进程号 停止进程<br />kill -9 进程号 强杀
<a name="RsmQr"></a>
## top 查看性能
<a name="Aetrg"></a>
## systemctl 系统控制
systemctl {子命令} 服务名(network\sshd)<br />status 查看状态<br />start 启动<br />stop 停止<br />restart 重启<br />reload 重新加载<br />enable 开机启动,将某个服务设置为开机启动<br />disable 取消开机启动
<a name="PEkyI"></a>
## firewalld firewall-cmd 防火墙
开关:systemctl start | stop firewalld
开放网络端口:<br />1)开放3306端口<br />firewall-cmd --zone=public --add-port=3306/tcp --permanent<br />2)重载配置,加载所有持久化过后的配置<br />firewall-cmd --reload<br />取消开放22端口<br />firewall-cmd --zone=public --remove-port=22/tcp --permanent<br />查看所有端口<br />firewall-cmd --list-all
<a name="xzjVG"></a>
## 装软件
- make 安装 从源码编译安装
- rpm 安装包格式,命令;无法解决依赖
```bash
1.安装一个包
rpm -ivh
2.升级一个包
rpm -Uvh
3.移走一个包
rpm -e
4.安装参数
--force 即使覆盖属于其它包的文件也强迫安装
--nodeps 如果该RPM包的安装依赖其它包,即使其它包没装,也强迫安装。
5.查询一个包是否被安装
rpm -q < rpm package name>
6.得到被安装的包的信息
rpm -qi < rpm package name>
7.列出该包中有哪些文件
rpm -ql < rpm package name>
8.列出服务器上的一个文件属于哪一个RPM包
rpm -qf
9.可综合好几个参数一起用
rpm -qil < rpm package name>
10.列出所有被安装的rpm package
rpm -qa
11.列出一个未被安装进系统的RPM包文件中包含有哪些文件?
rpm -qilp < rpm package name>
yum yellow dog updater modified 安装
有仓库的概念,软件包是标准化自动解决依赖及配置问题-y 默认yes
yum-y install 软件名yum update 更新全部软件yum upgrade 升级某个软件yum info 显示某个软件包的安装信息yum list 列出所有安装的软件yum remove 删除软件
添加额外的仓库,扩展仓库yum install epel-release
绿色安装,解压docker安装
安装JDK
上传
yum -y install lrzszrz 上传
解压配置环境变量 /etc/profile
```bash
export JAVA_HOME=/opt/jdk1.8.0_261/
export PATH=$PATH:$JAVA_HOME/bin
source /etc/profile<br />java -version<br />javac -version
编写一个java文件,javac java运行
<a name="DW9Qo"></a>
## 作业:
1. 为了安全考虑,在你的服务器上限制使用rm,每当使用时,输出“啊哦,rm不能用哦”
1. 执行以下操作
- 将/home目录下所有包含abc的目录(可能目录的目录的目录里还有abc目录) 目录都打包出来。要求:解压打包后的目录结构不能改变 。
- 将`~` 目录中3天内的文件打包成 day3.tar
3. 用两种方式删除系统内的所有.java后缀的文件
3. 在centos的/opt/tomcat目录下安装tomcat,安装步骤(上传、解压、运行)
3. 在centos的/opt/maven目录下安装maven,安装步骤(上传、解压、配置环境变量)
- M2_HOME
- bin
Adblocker
<a name="85phe"></a>
# 2020年10月23日 Linux3
<a name="fZBX0"></a>
## 安装tomcat
1. 上传 rz
1. 解压 tar -C /opt -zxf apache-tomcat-8.5.31.tar.gz
1. 测试本机是否能够访问
curl localhost:8080
4. 开放端口
firewall-cmd --zone=public --add-port=8080/tcp --permanent<br />firewall-cmd --reload
5. 操作
1. 启动 {tomcat_home}/bin/startup.sh
1. 关机: shutdown.sh
1. 查看日志 tail -f {tomcat_home}/logs/catalina.out
<a name="swqPC"></a>
## 安装Maven
1. 上传 rz
1. 解压
1. 配置环境变量
1. 修改mirror
<a name="ko3LE"></a>
## 安装nginx
1. 在 /etc/yum.repos.d/目录下创建nginx.repo,写入以下内容
[nginx]
name=nginx repo
baseurl=http://nginx.org/packages/centos/$releasever/$basearch/
gpgcheck=0
enabled=1
2. yum install nginx
2. 启动 systemctl start nginx
2. 日志在 /var/log/nginx目录下
2. 打开80端口 firewall-cmd
默认网页的托管路径是 /usr/share/nginx/html
nginx配置文件 /etc/nginx/nginx.conf<br />include /etc/nginx/conf.d/*.conf;<br />修改/etc/nginx/conf.d/default.conf<br />修改配置过后,需要重新加载配置 nginx -s reload
nginx 403权限问题解决
1. 修改用户为启动用户 root /etc/nginx/nginx.conf
user root;
2. 禁用selinux
临时禁用: setenforce 0 启用则设为1<br />永久修改的话 /etc/sysconfig/selinux ,SELINUX=disabled 重启虚拟机reboot
<a name="5aCMa"></a>
### 反向代理
过滤请求<br />流量控制<br />隐藏内部结构<br />…<br />修改配置文件 /etc/nginx/conf.d/default.conf
```shell
location / {
proxy_pass http://localhost:8080;
proxy_set_header X-real-ip $remote_addr;
proxy_set_header Host $http_host;
}
重新加载配置 nginx -s reload
负载均衡
开发一个项目,新建index.jsp,内容为
<%@ page language="java" contentType="text/html; charset=UTF-8"
pageEncoding="UTF-8"%>
<!DOCTYPE html>
<html>
<head>
<meta charset="UTF-8">
<title>得到端口</title>
</head>
<body>
<h1>本地端口:<%=request.getLocalPort() %></h1>
</body>
</html>
导成war包,上传到tomcat的webapps目录下
复制tomcat,修改端口 localhost:8080/lb45/index.jsp
```xml
8005->8015
22
8080 -> 8081
69
8009 ->8019
116
4. 修改nginx的配置
```xml
# 配置集群
upstream woniu_cluster{
server 127.0.0.1:8080 weight=2;
server 127.0.0.1:8081 weight=1;
}
proxy_pass http://woniu_cluster;
nginx -s reload
安装mysql没有wget 请自行yum -y install wget
下载mysql的仓库配置的安装包
wget http://dev.mysql.com/get/mysql-community-release-el7-5.noarch.rpm其他版本的yum仓库:https://dev.mysql.com/downloads/repo/yum/ 下载相应的redhat版本即可
安装mysql的仓库配置
rpm -ivh mysql-community-release-el7-5.noarch.rpm
安装mysql
yum install mysql-community-server
启动mysql
systemctl start mysql
进入 mysql mysql -uroot
修改密码 set password for ‘root’@’localhost’ =password(‘root123’);
允许外网访问
开放端口 开放外网访问的用户权限,进入mysql
```sql
grant all privileges on . to root@’%’identified by ‘root123’;
flush privileges;
<a name="tt8w7"></a>
## 部署spring-boot项目
1. 买云服务器
1. 安装jdk
1. 安装mysql,开放外网访问
1. mysql导入表结构
1. 项目打包上传
1. 开放端口8080 或者安装nginx使用反向代理之后配置开放80端口
1. 运行
nohup java -jar shiroboot45-0.0.1-SNAPSHOT.jar >shiroboot.log &
- [安装tomcat](#fZBX0)
- [安装Maven](#swqPC)
- [安装nginx](#ko3LE)
- [反向代理](#5aCMa)
- [负载均衡](#YRYeU)
- [安装mysql](#msQQ9)
- [部署spring-boot项目](#tt8w7)
Shell 语言
环境
- 统一jdk版本
- mysql服务器
- maven私服
- 工具包 commons-lang guava hutool
<a name="4ZnEO"></a>
## Docker
> 轻量级虚拟机
把操作系统及软件打包发布
<a name="1ocRP"></a>
## docker vs 虚拟机
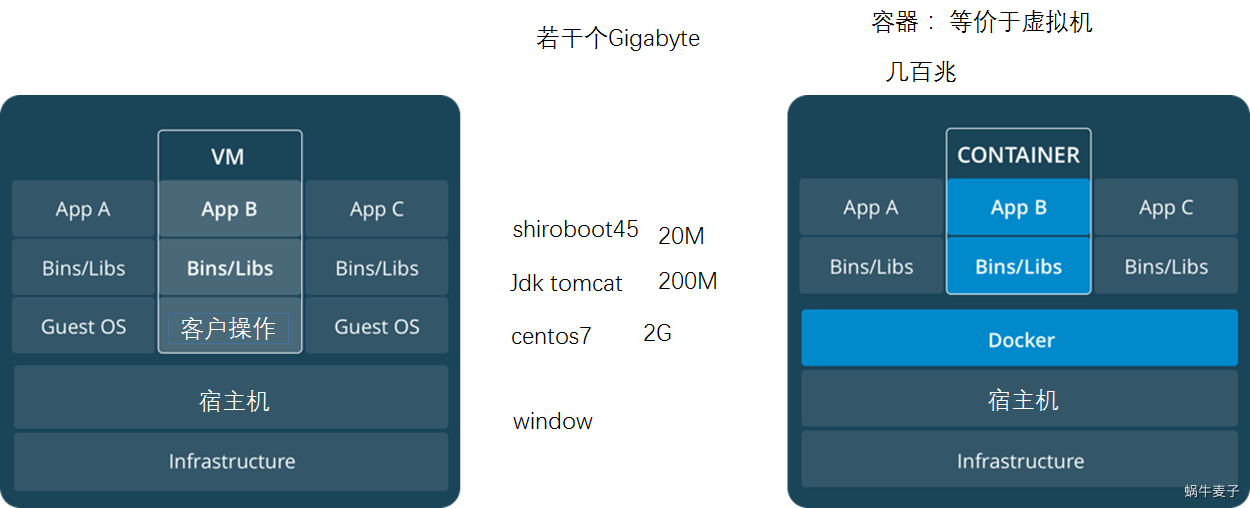<br />核心区别,<br />DOCKER复用了操作系统,Linux下的Docker和Window下的Docker是不能复用的<br />Docker在操作系统级别上实现了资源的隔离<br />新的软件安装方式,预装环境的方式
<a name="rcLOG"></a>
## 安装docker
<a name="33a793bb"></a>
#### 1)使用官方一键安装脚本
```bash
curl -fsSL https://get.docker.com | bash -s docker --mirror Aliyun
2)手动安装 sudo yum install -y yum-utils \
device-mapper-persistent-data \
lvm2
.修改docker的镜像源为国内请在 /etc/docker/daemon.json 中写入如下内容(如果文件不存在请新建该文件)
{
"registry-mirrors": [
"https://dockerhub.azk8s.cn",
"https://hub-mirror.c.163.com"
]
}
注意,一定要保证该文件符合 json 规范,否则 Docker 将不能启动。
systemctl start docker
使用如下命令查看是否设置成功
docker info | grep -A5 Mirror
Registry Mirrors:
https://dockerhub.azk8s.cn/
https://hub-mirror.c.163.com/
Live Restore Enabled: false
3.测试# 拉取docker镜像hello-world
docker pull hello-world
# 运行hello-world
docker run hello-world
Docker的基本概念
镜像 vs 容器类 与 实例ubuntu 操作系统运行了三个容器
从远程拉下来的是镜像容器是从镜像运行产生的
镜像
容器的模板名字tag 相当于版本,默认为latestpull 拉取 run 默认下载
镜像仓库: https://hub.docker.com/
搜索镜像,查看tag
基本命令docker {子命令} 动作docker image ls -a 列出所有的镜像docker container ls -a 列出所有的容器docker run 镜像名 运行某个容器docker container rm 容器ID 删除某个容器docker image rm 镜像ID 删除某个镜像
查看帮助:
docker --help 查看帮助
docker run --help 查看某个子命令的帮助
启动容器
docker run 镜像名 运行某个容器
-d 后台运行
-i 互动
-t 分配在一个终端
-p 端口映射 外部在前:内部在后 -p 8806:3306
-e 添加环境变量 MYSQL_ROOT_PASSWORD=root123
--name 指定容器的名称
-v 挂载数据 -v /tmp/data:/tmp/mydata data是宿主机的目录,mydata是容器的目录
进入容器docker exec -it 容器ID/容器名字 /bin/bash进入指定容器,并且给我分配一个/bin/bash的终端
docker container stop 6ddocker ps <=> docker container ls
-q 只输出id,方便删除
docker stop <=> docker container stopdocker rm <=> docker container rm
安装mysql# 运行一个mysql5.7的容器,后台运行, 设置端口映射将3307映射到容器的3306,设定环境变量,指定默认密码为root123
docker run --name goodmysql -itd -p 3307:3306 -e MYSQL_ROOT_PASSWORD=root123 mysql:5.7
#查看日志
docker logs goodmysql
#进入容器
docker exec -it {容器名} /bin/bash
# 以下命令在容器中执行
mysql -uroot -proot123
# 在mysql中执行
grant all privileges on *.* to root@'%'identified by 'root123';
flush privileges;
# 退出mysql
exit
#退出容器
exit
# 容器结束,进入centos
# 开放3307端口,让外部可以直接访问
firewall-cmd --zone=public --add-port=3307/tcp --permanent
firewall-cmd --reload
将外部目录挂载到docker容器中# 运行一个ubuntu容器,将/tmp/data目录挂载到该容器中
docker run -itd -v /tmp/data:/tmp/mydata ubuntu
延伸阅读docker file docker网络docker的volumedocker的编排: k8s Kubernetes
作业
安装tomcat,将lb45.war发布到容器中,要求在windows可以访问安装nginx
Adblocker
2020年10月27日 Vue1
复习看报错的方法
从下往上看,看最后一条异常的信息翻译,阅读,看懂报错信息联系联想到你的代码执行过程,定位到问题我错了!
Linux 部署项目+看日志
Vueangular -> React Facebook (JSX)-> Vue 尤雨溪
核心思想: MVVM model-view-viewmodel viewmodel 实现了数据的双向绑定官网网站:https://cn.vuejs.org/
Vue 是一个渐进式的JavaScript框架 : 适用于从小到个人项目大到企业级的规模化项目,完美支持。使用它作为前端的模板引擎,也可以用作单页面应用开发框架
开发工具: vscode , 安装插件:frontend-extension-pack、vuterhttps://cdn.jsdelivr.net/npm/vue/dist/vue.js
<!DOCTYPE html>
<html lang="en">
<head>
<meta charset="UTF-8">
<meta name="viewport" content="width=device-width, initial-scale=1.0">
<title>Vue1</title>
</head>
<body>
<div id="app">
<div>{{message}}</div>
</div>
<script src="./vue.js"></script>
<script>
var app = new Vue({
el:'#app',
data:{
message:'hello,vue!'
}
});
</script>
</body>
</html>
模板语法<!DOCTYPE html>
<html lang="en">
<head>
<meta charset="UTF-8">
<meta name="viewport" content="width=device-width, initial-scale=1.0">
<title>Vue1</title>
<style>
body {
background-color: blueviolet;
color:white;
}
</style>
</head>
<body>
<div id="app">
<div v-bind:title="titleDescription">{{message}}</div>
<!-- <img v-bind:src="logoPath" alt=""> -->
<img :src="logoPath" alt="">
<div>
<ul>
<li v-for='d in menu'>
{{d.dish}} 当日售价为 {{d.price}}$
</li>
</ul>
<div v-if="showRedPacket">
您有500红包,待收取
</div>
<!-- <button v-on:click="surprise">点我有惊喜</button> -->
<button @mouseover="surprise">点我有惊喜</button>
</div>
</div>
<script src="./vue.js"></script>
<script>
var app = new Vue({
el:'#app',
data:{
message:'hello,vue!',
titleDescription:'优雅的标题',
logoPath:'http://woniuxy.com/page/img/logo-500px.png',
menu:[{dish:'红烧狮子头',price:20.00},{dish:'盘龙茄子',price:25.00}],
showRedPacket: false
},
methods:{
surprise:function(){
this.showRedPacket=true;
}
}
});
</script>
</body>
</html>
FAQ:
无法正常渲染? 1)检查语法 2)是否在div#app范围内,所有代码都要写在#app范围内
小练习
跨域的报错:Access to XMLHttpRequest at ‘http://localhost:8080/login‘ from origin ‘http://localhost:52330‘ has been blocked by CORS policy: No ‘Access-Control-Allow-Origin’ header is present on the requested resource.
Form数据绑定v-model 将数据绑定到form的控件
<script src='jquery.min.js'></script>
<script>
var vm = new Vue({
el:'#app',
data:{
form:{
username:'',
password:''
}
},
methods:{
doLogin:function(){
console.log(this.form);
var _this = this;
$.ajax({
url:'http://localhost:8080/login',
type:'post',
dataType:'json',
data:_this.form,
success:function(resp){
console.log(resp)
alert(resp.success);
}
})
}
}
});
</script>
解决跨域:controller加 @CrossOrigin(“*”)注解
课堂练习:实现注册(用户名、密码、手机号码)
v-model的本质v-model 在内部为不同的输入元素使用不同的 property 并抛出不同的事件:
text 和 textarea 元素使用 value property 和 input 事件;checkbox 和 radio 使用 checked property 和 change 事件;select 字段将 value 作为 prop 并将 change 作为事件。
Model —> View (绑定 value)View —> Model (input事件处理)
计算属性<!DOCTYPE html>
<html lang="en">
<head>
<meta charset="UTF-8">
<meta name="viewport" content="width=device-width, initial-scale=1.0">
<title>vue5</title>
</head>
<body>
<div id="app">
<input type="text" v-model='importantMsg'>
<div>{{whatYouGet}}</div>
<div>
<input style='width:3em' type="text" v-model='numA'>+<input style='width:3em' type="text" v-model='numB'>=<span>{{result}}</span>
</div>
</div>
<script src="vue.js"></script>
<script>
var vm = new Vue({
el:'#app',
data:{
importantMsg:'',
numA: 0,
numB: 0
},
computed:{
whatYouGet:function(){
return this.importantMsg.split('').reverse().join('');
},
result:function(){
return Number(this.numA)+Number(this.numB);
}
},
methods:{
}
});
</script>
</body>
</html>
Vue实例data中的数据直接会绑定到实例上vue实例中,可以使用this来引用属性及方法,this指向了vue的实例
生命周期
生命周期钩子 beforeCreate -> created -> beforeMount -> mounted -> beforeUpdate -> updated -> beforeDestroy -> destroyed场景:
在vue挂载完成后,加载数据
<!DOCTYPE html>
<html lang="en">
<head>
<meta charset="UTF-8">
<meta name="viewport" content="width=device-width, initial-scale=1.0">
<title>vue5</title>
</head>
<body>
<div id="app">
<input type="text" v-model='abc'>
<button @click='bye'> say</button>
<table>
<thead>
<tr>
<th>学生ID</th>
<th>学生姓名</th>
<th>年龄</th>
<th>操作</th>
</tr>
</thead>
<tbody>
<tr v-for='stu in students'>
<td>{{stu.id}}</td>
<td>{{stu.name}}</td>
<td>{{stu.age}}</td>
<td><button @click="del(stu)">删除</button></td>
</tr>
</tbody>
</table>
</div>
<script src="vue.js"></script>
<script src='jquery.min.js'></script>
<script>
var vm = new Vue({
el:'#app',
data:{
abc:123,
students:[]
},
computed:{
},
methods:{
hello:function(words){
console.log(words);
},
bye:function(){
this.hello('bye');
}
},
created:function(){
console.log("created");
},
updated:function(){
console.log("updated");
},
mounted:function(){
alert("开始加载数据");
var _this = this;
$.ajax({
url:'http://localhost:8080/getStu',
type:'get',
dataType:'json',
success:function(resp){
if(resp.success){
_this.students=resp.data
}else{
alert("加载失败:"+resp.message);
}
}
})
}
});
console.log(vm.abc);
</script>
</body>
</html>
作业
完善删除功能,发送ajax到后端,完成后删除页面上的记录。比如在学生zhangsan的记录上点击删除,发请求到后端,并在页面上移除zhangsan的记录开发修改个人信息功能,个人信息包括
用户名(不可修改)邮箱我的标签(标签类似爱好,以多选框实现,只有固定的几个)所在省头像(选做)
完善查询的分页功能(后端实现可选)
复习Vue模板语法Form数据绑定v-model的本质计算属性Vue实例生命周期作业
开发修改个人信息功能,个人信息包括
用户名(不可修改)邮箱我的标签(标签类似爱好,以多选框实现,只有固定的几个)所在省头像(选做)
1) 挂载时从后端获取个人信息,绑定到表单2)确认修改之后,发送到后端修改
<!DOCTYPE html>
<html lang="en">
<head>
<meta charset="UTF-8">
<meta name="viewport" content="width=device-width, initial-scale=1.0">
<title>vue5</title>
<style>
body{
background-color: blueviolet;
color:white;
}
</style>
</head>
<body>
<div id="app">
<form action="#">
<div>
<img :src="form.avatar" alt="">
</div>
<div>
{{form.username}}
</div>
<div>
<label for="">Email:</label><input type="email" v-model='form.email' >
</div>
<div>
<label for="">我的标签</label>
<input type="checkbox" v-model='form.myTags' value="a">诚实
<input type="checkbox" v-model='form.myTags' value="b">正直
<input type="checkbox" v-model='form.myTags' value="c">幽默
<input type="checkbox" v-model='form.myTags' value="d">王者
</div>
<div>
<select v-model='form.province'>
<option value="chongqing">重庆</option>
<option value="sichuan">四川</option>
<option value="beijing">北京</option>
</select>
</div>
<div>
<input type="button" @click="doSubmit">
</div>
</form>
</div>
<script src="../vue.js"></script>
<script src='../jquery.min.js'></script>
<script>
var vm = new Vue({
el:'#app',
data:{
form:{
userId:'',
username:'',
email:'',
myTags:[],
province:'',
avatar:''
}
},
methods:{
doSubmit:function(){
var _this = this;
$.ajax(
{
url:'http://localhost:8080/modify',
type:'post',
dataType:'json',
data:JSON.stringify(_this.form),
contentType:'application/json;charset=utf-8',
success:function(resp){alert(resp.success)},
error:function(x,s,e){alert(e)}
}
)
}
},
mounted:function(){
var _this = this;
$.ajax({
url:'http://localhost:8080/getPersonalInfo',
type:'get',
traditional:true,
dataType:'json',
success:function(resp){
if(resp.success){
_this.form=resp.data;
_this.form.myTags=resp.data.myTags;
console.log(_this.form);
}else{
alert("加载失败:"+resp.message);
}
},
error:function(x,s,e){
alert("请求失败,"+e);
console.error(e);
}
});
}
});
</script>
</body>
</html>
完善查询的分页功能(后端实现可选)
<!DOCTYPE html>
<html lang="en">
<head>
<meta charset="UTF-8">
<meta name="viewport" content="width=device-width, initial-scale=1.0">
<title>vue5</title>
</head>
<body>
<div id="app">
<input type="text" v-model='abc'>
<button @click='bye'> say</button>
<table>
<thead>
<tr>
<th>学生ID</th>
<th>学生姓名</th>
<th>年龄</th>
<th>操作</th>
</tr>
</thead>
<tbody>
<tr v-for='stu in students'>
<td>{{stu.id}}</td>
<td>{{stu.name}}</td>
<td>{{stu.age}}</td>
<td><button @click="del(stu)">删除</button></td>
</tr>
</tbody>
</table>
<div>
<span v-for='i in totalPage'><a href="">{{i}}</a></span>
</div>
</div>
<script src="vue.js"></script>
<script src='jquery.min.js'></script>
<script>
var vm = new Vue({
el:'#app',
data:{
abc:123,
students:[],
total:0,
pageSize:2
},
computed:{
totalPage:function(){
return this.total%this.pageSize==0?this.total/this.pageSize:parseInt(this.total/this.pageSize)+1;
}
},
methods:{
hello:function(words){
console.log(words);
},
bye:function(){
this.hello('bye');
},
del:function(s){
this.students.splice(this.students.indexOf(s),1);
//TODO 发ajax去后台删除
}
},
created:function(){
console.log("created");
},
updated:function(){
console.log("updated");
},
mounted:function(){
alert("开始加载数据");
var _this = this;
$.ajax({
url:'http://localhost:8080/getStu',
type:'get',
dataType:'json',
data:{currPage:1},
success:function(resp){
if(resp.success){
//当前页的所有数据
_this.students=resp.data.content;
//一共多少条
_this.total=resp.data.total;
}else{
alert("加载失败:"+resp.message);
}
}
})
}
});
console.log(vm.abc);
</script>
</body>
</html>
复习Vue
MVVM Model-ViewModel-View 数据和视图双向绑定模板语法
插值 {{变量名}}v-if 判断v-for 循环 inv-bind 绑定属性 简写为 :v-on 绑定事件 简写为 @v-model 绑定表单的控件 input[type=text\password\radio\checkbox] select textarea
Vue实例
var vm = new Vue({
el:'#app', //挂载点
data:{}, //数据
methods:{ //函数
xxx:function(){}
},
mounted:function(){}, //生命周期钩子 beforeCreate created beforeMount Mounted beforeDestroy destroyed
computed:{} //计算函数
});
form数据
启动时加载数据
组件组件概念需要一种自行封装html的组件的机制,用来复用Vue提供了组件封装的机制业界专家提供了各种UI组件
props也可以动态绑定
绑定一个对象
<todo-item v-for='t in todos' :content='t.content' :finish="t.finish"></todo-item>
data:{
todos:[
{content:'买锅',finish:true},
{content:'买灶',finish:false},
{content:'买西红柿',finish:false},
{content:'买鸡蛋',finish:false},
{content:'下锅',finish:false},
{content:'买锅铲',finish:false}]
}
组件的props可以是一个对象
<todo-item v-for='t in todos' :todo='t'></todo-item>
//定义todo-item组件
Vue.component('todo-item',{
template:'<li>{{todo.content}} {{todo.finish}} </li>', //组件模板
// props:['content','finish'] //组件参数,认为是组件的入参
props:['todo']
});
var vm = new Vue({
el:"#app",
data:{
todos:[
{content:'买锅',finish:true},
{content:'买灶',finish:false},
{content:'买西红柿',finish:false},
{content:'买鸡蛋',finish:false},
{content:'下锅',finish:false},
{content:'买锅铲',finish:false}]
}
});
Vue.compoent 注册组件,每个Vue组件本身也是一个vue实例
组件名字 参数对象
template 模板 只允许一个根元素props 参数 <= 组件入参data 必须是个函数,返回值作为真正的datamethods生命周期
数据流是单向的,也就是说通过props传入的数据在组件内部被改变时,外部不会产生相应的变化。不建议这么做。
//定义todo-item组件,维护一条待办事项
Vue.component('todo-item',{
template:'<li @click="increment">{{todo.content}} {{todo.finish}} {{times}}</li>', //组件模板
// props:['content','finish'] //组件参数,认为是组件的入参
props:['todo'],
data:function(){ //语法不同,含义还是表示数据
return {
times:0
}
},
methods:{
increment:function(){
this.times++;
}
}
});
父子组件间的数据传递父-> 子 props子-> 父 自定义事件,利用的事件冒泡子组件触发一个自定义事件 this.$emit(事件名)父组件监听自定义事件 v-on:事件名 @事件名
单个组件大小变化
<!DOCTYPE html>
<html lang="en">
<head>
<meta charset="UTF-8">
<meta name="viewport" content="width=device-width, initial-scale=1.0">
<title>vue5</title>
</head>
<body>
<div id="app">
<div id="container">
<blog-post v-for='b in blogList' :blog='b'></blog-post>
</div>
</div>
<script src="vue.js"></script>
<script>
Vue.component('blog-post',{
template:`
<div :style='{fontSize:fs+"em"}'>
<div>{{blog.title}}</div>
<div style='color:gray'>
<span>{{blog.author}}</span>
<span>{{blog.shortDesc}}</span>
<button @click='fs+=0.5'>大</button><button @click='fs-=0.5'>小</button>
</div>
<hr>
</div>
`,
data:function(){
return {
fs:1
}
},
props:['blog'],
methods:{
}
});
var vm = new Vue({
el:"#app",
data:{
blogList:[
{title:'JavaScript的魔法',author:'js老哥',shortDesc:'带你见识只有js才有真正魔法'},
{title:'震惊!JavaScript竟然是这样的',author:'环球程序员',shortDesc:'作了50年程序员,才发现...'},
{title:'隔壁老王发现JavaScript居然可以这样用',author:'coldMorning.Week',shortDesc:'javacript作为一门开发语言竟然可以...'}
]
}
});
</script>
</body>
</html>
一起变大
<!DOCTYPE html>
<html lang="en">
<head>
<meta charset="UTF-8">
<meta name="viewport" content="width=device-width, initial-scale=1.0">
<title>vue5</title>
</head>
<body>
<div id="app">
<div id="container" :style="{fontSize:outFontSize+'em'}">
<blog-post v-for='b in blogList' @big='outFontSize+=0.5' @small='outFontSize-=0.5' :blog='b'></blog-post>
</div>
</div>
<script src="vue.js"></script>
<script>
Vue.component('blog-post',{
template:`
<div>
<div>{{blog.title}}</div>
<div style='color:gray'>
<span>{{blog.author}}</span>
<span>{{blog.shortDesc}}</span>
<button @click='bigger'>大</button><button @click='smaller'>小</button>
</div>
<hr>
</div>
`,
data:function(){
return {}
},
props:['blog'],
methods:{
bigger:function(){
//向外部发送一个自定义事件,名为makeBig
this.$emit('big');
},
smaller:function(){
this.$emit("small");
}
}
});
var vm = new Vue({
el:"#app",
data:{
blogList:[
{title:'JavaScript的魔法',author:'js老哥',shortDesc:'带你见识只有js才有真正魔法'},
{title:'震惊!JavaScript竟然是这样的',author:'环球程序员',shortDesc:'作了50年程序员,才发现...'},
{title:'隔壁老王发现JavaScript居然可以这样用',author:'coldMorning.Week',shortDesc:'javacript作为一门开发语言竟然可以...'}
],
outFontSize:1
}
});
</script>
</body>
</html>
Slot 插槽<!DOCTYPE html>
<html lang="en">
<head>
<meta charset="UTF-8">
<meta name="viewport" content="width=device-width, initial-scale=1.0">
<title>vue8</title>
<style>
a {
color:white;
text-decoration: none;
}
</style>
</head>
<body>
<div id="app">
<navbar brand='蜗牛'>
<!--1 应用navbar组件时,插入数据-->
<a href='product'> 产品</a>
<a href="helpEarth">保护地球</a>
<a href="contact">联系我们</a>
</navbar>
<base-layout>
<template v-slot:header>
头部
</template>
我是内容,吼吼吼
<template v-slot:footer>
jio
</template>
</base-layout>
</div>
<script src="vue.js"></script>
<script>
Vue.component('navbar', {
template: `
<div style='background:linear-gradient(0.25turn, #3f87a6, #ebf8e1, #f69d3c);width:800px;height:50px;line-height:50px;'>
<a href="/">{{brand}}</a>
<!--2支持外部插入数据-->
<slot></slot>
</div>
`,
data: function () {
return {}
},
props: ['brand'],
methods:{}
});
Vue.component('base-layout',{
template:`
<div class="container">
<header>
<!-- 我们希望把页头放这里 -->
<slot name="header"></slot>
</header>
<main>
<!-- 我们希望把主要内容放这里 -->
<slot></slot>
</main>
<footer>
<!-- 我们希望把页脚放这里 -->
<slot name="footer"></slot>
</footer>
</div>
`
})
var vm = new Vue({
el: "#app",
data: {
}
});
</script>
</body>
</html>
作业
完成一个豪华版的待办列表
<!DOCTYPE html>
<html lang="en">
<head>
<meta charset="UTF-8">
<meta name="viewport" content="width=device-width, initial-scale=1.0">
<title>我的待办</title>
</head>
<body>
<div id="app">
<h2>我的待办</h2>
<label for="">添加小目标</label><input type="text" v-model='newTodo' @keyup.enter='addTodo'>
<div>
共有{{total}}个目标,已完成{{finishedCount}}个,未完成{{unFinishedCount}}个
</div>
<div>
<todo-item v-for='t in todoList' @del='doDelete' :todo='t'></todo-item>
</div>
</div>
<script src="../vue.js"></script>
<script>
//内部 点击之后 发送 删除事件 携带数据
//外部 监听删除事件, 定位到该数据并删除
Vue.component('todo-item',{
});
var vm = new Vue({
el:'#app',
data:{
newTodo:'',
todoList: [{content:'买锅',finish:true},
{content:'买灶',finish:false},
{content:'买西红柿',finish:false},
{content:'买鸡蛋',finish:true},
{content:'下锅',finish:false},
{content:'买锅铲',finish:false}]
},
computed:{
},
methods:{
addTodo:function(){
},
doDelete:function(todo){
}
}
});
</script>
</body>
</html>
在js中this 默认指向当前函数 ,在vue中vue实例的第一层 computed methods 里的函数中的this做过特殊处理,this指向当前的vue实例
Adblocker
2020年10月29日 vue3
复习组件
组件注册: Vue.component()参数对象
template 只有一个根标签props 数组data 必须是一个函数methodscomputed生命周期钩子
父子组件传值
父->子 props子->父 自定义事件 this.$emit(事件名,事件参数)
slot插槽
node.jsNode.js® 是一个基于 Chrome V8 引擎 的 JavaScript 运行时。jre = java runtime environment官网: https://nodejs.org/zh-cn/在浏览器之外运行js,js变成了一个全栈语言具备独立语言的各种能力
访问数据库访问文件系统开启一个服务器…
安装步骤: 下一步新开cmd: node -v
var http = require("http");
const port = 8888;
// Web开发框架 express -> koa
http.createServer(function(request,response){
response.writeHead(200,{'Content-Type':'text/html;charset=utf-8'});
response.end(`<html>
<head></head>
<body>
<h2>helloworld</h2>
<img src='http://static.nodejs.cn/_static/img/logo.svg'/>
</body>
</html>`);
}).listen(port);
console.log("服务器运行在 http://localhost:"+port);
var mysql = require('mysql');
var http = require('http');
http.createServer(function (request, response) {
// 发送 HTTP 头部
// HTTP 状态值: 200 : OK
// 内容类型: text/plain
response.writeHead(200, {'Content-Type': 'text/plain'});
var connection = mysql.createConnection({
host: 'localhost',
port:3306,
user: 'root',
password: 'root123',
database: 'woniu_edu'
});
connection.connect();
connection.query('SELECT * from user', function (error, results, fields) {
if (error) throw error;
console.log('The solution is: ', results);
// 发送响应数据 "Hello World"
response.end(results);
});
}).listen(8888);
// 终端打印如下信息
console.log('Server running at http://127.0.0.1:8888/');
Vue单文件组件,后缀为.vue在web环境不能直接引用vue,工具。现代工具链来处理
.vue => js vue-loader (webpack工具的插件)webpack是一个构建工具,构建: 从源码到成品
node自带的包管理器 npm( node package manager) 是一个依赖管理工具npm的功能
有一个package.json的文件,用来管理依赖和版本执行一些命令
新建一个js项目 npm init
坐标:依赖及版本 安装依赖 npm install
Vue脚手架Vue Cli 脚手架工具,用来做vue开发1. 安装cnpm (1)输入以下命令npm install -g cnpm —registry=https://registry.npm.taobao.org (2)输入cnpm -v输入是否正常,这里肯定会出错。cnpm -v
vue-cli
cnpm install -g @vue/cli
使用vue-cli创建项目
# 打开界面 创建项目 (依赖不要选 lint formater)
vue ui
作业
完成学生查询,分页,查看,编辑,前后端全部完成使用vue脚手架创建一个项目 vuewolaila
复习node.jsVueVue脚手架作业
现代JavaScript开发工具链node : JavaScript的运行时
web桌面端:electron服务端: express 移动端: weex / react-native / uniapp
npm : node自带的依赖管理工具,包管理工具
标准化,package.json( 包名+版本;依赖)依赖管理命令(scripts) npm run
webpack: 构建工具
单文件组件 .vue =编译=> js
templatescriptstyle
html => pug
```bash
html
head script
style
body div(class=['aaa','bbb','ccc'])
//class也可以写成div(style="aaa bbb ccc")
div(style={width:'200px' ,height:'300px' ,background:'red'})
//style也可以写成div(style="width:200px;xxxx")
- css => sass \ less
```css
#scss
.main{
h1,h2{font-size: 20px;}
a{
color: red;
span{
font-size: 16px;
}
}
}
#编译后的css
.main h1, .main h2 {
font-size: 20px;
}
.main a {
color: red;
}
.main a span {
font-size: 16px;
}
ES ECMA-script javascript的官方标准
javascriptjscript
ES 5 6 7 阮一峰: https://es6.ruanyifeng.com/https://wangdoc.com/javascript/index.html
typescript coffeescript
vue-cli : 脚手架工具
SPA : single page application 单页面应用
体验数据流量小
不切换页面 vue-router 路由框架
js模块化
创建项目依赖 element-ui\axios\qs
npm install 依赖的名字
项目结构
node_modules 依赖下载的位置public 公开资源src 源码
assets 存放静态资源,图片components 组件router vue-router的配置文件夹
index.js 路由表 路径 -> vue文件
views 视图们
About.vue 关于页面Home.vue 主页页面….
App.vue 页面框架,第一个vue文件main.js 入口js
babel.config.js babel 插件 ,兼容低版本的JavaScriptpackage.json 项目描述文件
运行项目npm run serve
熟悉套路main.js => App.vue链接跳转 配置文件在 router/index.js 路径对应组件 => src/views/Home.vue => src/components/HelloWorld.vuesrc/views/About.vue
axios post 传参:
直接传对象 后端用 @RequestBody 只有一个对象 接受前端用qs.stringify ,后端直接接收
编写页面
在views目录下创建vue文件
```html
2. 配置路由映射 /router/index.js
```javascript
import Product from '../views/Product.vue'
const routes = [
{
path: '/',
name: 'Home',
component: Home
},
{
path: '/product',
name: 'Product',
component: Product
},
{
path: '/about',
name: 'About',
// route level code-splitting
// this generates a separate chunk (about.[hash].js) for this route
// which is lazy-loaded when the route is visited.
component: () => import(/* webpackChunkName: "about" */ '../views/About.vue')
}
]
挂到App.vue
```html
商品
<a name="KfHvF"></a>
## vue-router简介
<a name="2z0v6"></a>
## 使用element-ui
在 main.js 中写入以下内容:
import Vue from ‘vue’;
import ElementUI from ‘element-ui’;
import ‘element-ui/lib/theme-chalk/index.css’;
import App from ‘./App.vue’;
Vue.use(ElementUI);
new Vue({
el: ‘#app’,
render: h => h(App)
});
根目录下 npm install
<a name="slZL1"></a>
## 部署
npm run build<br />dist文件夹 静态资源 托管到nginx
<a name="k0w3n"></a>
## Git
项目:
1. 分析需求
产出:
- 原型 (Axure RP 、墨刀、mockplus)
- 数据库设计 excel
Adblocker
<a name="XMGme"></a>
# 2020年11月2日 Git
<a name="oCT7S"></a>
## 项目要求:
1. 1+1+1 1条主线流程 + 1个技术难点+1个业务难点
1. 主线流程
1. 技术难点
1. 即时聊天、地图、支付、短信
1. 并发加锁:秒杀
3. 业务难点
1. 拼团
1. 优惠券
2. 需要有前后台
1. 前台 给用户用的
1. 后台 给员工用的
3. 真实性
1. 细节: 前后端校验、跳转、样式、异常处理
1. 异常逆向流程
4. 提交:后补
1. 部署后演示
1. 代码
1. 数据库脚本(建表sql,基础数据)
1. 原型
1. 部署文档(拿到了源码+脚本后的部署步骤:1.。。 2.。。)
1. 接口文档(swagger生成)
<a name="M3sjI"></a>
## 日常:
每日站立会议:
1. 9:20 最长不超过15分 => 沟通
1. 轮流发言
1. 内容包括
1. 昨天做了什么,进度多少
1. 今天计划做什么,进度多少
1. 有什么**未解决**的问题?
<a name="Git"></a>
## Git
版本管理工具:<br />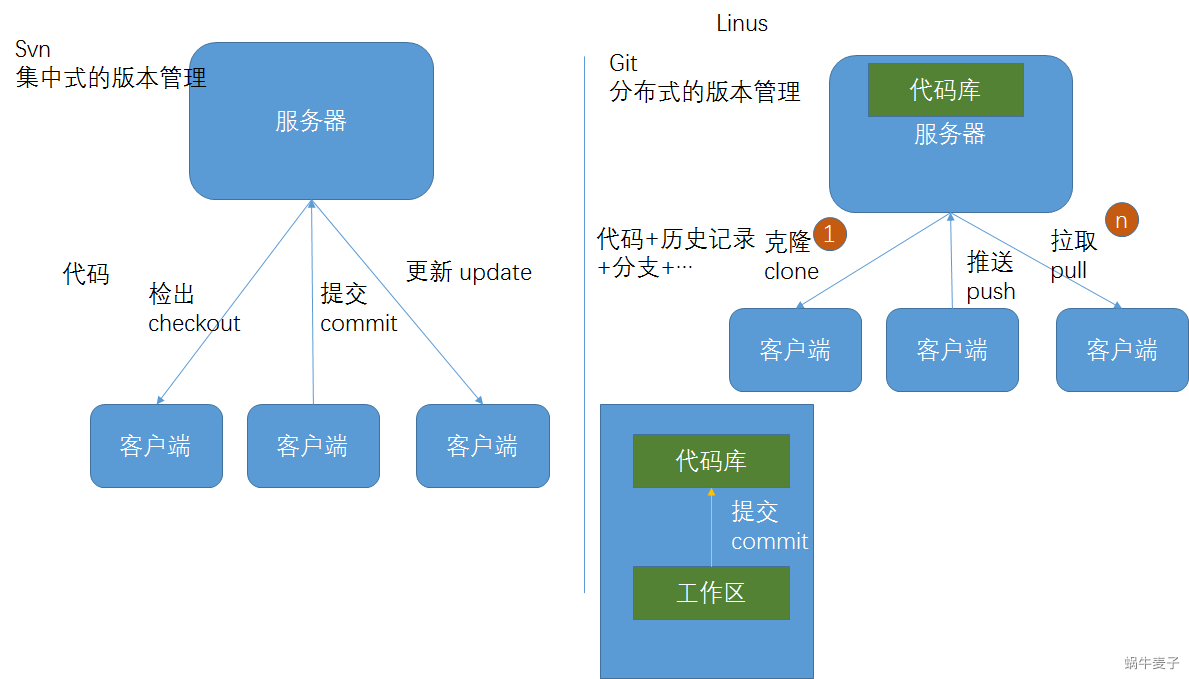
<a name="IxiuU"></a>
## 代码仓库托管服务:
1. github
1. gitee 国内,)
1. gitlab gogs 自建代码仓库服务器
<a name="Aoywb"></a>
## 初始步骤:
1. 注册gitee
1. 安装git [https://git-scm.com/](https://git-scm.com/)
1. 使用git bash `git --version`
1. 配置参考 [https://gitee.com/help/articles/4122](https://gitee.com/help/articles/4122)
<a name="MS0sh"></a>
## 简单使用
1. gitee创建代码库
1. 克隆 clone
- git clone [https://gitee.com/maizdotme/class45demo.git](https://gitee.com/maizdotme/class45demo.git)
3. 提交 commit 到本地
1. git add README.md 添加修改
1. git commit -m '修改readme'
4. 推送 push 到远程
1. git push
5. 拉取 pull 到本地
1. git pull
6. 合并 merge 代码发生冲突时合并冲突
<a name="9yt7a"></a>
## 文件状态
git status 查看工作区的文件状态<br />新建文件:Untracked 没有跟踪<br />添加之后:new file 新文件<br />修改之后: modified 已修改<br />正常: normal
<a name="046aW"></a>
## 跟idea集成
1. clone => 菜单 VCS | get from version control
1. add => 对话框询问
1. commit => ctrl+k
1. push => ctrl+shift+k
1. pull => ctrl+t
<a name="pdnIk"></a>
## .gitignore文件
忽略某些文件,不提交 .idea *.impl target<br />maven 真正提交 src pom.xml readme.md LICENSE<br />生效的前提条件: 需要提交
*.iml
/.idea/
<a name="TZA3L"></a>
## 代码合并
冲突的产生:<br />冲突的解决:
- 用你的 用你的覆盖我的 无副作用
- 用我的 用我的覆盖你的 可能没有朋友
- 合并 商量,合理
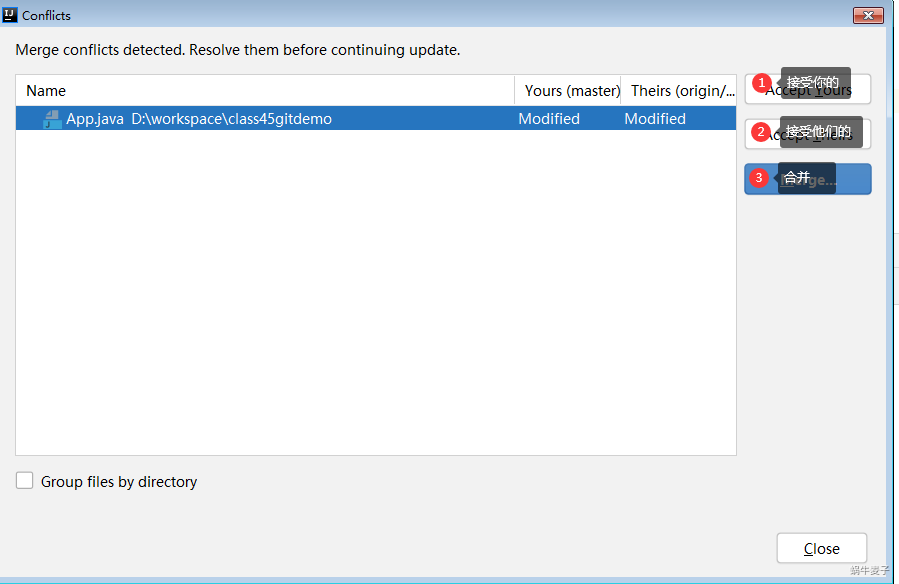
<a name="H0oqE"></a>
## 项目git相关操作
1. 同学A创建项目仓库,.gitignore
1. 同学A搭建项目架构(mbp\包\全局异常处理器\shiro\)
1. 同学A提交推送项目到仓库
1. 同学BCD clone
1. 修改提交推送拉取,冲突解决
doc目录 : 跟src平级 存放:文档 脚本
2个仓库,前台一个 后台一个 一个仓库管理一个项目
方法一:<br />spring-boot与git步骤
1. 创建git项目仓库
1. clone到本地
1. 创建spring-boot项目并指定项目所在位置为 git本地文件夹
方法二:
1. 创建项目
1. vcs | import into vcs | create git repository
1. git-bash 的相应目录下 执行命令:
```bash
git remote add origin https://gitee.com/用户个性地址/HelloGitee.git
git push -u origin master
项目要求:日常:Git代码仓库托管服务:初始步骤:简单使用文件状态跟idea集成.gitignore文件代码合并项目git相关操作


