- 自动化运维专题(一):Ansible批量自动化管理工具入门
- 通过yum源方式安装ansible
- 通过Python的pip方式安装ansible
- 查看服务器端IP
- 在Linux服务器端生成rsa密钥对
- 将生成的公钥导入到服务器端的~/.ssh/authorized_keys文件里
- 将私钥文件id_rsa复制一份改名为rd_rsa_root并导出到宿主机桌面上
- 创建一个普通用户yunjisuan
- 给普通用户修改密码
- 以root账号授权普通用户yunjisuan所有权限并免输入密码
- 切换到yunjisuan用户测试提权
- 1) 尊重别人的隐私。
- 2) 输入前要先考虑(后果和风险)。
- 3) 权力越大,责任越大。
- 测试提权
- 给yunjisuan普通用户创建公钥认证。注意权限。权限过大,公钥验证会失败
- 在生产环境我们一般是要禁止服务器root账号远程登录功能的(一旦关闭,密钥和密码登陆方式都不能再登陆)
- 如果我们想用root账号进行操作,那么远程密钥连接普通用户在切换成root账号即可
- 关闭Ansible管理服务器的root账号SSH远程登录功能
- 重启动sshd服务
- 开启sudo日志
- 测试sudo日志记录
- 查看/var/log/sudo.log日志
- 禁止非root用户查看Ansible管理服务器端/etc/hosts文件
- 禁止非root用户查看Ansible的主机清单配置文件
- 三,ansible的基础应用
- 测试单主机
- 测试单主机
- 测试主机组
- 测试所有的被管理主机
- 在Web01上创建用户yunjisuan,并非交互方式设定密码
- 在所有被管理的主机的/etc/hosts文件里添加Ansible管理服务器的IP地址映射
- 添加定时任务计划,在所有被管理的主机里每十分钟输出hello字符串,定时任务描述为test cron job
- Ansible: test cron job
- Ansible: test cron job
- 删除描述为test cron job的定时任务
- 给Web01服务器上的普通用户yunjisuan添加一个定时任务
- Ansible: yunjisuan cron job
- 将本地的/etc/hosts文件拷贝到所有被管理的主机的/etc/hosts路径下覆盖同名文件,并指定属主和权限,若拷贝的文件与目标文件内容不同,则备份目标文件再覆盖。
- 将本地/tmp/test.sh的脚本复制到远程主机上并远程激活
- !/bin/bash
- 编写一个脚本,然后通过ansible的script模块远程向被管理主机执行此脚本
- 安装nmap软件包
- 卸载nmap软件包
- 启动firewalld并设置开机自启动
- 关闭firewalld并设置开机不启动
- 在Web02上创建一个普通用户yunjisuan,并设置用户的密码为123123
- 安装Python2的pip工具,并通过pip工具安装Python的加密模块来给密码加密
- 生成密文密码
- 删除之前创建的yunjisuan用户,并删除它的家目录
- 继续在Web02上创建yunjisuan用户
- 查看远程主机的facts信息
自动化运维专题(一):Ansible批量自动化管理工具入门
Jenkins自动化运维专题
—私人课件,不公开,不出版,禁止传播
想做好运维工作,人先要学会勤快;
居安而思危,勤记而补拙,方可不断提高;
别人资料不论你用着再如何爽那也是别人的;
自己总结东西是你自身特有的一种思想与理念的展现;
精髓不是看出来的,精髓是记出来的;
请同学们在学习的过程中养成好的学习习惯;
勤于实践,抛弃教案,勤于动手,整理文档。
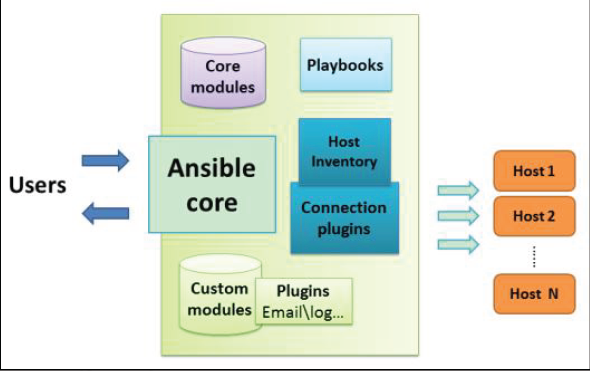
一,Ansible概述
- 由于互联网的快速发展导致产品更新换代速度逐步增长,运维人员每天都要进行大量的维护操作,按照传统方式进行维护使得工作效率低下。这时部署自动化运维工具就可以尽可能安全,高效的完成这些工作。
- Ansible是基于Python开发,集合了众多优秀运维工具的优点,实现了批量运行命令,部署程序,配置系统等功能的自动化运维管理工具。默认通过SSH协议进行远程命令执行或下发配置,无需部署任何客户端代理软件,从而使得自动化环境部署变得更加简单。可同时支持多台主机并行管理,使得管理主机更加敏捷。
- Ansible可以看作是一种基于模块进行工作的框架结构,批量部署能力就是由Ansible所运行的模块实现的。简单说Ansible是基于“模块”完成各种任务的。
二,ansible服务的安装和部署
2.1 实验环境
| 主机名 | IP地址 | 备注 |
|---|---|---|
| ansible | 192.168.200.183 | 管理服务器 |
| Web01 | 192.168.200.184 | 被管理主机 |
| Web02 | 192.168.200.185 | 被管理主机 |
- #
- [root@localhost~]#cat/etc/redhat-release
- CentOSLinuxrelease7.5.1804(Core)
- [root@localhost~]#uname-r
- 3.10.0-862.3.3.el7.x86_64
- [root@localhost~]#systemctl stop firewalld
- [root@localhost~]#systemctl disable firewalld
- [root@localhost~]#systemctl stopNetworkManager
- [root@localhost~]#systemctl disableNetworkManager
通过yum源方式安装ansible
- [root@ansible~]#yum-y install epel-release
- [root@ansible~]#yum-y install ansible
通过Python的pip方式安装ansible
- [root@ansible~]#yum-y install epel-release
- [root@ansible~]#yum-y install python2-pip
- [root@ansible~]#pip install ansible
yum源
#cd /etc/yum.repos.d/
#vim /etc/yum.repos.d/aliBase.repo
#以下是配置yum源
[Base]
name=aliBase
baseurl=https://mirrors.aliyun.com/centos/$releasever/os/$basearch/
enabled=1
gpgcheck=1
gpgkey=https://mirrors.aliyun.com/centos/$releasever/os/$basearch/RPM-GPG-KEY-CentOS-$releasever
# cat aliEpel.repo
[aliEpel]
name=aliEpel
baseurl=https://mirrors.aliyun.com/epel/$releasever\Server/$basearch/
enabled=1
gpgcheck=0
2.2 生产环境Ansible管理服务器ssh登陆安全策略
(1)生产环境ssh登陆策略
备份:cp /etc/ssh/sshd_config{,.bak}
- [root@www~]#cat-n/etc/ssh/sshd_config.bak|sed-n’17p;38p;43p;47p;65p;79p;115p’
- 17#Port 22 #修改ssh连接端口
- 38#PermitRootLogin yes #是否允许root账号远程登陆
- 43#PubkeyAuthentication yes #是否开启公钥连接认证
- 47AuthorizedKeysFile.ssh/authorized_keys#公钥文件的放置位置
- 65PasswordAuthenticationyes#是否开启密码验证登陆
- 79GSSAPIAuthenticationyes#是否关闭GSSAPI认证
- 115#UseDNS yes #是否关闭DNS反向解析
- [root@www~]#cat-n/etc/ssh/sshd_config|sed-n’17p;38p;43p;47p;65p;79p;115p’
- 17Port22221#工作中需要设定到1万以上的端口,避免被扫描出来。
- 38PermitRootLoginyes#如果不是超大规模的服务器,为了方便我们可以暂时开启root远程登录
- 43PubkeyAuthenticationyes#开启公钥认证模式
- 47AuthorizedKeysFile.ssh/authorized_keys#公钥放置位置
- 65PasswordAuthenticationno#为了安全我们关闭服务器的密码认证方式
- 79GSSAPIAuthenticationno#关闭GSSAPI认证,极大提高ssh连接速度
- 115UseDNSno#关闭DNS反向解析,极大提高ssh连接速度
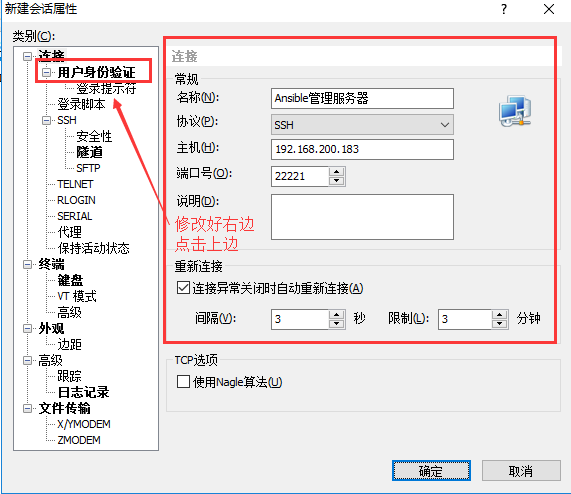
(2)设置xshell私钥登陆Linux
查看服务器端IP
- [root@ansible.ssh]#hostname-I
- 192.168.200.183
在Linux服务器端生成rsa密钥对
- [root@ansible~]#ssh-keygen#一直回车
- Generatingpublic/private rsa key pair.
- Enterfileinwhich to save the key(/root/.ssh/id_rsa):
- Enterpassphrase(emptyforno passphrase):
- Entersame passphrase again:
- Youridentification has been savedin/root/.ssh/id_rsa.
- Yourpublic key has been savedin/root/.ssh/id_rsa.pub.
- Thekey fingerprint is:
- SHA256:royhAEKx9bhe4jLZ3SzfZ/yvhkzPgToDIx+1gSxoOLMroot@www
- Thekeys randomart image is:
- +—-[RSA2048]——+
- |..|
- |+o|
- |o……|
- |.+o..o o|
- |o=o..S o.|
- |oE=+.o=.o.|
- |.++.ooo==+.|
- |.o.+oo.+*+|
- |..o..=ooo.|
- +——[SHA256]——-+
将生成的公钥导入到服务器端的~/.ssh/authorized_keys文件里
- [root@ansible~]#cd.ssh/
- [root@ansible.ssh]#ls
- id_rsa id_rsa.pub
- [root@ansible.ssh]#cat id_rsa.pub>authorized_keys
- [root@ansible.ssh]#chmod600authorized_keys#权限必须600否则不生效
- [root@ansible.ssh]#cat authorized_keys
- ssh-rsa AAAAB3NzaC1yc2EAAAADAQABAAABAQDS7U4vgjCpWrMFwnWjUlrebldvPw5NNQpnyGT/1cTsyI6ryPm19J+IQ2wNn67BpYz0NKyLjq/hYlSxlQmD7xHwNM5KQirUYPgwPhhDqGuNE+UrBZ2lUkknt358YWGpEC+TUPy/MLNbnIepPpZr0y0qyXmtp7KpeXJwLeKLzZLpHnzA8Vr3A7w/jNaDnQJmKYvDvD0Q6O54CVkkSdxaYPAT1hVfX1pKz0dSNQbJpl5ZJXigQo26M+7qYXeUBxI5Guaapl6uT5sySzTBwwd9Yt49NKE/kIivClegVfHPGF4iSqfCiCd2BTJGTuCVBS2j4lhrjTLyWRO8po7BM4yImRGf root@www
将私钥文件id_rsa复制一份改名为rd_rsa_root并导出到宿主机桌面上
- [root@ansible.ssh]#ls
- id_rsa #私钥
- id_rsa.pub #公钥
- authorized_keys id_rsa id_rsa.pub
- [root@ansible.ssh]#cp id_rsa id_rsa_root
- [root@ansible.ssh]#ls
- authorized_keys id_rsa.pub id_rsa id_rsa_root
查看导入到桌面上的私钥文件


而后xshell显示登陆成功!
三:向SELinux中添加修改的SSH端口
在网上很多的修改ssh默认端口号的教程中都是只说到上面那一部分然后重新启动ssh服务,我是不知道他怎么实现的啊,反正我是怎么也实现不了,不管怎样配置都不起作用,ssh端口号一直是22,最后我发现了,这是由于我们需要向SELinux中添加修改的SSH端口
1:安装semanage
semanage是SELinux的管理工具,是用于向SELinux添加和修改ssh端口号
#安装依赖
yuminstallpolicycoreutils-python
#安装semanage
yum provides semanage
2:使用semanage向SELinux中添加我们刚刚添加的端口号(22221)
查询当前 ssh 服务端口:
semanage port -l| grep ssh
验证 ssh 端口是否添加成功:
semanage port -l| grep ssh
重启 ssh 服务:
systemctlrestartsshd.service
(2)用户权限策略
在生产环境中,如果遇到禁止root用户远程登录系统,授权仅普通用户登陆系统,那么需要管理员权限执行sudo提权即可,避免root用户之间登陆
创建一个普通用户yunjisuan
- [root@ansible~]#useradd yunjisuan
- [root@ansible~]#echo”123123”|passwd—stdin yunjisuan
- 更改用户yunjisuan的密码。
- passwd:所有的身份验证令牌已经成功更新。
- [root@server-2 ~]# passwd gongwenhua
给普通用户修改密码
以root账号授权普通用户yunjisuan所有权限并免输入密码
- [root@ansible~]#sed-n’93p’/etc/sudoers
- yunjisuan ALL=(ALL)ALL
切换到yunjisuan用户测试提权
- [root@ansible~]#su-yunjisuan
- [yunjisuan@ansible~]$ sudo-l
- 我们信任您已经从系统管理员那里了解了日常注意事项。
- 总结起来无外乎这三点:
1) 尊重别人的隐私。
2) 输入前要先考虑(后果和风险)。
3) 权力越大,责任越大。
- [sudo]yunjisuan的密码:
- 匹配%2$s上%1$s的默认条目:
- !visiblepw,always_set_home,match_group_by_gid,env_reset,env_keep=”COLORS DISPLAY HOSTNAME HISTSIZE KDEDIR LS_COLORS”,
- env_keep+=”MAIL PS1 PS2 QTDIR USERNAME LANG LC_ADDRESS LC_CTYPE”,env_keep+=”LC_COLLATE LC_IDENTIFICATION LC_MEASUREMENT LC_MESSAGES”,
- env_keep+=”LC_MONETARY LC_NAME LC_NUMERIC LC_PAPER LC_TELEPHONE”,env_keep+=”LC_TIME LC_ALL LANGUAGE LINGUAS _XKB_CHARSET XAUTHORITY”,
- secure_path=/sbin\:/bin\:/usr/sbin\:/usr/bin
- 用户yunjisuan可以在ansible上运行以下命令:
- (ALL)ALL
测试提权
- [yunjisuan@ansible~]$ ls/root
- ls:无法打开目录/root:权限不够
- [yunjisuan@ansible~]$ sudo ls/root
- anaconda-ks.cfg
(3)配置xshell远程密钥登陆服务器端普通用户
给yunjisuan普通用户创建公钥认证。注意权限。权限过大,公钥验证会失败
- [root@ansible~]#mkdir-p/home/yunjisuan/.ssh
- [root@ansible~]#chmod700/home/yunjisuan/.ssh
- [root@ansible~]#chown yunjisuan.yunjisuan/home/yunjisuan/.ssh
- [root@ansible~]#cp~/.ssh/authorized_keys/home/yunjisuan/.ssh/
- [root@ansible~]#chmod600/home/yunjisuan/.ssh/authorized_keys
- [root@ansible~]#chown yunjisuan.yunjisuan/home/yunjisuan/.ssh/authorized_keys
然后我们xshell远程登陆普通用户到Ansible服务器端
xshell还是用刚才导入的那个私钥文件即可。

然后就登陆成功了。
最后我们关闭Ansible管理服务器端的root账号SSH远程登录功能即可。
在生产环境我们一般是要禁止服务器root账号远程登录功能的(一旦关闭,密钥和密码登陆方式都不能再登陆)
如果我们想用root账号进行操作,那么远程密钥连接普通用户在切换成root账号即可
- yunjisuan@ansible~]$ sudo su-
- [sudo]yunjisuan的密码:
- 上一次登录:日9月921:01:31CST2018从192.168.200.1pts/1上
- [root@ansible~]#
关闭Ansible管理服务器的root账号SSH远程登录功能
- [root@ansible~]#sed-n’38p’/etc/ssh/sshd_config
- PermitRootLoginno
重启动sshd服务
- [root@ansible~]#systemctl restart sshd
(4)配置Ansible管理服务器sudo审计日志
Centos6.x和Centos7.x的配置方法相同,rsyslog服务是所有日志记录的服务进程
开启sudo日志
- [root@ansible~]#echo”local2.debug /var/log/sudo.log”>>/etc/rsyslog.conf
- [root@ansible~]#echo”Defaults logfile=/var/log/sudo.log”>>/etc/sudoers
- [root@ansible~]#systemctl restart rsyslog
测试sudo日志记录
- [root@ansible~]#exit
- 登出
- [yunjisuan@ansible~]$ sudo su-
- [sudo]yunjisuan的密码:
- 上一次登录:日9月921:40:11CST2018pts/0上
查看/var/log/sudo.log日志
- [root@ansible~]#cat/var/log/sudo.log
- Sep921:49:12:yunjisuan:TTY=pts/0;PWD=/home/yunjisuan;USER=root;
-
2.3 安装ansible
[root@ansible~]#yum-y install epel-release
- [root@ansible~]#yum-y install ansible
- [root@ansible~]#ansible—version
- ansible2.6.3
- config file=/etc/ansible/ansible.cfg
- configuredmodulesearch path=[u’/root/.ansible/plugins/modules’,u’/usr/share/ansible/plugins/modules’]
- ansible pythonmodulelocation=/usr/lib/python2.7/site-packages/ansible
- executable location=/usr/bin/ansible
python version=2.7.5(default,Apr112018,07:36:10)[GCC4.8.520150623(RedHat4.8.5-28)]
2.4 配置主机清单
/etc/ansible/hosts文件中可以定义被管理主机,Ansible通过读取/etc/ansible/hosts文件内定义的主机清单批量做一些操作。比如定义一个nginx组,包含一台主机Web01,再定义一个apache组,包含另一台主机Web02.
[root@ansible~]#cat/etc/ansible/hosts
- [nginx]
- Web01ansible_ssh_host=192.168.200.184
- Web02ansible_ssh_host=192.168.200.185
- 说明:
- ansible_ssh_host:被管理主机IP
- ansible_ssh_user:被管理主机用户名
- ansible_ssh_pass:被管理主机用户的登陆密码
ansible_sudo_pass:被管理主机用户sudo时的密码
2.5 设置SSH免密码登陆
为了避免Ansible下发指令时需要输入被管理主机的密码,可以通过证书签名达到SSH无密码登陆。使用ssh-keygen产生一对密钥,并通过ssh-copy-id命令来发送生成的公钥。
[root@ansible~]#ls~/.ssh/
- authorized_keys id_rsa id_rsa.pub
- [root@ansible~]#ssh-copy-id192.168.200.184
- [root@ansible~]#ssh-copy-id192.168.200.185
当然,我们也可以在控制端主机的hosts文件里直接写入连接方式,用户,密码也能下发指令。但是生产环境不建议这么做。因为这样明文密码容易泄露,另外如果被控制主机修改了密码,这里也需要一起更改,不便于管理。
2.6 Ansible服务器简单的综合安全管理策略
禁止非root用户查看Ansible管理服务器端/etc/hosts文件
- [root@ansible~]#ll/etc/hosts
- -rw-r—r—.1root root1809月900:38/etc/hosts
- [root@ansible~]#chmod600/etc/hosts
禁止非root用户查看Ansible的主机清单配置文件
- [root@ansible~]#ll/etc/ansible/hosts
- -rw-r—r—1root root879月921:59/etc/ansible/hosts
[root@ansible~]#chmod600/etc/ansible/hosts
2.7 ansible查看帮助
[root@ansible ~]# /usr/local/python/bin/ansible-doc -l 查看总帮助
[root@ansible ~]# /usr/local/python/bin/ansible-doc -s shell 查看shell模块的帮助三,ansible的基础应用
Ansible可以使用命令行的方式进行自动化管理。命令的基本语法如下所示:
ansible<被操控的主机或主机组或all>[-m模块名][-a具体命令]
- 说明:
- 主机组名====>/etc/ansible/hosts里设定的nginx,apache,web
- 主机名====>Web01,Web02
- all====>/etc/ansible/hosts里设定的所有主机
模块名====>command,cron,shell,file等
3.1 ping模块
Ansible中使用ping模块来检测指定主机的连通性
测试单主机
- [root@ansible~]#ansibleWeb01-m ping
- Web01|SUCCESS=>{
- “changed”:false,
- “ping”:”pong”
- }
测试单主机
- [root@ansible~]#ansibleWeb02-m ping
- Web02|SUCCESS=>{
- “changed”:false,
- “ping”:”pong”
- }
测试主机组
- [root@ansible~]#ansible nginx-m ping
- Web02|SUCCESS=>{
- “changed”:false,
- “ping”:”pong”
- }
- Web01|SUCCESS=>{
- “changed”:false,
- “ping”:”pong”
- }
测试所有的被管理主机
- [root@ansible~]#ansible all-m ping
- Web02|SUCCESS=>{
- “changed”:false,
- “ping”:”pong”
- }
- Web01|SUCCESS=>{
- “changed”:false,
- “ping”:”pong”
-
3.2 command模块
在远程主机执行命令,不支持管道符和重定向等复杂命令,可完全被shell模块替代
[root@ansible~]#ansibleWeb01-m command-a’uptime’
- Web01|SUCCESS|rc=0>>
- 22:14:43up9:43,3users,load average:0.00,0.01,0.05
- [root@ansible~]#ansibleWeb01-m command-a’ls’
- Web01|SUCCESS|rc=0>>
-
3.3 shell模块
Ansible中的shell模块可以在被管理主机上运行命令,并支持像管道符重定向这样的复杂命令。
在Web01上创建用户yunjisuan,并非交互方式设定密码
- [root@ansible~]#ansibleWeb01-m shell-a’useradd yunjisuan’
- Web01|SUCCESS|rc=0>>
- [root@ansible~]#ansibleWeb01-m shell-a’echo 123123 | passwd —stdin yunjisuan’
- Web01|SUCCESS|rc=0>>
- 更改用户yunjisuan的密码。
- passwd:所有的身份验证令牌已经成功更新。
- [root@ansible~]#ansibleWeb01-m shell-a’id yunjisuan’
- Web01|SUCCESS|rc=0>>
- uid=1000(yunjisuan)gid=1000(yunjisuan)组=1000(yunjisuan)
- [root@ansible~]#ansibleWeb01-m shell-a’tail -1 /etc/shadow’
- Web01|SUCCESS|rc=0>>
- yunjisuan:$6$4y7c1tkV$oPZW0psDdAzJp5RomBrOpSlTuvsdQ/5JaBYHU.LOPsYQ0o7EpPFRMuh/X9ruwcmBcZbN.l/glBTfDKm//jJP60:17782:0:99999:7:::
在所有被管理的主机的/etc/hosts文件里添加Ansible管理服务器的IP地址映射
- [root@ansible~]#ansible all-m shell-a’echo “ansible 192.168.200.183” >> /etc/hosts’
- Web02|SUCCESS|rc=0>>
- Web01|SUCCESS|rc=0>>
- [root@ansible~]#ansible all-m shell-a’tail -1 /etc/hosts’
- Web01|SUCCESS|rc=0>>
- ansible192.168.200.183
- Web02|SUCCESS|rc=0>>
- ansible192.168.200.183
3.4 cron模块
Ansible中的cron模块用于定义任务计划。主要包括两种状态(state);
- crontab时间周期:
- minute:分钟
- hour:小时
- day:日期
- month:月份
- weekday:周期
- crontab任务:
- job:指明运行的命令是什么
- crontab任务描述:
- name:定时任务描述(定时任务清除的依据)
- state状态:
- present:表示添加(省略状态时默认使用);
- absent:表示移除;
- crontab任务的用户身份:
- user:指定定时任务以哪个用户身份执行
添加定时任务计划,在所有被管理的主机里每十分钟输出hello字符串,定时任务描述为test cron job
- [root@ansible~]#ansible all-m cron-a’minute=”*/10” job=”/bin/echo hello” name=”test cron job”‘
- Web02|SUCCESS=>{
- “changed”:true,
- “envs”:[],
- “jobs”:[
- “test cron job”
- ]
- }
- Web01|SUCCESS=>{
- “changed”:true,
- “envs”:[],
- “jobs”:[
- “test cron job”
- ]
- }
- [root@ansible~]#ansible all-m shell-a’crontab -l’
- Web01|SUCCESS|rc=0>>
Ansible: test cron job
- /10 * /bin/echo hello
- Web02|SUCCESS|rc=0>>
Ansible: test cron job
- /10 * /bin/echo hello
删除描述为test cron job的定时任务
- [root@ansible~]#ansible all-m cron-a’minute=”*/10” job=”/bin/echo hello” name=”test cron job” state=absent’
- Web02|SUCCESS=>{
- “changed”:true,
- “envs”:[],
- “jobs”:[]
- }
- Web01|SUCCESS=>{
- “changed”:true,
- “envs”:[],
- “jobs”:[]
- }
- [root@ansible~]#ansible all-m shell-a’crontab -l’
- Web02|SUCCESS|rc=0>>
- Web01|SUCCESS|rc=0>>
给Web01服务器上的普通用户yunjisuan添加一个定时任务
- [root@ansible~]#ansibleWeb01-m shell-a’id yunjisuan’
- Web01|SUCCESS|rc=0>>
- uid=1000(yunjisuan)gid=1000(yunjisuan)组=1000(yunjisuan)
- [root@ansible~]#ansibleWeb01-m cron-a’minute=”*/10” job=”/bin/echo hello” name=”yunjisuan cron job” user=”yunjisuan”‘
- Web01|SUCCESS=>{
- “changed”:true,
- “envs”:[],
- “jobs”:[
- “yunjisuan cron job”
- ]
- }
- [root@ansible~]#ansibleWeb01-m shell-a’crontab -u yunjisuan -l’
- Web01|SUCCESS|rc=0>>
Ansible: yunjisuan cron job
- /10 * /bin/echo hello
- [root@ansible~]#ansibleWeb01-m cron-a’minute=”*/10” job=”/bin/echo hello” name=”yunjisuan cron job” user=”yunjisuan” state=”absent”‘
- Web01|SUCCESS=>{
- “changed”:true,
- “envs”:[],
- “jobs”:[]
- }
- [root@ansible~]#ansibleWeb01-m shell-a’crontab -u yunjisuan -l’
-
3.5 copy模块
Ansible中的copy模块用于实现文件复制和批量下发文件。其中使用src来定义本地源文件路径;使用dest定义被管理主机文件路径;使用content则是使用指定信息内容来生成目标文件。
将本地的/etc/hosts文件拷贝到所有被管理的主机的/etc/hosts路径下覆盖同名文件,并指定属主和权限,若拷贝的文件与目标文件内容不同,则备份目标文件再覆盖。
- [root@ansible~]#ansible all-m shell-a’tail -1 /etc/hosts’
- Web01|SUCCESS|rc=0>>
- ansible192.168.200.183
- Web02|SUCCESS|rc=0>>
- ansible192.168.200.183
- [root@ansible~]#echo”web01 192.168.200.184”>>/etc/hosts
- [root@ansible~]#tail-1/etc/hosts
- web01192.168.200.184
- [root@ansible~]#ansible all-m copy-a’src=/etc/hosts dest=/etc/hosts owner=root mode=640 backup=yes’
- Web01|SUCCESS=>{
- “backup_file”:”/etc/hosts.13083.2018-09-09@00:38:35~”,
- “changed”:true,
- “checksum”:”80244bc6f9638a3505aae1a2bcf2228e69a00420”,
- “dest”:”/etc/hosts”,
- “gid”:0,
- “group”:”root”,
- “md5sum”:”de48f3cf45d11215fa7cfd0d558be954”,
- “mode”:”0640”,
- “owner”:”root”,
- “size”:180,
- “src”:”/root/.ansible/tmp/ansible-tmp-1536424715.44-39054260112988/source”,
- “state”:”file”,
- “uid”:0
- }
- Web02|SUCCESS=>{
- “backup_file”:”/etc/hosts.12643.2018-09-09@00:38:36~”,
- “changed”:true,
- “checksum”:”80244bc6f9638a3505aae1a2bcf2228e69a00420”,
- “dest”:”/etc/hosts”,
- “gid”:0,
- “group”:”root”,
- “md5sum”:”de48f3cf45d11215fa7cfd0d558be954”,
- “mode”:”0640”,
- “owner”:”root”,
- “size”:180,
- “src”:”/root/.ansible/tmp/ansible-tmp-1536424715.45-15307684711466/source”,
- “state”:”file”,
- “uid”:0
- }
- [root@ansible~]#ansible all-m shell-a’tail -1 /etc/hosts’
- Web02|SUCCESS|rc=0>>
- web01192.168.200.184
- Web01|SUCCESS|rc=0>>
- web01192.168.200.184
- [root@ansible~]#ansible all-m shell-a’ls /etc/hosts*’
- Web01|SUCCESS|rc=0>>
- /etc/hosts
- /etc/hosts.13083.2018-09-09@00:38:35~#这就是备份的文件
- /etc/hosts.allow
- /etc/hosts.deny
- Web02|SUCCESS|rc=0>>
- /etc/hosts
- /etc/hosts.12643.2018-09-09@00:38:36~#这就是备份的文件
- /etc/hosts.allow
- /etc/hosts.deny
将本地/tmp/test.sh的脚本复制到远程主机上并远程激活
- [root@ansible~]#cat/tmp/test.sh
!/bin/bash
- echo”welcome to yunjisuan”
- [root@ansible~]#ansible all-m copy-a’src=/tmp/test.sh dest=/tmp owner=root mode=500’
- Web01|SUCCESS=>{
- “changed”:true,
- “checksum”:”70ae837e7367f5d4de9a3197709639ae14743000”,
- “dest”:”/tmp/test.sh”,
- “gid”:0,
- “group”:”root”,
- “md5sum”:”5ff4338de7d9ff0ded9fa3e0ecd15bab”,
- “mode”:”0500”,
- “owner”:”root”,
- “size”:41,
- “src”:”/root/.ansible/tmp/ansible-tmp-1536425049.22-149074464676784/source”,
- “state”:”file”,
- “uid”:0
- }
- Web02|SUCCESS=>{
- “changed”:true,
- “checksum”:”70ae837e7367f5d4de9a3197709639ae14743000”,
- “dest”:”/tmp/test.sh”,
- “gid”:0,
- “group”:”root”,
- “md5sum”:”5ff4338de7d9ff0ded9fa3e0ecd15bab”,
- “mode”:”0500”,
- “owner”:”root”,
- “size”:41,
- “src”:”/root/.ansible/tmp/ansible-tmp-1536425049.23-32532320097185/source”,
- “state”:”file”,
- “uid”:0
- }
- [root@ansible~]#ansible all-m shell-a’/tmp/test.sh’
- Web01|SUCCESS|rc=0>>
- welcome to yunjisuan
- Web02|SUCCESS|rc=0>>
-
3.6 script模块
Ansible中的script模块可以将本地脚本复制到被管理主机的内存中并运行,不会在被管理主机中留下脚本文件。
编写一个脚本,然后通过ansible的script模块远程向被管理主机执行此脚本
- [root@ansible~]#echo’echo “1111” >> /tmp/test’>>/tmp/test.sh
- [root@ansible~]#cat/tmp/test.sh
- echo”1111”>>/tmp/test
- [root@ansible~]#ansible all-m script-a’/tmp/test.sh’
- Web01|SUCCESS=>{
- “changed”:true,
- “rc”:0,
- “stderr”:”Shared connection to 192.168.200.184 closed.\r\n”,
- “stderr_lines”:[
- “Shared connection to 192.168.200.184 closed.”
- ],
- “stdout”:””,
- “stdout_lines”:[]
- }
- Web02|SUCCESS=>{
- “changed”:true,
- “rc”:0,
- “stderr”:”Shared connection to 192.168.200.185 closed.\r\n”,
- “stderr_lines”:[
- “Shared connection to 192.168.200.185 closed.”
- ],
- “stdout”:””,
- “stdout_lines”:[]
- }
- [root@ansible~]#ansible all-m shell-a’cat /tmp/test’
- Web02|SUCCESS|rc=0>>
- 1111
- Web01|SUCCESS|rc=0>>
- 1111
3.7 yum模块
利用yum模块安装软件包,虽然能被shell模块替代
但是用yum模块更显专业一些
- 软件包名:
- name:指定软件包的名字
- state状态:
- present:安装软件包(默认就是这个)
- absent:卸载软件包
安装nmap软件包
- [root@ansible~]#ansible all-m yum-a’name=nmap’
卸载nmap软件包
- [root@ansible~]#ansible all-m yum-a’name=nmap state=absent’
3.8 service模块
利用service模块管理服务程序,虽然能被shell模块替代
但是用service模块更显专业一些
- 服务名称:
- name:指定服务的名字
- state状态:
- started:启动服务
- stopped:停止服务
- restarted:重启服务
- reloaded:平滑重载
- enabled开机自启动:
- true:设置开机自启动
- false:设置开启不启动
启动firewalld并设置开机自启动
- [root@ansible~]#ansibleWeb01-m service-a’name=firewalld state=started enabled=true’
关闭firewalld并设置开机不启动
- [root@ansible~]#ansibleWeb01-m service-a’name=firewalld state=stopped enabled=false’
3.9 user模块
用户管理模块。管理用户账号
- :指定用户名
- name:指定操作的用户的名字
- :用户描述
- comment:指定用户的描述信息
- :createhome:是否创建家目录
- :uid:指定用户的uid号
- :groups:指定用户的附加组(默认创建和用户名相同的组)
- :password:指定用户的密码
- :update_password:更新用户的密码
- :shell指定用户的登陆方式
- /bin/bash:能登录系统
- /sbin/nologin:不能登录系统
- :home:指定用户的家目录路径
- :state状态:
- present:创建用户(默认就是这个)
- absent:删除用户
- :remove:当指定state=absent时,确认是否删除用户家目录
- true
- false
在Web02上创建一个普通用户yunjisuan,并设置用户的密码为123123
- [root@ansible~]#ansibleWeb02-m user-a’name=yunjisuan comment=”welcom to yunjisuan” uid=1066 groups=wheel password=123123 shell=/bin/bash home=/home/yunjisuan’
- Web02|SUCCESS=>{
- “changed”:true,
- “comment”:”welcom to yunjisuan”,
- “create_home”:true,
- “group”:1066,
- “groups”:”wheel”,
- “home”:”/home/yunjisuan”,
- “name”:”yunjisuan”,
- “password”:”NOT_LOGGING_PASSWORD”,
- “shell”:”/bin/bash”,
- “state”:”present”,
- “system”:false,
- “uid”:1066
- }
- [root@ansible~]#ansibleWeb02-m shell-a’tail -1 /etc/passwd’
- Web02|SUCCESS|rc=0>>
- yunjisuan:x:1066:1066:welcom to yunjisuan:/home/yunjisuan:/bin/bash
- [root@ansible~]#ansibleWeb02-m shell-a’tail -1 /etc/shadow’
- Web02|SUCCESS|rc=0>>
- yunjisuan:123123:17783:0:99999:7:::#密码居然是明文!!!
利用ansible的user模块状态用户时要注意在password参数的后边添加密文,否则不能登陆用户
通过Python的pip程序安装passlib即可为密码加密
安装Python2的pip工具,并通过pip工具安装Python的加密模块来给密码加密
- [root@ansible~]#yum-y install epel-release
- [root@ansible~]#yum-y install python2-pip
- [root@ansible~]#pip install passlib
生成密文密码
- [root@ansible~]#python-c”from passlib.hash import sha512_crypt;import getpass;print sha512_crypt.encrypt(getpass.getpass())”
- Password:#输入你想要加密的密码
- $6$rounds=656000$Tw15COd8DLh/VS94$Mcmz/8CcjBKiEl0mYHcOQQCxEA5mz66EcGH2qXVk6o.Sm7FsRS.DsDVy6ET8iI6jDa045I94slZqWFwyYnRSW1#加密后的密码
删除之前创建的yunjisuan用户,并删除它的家目录
- [root@ansible~]#ansibleWeb02-m user-a’name=yunjisuan state=absent remove=true’
- Web02|SUCCESS=>{
- “changed”:true,
- “force”:false,
- “name”:”yunjisuan”,
- “remove”:true,
- “state”:”absent”
- }
继续在Web02上创建yunjisuan用户
- [root@ansible~]#ansibleWeb02-m user-a’name=yunjisuan comment=”welcom to yunjisuan” uid=1066 groups=wheel password=$6$rounds=656000$Tw15COd8DLh/VS94$Mcmz/8CcjBKiEl0mYHcOQQCxEA5mz66EcGH2qXVk6o.Sm7FsRS.DsDVy6ET8iI6jDa045I94slZqWFwyYnRSW1 shell=/bin/bash’home=/home/yunjisuan’
- [root@ansible ~]# ansible Web02 -m shell -a ‘tail-1/etc/shadow’
- Web02 | SUCCESS | rc=0 >>
yunjisuan:$6$rounds=656000$Tw15COd8DLh/VS94$Mcmz/8CcjBKiEl0mYHcOQQCxEA5mz66EcGH2qXVk6o.Sm7FsRS.DsDVy6ET8iI6jDa045I94slZqWFwyYnRSW1:17783:0:99999:7::: #终于密文了
3.10 setup模块
Ansible中使用setup模块收集,查看被管理主机的facts(facts是Ansible采集被管理主机设备信息的一个功能)。每个被管理主机在接收并运行管理命令之前,都会将自己的相关信息(操作系统版本,IP地址等)发送给控制主机
查看远程主机的facts信息
- [root@ansible~]#ansibleWeb01-m setup|head
- Web01|SUCCESS=>{
- “ansible_facts”:{
- “ansible_all_ipv4_addresses”:[
- “192.168.200.184”
- ],
- “ansible_all_ipv6_addresses”:[
- “fe80::20c:29ff:fe77:16ad”
- ],
- “ansible_apparmor”:{
- “status”:”disabled”
四,作业与思考:Ansible批量管理企业应用案例
在工作中我们如何利用ansible进行服务器的批量管理和维护?4.1 利用ansible批量下发文件,脚本和目录
4.2 利用ansible给多台服务器批量创建程序用户
4.3 利用ansible给多台服务器批量修改root密码
4.4 利用ansible给多台服务器创建普通登陆用户并设置初始密码及sudo授权
4.5 利用ansible给多台服务器的普通用户下发定时任务
4.6 利用ansible批量获取多台服务器的CPU,MEM,IO信息
4.7 利用ansible对远程服务器进行批量系统初始优化及服务器基本安全加固
+

若有收获,就点个赞吧
0 人点赞
