一、JDBC简介
JDBC(Java DataBase Connectivity, java 数据库连接)是一种用于执行 SQL 语句的 Java API,可以为多种关系数据库提供统一访问,它由一组用 java 语言编写的类和接口组成。JDBC 提供了一个种基准,据此可以构建更高级的工具和接口,使数据库开发人员能够编写数据库应用程序,同时,JDBC 也是个商标名。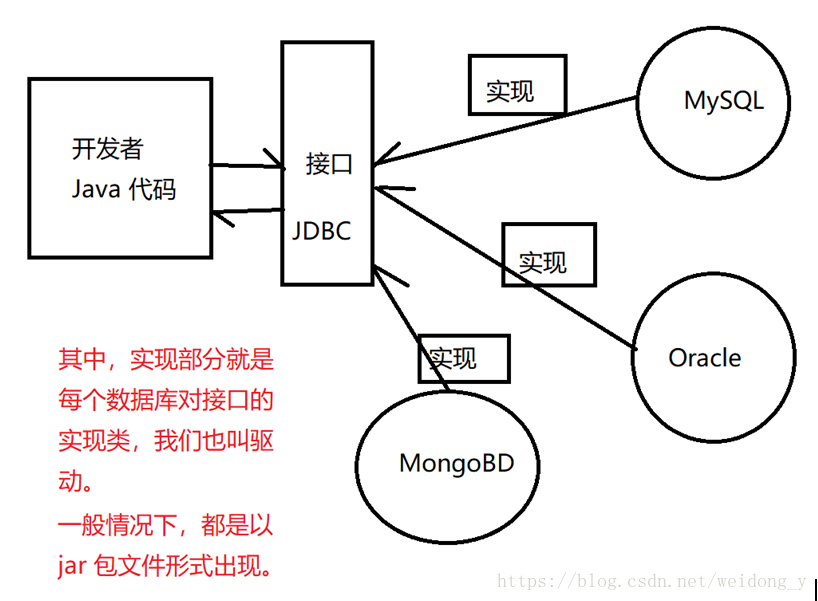
如果我们在程序中使用 JDBC 的话,需要导入一个数据库驱动,这个驱动就是我们的连接接口,主要开发者调用对应的方法,设置好对应的数据,即可访问对应的数据库进行操作。
【准备数据】
1. CREATE TABLE product (2. id INT PRIMARY KEY AUTO_INCREMENT,3. NAME VARCHAR(30),4. price DOUBLE,5. mark VARCHAR(100)6. );7.8. INSERT INTO product(NAME, price, mark) VALUES ('凹凸曼', 19.5, '超帅的凹凸曼');9. INSERT INTO product(NAME, price, mark) VALUES ('五粮液', 59.5, '快涨了的');10. INSERT INTO product(NAME, price, mark) VALUES ('伊利牛奶', 3.5, '想长高嘛?');11. INSERT INTO product(NAME, price, mark) VALUES ('小猪佩琪', 29.5, '社会人的标志');
二、JDBC 的开发步骤
1)注册驱动:主要告诉 JVM 我们的程序将要使用哪一种数据库
2)获取连接:使用 JDBC 中的类,获得数据库的连接对象 Connection
3)获得语句执行平台:通过 Connection 可以获取执行者对象,Statement、PreparedStatement.
4)执行 SQL 语句:使用执行者对象,向数据库中执行 SQL 语句,然后可以得到对应的接口,有单个结果,也可能有结果集 ResultSet。
5)处理结果
6)释放对象:关闭顺序:rs -> stmt 、ptmt -> conn
三、JDBC 的简单使用
1. @Test2. public void fun1() throws Exception {3. // 1.注册驱动4. // 这里,其实是用到了反射的原理,通过给定类的名字,让程序自动去找对应的类5. // 然后执行得到对应实例6. Class.forName("com.mysql.jdbc.Driver");7.8. // 使用注册方法的时候,底层会注册两次,不推荐使用9. // DriverManager.registerDriver(new com.mysql.jdbc.Driver());10.11. // 2.获取连接:数据库地址、用户名、密码 Connection12. String url = "jdbc:mysql://localhost:3306/test";13. String user = "root";14. String password = "root";15. Connection conn = DriverManager.getConnection(url, user, password);16.17. // 3.获取执行者对象18. Statement stmt = conn.createStatement();19.20. // 4.准备 SQL 语句21. String sql = "select * from product";22.23. // 5.执行 SQL 语句24. ResultSet rs = stmt.executeQuery(sql);25.26. // 6.处理结果27. while (rs.next()) {28. int idStr = rs.getInt("id");29. String nameStr = rs.getString("name");30. double priceStr = rs.getDouble("price");31. String markStr = rs.getString("mark");32. System.out.println(idStr + "--" + nameStr + "--" + markStr);33. }34.35. // 7.关闭资源36. rs.close();37. stmt.close();38. conn.close();39. }
四、抽取 JDBC 工具类
在实际开发中,我们经常会碰到一些重复的代码,比如在获取某些资源的时候,解析某些数据的时候,都是需要重复去做一些相似的动作,这个时候很有必要抽取这些重复的代码成一个工具类,方面后面的使用。
很明显,我们每次操作数据库的,都需要连接数据库和关闭数据库,所有我们可以把数据库的连接和关闭都给抽取出来,作为公共部分。
新建一个 JDBCUtil.java 类。
1. public class JDBCUtils {2. // 重构:一旦发现代码用起来不是很爽的时候,一直有重复动作,必须想把饭抽取出来一个新的3. public JDBCUtils() {4. }5.6. public static Connection conn;7.8. // 静态块:在类初始化之后,会加载一次9. // 一般情况,我们会将一些常用的数据,放在静态块中进行加载10. // 加载完成之后,后面如果想要用的话,直接就可以用11. // 优点是,只会创建一次,不会重复创建良妃性能12. static {13. try {14. // 1.注册驱动15. Class.forName("com.mysql.jdbc.Driver");16. // 2.获取连接:数据库地址、用户名、密码 Connection17. String url = "jdbc:mysql://localhost:3306/test";18. String user = "root";19. String password = "root";20. conn = DriverManager.getConnection(url, user, password);21. } catch (Exception e) {22. e.printStackTrace();23. }24. }25.26. /**27. * 获取 Connection 对象28. */29. public static Connection getConnection() {30. return conn;31. }32.33. /**34. * 释放资源35. */36. public static void close(Statement stmt, Connection conn) {37. // 思路:在关闭资源之前,先要判断,到底有没有用到这个资源38. if (stmt != null) {39. try {40. stmt.close();41. } catch (SQLException e) {42. e.printStackTrace();43. }44. }45. if (conn != null) {46. try {47. conn.close();48. } catch (SQLException e) {49. e.printStackTrace();50. }51. }52. }53.54. public static void close(ResultSet rs, Statement stmt, Connection conn) {55. if (rs != null) {56. try {57. rs.close();58. } catch (SQLException e) {59. e.printStackTrace();60. }61. }62. if (stmt != null) {63. try {64. stmt.close();65. } catch (SQLException e) {66. e.printStackTrace();67. }68. }69. if (conn != null) {70. try {71. conn.close();72. } catch (SQLException e) {73. e.printStackTrace();74. }75. }76. }77.78. }
改写上面的类:(可以发现抽出公共部分之后,以后每次写的代码都会大大减少)
1. @Test2. public void fun2() throws Exception {3. // 1.获取数据库连接4. Connection conn = JDBCUtils.getConnection();5.6. // 2.准备 SQL 语句7. String sql = "select * from product";8.9. // 3.获取执行者对象10. Statement stmt = conn.createStatement();11.12. // 4.执行 SQL 语句13. ResultSet rs = stmt.executeQuery(sql);14.15. // 5.处理结果16. while (rs.next()) {17. int idStr = rs.getInt("id");18. String nameStr = rs.getString("name");19. double priceStr = rs.getDouble("price");20. String markStr = rs.getString("mark");21. System.out.println(idStr + "--" + nameStr + "--" + markStr);22. }23.24. // 6.关闭资源25. JDBCUtils.close(rs, stmt, conn);26. }
五、SQL 的注入(了解)
SELECT * FROM product WHERE NAME = ‘伊利牛奶’ AND price= 3.5
使用 PreparedStatement 对象,可以预防SQL 注入和提高 SQL 的预编译。
1. @Test2. public void fun3() throws Exception {3. // 1.获取数据库连接4. Connection conn = JDBCUtils.getConnection();5.6. // 2. 获取执行者对象7. // 如果使用 Statement 的话,则有可能会被 SQL 注入破坏8. // Statement stmt = conn.createStatement();9. // 推荐使用 PreparedStatement,它是 Statement 的子类,10. // 可以预防 SQL 注入,而且还可以把我们的 SQL 语句进行预初始化11.12. // 3. 准备 SQL 语句13. String sql = "select * from product where NAME = ? and price = ?";14. PreparedStatement ptmt = conn.prepareStatement(sql);15. // 这里的 1和2 表示的 where 后面的第n个属性16. ptmt.setString(1, "伊利牛奶");17. ptmt.setDouble(2, 3.5);18.19. // 4. 执行 SQL 语句20. ResultSet rs = ptmt.executeQuery();21.22. // 5. 处理结果23. while (rs.next()) {24. int idStr = rs.getInt("id");25. String nameStr = rs.getString("NAME");26. String passStr = rs.getString("price");27. System.out.println(idStr + "--" + nameStr + "--" + passStr);28. }29.30. // 6. 关闭资源31. JDBCUtils.close(rs, ptmt, conn);32. }
六、PreparedStatement 的简单使用
主要演示了“修改”功能,至于其他的功能,有时间再自己实践下。
1. @Test2. public void fun4() throws Exception {3.4. // 1.获取数据库连接5. Connection conn = JDBCUtils.getConnection();6.7. // 2. 准备 SQL 语句8. String sql = "update product set name = ?, price = ? where id = ?";9.10. PreparedStatement ptmt = conn.prepareStatement(sql);11.12. ptmt.setString(1, "奥特曼");13. ptmt.setString(2, "49.8");14. ptmt.setInt(3, 1);15.16. // 3. 执行 SQL 语句17. // 此处的返回值是 int 类型,如果有一条数据发生改变的话,则返回 118. int i = ptmt.executeUpdate();19.20. // 4. 处理结果21. if (i == 1) {22. System.out.println("恭喜你,修改成功了...");23. }24.25. // 6. 关闭资源26. JDBCUtils.close(ptmt, conn);27. }
七、封装数据
如果要封装数据的话,则需要新建一个对应的 JavaBean 类
如果要提供一个 JavaBean 的话,需要满足三个条件:、
1)实现序列化接口
2)提供字段
3)提供字段对应的 get 和 set 方法
注意: JavaBean 的命名,最好和对应的数据表一致。主要为了更好体现类与表的映射关系。
1. public class Product {2. private int id;3. private String NAME;4. private double price;5. private String mark;6.7. public Product(int id, String nAME, double price, String mark) {8. super();9. this.id = id;10. NAME = nAME;11. this.price = price;12. this.mark = mark;13. }14. public int getId() {15. return id;16. }17. public void setId(int id) {18. this.id = id;19. }20. public String getNAME() {21. return NAME;22. }23. public void setNAME(String nAME) {24. NAME = nAME;25. }26. public double getPrice() {27. return price;28. }29. public void setPrice(double price) {30. this.price = price;31. }32. public String getMark() {33. return mark;34. }35. public void setMark(String mark) {36. this.mark = mark;37. }38. }
查询所有数据:
1. /**2. * 封装数据3. * @throws Exception4. */5. @Test6. public void fun5() throws Exception {7.8. // 1. 获取数据库连接9. Connection conn = JDBCUtils.getConnection();10.11. // 2. 准备 SQL 语句12. String sql = "select * from product";13.14. PreparedStatement ptmt = conn.prepareStatement(sql);15.16. // 3. 执行 SQL 语句17. ResultSet rs = ptmt.executeQuery();18.19. // 4. 创建一个集合,用来保存查询出来的对象实例20. // 菱形语法,在泛型中,用来指定集合中存储的内容类型21. List<Product> proList = new ArrayList<Product>();22.23. // 5. 处理结果24. while (rs.next()){25. // 5.1 获取目标对象的实例,可以通过有参构造器26. int id = rs.getInt("id");27. String name = rs.getString("name");28. double price = rs.getDouble("price");29. String mark = rs.getString("mark");30. Product pro = new Product(id, name, price, mark);31. proList.add(pro);32. }33.34. // 5.2 查看保存数据的集合35. for (Product pro : proList) {36. System.out.println("商品的名字是:" + pro.getNAME());37. }38.39. // 6. 关闭资源40. JDBCUtils.close(rs, ptmt, conn);41. }
八、Properties 配置文件
在实际开发中,我们一般情况下,会把配置相关的信息,放在 xx.properties 中保存,并且使用。因为,以后代码有可能写的非常复杂,像一些不经常改动的东西,都建议抽取出来保存到配置文件中。当我们要用的时候,直接从配置文件中获取使用。当我们需要修改的时候,显示找到文件,然后就可以直接修改即可。很方便的。
一般情况下,都是写死的内容,不会经常改动的。
8.1 编写 jdbc.properties 文件
1. driver=com.mysql.jdbc.Driver2. url=jdbc:mysql://localhost:3306/test3. user=root4. password=root
8.2 重写 JDBCUtils.java
1. public class JDBCUtils2 {2. public JDBCUtils2() {3. }4.5. public static Connection conn;6.7. private static String driver;8. private static String url;9. private static String user;10. private static String password;11.12. static {13. try {14. // 0.加载配置文件,获取对应的信息15. readConfig();16. // 1.注册驱动17. Class.forName(driver);18. // 2.获取连接:数据库地址、用户名、密码 Connection19. conn = DriverManager.getConnection(url, user, password);20. } catch (Exception e) {21. e.printStackTrace();22. }23. }24.25. /**26. * 用来加载配置文件27. *28. * source folder 在部署之后,他的路径就是 bin 路径,也就是 classes 类资源路径29. *30. * @throws IOException31. */32. public static void readConfig() throws IOException {33. // 1.找到文件,并且加载文件34. InputStream is = JDBCUtils2.class.getClassLoader().getResourceAsStream("jdbc.properties");35. System.out.println("is 的值:" + is);36.37. // 2.从文件中获取数据38. Properties pro = new Properties();39.40. // 3.通过输入流加载数据41. pro.load(is);42.43. // 4.当获取到数据之后,应该把数据赋值给上面的变量44. driver = pro.getProperty("driver");45. url = pro.getProperty("url");46. user = pro.getProperty("user");47. password = pro.getProperty("password");48. }49.50. /**51. * 获取 Connection 对象52. */53. public static Connection getConnection() {54. return conn;55. }56.57. /**58. * 释放资源59. */60. public static void close(Statement stmt, Connection conn) {61. // 思路:在关闭资源之前,先要判断,到底有没有用到这个资源62. if (stmt != null) {63. try {64. stmt.close();65. } catch (SQLException e) {66. e.printStackTrace();67. }68. }69. if (conn != null) {70. try {71. conn.close();72. } catch (SQLException e) {73. e.printStackTrace();74. }75. }76. }77.78. public static void close(ResultSet rs, Statement stmt, Connection conn) {79. if (rs != null) {80. try {81. rs.close();82. } catch (SQLException e) {83. e.printStackTrace();84. }85. }86. if (stmt != null) {87. try {88. stmt.close();89. } catch (SQLException e) {90. e.printStackTrace();91. }92. }93. if (conn != null) {94. try {95. conn.close();96. } catch (SQLException e) {97. e.printStackTrace();98. }99. }100. }101.

若有收获,就点个赞吧
0 人点赞
