零声学院 Darren qq326873713
FFmpeg/WebRTC/RTMP音视频流媒体高级开发 https://ke.qq.com/course/468797?tuin=137bb271
1 简介
Janus 是一个开源的,通过 C 语言实现了对 WebRTC 支持的 Gateway;Janus 自身实现得很简单,提供插件机制来支持不同的业务逻辑,配合官方自带插件就可以用来实现高效的 Media Server 服务。
本文主要介绍如何在 Ubuntu 16.04 下搭建起 janus 服务器,实现 janus 官方 Demo 浏览器与 Android APP Demo(janus-gateway-android)之间的音视频通话。
浏览器打开音视频采集的话需要 HTTPS 加密访问!
效果图如下:
Janus 官网:https://janus.conf.meetecho.com/index.html
参考文档:https://github.com/meetecho/janus-gateway
2 下载和编译 Janus
编译运行 Janus Server 需要依赖较多的一些第三方库,而这些依赖库在 Ubuntu 下主要通过 aptitude 进行安装,首先通过安装 aptitude:
sudo apt-get install aptitude
2.1 命令安装依赖
Ubuntu 下通过 aptitude 批量安装依赖工具包,这里建议 Ubuntu 镜像源(/etc/apt/source.list)不要为了追求速度而改用了国内的某些镜像源,如 网易 163,这可能会导致某些工具包下载失败,建议依然使用官方自带的镜像源。
批量安装命令:
sudo aptitude install libmicrohttpd-dev libjansson-dev libnice-dev \libssl1.0.1-dev libsrtp-dev libsofia-sip-ua-dev libglib2.3.4-dev \libopus-dev libogg-dev libcurl4-openssl-dev pkg-config gengetopt \libtool automakesudo apt install cmakesudo aptitude install libconfig-devsudo aptitude install libssl-devsudo aptitude install doxygen graphviz# ffmpeg库 支持--enable-post-processingsudo aptitude install libavcodec-dev libavformat-dev libswscale-dev libavutil-dev
如果出现某个工具包下载失败,请修改镜像源为官方地址,并执行以下命令
sudo apt-get update && sudo apt-get upgrade
以更新镜像源,完成后重新安装。
附录:卸载命令
apt-get remove 会删除软件包而保留软件的配置文件apt-get purge 会同时清除软件包和软件的配置文件
查找包命令
查找软件包apt-cache search 软件包名显示软件包的详细信息apt-cache show 软件包名
2.2 源码安装依赖
2.2.1 安装 WebSocket
janus 支持 WebSocket 是可选项,如果不安装,编译 janus 时,默认不支持 WebSocket 的链接请求,而 Android APP Demo 是通过 WebSocket 与 janus 进行通信的,因为我们希望 Android APP Demo 能与浏览器(HTTP)进行视频通话,所以就必须要在编译 janus 时支持 WebSocket。
依次执行以下命令,分别进行下载,编译,安装:
git clone https://github.com/warmcat/libwebsockets.gitcd libwebsocketsgit branch -a 查看选择最新的稳定版本,目前的是remotes/origin/v3.2-stablegit checkout v3.2-stable 切换到最新稳定版本mkdir buildcd buildcmake -DCMAKE_INSTALL_PREFIX:PATH=/usr -DCMAKE_C_FLAGS="-fpic" ..make && sudo make install
安装成功后,在编译 janus 时,janus 默认会增加对 WebSocket 的集成,或者通过增加编译参数 —enable-websockets 打开 WebSocket 开关,或 —disable-websockets 关闭 WebSocket 开关。
2.2.2 安装 libsrtp
Janus 需要至少 version 1.5 以上的 libsrtp,如果系统中已经安装了 libsrtp,则首先卸载后,手动安装新版本,这里我们安装 libsrtp 2.2,依次执行以下命令:
wget https://github.com/cisco/libsrtp/archive/v2.2.0.tar.gz
tar xfv v2.2.0.tar.gz
cd libsrtp-2.2.0
./configure --prefix=/usr --enable-openssl
make shared_library && sudo make install
2.2.3 安装libusrsctp
libusrsctp支持—enable-data-channels
git clone https://github.com/Kurento/libusrsctp.git
cd libusrsctp
./bootstrap
./configure
make
sudo make install
2.2.4 安装libmicrohttpd
libmicrohttpd支持—enable-rest
wget https://ftp.gnu.org/gnu/libmicrohttpd/libmicrohttpd-0.9.71.tar.gz
tar zxf libmicrohttpd-0.9.71.tar.gz
cd libmicrohttpd-0.9.71/
./configure
make
sudo make install
2.3 编译 Janus
通过 Git 下载 Janus 源码,并编译安装:
git clone https://github.com/meetecho/janus-gateway.git
git tag 查看当前的 tag,选择最新稳定的版本v0.10.4
git  checkout v0.10.4
sh autogen.sh
./configure --prefix=/opt/janus --enable-websockets --enable-post-processing --enable-docs --enable-rest --enable-data-channels
make
sudo make install
make install的时候,将janus安装到 /opt/janus路径,插件的so库在/opt/janus/lib/janus/plugins
configure 执行成功后,会输出 janus 所支持的 协议及插件,如下:
ompiler:                  gcc
libsrtp version:           2.x
SSL/crypto library:        OpenSSL
DTLS set-timeout:          not available
Mutex implementation:      GMutex (native futex on Linux)
DataChannels support:      yes
Recordings post-processor: yes
TURN REST API client:      yes
Doxygen documentation:     yes
Transports:
    REST (HTTP/HTTPS):     yes
    WebSockets:            yes
    RabbitMQ:              no
    MQTT:                  no
    Unix Sockets:          yes
    Nanomsg:               no
Plugins:
    Echo Test:             yes
    Streaming:             yes
    Video Call:            yes
    SIP Gateway:           yes
    NoSIP (RTP Bridge):    yes
    Audio Bridge:          yes
    Video Room:            yes
    Voice Mail:            yes
    Record&Play:           yes
    Text Room:             yes
    Lua Interpreter:       no
    Duktape Interpreter:   no
Event handlers:
    Sample event handler:  yes
    WebSocket ev. handler: yes
    RabbitMQ event handler:no
    MQTT event handler:    no
    Nanomsg event handler: no
    GELF event handler:    yes
External loggers:
    JSON file logger:      no
JavaScript modules:        no
3 配置和运行janus
3.1 配置nginx
生成证书
mkdir -p ~/cert
cd ~/cert
# CA私钥
openssl genrsa -out key.pem 2048
# 自签名证书
openssl req -new -x509 -key key.pem -out cert.pem -days 1095
安装nginx
#下载nginx 1.15.8版本
wget http://nginx.org/download/nginx-1.15.8.tar.gz
tar xvzf nginx-1.15.8.tar.gz
cd nginx-1.15.8/


# 配置,一定要支持https
./configure --with-http_ssl_module

# 编译
make

#安装
sudo make install
修改nginx配置文件
/usr/local/nginx/conf/nginx.conf
指向janus所在目录/opt/janus/share/janus/demos
# HTTPS server
    #
    server {
        listen       443 ssl;
        server_name  localhost;
                # 配置相应的key
        ssl_certificate      /home/ubuntu/cert/cert.pem;
        ssl_certificate_key  /home/ubuntu/cert/key.pem;

        ssl_session_cache    shared:SSL:1m;
        ssl_session_timeout  5m;

        ssl_ciphers  HIGH:!aNULL:!MD5;
        ssl_prefer_server_ciphers  on;
                # 指向janus demo所在目录
        location / {
            root   /opt/janus/share/janus/demos;
            index  index.html index.htm;
        }
    }
启动nginx
sudo /usr/local/nginx/sbin/nginx
然后通过
https://111.229.231.225/
可以访问到界面,但此时还不能正常通话。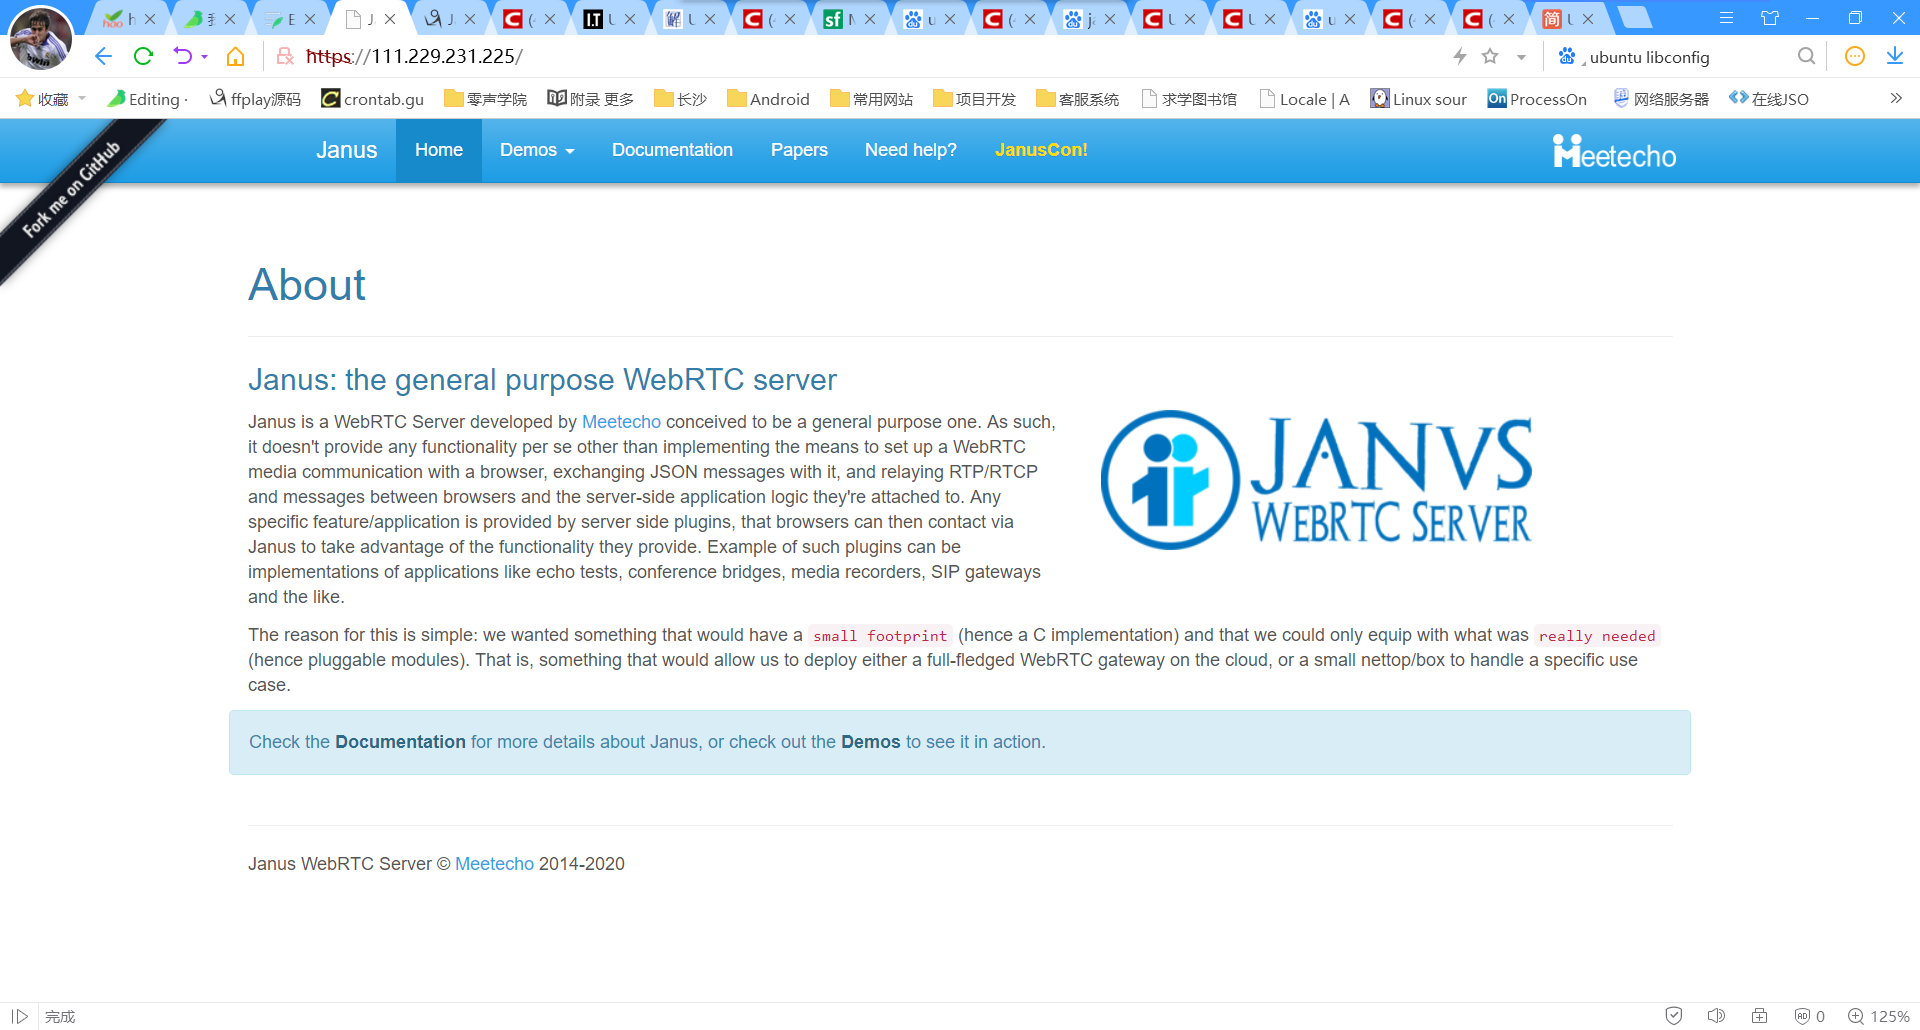
3.2 安装和启动coturn
sudo apt-get install libssl-dev
sudo apt-get install libevent-dev


#git clone https://github.com/coturn/coturn
#cd coturn
# 提供另一种安装方式turnserver是coturn的升级版本
wget http://coturn.net/turnserver/v4.5.0.7/turnserver-4.5.0.7.tar.gz
tar xfz turnserver-4.5.0.7.tar.gz
cd turnserver-4.5.0.7

./configure
make
sudo make install
启动
sudo nohup turnserver -L 0.0.0.0 --min-port 30000 --max-port 60000 -a -u lqf:123456 -v -f -r nort.gov &
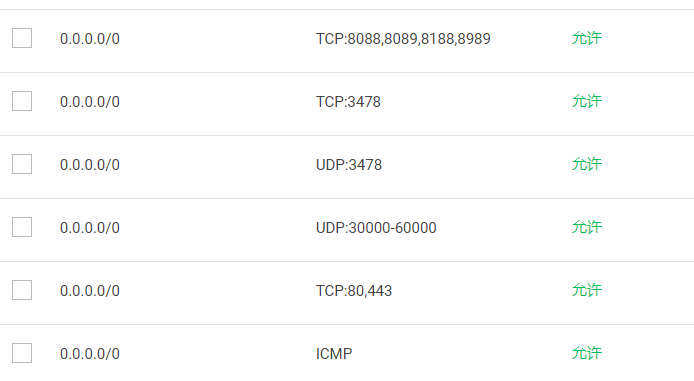
需要在安全组开放端口:
TCP/UDP 3478
UDP 30000-60000
3.3 配置janus的jcfg文件
janus配置
janus安装目录在/opt/janus
| ./bin | ./etc | ./include | ./lib | ./share |
|---|---|---|---|---|
| 可执行文件 | janus配置文件 | janus头文件 | janus库 | 存放脚本或者文档,web demo也在这里 |
配置Video room
我们先配置video room
需要配置的文件为(目录/opt/janus/etc/janus):
并开通8088,8089;8188,8989
要先把.sample后缀的文件拷贝成jcfg后缀
# 进到对应的目录
cd /opt/janus/etc/janus
# 拷贝文件
sudo cp janus.jcfg.sample janus.jcfg
sudo cp janus.transport.http.jcfg.sample janus.transport.http.jcfg
sudo cp janus.transport.websockets.jcfg.sample janus.transport.websockets.jcfg
sudo cp janus.plugin.videoroom.jcfg.sample janus.plugin.videoroom.jcfg
sudo cp janus.transport.pfunix.jcfg.sample janus.transport.pfunix.jcfg
sudo cp janus.plugin.streaming.jcfg.sample janus.plugin.streaming.jcfg
sudo cp janus.plugin.recordplay.jcfg.sample janus.plugin.recordplay.jcfg
sudo cp janus.plugin.voicemail.jcfg.sample janus.plugin.voicemail.jcfg
sudo cp janus.plugin.sip.jcfg.sample janus.plugin.sip.jcfg
sudo cp janus.plugin.nosip.jcfg.sample janus.plugin.nosip.jcfg
sudo cp janus.plugin.textroom.jcfg.sample  janus.plugin.textroom.jcfg
sudo cp janus.plugin.echotest.jcfg.sample janus.plugin.echotest.jcfg
配置janus.jcfg
# 大概237行
stun_server = "111.229.231.225"
        stun_port = 3478
        nice_debug = false

#大概274行
# credentials to authenticate...
        turn_server = "111.229.231.225"
        turn_port = 3478
        turn_type = "udp"
        turn_user = "lqf"
        turn_pwd = "123456"
配置janus.transport.http.jcfg
general: {
        #events = true                                  # Whether to notify event handlers about transport events (default=true)
        json = "indented"                               # Whether the JSON messages should be indented (default),
                                                                        # plain (no indentation) or compact (no indentation and no spaces)
        base_path = "/janus"                    # Base path to bind to in the web server (plain HTTP only)
        threads = "unlimited"                   # unlimited=thread per connection, number=thread pool
        http = true                                             # Whether to enable the plain HTTP interface
        port = 8088                                             # Web server HTTP port
        #interface = "eth0"                             # Whether we should bind this server to a specific interface only
        #ip = "192.168.0.1"                             # Whether we should bind this server to a specific IP address (v4 or v6) only
        https = true                                    # Whether to enable HTTPS (default=false)
        secure_port = 8089                              # Web server HTTPS port, if enabled
        #secure_interface = "eth0"              # Whether we should bind this server to a specific interface only
        #secure_ip = "192.168.0.1"              # Whether we should bind this server to a specific IP address (v4 or v6) only
        #acl = "127.,192.168.0."                # Only allow requests coming from this comma separated list of addresses
}

certificates: {
        cert_pem = "/home/ubuntu/cert/cert.pem"
        cert_key = "/home/ubuntu/cert/key.pem"
        #cert_pwd = "secretpassphrase"
        #ciphers = "PFS:-VERS-TLS1.0:-VERS-TLS1.1:-3DES-CBC:-ARCFOUR-128"
}


配置janus.transport.websockets.jcfg
general: {
        #events = true                                  # Whether to notify event handlers about transport events (default=true)
        json = "indented"                               # Whether the JSON messages should be indented (default),
                                                                        # plain (no indentation) or compact (no indentation and no spaces)
        #pingpong_trigger = 30                  # After how many seconds of idle, a PING should be sent
        #pingpong_timeout = 10                  # After how many seconds of not getting a PONG, a timeout should be detected

        ws = true                                               # Whether to enable the WebSockets API
        ws_port = 8188                                  # WebSockets server port
        #ws_interface = "eth0"                  # Whether we should bind this server to a specific interface only
        #ws_ip = "192.168.0.1"                  # Whether we should bind this server to a specific IP address only
        wss = true                                              # Whether to enable secure WebSockets
        wss_port = 8989                         # WebSockets server secure port, if enabled
        #wss_interface = "eth0"                 # Whether we should bind this server to a specific interface only
        #wss_ip = "192.168.0.1"                 # Whether we should bind this server to a specific IP address only
        #ws_logging = "err,warn"                # libwebsockets debugging level as a comma separated list of things
                                                                        # to debug, supported values: err, warn, notice, info, debug, parser,
                                                                        # header, ext, client, latency, user, count (plus 'none' and 'all')
        #ws_acl = "127.,192.168.0."             # Only allow requests coming from this comma separated list of addresses
}

certificates: {
        cert_pem = "/home/ubuntu/cert/cert.pem"
        cert_key = "/home/ubuntu/cert/key.pem"
        #cert_pwd = "secretpassphrase"
}
3.4 修改网页默认支持的wss协议
修改 /opt/janus/share/janus/demos/videoroomtest.js文件
原来为(在45行处)
var server = null;
if(window.location.protocol === 'http:')
        server = "http://" + window.location.hostname + ":8088/janus";
else
        server = "https://" + window.location.hostname + ":8089/janus";
将默认的https协议改为wss
var server = "wss://" + window.location.hostname + ":8989";
3.5 运行 Janus
WebSocket 的ws端口号为 8188和8989,记住这个端口号,在 Android APP Demo 中会使用到!
启动 Janus:
/opt/janus/bin/janus --debug-level=5 --log-file=$HOME/janus-log
根据需要可以选择是否加上后面两个启动参数。
webscoket 一定要启动ws和wss(安全的ws,类比http-https)。
3.6 云服务器端口开放
3.7 测试web和web的通话
https://111.229.231.225/videoroomtest.html
开两个同样的网页,然后点击start,输入名字则开始进行音视频通话测试。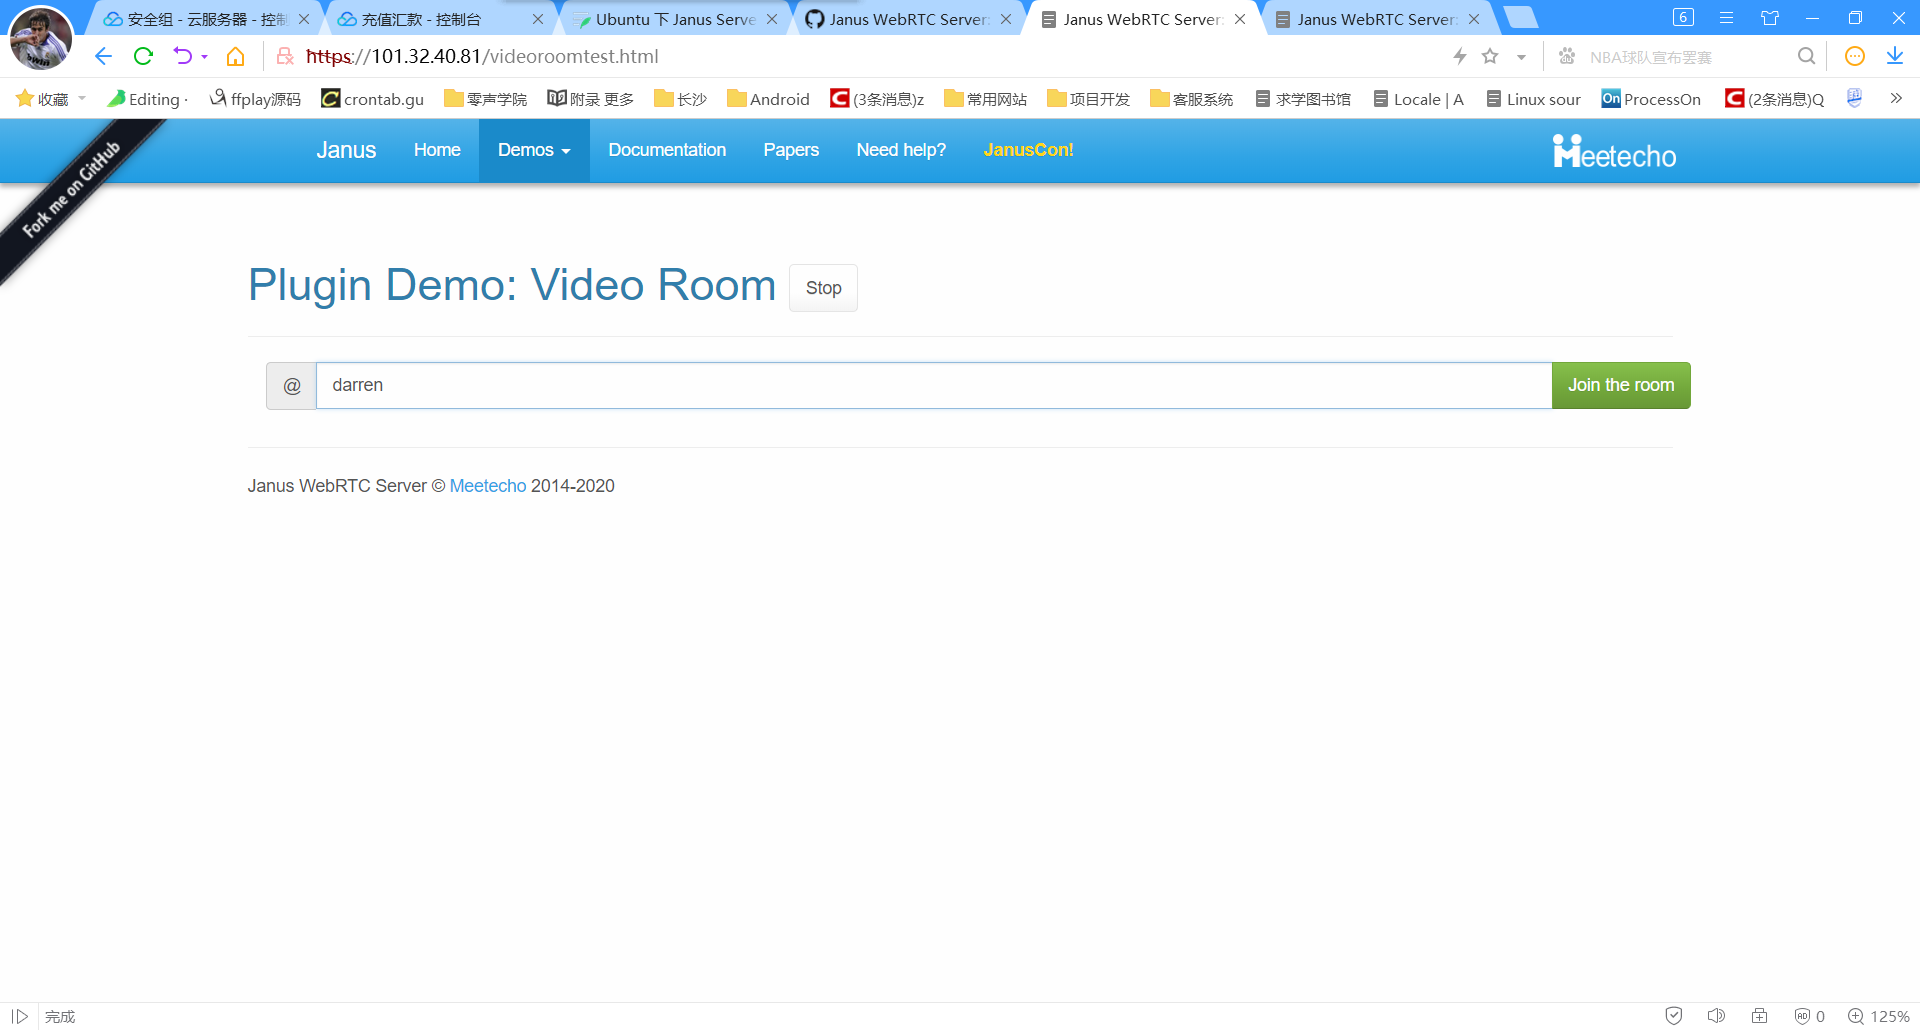
4 视频通话联调测试
我们使用 PC 下的 浏览器 与 Android APP Demo 进行联调。
4.1 启动 Web Demo
这样外部便可以通过 https://111.229.231.225进行访问了,进入首页后,找到 videoRoom,Start
4.2 启动 Android APP Demo
4.2.1 下载源码
git clone https://github.com/pcgpcgpcg/janus-gateway-android.git
4.2.2 修改信令地址
janus-gateway-android 支持两个 Demo 测试:EchoTest 和 VideoRoom,默认情况下会启用 EchoTest,这个 Demo 仅仅是连接服务器后,将数据再发回本地进行本地测试,我们要改为与房间内的其它用户(浏览器)进行视频通话,则需要启用另外一个测试用例 VideoRoom,按照如下方式修改代码:
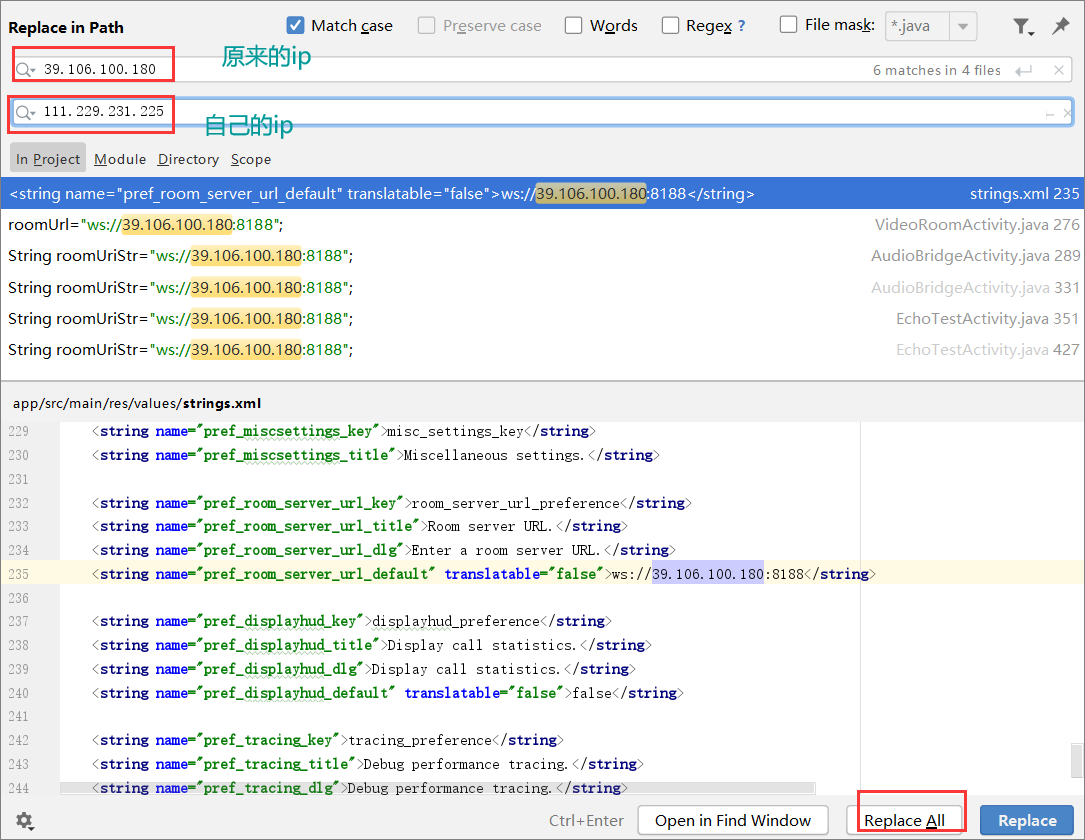
APP Demo 是通过 WebSocket 连接 Janus Server,所以修改 VideoRoomTest.java 中 roomUrl地址为我们启动的 Janus 服务器 WebSocket 地址,IP 为 janus server 地址,端口默认为 8188: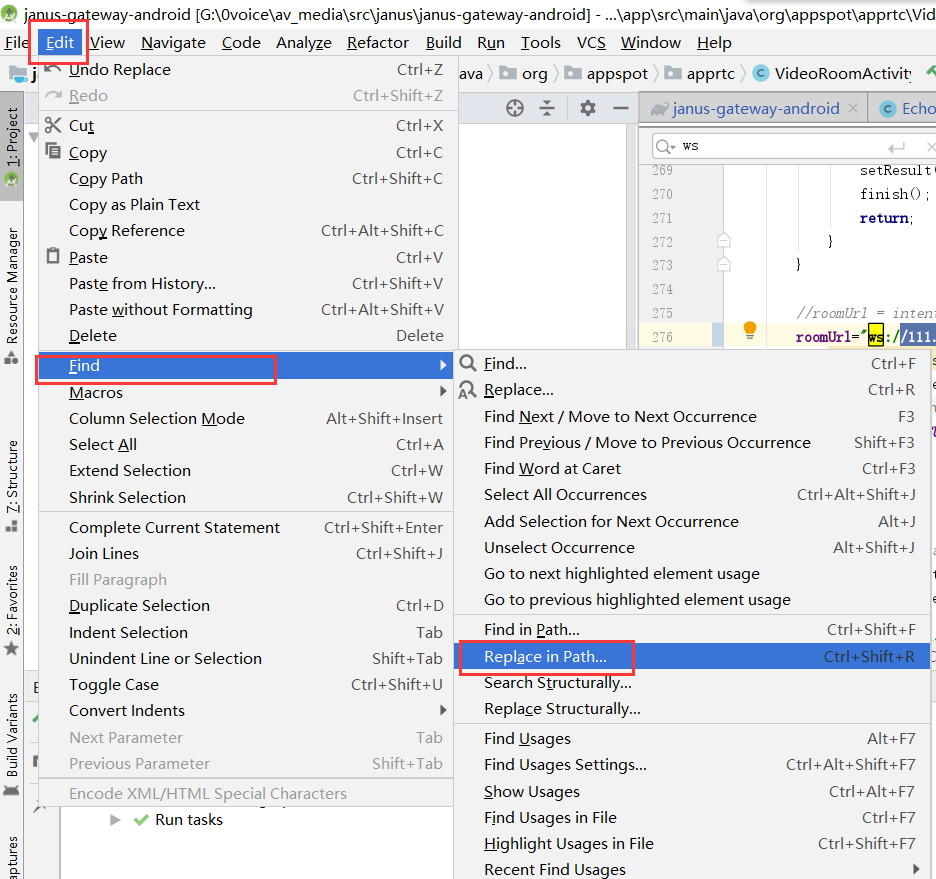
然后,搜索39.106.100.180,替换为自己的IP。
4.2.3 修改build.gradle
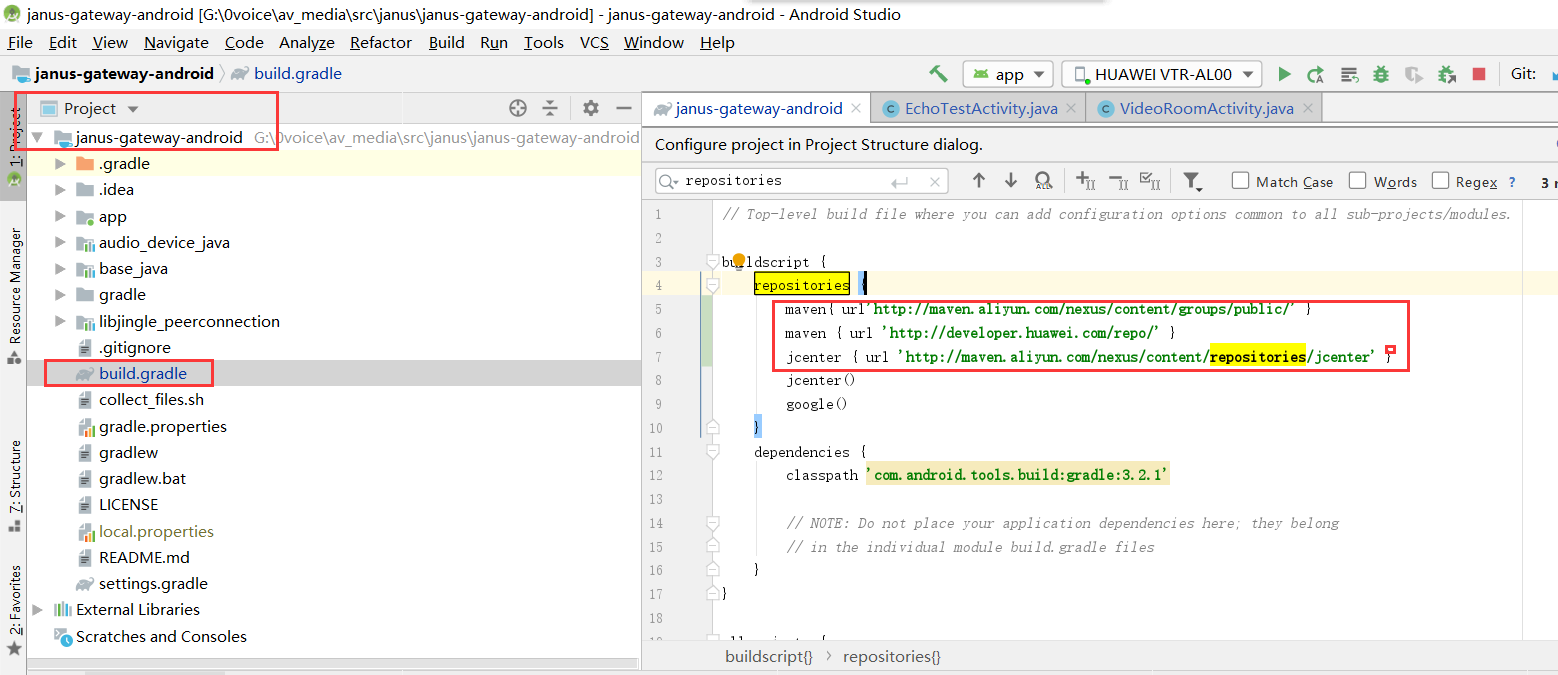
加上
maven{ url'http://maven.aliyun.com/nexus/content/groups/public/' }
maven { url 'http://developer.huawei.com/repo/' }
jcenter { url 'http://maven.aliyun.com/nexus/content/repositories/jcenter' }
否则下载不了部分组件。
4.2.4 编译安装
通过 Android studio 进行编译安装到 Android 机。
安装好后的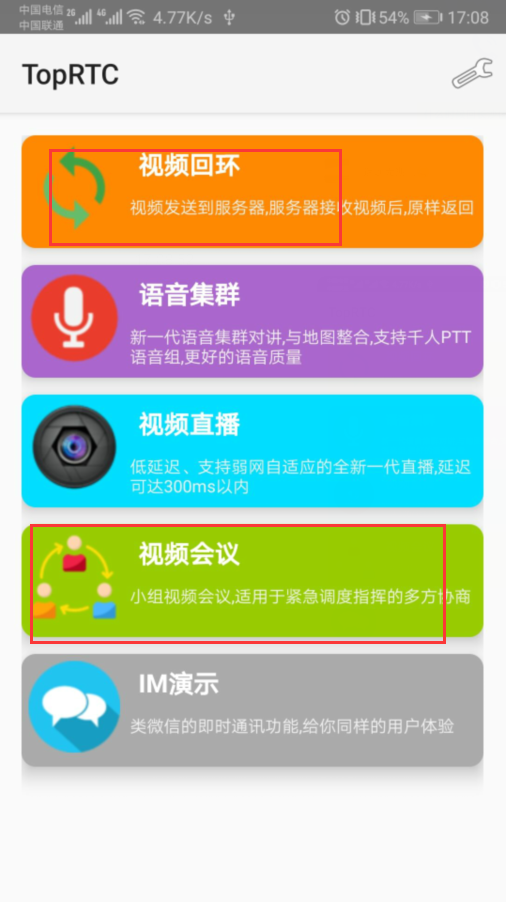
4.3 联调测试
Janus Server 默认会开启两个视频房间:1234 和 5678,分别使用 VP8 和 VP9 视频编码器,所以我们通过 Brower 和 Android APP Demo 进行联调测试时,暂不需要设置房间 ID。
效果图: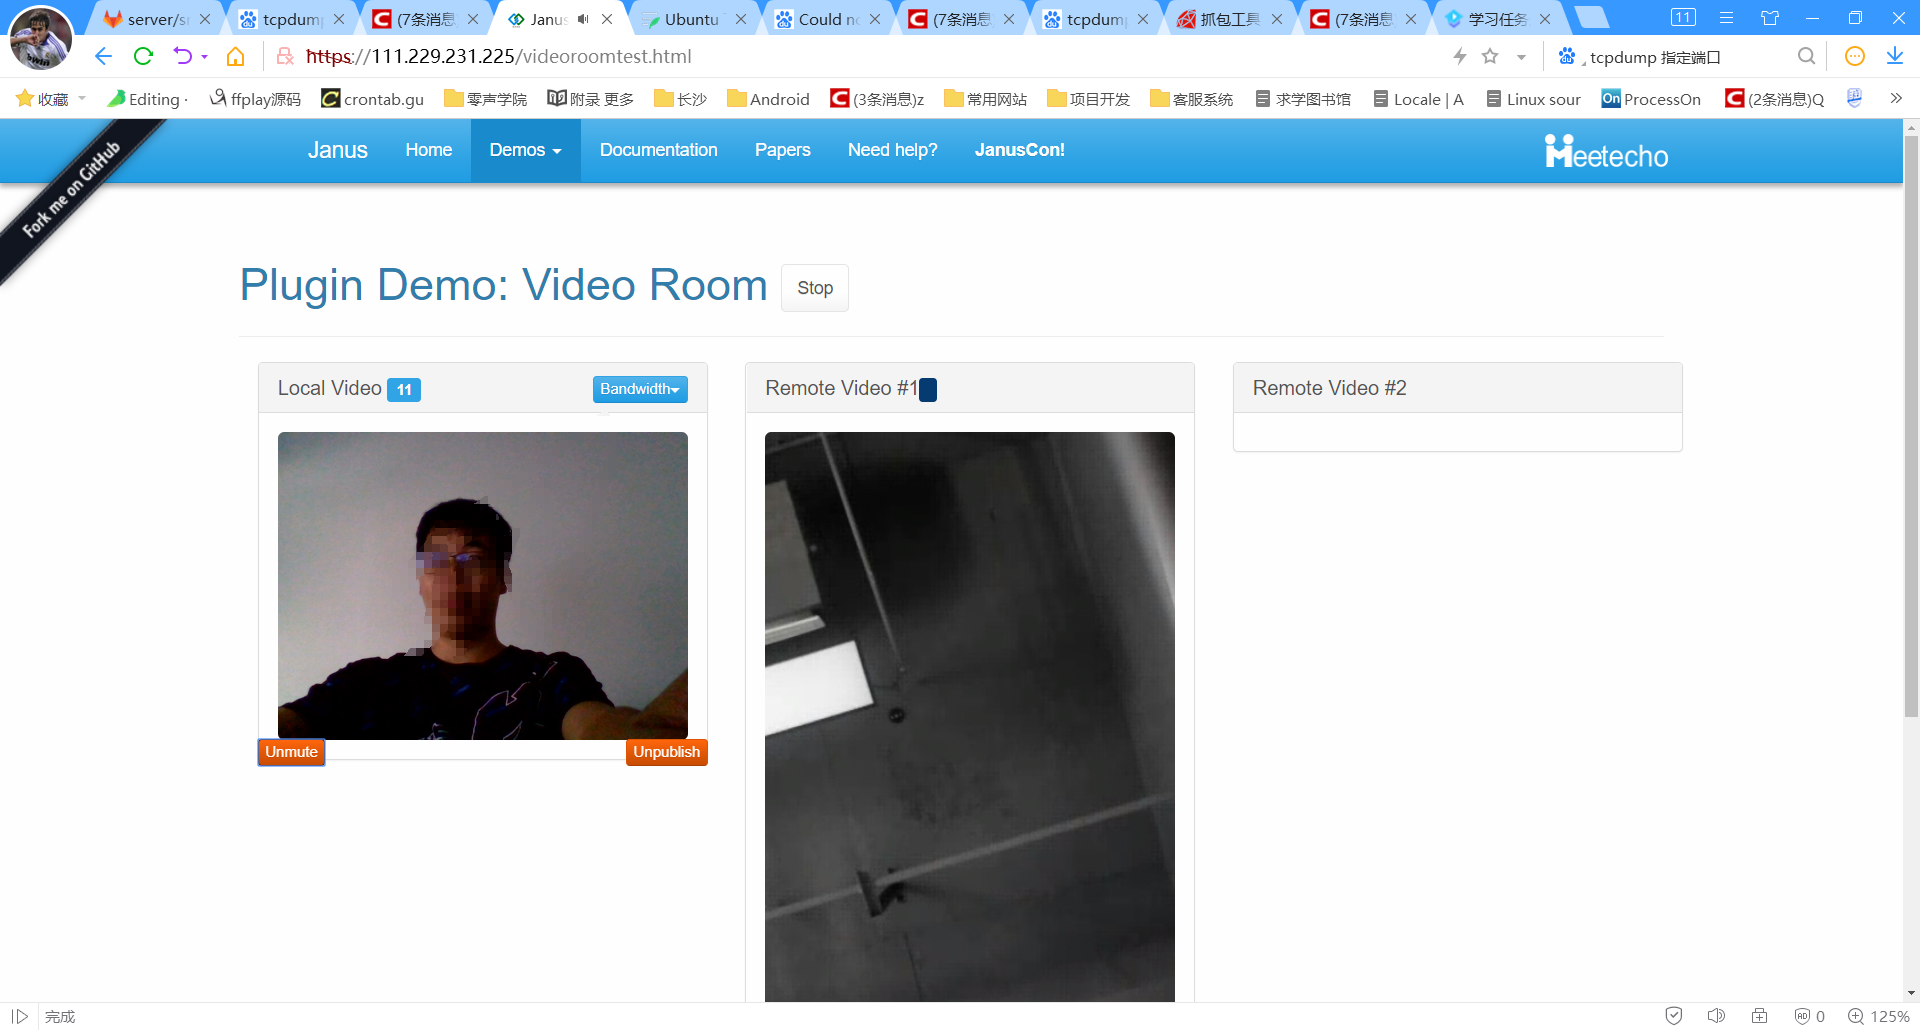
附录
linux – 如何组合音频和视频mjr文件以生成.
我正在使用janus-gateway在网络浏览器中录制.录制完成后,会生成两个文件,一个是音频,另一个是视频.两者都有格式mjr.如何将这两个文件组合在一起创建单个文件?
最佳答案
我正在处理同样的需要.
如果您执行了默认的janus-gateway安装,则只会错过以下步骤:
在你下载git源的文件夹上运行它:
./configure --enable-post-processing
然后
make
(sudo) make install
然后为要将其转换为音频/视频格式的每个文件运行此命令:
./janus-pp-rec /opt/janus/share/janus/recordings/video.mjr /opt/janus/share/janus/recordings/video.webm
./janus-pp-rec /opt/janus/share/janus/recordings/audio.mjr /opt/janus/share/janus/recordings/audio.opus
如果你没有安装ffmpeg运行这个(我在Ubuntu上,在其他发行版上ffmpeg可能已经在apt-get存储库中)
sudo add-apt-repository ppa:kirillshkrogalev/ffmpeg-next
sudo apt-get update
sudo apt-get install ffmpeg
然后最终将音频与视频合并:
(sudo) ffmpeg -i audio.opus -i video.webm -c:v copy -c:a opus -strict experimental mergedoutput.webm
从那里你可以构建一个shell脚本来自动转换cron上的所有mjr文件
sudo apt install python3-pip
pip3 install —user meson
sudo ln -s ~/.local/bin/meson /usr/bin/
pip3 install —user ninja
sudo ln -s ~/.local/bin/ninja/usr/bin/
源码编译
(glib-2.0 >= 2.54 gio-2.0 >= 2.54 gobject-2.0 >= 2.54 gthread-2.0)
git clone https://github.com/GNOME/glib.git
git checkout glib-2-64
mkdir build
meson build
ninja -C build
sudo ninja -C build install
源码编译libnice
sudo apt-get install gtk-doc-tools
autogen.sh
git checkout 0.1.17
./autogen.sh
./configure
make
sudo make install

若有收获,就点个赞吧
0 人点赞
