Lustre是业界流行的并行文件系统,利用多个IO节点提供并发读写能力,可以为大型超级计算系统等提供高IO带宽等性能,主页在:https://wiki.hpdd.intel.com/display/PUB/Lustre+Releases。本文以CentOS 7.3为例做一简要介绍。
Lustre基本组件
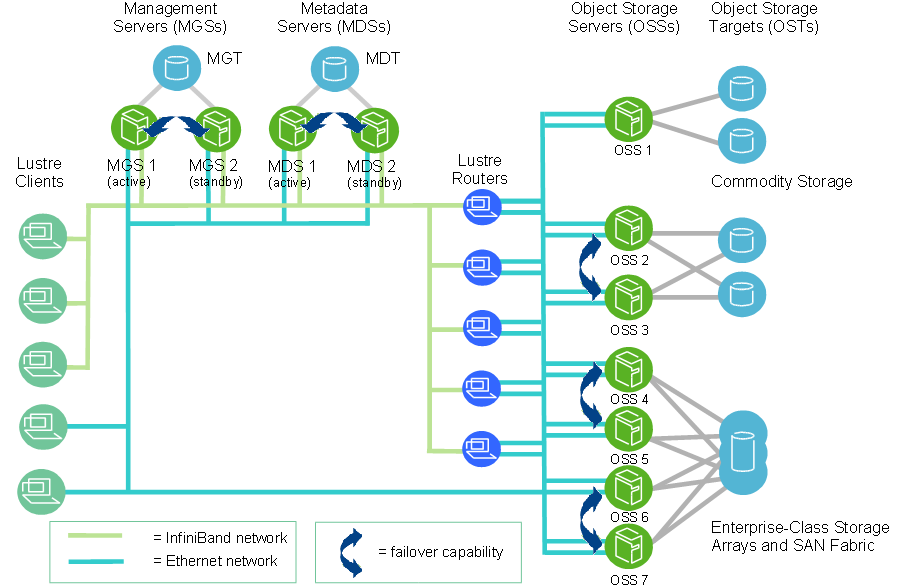
- MGS(Management Server,管理服务端)MGS存储集群中的所有Lustre文件的配置信息,并为其它Lustre组件提供信息。每个Lustre目标通过MGS提供信息,Luster客户端通过MGS获取信息。最好MGS具有自己单独的存储空间,以便可以独立管理。MGS也可以与MDS保存在同一地点共享存储空间。
- MGT(Management Targets,管理目标)仅存储管理信息,仅在服务端或客户端mount时访问,所需空间极小(<100MB),最好RAID1。

Lustre文件系统组件
- MDS(Metadata Servers,元数据服务端)MDS使得存储在一个或多个MDT中的元数据对客户端有效。每个MDS管理Lustre文件系统中的名称和目录,并提供一个或多个当地MDT的网络请求。
- MDT(Metadata Targets,元数据目标)MDT存储元数据(如文件名、目录、权限和文件层),并且附在一个MDS上。每个文件系统有一个MDT。在共享存储目标上的一个MDT可以对多个MDS有效,但只能同时只有一个MDS可以访问它。如果激活的MDS故障,待机的MDS可以服务此MDT,并对客户端有效。对与MDT,高通量存储没必要,但最好是寻址时间短的快速存储,如SSD或高转速的SAS。建议RAID1或10。
- OSS(Object Storage Servers,对象存储服务端)OSS处理一个或多个本地OST的文件IO服务和网络请求。通常,一个OSS可以服务2到8个OST,每个OST可以24到48TB。典型配置为一个MDT使用一个专用的节点,每个OSS节点有两个或多个OST,大量的计算节点各有一个客户端。
- OST(Object Storage Target,对象存储目标)用户文件存储在一个或多个对象中,每个对象在Lustre文件系统的一个单独OST上。每个文件的对象数由用户配置,并且可以优化。建议RAID5,如存储规模很大,最好为RAID6。为了性能,最好4或8块硬盘附加1或2个等价硬盘做一个RAID。
- Lustre客户端Lustre客户端是运行这Lustre客户端软件的计算、可视化或桌面节点,并且可以挂载(mount)上Lustre文件系统。Lustre客户端软件提供Linux虚拟文件系统与Luster服务端之间的接口。客户端包括管理客户端(MGC)、元数据客户端(MDC)和多对象存储客户端(OSC),对应文件系统中的每一个OST。LOV(logical object volume,逻辑对象卷)聚合OSC以便对所有OST提供统一访问。因此,挂载Lustre文件系统的客户端可以看到一个单一的、一致的、同步的名称空间。多个客户端可以同时写同一个文件的不同部分,并且在同一时间,其它客户端也可以读这个文件。LMV(logical metadata volume,逻辑元数据卷)聚合MDC以便类似LOV行为一样对所有MDT的透明访问。这允许客户端可以将多个MDT上的目录树看作一个单独耦合的名称空间,且条带化的目录在客户端上被合并成一个用户和应用单独可见的目录。 | 组件 | 所需存储 | 所需硬件特征 | | —- | —- | —- | | MDS | 文件系统总容量的1-2% | 合适的CPU能力、足够的内存、快速的存储。 | | OSS | 每个OST 1-128TB、每个OSS 1-8个OST | 良好的总线带宽。建议通过交叉OSS来平衡存储和网络带宽。 | | 客户端 | 无需本地存储 | 低延迟、高带宽网络。 |
LNet(Lustre Networking,Lustre网络)LNet是定制的网络API,可以对Lustre文件系统服务端和客户端提供处理元数据和文件IO数据的通讯底层结构。
- Lustre集群Lustre文件系统集群可以含有成上百个OSS和成千个客户端,并可使用不只一种网络。OSS之间共享存储使其具有故障复原功能。
- 故障恢复Lustre软件本身仅提供Lustre文件系统层的故障恢复机制,但没有提供系统级组件的故障恢复机制,比如硬件、应用或整个节点故障等。节点监控、故障探测、资源隔离等必须由额外的HA软件负责,比如PowerMan、开源的Corosync和Pacemaker等。其中,Corosync提供探测故障,Pacemaker提供故障发生时的动作。本文不涉及额外的HA配置。Lustre文件系统层的故障恢复机制主要有以下几种:
- MDT主从(Active/Passive)模式:两个MGS共用同一个MDT存储(如采用multipath多路径存储设备时),只能同时有一个处于服务状态。

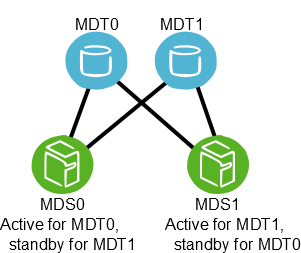
- MDT双活(Active/Active)模式:两个MGS交叉共用不同MDT存储,同时处于服务状态。
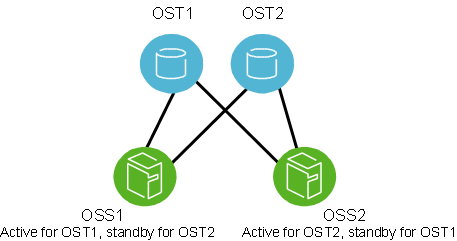
- OST双活(Active/Active)模式:两个OSS交叉共用不同OST存储,同时处于服务状态。
- MDT主从(Active/Passive)模式:两个MGS共用同一个MDT存储(如采用multipath多路径存储设备时),只能同时有一个处于服务状态。
- 安装方式(以下二选一)
- 可以直接下载编译好的Linux内核及Lustre包,而无需编译:https://downloads.hpdd.intel.com/public/lustre/latest-release/
- 如果没有编译好的Linux内核等,可采用源码编译,本文主要介绍此方式。
- 安装编译环境(以下二选一,本步及之后采用root账户处理)
- 组安装
- 精简安装
- 安装EPEL源
- 安装其它所需包
- 准备源代码
- 建立build账户
- 切换到build账户
- 获取HPDD git上的最新Lustre(当前为2.9.55_45版,本步及之后采用build账户处理)
- 生成初始配置
- 编译生成含有Lustre补丁的内核(MDS、OSS等服务端节点需要打过Lustre补丁的内核,客户端可不需要)
- 生成目录及.rpmmacros
- 获取内核源码
- 利用rpmbuild准备内核源码
- 给内核源码打lustre补丁
- 从所有lustre树获取补丁并合并成一个文件
- 复制lustre内核补丁到RPM编译树
- 编辑内核spec文件
- 利用~/lustre-release/lustre/kernel_patches/kernel_configs/kernel-3.10.0-3.10-rhel7-x86_64.config覆盖掉内核config文件
- 编译生成新内核RPM包
- 安装内核并重启(本步及之后采用root账户处理)
- 重启后运行查看内核
- 配置和生成Lustre(本步及之后采用build账户处理)
- 生成RPM包
- 安装针对Lustre的e2fsprogs(本步及之后采用root账户处理)下载安装e2fsprogs,可采用以下两方法之一:
- 安装lustre包
- 禁止SELinux (Lustre服务节点) 将/etc/selinux/config中的’SELINUX=enforcing’变为’SELINUX=disabled’,修改完保存退出后,需要重启系统# This file controls the state of SELinux on the system. # SELINUX= can take one of these three values: # enforcing - SELinux security policy is enforced. # permissive - SELinux prints warnings instead of enforcing. # disabled - No SELinux policy is loaded. SELINUX=disabled # SELINUXTYPE= can take one of these two values: # targeted - Only targeted network daemons are protected. # strict - Full SELinux protection. SELINUXTYPE=targeted
- 设置并加载Lustre模块,并启动Lustre服务
- 测试,运行
- 服务端配置
- 说明:
- —fsname:指定生成后的lustre文件系统名,如sgfs,将来客户端采用mount -t 192.168.100.1@tcp0:192.168.100.2@tcp0:/sgfs /home进行挂载。
- —mgs:指定为MGS分区
- —mgt:指定为MGT分区
- —ost:指定为OST分区
- —servicenode=ServiceNodeIP@tcp0:指定本节点失效时,接手提供服务的节点,如为InfiniBand网络,那么tcp0需要换成o2ib
- —index:指定索引,不能相同
- 建立MGS和MGT(MGS和MGT共享节点)
- MGS1(IP:192.168.100.1)
- MGS2(IP:192.168.100.2)
- 建立OST(各OSS节点)如果不同OSS节点没有共享OST分区,那么下面命令需去掉对应的—servicenode=ServiceNodeIP@tcp0选项。
- OSS1(IP:192.168.100.3):
- OSS2(IP:192.168.100.4):
- 说明:
- 客户端配置
- 无需安装打过Lustre补丁的内核及e2fsprogs等,只需安装如下客户端包
- 设置并加载Lustre模块
- 挂载Lustre文件系统
- 磁盘配额
- 命令格式:lctl conf_param fsname.quota.ost|mdt=u|g|ug|none
- ost:配置OST管理的块配额
- mdt:配置MDT管理的inode配额
- u:仅对用户启用配额
- g:仅对用户组启用配额
- ug:仅对用户和用户组启用配额
- none:取消对用户和用户组启用配额
- 例子
- 启用用户和用户组配额(在MGS节点执行):
- 启用用户组inode配额(在MGS节点执行):
- 取消用户和用户组配额(在MGS节点执行):
- 取消用户组inode配额(在MGS节点执行):
- 设置USERNAME用户/home磁盘配额大小为软限制50GB,硬限制51GB:
- 显示USERNAME用户/home磁盘配额大小及使用情况:
- 命令格式:lctl conf_param fsname.quota.ost|mdt=u|g|ug|none
- 常用命令
- modprobe lustre:加载Lustre模块
- lustre_rmmod:去除Lustre模块
- lctl:通过ioctl接口直接控制Lustre属性,允许调整相关的不同配置、管理和调试等属性。
- lctl lustre_build_version:显示Lustre版本
- lctl list_nids:显示网络ID情况
- lctl list_param:显示配置参数
- lctl dl:显示所有文件系统组件
- lnetctl:控制和显示网络信息
- lnetctl net show:显示网络信息
- lnetctl net add —net tcp0 —if eth0:添加网络
- lnetctl net add —net tcp0 —if eth0:添加网络
- lnetctl net del —net tcp0:删除网络
- lnetctl route show:显示路由信息
- lfs:主要对与文件相关的属性进行配置及查询
- lfs df:客户端上运行时,显示各MDT、OST等空间占用情况
- lfs mdts /home:客户端上运行时,显示/home使用的MDT情况
- lfs osts /home:客户端上运行时,显示/home使用的OST情况
- tunefs.lustre:在服务端运行,显示或调整mkfs.lustre生成的Lustre目标磁盘配置
- tunefs.lustre /dev/mapper/mpathb:显示磁盘信息
- tunefs.lustre —erase-params —param=”failover.node=192.168.100.1@tcp0:192.168.100.2@tcp0” /dev/mapper/mpathb:修改配置
- tunefs.lustre —writeconf /dev/mapper/mpathb:将修改后的配置写入
- 多挂载保护(Multiple-Mount Protection)
- tune2fs -O mmp /dev/block_device:禁止块设备同时被多个节点mount
- tune2fs -O ^mmp /dev/block_device:允许块设备同时被多个节点mount
参考文档::
- https://wiki.hpdd.intel.com/pages/viewpage.action?pageId=52104622
https://build.hpdd.intel.com/job/lustre-manual/lastSuccessfulBuild/artifact/lustre_manual.xhtml
yum -y groupinstall "Development Tools"
yum -y install automake xmlto asciidoc elfutils-libelf-devel zlib-devel binutils-devel newt-devel python-devel libyaml-devel hmaccalc perl-ExtUtils-Embed rpm-build make gcc redhat-rpm-config patchutils git libtool net-tools elfutils-devel bison audit-libs-deve
rpm -ivh http://download.fedoraproject.org/pub/epel/7/x86_64/e/epel-release-7-9.noarch.rpm
yum -y install pesign numactl-devel pciutils-devel ncurses-devel libselinux-devel
useradd -m build
su - build
git clone git://git.hpdd.intel.com/fs/lustre-release.git
cd lustre-releasesh autogen.sh
正常的话输出如下:configure.ac:10: installing ‘config/config.guess’ configure.ac:10: installing ‘config/config.sub’ configure.ac:12: installing ‘config/install-sh’ configure.ac:12: installing ‘config/missing’ libcfs/libcfs/autoMakefile.am: installing ‘config/depcomp’
mkdir -p ~/kernel/rpmbuild/{BUILD,RPMS,SOURCES,SPECS,SRPMS}cd ~/kernelecho '%_topdir %(echo $HOME)/kernel/rpmbuild' > ~/.rpmmacros
rpm -ivh http://vault.centos.org/7.3.1611/updates/Source/SPackages/kernel-3.10.0-514.16.1.el7.src.rpm
cd ~/kernel/rpmbuildrpmbuild -bp --target=`uname -m` ./SPECS/kernel.spec
正常的话,将有如下输出:… + make ARCH=x86_64 oldnoconfig scripts/kconfig/conf —olddefconfig Kconfig # # configuration written to .config # + echo ‘# x86_64’ + cat .config + find . ‘(‘ -name ‘.orig’ -o -name ‘~’ ‘)’ -exec rm -f ‘{}’ ‘;’ + find . -name .gitignore -exec rm -f ‘{}’ ‘;’ + cd .. + exit 0现在我们获取了打了所有RHEL/CentOS补丁的内核源代码,目录在~/kernel/rpmbuild/BUILD/kernel-3.10.0-514.16.1.el7/linux-3.10.0-514.16.1.el7.x86_64
rm -f ~/lustre-kernel-x86_64-lustre.patchcd ~/lustre-release/lustre/kernel_patches/seriesfor patch in $(<"3.10-rhel7.series"); do \patch_file="$HOME/lustre-release/lustre/kernel_patches/patches/${patch}";\cat "${patch_file}" >> $HOME/lustre-kernel-x86_64-lustre.patch; \done
cp ~/lustre-kernel-x86_64-lustre.patch ~/kernel/rpmbuild/SOURCES/patch-3.10.0-lustre.patch
vim ~/kernel/rpmbuild/SPECS/kernel.spec
1. 在含有'find $RPM_BUILD_ROOT/lib/modules/$KernelVer'的行下面插入以下两行:cp -a fs/ext3/* $RPM_BUILD_ROOT/lib/modules/$KernelVer/build/fs/ext3 cp -a fs/ext4/* $RPM_BUILD_ROOT/lib/modules/$KernelVer/build/fs/ext42. 在含有'# empty final patch to facilitate testing of kernel patches'的行下面插入以下两行:# adds Lustre patches Patch99995: patch-%{version}-lustre.patch3. 在含有'ApplyOptionalPatch linux-kernel-test.patch'的行下面插入以下两行:# lustre patch ApplyOptionalPatch patch-%{version}-lustre.patch4. 找到'%define listnewconfig_fail 1',并将1变为05. 找到'%define with_kabichk #%{?_without_kabichk: 0} %{?!_without_kabichk: 1}',将其变为下面,禁止kABI检查:%define with_kabichk 0 #%{?_without_kabichk: 0} %{?!_without_kabichk: 1} 如不做,则显示kABI错误。6. 保存spec文件,并退出编辑。
echo '# x86_64' > ~/kernel/rpmbuild/SOURCES/kernel-3.10.0-x86_64.configcat ~/lustre-release/lustre/kernel_patches/kernel_configs/kernel-3.10.0-3.10-rhel7-x86_64.config >> ~/kernel/rpmbuild/SOURCES/kernel-3.10.0-x86_64.config
cd ~/kernel/rpmbuildbuildid="_lustre" # Note: change to any string that identify your workrpmbuild -ba --with firmware --target x86_64 --with baseonly \--define "buildid ${buildid}" \~/kernel/rpmbuild/SPECS/kernel.spec
编译成功的话将产生类似下面文件:… … Wrote: /home/build/kernel/rpmbuild/SRPMS/kernel-3.10.0-514.16.1.el7_lustre.src.rpm Wrote: /home/build/kernel/rpmbuild/RPMS/x86_64/kernel-3.10.0-514.16.1.el7_lustre.x86_64.rpm Wrote: /home/build/kernel/rpmbuild/RPMS/x86_64/kernel-headers-3.10.0-514.16.1.el7_lustre.x86_64.rpm Wrote: /home/build/kernel/rpmbuild/RPMS/x86_64/kernel-debuginfo-common-x86_64-3.10.0-514.16.1.el7_lustre.x86_64.rpm Wrote: /home/build/kernel/rpmbuild/RPMS/x86_64/perf-3.10.0-514.16.1.el7_lustre.x86_64.rpm Wrote: /home/build/kernel/rpmbuild/RPMS/x86_64/perf-debuginfo-3.10.0-514.16.1.el7_lustre.x86_64.rpm Wrote: /home/build/kernel/rpmbuild/RPMS/x86_64/python-perf-3.10.0-514.16.1.el7_lustre.x86_64.rpm Wrote: /home/build/kernel/rpmbuild/RPMS/x86_64/python-perf-debuginfo-3.10.0-514.16.1.el7_lustre.x86_64.rpm Wrote: /home/build/kernel/rpmbuild/RPMS/x86_64/kernel-tools-3.10.0-514.16.1.el7_lustre.x86_64.rpm Wrote: /home/build/kernel/rpmbuild/RPMS/x86_64/kernel-tools-libs-3.10.0-514.16.1.el7_lustre.x86_64.rpm Wrote: /home/build/kernel/rpmbuild/RPMS/x86_64/kernel-tools-libs-devel-3.10.0-514.16.1.el7_lustre.x86_64.rpm Wrote: /home/build/kernel/rpmbuild/RPMS/x86_64/kernel-tools-debuginfo-3.10.0-514.16.1.el7_lustre.x86_64.rpm Wrote: /home/build/kernel/rpmbuild/RPMS/x86_64/kernel-devel-3.10.0-514.16.1.el7_lustre.x86_64.rpm Wrote: /home/build/kernel/rpmbuild/RPMS/x86_64/kernel-debuginfo-3.10.0-514.16.1.el7_lustre.x86_64.rpm Executing(%clean): /bin/sh -e /var/tmp/rpm-tmp.F7X9cL + umask 022 + cd /home//build/kernel/rpmbuild/BUILD + cd kernel-3.10.0-514.16.1.el7 + rm -rf /home/build/kernel/rpmbuild/BUILDROOT/kernel-3.10.0-514.16.1.el7_lustre.x86_64 + exit 0 到此,应该已生成新的内核RPM文件~/kernel/rpmbuild/RPMS/x86_64/kernel-[devel-]3.10.0-514.16.1.el7_lustre.x86_64.rpm
yum localinstall -y /home/build/kernel/rpmbuild/RPMS/x86_64/{kernel,kernel-devel}-3.10.0-514.16.1.el7_lustre.x86_64.rpmreboot
uname -r
如显示3.10.0-514.16.1.el7_lustre.x86_64,则表示已经使用打过lustre补丁的内核。
cd ~/lustre-release/./configure --enable-quota
- —enable-quota表示启用磁盘配额,如不需要,可去掉此选项。
- 如采用InfiniBand或OPA高速网络(已安装驱动),需打开—with-o2ib支持,上述命令应该换成下述两者之一:
- InfiniBand:
- OPA:
正常的话,将显示如下信息:… … CC: gcc LD: /bin/ld -m elf_x86_64 CPPFLAGS: -include /home/build/lustre-release/undef.h -include /home/build/lustre-release/config.h -I/home/build/lustre-release/libcfs/include -I/home/build/lustre-release/lnet/include -I/home/build/lustre-release/lustre/include CFLAGS: -g -O2 -Wall -Werror EXTRA_KCFLAGS: -include /home/build/lustre-release/undef.h -include /home/build/lustre-release/config.h -g -I/home/build/lustre-release/libcfs/include -I/home/build/lustre-release/lnet/include -I/home/build/lustre-release/lustre/include
./configure --with-o2ib=/usr/src/ofa_kernel/default
./configure --with-o2ib=yes
make rpms
正常的话,将输出类似下面信息:… … Wrote: /tmp/rpmbuild-lustre-build-JZiW94sq/RPMS/x86_64/lustre-2.9.55_45_g04fb37c-1.el7.centos.x86_64.rpm Wrote: /tmp/rpmbuild-lustre-build-JZiW94sq/RPMS/x86_64/kmod-lustre-2.9.55_45_g04fb37c-1.el7.centos.x86_64.rpm Wrote: /tmp/rpmbuild-lustre-build-JZiW94sq/RPMS/x86_64/kmod-lustre-osd-ldiskfs-2.9.55_45_g04fb37c-1.el7.centos.x86_64.rpm Wrote: /tmp/rpmbuild-lustre-build-JZiW94sq/RPMS/x86_64/lustre-osd-ldiskfs-mount-2.9.55_45_g04fb37c-1.el7.centos.x86_64.rpm Wrote: /tmp/rpmbuild-lustre-build-JZiW94sq/RPMS/x86_64/lustre-tests-2.9.55_45_g04fb37c-1.el7.centos.x86_64.rpm Wrote: /tmp/rpmbuild-lustre-build-JZiW94sq/RPMS/x86_64/kmod-lustre-tests-2.9.55_45_g04fb37c-1.el7.centos.x86_64.rpm Wrote: /tmp/rpmbuild-lustre-build-JZiW94sq/RPMS/x86_64/lustre-iokit-2.9.55_45_g04fb37c-1.el7.centos.x86_64.rpm Wrote: /tmp/rpmbuild-lustre-build-JZiW94sq/RPMS/x86_64/lustre-debuginfo-2.9.55_45_g04fb37c-1.el7.centos.x86_64.rpm Executing(%clean): /bin/sh -e /tmp/rpmbuild-lustre-build-JZiW94sq/TMP/rpm-tmp.SxgoFt + umask 022 + cd /tmp/rpmbuild-lustre-build-JZiW94sq/BUILD + cd lustre-2.9.55_45_g04fb37c + rm -rf /tmp/rpmbuild-lustre-build-JZiW94sq/BUILDROOT/lustre-2.9.55_45_g04fb37c-1.x86_64 + rm -rf /tmp/rpmbuild-lustre-build-JZiW94sq/TMP/kmp + exit 0 Executing(—clean): /bin/sh -e /tmp/rpmbuild-lustre-build-JZiW94sq/TMP/rpm-tmp.vYmwdb + umask 022 + cd /tmp/rpmbuild-lustre-build-JZiW94sq/BUILD + rm -rf lustre-2.9.55_45_g04fb37c + exit 0 将生成如下rpm,利用ls *rpm可以查看,将显示:kmod-lustre-2.9.55_45_g04fb37c-1.el7.centos.x86_64.rpm kmod-lustre-osd-ldiskfs-2.9.55_45_g04fb37c-1.el7.centos.x86_64.rpm kmod-lustre-tests-2.9.55_45_g04fb37c-1.el7.centos.x86_64.rpm lustre-2.9.55_45_g04fb37c-1.el7.centos.x86_64.rpm lustre-2.9.55_45_g04fb37c-1.src.rpm lustre-debuginfo-2.9.55_45_g04fb37c-1.el7.centos.x86_64.rpm lustre-iokit-2.9.55_45_g04fb37c-1.el7.centos.x86_64.rpm lustre-osd-ldiskfs-mount-2.9.55_45_g04fb37c-1.el7.centos.x86_64.rpm lustre-tests-2.9.55_45_g04fb37c-1.el7.centos.x86_64.rpm
cat << EOF >> /etc/yum.repos.d/e2fsprogs.repo[e2fsprogs-el7-x86_64]name=e2fsprogs-el7-x86_64baseurl=https://downloads.hpdd.intel.com/public/e2fsprogs/latest/el7/enabled=1priority=1EOFyum update e2fsprogs
cd ~build/lustre-release/yum -y localinstall {kmod-lustre-osd-ldiskfs,kmod-lustre,lustre,lustre-osd-ldiskfs-mount,lustre-iokit,lustre-tests,kmod-lustre-tests}-2.9.55_45_g04fb37c-1.el7.centos.x86_64.rpm
echo 'options lnet networks=tcp0(eth0)' > /etc/modprobe.d/lustre.confdepmod -amodprobe lustresystemctl restart lustre
/usr/lib64/lustre/tests/llmount.sh
如有类似下面输出,则表示lustre服务正常:Stopping clients: onyx-21vm8.onyx.hpdd.intel.com /mnt/lustre (opts:) Stopping clients: onyx-21vm8.onyx.hpdd.intel.com /mnt/lustre2 (opts:) Loading modules from /usr/lib64/lustre/tests/.. detected 1 online CPUs by sysfs libcfs will create CPU partition based on online CPUs debug=vfstrace rpctrace dlmtrace neterror ha config ioctl super lfsck subsystem_debug=all gss/krb5 is not supported Formatting mgs, mds, osts Format mds1: /tmp/lustre-mdt1 Format ost1: /tmp/lustre-ost1 Format ost2: /tmp/lustre-ost2 Checking servers environments Checking clients onyx-21vm8.onyx.hpdd.intel.com environments Loading modules from /usr/lib64/lustre/tests/.. detected 1 online CPUs by sysfs libcfs will create CPU partition based on online CPUs debug=vfstrace rpctrace dlmtrace neterror ha config ioctl super lfsck subsystem_debug=all gss/krb5 is not supported Setup mgs, mdt, osts Starting mds1: -o loop /tmp/lustre-mdt1 /mnt/lustre-mds1 Commit the device label on /tmp/lustre-mdt1 Started lustre-MDT0000 Starting ost1: -o loop /tmp/lustre-ost1 /mnt/lustre-ost1 Commit the device label on /tmp/lustre-ost1 Started lustre-OST0000 Starting ost2: -o loop /tmp/lustre-ost2 /mnt/lustre-ost2 Commit the device label on /tmp/lustre-ost2 Started lustre-OST0001 Starting client: onyx-21vm8.onyx.hpdd.intel.com: -o user_xattr,flock onyx-21vm8.onyx.hpdd.intel.com@tcp:/lustre /mnt/lustre UUID 1K-blocks Used Available Use% Mounted on lustre-MDT0000_UUID 125368 1736 114272 1% /mnt/lustre[MDT:0] lustre-OST0000_UUID 350360 13492 309396 4% /mnt/lustre[OST:0] lustre-OST0001_UUID 350360 13492 309396 4% /mnt/lustre[OST:1] filesystem_summary: 700720 26984 618792 4% /mnt/lustre Using TIMEOUT=20 seting jobstats to procname_uid Setting lustre.sys.jobid_var from disable to procname_uid Waiting 90 secs for update Updated after 7s: wanted ‘procname_uid’ got ‘procname_uid’ disable quota as required
mkdir -p /sugon/mdtmkfs.lustre --fsname=sgfs --mgs --mdt --index=0 --servicenode=192.168.100.1@tcp0 --servicenode=192.168.100.2@tcp0 --reformat /dev/mapper/mpathbmount -t lustre /dev/mapper/mpathb /sugon/mdt
如果只有一个MGS节点,那么上述—servicenode=192.168.100.2@tcp0应去掉,并且下面步骤不执行
mkdir -p /sugon/mdt
此处两个MGS共享同一个MGT,因此故障恢复采用的是主从模式,从MGS节点也无需执行以下操作:
mkdir -p /sugon/ost1mkfs.lustre --fsname=sgfs --mgsnode=192.168.100.1@tcp0 --mgsnode=192.168.100.2@tcp0 --servicenode=192.168.100.3@tcp0 --servicenode=192.168.100.4@tcp0 --ost --reformat --index=2 /dev/mapper/mpathcmount -t lustre /dev/mapper/mpathc /sugon/ost1
mkdir -p /sugon/ost2mkfs.lustre --fsname=sgfs --mgsnode=192.168.100.1@tcp0 --mgsnode=192.168.100.2@tcp0 --servicenode=192.168.100.4@tcp0 --servicenode=192.168.100.3@tcp0 --ost --reformat --index=3 /dev/mapper/mpathcmount -t lustre /dev/mapper/mpathc /sugon/ost2
cd /home/build/lustre-releaseyum -y localinstall {lustre-client,kmod-lustre-client}-2.9.55-1.el7.centos.x86_64.rpm
echo 'options lnet networks=tcp0(eth0)' > /etc/modprobe.d/lustre.confdepmod -amodprobe lustre
mount -t lustre 192.168.100.1@tcp0:192.168.100.2@tcp0:/sgfs /home
lctl conf_param sgfs.quota.ost=ug
lctl conf_param sgfs.quota.mdt=g
lctl conf_param sgfs.quota.ost=none
lctl conf_param sgfs.quota.mdt=none
lfs setquota -u USERNAME -b 50G -B 51G /home
lfs quota -u USERNAME /home

若有收获,就点个赞吧
0 人点赞
