- 环境准备
- 192.168.80.0/24">Allow NTP client access from local network.
allow 192.168.80.0/24 - 在 controller 上
- http://192.168.80.80:2380“
ETCD_LISTEN_CLIENT_URLS=”http://192.168.80.80:2379“
ETCD_NAME=”controller”
#[Clustering]
ETCD_INITIAL_ADVERTISE_PEER_URLS=”http://192.168.80.80:2380“
ETCD_ADVERTISE_CLIENT_URLS=”http://192.168.80.80:2379“
ETCD_INITIAL_CLUSTER=”controller=http://192.168.80.80:2380“
ETCD_INITIAL_CLUSTER_TOKEN=”etcd-cluster-01”
ETCD_INITIAL_CLUSTER_STATE=”new”">[Member]
ETCD_DATA_DIR=”/var/lib/etcd/default.etcd”
ETCD_LISTEN_PEER_URLS=”http://192.168.80.80:2380“
ETCD_LISTEN_CLIENT_URLS=”http://192.168.80.80:2379“
ETCD_NAME=”controller”
#[Clustering]
ETCD_INITIAL_ADVERTISE_PEER_URLS=”http://192.168.80.80:2380“
ETCD_ADVERTISE_CLIENT_URLS=”http://192.168.80.80:2379“
ETCD_INITIAL_CLUSTER=”controller=http://192.168.80.80:2380“
ETCD_INITIAL_CLUSTER_TOKEN=”etcd-cluster-01”
ETCD_INITIAL_CLUSTER_STATE=”new” - 在 compute1 和 compute2 上
- 在 cinder 上
- 启动 openstack 示例">启动 openstack 示例
环境准备
- 配置各节点 IP 地址和主机名(相互能 ping 通 ip)

cinder 192.168.80.83
注意:Ens37的网关、DNS不需要设置 - 配置各节点主机名解析文件(相互能 ping 通主机名)
vim /etc/hosts
192.168.80.80 controller
192.168.80.81 compute1
192.168.80.82 compute2192.168.80.83 cinder - 安装 NTP 服务
- 在 controller 上
- 安装 NTP
yum install chrony - 修改 NTP 配置文件
vim /etc/chrony.conf
- 安装 NTP
- 在 controller 上
Allow NTP client access from local network.
allow 192.168.80.0/24
- 重启服务<br />systemctl restart chronyd.service- 查看服务状态<br />chronyc sources- 查看服务状态<br />chronyc sources- compute1、compute2 和 cinder 上- 安装 NTP<br />yum install chrony -y- 修改 NTP 配置文件<br />vim /etc/chrony.conf
删掉开头前面几行,改为:server controller iburst
- 重启 chrony 服务<br />systemctl restart chronyd.service- 查看服务状态<br />chronyc sources
- 安装 OpenStack 包(rocky 版本)
yum install centos-release-openstack-rocky -y 在 controller、compute1 和 compute2 上
安装配置关系型数据库(MySQL)
- 安装数据库包
yum install -y mariadb mariadb-server python2-PyMySQL - 修改配置文件
vim /etc/my.cnf.d/openstack.cnf
- 安装数据库包
[mysqld]
bind-address = 192.168.80.80
default-storage-engine = innodb
innodb_file_per_table = on
max_connections = 4096
collation-server = utf8_general_ci
character-set-server = utf8
- 启动数据库服务<br />systemctl enable mariadb.service<br />systemctl start mariadb.service- 查看数据库状态<br />systemctl status mariadb.service- 初始化数据库<br />mysql_secure_installation
- 安装配置消息队列(rabbit)
- 安装 rabbit 包
yum install rabbitmq-server - 启动 rabbit 服务
systemctl enable rabbitmq-server.service
systemctl start rabbitmq-server.service - 查看 rabbit 状态
systemctl status rabbitmq-server.service - 添加 opentack 用户
rabbitmqctl add_user openstack RABBIT_PASS - 为 openstack 用户配置读写权限
rabbitmqctl set_permissions openstack “.“ “.“ “.*”
- 安装 rabbit 包
- 安装配置 NoSQL 数据库(memcached)
- 安装 memcached
yum install memcached python-memcached - 修改配置文件
vim /etc/sysconfig/memcached
- 安装 memcached
OPTIONS=”-l 127.0.0.1,::1,controller”
- 启动 memcached 服务<br />systemctl enable memcached.service<br />systemctl start memcached.service- 查看 memcached 服务状态<br />systemctl status memcached.service
- 安装配置分布式数据库(etcd)
- 安装 etcd
yum install etcd - 修改配置文件
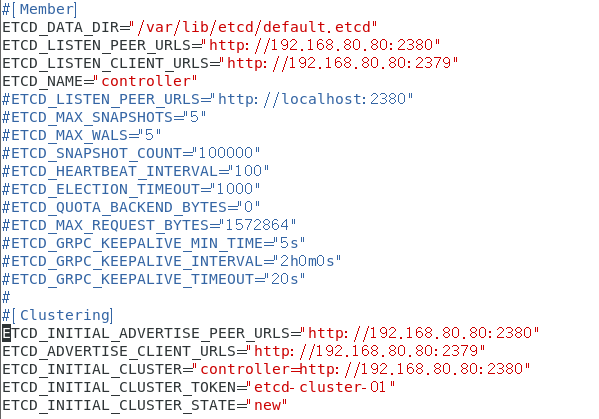
vim /etc/etcd/etcd.conf
- 安装 etcd
[Member]
ETCD_DATA_DIR=”/var/lib/etcd/default.etcd”
ETCD_LISTEN_PEER_URLS=”http://192.168.80.80:2380“
ETCD_LISTEN_CLIENT_URLS=”http://192.168.80.80:2379“
ETCD_NAME=”controller”
#[Clustering]
ETCD_INITIAL_ADVERTISE_PEER_URLS=”http://192.168.80.80:2380“
ETCD_ADVERTISE_CLIENT_URLS=”http://192.168.80.80:2379“
ETCD_INITIAL_CLUSTER=”controller=http://192.168.80.80:2380“
ETCD_INITIAL_CLUSTER_TOKEN=”etcd-cluster-01”
ETCD_INITIAL_CLUSTER_STATE=”new”
- 启动 etcd 服务<br />systemctl enable etcd<br />systemctl start etcd- 查看 etcd 服务状态<br />systemctl status etcd- 查看端口监听状态<br />netstat -anlp | grep 2379 |grep LISTEN<br />netstat -anlp | grep 2380 |grep LISTEN
- 安装配置身份服务(keystone)https://docs.openstack.org/keystone/rocky/install/keystone-install-rdo.html
- 创建 keystone 数据库和用户
- 连接数据库
mysql -u root -proot - 创建数据库
CREATE DATABASE keystone; - 创建用户并授权
GRANT ALL PRIVILEGES ON keystone. TO ‘keystone’@’localhost‘ \IDENTIFIED BY ‘KEYSTONE_DBPASS’;GRANT ALL PRIVILEGES ON keystone. TO ‘keystone’@’%’ \IDENTIFIED BY ‘KEYSTONE_DBPASS’; - 刷新权限
flush privileges; - 退出数据库,用新建的用户登录测试
mysql -ukeystone -pKEYSTONE_DBPASS
- 连接数据库
- 安装和配置环境
- 安装相 keystone 关包
yum install openstack-keystone httpd mod_wsgi -y - 修改配置文件
vim /etc/keystone/keystone.conf
- 安装相 keystone 关包
- 创建 keystone 数据库和用户
[database]
connection = mysql+pymysql://keystone:KEYSTONE_DBPASS@controller/keystone
[token]
provider = fernet
- 初始化数据库<br />su -s /bin/sh -c "keystone-manage db_sync" keystone- 初始化密钥<br />keystone-manage fernet_setup --keystone-user keystone --keystone-group keystonekeystone-manage credential_setup --keystone-user keystone --keystone-group keystone- 查看写入的数据库表- 登录数据库<br />mysql -ukeystone -pKEYSTONE_DBPASS- 切换到 keystone 数据库<br />use keystone;- 查看数据库表<br />show tables;- 引导身份服务<br />keystone-manage bootstrap --bootstrap-password ADMIN_PASS \ --bootstrap-admin-url http://controller:5000/v3/ \ --bootstrap-internal-url http://controller:5000/v3/ \ --bootstrap-public-url http://controller:5000/v3/ \ --bootstrap-region-id RegionOne- 配置 Apache HTTP 服务器- 编辑 Apache 配置文件(配置 ServerName选项,以引用控制器节点)<br />vim /etc/httpd/conf/httpd.conf<br />ServerName controller- 创建 /usr/share/keystone/wsgi-keystone.conf 文件链接<br />ln -s /usr/share/keystone/wsgi-keystone.conf /etc/httpd/conf.d/- 启动Apache HTTP服务,并设置为开机启动<br />systemctl enable httpd.servicesystemctl start httpd.service- 查看 Apache HTTP 服务状态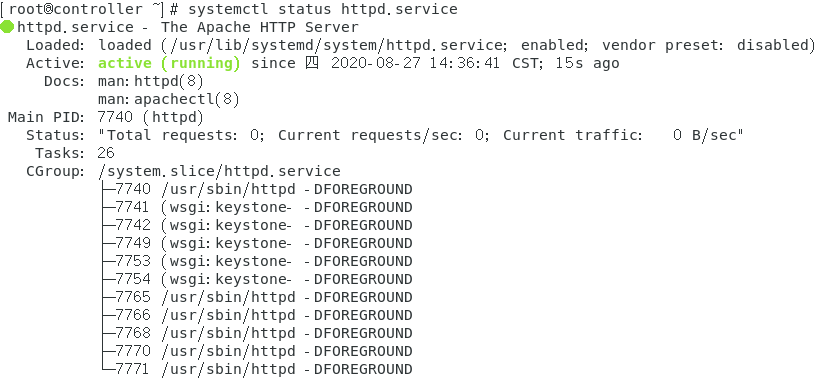<br />systemctl status httpd.service- 查看 5000 端口监听状态<br />netstat -anlp | grep 5000 | grep LISTEN- 配置管理账户<br />export OS_USERNAME=adminexport OS_PASSWORD=ADMIN_PASSexport OS_PROJECT_NAME=adminexport OS_USER_DOMAIN_NAME=Defaultexport OS_PROJECT_DOMAIN_NAME=Defaultexport OS_AUTH_URL=http://controller:5000/v3export OS_IDENTITY_API_VERSION=3- 在终端中访问测试<br />curl `echo $OS_AUTH_URL`- 创建域,项目,用户和角色- 创建一个 example 域<br />openstack domain create --description "An Example Domain" example- 创建一个 service 项目(服务项目)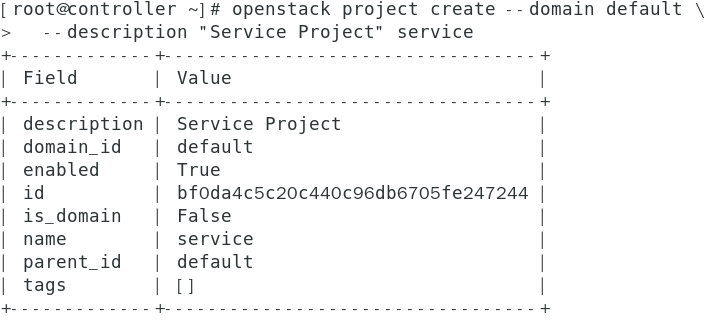<br />openstack project create --domain default \ <br />--description "Service Project" service- 创建一个 myproject 项目(常规项目)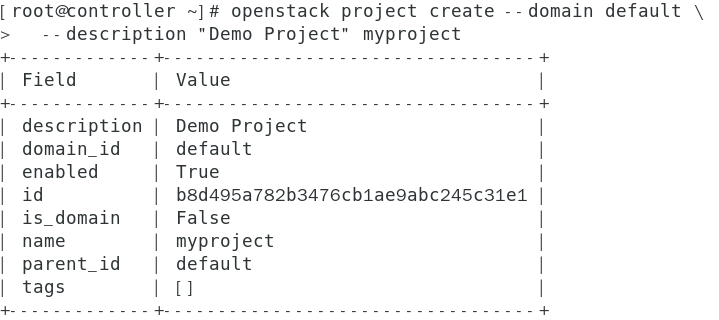<br />openstack project create --domain default \ <br /> --description "Demo Project" myproject- 创建 myuser 用户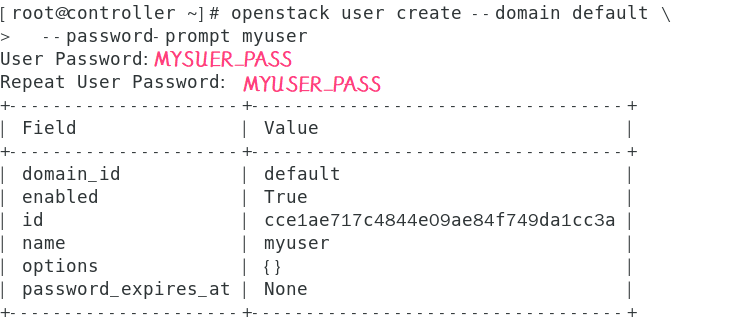<br />openstack user create --domain default \ <br />--password-prompt myuser手动输入密码:MYUSER_PASS- 创建 myrole 角色<br />openstack role create myrole- 将 myrole 角色添加到 myproject 项目和 myuser 用户<br />openstack role add --project myproject --user myuser myrole- 验证身份服务- 取消设置临时变量 OS_AUTH_URL 和 OS_PASSWORD 环境变量<br />unset OS_AUTH_URL OS_PASSWORD- 以 admin 用户身份请求身份验证令牌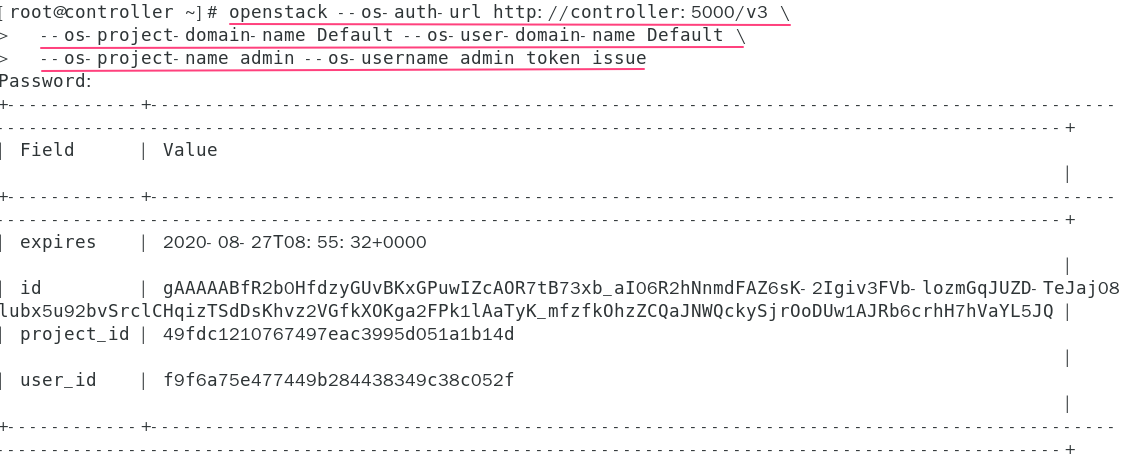<br />openstack --os-auth-url http://controller:5000/v3 \ <br />--os-project-domain-name Default --os-user-domain-name Default \ <br />--os-project-name admin --os-username admin token issue<br />输入密码:ADMIN_PASS- 以 myuser 用户身份请求身份验证令牌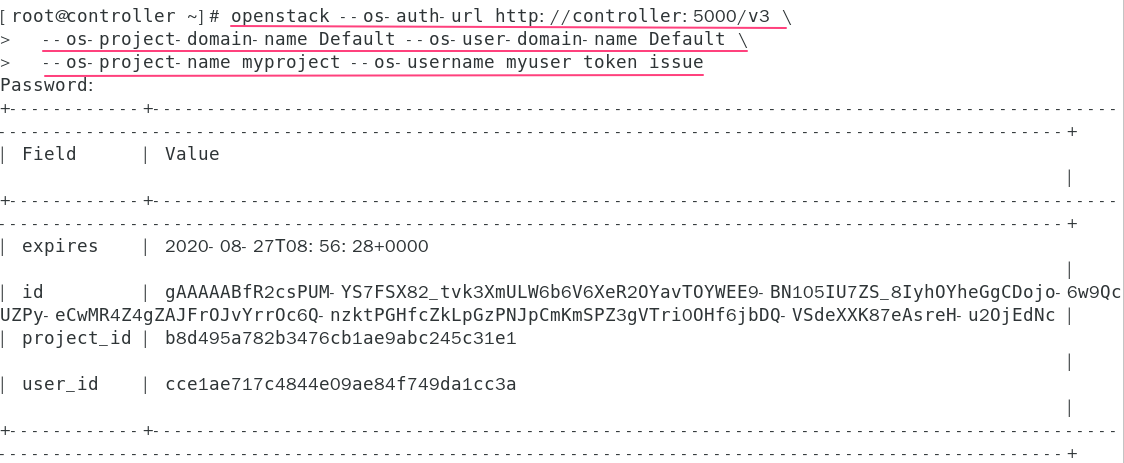<br />openstack --os-auth-url http://controller:5000/v3 \ <br />--os-project-domain-name Default --os-user-domain-name Default \ <br />--os-project-name myproject --os-username myuser token issue<br />输入密码:MYUSER_PASS- 创建 OpenStack 客户端环境脚本[https://docs.openstack.org/keystone/rocky/install/keystone-openrc-rdo.html](https://docs.openstack.org/keystone/rocky/install/keystone-openrc-rdo.html)- 创建脚本mkdir -p /scripts <br />cd /scripts- 新建 admin-openrc 文件<br />vim admin-openrc<br />export OS_PROJECT_DOMAIN_NAME=Default<br />export OS_USER_DOMAIN_NAME=Default<br />export OS_PROJECT_NAME=admin<br />export OS_USERNAME=admin<br />export OS_PASSWORD=ADMIN_PASS<br />export OS_AUTH_URL=http://controller:5000/v3<br />export OS_IDENTITY_API_VERSION=3<br />export OS_IMAGE_API_VERSION=2- 新建 demo-openrc 文件<br />vim demo-openrc <br />export OS_PROJECT_DOMAIN_NAME=Default<br />export OS_USER_DOMAIN_NAME=Default<br />export OS_PROJECT_NAME=myproject<br />export OS_USERNAME=myuser<br />export OS_PASSWORD=MYUSER_PASS<br />export OS_AUTH_URL=http://controller:5000/v3<br />export OS_IDENTITY_API_VERSION=3<br />export OS_IMAGE_API_VERSION=2- 使用脚本- 加载 admin-openrc 文件<br />. admin-openrc- 请求身份验证令牌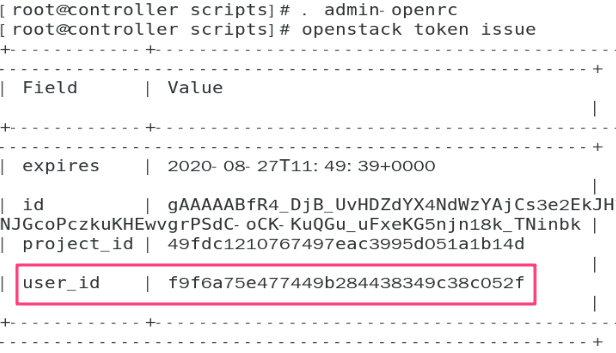<br />openstack token issue- 加载 demo-openrc 文件<br />. demo-openrc- 请求身份令牌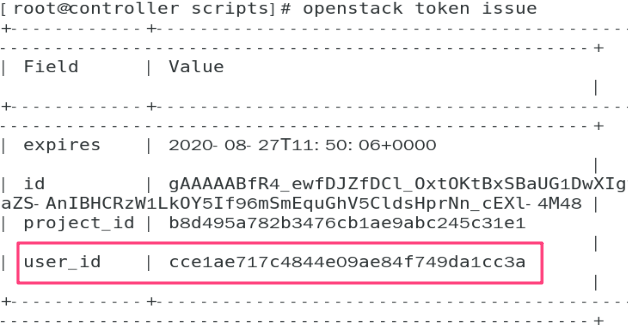<br />openstack token issue
- 安装配置镜像服务(glance)https://docs.openstack.org/glance/rocky/install/install-rdo.html
- 创建数据库,服务凭证和 API 端点
- 创建数据库
- 使用数据库访问客户端以root用户身份连接到数据库服务器
mysql -u root -p - 创建glance数据库
CREATE DATABASE glance; - 授予对glance数据库的适当访问权限
GRANT ALL PRIVILEGES ON glance. TO ‘glance’@’localhost‘ \ IDENTIFIED BY ‘GLANCE_DBPASS’;GRANT ALL PRIVILEGES ON glance. TO ‘glance’@’%’ \ IDENTIFIED BY ‘GLANCE_DBPASS’;
- 使用数据库访问客户端以root用户身份连接到数据库服务器
- 加载 admin-openrc 文件
cd /scripts
. admin-openrc - 创建服务凭证
- 创建 glance 用户

openstack user create —domain default —password-prompt glance输入密码:GLANCE_PASS - 将 admin 角色添加到 glance 用户和 service 项目
openstack role add —project service —user glance admin - 创建 glance 服务实体

openstack service create —name glance --description “OpenStack Image” image
- 创建 glance 用户
- 创建镜像服务 API 端点
- public
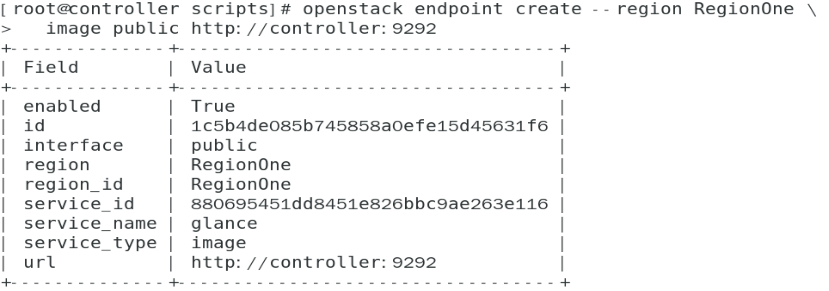
openstack endpoint create —region RegionOne \image public http://controller:9292 - internal
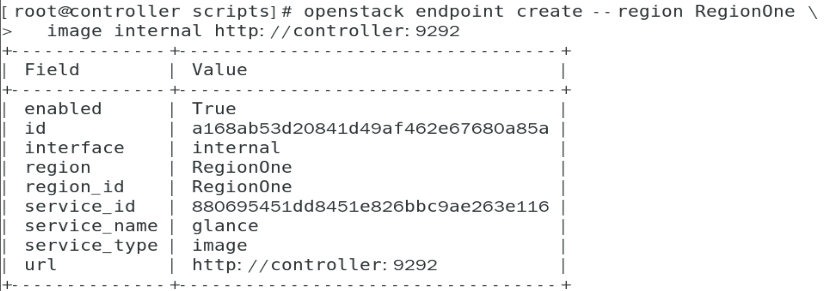
openstack endpoint create —region RegionOne \image internal http://controller:9292 - admin
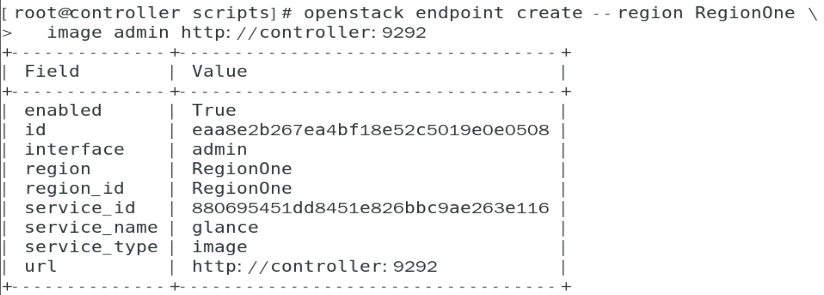
openstack endpoint create —region RegionOne \image admin http://controller:9292
- public
- 创建数据库
- 安装和配置组件
- 安装 glance 包
yum install openstack-glance -y - 修改配置文件
- glance-api.conf 文件
- 修改 glance-api.conf 文件
vim /etc/glance/glance-api.conf
- 修改 glance-api.conf 文件
- glance-api.conf 文件
- 安装 glance 包
- 创建数据库,服务凭证和 API 端点
[database]
connection = mysql+pymysql://glance:GLANCE_DBPASS@controller/glance
[keystone_authtoken]www_authenticate_uri = http://controller:5000auth_url = http://controller:5000memcached_servers = controller:11211auth_type = passwordproject_domain_name = Defaultuser_domain_name = Defaultproject_name = serviceusername = glancepassword = GLANCE_PASS
[paste_deploy]
flavor = keystone
[glance_store]stores = file,httpdefault_store = filefilesystem_store_datadir = /var/lib/glance/images/
- 验证 glance-api.conf 文件<br />curl http://controller:5000<br />netstat -anlp | grep 11211 | grep LISTEN- 查看服务状态<br />systemctl status openstack-glance-api- glance-registry.conf 文件- 修改 glance-registry.conf 文件<br />vim /etc/glance/glance-registry.conf<br />[database]connection = mysql+pymysql://glance:GLANCE_DBPASS@controller/glance<br />[keystone_authtoken]www_authenticate_uri = http://controller:5000auth_url = http://controller:5000memcached_servers = controller:11211auth_type = passwordproject_domain_name = Defaultuser_domain_name = Defaultproject_name = serviceusername = glancepassword = GLANCE_PASS
[paste_deploy]flavor = keystone
- 查看服务状态<br />systemctl status openstack-glance-registry- 创建远程镜像目录并授权<br />mkdir -p /var/lib/glance/imageschown -Rhf glance:nobody /var/lib/glance/images/- 同步数据库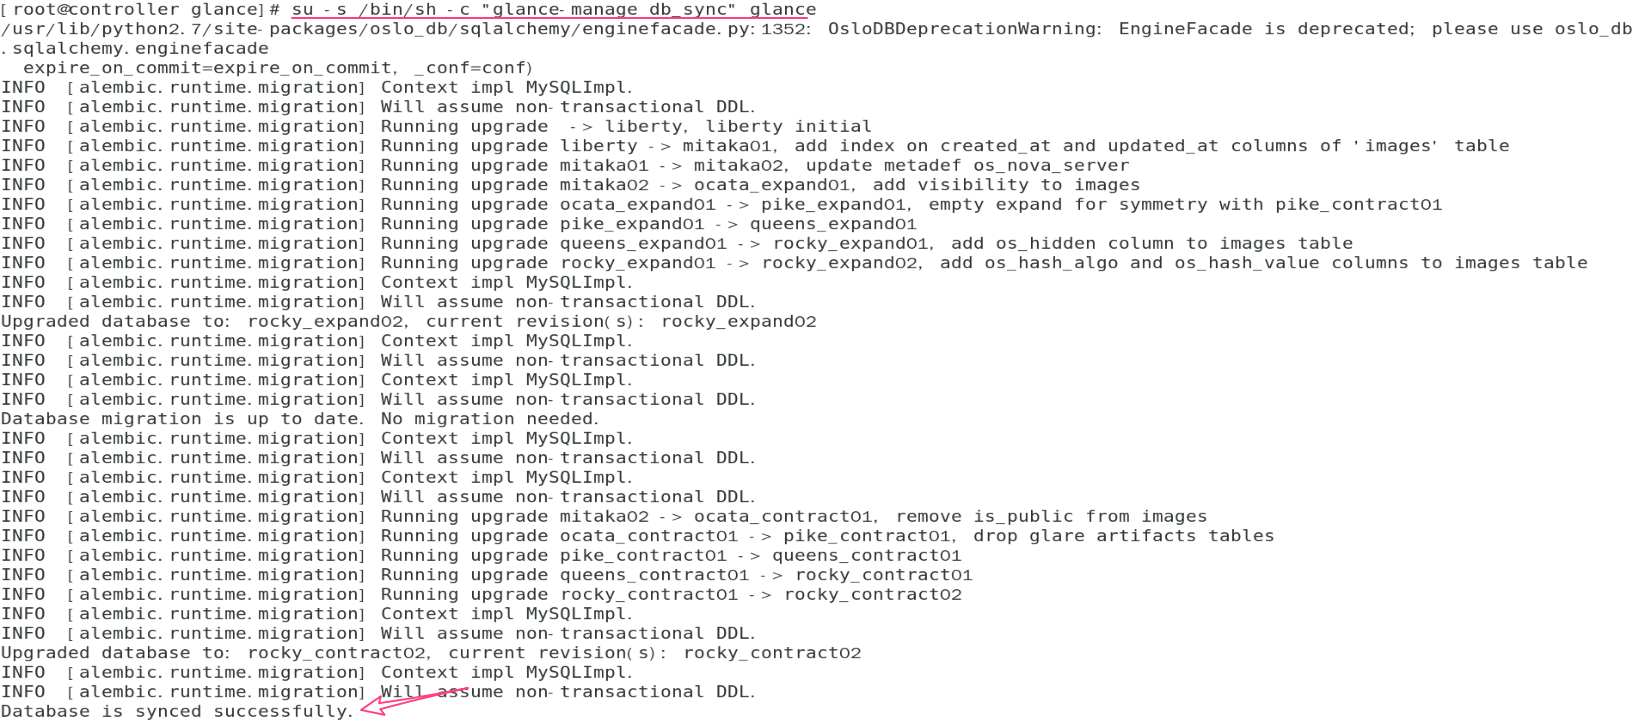<br />su -s /bin/sh -c "glance-manage db_sync" glance- 查看数据库表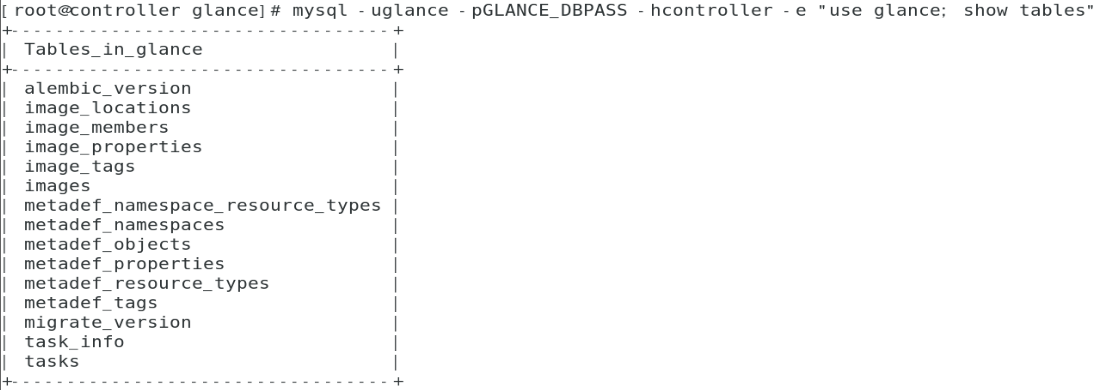<br />mysql -uglance -pGLANCE_DBPASS -hcontroller -e "use glance; show tables"- 启动镜像服务<br />systemctl enable openstack-glance-api.service \openstack-glance-registry.service<br />systemctl start openstack-glance-api.service \ <br />openstack-glance-registry.service- 验证镜像服务- 加载 admin-openrc 文件<br />cd /scripts<br />. admin-openrc- 下载镜像到本地<br />mkdir -p /images<br />cd /imageswget [http://download.cirros-cloud.net/0.4.0/cirros-0.4.0-x86_64-disk.img](http://download.cirros-cloud.net/0.4.0/cirros-0.4.0-x86_64-disk.img)- 查看下载的镜像<br />ls /images- 上传镜像到 openstack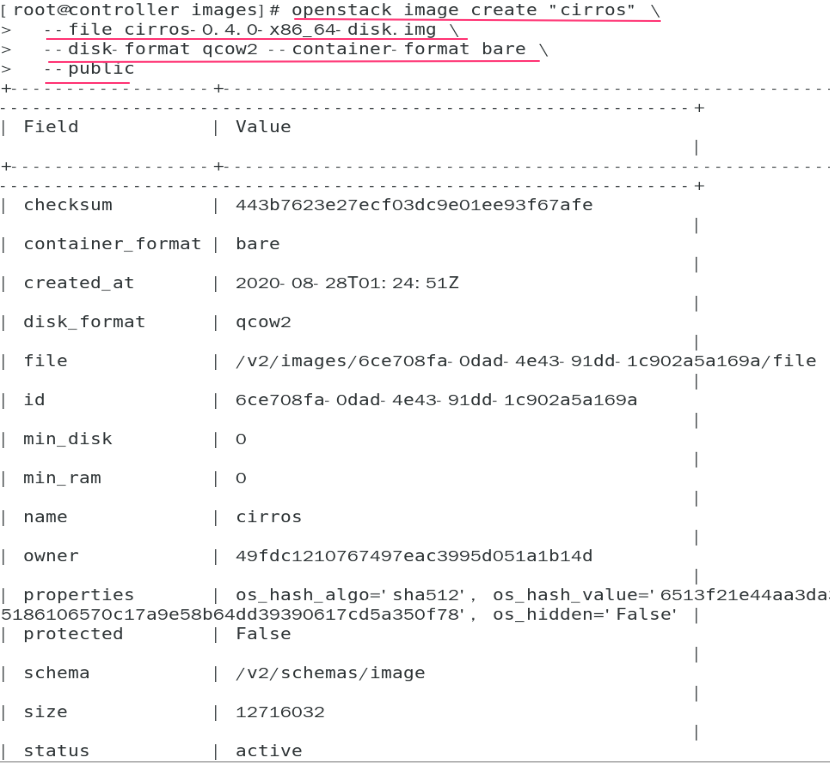<br />openstack image create "cirros" \ <br />--file cirros-0.4.0-x86_64-disk.img \ <br />--disk-format qcow2 --container-format bare \--public- 查看上传的镜像<br />ll /var/lib/glance/images- 查看镜像属性<br />openstack image list
- 安装配置计算服务(nova)https://docs.openstack.org/nova/rocky/install/controller-install-rdo.html#install-and-configure-components
- 创建数据库,服务凭证和API端点
- 创建数据库
- 连接数据库
mysql -u root -proot - 创建nova_api,nova,nova_cell0,和placement数据库
CREATE DATABASE nova_api;CREATE DATABASE nova;CREATE DATABASE nova_cell0;CREATE DATABASE placement; - 对数据库授权
GRANT ALL PRIVILEGES ON nova_api. TO ‘nova’@’localhost‘ \ IDENTIFIED BY ‘NOVA_DBPASS’;GRANT ALL PRIVILEGES ON nova_api. TO ‘nova’@’%’ \ IDENTIFIED BY ‘NOVA_DBPASS’;
GRANT ALL PRIVILEGES ON nova. TO ‘nova’@’localhost‘ \ IDENTIFIED BY ‘NOVA_DBPASS’;GRANT ALL PRIVILEGES ON nova. TO ‘nova’@’%’ \ IDENTIFIED BY ‘NOVA_DBPASS’;
- 连接数据库
- 创建数据库
- 创建数据库,服务凭证和API端点
GRANT ALL PRIVILEGES ON nova_cell0. TO ‘nova’@’localhost‘ \ IDENTIFIED BY ‘NOVA_DBPASS’;GRANT ALL PRIVILEGES ON nova_cell0. TO ‘nova’@’%’ \ IDENTIFIED BY ‘NOVA_DBPASS’;
GRANT ALL PRIVILEGES ON placement. TO ‘placement’@’localhost‘ \ IDENTIFIED BY ‘PLACEMENT_DBPASS’;GRANT ALL PRIVILEGES ON placement. TO ‘placement’@’%’ \ IDENTIFIED BY ‘PLACEMENT_DBPASS’;
- 使用 nova 用户连接数据库测试<br />mysql -unova -pNOVA_DBPASS- 加载 admin-openrc 文件<br />cd /scripts<br />. admin-openrc- 创建计算服务凭证- 创建nova用户<br />openstack user create --domain default --password-prompt nova<br />输入密码:NOVA_PASS- admin向nova用户添加角色<br />openstack role add --project service --user nova admin- 创建nova服务实体<br />openstack service create --name nova \--description "OpenStack Compute" compute- 创建Compute API服务端点<br />openstack endpoint create --region RegionOne \compute public http://controller:8774/v2.1<br />openstack endpoint create --region RegionOne \compute internal http://controller:8774/v2.1<br />openstack endpoint create --region RegionOne \compute admin http://controller:8774/v2.1- 创建 placement 用户<br />openstack user create --domain default --password-prompt placement输入密码:PLACEMENT_PASS- 添加 placement 用户到 service 项目中<br />openstack role add --project service --user placement admin- 在 servcie 中创建Placement API<br />openstack service create --name placement \ <br />--description "Placement API" placement- 创建Placement API服务端点<br />openstack endpoint create --region RegionOne \placement public http://controller:8778<br />openstack endpoint create --region RegionOne \placement internal http://controller:8778
openstack endpoint create —region RegionOne \placement admin http://controller:8778
- 安装和配置组件- 安装软件包<br />yum install openstack-nova-api openstack-nova-conductor \openstack-nova-console openstack-nova-novncproxy \openstack-nova-scheduler openstack-nova-placement-api- 修改 nova.conf 文件<br />vim /etc/nova/nova.conf
[DEFAULT]enabled_apis = osapi_compute,metadata
transport_url = rabbit://openstack:RABBIT_PASS@controller
my_ip = 192.168.80.80
use_neutron = truefirewall_driver = nova.virt.firewall.NoopFirewallDriver
[api_database]connection = mysql+pymysql://nova:NOVA_DBPASS@controller/nova_api
[database]connection = mysql+pymysql://nova:NOVA_DBPASS@controller/nova
[placement_database]connection = mysql+pymysql://placement:PLACEMENT_DBPASS@controller/placement
[api]auth_strategy = keystone
[keystone_authtoken]auth_url = http://controller:5000/v3memcached_servers = controller:11211auth_type = passwordproject_domain_name = Defaultuser_domain_name = Defaultproject_name = serviceusername = novapassword = NOVA_PASS
[vnc]enabled = trueserver_listen = $my_ipserver_proxy
client_address = $my_ip
[glance]api_servers = http://controller:9292
[oslo_concurrency]lock_path = /var/lib/nova/tmp
[placement]region_name = RegionOneproject_domain_name = Defaultproject_name = serviceauth_type = passworduser_domain_name = Defaultauth_url = http://controller:5000/v3username = placementpassword = PLACEMENT_PASS
- 修改 00-nova-placement-api.conf 文件,启用对Placement API的访问<br />在最后添加:<Directory /usr/bin> <IfVersion >= 2.4> Require all granted </IfVersion> <IfVersion < 2.4> Order allow,deny Allow from all </IfVersion></Directory>- 重新启动httpd服务<br />systemctl restart httpd- 同步 nova-api 和 placement 数据库<br />su -s /bin/sh -c "nova-manage api_db sync" nova- 注册cell0数据库<br />su -s /bin/sh -c "nova-manage cell_v2 map_cell0" nova- 创建cell1<br />su -s /bin/sh -c "nova-manage cell_v2 create_cell --name=cell1 --verbose" nova- 同步 nova 数据库<br />su -s /bin/sh -c "nova-manage db sync" nova- 验证nova cell0和cell1是否正确注册<br />su -s /bin/sh -c "nova-manage cell_v2 list_cells" nova- 启动服务<br />systemctl enable openstack-nova-api.service \openstack-nova-consoleauth openstack-nova-scheduler.service \openstack-nova-conductor.service openstack-nova-novncproxy.service<br />systemctl start openstack-nova-api.service \openstack-nova-consoleauth openstack-nova-scheduler.service \openstack-nova-conductor.service openstack-nova-novncproxy.service
- 安装配置网络服务(neutron)https://docs.openstack.org/neutron/rocky/install/controller-install-rdo.html
- 先决条件
- 连接到数据库
mysql -uroot -proot - 创建 neutron 数据库
CREATE DATABASE neutron; - 授予对 neutron 数据库的适当访问权限
GRANT ALL PRIVILEGES ON neutron. TO ‘neutron’@’localhost‘ \ IDENTIFIED BY ‘NEUTRON_DBPASS’;GRANT ALL PRIVILEGES ON neutron. TO ‘neutron’@’%’ \ IDENTIFIED BY ‘NEUTRON_DBPASS’; - 加载 admin-openrc 文件
cd /scripts
. admin-openrc - 创建 neutron 用户

openstack user create —domain default —password-prompt neutron输入密码:NEUTRON_PASS - admin 向 neutron 用户添加角色
openstack role add —project service —user neutron admin - 创建 neutron 服务实体
openstack service create —name neutron --description “OpenStack Networking” network - 创建网络服务 API 端点
openstack endpoint create —region RegionOne \network public http://controller:9696
- 连接到数据库
- 先决条件
openstack endpoint create —region RegionOne \network internal http://controller:9696
openstack endpoint create —region RegionOne \network admin http://controller:9696
- 配置网络选项([联网选项2:自助服务网络](https://docs.openstack.org/neutron/rocky/install/controller-install-option2-rdo.html))- 安装组件<br />yum install openstack-neutron openstack-neutron-ml2 \openstack-neutron-linuxbridge ebtables- 配置服务器组件<br />vim /etc/neutron/neutron.conf<br />[database]<br />connection = mysql+pymysql://neutron:NEUTRON_DBPASS@controller/neutron
[DEFAULT]
core_plugin = ml2service_plugins = routerallow_overlapping_ips = true
transport_url = rabbit://openstack:RABBIT_PASS@controller
auth_strategy = keystonenotify_nova_on_port_status_changes = truenotify_nova_on_port_data_changes = true
[keystone_authtoken]www_authenticate_uri = http://controller:5000auth_url = http://controller:5000memcached_servers = controller:11211auth_type = passwordproject_domain_name = defaultuser_domain_name = defaultproject_name = serviceusername = neutronpassword = NEUTRON_PASS
[nova]auth_url = http://controller:5000auth_type = passwordproject_domain_name = defaultuser_domain_name = defaultregion_name = RegionOneproject_name = serviceusername = novapassword = NOVA_PASS
[oslo_concurrency]
lock_path = /var/lib/neutron/tmp
- 配置 ML2 插件<br />vim /etc/neutron/plugins/ml2/ml2_conf.ini<br />[ml2]<br />type_drivers = flat,vlan,vxlan<br />tenant_network_types = vxlan<br />mechanism_drivers = linuxbridge,l2population<br />extension_drivers = port_security
[ml2_type_flat]
flat_networks = provider
[ml2_type_vxlan]
vni_ranges = 1:1000
[securitygroup]
enable_ipset = true
- 配置 Linux 网桥代理<br />vim /etc/neutron/plugins/ml2/linuxbridge_agent.ini
[linux_bridge]physical_interface_mappings = provider:ens37
[vxlan]enable_vxlan = truelocal_ip = 192.168.80.80
l2_population = true
[securitygroup]enable_security_group = truefirewall_driver = neutron.agent.linux.iptables_firewall.IptablesFirewallDriver
- 设置 sysctl 值- 查看 br_netfilter 模块是否加载<br />lsmod | grep br_netfilter- 加载 br_netfilter 模块(若未加载)<br />modprobe br_netfilter- 编辑配置文件<br />vim /etc/sysctl.conf <br />net.bridge.bridge-nf-call-iptables=1<br />net.bridge.bridge-nf-call-ip6tables=1- 配置生效<br />sysctl -p- 查看修改的配置<br />sysctl -a | grep net.bridge.bridge-nf-call-ip- 配置 3 层代理<br />vim /etc/neutron/l3_agent.ini
[DEFAULT]
interface_driver = linuxbridge
- 配置 DHCP 代理<br />vim /etc/neutron/dhcp_agent.ini
[DEFAULT]nova_metadata_host = controllermetadata_proxy_shared_secret = METADATA_SECRET
- 配置元数据代理<br />vim /etc/neutron/metadata_agent.ini
[DEFAULT]nova_metadata_host = controllermetadata_proxy_shared_secret = METADATA_SECRET
- 配置计算服务以使用网络服务<br />vim /etc/nova/nova.conf
[neutron]url = http://controller:9696auth_url = http://controller:5000auth_type = passwordproject_domain_name = defaultuser_domain_name = defaultregion_name = RegionOneproject_name = serviceusername = neutronpassword = NEUTRON_PASSservice_metadata_proxy = truemetadata_proxy_shared_secret = METADATA_SECRET
- 确定安装- 创建符号连接文件<br />ln -s /etc/neutron/plugins/ml2/ml2_conf.ini /etc/neutron/plugin.ini- 同步数据库<br />su -s /bin/sh -c "neutron-db-manage --config-file /etc/neutron/neutron.conf \--config-file /etc/neutron/plugins/ml2/ml2_conf.ini upgrade head" neutron- 重新启动 Compute API 服务<br />systemctl restart openstack-nova-api.service- 启动网络服务,并将其配置为在系统引导时启动<br />systemctl enable neutron-server.service \neutron-linuxbridge-agent.service neutron-dhcp-agent.service \neutron-metadata-agent.service<br />systemctl start neutron-server.service \neutron-linuxbridge-agent.service neutron-dhcp-agent.service \neutron-metadata-agent.service<br />systemctl enable neutron-l3-agent.servicesystemctl start neutron-l3-agent.service
- 安装配置控制面板服务(dashboard)https://docs.openstack.org/horizon/rocky/install/install-rdo.html
- 安装配置组件
- 安装软件包
yum install openstack-dashboard -y - 修改 mysql-clients.cnf 文件
cd /etc/my.cnf.d/vim mysql-clients.cnf
[mysql]
default-character-set = utf8 - 重启数据库
systemctl restart mariadb - 修改 local_settings 文件
vim /etc/openstack-dashboard/local_settings
OPENSTACK_HOST = “controller”
ALLOWED_HOSTS = [‘*’]
SESSION_ENGINE = ‘django.contrib.sessions.backends.cache’
CACHES = { ‘default’: { ‘BACKEND’: ‘django.core.cache.backends.memcached.MemcachedCache’, ‘LOCATION’: ‘controller:11211’,
}}
- 安装软件包
- 安装配置组件
OPENSTACK_KEYSTONE_URL = “http://%s:5000/v3“ % OPENSTACK_HOST
OPENSTACK_KEYSTONE_MULTIDOMAIN_SUPPORT = True
OPENSTACK_API_VERSIONS = { “identity”: 3, “image”: 2, “volume”: 2,}
OPENSTACK_KEYSTONE_DEFAULT_DOMAIN = “Default”
OPENSTACK_KEYSTONE_DEFAULT_ROLE = “user”
- 修改 <br />vim /etc/httpd/conf.d/openstack-dashboard.conf<br />WSGIApplicationGroup %{GLOBAL}- 确定安装<br />systemctl restart httpd.service memcached.service- 验证- 访问 [http://192.168.80.80/dashboard](http://192.168.80.80/dashboard)<br />域:Default<br />用户名:admin<br />密码:ADMIN_PASS- dashboard 界面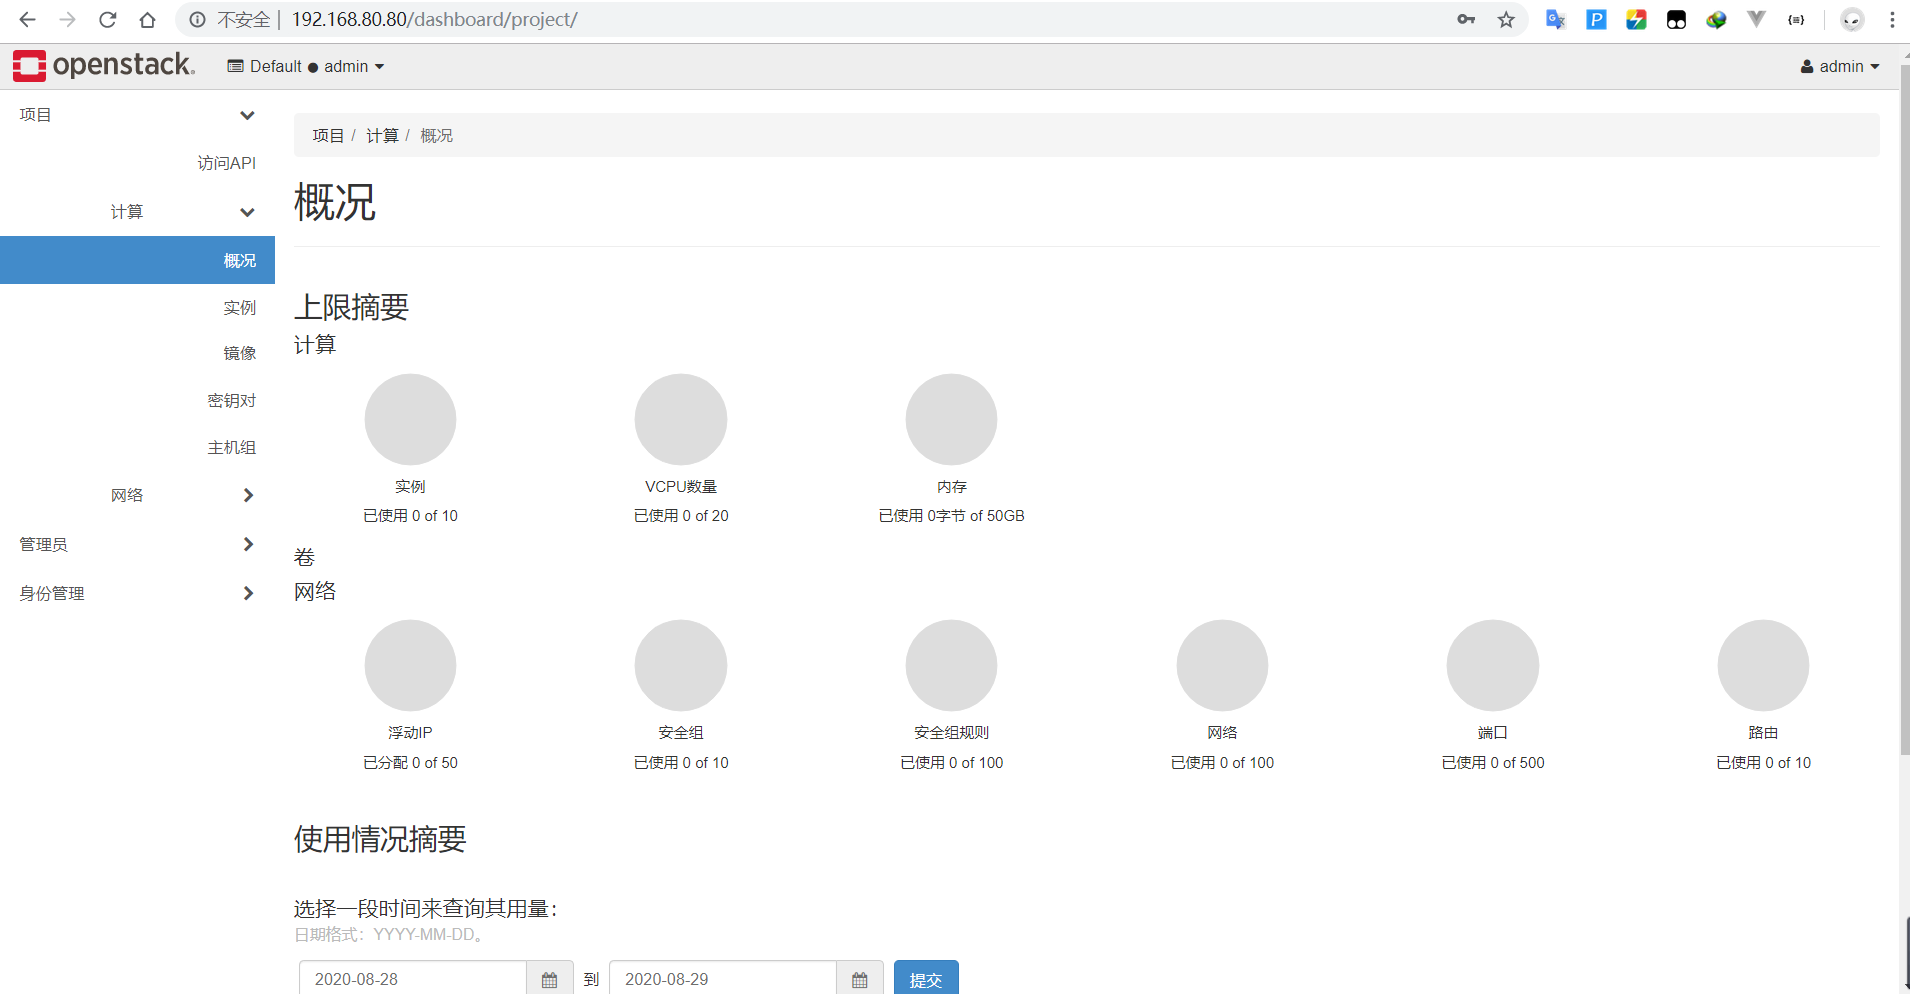
- 安装配置块存储服务(cinder)https://docs.openstack.org/cinder/rocky/install/cinder-controller-install-rdo.html
- 先决条件
- 创建 cinder 数据库
mysql -u root -prootCREATE DATABASE cinder; - 创建用户并授权 cinder 数据库
GRANT ALL PRIVILEGES ON cinder. TO ‘cinder’@’localhost‘ \IDENTIFIED BY ‘CINDER_DBPASS’;
GRANT ALL PRIVILEGES ON cinder. TO ‘cinder’@’%’ \IDENTIFIED BY ‘CINDER_DBPASS’; - 访问测试
mysql -ucinder -pCINDER_DBPASS -hcontroller
use cinder;
show tables; - 加载 admin-openrc 文件
. /scripts/admin-openrc - 创建一个 cinder 用户
openstack user create —domain default —password-prompt cinder输入密码:CINDER_PASS - admin 向 cinder 用户添加角色
openstack role add —project service —user cinder admin - 创建cinderv2和cinderv3服务实体
openstack service create —name cinderv2 --description “OpenStack Block Storage” volumev2
openstack service create —name cinderv3 --description “OpenStack Block Storage” volumev3 - 创建块存储服务API端点
openstack endpoint create —region RegionOne \volumev2 public http://controller:8776/v2/%\(project_id\)s
openstack endpoint create —region RegionOne \volumev2 internal http://controller:8776/v2/%\(project_id\)s
- 创建 cinder 数据库
- 先决条件
openstack endpoint create —region RegionOne \volumev2 admin http://controller:8776/v2/%\(project_id\)s
openstack endpoint create —region RegionOne \volumev3 public http://controller:8776/v3/%\(project_id\)s
openstack endpoint create —region RegionOne \volumev3 internal http://controller:8776/v3/%\(project_id\)s
openstack endpoint create —region RegionOne \volumev3 admin http://controller:8776/v3/%\(project_id\)s
- 安装配置组件- 安装软件包<br />yum install openstack-cinder -y- 编辑 cinder.conf 文件<br />vim /etc/cinder/cinder.conf
[database]connection = mysql+pymysql://cinder:CINDER_DBPASS@controller/cinder
[DEFAULT]transport_url = rabbit://openstack:RABBIT_PASS@controllerauth_strategy = keystonemy_ip = 192.168.80.80
[keystone_authtoken]www_authenticate_uri = http://controller:5000auth_url = http://controller:5000memcached_servers = controller:11211auth_type = passwordproject_domain_id = defaultuser_domain_id = defaultproject_name = serviceusername = cinderpassword = CINDER_PASS
[oslo_concurrency]lock_path = /var/lib/cinder/tmp
- 填充块存储数据库<br />su -s /bin/sh -c "cinder-manage db sync" cinder- 查看数据库表<br />mysql -ucinder -pCINDER_DBPASS -hcontroller -e "use cinder; show tables" | wc -l显示为:36- 配置计算以使用块存储<br />vim /etc/nova/nova.conf
[cinder]os_region_name = RegionOne
- 完成安装- 重新启动 Compute API 服务<br />systemctl restart openstack-nova-api.service- 启动块存储服务,并将其配置为在系统引导时启动<br />systemctl enable openstack-cinder-api.service openstack-cinder-scheduler.service<br />systemctl start openstack-cinder-api.service openstack-cinder-scheduler.service
在 compute1 和 compute2 上
- 安装配置计算服务(compute)https://docs.openstack.org/nova/rocky/install/compute-install-rdo.html
- 安装配置组件
- 安装 openstack-nova-compute 包
yum install openstack-nova-compute -y - 修改 nova.conf 文件
vim /etc/nova/nova.conf
[DEFAULT]
enabled_apis = osapi_compute,metadatatransport_url = rabbit://openstack:RABBIT_PASS@controllermy_ip = 192.168.80.81 或 192.168.80.82
use_neutron = truefirewall_driver = nova.virt.firewall.NoopFirewallDriver
- 安装 openstack-nova-compute 包
- 安装配置组件
[api]auth_strategy = keystone
[keystone_authtoken]auth_url = http://controller:5000/v3memcached_servers = controller:11211auth_type = passwordproject_domain_name = Defaultuser_domain_name = Defaultproject_name = serviceusername = novapassword = NOVA_PASS
[vnc]enabled = trueserver_listen = 0.0.0.0
server_proxyclient_address = $my_ipnovncproxy_base_url = http://controller:6080/vnc_auto.html
[glance]api_servers = http://controller:9292
[oslo_concurrency]lock_path = /var/lib/nova/tmp
[placement]region_name = RegionOneproject_domain_name = Defaultproject_name = serviceauth_type = passworduser_domain_name = Defaultauth_url = http://controller:5000/v3username = placementpassword = PLACEMENT_PASS
[libvirt]virt_type = qemu
- 启动服务<br />systemctl enable libvirtd.service openstack-nova-compute.service<br />systemctl start libvirtd.service openstack-nova-compute.service- 将计算节点添加到单元数据库中(在 controller 上添加)- 加载 admin-openrc 文件<br />cd /scripts<br />. admin-openrc- 确认数据库中有计算节点<br />openstack compute service list --service nova-compute- 发现计算节点<br />su -s /bin/sh -c "nova-manage cell_v2 discover_hosts --verbose" nova- 验证计算服务(在 controller 上验证)[https://docs.openstack.org/nova/rocky/install/verify.html](https://docs.openstack.org/nova/rocky/install/verify.html)- 加载 admin-openrc 文件<br />cd /scripts. admin-openrc- 列出服务组件,以验证每个进程的成功启动和注册<br />openstack compute service list- 列出身份服务中的API端点,以验证与身份服务的连接性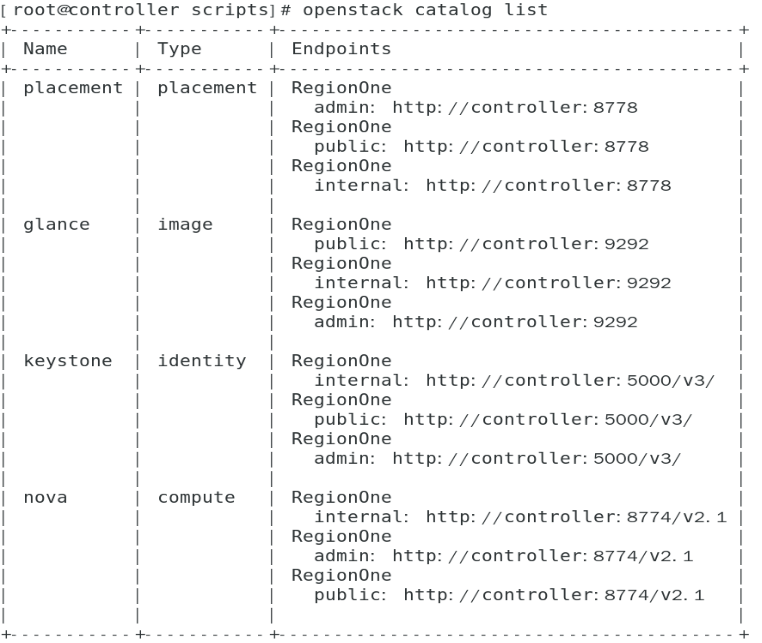<br />openstack catalog list- 列出镜像服务中的镜像,以验证与镜像服务的连接性<br />openstack image list- 检查 cells 和 placement API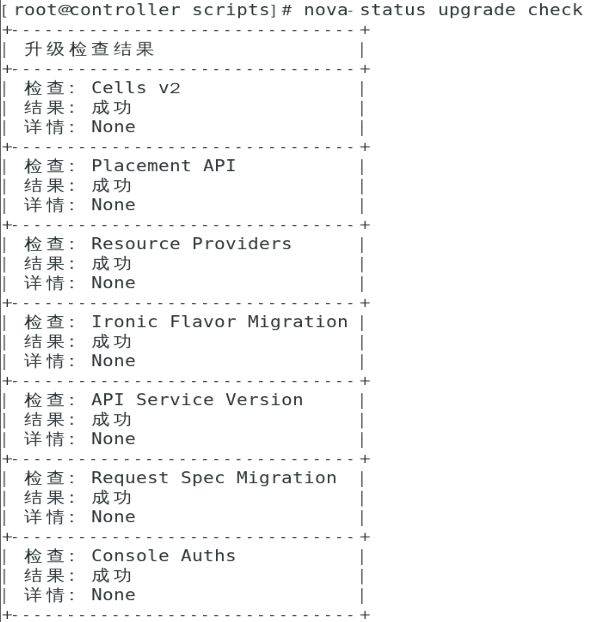<br />nova-status upgrade check
- 安装配置网络服务(neutron)https://docs.openstack.org/neutron/rocky/install/compute-install-rdo.html
- 安装配置组件
- 安装组件
yum install openstack-neutron-linuxbridge ebtables ipset -y - 配置身份验证机制和消息队列
vim /etc/neutron/neutron.conf
- 安装组件
- 安装配置组件
[DEFAULT]
transport_url = rabbit://openstack:RABBIT_PASS@controller
auth_strategy = keystone
[keystone_authtoken]
www_authenticate_uri = http://controller:5000auth_url = http://controller:5000memcached_servers = controller:11211auth_type = passwordproject_domain_name = defaultuser_domain_name = defaultproject_name = serviceusername = neutronpassword = NEUTRON_PASS
[oslo_concurrency]
lock_path = /var/lib/neutron/tmp
- 配置网络选项([联网选项2:自助服务网络](https://docs.openstack.org/neutron/rocky/install/compute-install-option2-rdo.html))——配置Linux网桥代理- 修改配置文件<br />vim /etc/neutron/plugins/ml2/linuxbridge_agent.ini<br />[linux_bridge]physical_interface_mappings = provider:ens37
[vxlan]enable_vxlan = truelocal_ip = 192.168.80.81 或 192.168.80.82
l2_population = true
[securitygroup]
enable_security_group = truefirewall_driver = neutron.agent.linux.iptables_firewall.IptablesFirewallDriver
- 设置 sysctl 值- 查看是否有 br_netfilter 模块<br />lsmod | grep br_netfilter- 加载 br_netfilter 模块(若无)<br />modprobe br_netfilter- 修改配置文件<br />vim /etc/sysctl.conf <br />net.bridge.bridge-nf-call-iptables=1<br />net.bridge.bridge-nf-call-ip6tables=1- 配置生效<br />sysctl -p- 查看修改的配置<br />sysctl -a | grep net.bridge.bridge-nf-call-ip- 配置计算服务以使用网络服务<br />vim /etc/nova/nova.conf<br />[neutron]<br />url = http://controller:9696auth_url = http://controller:5000auth_type = passwordproject_domain_name = defaultuser_domain_name = defaultregion_name = RegionOneproject_name = serviceusername = neutronpassword = NEUTRON_PASS- 完成安装- 重新启动计算服务<br />systemctl restart openstack-nova-compute.service- 启动Linux网桥代理,并将其配置为在系统引导时启动<br />systemctl enable neutron-linuxbridge-agent.servicesystemctl start neutron-linuxbridge-agent.service- 验证网络服务(在 controller 上验证)- 加载 admin-openrc 文件<br />. /admin-openrc- 列出已加载的扩展,以验证该 neutron-server 过程是否成功启动<br />openstack extension list --network
在 cinder 上
- 安装配置块存储服务(cinder)
- 先决条件
- 安装支持的实用程序包
- 安装LVM软件包
yum install lvm2 device-mapper-persistent-data -y - 启动LVM元数据服务,并将其配置为在系统引导时启动
systemctl enable lvm2-lvmetad.servicesystemctl start lvm2-lvmetad.service
- 安装LVM软件包
- 创建LVM物理卷/dev/sdb
pvcreate /dev/sdb - 创建LVM卷组cinder-volumes
vgcreate cinder-volumes /dev/sdb - 修改 lvm.conf 文件(在 cinder、compute1 和 compute2上都要修改)
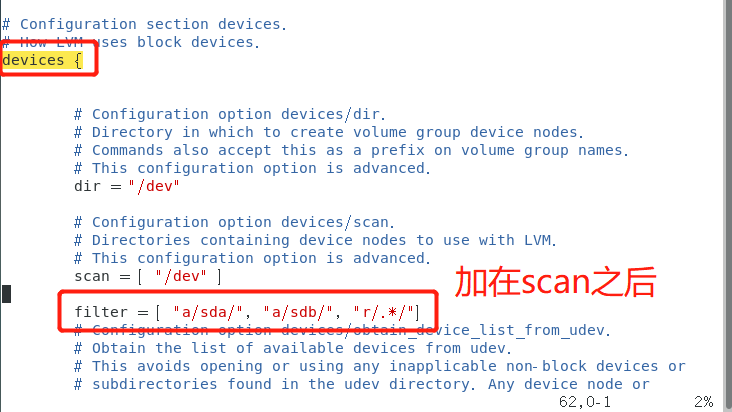
vim /etc/lvm/lvm.conffilter = [ “a/sda/“, “a/sdb/“, “r/.*/“]
- 安装支持的实用程序包
- 安装和配置组件
- 安装软件包
yum install openstack-cinder targetcli python-keystone -y - 修改 /etc/cinder/cinder.conf 文件
vim /etc/cinder/cinder.conf
[database]connection = mysql+pymysql://cinder:CINDER_DBPASS@controller/cinder
- 安装软件包
- 先决条件
[DEFAULT]transport_url = rabbit://openstack:RABBIT_PASS@controller
auth_strategy = keystone
my_ip = 192.168.80.83
enabled_backends = lvm
glance_api_servers = http://controller:9292
[keystone_authtoken]www_authenticate_uri = http://controller:5000auth_url = http://controller:5000memcached_servers = controller:11211auth_type = passwordproject_domain_id = defaultuser_domain_id = defaultproject_name = serviceusername = cinderpassword = CINDER_PASS
[lvm]volume_driver = cinder.volume.drivers.lvm.LVMVolumeDrivervolume_group = cinder-volumesiscsi_protocol = iscsiiscsi_helper = lioadm
注意:[lvm]原文件中不存在,需要创建,可放到文件最后
[oslo_concurrency]lock_path = /var/lib/cinder/tmp
- 完成安装- 启动块存储卷服务及其相关性,并将其配置为在系统启动时启动<br />systemctl enable openstack-cinder-volume.service target.servicesystemctl start openstack-cinder-volume.service target.service- [验证 cinder 服务](https://docs.openstack.org/cinder/rocky/install/cinder-verify.html)(在 controller 上验证)- 加载 admin-openrc 文件<br />. /scripts/admin-openrc- 列出服务组件以验证每个进程是否成功启动<br />openstack volume service list
启动 openstack 示例
- 在 controller 上 创建虚拟网络(自服务网络)
- 创建提供商网络
- 获取管理员凭证
. /scripts/admin-openrc - 创建 provider 网络
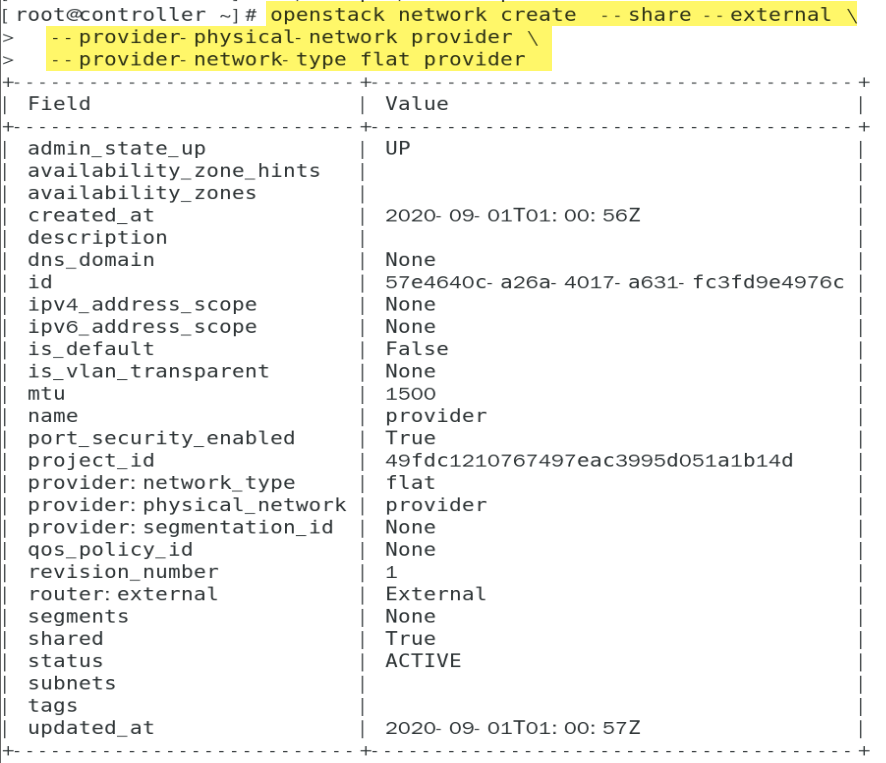
openstack network create —share —external --provider-physical-network provider --provider-network-type flat provider - 查看网络

openstack network list - 查看网络代理

openstack network agent list - 在 provider 网络上创建并查看子网
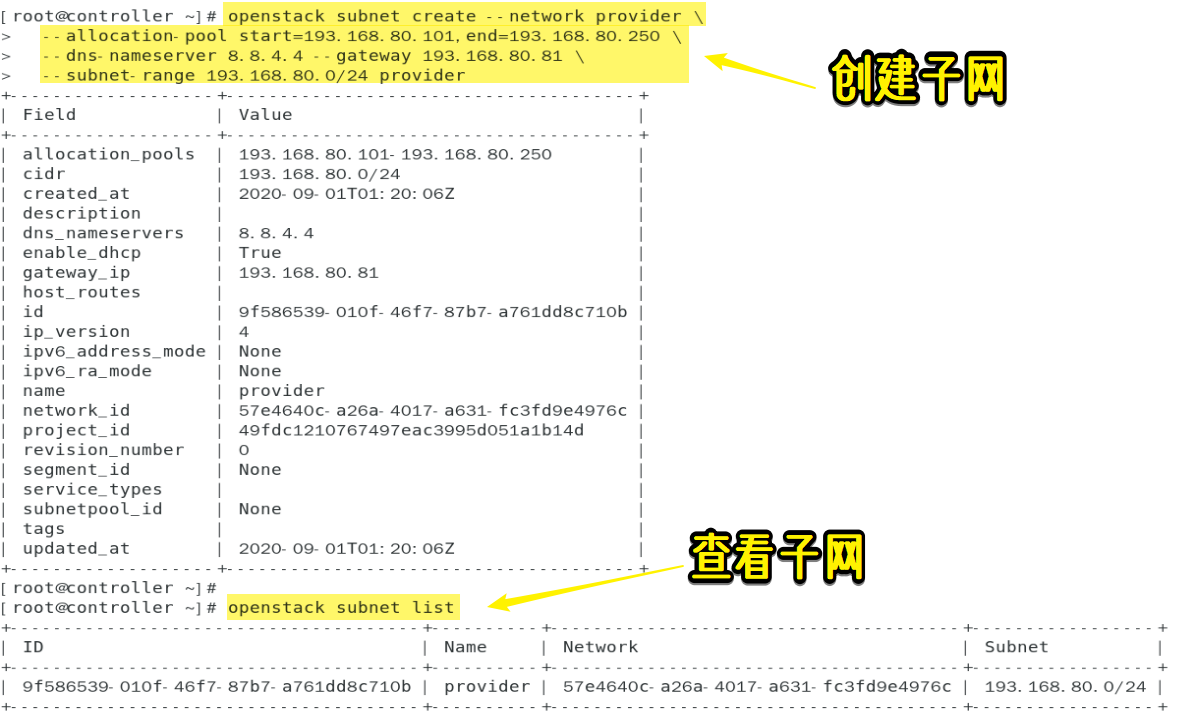

openstack subnet create —network provider \
—allocation-pool start=193.168.80.101,end=193.168.80.250 \
—dns-nameserver 8.8.4.4 —gateway 193.168.80.81 \
—subnet-range 193.168.80.0/24 provider
openstack subnet list
- 获取管理员凭证
- 创建提供商网络
openstack network list
- 创建自服务网络- 获取 demo 凭证<br />. /scripts/demo-openrc- 创建网络<br />openstack network create selfservice- 在网络上创建一个子网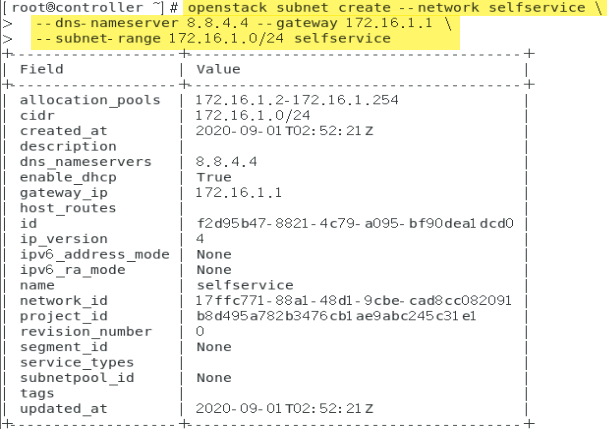<br />openstack subnet create --network selfservice \--dns-nameserver [8.8.4.4](http://8.8.4.4/) --gateway [172.16.1.1](http://172.16.1.1/) \--subnet-range [172.16.1.0/24](http://172.16.1.0/24) selfservice- 创建路由器- 获取 demo 凭证<br />. /scripts/demo-openrc- 创建路由器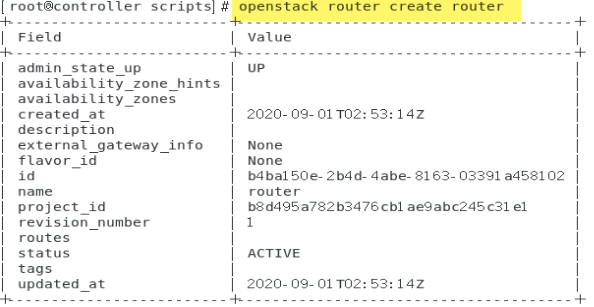<br />openstack router create router- 将自助服务网络子网添加为路由器上的接口<br />openstack router add subnet router selfservice- 在路由器的提供者网络上设置网关<br />openstack router set router --external-gateway provider- 验证操作- 获取管理员凭证<br />. /scripts/admin-openrc- 列出网络名称空间<br />ip netns- 列出路由器上的端口,以确定提供商网络上的网关IP地址<br />openstack port list --router router- 从控制器节点或物理提供商网络上的任何主机ping此IP地址<br />ping [193.168.80.102](http://193.168.80.102/)
- 创建最小实例风格
- 创建一个 m1.nano 实例风格

openstack flavor create —id 0 —vcpus 1 —ram 64 —disk 1 m1.nano
- 创建一个 m1.nano 实例风格
- 生成密钥对
- 获取 demo 凭证
. /sccripts/demo-openrc - 生成密钥对
ssh-keygen -q -N “” - 添加公共密钥
openstack keypair create —public-key ~/.ssh/id_rsa.pub mykey - 验证添加的密钥对

openstack keypair list
- 获取 demo 凭证
- 添加安全组规则(将规则添加到 default 安全组)
- 允许ICMP(ping)
openstack security group rule create —proto icmp default - 允许 shell(ssh)
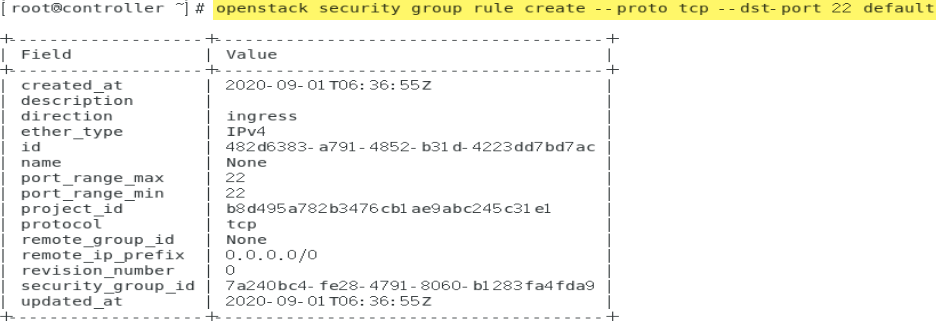
openstack security group rule create —proto tcp —dst-port 22 default - 查看 default 安全组规则

openstack security group rule list default
- 允许ICMP(ping)
- 启动一个实例(在自助服务网络上启动实例)
- 确定实例的选项
- 获取 demo 凭证
. /scripts/demo-openrc - 列出可用实例风格

openstack flavor list - 列出可用镜像
openstack image list - 列出可用网络

openstack network list - 列出可用安全组

openstack security group list - 启动实例

openstack server create —flavor m1.nano —image cirros —nic net-id=17ffc771-88a1-48d1-9cbe-cad8cc082091 —security-group default —key-name mykey selfservice-instance - 查看实例的状态

openstack server list
- 获取 demo 凭证
- 使用虚拟控制台访问实例
- 获取实例的 VNC URL
openstack console url show selfservice-instance - 验证对自助服务网络网关的访问

ping -c 4 172.16.1.1
- 获取实例的 VNC URL
- 远程访问实例
- 在提供者虚拟网络上创建一个浮动IP地址
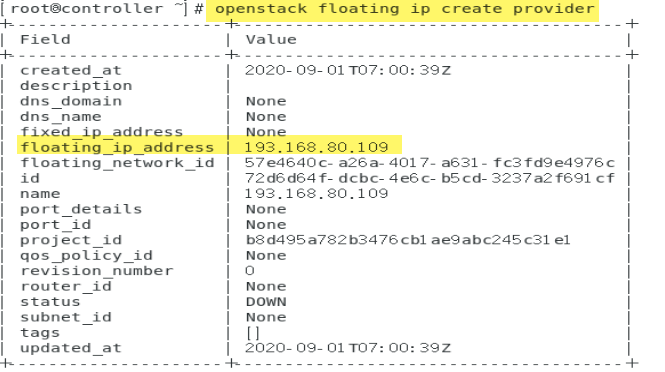
openstack floating ip create provider - 将浮动IP地址与实例相关联
openstack server add floating ip selfservice-instance 193.168.80.109 - 检查浮动IP地址的状态

openstack server list - 在实例中 ping 浮动 ip

ping 193.168.80.109 - 从控制器节点或提供程序物理网络上的任何主机使用SSH访问您的实例

ssh cirros@193.168.80.109
- 在提供者虚拟网络上创建一个浮动IP地址
- 确定实例的选项

