- 谷粒商城
- 项目简介
- 项目架构图
- Docker
- 构建微服务
- 5. 执行sql脚本
- 6. clone 人人开源
- 7. clone renren-generator
- 8. 微服务注册中心
- 9. 使用openfen
- 10. 配置中心
- 5)同时加载多个配置集
- 11. 网关
- 1、注册“gulimall-gateway”到Nacos
- 1)创建“gulimall-gateway”
- 2)添加“gulimall-common”依赖和“spring-cloud-starter-gateway”依赖
- 3)“com.bigdata.gulimall.gulimallgateway.GulimallGatewayApplication”类上加上“@EnableDiscoveryClient”注解
- 4)在Nacos中创建“gateway”命名空间,同时在该命名空间中创建“gulimall-gateway.yml”
- 5)创建“bootstrap.properties”文件,添加如下配置,指明配置中心地址和所属命名空间
- 6)创建“application.properties”文件,指定服务名和注册中心地址
- 7)启动“gulimall-gateway”
- 2、案例
- 1、注册“gulimall-gateway”到Nacos
- 12. Vue
- 13. element ui
- 14. 递归树形结构获取数据
- 15. 删除数据
- 16. 菜单拖动
- 17. 品牌管理菜单
- 18. JSR303校验
- 19. 分组校验功能(完成多场景的复杂校验)
- 20. 自定义校验功能
- 21. 商品SPU和SKU管理
- 22. 点击子组件,父组件触发事件
- 23. 规格参数新增与VO
- 24. 查询分组关联属性和删除关联
- 25. 查询分组未关联的属性
- 26. 添加属性和分组的关联关系
- 27. 发布商品
- 28. 商品管理
- 29. 仓库管理
- 30. 获取spu规格
- 31. 修改商品规格
- 小结:
- 其他
- FAQ
谷粒商城
项目简介
项目背景
电商模式
市面上有 5 种常见的电商模式 B2B、B2C、C2B、C2C、O2O;
1、B2B 模式
B2B (Business to Business), 是指商家与商家建立的商业关系。 如:阿里巴巴
2、B2C 模式
B2C (Business to Consumer), 就是我们经常看到的供应商直接把商品卖给用户,即“商对客”
模式,也就是通常说的商业零售,直接面向消费者销售产品和服务。如:苏宁易购、京东、
天猫、小米商城
3、C2B 模式
C2B (Customer to Business),即消费者对企业。先有消费者需求产生而后有企业生产,即先
有消费者提出需求,后有生产企业按需求组织生产
4、C2C 模式
C2C (Customer to Consumer) ,客户之间自己把东西放上网去卖,如:淘宝,闲鱼
5、O2O 模式
O2O 即 Online To Offline,也即将线下商务的机会与互联网结合在了一起,让互联网成为线
下交易的前台。线上快速支付,线下优质服务。如:饿了么,美团,淘票票,京东到家
谷粒商城是一个 B2C 模式的电商平台,销售自营商品给客户。
项目架构图
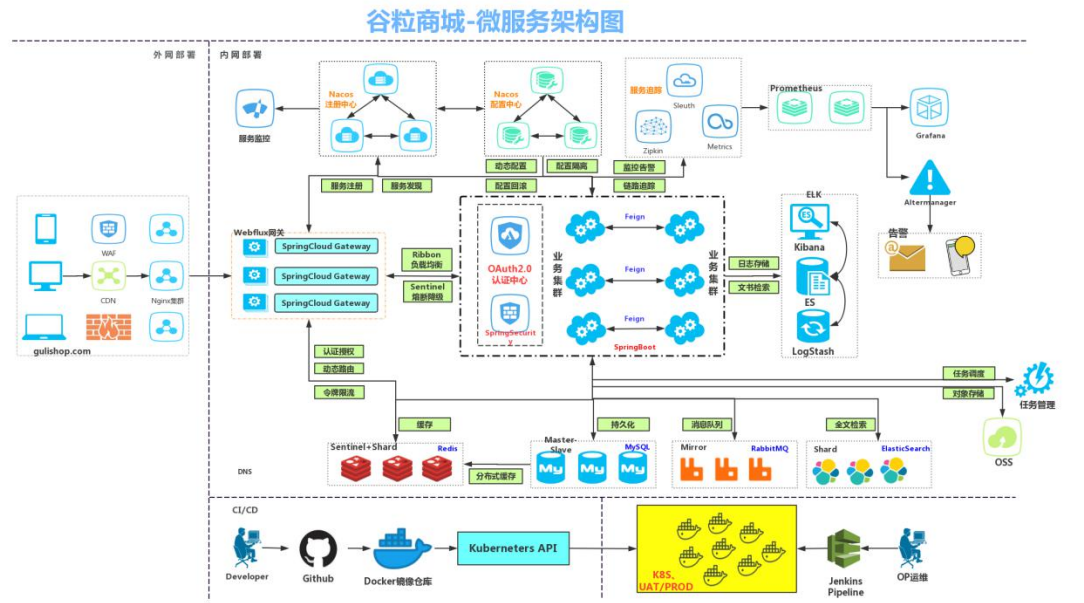
项目微服务架构图
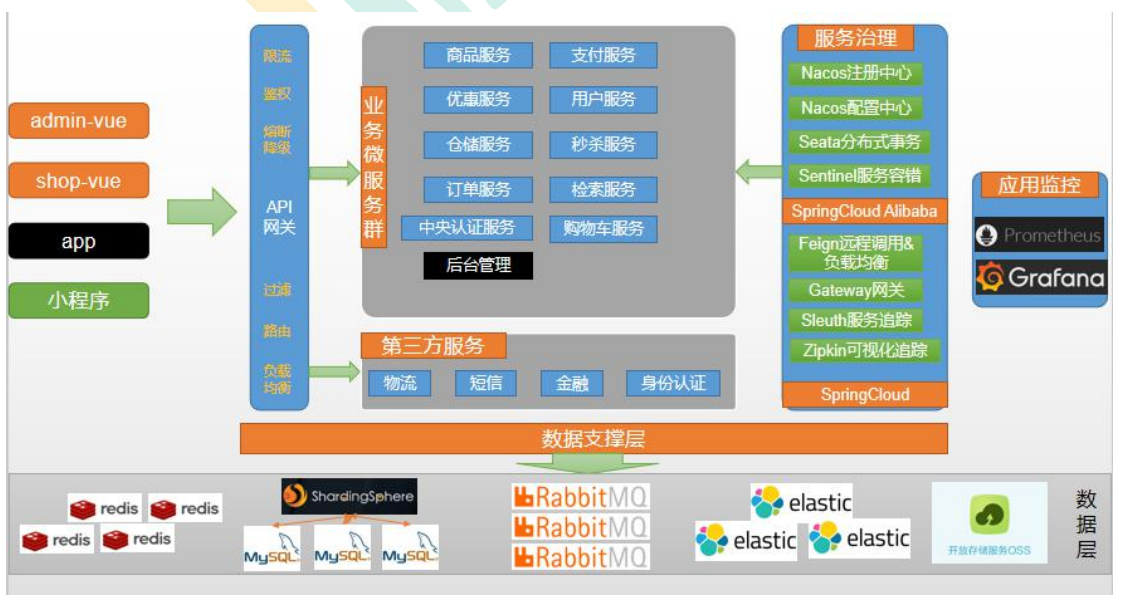
微服务划分图
项目技术&特色
- 前后分离开发,并开发基于 vue 的后台管理系统、
- SpringCloud 全新的解决方案
- 应用监控、限流、网关、熔断降级等分布式方案 全方位涉及
- 透彻讲解分布式事务、分布式锁等分布式系统的难点
- 分析高并发场景的编码方式,线程池,异步编排等使用
- 压力测试与性能优化
- 各种集群技术的区别以及使用
- CI/CD 使用
项目前置要求
学习项目的前置知识
- 熟悉 SpringBoot 以及常见整合方案
- 了解 SpringCloud
- 熟悉 git,maven
- 熟悉 linux,redis,docker 基本操作
- 了解 html,css,js,vue
- 熟练使用 idea 开发项目
分布式基础概念
微服务
微服务架构风格,就像是把一个单独的应用程序开发为一套小服务,每个小服务运行在自 己的进程中,并使用轻量级机制通信,通常是 HTTP API。这些服务围绕业务能力来构建, 并通过完全自动化部署机制来独立部署。这些服务使用不同的编程语言书写,以及不同数据 存储技术,并保持最低限度的集中式管理。
简而言之:拒绝大型单体应用,基于业务边界进行服务微化拆分,各个服务独立部署运行。
集群&分布式&节点
集群是个物理形态,分布式是个工作方式。只要是一堆机器,就可以叫集群,他们是不是一起协作着干活,这个谁也不知道; 《分布式系统原理与范型》定义:
“分布式系统是若干独立计算机的集合,这些计算机对于用户来说就像单个相关系统” 分布式系统(distributed system)是建立在网络之上的软件系统。 分布式是指将不同的业务分布在不同的地方。
集群指的是将几台服务器集中在一起,实现同一业务。
例如:京东是一个分布式系统,众多业务运行在不同的机器,所有业务构成一个大型的业务集群。每一个小的业务,比如用户系统,访问压力大的时候一台服务器是不够的。我们就 应该将用户系统部署到多个服务器,也就是每一个业务系统也可以做集群化;
分布式中的每一个节点,都可以做集群。 而集群并不一定就是分布式的。 节点:集群中的一个服务器
远程调用
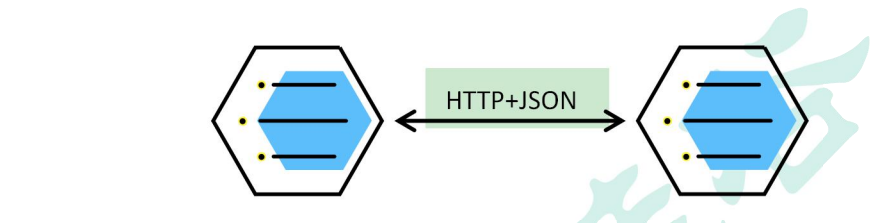
在分布式系统中,各个服务可能处于不同主机,但是服务之间不可避免的需要互相调用,我 们称为远程调用。
SpringCloud 中使用 HTTP+JSON 的方式完成远程调用
负载均衡
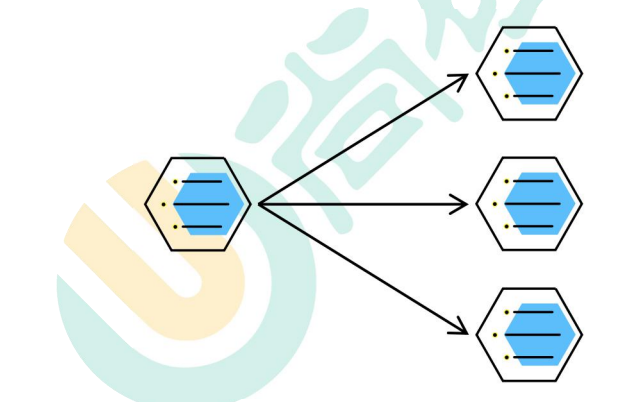
分布式系统中,A 服务需要调用 B 服务,B 服务在多台机器中都存在,A 调用任意一个 服务器均可完成功能。
为了使每一个服务器都不要太忙或者太闲,我们可以负载均衡的调用每一个服务器,提 升网站的健壮性。
常见的负载均衡算法:
轮询:为第一个请求选择健康池中的第一个后端服务器,然后按顺序往后依次选择,直 到最后一个,然后循环。
最小连接:优先选择连接数最少,也就是压力最小的后端服务器,在会话较长的情况下 可以考虑采取这种方式。
散列:根据请求源的 IP 的散列(hash)来选择要转发的服务器。这种方式可以一定程
度上保证特定用户能连接到相同的服务器。如果你的应用需要处理状态而要求用户能连接到和之前相同的服务器,可以考虑采取这种方式。
服务注册/发现&注册中心
A 服务调用 B 服务,A 服务并不知道 B 服务当前在哪几台服务器有,哪些正常的,哪些服务
已经下线。解决这个问题可以引入注册中心;
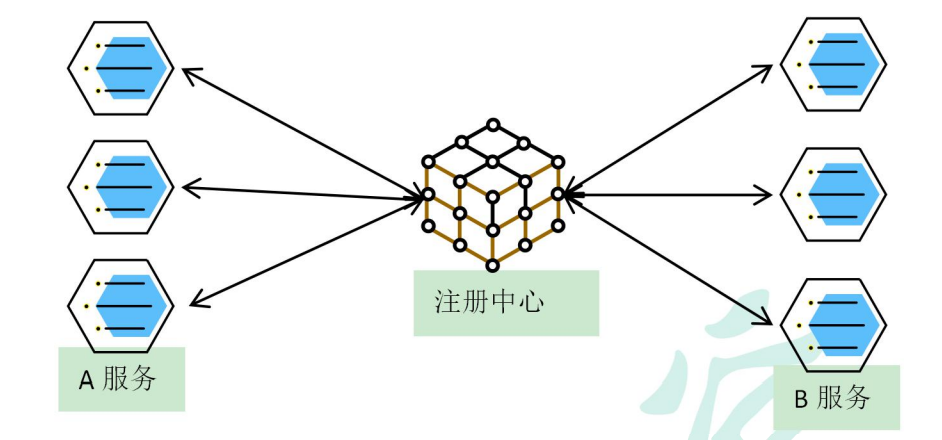
如果某些服务下线,我们其他人可以实时的感知到其他服务的状态,从而避免调用不可用的服务
配置中心
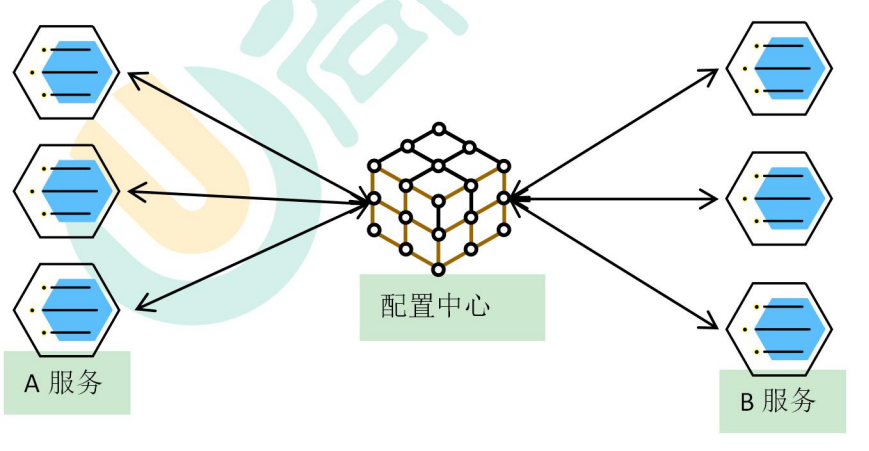
每一个服务最终都有大量的配置,并且每个服务都可能部署在多台机器上。我们经常需要变 更配置,我们可以让每个服务在配置中心获取自己的配置。 配置中心用来集中管理微服务的配置信息
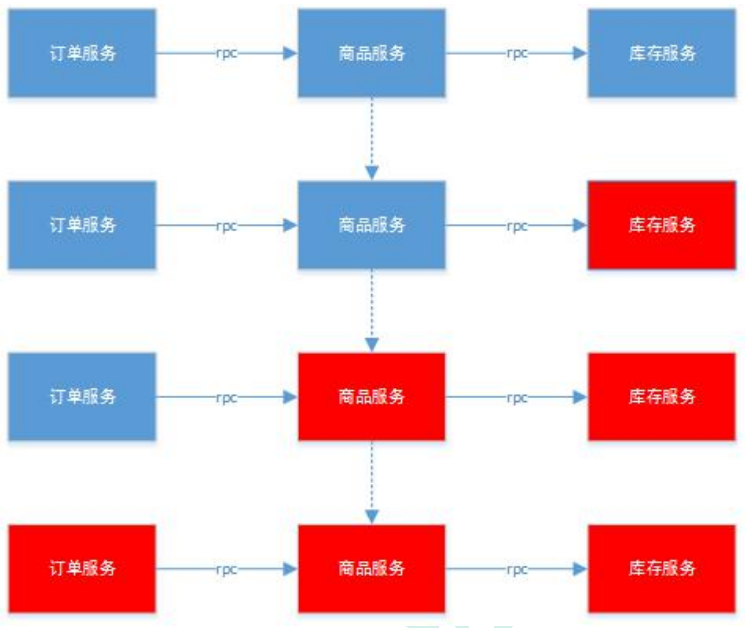
服务熔断&服务降级
在微服务架构中,微服务之间通过网络进行通信,存在相互依赖,当其中一个服务不可用时, 有可能会造成雪崩效应。要防止这样的情况,必须要有容错机制来保护服务。
1、服务熔断
a. 设置服务的超时,当被调用的服务经常失败到达某个阈值,我们可以开 启断路保护机制,后来的请求不再去调用这个服务。本地直接返回默认的数据
2、服务降级
a. 在运维期间,当系统处于高峰期,系统资源紧张,我们可以让非核心业 务降级运行。降级:某些服务不处理,或者简单处理【抛异常、返回 NULL、调用 Mock 数据、调用 Fallback 处理逻辑】。
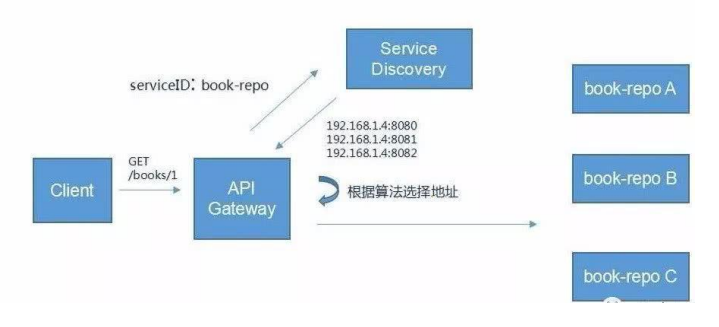
API 网关
在微服务架构中,API Gateway 作为整体架构的重要组件,它抽象了微服务中都需要的公共 功能,同时提供了客户端负载均衡,服务自动熔断,灰度发布,统一认证,限流流控,日 志统计等丰富的功能,帮助我们解决很多 API 管理难题。
环境搭建
安装虚拟机可以自己百度,这里博主是使用的自己的服务器,
系统 : centos 7.6
Docker
安装Docker
环境准备
- 需要会一点点linx的基础
- linux : CentOS7
- 使用连接工具连接服务器操作
确认系统环境
[root@iZwz90ps06ioyada63oiwiZ ~]# uname -r3.10.0-957.21.3.el7.x86_64
[root@iZwz90ps06ioyada63oiwiZ ~]# cat /etc/os-releaseNAME="CentOS Linux"VERSION="7 (Core)"ID="centos"ID_LIKE="rhel fedora"VERSION_ID="7"PRETTY_NAME="CentOS Linux 7 (Core)"ANSI_COLOR="0;31"CPE_NAME="cpe:/o:centos:centos:7"HOME_URL="https://www.centos.org/"BUG_REPORT_URL="https://bugs.centos.org/"CENTOS_MANTISBT_PROJECT="CentOS-7"CENTOS_MANTISBT_PROJECT_VERSION="7"REDHAT_SUPPORT_PRODUCT="centos"REDHAT_SUPPORT_PRODUCT_VERSION="7"
首先 更新yum 来保证可以完整下载
yum update
官方文档可以看到要求:

我们如果是用的linxu系统是 CentOS 那么必须是 7 版本以上才支持的
如果安装装过的话,建议删除之前的旧版本的docker
#1·卸载掉旧的版本sudo yum remove docker \docker-client \docker-client-latest \docker-common \docker-latest \docker-latest-logrotate \docker-logrotate \docker-engine#2 需要的安装包sudo yum install -y yum-utils#3设置镜像的仓库,默认是国外的(建议大家使用阿里云的镜像)sudo yum-config-manager \--add-repo \http://mirrors.aliyun.com/docker-ce/linux/centos/docker-ce.repo#4 安装docker相关的内容yum install docker-ce docker-ce-cli containerd.io#5 安装之后测试是否安装成功systemctl start docker#6查看docker的版本号docker version
之后查看我们docker的版本即可
#7 运行docker的helloworddocker run hello-world
# 8 如何查看docker下载的镜像呢?docker images# 就可以查看docker下载的位置了
了解 如何卸载docker
#1 卸载docker的相关内容yum remove docker-ce docker-ce-cli containerd.io#2 卸载docker的和我们下载容器sudo rm -rf /var/lib/dockersudo rm -rf /var/lib/containerd# /var/lib/docker 是 docker的默认工作路径
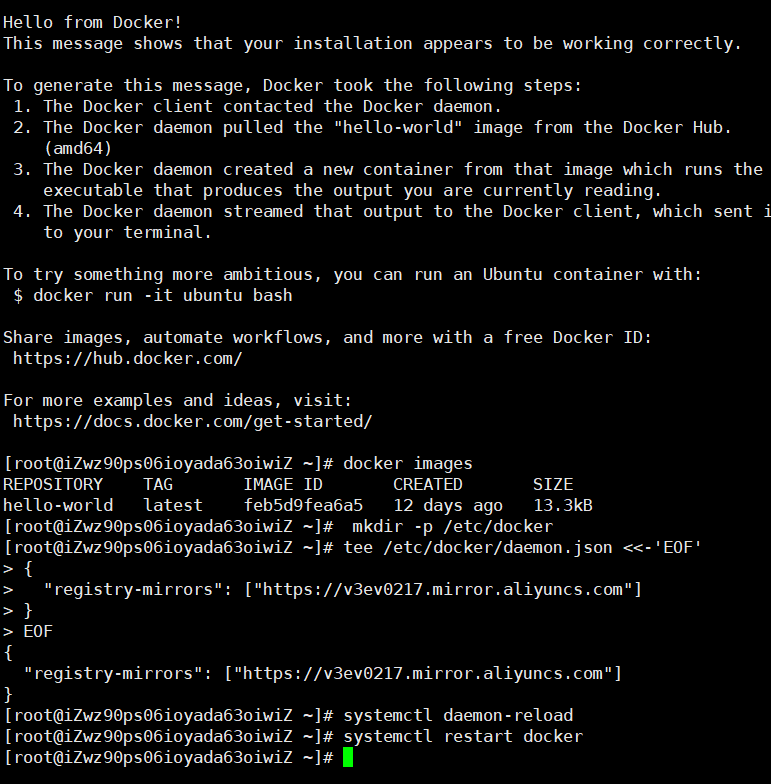
提升效率
阿里云的容器加速
- 登录阿里云找到容器服务
- 找到镜像加速地址
docker安装mysql8.0
拉去镜像
docker pull mysql:8.0
配置启动容器
docker run -p 3306:3306 --name mysql-v /mydata/mysql/log:/var/log/mysql-v /mydata/mysql/data:/var/lib/mysql-v /mydata/mysql/conf:/etc/mysql-v /mydata/mysql/mysql-files:/var/lib/mysql-files-e MYSQL_ROOT_PASSWORD=root-d mysql:8.0
参数说明
-p 3306:3306:将容器的 3306 端口映射到主机的 3306 端口
-v /mydata/mysql/conf:/etc/mysql:将配置文件夹挂载到主机
-v /mydata/mysql/log:/var/log/mysql:将日志文件夹挂载到主机
-v /mydata/mysql/data:/var/lib/mysql/:将配置文件夹挂载到主机
-v /mydata/mysql/mysql-files:/var/lib/mysql-files 8.0版本新增内容必须挂在 否则启动失败
-e MYSQL_ROOT_PASSWORD=root:初始化 root 用户的密码
配置远程连接
select User,authentication_string,Host from user;update user set host='%' where user='root';
修改密码
ALTER USER 'root'@'%' IDENTIFIED WITH mysql_native_password BY 'root'
连接容器 mysql 命令行工具
docker exec -it mysql mysql -uroot -proot
进入容器文件系统
docker exec -it mysql /bin/bash
Docker安装Redis
拉取镜像
docker pull redis
创建挂载目录
mkdir -p /mydata/redis/conftouch /mydata/redis/conf/redis.conf
启动容器参数
docker run -p 6379:6379 --name redis-v /mydata/redis/data:/data \-v /mydata/redis/conf/redis.conf:/etc/redis/redis.conf \-d redis redis-server /etc/redis/redis.conf
启动容器进入redis控制面板
docker exec -it redis redis-cli
构建微服务
微服务项目模块
springboot 版本 : 2.1.8.RELEASE
- gulimall-coupon 优惠卷服务
- gulimall-member 会员服务
- gulimall-order 订单服务
- gulimall-product 商品服务
- gulimall-ware 库存服务
初次构建的时候 每个项目使用的依赖都是
- spring web
- openfegin
之后会根据需求更新依赖
配置聚合
<?xml version="1.0" encoding="UTF-8"?><project xmlns="http://maven.apache.org/POM/4.0.0" xmlns:xsi="http://www.w3.org/2001/XMLSchema-instance"xsi:schemaLocation="http://maven.apache.org/POM/4.0.0 https://maven.apache.org/xsd/maven-4.0.0.xsd"><modelVersion>4.0.0</modelVersion><groupId>coim.hyc</groupId><artifactId>gulimall</artifactId><version>0.0.1-SNAPSHOT</version><name>gulimall</name><description>谷粒商城聚合服务</description><packaging>pom</packaging><modules><module>gulimall-coupon</module><module>gulimall-member</module><module>gulimall-order</module><module>gulimall-product</module><module>gulimall-ware</module></modules></project>
配置完成我们的maven gulimall会有一个root的标识
5. 执行sql脚本
gulimall_oms.sql
gulimall_pms.sql
gulimall_sms.sql
gulimall_ums.sql
gulimall_wms.sql
pms_catelog.sql
sys_menus.sql
6. clone 人人开源

克隆到本地:
git clone https://gitee.com/renrenio/renren-fast-vue.gitgit clone https://gitee.com/renrenio/renren-fast.git
将拷贝下来的“renren-fast”删除“.git”后,拷贝到“gulimall”工程根目录下,然后将它作为gulimall的一个module
创建“gulimall_admin”的数据库,然后执行“renren-fast/db/mysql.sql”中的SQl脚本
修改“application-dev.yml”文件,默认为dev环境,修改连接mysql的url和用户名密码
spring:datasource:type: com.alibaba.druid.pool.DruidDataSourcedruid:driver-class-name: com.mysql.cj.jdbc.Driverurl: jdbc:mysql://192.168.137.14:3306/gulimall_admin?useUnicode=true&characterEncoding=UTF-8&serverTimezone=Asia/Shanghaiusername: rootpassword: root
启动“gulimall_admin”,然后访问“http://localhost:8080/renren-fast/”

安装node.js,并且安装仓库
npm config set registry http://registry.npm.taobao.org/
PS D:\tmp\renren-fast-vue> npm config set registry http://registry.npm.taobao.org/PS D:\tmp\renren-fast-vue> npm installnpm WARN ajv-keywords@1.5.1 requires a peer of ajv@>=4.10.0 but none is installed. You must install peer dependencies yourself.npm WARN sass-loader@6.0.6 requires a peer of node-sass@^4.0.0 but none is installed. You must install peer dependencies yourself.npm WARN optional SKIPPING OPTIONAL DEPENDENCY: fsevents@1.2.9 (node_modules\fsevents):npm WARN notsup SKIPPING OPTIONAL DEPENDENCY: Unsupported platform for fsevents@1.2.9: wanted {"os":"darwin","arch":"any"} (current: {"os":"win32","arch":"x64"})up to date in 17.227sPS D:\tmp\renren-fast-vue>
PS D:\tmp\renren-fast-vue> npm run dev> renren-fast-vue@1.2.2 dev D:\tmp\renren-fast-vue> webpack-dev-server --inline --progress --config build/webpack.dev.conf.js10% building modules 5/10 modules 5 active ...-0!D:\tmp\renren-fast-vue\src\main.js(node:19864) Warning: Accessing non-existent property 'cat' of module exports inside circular dependency(Use `node --trace-warnings ...` to show where the warning was created)(node:19864) Warning: Accessing non-existent property 'cd' of module exports inside circular dependency(node:19864) Warning: Accessing non-existent property 'chmod' of module exports inside circular dependency(node:19864) Warning: Accessing non-existent property 'cp' of module exports inside circular dependency(node:19864) Warning: Accessing non-existent property 'dirs' of module exports inside circular dependency(node:19864) Warning: Accessing non-existent property 'pushd' of module exports inside circular dependency(node:19864) Warning: Accessing non-existent property 'popd' of module exports inside circular dependency(node:19864) Warning: Accessing non-existent property 'echo' of module exports inside circular dependency(node:19864) Warning: Accessing non-existent property 'tempdir' of module exports inside circular dependency(node:19864) Warning: Accessing non-existent property 'pwd' of module exports inside circular dependency
常见问题1:“Module build failed: Error: Cannot find module ‘node-sass”
运行过程中,出现“Module build failed: Error: Cannot find module ‘node-sass’报错问题”,解决方法
用npm install -g cnpm —registry=https://registry.npm.taobao.org ,从淘宝镜像那下载,然后cnpm下载成功。
最后输入cnpm install node-sass —save。npm run dev终于能跑起来了!!!
————————————————
版权声明:本文为CSDN博主「夕阳下美了剪影」的原创文章,遵循CC 4.0 BY-SA版权协议,转载请附上原文出处链接及本声明。
原文链接:https://blog.csdn.net/qq_38401285/article/details/86483278
常见问题2:cnpm - 解决 “ cnpm : 无法加载文件 C:\Users\93457\AppData\Roaming\npm\cnpm.ps1,因为在此系统上禁止运行脚本。有关详细信息 。。。 “
https://www.cnblogs.com/500m/p/11634969.html
所有问题的根源都在“node_modules”,npm install之前,应该将这个文件夹删除,然后再进行安装和运行。
再次运行npm run dev恢复正常:
7. clone renren-generator
clone
https://gitee.com/renrenio/renren-generator.git
然后将该项目放置到“gulimall”的跟路径下,然后添加该Module,并且提交到github上
修改配置
renren-generator/src/main/resources/generator.properties
#代码生成器,配置信息mainPath=com.bigdata#包名package=com.bigdata.gulimallmoduleName=product#作者author=cosmoswongemail=cosmoswong@sina.com#表前缀(类名不会包含表前缀)tablePrefix=pms_
运行“renren-generator”
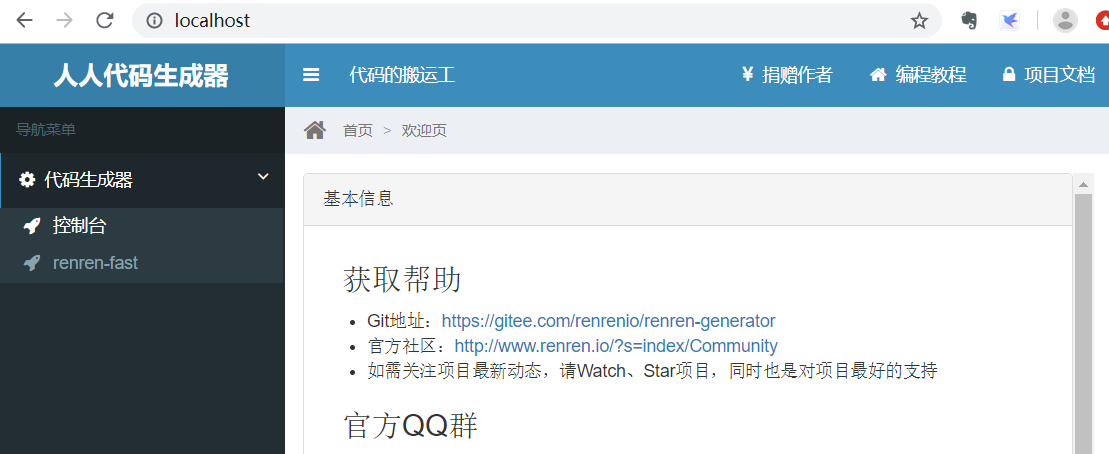
点击“renren-fast”,能够看到它将“renren-fast”的所有表都列举了出来:
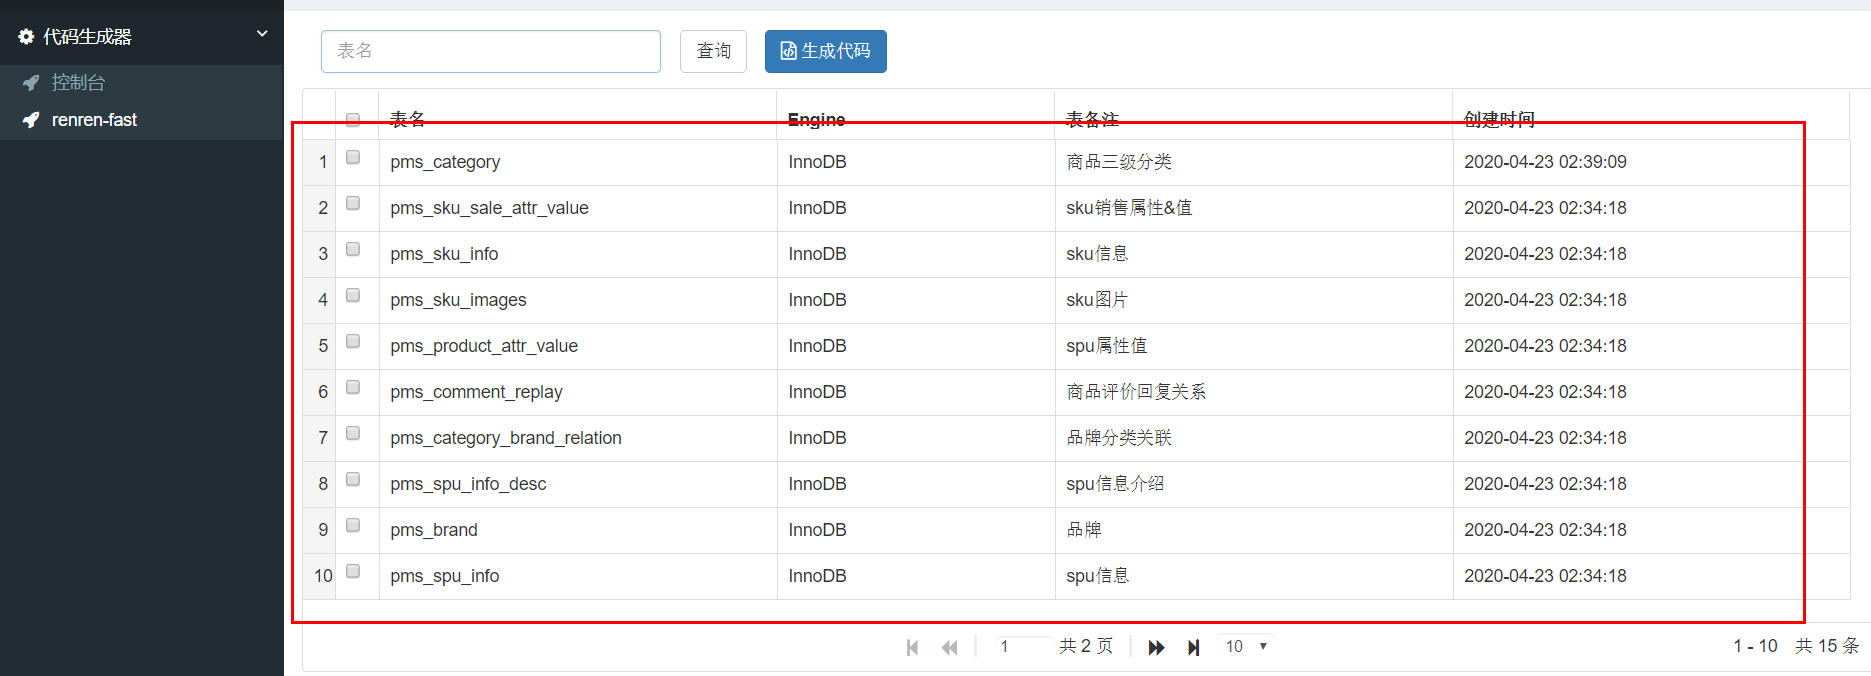
选择所有的表,然后点击“生成代码”,将下载的“renren.zip”,解压后取出main文件夹,放置到“gulimall-product”项目的main目录中。
下面的几个module,也采用同样的方式来操作。
但是针对于“undo_log”,存在一个问题

它的数据类型是“longblob”类型,逆向工程后,对应的数据类型未知:

这个问题该要怎么解决?
8. 微服务注册中心
要注意nacos集群所在的server,一定要关闭防火墙,否则容易出现各种问题。
搭建nacos集群,然后分别启动各个微服务,将它们注册到Nacos中。
application:name: gulimall-couponcloud:nacos:discovery:server-addr: 192.168.137.14
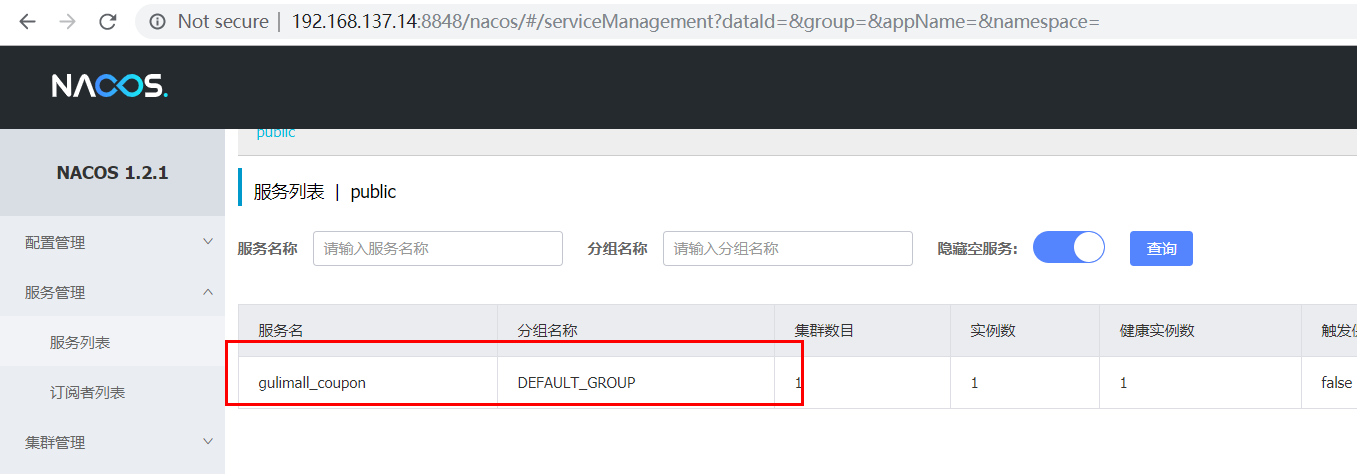
查看注册情况:
http://192.168.137.14:8848/nacos/#/serviceManagement?dataId=&group=&appName=&namespace=
9. 使用openfen
1)、引入open-feign
<dependency><groupId>org.springframework.cloud</groupId><artifactId>spring-cloud-starter-openfeign</artifactId></dependency>
2)、编写一个接口,告诉SpringCLoud这个接口需要调用远程服务
修改“com.bigdata.gulimall.coupon.controller.CouponController”,添加以下controller方法:
@RequestMapping("/member/list")public R memberCoupons(){CouponEntity couponEntity = new CouponEntity();couponEntity.setCouponName("discount 20%");return R.ok().put("coupons",Arrays.asList(couponEntity));}
新建“com.bigdata.gulimall.member.feign.CouponFeignService”接口
@FeignClient("gulimall_coupon")public interface CouponFeignService {@RequestMapping("/coupon/coupon/member/list")public R memberCoupons();}
修改“com.bigdata.gulimall.member.GulimallMemberApplication”类,添加上”@EnableFeignClients”:
@SpringBootApplication@EnableDiscoveryClient@EnableFeignClients(basePackages = "com.bigdata.gulimall.member.feign")public class GulimallMemberApplication {public static void main(String[] args) {SpringApplication.run(GulimallMemberApplication.class, args);}}
声明接口的每一个方法都是调用哪个远程服务的那个请求
3)、开启远程调用功能
com.bigdata.gulimall.member.controller.MemberController
@RequestMapping("/coupons")public R test(){MemberEntity memberEntity=new MemberEntity();memberEntity.setNickname("zhangsan");R memberCoupons = couponFeignService.memberCoupons();return memberCoupons.put("member",memberEntity).put("coupons",memberCoupons.get("coupons"));}
(4)、访问http://localhost:8000/member/member/coupons

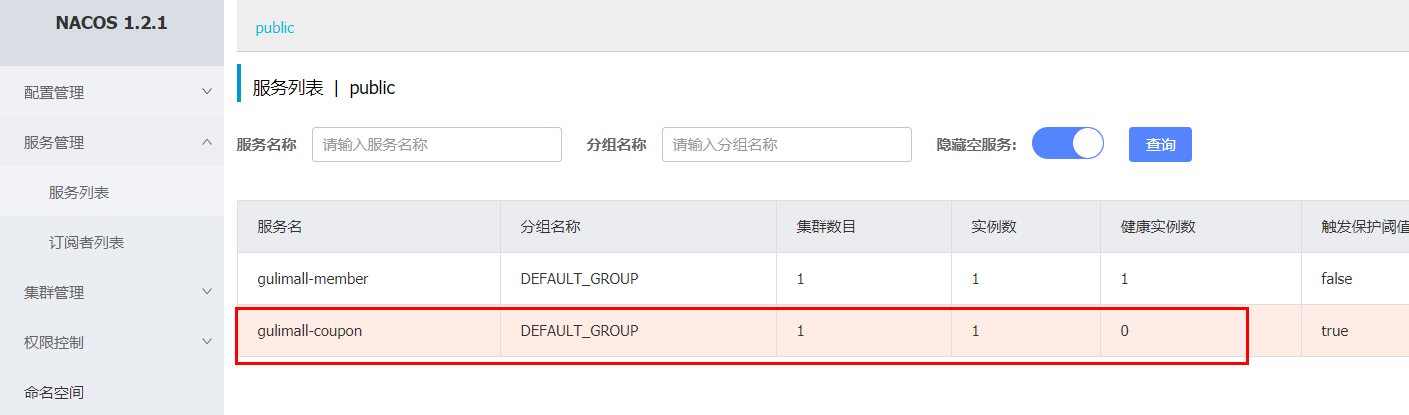
停止“gulimall-coupon”服务,能够看到注册中心显示该服务的健康值为0:
再次访问:http://localhost:8000/member/member/coupons
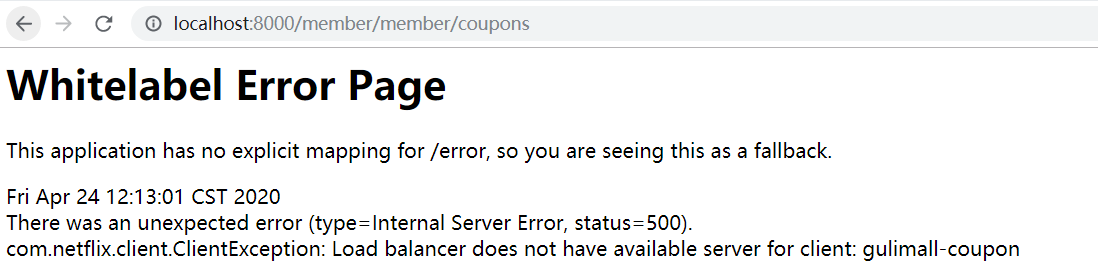
启动“gulimall-coupon”服务,再次访问,又恢复了正常。
10. 配置中心
1)修改“gulimall-coupon”模块
添加pom依赖:
<dependency><groupId>com.alibaba.cloud</groupId><artifactId>spring-cloud-starter-alibaba-nacos-config</artifactId></dependency>
创建bootstrap.properties文件,该配置文件会优先于“application.yml”加载。
spring.application.name=gulimall-couponspring.cloud.nacos.config.server-addr=192.168.137.14:8848
2)传统方式
为了详细说明config的使用方法,先来看原始的方式
创建“application.properties”配置文件,添加如下配置内容:
coupon.user.name="zhangsan"coupon.user.age=30
修改“com.bigdata.gulimall.coupon.controller.CouponController”文件,添加如下内容:
@Value("${coupon.user.name}")private String name;@Value("${coupon.user.age}")private Integer age;@RequestMapping("/test")public R getConfigInfo(){return R.ok().put("name",name).put("age",age);}
启动“gulimall-coupon”服务:
访问:http://localhost:7000/coupon/coupon/test>

这样做存在的一个问题,如果频繁的修改application.properties,在需要频繁重新打包部署。下面我们将采用Nacos的配置中心来解决这个问题。
3)nacos config
1、在Nacos注册中心中,点击“配置列表”,添加配置规则:
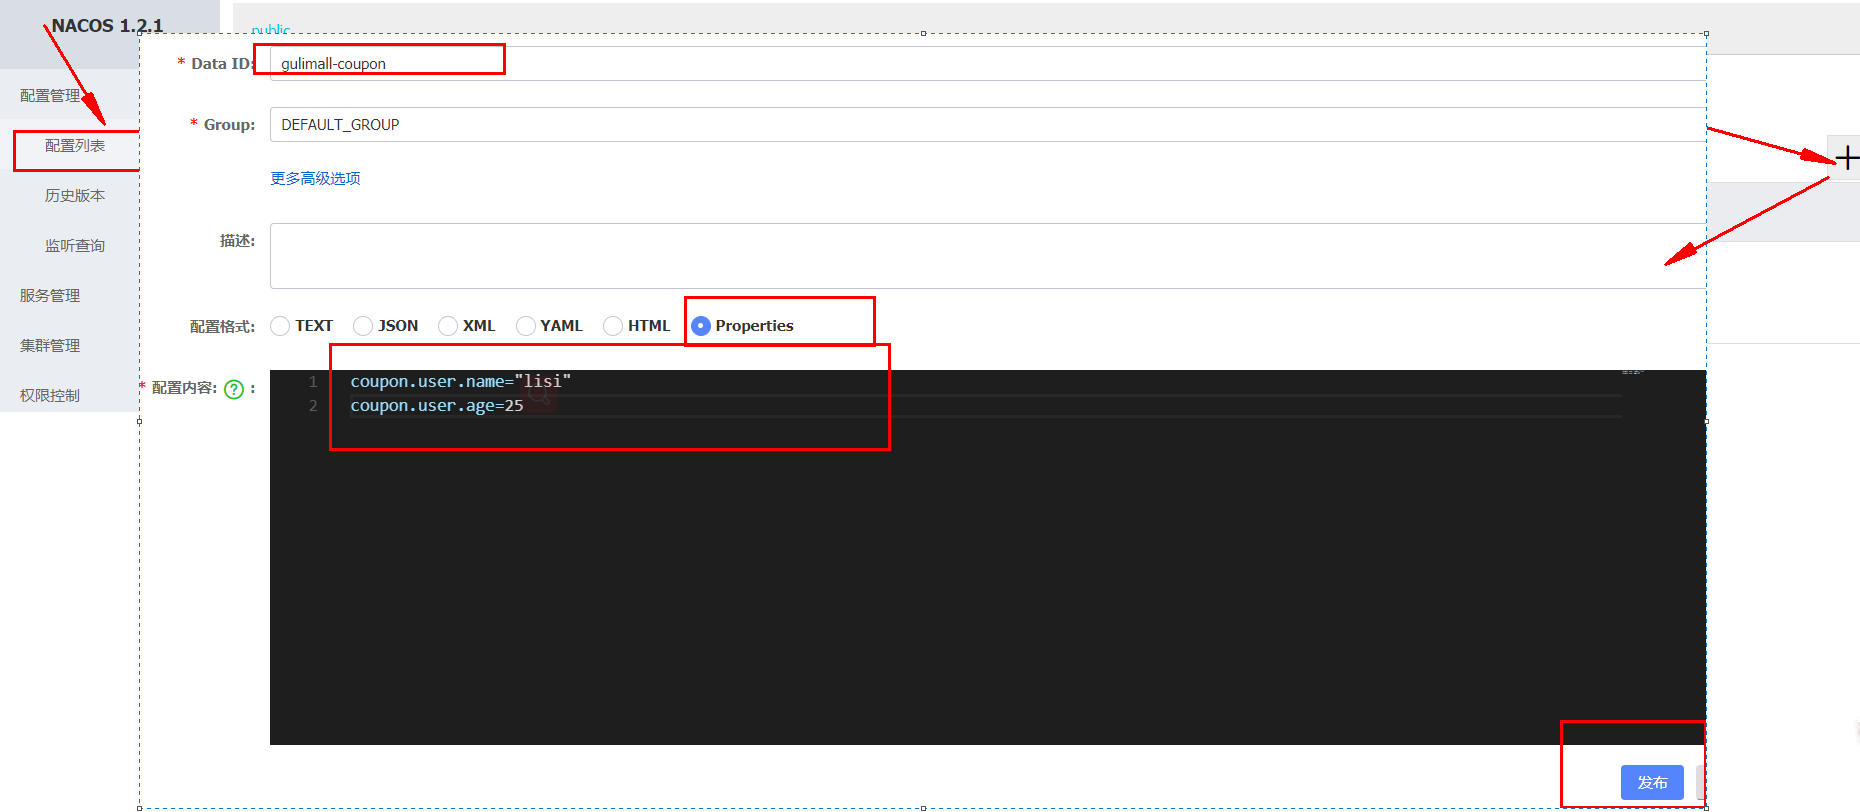
DataID:gulimall-coupon
配置格式:properties
文件的命名规则为:{spring.profiles.active}.${spring.cloud.nacos.config.file-extension}
${spring.application.name}:为微服务名
${spring.profiles.active}:指明是哪种环境下的配置,如dev、test或info
${spring.cloud.nacos.config.file-extension}:配置文件的扩展名,可以为properties、yml等
2、查看配置:
3、修改“com.bigdata.gulimall.coupon.controller.CouponController”类,添加“@RefreshScope”注解
@RestController@RequestMapping("coupon/coupon")@RefreshScopepublic class CouponController {
这样都会动态的从配置中心读取配置.
4、访问:http://localhost:7000/coupon/coupon/test

能够看到读取到了nacos 中的最新的配置信息,并且在指明了相同的配置信息时,配置中心中设置的值优先于本地配置。
4)Nacos支持三种配置加载方方案
Nacos支持“Namespace+group+data ID”的配置解决方案。
Namespace方案
通过命名空间实现环境区分
下面是配置实例:
1、创建命名空间:
“命名空间”—>“创建命名空间”:
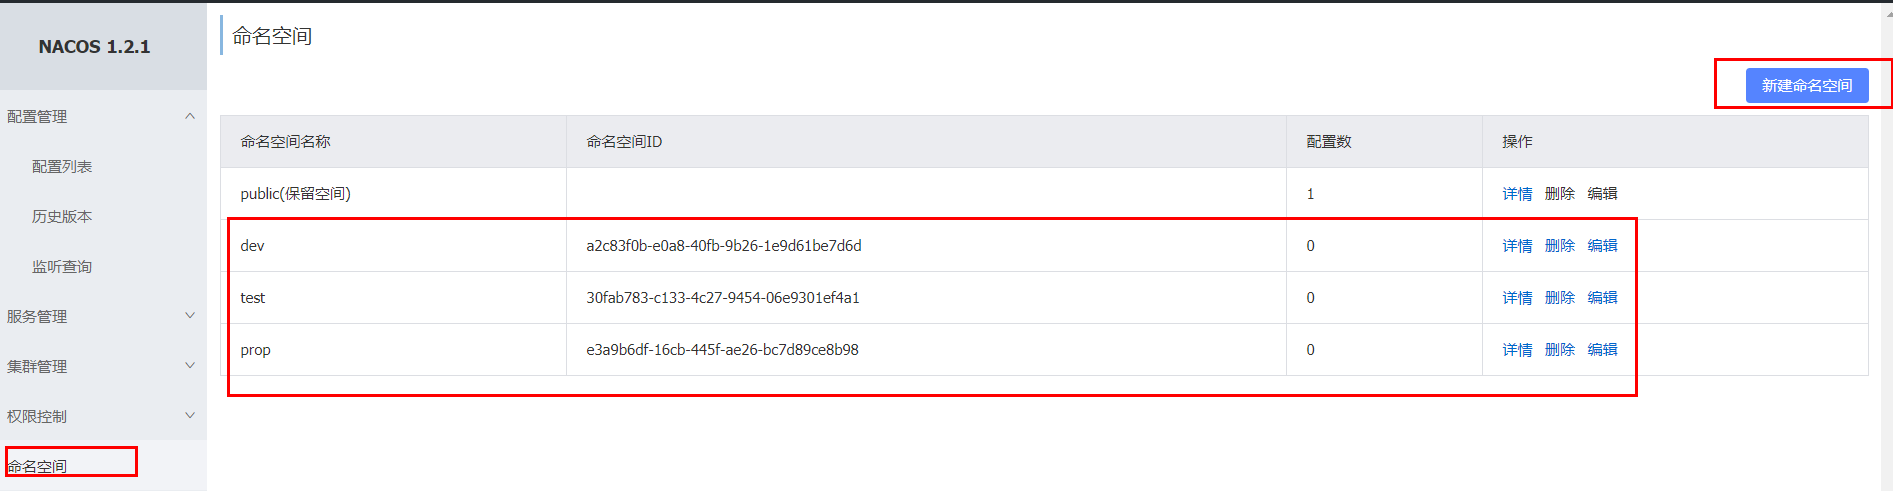
创建三个命名空间,分别为dev,test和prop
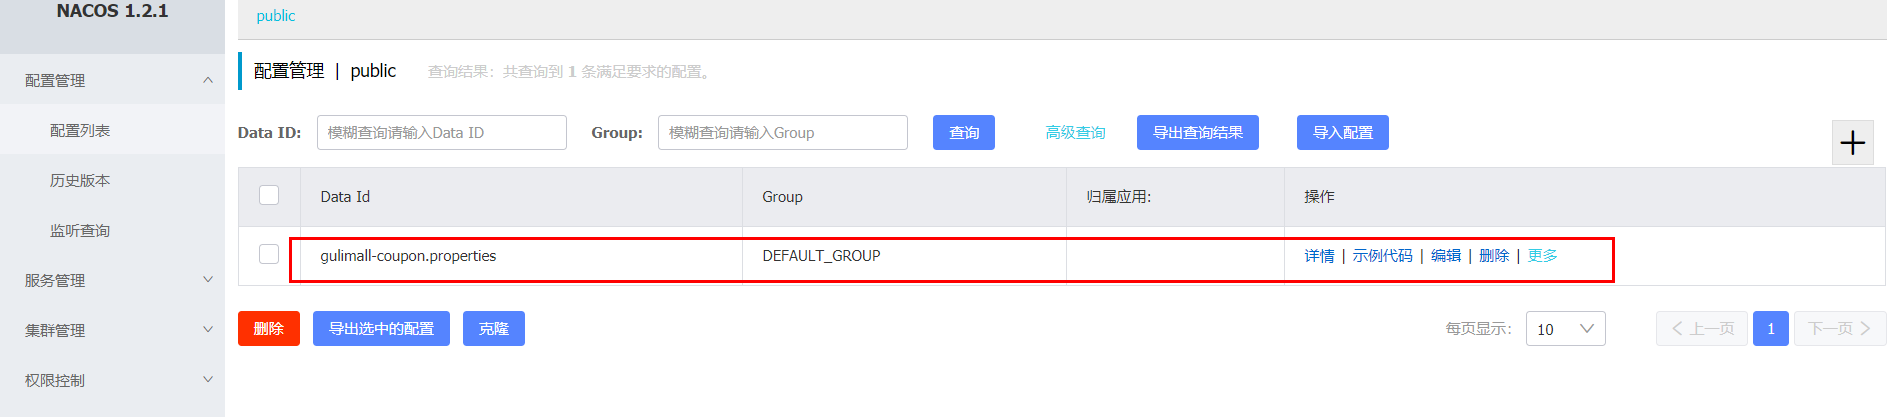
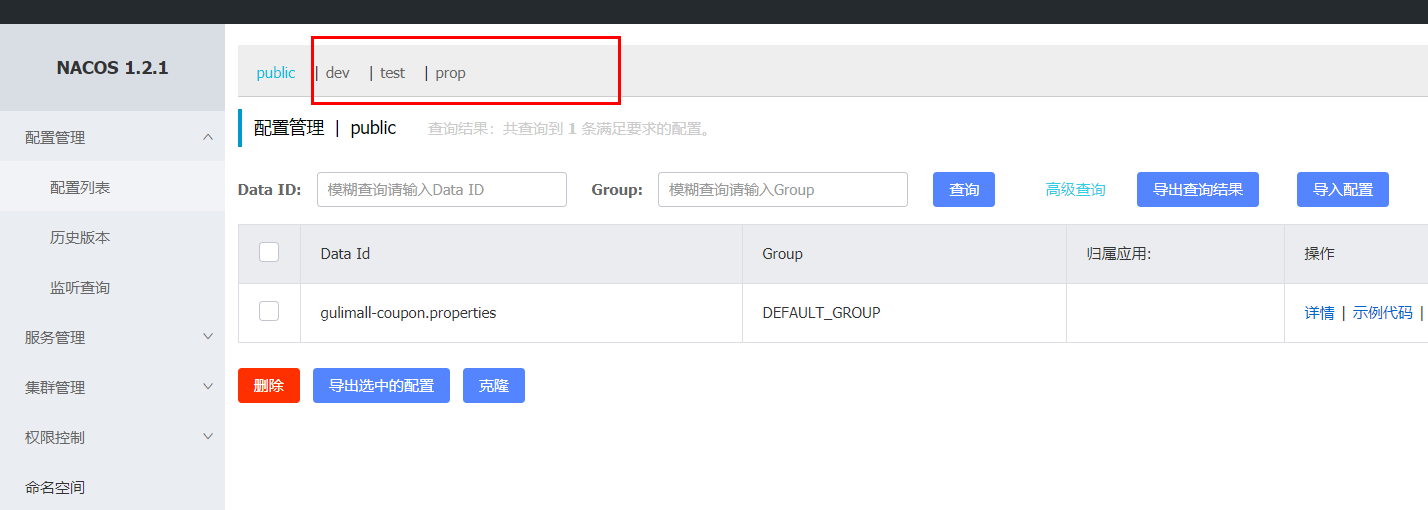
2、回到配置列表中,能够看到所创建的三个命名空间
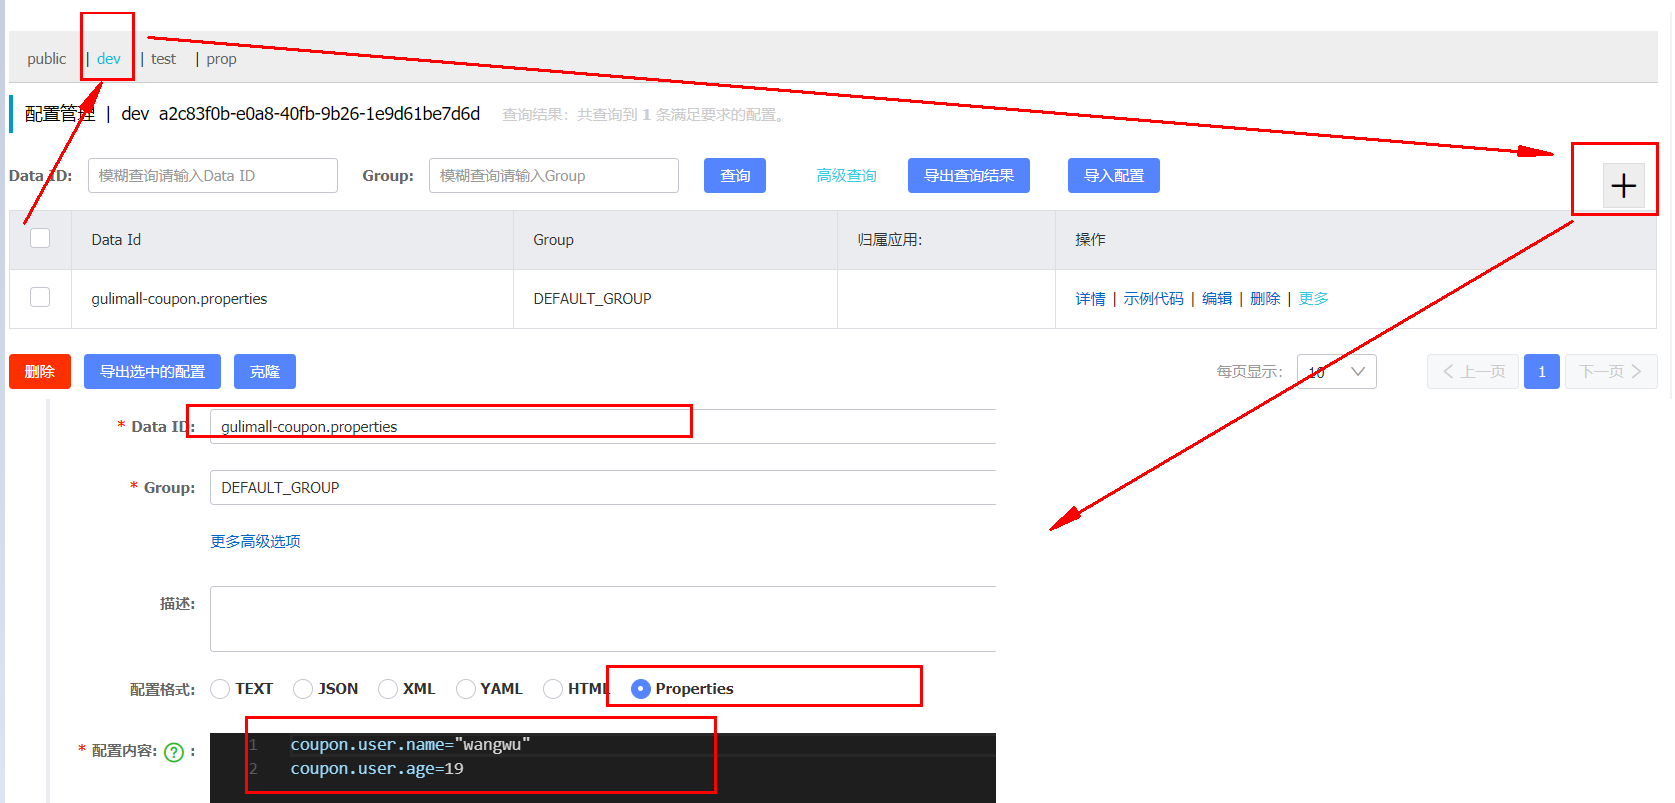
下面我们需要在dev命名空间下,创建“gulimall-coupon.properties”配置规则:
3、访问:http://localhost:7000/coupon/coupon/test

并没有使用我们在dev命名空间下所配置的规则,而是使用的是public命名空间下所配置的规则,这是怎么回事呢?
查看“gulimall-coupon”服务的启动日志:
2020-04-24 16:37:24.158 WARN 32792 --- [ main] c.a.c.n.c.NacosPropertySourceBuilder : Ignore the empty nacos configuration and get it based on dataId[gulimall-coupon] & group[DEFAULT_GROUP]2020-04-24 16:37:24.163 INFO 32792 --- [ main] c.a.nacos.client.config.utils.JVMUtil : isMultiInstance:false2020-04-24 16:37:24.169 INFO 32792 --- [ main] b.c.PropertySourceBootstrapConfiguration : Located property source: [BootstrapPropertySource {name='bootstrapProperties-gulimall-coupon.properties,DEFAULT_GROUP'}, BootstrapPropertySource {name='bootstrapProperties-gulimall-coupon,DEFAULT_GROUP'}]
“gulimall-coupon.properties”,默认就是public命名空间中的内容中所配置的规则。
4、指定命名空间
如果想要使得我们自定义的命名空间生效,需要在“bootstrap.properties”文件中,指定使用哪个命名空间:
spring.cloud.nacos.config.namespace=a2c83f0b-e0a8-40fb-9b26-1e9d61be7d6d
这个命名空间ID来源于我们在第一步所创建的命名空间

5、重启“gulimall-coupon”,再次访问:http://localhost:7000/coupon/coupon/test

但是这种命名空间的粒度还是不够细化,对此我们可以为项目的每个微服务module创建一个命名空间。
6、为所有微服务创建命名空间
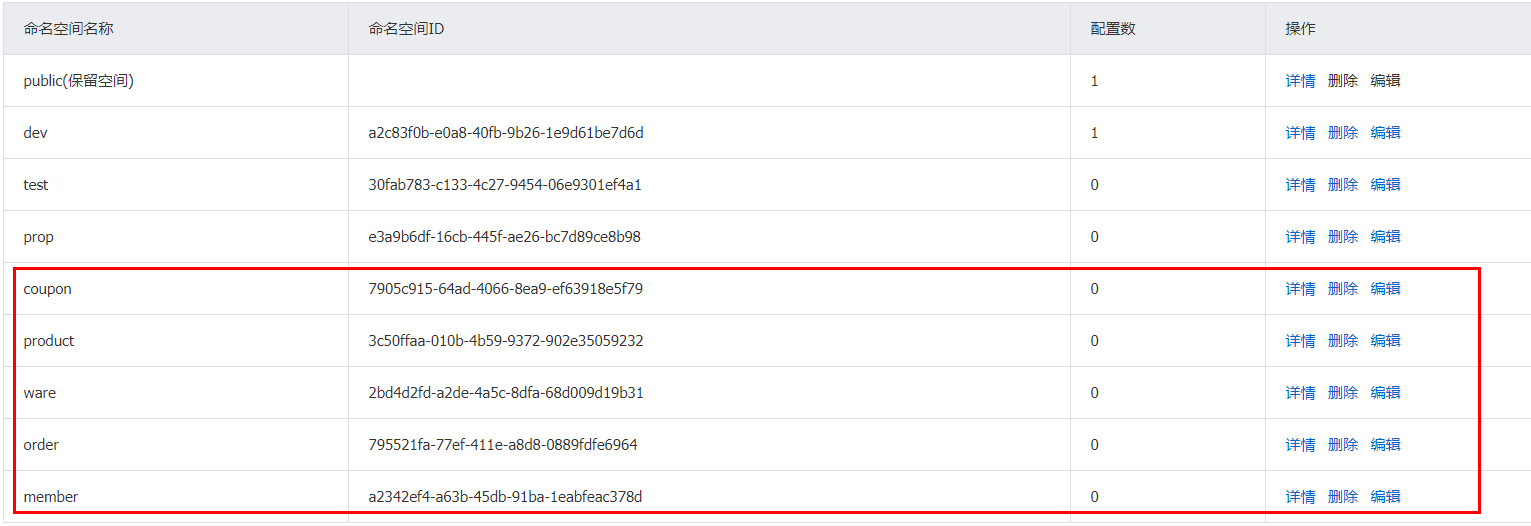
7、回到配置列表选项卡,克隆pulic的配置规则到coupon命名空间下
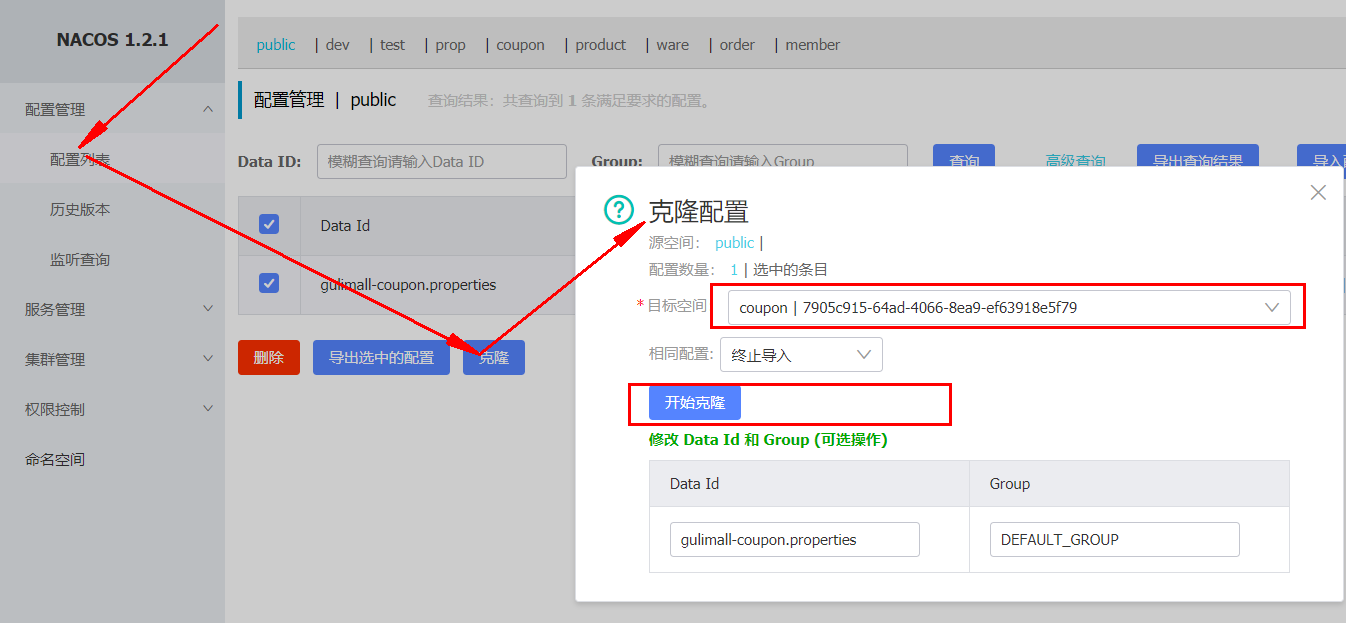
切换到coupon命名空间下,查看所克隆的规则:

8、修改“gulimall-coupon”下的bootstrap.properties文件,添加如下配置信息
spring.cloud.nacos.config.namespace=7905c915-64ad-4066-8ea9-ef63918e5f79
这里指明的是,读取时使用coupon命名空间下的配置。
9、重启“gulimall-coupon”,访问:http://localhost:7000/coupon/coupon/test

DataID方案
通过指定spring.profile.active和配置文件的DataID,来使不同环境下读取不同的配置,读取配置时,使用的是默认命名空间public,默认分组(default_group)下的DataID。
默认情况,Namespace=public,Group=DEFAULT GROUP,默认Cluster是DEFAULT
Group方案
通过Group实现环境区分
实例:通过使用不同的组,来读取不同的配置,还是以上面的gulimall-coupon微服务为例
1、新建“gulimall-coupon.properties”,将它置于“tmp”组下

2、修改“bootstrap.properties”配置,添加如下的配置
spring.cloud.nacos.config.group=tmp
3、重启“gulimall-coupon”,访问:http://localhost:7000/coupon/coupon/test

5)同时加载多个配置集
当微服务数量很庞大时,将所有配置都书写到一个配置文件中,显然不是太合适。对此我们可以将配置按照功能的不同,拆分为不同的配置文件。
如下面的配置文件:
server:port: 7000spring:datasource:#MySQL配置driverClassName: com.mysql.cj.jdbc.Driverurl: jdbc:mysql://192.168.137.14:3306/gulimall_sms?useUnicode=true&characterEncoding=UTF-8&useSSL=falseusername: rootpassword: rootapplication:name: gulimall-couponcloud:nacos:discovery:server-addr: 192.168.137.14:8848mybatis-plus:global-config:db-config:id-type: automapper-locations: classpath:/mapper/**/*.xml
我们可以将,
数据源有关的配置写到一个配置文件中:
spring:datasource:#MySQL配置driverClassName: com.mysql.cj.jdbc.Driverurl: jdbc:mysql://192.168.137.14:3306/gulimall_sms?useUnicode=true&characterEncoding=UTF-8&useSSL=falseusername: rootpassword: root
和框架有关的写到另外一个配置文件中:
mybatis-plus:global-config:db-config:id-type: automapper-locations: classpath:/mapper/**/*.xml
也可以将上面的这些配置交给nacos来进行管理。
实例:将“gulimall-coupon”的“application.yml”文件拆分为多个配置,并放置到nacos配置中心
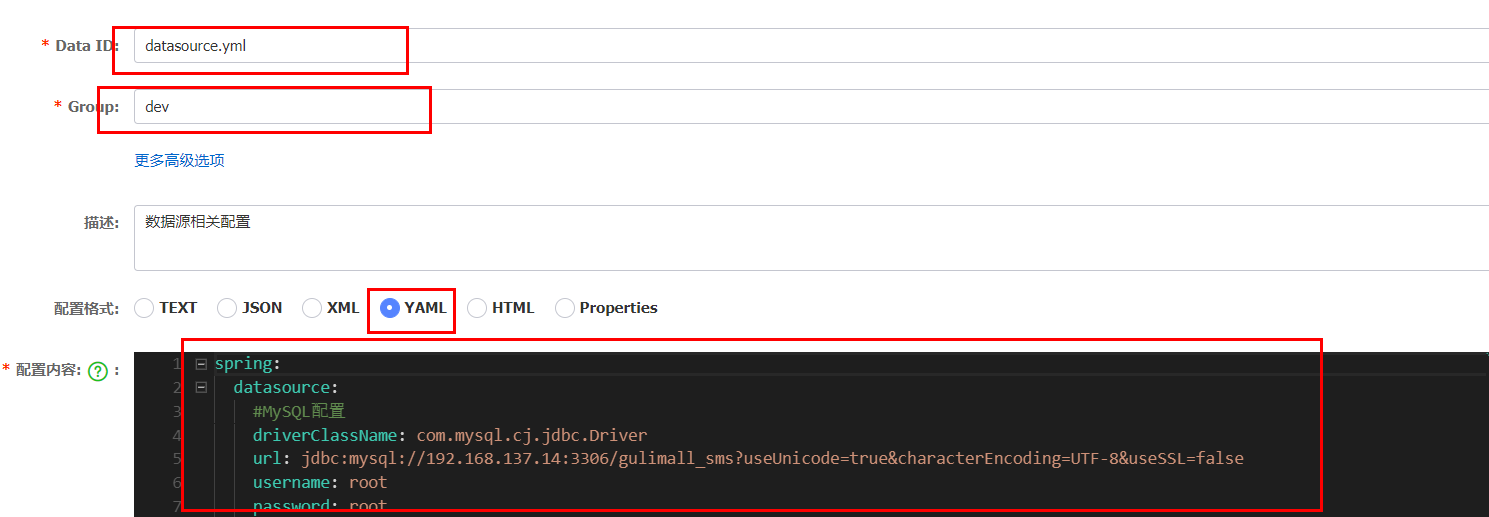
1、创建“datasource.yml”,用于存储和数据源有关的配置
spring:datasource:#MySQL配置driverClassName: com.mysql.cj.jdbc.Driverurl: jdbc:mysql://192.168.137.14:3306/gulimall_sms?useUnicode=true&characterEncoding=UTF-8&useSSL=falseusername: rootpassword: root
在coupon命名空间中,创建“datasource.yml”配置
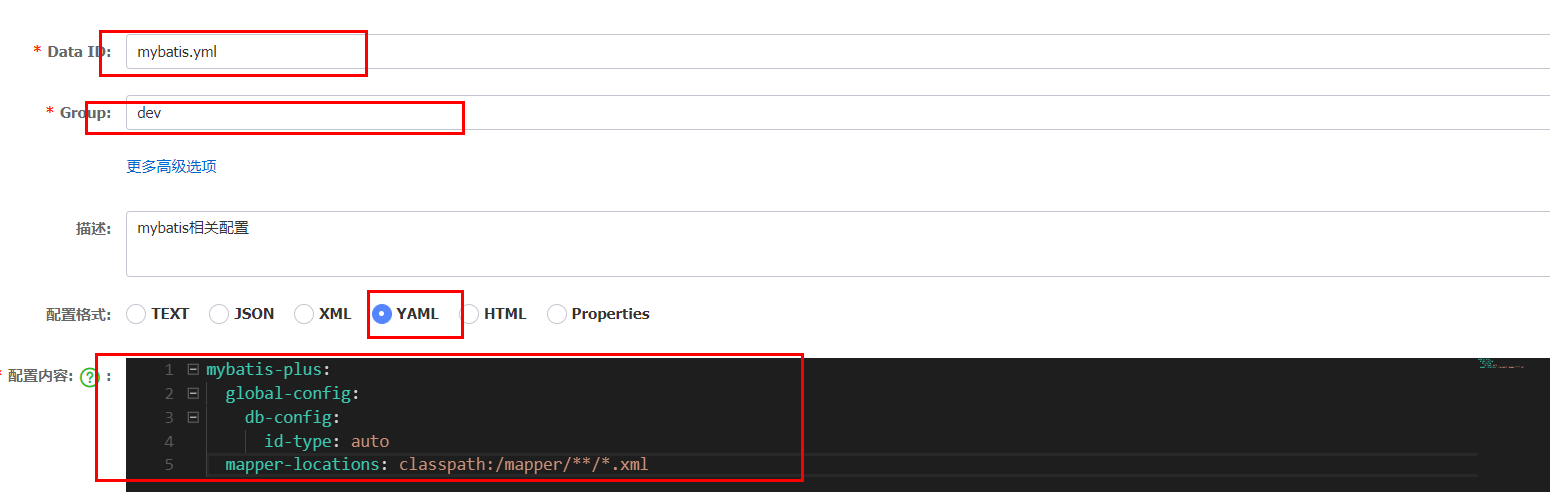
2、将和mybatis相关的配置,放置到“mybatis.yml”中
mybatis-plus:global-config:db-config:id-type: automapper-locations: classpath:/mapper/**/*.xml
3、创建“other.yml”配置,保存其他的配置信息
server:port: 7000spring:application:name: gulimall-couponcloud:nacos:discovery:server-addr: 192.168.137.14:8848
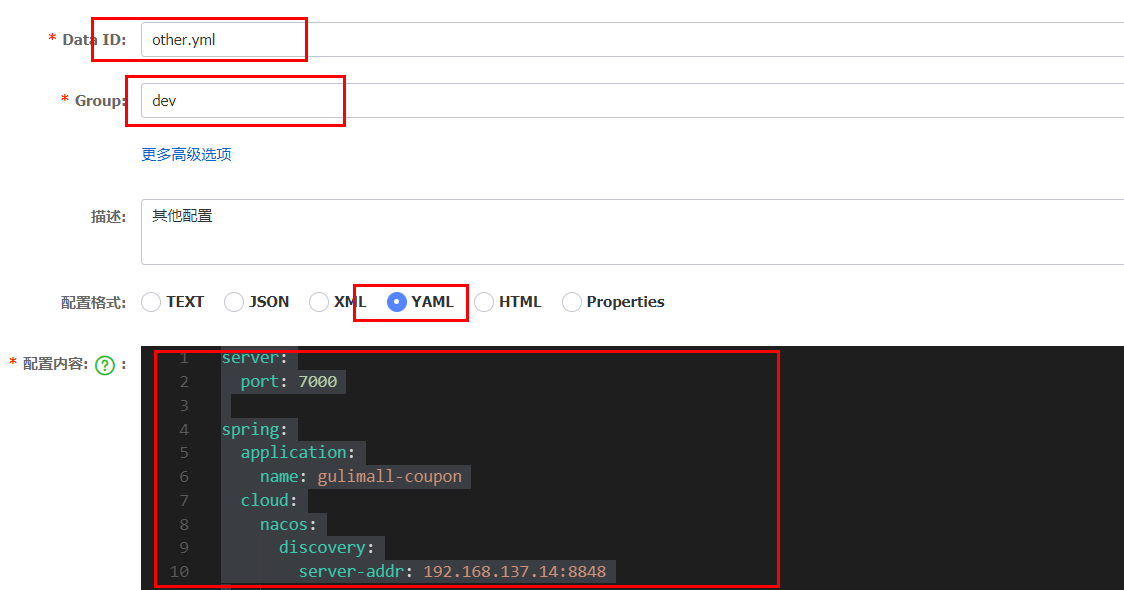
现在“mybatis.yml”、“datasource.yml”和“other.yml”共同构成了微服务的配置。
4、修改“gulimall-coupon”的“bootstrap.properties”文件,加载“mybatis.yml”、“datasource.yml”和“other.yml”配置
spring.cloud.nacos.config.extension-configs[0].data-id=mybatis.ymlspring.cloud.nacos.config.extension-configs[0].group=devspring.cloud.nacos.config.extension-configs[0].refresh=truespring.cloud.nacos.config.extension-configs[1].data-id=datasource.ymlspring.cloud.nacos.config.extension-configs[1].group=devspring.cloud.nacos.config.extension-configs[1].refresh=truespring.cloud.nacos.config.extension-configs[2].data-id=other.ymlspring.cloud.nacos.config.extension-configs[2].group=devspring.cloud.nacos.config.extension-configs[2].refresh=true
“spring.cloud.nacos.config.ext-config”已经被废弃,建议使用“spring.cloud.nacos.config.extension-configs”
5、注释“application.yml”文件中的所有配置
6、重启“gulimall-coupon”服务,然后访问:http://localhost:7000/coupon/coupon/test

7、访问:http://localhost:7000/coupon/coupon/list,查看是否能够正常的访问数据库

小结:
1)、微服务任何配置信息,任何配置文件都可以放在配置中心;
2)、只需要在bootstrap.properties中,说明加载配置中心的哪些配置文件即可;
3)、@Value, @ConfigurationProperties。都可以用来获取配置中心中所配置的信息;
4)、配置中心有的优先使用配置中心中的,没有则使用本地的配置。
11. 网关
1、注册“gulimall-gateway”到Nacos
1)创建“gulimall-gateway”
SpringCloud gateway
2)添加“gulimall-common”依赖和“spring-cloud-starter-gateway”依赖
<dependency><groupId>com.bigdata.gulimall</groupId><artifactId>gulimall-common</artifactId><version>1.0-SNAPSHOT</version></dependency><dependency><groupId>org.springframework.cloud</groupId><artifactId>spring-cloud-starter-gateway</artifactId></dependency>
3)“com.bigdata.gulimall.gulimallgateway.GulimallGatewayApplication”类上加上“@EnableDiscoveryClient”注解
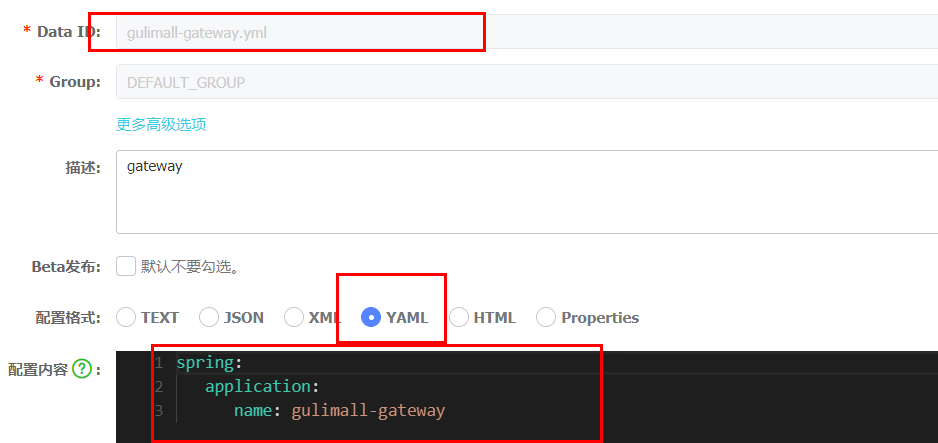
4)在Nacos中创建“gateway”命名空间,同时在该命名空间中创建“gulimall-gateway.yml”
5)创建“bootstrap.properties”文件,添加如下配置,指明配置中心地址和所属命名空间
spring.application.name=gulimall-gatewayspring.cloud.nacos.config.server-addr=192.168.137.14:8848spring.cloud.nacos.config.namespace=1c82552e-1af0-4ced-9a48-26f19c2d315f
6)创建“application.properties”文件,指定服务名和注册中心地址
spring.application.name=gulimall-gatewayspring.cloud.nacos.discovery.server-addr=192.168.137.14:8848server.port=88
7)启动“gulimall-gateway”
启动报错:
Description:Failed to configure a DataSource: 'url' attribute is not specified and no embedded datasource could be configured.Reason: Failed to determine a suitable driver class
解决方法:在“com.bigdata.gulimall.gulimallgateway.GulimallGatewayApplication”中排除和数据源相关的配置
@SpringBootApplication(exclude = {DataSourceAutoConfiguration.class})
重新启动
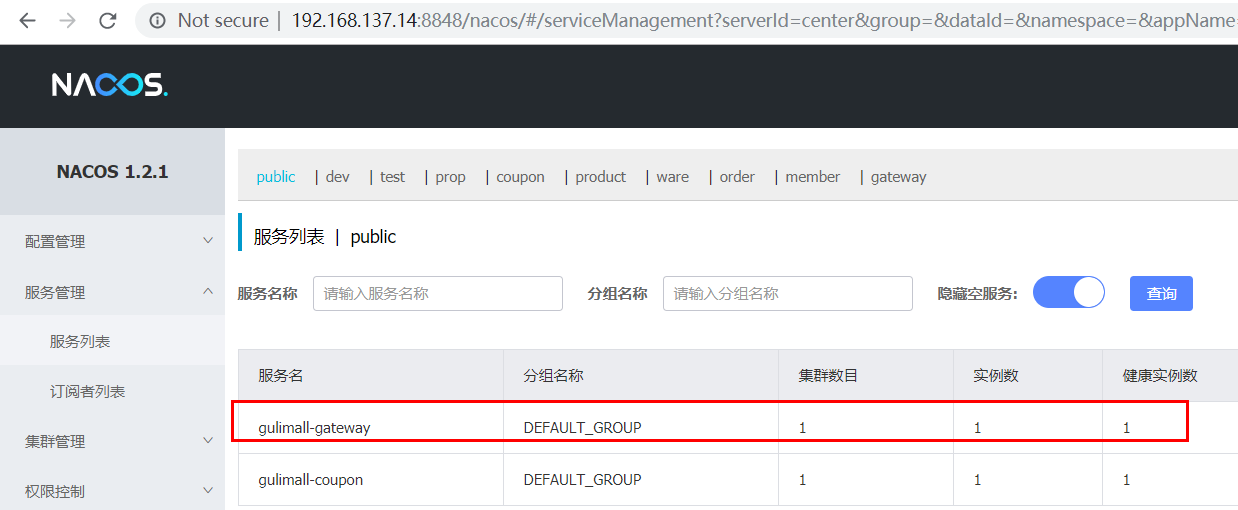
访问:http://192.168.137.14:8848/nacos/#,查看到该服务已经注册到了Nacos中
2、案例
1)创建“application.yml”
spring:cloud:gateway:routes:- id: baidu_routeuri: https://www.baidu.compredicates:- Query=url, baidu- id: qq_routeuri: https://www.qq.com/predicates:- Query=url, qq
2)启动“gulimall-gateway”
3)测试
访问:http://localhost:88/hello?url=baidu
访问:http://localhost:88/hello?url=qq
12. Vue
ES6
ECMAScript 6.0(以下简称 ES6,ECMAScript 是一种由 Ecma 国际(前身为欧洲计算机制造商协会,英文名称是 European Computer Manufacturers Association)通过 ECMA-262标准化的脚本程序设计语言)是 JavaScript 语言的下一代标准,已经在 2015 年 6 月正式发布了,并且从 ECMAScript 6 开始,开始采用年号来做版本。即 ECMAScript 2015,就是ECMAScript6。它的目标,是使得 JavaScript 语言可以用来编写复杂的大型应用程序,成为企业级开发语言。每年一个新版本。
什么是 ECMAScript
来看下前端的发展历程:

安装vue
# 最新稳定版$ npm install vue
1、vue声明式渲染
let vm = new Vue({el: "#app",//绑定元素data: { //封装数据name: "张三",num: 1},methods:{ //封装方法cancle(){this.num -- ;},hello(){return "1"}}});
2、双向绑定,模型变化,视图变化。反之亦然
双向绑定使用v-model
<input type="text" v-model="num">
<h1> {{name}} ,非常帅,有{{num}}个人为他点赞{{hello()}}</h1>

3、事件处理
v-xx:指令
1、创建vue实例,关联页面的模板,将自己的数据(data)渲染到关联的模板,响应式的
2、指令来简化对dom的一些操作。
3、声明方法来做更复杂的操作。methods里面可以封装方法。
v-on是按钮的单击事件:
<button v-on:click="num++">点赞</button>
在VUE中el,data和vue的作用:
- el:用来绑定数据;
- data:用来封装数据;
- methods:用来封装方法,并且能够封装多个方法,如何上面封装了cancell和hello方法。
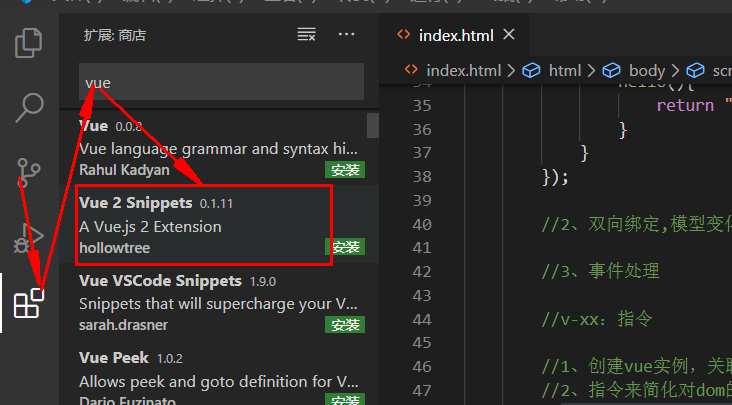
安装“Vue 2 Snippets”,用来做代码提示
为了方便的在浏览器上调试VUE程序,需要安装“vue-devtools”,编译后安装到chrome中即可。
详细的使用方法见:Vue调试神器vue-devtools安装
“v-html”不会对于HTML标签进行转义,而是直接在浏览器上显示data所设置的内容;而“ v-text”会对html标签进行转义
<div id="app">{{msg}} {{1+1}} {{hello()}}<br/><span v-html="msg"></span><br/><span v-text="msg"></span></div><script src="../node_modules/vue/dist/vue.js"></script><script>new Vue({el:"#app",data:{msg:"<h1>Hello</h1>",link:"http://www.baidu.com"},methods:{hello(){return "World"}}})</script>
运行结果:
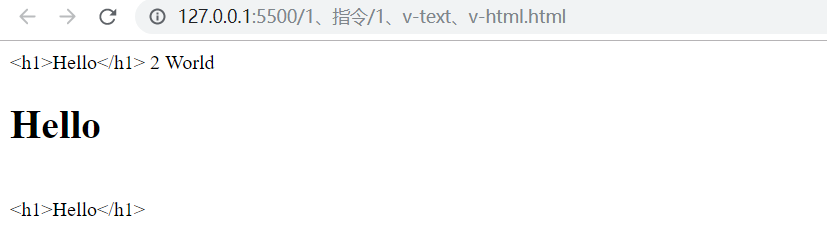
{{msg}} :称为差值表达式,它必须要写在Html表达式,可以完成数学运算和方法调用
4、v-bind :单向绑定
给html标签的属性绑定
<!-- 给html标签的属性绑定 --><div id="app"><a v-bind:href="link">gogogo</a><!-- class,style {class名:加上?}--><span v-bind:class="{active:isActive,'text-danger':hasError}":style="{color: color1,fontSize: size}">你好</span></div><script src="../node_modules/vue/dist/vue.js"></script><script>let vm = new Vue({el:"#app",data:{link: "http://www.baidu.com",isActive:true,hasError:true,color1:'red',size:'36px'}})</script>
上面所完成的任务就是给a标签绑定一个超链接。并且当“isActive”和“hasError”都是true的时候,将属性动态的绑定到,则绑定该“active”和 “text-danger”class。这样可以动态的调整属性的存在。
而且如果想要实现修改vm的”color1”和“size”, span元素的style也能够随之变化,则可以写作v-bind:style,也可以省略v-bind。
5、v-model双向绑定
<!DOCTYPE html><html lang="en"><head><meta charset="UTF-8"><meta name="viewport" content="width=device-width, initial-scale=1.0"><meta http-equiv="X-UA-Compatible" content="ie=edge"><title>Document</title></head><body><!-- 表单项,自定义组件 --><div id="app">精通的语言:<input type="checkbox" v-model="language" value="Java"> java<br/><input type="checkbox" v-model="language" value="PHP"> PHP<br/><input type="checkbox" v-model="language" value="Python"> Python<br/>选中了 {{language.join(",")}}</div><script src="../node_modules/vue/dist/vue.js"></script><script>let vm = new Vue({el:"#app",data:{language: []}})</script></body></html>
上面完成的功能就是通过“v-model”为输入框绑定多个值,能够实现选中的值,在data的language也在不断的发生着变化,
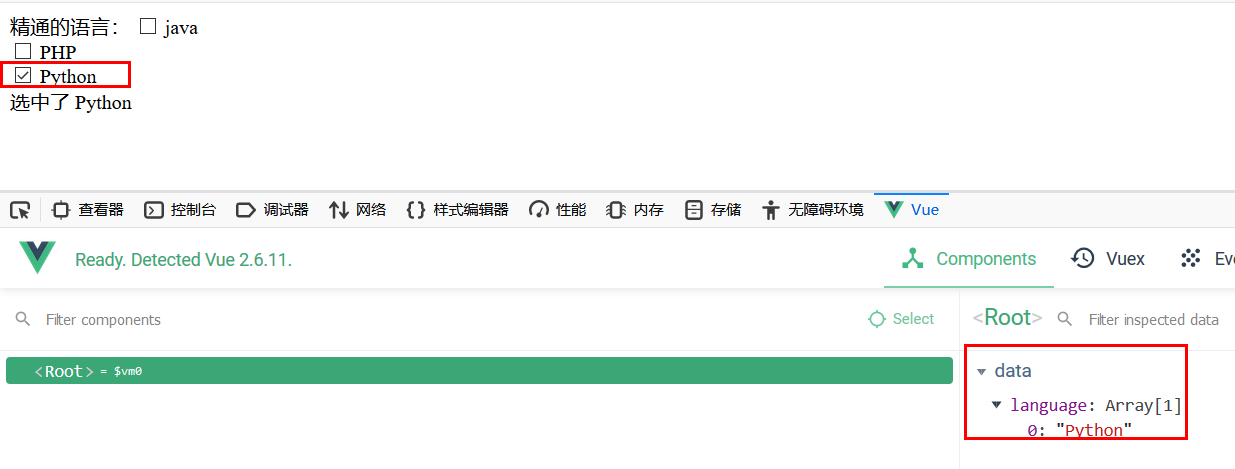
如果在控制台上指定vm.language=[“Java”,”PHP”],则data值也会跟着变化。
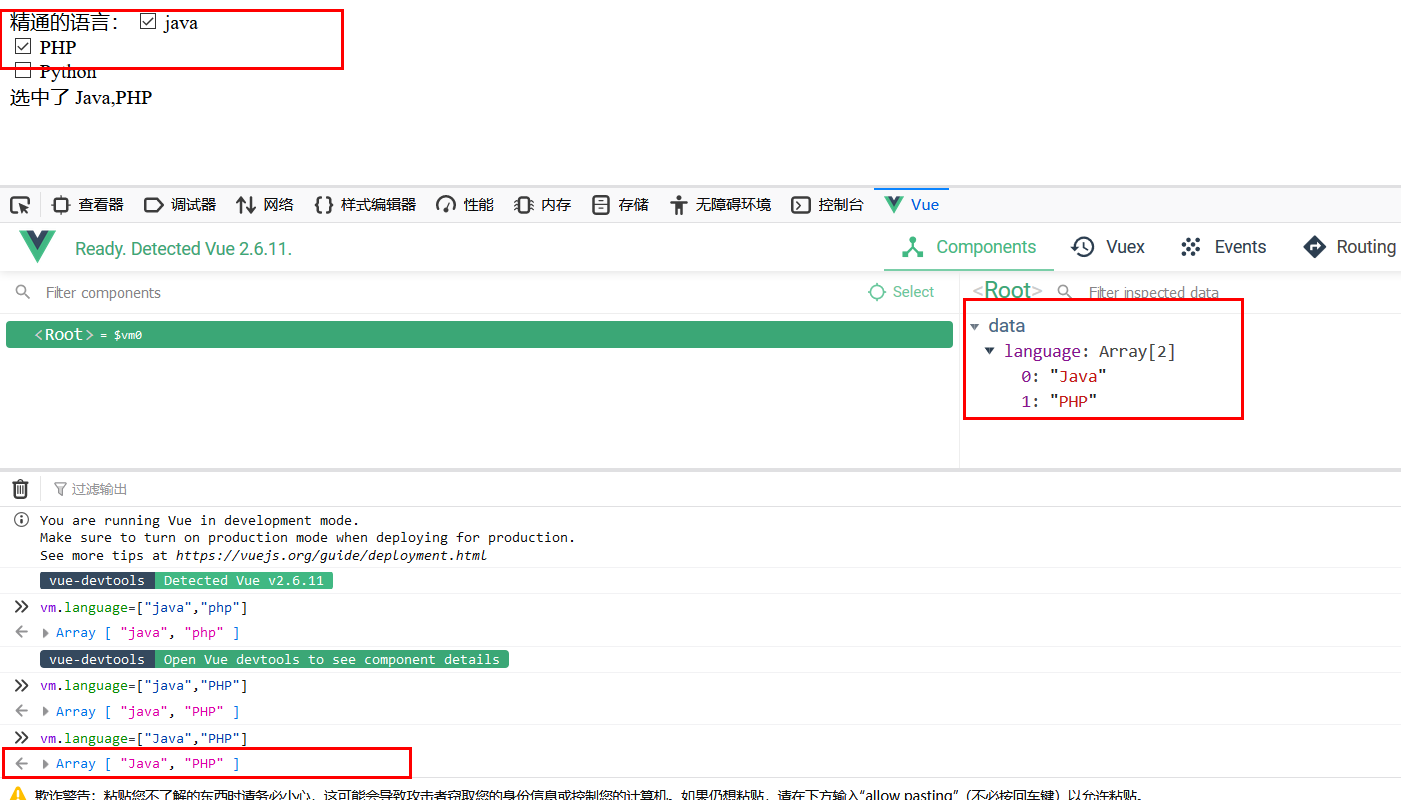
通过“v-model”实现了页面发生了变化,则数据也发生变化,数据发生变化,则页面也发生变化,这样就实现了双向绑定。
数组的连接操作: 选中了 {{language.join(“,”)}}
6、v-on为按钮绑定事件
<!--事件中直接写js片段--><button v-on:click="num++">点赞</button><!--事件指定一个回调函数,必须是Vue实例中定义的函数--><button @click="cancle">取消</button>
上面是为两个按钮绑定了单击事件,其中一个对于num进行自增,另外一个自减。
v-on:click也可以写作@click
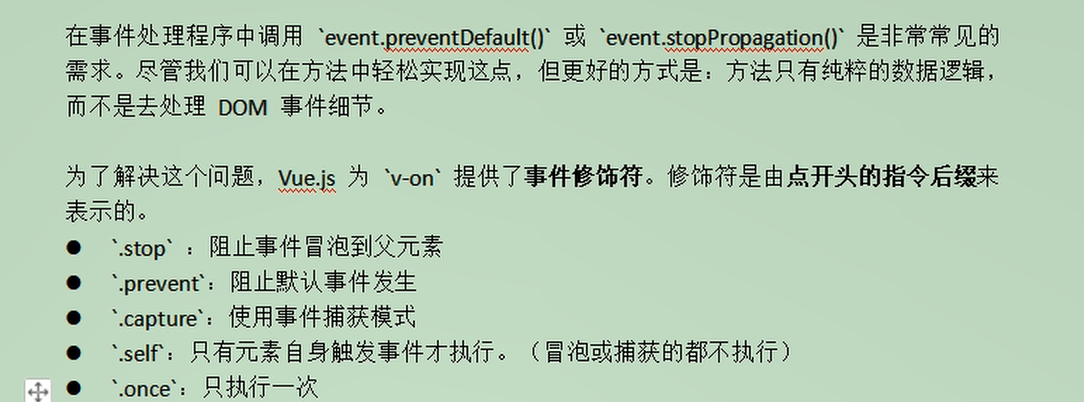
事件的冒泡:
<!-- 事件修饰符 --><div style="border: 1px solid red;padding: 20px;" v-on:click="hello">大div<div style="border: 1px solid blue;padding: 20px;" @click="hello">小div <br /><a href="http://www.baidu.com" @click.prevent="hello">去百度</a></div></div>
上面的这两个嵌套div中,如果点击了内层的div,则外层的div也会被触发;这种问题可以事件修饰符来完成:
<!-- 事件修饰符 --><div style="border: 1px solid red;padding: 20px;" v-on:click.once="hello">大div<div style="border: 1px solid blue;padding: 20px;" @click.stop="hello">小div <br /><a href="http://www.baidu.com" @click.prevent.stop="hello">去百度</a><!--这里禁止了超链接的点击跳转操作,并且只会触发当前对象的操作--></div></div>
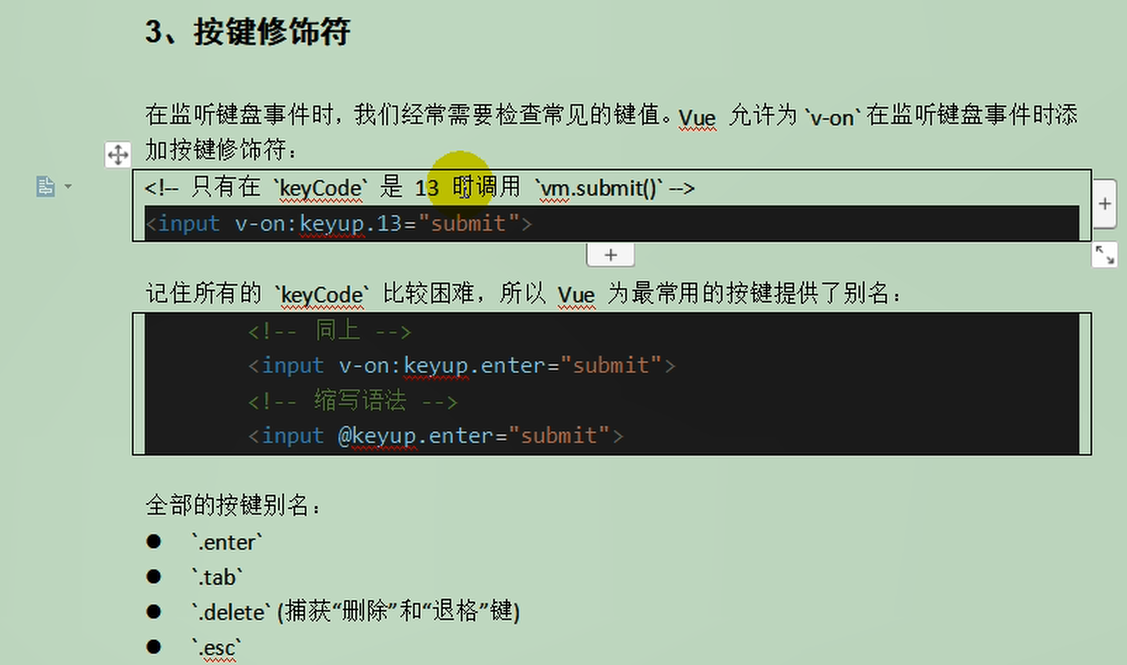
关于事件修饰符:
按键修饰符:

7、v-for遍历循环
<!DOCTYPE html><html lang="en"><head><meta charset="UTF-8"><meta name="viewport" content="width=device-width, initial-scale=1.0"><meta http-equiv="X-UA-Compatible" content="ie=edge"><title>Document</title></head><body><div id="app"><ul><li v-for="(user,index) in users" :key="user.name" v-if="user.gender == '女'"><!-- 1、显示user信息:v-for="item in items" -->当前索引:{{index}} ==> {{user.name}} ==> {{user.gender}} ==>{{user.age}} <br><!-- 2、获取数组下标:v-for="(item,index) in items" --><!-- 3、遍历对象:v-for="value in object"v-for="(value,key) in object"v-for="(value,key,index) in object"-->对象信息:<span v-for="(v,k,i) in user">{{k}}=={{v}}=={{i}};</span><!-- 4、遍历的时候都加上:key来区分不同数据,提高vue渲染效率 --></li></ul><ul><li v-for="(num,index) in nums" :key="index"></li></ul></div><script src="../node_modules/vue/dist/vue.js"></script><script>let app = new Vue({el: "#app",data: {users: [{ name: '柳岩', gender: '女', age: 21 },{ name: '张三', gender: '男', age: 18 },{ name: '范冰冰', gender: '女', age: 24 },{ name: '刘亦菲', gender: '女', age: 18 },{ name: '古力娜扎', gender: '女', age: 25 }],nums: [1,2,3,4,4]},})</script></body></html>
4、遍历的时候都加上:key来区分不同数据,提高vue渲染效率
过滤器
<!DOCTYPE html><html lang="en"><head><meta charset="UTF-8"><meta name="viewport" content="width=device-width, initial-scale=1.0"><meta http-equiv="X-UA-Compatible" content="ie=edge"><title>Document</title></head><body><!-- 过滤器常用来处理文本格式化的操作。过滤器可以用在两个地方:双花括号插值和 v-bind 表达式 --><div id="app"><ul><li v-for="user in userList">{{user.id}} ==> {{user.name}} ==> {{user.gender == 1?"男":"女"}} ==>{{user.gender | genderFilter}} ==> {{user.gender | gFilter}}<!-- 这里的"|"表示的管道,将user.gender的值交给genderFilter --></li></ul></div><script src="../node_modules/vue/dist/vue.js"></script><script>// 全局过滤器Vue.filter("gFilter", function (val) {if (val == 1) {return "男~~~";} else {return "女~~~";}})let vm = new Vue({el: "#app",data: {userList: [{ id: 1, name: 'jacky', gender: 1 },{ id: 2, name: 'peter', gender: 0 }]},filters: {//// filters 定义局部过滤器,只可以在当前vue实例中使用genderFilter(val) {if (val == 1) {return "男";} else {return "女";}}}})</script></body></html>
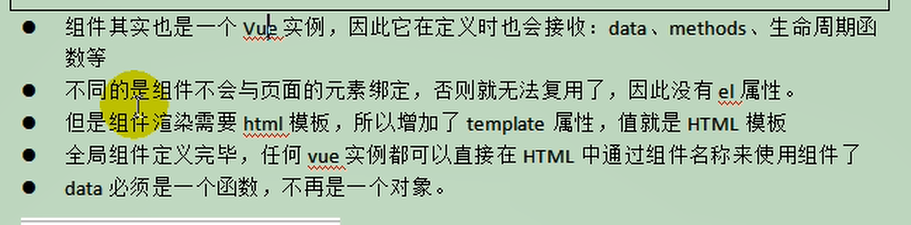
组件化
<!DOCTYPE html><html lang="en"><head><meta charset="UTF-8"><meta name="viewport" content="width=device-width, initial-scale=1.0"><meta http-equiv="X-UA-Compatible" content="ie=edge"><title>Document</title></head><body><div id="app"><button v-on:click="count++">我被点击了 {{count}} 次</button><counter></counter><counter></counter><counter></counter><counter></counter><counter></counter><!-- 使用所定义的组件button-counter --><button-counter></button-counter></div><script src="../node_modules/vue/dist/vue.js"></script><script>//1、全局声明注册一个组件Vue.component("counter", {template: `<button v-on:click="count++">我被点击了 {{count}} 次</button>`,data() {return {count: 1}}});//2、局部声明一个组件const buttonCounter = {template: `<button v-on:click="count++">我被点击了 {{count}} 次~~~</button>`,data() {return {count: 1}}};new Vue({el: "#app",data: {count: 1},components: {//声明所定义的局部组件'button-counter': buttonCounter}})</script></body></html>
生命周期钩子函数
<!DOCTYPE html><html lang="en"><head><meta charset="UTF-8"><meta name="viewport" content="width=device-width, initial-scale=1.0"><meta http-equiv="X-UA-Compatible" content="ie=edge"><title>Document</title></head><body><div id="app"><span id="num">{{num}}</span><button @click="num++">赞!</button><h2>{{name}},有{{num}}个人点赞</h2></div><script src="../node_modules/vue/dist/vue.js"></script><script>let app = new Vue({el: "#app",data: {name: "张三",num: 100},methods: {show() {return this.name;},add() {this.num++;}},beforeCreate() {console.log("=========beforeCreate=============");console.log("数据模型未加载:" + this.name, this.num);console.log("方法未加载:" + this.show());console.log("html模板未加载:" + document.getElementById("num"));},created: function () {console.log("=========created=============");console.log("数据模型已加载:" + this.name, this.num);console.log("方法已加载:" + this.show());console.log("html模板已加载:" + document.getElementById("num"));console.log("html模板未渲染:" + document.getElementById("num").innerText);},beforeMount() {console.log("=========beforeMount=============");console.log("html模板未渲染:" + document.getElementById("num").innerText);},mounted() {console.log("=========mounted=============");console.log("html模板已渲染:" + document.getElementById("num").innerText);},beforeUpdate() {console.log("=========beforeUpdate=============");console.log("数据模型已更新:" + this.num);console.log("html模板未更新:" + document.getElementById("num").innerText);},updated() {console.log("=========updated=============");console.log("数据模型已更新:" + this.num);console.log("html模板已更新:" + document.getElementById("num").innerText);}});</script></body></html>
13. element ui
官网: https://element.eleme.cn/#/zh-CN/component/installation
安装
npm i element-ui -S
在 main.js 中写入以下内容:
import ElementUI from 'element-ui'import 'element-ui/lib/theme-chalk/index.css';Vue.use(ElementUI);
14. 递归树形结构获取数据
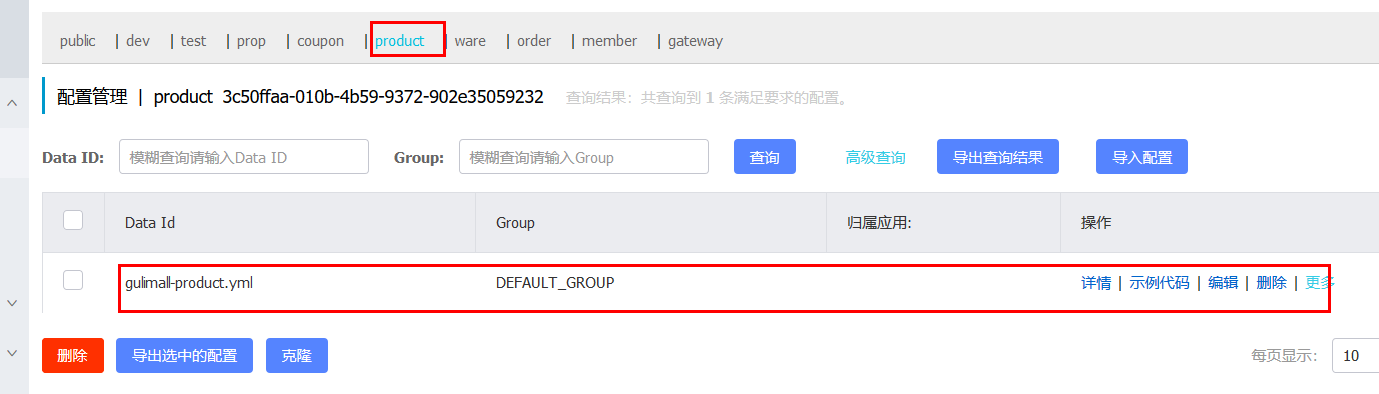
在注册中心中“product”命名空间中,创建“gulimall-product.yml”配置文件:
将“application.yml”内容拷贝到该配置文件中
server:port: 10000spring:datasource:#MySQL配置driverClassName: com.mysql.cj.jdbc.Driverurl: jdbc:mysql://192.168.137.14:3306/gulimall_pms?useUnicode=true&characterEncoding=UTF-8&useSSL=falseusername: rootpassword: rootapplication:name: gulimall-productcloud:nacos:discovery:server-addr: 192.168.137.14:8848mybatis-plus:global-config:db-config:id-type: automapper-locations: classpath:/mapper/**/*.xml
在本地创建“bootstrap.properties”文件,指明配置中心的位置和使用到的配置文件:
spring.application.name=gulimall-productspring.cloud.nacos.config.server-addr=192.168.137.14:8848spring.cloud.nacos.config.namespace=3c50ffaa-010b-4b59-9372-902e35059232spring.cloud.nacos.config.extension-configs[0].data-id=gulimall-product.ymlspring.cloud.nacos.config.extension-configs[0].group=DEFAULT_GROUPspring.cloud.nacos.config.extension-configs[0].refresh=true
然后启动gulimall-product,查看到该服务已经出现在了nacos的注册中心中了
修改“com.bigdata.gulimall.product.service.CategoryService”类,添加如下代码:
/*** 列表*/@RequestMapping("/list/tree")public List<CategoryEntity> list(){List<CategoryEntity> categoryEntities = categoryService.listWithTree();return categoryEntities;}
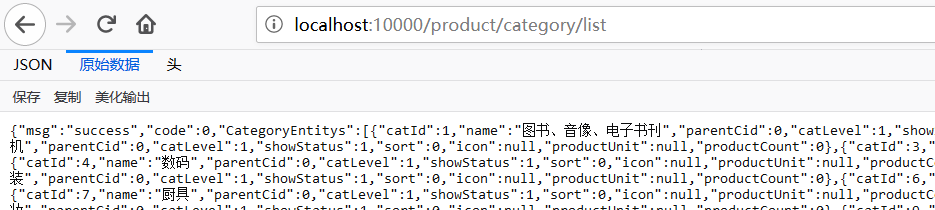
测试:http://localhost:10000/product/category/list/tree
如何区别是哪种分类级别?
答:可以通过分类的parent_cid来进行判断,如果是一级分类,其值为0.
/*** 列表*/@RequestMapping("/list/tree")public List<CategoryEntity> list(){List<CategoryEntity> categoryEntities = categoryService.listWithTree();//找到所有的一级分类List<CategoryEntity> level1Menus = categoryEntities.stream().filter(item -> item.getParentCid() == 0).map(menu->{menu.setChildCategoryEntity(getChildrens(menu,categoryEntities));return menu;}).sorted((menu1, menu2) -> {return (menu1.getSort() ==null ? 0:menu1.getSort())- (menu2.getSort()==null?0:menu2.getSort());}).collect(Collectors.toList());return level1Menus;}public List<CategoryEntity> getChildrens(CategoryEntity root,List<CategoryEntity> all){List<CategoryEntity> childrens = all.stream().filter(item -> {return item.getParentCid() == root.getCatId();}).map(item -> {item.setChildCategoryEntity(getChildrens(item, all));return item;}).sorted((menu1, menu2) -> {return (menu1.getSort() ==null ? 0:menu1.getSort())- (menu2.getSort()==null?0:menu2.getSort());}).collect(Collectors.toList());return childrens;}
下面是得到的部分JSON数据
[{"catId": 1,"name": "图书、音像、电子书刊","parentCid": 0,"catLevel": 1,"showStatus": 1,"sort": 0,"icon": null,"productUnit": null,"productCount": 0,"childCategoryEntity": [{"catId": 22,"name": "电子书刊","parentCid": 1,"catLevel": 2,"showStatus": 1,"sort": 0,"icon": null,"productUnit": null,"productCount": 0,"childCategoryEntity": [{"catId": 165,"name": "电子书","parentCid": 22,"catLevel": 3,"showStatus": 1,"sort": 0,"icon": null,"productUnit": null,"productCount": 0,"childCategoryEntity": []},{"catId": 166,"name": "网络原创","parentCid": 22,"catLevel": 3,"showStatus": 1,"sort": 0,"icon": null,"productUnit": null,"productCount": 0,"childCategoryEntity": []},{"catId": 167,"name": "数字杂志","parentCid": 22,"catLevel": 3,"showStatus": 1,"sort": 0,"icon": null,"productUnit": null,"productCount": 0,"childCategoryEntity": []},{"catId": 168,"name": "多媒体图书","parentCid": 22,"catLevel": 3,"showStatus": 1,"sort": 0,"icon": null,"productUnit": null,"productCount": 0,"childCategoryEntity": []}]},{"catId": 23,"name": "音像","parentCid": 1,"catLevel": 2,"showStatus": 1,"sort": 0,"icon": null,"productUnit": null,"productCount": 0,"childCategoryEntity": [{"catId": 169,"name": "音乐","parentCid": 23,"catLevel": 3,"showStatus": 1,"sort": 0,"icon": null,"productUnit": null,"productCount": 0,"childCategoryEntity": []},{"catId": 170,"name": "影视","parentCid": 23,"catLevel": 3,"showStatus": 1,"sort": 0,"icon": null,"productUnit": null,"productCount": 0,"childCategoryEntity": []},{"catId": 171,"name": "教育音像","parentCid": 23,"catLevel": 3,"showStatus": 1,"sort": 0,"icon": null,"productUnit": null,"productCount": 0,"childCategoryEntity": []}]},{
启动后端项目renren-fast
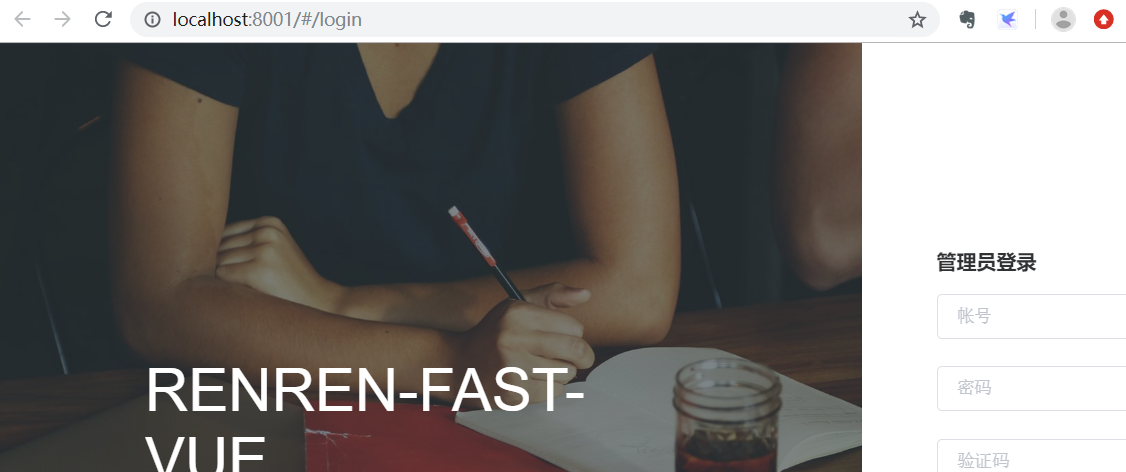
启动前端项目renren-fast-vue:
npm run dev
访问: http://localhost:8001/#/login
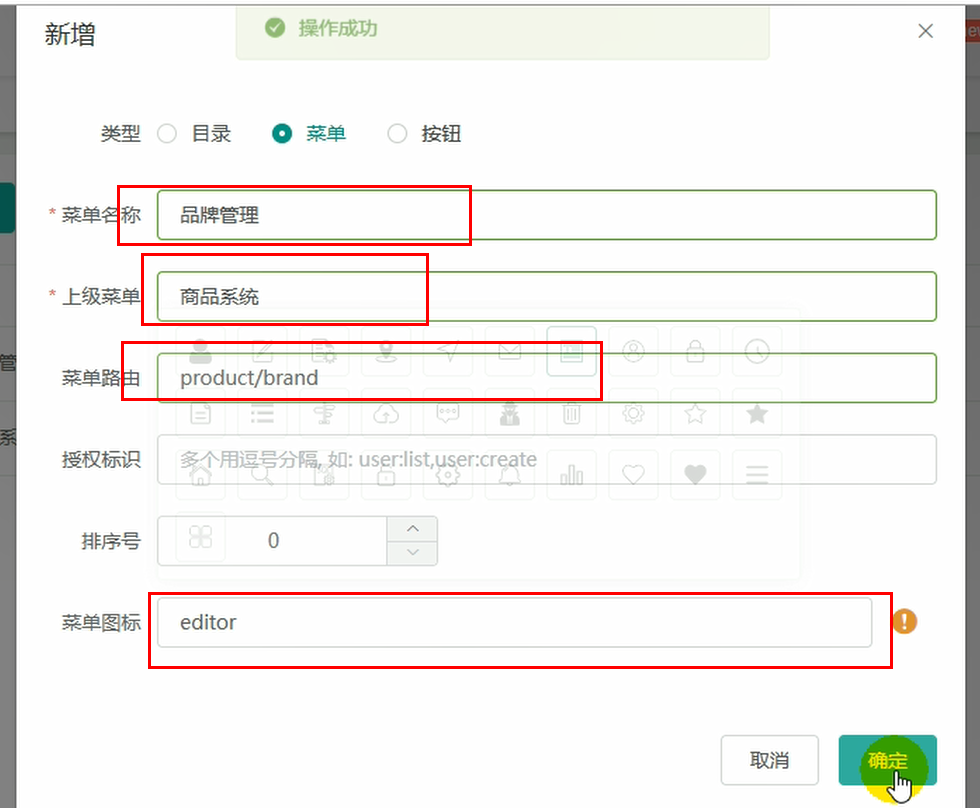
创建一级菜单:
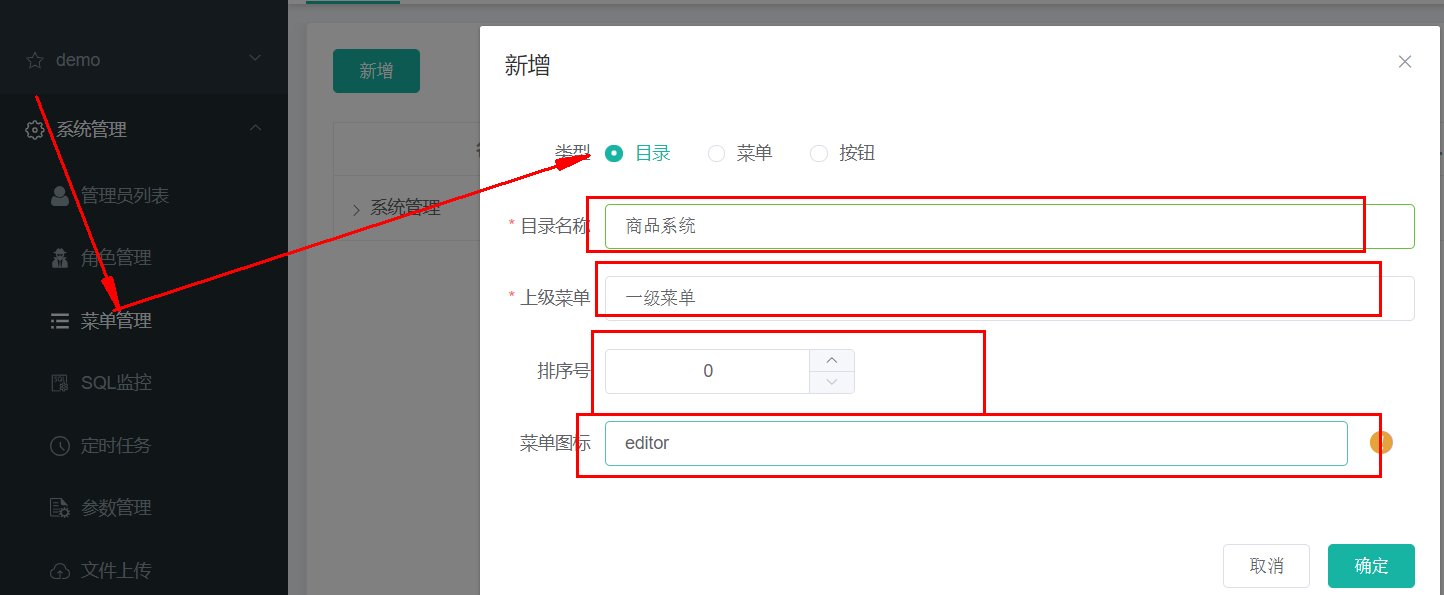
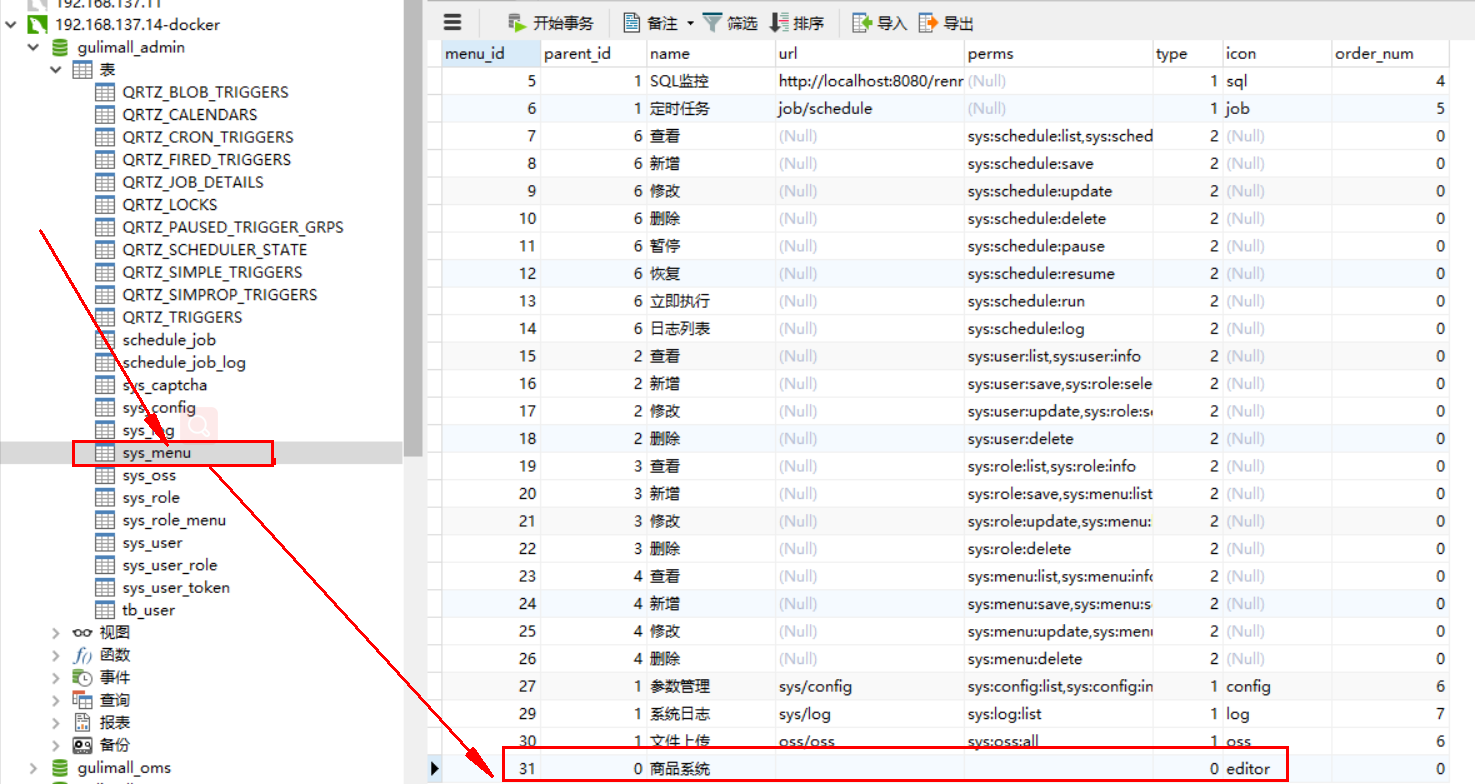
创建完成后,在后台的管理系统中会创建一条记录:
然后创建子菜单:

创建renren-fast-vue\src\views\modules\product目录,子所以是这样来创建,是因为product/category,对应于product-category
在该目录下,新建“category.vue”文件:
刷新页面出现404异常,查看请求发现,请求的是“http://localhost:8080/renren-fast/product/category/list/tree”
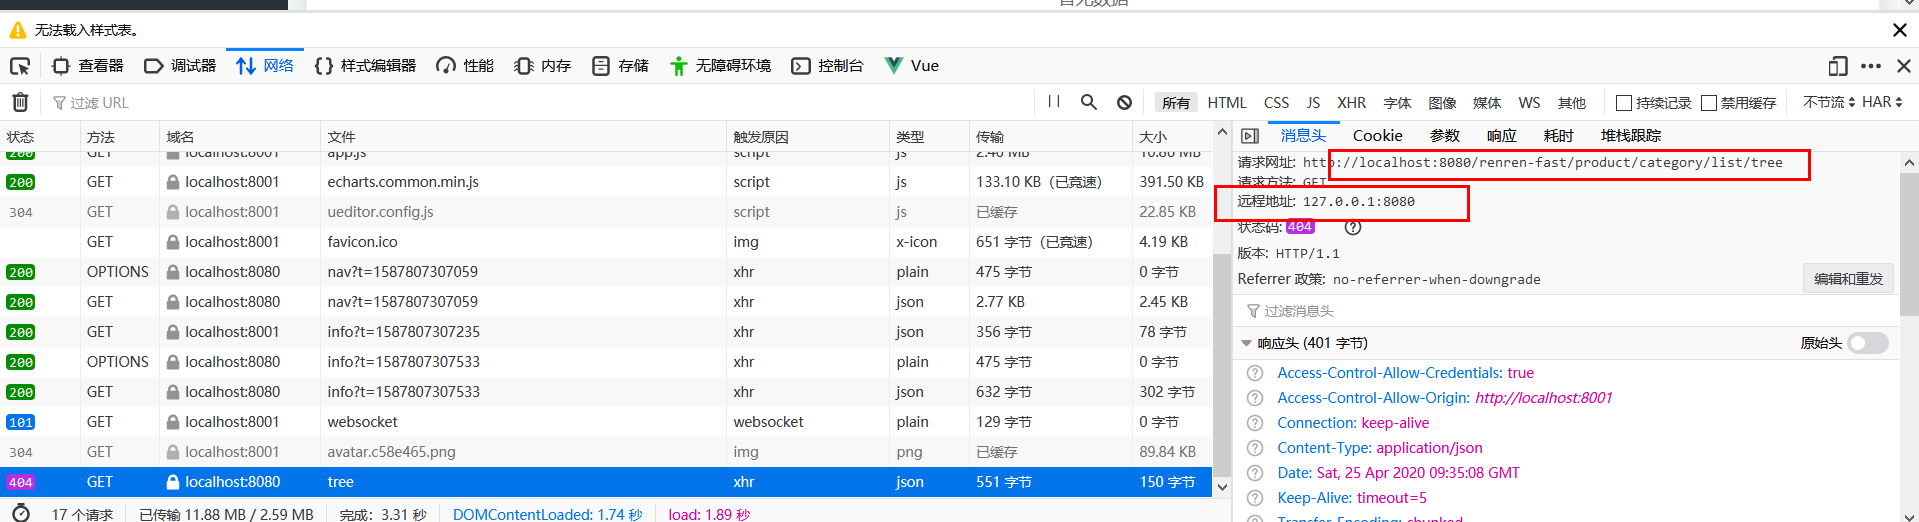
这个请求是不正确的,正确的请求是:http://localhost:10000/product/category/list/tree,
修正这个问题:
替换“static\config\index.js”文件中的“window.SITE_CONFIG[‘baseUrl’]”
替换前:
window.SITE_CONFIG['baseUrl'] = 'http://localhost:8080/renren-fast';
替换后:
window.SITE_CONFIG['baseUrl'] = 'http://localhost:88/api';
http://localhost:88,这个地址是我们网关微服务的接口。
这里我们需要通过网关来完成路径的映射,因此将renren-fast注册到nacos注册中心中,并添加配置中心
application:
    name: renren-fast
  cloud:
    nacos:
      discovery:
        server-addr: 192.168.137.14:8848

      config:
        name: renren-fast
        server-addr: 192.168.137.8848
        namespace: ee409c3f-3206-4a3b-ba65-7376922a886d
配置网关路由,前台的所有请求都是经由“http://localhost:88/api”来转发的,在“gulimall-gateway”中添加路由规则:
        - id: admin_route
          uri: lb://renren-fast
          predicates:
            - Path=/api/**
但是这样做也引入了另外的一个问题,再次访问:http://localhost:8001/#/login,发现验证码不再显示:
分析原因:
- 现在的验证码请求路径为,http://localhost:88/api/captcha.jpg?uuid=69c79f02-d15b-478a-8465-a07fd09001e6
- 原始的验证码请求路径:http://localhost:8001/renren-fast/captcha.jpg?uuid=69c79f02-d15b-478a-8465-a07fd09001e6
在admin_route的路由规则下,在访问路径中包含了“api”,因此它会将它转发到renren-fast,网关在转发的时候,会使用网关的前缀信息,为了能够正常的取得验证码,我们需要对请求路径进行重写
关于请求路径重写:
6.16. The [RewritePath](https://cloud.spring.io/spring-cloud-static/spring-cloud-gateway/2.2.2.RELEASE/reference/html/#the-rewritepath-gatewayfilter-factory) [GatewayFilter](https://cloud.spring.io/spring-cloud-static/spring-cloud-gateway/2.2.2.RELEASE/reference/html/#the-rewritepath-gatewayfilter-factory) Factory
The RewritePath GatewayFilter factory takes a path regexp parameter and a replacement parameter. This uses Java regular expressions for a flexible way to rewrite the request path. The following listing configures a RewritePath GatewayFilter:
Example 41. application.yml
spring:
  cloud:
    gateway:
      routes:
      - id: rewritepath_route
        uri: https://example.org
        predicates:
        - Path=/foo/**
        filters:
        - RewritePath=/red(?<segment>/?.*), $\{segment}
For a request path of /red/blue, this sets the path to /blue before making the downstream request. Note that the $ should be replaced with $\ because of the YAML specification.
修改“admin_route”路由规则:
        - id: admin_route
          uri: lb://renren-fast
          predicates:
            - Path=/api/**
          filters:
            - RewritePath=/api/(?<segment>/?.*), /renren-fast/$\{segment}
再次访问:http://localhost:8001/#/login,验证码能够正常的加载了。
但是很不幸新的问题又产生了,访问被拒绝了

问题描述:已拦截跨源请求:同源策略禁止读取位于 http://localhost:88/api/sys/login 的远程资源。(原因:CORS 头缺少 ‘Access-Control-Allow-Origin’)。
问题分析:这是一种跨域问题。访问的域名和端口和原来的请求不同,请求就会被限制

跨域流程:
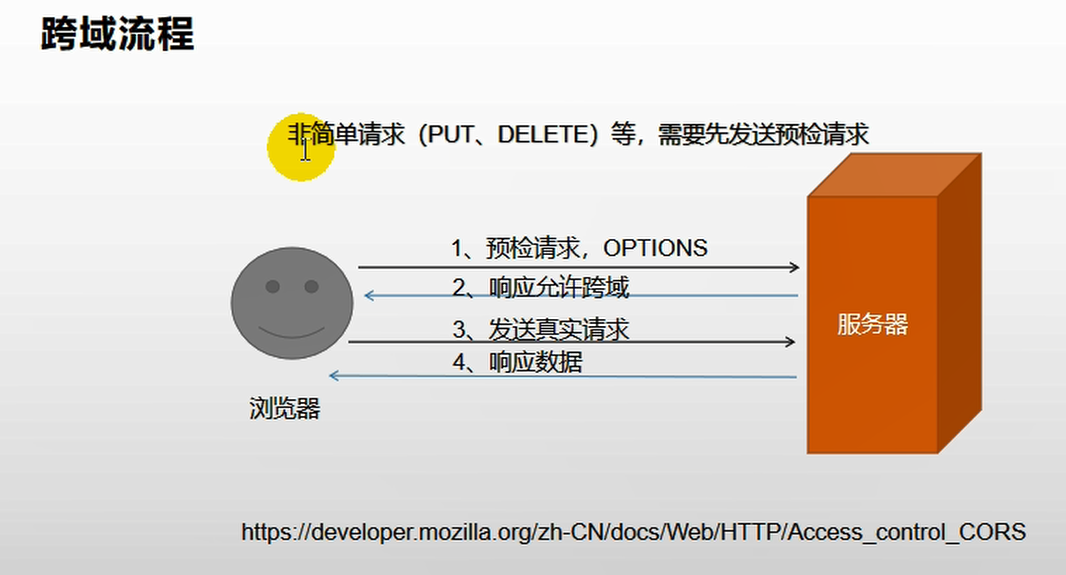
解决方法:在网关中定义“GulimallCorsConfiguration”类,该类用来做过滤,允许所有的请求跨域。
@Configuration
public class GulimallCorsConfiguration {

    @Bean
    public CorsWebFilter corsWebFilter(){
        UrlBasedCorsConfigurationSource source=new UrlBasedCorsConfigurationSource();
        CorsConfiguration corsConfiguration = new CorsConfiguration();
        corsConfiguration.addAllowedHeader("*");
        corsConfiguration.addAllowedMethod("*");
        corsConfiguration.addAllowedOrigin("*");
        corsConfiguration.setAllowCredentials(true);

        source.registerCorsConfiguration("/**",corsConfiguration);
        return new CorsWebFilter(source);
    }
}
再次访问:http://localhost:8001/#/login
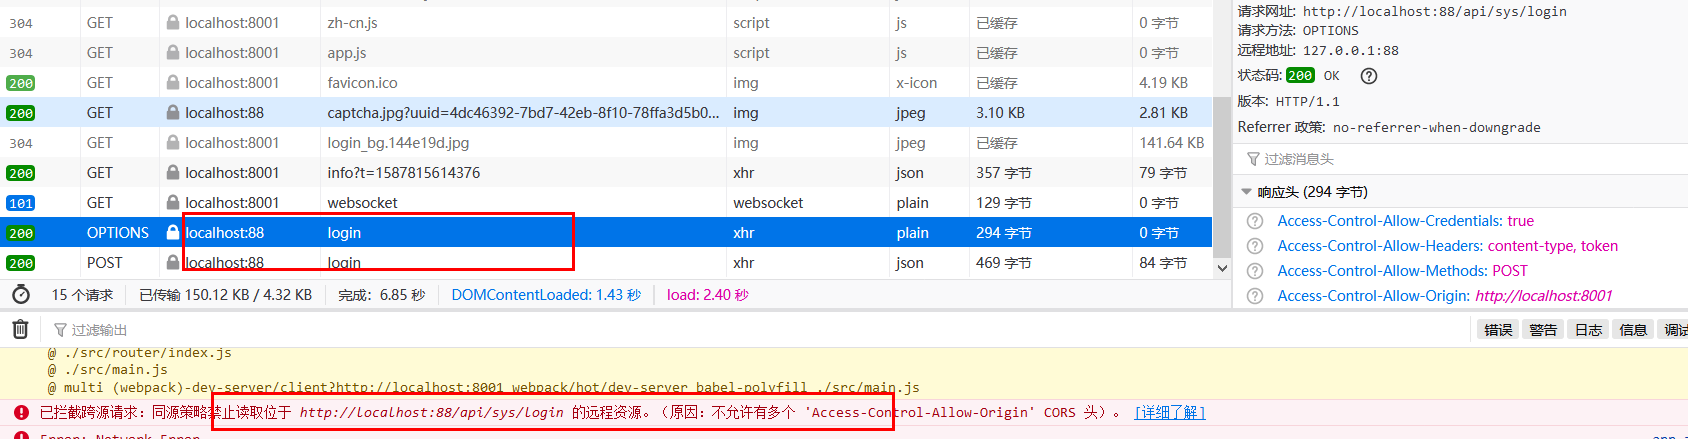
http://localhost:8001/renre已拦截跨源请求:同源策略禁止读取位于 http://localhost:88/api/sys/login 的远程资源。(原因:不允许有多个 ‘Access-Control-Allow-Origin’ CORS 头)n-fast/captcha.jpg?uuid=69c79f02-d15b-478a-8465-a07fd09001e6
出现了多个请求,并且也存在多个跨源请求。
为了解决这个问题,需要修改renren-fast项目,注释掉“io.renren.config.CorsConfig”类。然后再次进行访问。
在显示分类信息的时候,出现了404异常,请求的http://localhost:88/api/product/category/list/tree不存在
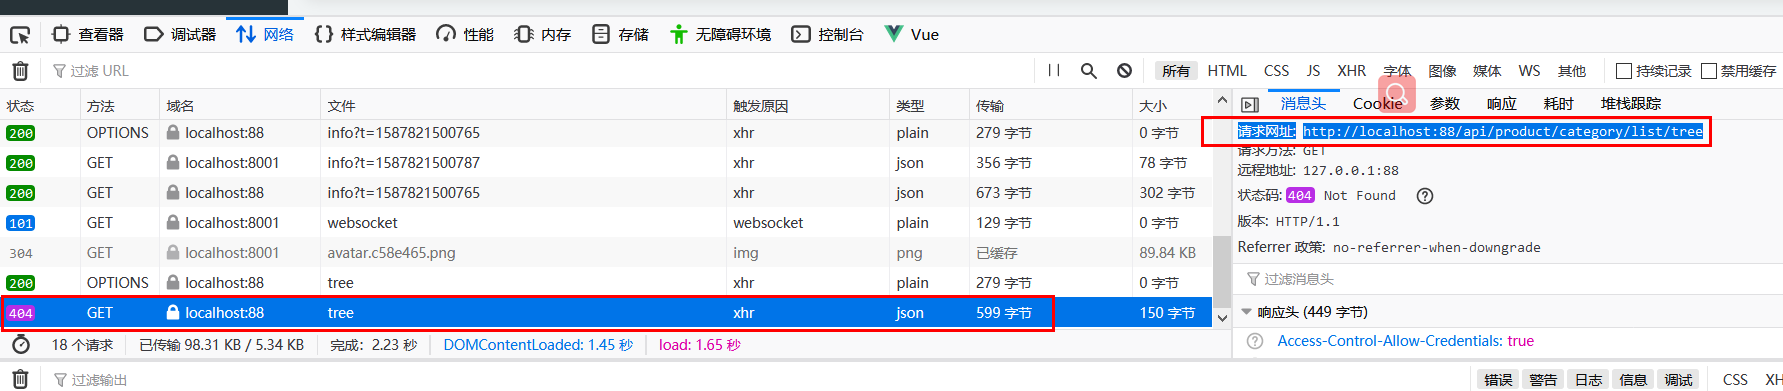
这是因为网关上所做的路径映射不正确,映射后的路径为http://localhost:8001/renren-fast/product/category/list/tree
但是只有通过http://localhost:10000/product/category/list/tree路径才能够正常访问,所以会报404异常。
解决方法就是定义一个product路由规则,进行路径重写:
        - id: product_route
          uri: lb://gulimall-product
          predicates:
            - Path=/api/product/**
          filters:
            - RewritePath=/api/(?<segment>/?.*),/$\{segment}
在路由规则的顺序上,将精确的路由规则放置到模糊的路由规则的前面,否则的话,精确的路由规则将不会被匹配到,类似于异常体系中try catch子句中异常的处理顺序。
15. 删除数据
添加delete和append标识,并且增加复选框
 <el-tree
    :data="menus"
    show-checkbox  //显示复选框
    :props="defaultProps"
    :expand-on-click-node="false" //设置节点点击时不展开
    node-key="catId"
  >
    <span class="custom-tree-node" slot-scope="{ node, data }">
      <span>{{ node.label }}</span>
      <span>
        <el-button v-if="node.level <= 2" type="text" size="mini" @click="() => append(data)">Append</el-button>
        <el-button
          v-if="node.childNodes.length == 0"
          type="text"
          size="mini"
          @click="() => remove(node, data)"
        >Delete</el-button>
      </span>
    </span>
  </el-tree>
测试删除数据,打开postman输入“ http://localhost:88/api/product/category/delete ”,请求方式设置为POST,为了比对效果,可以在删除之前查询数据库的pms_category表:

由于delete请求接收的是一个数组,所以这里使用JSON方式,传入了一个数组:
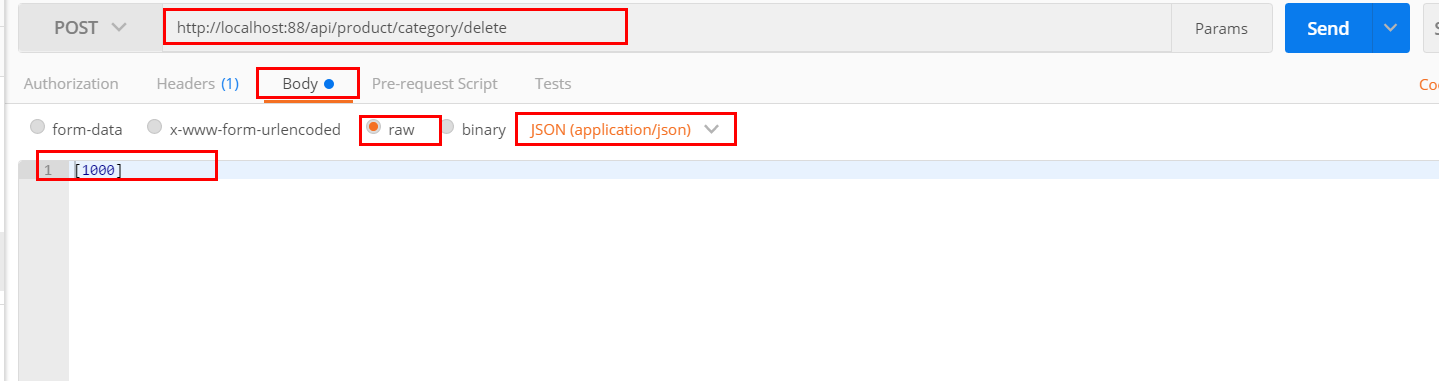
再次查询数据库能够看到cat_id为1000的数据已经被删除了。
修改“com.bigdata.gulimall.product.controller.CategoryController”类,添加如下代码:
 @RequestMapping("/delete")
    public R delete(@RequestBody Long[] catIds){
        //删除之前需要判断待删除的菜单那是否被别的地方所引用。
//        categoryService.removeByIds(Arrays.asList(catIds));

        categoryService.removeMenuByIds(Arrays.asList(catIds));
        return R.ok();
    }
com.bigdata.gulimall.product.service.impl.CategoryServiceImpl
    @Override
    public   void removeMenuByIds(List<Long> asList) {
        //TODO 检查当前的菜单是否被别的地方所引用
        categoryDao.deleteBatchIds(asList);
    }
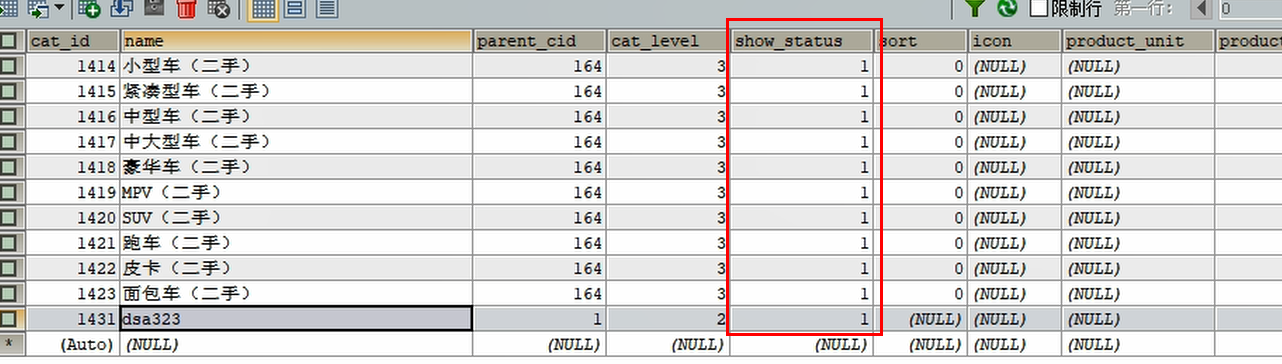
然而多数时候,我们并不希望删除数据,而是标记它被删除了,这就是逻辑删除;
可以设置show_status为0,标记它已经被删除。
mybatis-plus的逻辑删除:
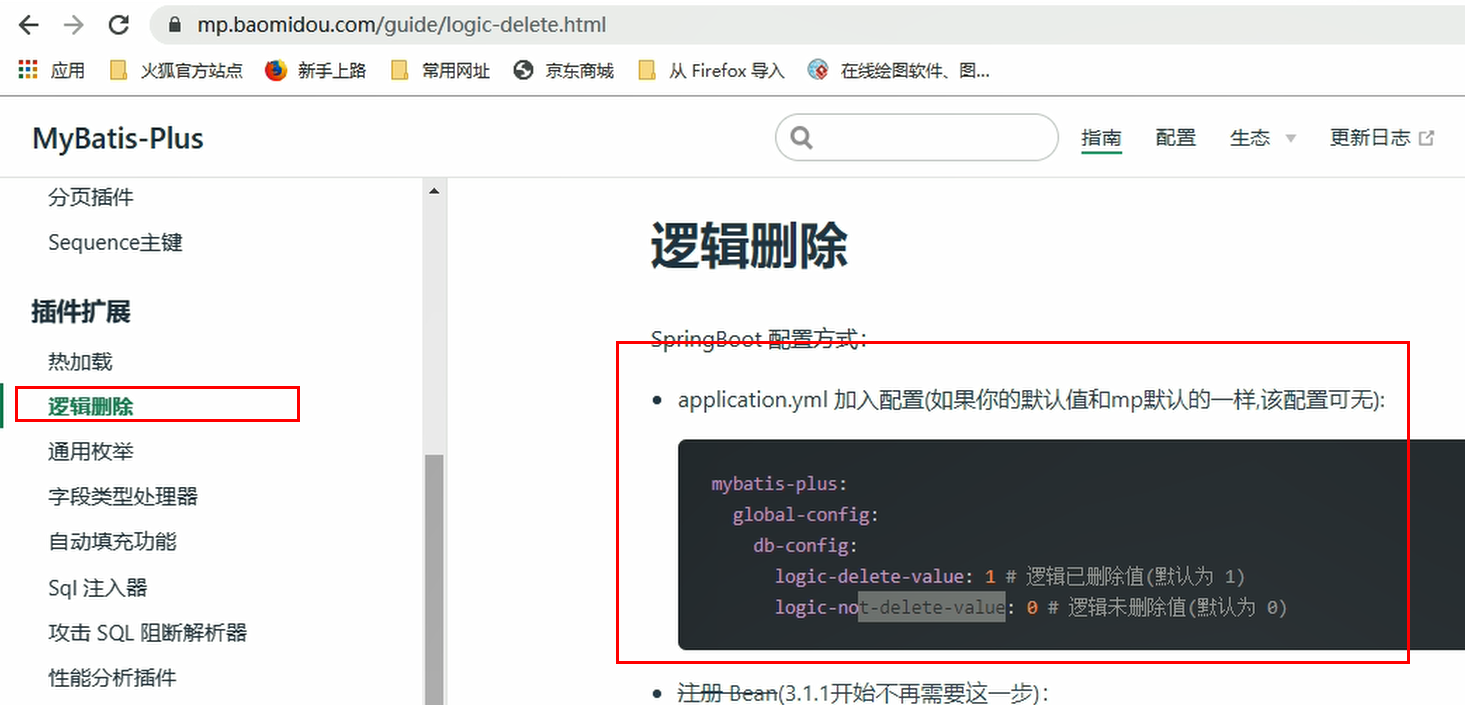
配置全局的逻辑删除规则,在“src/main/resources/application.yml”文件中添加如下内容:
mybatis-plus:
  global-config:
    db-config:
      id-type: auto
      logic-delete-value: 1
      logic-not-delete-value: 0
修改“com.bigdata.gulimall.product.entity.CategoryEntity”类,添加上@TableLogic,表明使用逻辑删除:
    /**
     * 是否显示[0-不显示,1显示]
     */
    @TableLogic(value = "1",delval = "0")
    private Integer showStatus;
然后在POSTMan中测试一下是否能够满足需要。另外在“src/main/resources/application.yml”文件中,设置日志级别,打印出SQL语句:
logging:
  level:
    com.bigdata.gulimall.product: debug
打印的日志:
 ==>  Preparing: UPDATE pms_category SET show_status=0 WHERE cat_id IN ( ? ) AND show_status=1
 ==> Parameters: 1431(Long)
 <==    Updates: 1
 get changedGroupKeys:[]
16. 菜单拖动
| 同一个菜单内拖动 | 正常 |
| 拖动到父菜单的前面或后面 | 正常 |
| 拖动到父菜单同级的另外一个菜单中 | 正常 |
关注的焦点在于,拖动到目标节点中,使得目标节点的catlevel+deep小于3即可。拖动到目标节点前后的条件是,使得
拖动菜单时需要修改顺序和级别
需要考虑两种类型节点的catLevel
一种关系是:如果是同一个节点下的子节点的前后移动,则不需要修改其catLevel
如果是拖动到另外一个节点内或父节点中,则要考虑修改其catLevel
如果拖动到与父节点平级的节点关系中,则要将该拖动的节点的catLevel,设置为兄弟节点的Level,
先考虑parentCid还是先考虑catLevel?
两种关系在耦合
另外还有一种是前后拖动的情况
哪个范围最大?
肯定是拖动类型关系最大,
如果是前后拖动,则拖动后需要看待拖动节点的层级和设置待拖动节点的parentId,
   如果待拖动节点和目标节点的层级相同,则认为是同级拖动,只需要修改节点的先后顺序即可;

   否则认为是跨级拖动,则需要修改层级和重新设置parentID

          如果

  以拖动类型来分,并不合适,比较合适的是跨级拖动和同级拖动
如何判断是跨级拖动还是同级拖动,根据拖动的层级来看,如果是同一级的拖动,只需要修改先后顺序即可,但是这样也会存在一个问题,就是当拖动到另外一个分组下的同级目录中,显然也需要修改parentID,究竟什么样的模型最好呢?
另外也可以判断在跨级移动时,跨级后的parentID是否相同,如果不相同,则认为是在不同目录下的跨级移动需要修改parentID。
顺序、catLevel和parentID
同级移动:
(1)首先判断待移动节点和目标节点的catLevel是否相同,
(2)相同则认为是同级移动,
      如果此时移动后目标节点的parentID和待移动节点的相同,但是移动类型是前后移动,只需要调整顺序即可,此时移动类型是inner,则需要修改catLevel和parentId和顺序

     如果此时移动后目标节点的parentID和待移动节点的不相同,但是移动类型是前后移动,则需要调整顺序和parentId,此时移动类型是inner,则需要修改catLevel和parentId和顺序
通过这两步的操作能看到一些共性,如果抽取移动类型作为大的分类,则在这种分类下,
如果是前后移动,则分为下面几种情况:
同级别下的前后移动:界定标准为catLevel相同,但是又可以分为parentID相同和parentID不同,parent相同时,只需要修改顺序即可;parentID不同时,需要修改parentID和顺序

不同级别下的前后移动:界定标准为catLevel不同,此时无论如何都要修改parentID,顺序和catLevel
如果是inner类型移动,则分为一下的几种情况。
此时不论是同级inner,还是跨级innner,都需要修改parentID,顺序和catLevel
哪种情况需要更新子节点呢?
那就要看要拖拽的节点是否含有子节点,如果有子节点,则需要更新子节点的catLevel,不需要更新它之间的顺序和parentId,只需要更新catLevel即可。这种更新子节点的Level应该归类,目前的目标是只要有子节点就更新它的catLevel,
(2)如果待移动节点和目标节点的catLevel不同,则认为是跨级移动。如果是移动到父节点中,则需要设置catLevel,parentID和顺序。此时需要分两种情况来考虑,如果是移动到父节点中,则需要设置catLevel,parentID和顺序,如果是移动到兄弟节点中,则需要设置
包含移动到父节点同级目录,兄弟节点中。
设置菜单拖动开关
<el-switch v-model="draggable" active-text="开启拖拽" inactive-text="关闭拖拽"></el-switch>
但是现在存在的一个问题是每次拖拽的时候,都会发送请求,更新数据库这样频繁的与数据库交互,现在想要实现一个拖拽过程中不更新数据库,拖拽完成后,统一提交拖拽后的数据。
现在还存在一个问题,如果是将一个菜单连续的拖拽,最终还放到了原来的位置,但是updateNode中却出现了很多节点更新信息,这样显然也是一个问题。
批量删除
<el-button type="danger" plain size="small" @click="batchDelete">批量删除</el-button>
 //批量删除
    batchDelete() {
      let checkNodes = this.$refs.menuTree.getCheckedNodes();

      //  console.log("被选中的节点:",checkNodes);

      let catIds = [];
      for (let i = 0; i < checkNodes.length; i++) {
        catIds.push(checkNodes[i].catId);
      }

      this.$confirm(`确定要删除?`, "提示", {
        confirmButtonText: "确定",
        cancelButtonText: "取消",
        type: "warning"
      })
        .then(() => {
          this.$http({
            url: this.$http.adornUrl("/product/category/delete"),
            method: "post",
            data: this.$http.adornData(catIds, false)
          }).then(({ data }) => {
            this.$message({
              message: "菜单批量删除成功",
              type: "success"
            });

            //重新刷新页面
            this.getMeus();
          });


        })
        .catch(() => {
          //取消删除
        });
    },
17. 品牌管理菜单
(2)将“”逆向工程得到的resources\src\views\modules\product文件拷贝到gulimall/renren-fast-vue/src/views/modules/product目录下,也就是下面的两个文件
brand.vue brand-add-or-update.vue
但是显示的页面没有新增和删除功能,这是因为权限控制的原因,

<el-button v-if="isAuth('product:brand:save')" type="primary" @click="addOrUpdateHandle()">新增</el-button>
<el-button v-if="isAuth('product:brand:delete')" type="danger" @click="deleteHandle()" :disabled="dataListSelections.length <= 0">批量删除</el-button>
查看“isAuth”的定义位置:

它是在“index.js”中定义,现在将它设置为返回值为true,即可显示添加和删除功能。
再次刷新页面能够看到,按钮已经出现了:
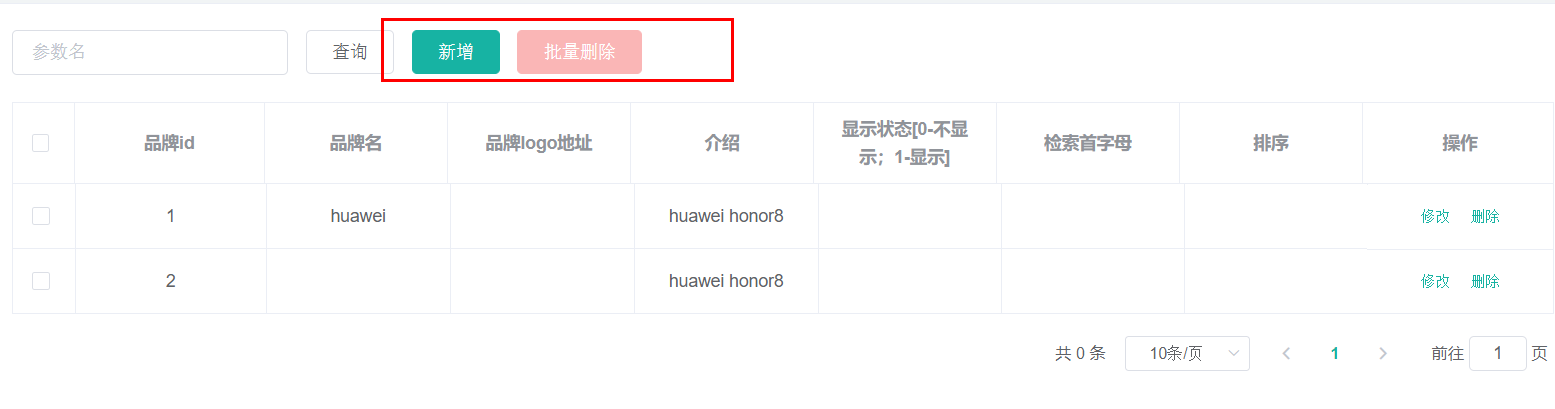
添加“显示状态按钮”
brand.vue
<template slot-scope="scope">
  <el-switch
    v-model="scope.row.showStatus"
    active-color="#13ce66"
    inactive-color="#ff4949"
    @change="updateBrandStatus(scope.row)"
    :active-value = "1"
    :inactive-value    = "0"
  ></el-switch>
</template>
brand-add-or-update.vue
 <el-form-item label="显示状态" prop="showStatus">
    <el-switch v-model="dataForm.showStatus" active-color="#13ce66" inactive-color="#ff4949"></el-switch>
 </el-form-item>
//更新开关的状态
    updateBrandStatus(data) {
      console.log("最新状态", data);
      let {brandId,showStatus} = data;
      this.$http({
        url: this.$http.adornUrl("/product/brand/update"),
        method: "post",
        data: this.$http.adornData({brandId,showStatus}, false)
      }).then(({ data }) => {

        this.$message({
          message: "状态更新成功",
          type: "success"
        });

      });
    },
添加上传
和传统的单体应用不同,这里我们选择将数据上传到分布式文件服务器上。
这里我们选择将图片放置到阿里云上,使用对象存储。
阿里云上使使用对象存储方式:
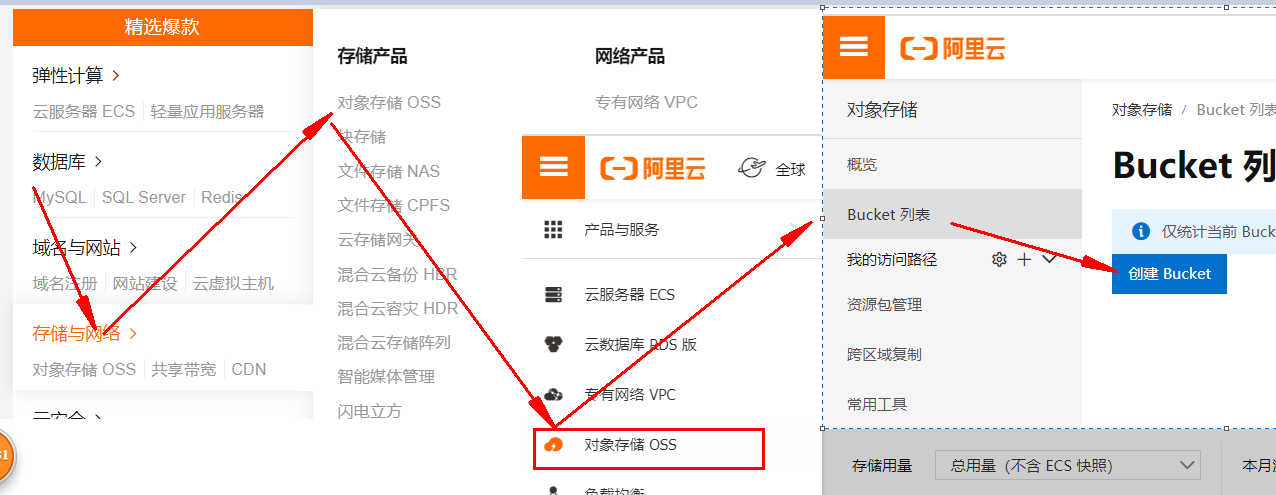
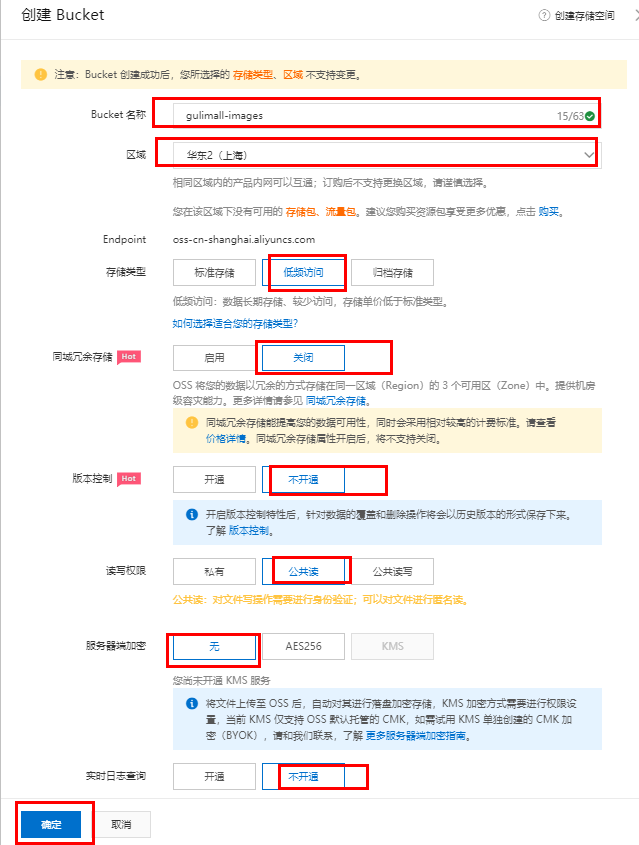
创建Bucket
上传文件:
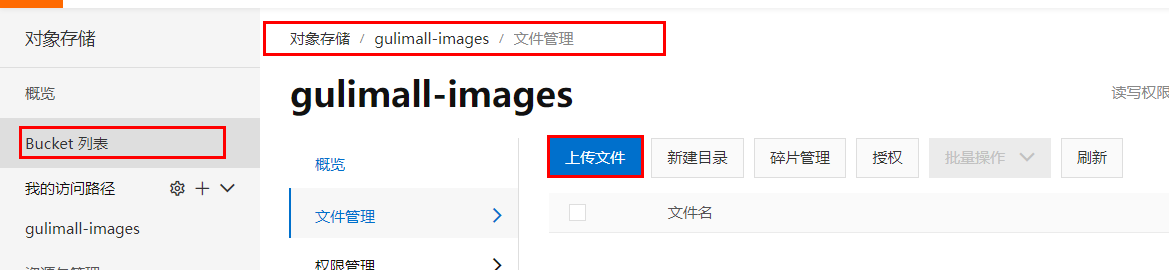
上传成功后,取得图片的URL

这种方式是手动上传图片,实际上我们可以在程序中设置自动上传图片到阿里云对象存储。
上传模型:
查看阿里云关于文件上传的帮助: https://help.aliyun.com/document_detail/32009.html?spm=a2c4g.11186623.6.768.549d59aaWuZMGJ
1)添加依赖包
在Maven项目中加入依赖项(推荐方式)
在 Maven 工程中使用 OSS Java SDK,只需在 pom.xml 中加入相应依赖即可。以 3.8.0 版本为例,在 内加入如下内容:
<dependency>
    <groupId>com.aliyun.oss</groupId>
    <artifactId>aliyun-sdk-oss</artifactId>
    <version>3.8.0</version>
</dependency>
2)上传文件流
以下代码用于上传文件流:
// Endpoint以杭州为例,其它Region请按实际情况填写。
String endpoint = "http://oss-cn-hangzhou.aliyuncs.com";
// 云账号AccessKey有所有API访问权限,建议遵循阿里云安全最佳实践,创建并使用RAM子账号进行API访问或日常运维,请登录 https://ram.console.aliyun.com 创建。
String accessKeyId = "<yourAccessKeyId>";
String accessKeySecret = "<yourAccessKeySecret>";

// 创建OSSClient实例。
OSS ossClient = new OSSClientBuilder().build(endpoint, accessKeyId, accessKeySecret);

// 上传文件流。
InputStream inputStream = new FileInputStream("<yourlocalFile>");
ossClient.putObject("<yourBucketName>", "<yourObjectName>", inputStream);

// 关闭OSSClient。
ossClient.shutdown();
endpoint的取值:

accessKeyId和accessKeySecret需要创建一个RAM账号:
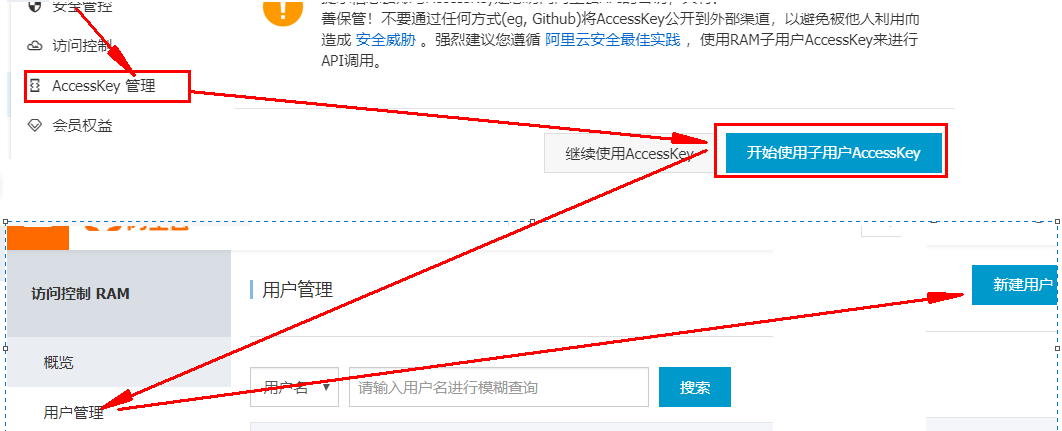
创建用户完毕后,会得到一个“AccessKey ID”和“AccessKeySecret”,然后复制这两个值到代码的“AccessKey ID”和“AccessKeySecret”。
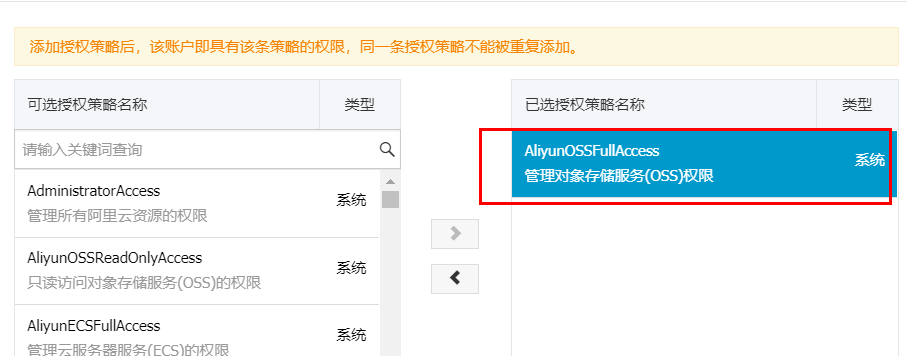
另外还需要添加访问控制权限:
@Test
    public void testUpload() throws FileNotFoundException {
        // Endpoint以杭州为例,其它Region请按实际情况填写。
        String endpoint = "oss-cn-shanghai.aliyuncs.com";
        // 云账号AccessKey有所有API访问权限,建议遵循阿里云安全最佳实践,创建并使用RAM子账号进行API访问或日常运维,请登录 https://ram.console.aliyun.com 创建。
        String accessKeyId = "LTAI4G4W1RA4JXz2QhoDwHhi";
        String accessKeySecret = "R99lmDOJumF2x43ZBKT259Qpe70Oxw";

        // 创建OSSClient实例。
        OSS ossClient = new OSSClientBuilder().build(endpoint, accessKeyId, accessKeySecret);

        // 上传文件流。
        InputStream inputStream = new FileInputStream("C:\\Users\\Administrator\\Pictures\\timg.jpg");
        ossClient.putObject("gulimall-images", "time.jpg", inputStream);

        // 关闭OSSClient。
        ossClient.shutdown();
        System.out.println("上传成功.");
    }
更为简单的使用方式,是使用SpringCloud Alibaba
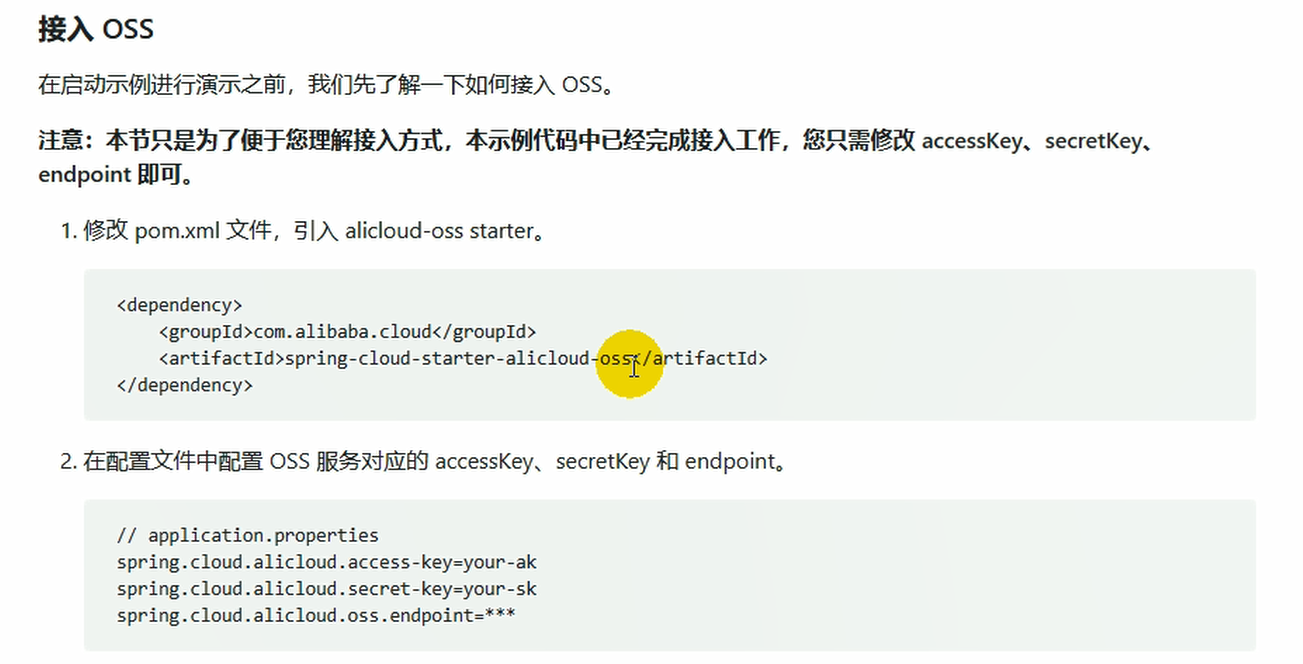
详细使用方法,见: https://help.aliyun.com/knowledge_detail/108650.html
(1)添加依赖
        <dependency>
            <groupId>com.alibaba.cloud</groupId>
            <artifactId>spring-cloud-starter-alicloud-oss</artifactId>
            <version>2.2.0.RELEASE</version>
        </dependency>
(2)创建“AccessKey ID”和“AccessKeySecret”
(3)配置key,secret和endpoint相关信息
      access-key: LTAI4G4W1RA4JXz2QhoDwHhi
      secret-key: R99lmDOJumF2x43ZBKT259Qpe70Oxw
      oss:
        endpoint: oss-cn-shanghai.aliyuncs.com
(4)注入OSSClient并进行文件上传下载等操作
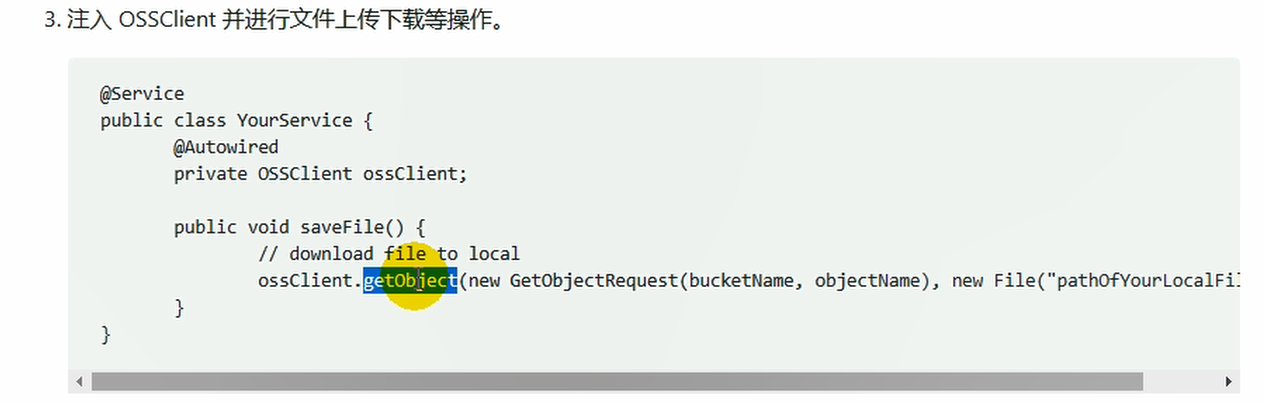
但是这样来做还是比较麻烦,如果以后的上传任务都交给gulimall-product来完成,显然耦合度高。最好单独新建一个Module来完成文件上传任务。
其他方式
1)新建gulimall-third-party
2)添加依赖,将原来gulimall-common中的“spring-cloud-starter-alicloud-oss”依赖移动到该项目中
        <dependency>
            <groupId>com.alibaba.cloud</groupId>
            <artifactId>spring-cloud-starter-alicloud-oss</artifactId>
            <version>2.2.0.RELEASE</version>
        </dependency>

        <dependency>
            <groupId>com.bigdata.gulimall</groupId>
            <artifactId>gulimall-common</artifactId>
            <version>1.0-SNAPSHOT</version>
            <exclusions>
                <exclusion>
                    <groupId>com.baomidou</groupId>
                    <artifactId>mybatis-plus-boot-starter</artifactId>
                </exclusion>
            </exclusions>
        </dependency>
另外也需要在“pom.xml”文件中,添加如下的依赖管理
<dependencyManagement>

        <dependencies>
            <dependency>
                <groupId>org.springframework.cloud</groupId>
                <artifactId>spring-cloud-dependencies</artifactId>
                <version>${spring-cloud.version}</version>
                <type>pom</type>
                <scope>import</scope>
            </dependency>
            <dependency>
                <groupId>com.alibaba.cloud</groupId>
                <artifactId>spring-cloud-alibaba-dependencies</artifactId>
                <version>2.2.1.RELEASE</version>
                <type>pom</type>
                <scope>import</scope>
            </dependency>
        </dependencies>
    </dependencyManagement>
3)在主启动类中开启服务的注册和发现
@EnableDiscoveryClient
4)在nacos中注册
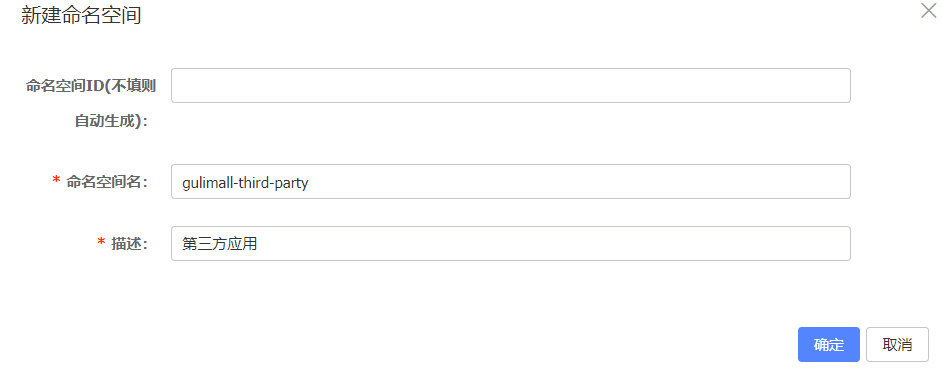
(1)创建命名空间“ gulimall-third-party ”
(2)在“ gulimall-third-party”命名空间中,创建“ gulimall-third-party.yml”文件
spring:
  cloud:
    alicloud:
      access-key: LTAI4G4W1RA4JXz2QhoDwHhi
      secret-key: R99lmDOJumF2x43ZBKT259Qpe70Oxw
      oss:
        endpoint: oss-cn-shanghai.aliyuncs.com
5)编写配置文件
application.yml
server:
  port: 30000

spring:
  application:
    name: gulimall-third-party
  cloud:
    nacos:
      discovery:
        server-addr: 192.168.137.14:8848

logging:
  level:
    com.bigdata.gulimall.product: debug
bootstrap.properties
spring.cloud.nacos.config.name=gulimall-third-party
spring.cloud.nacos.config.server-addr=192.168.137.14:8848
spring.cloud.nacos.config.namespace=f995d8ee-c53a-4d29-8316-a1ef54775e00
spring.cloud.nacos.config.extension-configs[0].data-id=gulimall-third-party.yml
spring.cloud.nacos.config.extension-configs[0].group=DEFAULT_GROUP
spring.cloud.nacos.config.extension-configs[0].refresh=true
6) 编写测试类
package com.bigdata.gulimall.thirdparty;

import com.aliyun.oss.OSS;
import com.aliyun.oss.OSSClient;
import com.aliyun.oss.OSSClientBuilder;
import org.junit.jupiter.api.Test;
import org.springframework.beans.factory.annotation.Autowired;
import org.springframework.boot.test.context.SpringBootTest;

import java.io.FileInputStream;
import java.io.FileNotFoundException;
import java.io.InputStream;

@SpringBootTest
class GulimallThirdPartyApplicationTests {


    @Autowired
    OSSClient ossClient;

    @Test
    public void testUpload() throws FileNotFoundException {
        // Endpoint以杭州为例,其它Region请按实际情况填写。
        String endpoint = "oss-cn-shanghai.aliyuncs.com";
        // 云账号AccessKey有所有API访问权限,建议遵循阿里云安全最佳实践,创建并使用RAM子账号进行API访问或日常运维,请登录 https://ram.console.aliyun.com 创建。
        String accessKeyId = "LTAI4G4W1RA4JXz2QhoDwHhi";
        String accessKeySecret = "R99lmDOJumF2x43ZBKT259Qpe70Oxw";

        // 创建OSSClient实例。
        OSS ossClient = new OSSClientBuilder().build(endpoint, accessKeyId, accessKeySecret);

         //上传文件流。
        InputStream inputStream = new FileInputStream("C:\\Users\\Administrator\\Pictures\\timg.jpg");
        ossClient.putObject("gulimall-images", "time3.jpg", inputStream);

        // 关闭OSSClient。
        ossClient.shutdown();
        System.out.println("上传成功.");
    }

}
https://help.aliyun.com/document_detail/31926.html?spm=a2c4g.11186623.6.1527.228d74b8V6IZuT
背景
采用JavaScript客户端直接签名(参见JavaScript客户端签名直传)时,AccessKeyID和AcessKeySecret会暴露在前端页面,因此存在严重的安全隐患。因此,OSS提供了服务端签名后直传的方案。
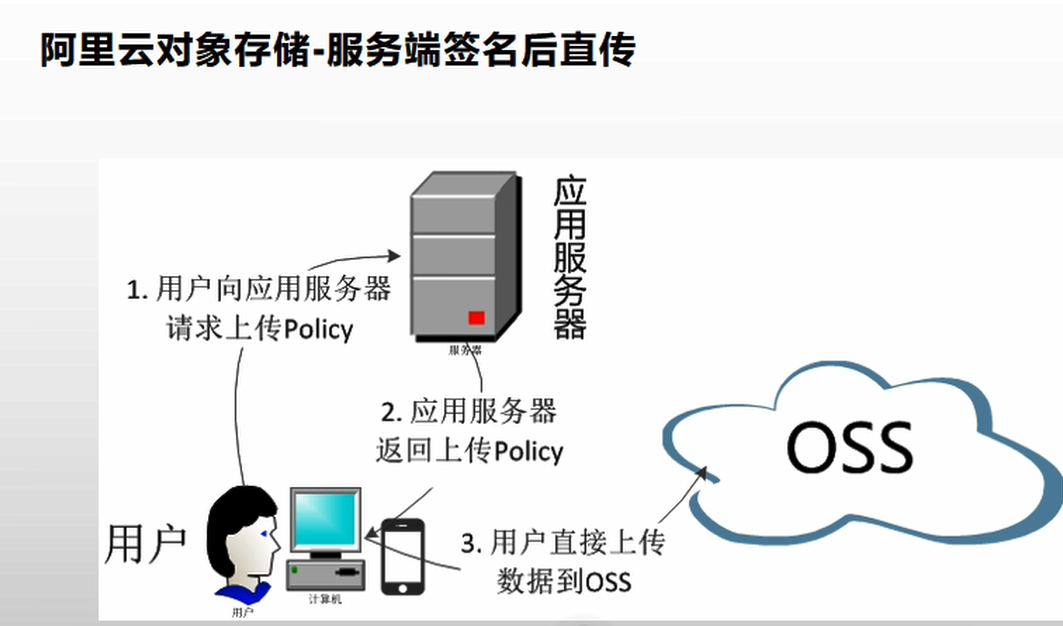
原理介绍

服务端签名后直传的原理如下:
- 用户发送上传Policy请求到应用服务器。
- 应用服务器返回上传Policy和签名给用户。
- 用户直接上传数据到OSS。
编写“com.bigdata.gulimall.thirdparty.controller.OssController”类:
package com.bigdata.gulimall.thirdparty.controller;

import com.aliyun.oss.OSS;
import com.aliyun.oss.common.utils.BinaryUtil;
import com.aliyun.oss.model.MatchMode;
import com.aliyun.oss.model.PolicyConditions;
import org.springframework.beans.factory.annotation.Autowired;
import org.springframework.beans.factory.annotation.Value;
import org.springframework.web.bind.annotation.RequestMapping;
import org.springframework.web.bind.annotation.RestController;

import java.text.SimpleDateFormat;
import java.util.Date;
import java.util.LinkedHashMap;
import java.util.Map;

@RestController
public class OssController {

    @Autowired
    OSS ossClient;
    @Value ("${spring.cloud.alicloud.oss.endpoint}")
    String endpoint ;

    @Value("${spring.cloud.alicloud.oss.bucket}")
    String bucket ;

    @Value("${spring.cloud.alicloud.access-key}")
    String accessId ;
    @Value("${spring.cloud.alicloud.secret-key}")
    String accessKey ;
    @RequestMapping("/oss/policy")
    public Map<String, String> policy(){

        String host = "https://" + bucket + "." + endpoint; // host的格式为 bucketname.endpoint

        String format = new SimpleDateFormat("yyyy-MM-dd").format(new Date());
        String dir = format; // 用户上传文件时指定的前缀。

        Map<String, String> respMap=null;
        try {
            long expireTime = 30;
            long expireEndTime = System.currentTimeMillis() + expireTime * 1000;
            Date expiration = new Date(expireEndTime);
            PolicyConditions policyConds = new PolicyConditions();
            policyConds.addConditionItem(PolicyConditions.COND_CONTENT_LENGTH_RANGE, 0, 1048576000);
            policyConds.addConditionItem(MatchMode.StartWith, PolicyConditions.COND_KEY, dir);

            String postPolicy = ossClient.generatePostPolicy(expiration, policyConds);
            byte[] binaryData = postPolicy.getBytes("utf-8");
            String encodedPolicy = BinaryUtil.toBase64String(binaryData);
            String postSignature = ossClient.calculatePostSignature(postPolicy);

            respMap= new LinkedHashMap<String, String>();
            respMap.put("accessid", accessId);
            respMap.put("policy", encodedPolicy);
            respMap.put("signature", postSignature);
            respMap.put("dir", dir);
            respMap.put("host", host);
            respMap.put("expire", String.valueOf(expireEndTime / 1000));

        } catch (Exception e) {
            // Assert.fail(e.getMessage());
            System.out.println(e.getMessage());
        } finally {
            ossClient.shutdown();
        }
        return respMap;
    }
}
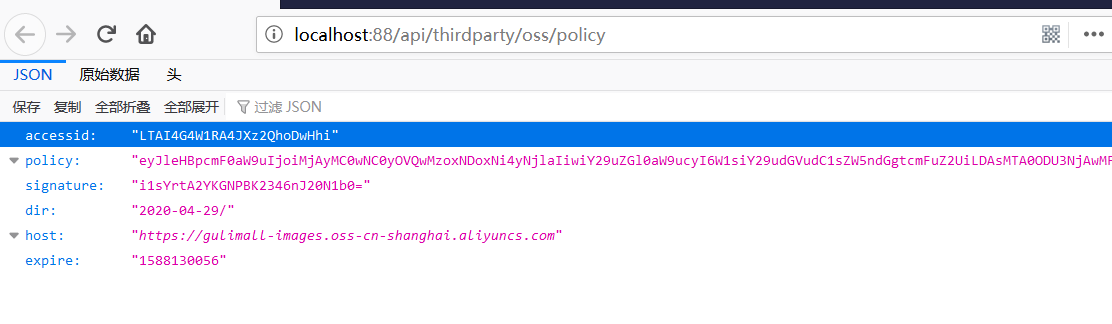
测试: http://localhost:30000/oss/policy
{"accessid":"LTAI4G4W1RA4JXz2QhoDwHhi","policy":"eyJleHBpcmF0aW9uIjoiMjAyMC0wNC0yOVQwMjo1ODowNy41NzhaIiwiY29uZGl0aW9ucyI6W1siY29udGVudC1sZW5ndGgtcmFuZ2UiLDAsMTA0ODU3NjAwMF0sWyJzdGFydHMtd2l0aCIsIiRrZXkiLCIyMDIwLTA0LTI5LyJdXX0=","signature":"s42iRxtxGFmHyG40StM3d9vOfFk=","dir":"2020-04-29/","host":"https://gulimall-images.oss-cn-shanghai.aliyuncs.com","expire":"1588129087"}
以后在上传文件时的访问路径为“ http://localhost:88/api/thirdparty/oss/policy”,
在“gulimall-gateway”中配置路由规则:
        - id: third_party_route
          uri: lb://gulimall-gateway
          predicates:
            - Path=/api/thirdparty/**
          filters:
            - RewritePath=/api/thirdparty/(?<segment>/?.*),/$\{segment}
测试是否能够正常跳转: http://localhost:88/api/thirdparty/oss/policy
上传组件
放置项目提供的upload文件夹到components目录下,一个是单文件上传,另外一个是多文件上传
PS D:\Project\gulimall\renren-fast-vue\src\components\upload> ls


    目录: D:\Project\gulimall\renren-fast-vue\src\components\upload


Mode                LastWriteTime         Length Name
----                -------------         ------ ----
-a----  2020/4/29 星期三     12:0           3122 multiUpload.vue
                                2
-a----  2019/11/11 星期一     21:            343 policy.js
                               20
-a----  2020/4/29 星期三     12:0           3053 singleUpload.vue
                                1


PS D:\Project\gulimall\renren-fast-vue\src\components\upload>
修改这两个文件的配置后
开始执行上传,但是在上传过程中,出现了如下的问题:

Access to XMLHttpRequest at 'http://gulimall-images.oss-cn-shanghai.aliyuncs.com/' from origin 'http://localhost:8001' has been blocked by CORS policy: Response to preflight request doesn't pass access control check: No 'Access-Control-Allow-Origin' header is present on the requested resource.
这又是一个跨域的问题,解决方法就是在阿里云上开启跨域访问:
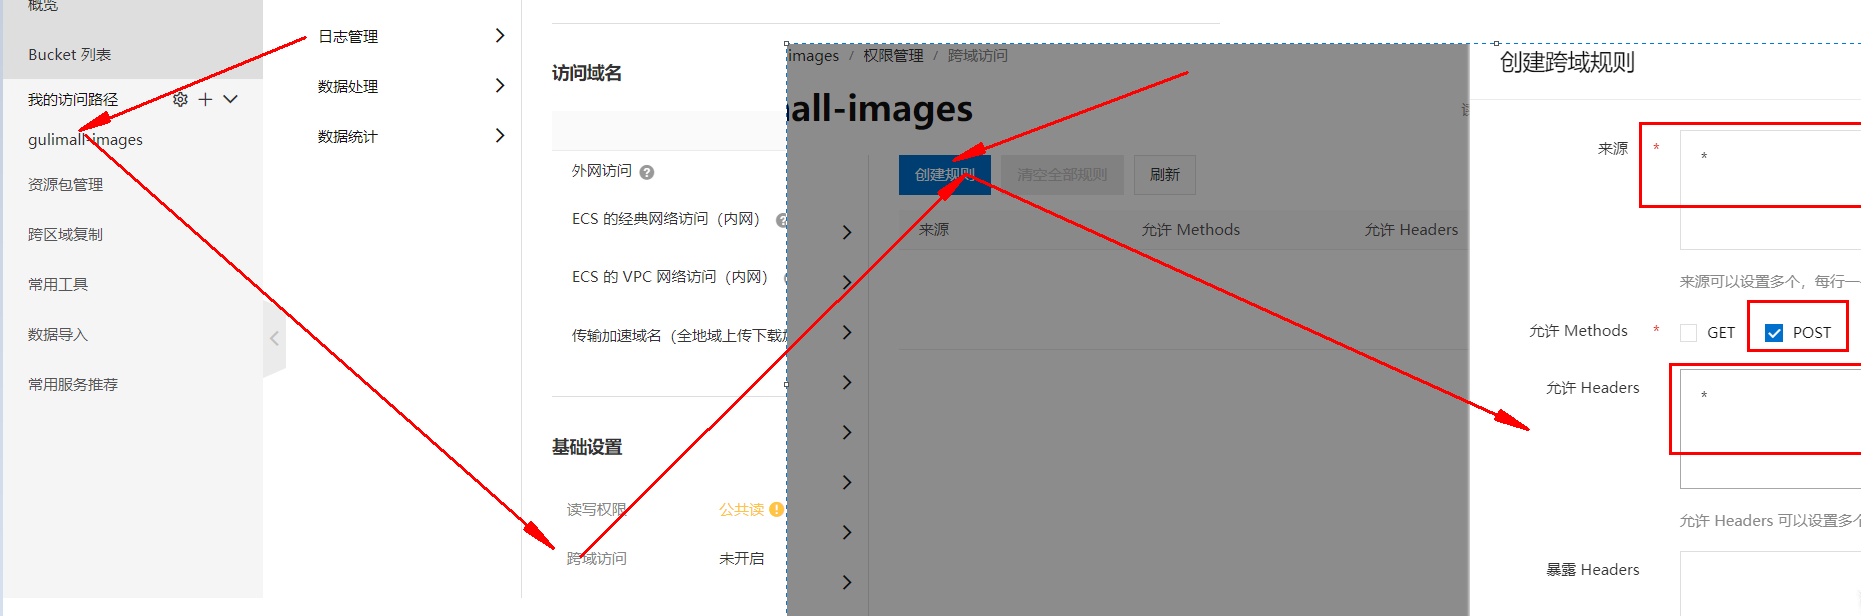
再次执行文件上传。
18. JSR303校验
步骤1:使用校验注解
在Java中提供了一系列的校验方式,它这些校验方式在“javax.validation.constraints”包中,提供了如@Email,@NotNull等注解。
在非空处理方式上提供了@NotNull,@Blank和@
(1)@NotNull
The annotated element must not be null. Accepts any type.
注解元素禁止为null,能够接收任何类型
(2)@NotEmpty
the annotated element must not be null nor empty.
该注解修饰的字段不能为null或””
Supported types are:
支持以下几种类型
CharSequence (length of character sequence is evaluated)
字符序列(字符序列长度的计算)
Collection (collection size is evaluated)
集合长度的计算
Map (map size is evaluated)
map长度的计算
Array (array length is evaluated)
数组长度的计算
(3)@NotBlank
The annotated element must not be null and must contain at least one non-whitespace character. Accepts CharSequence.
该注解不能为null,并且至少包含一个非空白字符。接收字符序列。
步骤2:在请求方法种,使用校验注解@Valid,开启校验,
    @RequestMapping("/save")
    public R save(@Valid @RequestBody BrandEntity brand){
        brandService.save(brand);

        return R.ok();
    }
测试: http://localhost:88/api/product/brand/save
在postman种发送上面的请求
{
    "timestamp": "2020-04-29T09:20:46.383+0000",
    "status": 400,
    "error": "Bad Request",
    "errors": [
        {
            "codes": [
                "NotBlank.brandEntity.name",
                "NotBlank.name",
                "NotBlank.java.lang.String",
                "NotBlank"
            ],
            "arguments": [
                {
                    "codes": [
                        "brandEntity.name",
                        "name"
                    ],
                    "arguments": null,
                    "defaultMessage": "name",
                    "code": "name"
                }
            ],
            "defaultMessage": "不能为空",
            "objectName": "brandEntity",
            "field": "name",
            "rejectedValue": "",
            "bindingFailure": false,
            "code": "NotBlank"
        }
    ],
    "message": "Validation failed for object='brandEntity'. Error count: 1",
    "path": "/product/brand/save"
}
能够看到”defaultMessage”: “不能为空”,这些错误消息定义在“hibernate-validator”的“\org\hibernate\validator\ValidationMessages_zh_CN.properties”文件中。在该文件中定义了很多的错误规则:
javax.validation.constraints.AssertFalse.message     = 只能为false
javax.validation.constraints.AssertTrue.message      = 只能为true
javax.validation.constraints.DecimalMax.message      = 必须小于或等于{value}
javax.validation.constraints.DecimalMin.message      = 必须大于或等于{value}
javax.validation.constraints.Digits.message          = 数字的值超出了允许范围(只允许在{integer}位整数和{fraction}位小数范围内)
javax.validation.constraints.Email.message           = 不是一个合法的电子邮件地址
javax.validation.constraints.Future.message          = 需要是一个将来的时间
javax.validation.constraints.FutureOrPresent.message = 需要是一个将来或现在的时间
javax.validation.constraints.Max.message             = 最大不能超过{value}
javax.validation.constraints.Min.message             = 最小不能小于{value}
javax.validation.constraints.Negative.message        = 必须是负数
javax.validation.constraints.NegativeOrZero.message  = 必须是负数或零
javax.validation.constraints.NotBlank.message        = 不能为空
javax.validation.constraints.NotEmpty.message        = 不能为空
javax.validation.constraints.NotNull.message         = 不能为null
javax.validation.constraints.Null.message            = 必须为null
javax.validation.constraints.Past.message            = 需要是一个过去的时间
javax.validation.constraints.PastOrPresent.message   = 需要是一个过去或现在的时间
javax.validation.constraints.Pattern.message         = 需要匹配正则表达式"{regexp}"
javax.validation.constraints.Positive.message        = 必须是正数
javax.validation.constraints.PositiveOrZero.message  = 必须是正数或零
javax.validation.constraints.Size.message            = 个数必须在{min}和{max}之间

org.hibernate.validator.constraints.CreditCardNumber.message        = 不合法的信用卡号码
org.hibernate.validator.constraints.Currency.message                = 不合法的货币 (必须是{value}其中之一)
org.hibernate.validator.constraints.EAN.message                     = 不合法的{type}条形码
org.hibernate.validator.constraints.Email.message                   = 不是一个合法的电子邮件地址
org.hibernate.validator.constraints.Length.message                  = 长度需要在{min}和{max}之间
org.hibernate.validator.constraints.CodePointLength.message         = 长度需要在{min}和{max}之间
org.hibernate.validator.constraints.LuhnCheck.message               = ${validatedValue}的校验码不合法, Luhn模10校验和不匹配
org.hibernate.validator.constraints.Mod10Check.message              = ${validatedValue}的校验码不合法, 模10校验和不匹配
org.hibernate.validator.constraints.Mod11Check.message              = ${validatedValue}的校验码不合法, 模11校验和不匹配
org.hibernate.validator.constraints.ModCheck.message                = ${validatedValue}的校验码不合法, ${modType}校验和不匹配
org.hibernate.validator.constraints.NotBlank.message                = 不能为空
org.hibernate.validator.constraints.NotEmpty.message                = 不能为空
org.hibernate.validator.constraints.ParametersScriptAssert.message  = 执行脚本表达式"{script}"没有返回期望结果
org.hibernate.validator.constraints.Range.message                   = 需要在{min}和{max}之间
org.hibernate.validator.constraints.SafeHtml.message                = 可能有不安全的HTML内容
org.hibernate.validator.constraints.ScriptAssert.message            = 执行脚本表达式"{script}"没有返回期望结果
org.hibernate.validator.constraints.URL.message                     = 需要是一个合法的URL

org.hibernate.validator.constraints.time.DurationMax.message        = 必须小于${inclusive == true ? '或等于' : ''}${days == 0 ? '' : days += '天'}${hours == 0 ? '' : hours += '小时'}${minutes == 0 ? '' : minutes += '分钟'}${seconds == 0 ? '' : seconds += '秒'}${millis == 0 ? '' : millis += '毫秒'}${nanos == 0 ? '' : nanos += '纳秒'}
org.hibernate.validator.constraints.time.DurationMin.message        = 必须大于${inclusive == true ? '或等于' : ''}${days == 0 ? '' : days += '天'}${hours == 0 ? '' : hours += '小时'}${minutes == 0 ? '' : minutes += '分钟'}${seconds == 0 ? '' : seconds += '秒'}${millis == 0 ? '' : millis += '毫秒'}${nanos == 0 ? '' : nanos += '纳秒'}
想要自定义错误消息,可以覆盖默认的错误提示信息,如@NotBlank的默认message是
public @interface NotBlank {

    String message() default "{javax.validation.constraints.NotBlank.message}";
可以在添加注解的时候,修改message:
    @NotBlank(message = "品牌名必须非空")
    private String name;
当再次发送请求时,得到的错误提示信息:
{
    "timestamp": "2020-04-29T09:36:04.125+0000",
    "status": 400,
    "error": "Bad Request",
    "errors": [
        {
            "codes": [
                "NotBlank.brandEntity.name",
                "NotBlank.name",
                "NotBlank.java.lang.String",
                "NotBlank"
            ],
            "arguments": [
                {
                    "codes": [
                        "brandEntity.name",
                        "name"
                    ],
                    "arguments": null,
                    "defaultMessage": "name",
                    "code": "name"
                }
            ],
            "defaultMessage": "品牌名必须非空",
            "objectName": "brandEntity",
            "field": "name",
            "rejectedValue": "",
            "bindingFailure": false,
            "code": "NotBlank"
        }
    ],
    "message": "Validation failed for object='brandEntity'. Error count: 1",
    "path": "/product/brand/save"
}
但是这种返回的错误结果并不符合我们的业务需要。
步骤3:给校验的Bean后,紧跟一个BindResult,就可以获取到校验的结果。拿到校验的结果,就可以自定义的封装。
 @RequestMapping("/save")
    public R save(@Valid @RequestBody BrandEntity brand, BindingResult result){
        if( result.hasErrors()){
            Map<String,String> map=new HashMap<>();
            //1.获取错误的校验结果
            result.getFieldErrors().forEach((item)->{
                //获取发生错误时的message
                String message = item.getDefaultMessage();
                //获取发生错误的字段
                String field = item.getField();
                map.put(field,message);
            });
            return R.error(400,"提交的数据不合法").put("data",map);
        }else {

        }
        brandService.save(brand);

        return R.ok();
    }
这种是针对于该请求设置了一个内容校验,如果针对于每个请求都单独进行配置,显然不是太合适,实际上可以统一的对于异常进行处理。
步骤4:统一异常处理
可以使用SpringMvc所提供的@ControllerAdvice,通过“basePackages”能够说明处理哪些路径下的异常。
(1)抽取一个异常处理类
package com.bigdata.gulimall.product.exception;
import com.bigdata.common.utils.R;
import lombok.extern.slf4j.Slf4j;
import org.springframework.validation.BindingResult;
import org.springframework.web.bind.MethodArgumentNotValidException;
import org.springframework.web.bind.annotation.ControllerAdvice;
import org.springframework.web.bind.annotation.ExceptionHandler;
import org.springframework.web.bind.annotation.ResponseBody;
import org.springframework.web.bind.annotation.RestControllerAdvice;
import java.util.HashMap;
import java.util.Map;
/**
* 集中处理所有异常
*/
@Slf4j
@RestControllerAdvice(basePackages = "com.bigdata.gulimall.product.controller")
public class GulimallExceptionAdvice {
@ExceptionHandler(value = Exception.class)
public R handleValidException(MethodArgumentNotValidException exception){
Map<String,String> map=new HashMap<>();
BindingResult bindingResult = exception.getBindingResult();
bindingResult.getFieldErrors().forEach(fieldError -> {
String message = fieldError.getDefaultMessage();
String field = fieldError.getField();
map.put(field,message);
});
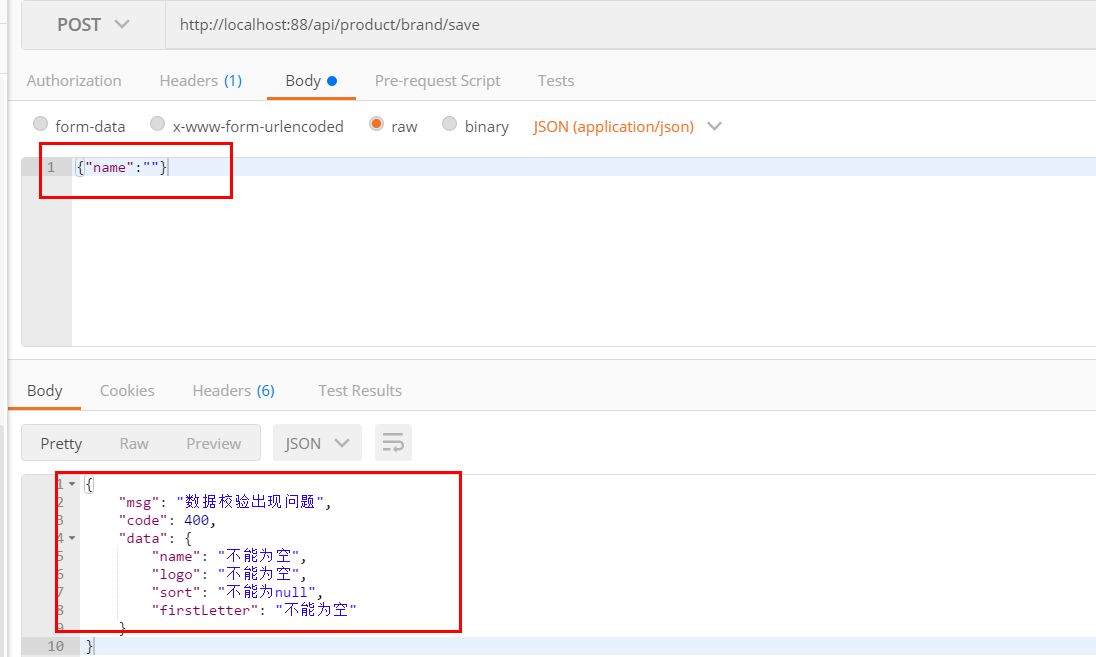
log.error("数据校验出现问题{},异常类型{}",exception.getMessage(),exception.getClass());
return R.error(400,"数据校验出现问题").put("data",map);
}
}
(2)测试: http://localhost:88/api/product/brand/save
(3)默认异常处理
   @ExceptionHandler(value = Throwable.class)
    public R handleException(Throwable throwable){
        log.error("未知异常{},异常类型{}",throwable.getMessage(),throwable.getClass());
        return R.error(BizCodeEnum.UNKNOW_EXEPTION.getCode(),BizCodeEnum.UNKNOW_EXEPTION.getMsg());
    }
(4)错误状态码
上面代码中,针对于错误状态码,是我们进行随意定义的,然而正规开发过程中,错误状态码有着严格的定义规则,如该在项目中我们的错误状态码定义

为了定义这些错误状态码,我们可以单独定义一个常量类,用来存储这些错误状态码
package com.bigdata.common.exception;
/***
* 错误码和错误信息定义类
* 1. 错误码定义规则为5为数字
* 2. 前两位表示业务场景,最后三位表示错误码。例如:100001。10:通用 001:系统未知异常
* 3. 维护错误码后需要维护错误描述,将他们定义为枚举形式
* 错误码列表:
* 10: 通用
* 001:参数格式校验
* 11: 商品
* 12: 订单
* 13: 购物车
* 14: 物流
*/
public enum BizCodeEnum {
UNKNOW_EXEPTION(10000,"系统未知异常"),
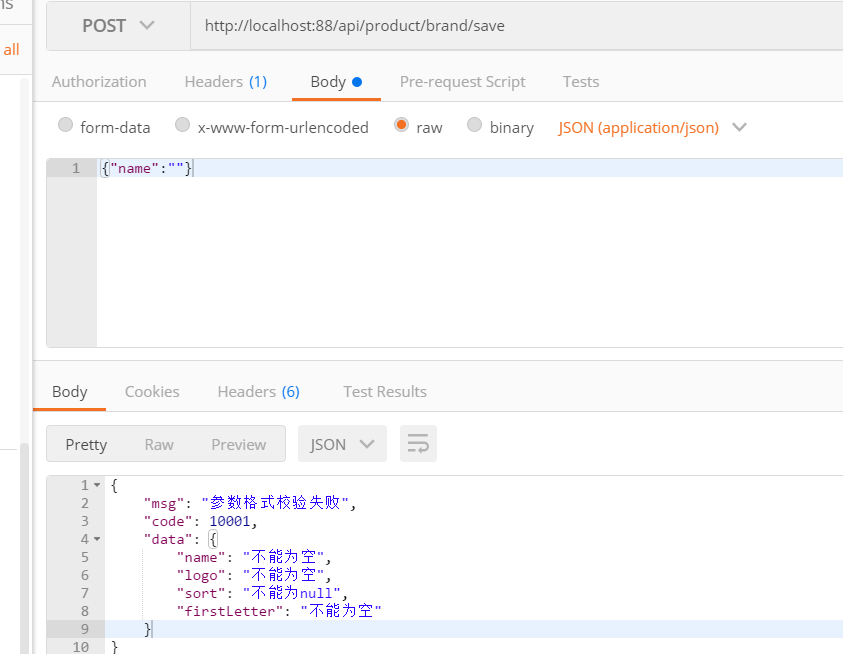
VALID_EXCEPTION( 10001,"参数格式校验失败");
private int code;
private String msg;
BizCodeEnum(int code, String msg) {
this.code = code;
this.msg = msg;
}
public int getCode() {
return code;
}
public String getMsg() {
return msg;
}
}
(5)测试: http://localhost:88/api/product/brand/save
19. 分组校验功能(完成多场景的复杂校验)
1、给校验注解,标注上groups,指定什么情况下才需要进行校验
如:指定在更新和添加的时候,都需要进行校验
    @NotEmpty
    @NotBlank(message = "品牌名必须非空",groups = {UpdateGroup.class,AddGroup.class})
    private String name;
在这种情况下,没有指定分组的校验注解,默认是不起作用的。想要起作用就必须要加groups。
2、业务方法参数上使用@Validated注解
@Validated的value方法:
Specify one or more validation groups to apply to the validation step kicked off by this annotation.
指定一个或多个验证组以应用于此注释启动的验证步骤。
JSR-303 defines validation groups as custom annotations which an application declares for the sole purpose of using
them as type-safe group arguments, as implemented in SpringValidatorAdapter.
JSR-303 将验证组定义为自定义注释,应用程序声明的唯一目的是将它们用作类型安全组参数,如 SpringValidatorAdapter 中实现的那样。
Other SmartValidator implementations may support class arguments in other ways as well.
其他SmartValidator 实现也可以以其他方式支持类参数。
3、默认情况下,在分组校验情况下,没有指定指定分组的校验注解,将不会生效,它只会在不分组的情况下生效。
20. 自定义校验功能
1、编写一个自定义的校验注解
@Documented
@Constraint(validatedBy = { ListValueConstraintValidator.class})
@Target({ METHOD, FIELD, ANNOTATION_TYPE, CONSTRUCTOR, PARAMETER, TYPE_USE })
@Retention(RUNTIME)
public @interface ListValue {
    String message() default "{com.bigdata.common.valid.ListValue.message}";

    Class<?>[] groups() default { };

    Class<? extends Payload>[] payload() default { };

    int[] value() default {};
}
2、编写一个自定义的校验器
public class ListValueConstraintValidator implements ConstraintValidator<ListValue,Integer> {
    private Set<Integer> set=new HashSet<>();
    @Override
    public void initialize(ListValue constraintAnnotation) {
        int[] value = constraintAnnotation.value();
        for (int i : value) {
            set.add(i);
        }

    }

    @Override
    public boolean isValid(Integer value, ConstraintValidatorContext context) {


        return  set.contains(value);
    }
}
3、关联自定义的校验器和自定义的校验注解
@Constraint(validatedBy = { ListValueConstraintValidator.class})
4、使用实例
    /**
     * 显示状态[0-不显示;1-显示]
     */
    @ListValue(value = {0,1},groups ={AddGroup.class})
    private Integer showStatus;
21. 商品SPU和SKU管理
重新执行“sys_menus.sql”
22. 点击子组件,父组件触发事件
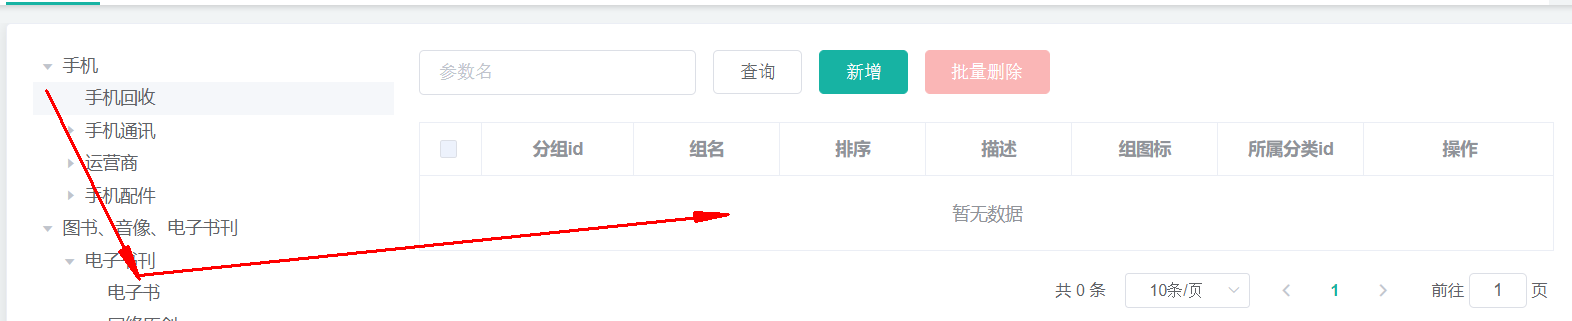
现在想要实现点击菜单的左边,能够实现在右边展示数据
父子组件传递数据:
1)子组件给父组件传递数据,事件机制;
在category中绑定node-click事件,
<el-tree :data="menus" :props="defaultProps" node-key="catId" ref="menuTree" @node-click="nodeClick" ></el-tree>
2)子组件给父组件发送一个事件,携带上数据;
    nodeClick(data,Node,component){
       console.log("子组件",data,Node,component);
       this.$emit("tree-node-click",data,Node,component);
    },
this.$emit(事件名,”携带的数据”);
3)父组件中的获取发送的事件
<category @tree-node-click="treeNodeClick"></category>
    //获取发送的事件数据
    treeNodeClick(data,Node,component){
     console.log("attgroup感知到的category的节点被点击",data,Node,component);
     console.log("刚才被点击的菜单ID",data.catId);
    },
23. 规格参数新增与VO
规格参数新增时,请求的URL:Request URL:
http://localhost:88/api/product/attr/base/list/0?t=1588731762158&page=1&limit=10&key=
当有新增字段时,我们往往会在entity实体类中新建一个字段,并标注数据库中不存在该字段,然而这种方式并不规范
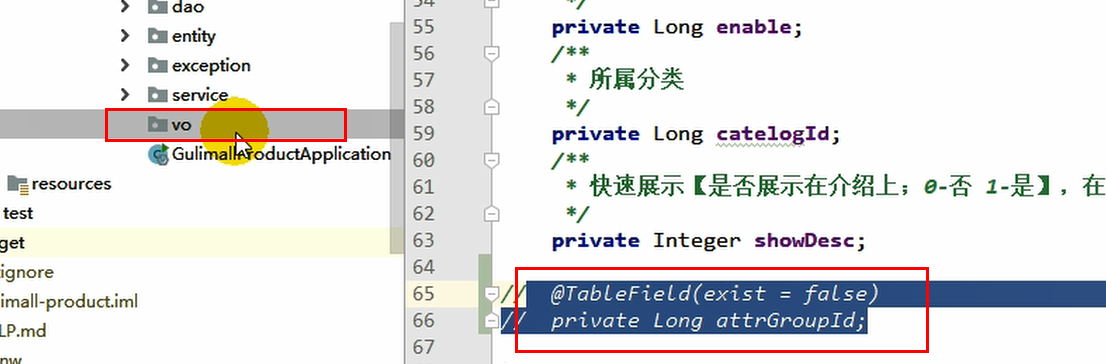
比较规范的做法是,新建一个vo文件夹,将每种不同的对象,按照它的功能进行了划分。在java中,涉及到了这几种类型

通过” BeanUtils.copyProperties(attr,attrEntity);”能够实现在两个Bean之间拷贝数据,但是两个Bean的字段要相同
   @Override
    public void saveAttr(AttrVo attr) {
        AttrEntity attrEntity = new AttrEntity();
        BeanUtils.copyProperties(attr,attrEntity);
        this.save(attrEntity);
    }
问题:现在有两个查询,一个是查询部分,另外一个是查询全部,但是又必须这样来做吗?还是有必要的,但是可以在后台进行设计,两种查询是根据catId是否为零进行区分的。
24. 查询分组关联属性和删除关联
获取属性分组的关联的所有属性
API:https://easydoc.xyz/doc/75716633/ZUqEdvA4/LnjzZHPj
发送请求:/product/attrgroup/{attrgroupId}/attr/relation
获取当前属性分组所关联的属性

如何查找:既然给出了attr_group_id,那么到中间表中查询出来所关联的attr_id,然后得到最终的所有属性即可。
可能出现null值的问题
25. 查询分组未关联的属性
/product/attrgroup/{attrgroupId}/noattr/relation
API:https://easydoc.xyz/doc/75716633/ZUqEdvA4/d3EezLdO
获取属性分组里面还没有关联的本分类里面的其他基本属性,方便添加新的关联
Request URL: http://localhost:88/api/product/attrgroup/1/noattr/relation?t=1588780783441&page=1&limit=10&key=
属性分组,对应于“pms_attr_group”表,每个分组下,需要查看到关联了哪些属性信息,销售属性不需要和分组进行关联,但是规格参数要和属性分组进行关联。
规格参数:对应于pms_attr表,attr_type=1,需要显示分组信息
销售属性:对应于pms_attr`表,attr_type=0,不需要显示分组信息
分组ID为9的分组:Request URL: http://localhost:88/api/product/attrgroup/9/noattr/relation?t=1588822258669&page=1&limit=10&key=
对应的数据库字段
attr_group_id attr_group_name sort descript icon catelog_id
        9  主体                    1  型号 平台                   wu               454
       10  显卡                    1  显存容量                    wu               454
       11  输入设备                  1  鼠标 键盘                   wu               454
       12  主板                    1  显卡类型 芯片组                wu               454
       13  规格                    1  尺寸                      wu               454
查询attrgroupId=9的属性分组:
AttrGroupEntity attrGroupEntity = attrGroupDao.selectById(attrgroupId);
获取到分类信息:
Long catelogId = attrGroupEntity.getCatelogId();
目标:获取属性分组没有关联的其他属性
也就是获取attrgroupId=9的属性分组中,关联的分类catelog_id =454 (台式机),其他基本属性
在该属性分组中,现在已经关联的属性:
本分类下,存在哪些基本属性?
没有关联的其他属性
已经关联的属性,这些属性是如何关联上的?
答:在创建规格参数的时候,已经设置了需要关联哪些属性分组。
想要知道还没有关联哪些,先查看关联了哪些,如何排除掉这些就是未关联的
在中间表中显示了属性和属性分组之间的关联关系,在属性表中显示了所有的属性,
先查询中间表,得到所有已经关联的属性的id,然后再次查询属性表,排除掉已经建立关联的属性ID,将剩下的属性ID和属性建立起关联关系
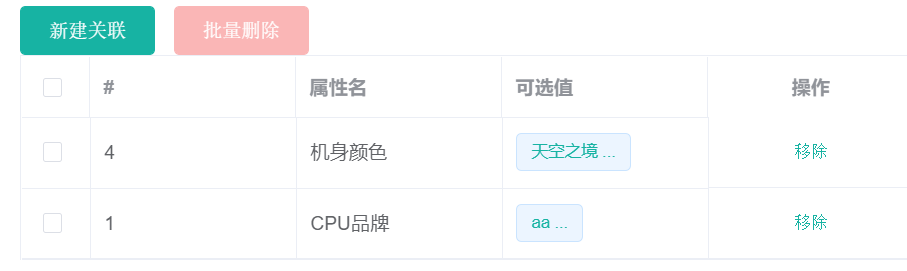
26. 添加属性和分组的关联关系
请求类型:Request URL: http://localhost:88/api/product/attrgroup/attr/relation
请求方式:POST
请求数据:[{“attrId”:10,”attrGroupId”:9}]
API:https://easydoc.xyz/doc/75716633/ZUqEdvA4/VhgnaedC
响应数据:
{
    "msg": "success",
    "code": 0
}
本质就是在中间表pms_attr_attrgroup_relation中,添加一条记录的过程
27. 发布商品
获取所有会员等级:/member/memberlevel/list
API:https://easydoc.xyz/doc/75716633/ZUqEdvA4/jCFganpf
在“gulimall-gateway”中修改“”文件,添加对于member的路由
        - id: gulimall-member
          uri: lb://gulimall-member
          predicates:
            - Path=/api/member/**
          filters:
            - RewritePath=/api/(?<segment>/?.*),/$\{segment}
在“gulimall-member”中,创建“bootstrap.properties”文件,内容如下:
spring.cloud.nacos.config.name=gulimall-member
spring.cloud.nacos.config.server-addr=192.168.137.14:8848
spring.cloud.nacos.config.namespace=795521fa-77ef-411e-a8d8-0889fdfe6964
spring.cloud.nacos.config.extension-configs[0].data-id=gulimall-member.yml
spring.cloud.nacos.config.extension-configs[0].group=DEFAULT_GROUP
spring.cloud.nacos.config.extension-configs[0].refresh=true
获取分类关联的品牌:/product/categorybrandrelation/brands/list
API:https://easydoc.xyz/doc/75716633/ZUqEdvA4/HgVjlzWV
遇到PubSub问题
- 首先安装pubsub-js
`npm install --save pubsub-js`
- 订阅方组件
`import PubSub from 'pubsub-js'`
该this.PubSub为PubSub。
获取分类下所有分组&关联属性
请求类型:/product/attrgroup/{catelogId}/withattr
请求方式:GET
请求URL:http://localhost:88/api/product/attrgroup/225/withattr?t=1588864569478
mysql默认的隔离级别为读已提交,为了能够在调试过程中,获取到数据库中的数据信息,可以调整隔离级别为读未提交:
SET SESSION TRANSACTION ISOLATION LEVEL READ UNCOMMITTED;
但是它对于当前的事务窗口生效,如果想要设置全局的,需要加上global字段。
28. 商品管理
当新建时:
t: 1588983621569
status: 0
key:
brandId: 0
catelogId: 0
page: 1
limit: 10
当上架时:
t: 1588983754030
status: 1
key:
brandId: 0
catelogId: 0
page: 1
limit: 10
当下架时:
t: 1588983789089
status: 2
key:
brandId: 0
catelogId: 0
page: 1
limit: 10
在SPU中,写出的日期数据都不符合规则:
想要符合规则,可以设置写出数据的规则:
spring.jackson
  jackson:
    date-format: yyyy-MM-dd HH:mm:ss
SKU检索:
Request URL: http://localhost:88/api/product/skuinfo/list?t=1588989437944&page=1&limit=10&key=&catelogId=0&brandId=0&min=0&max=0
请求体:
t: 1588989437944
page: 1
limit: 10
key:
catelogId: 0
brandId: 0
min: 0
max: 0
API: https://easydoc.xyz/doc/75716633/ZUqEdvA4/ucirLq1D
29. 仓库管理
库存信息表:wms_ware_info
【1】仓库列表功能:
【2】查询商品库存:
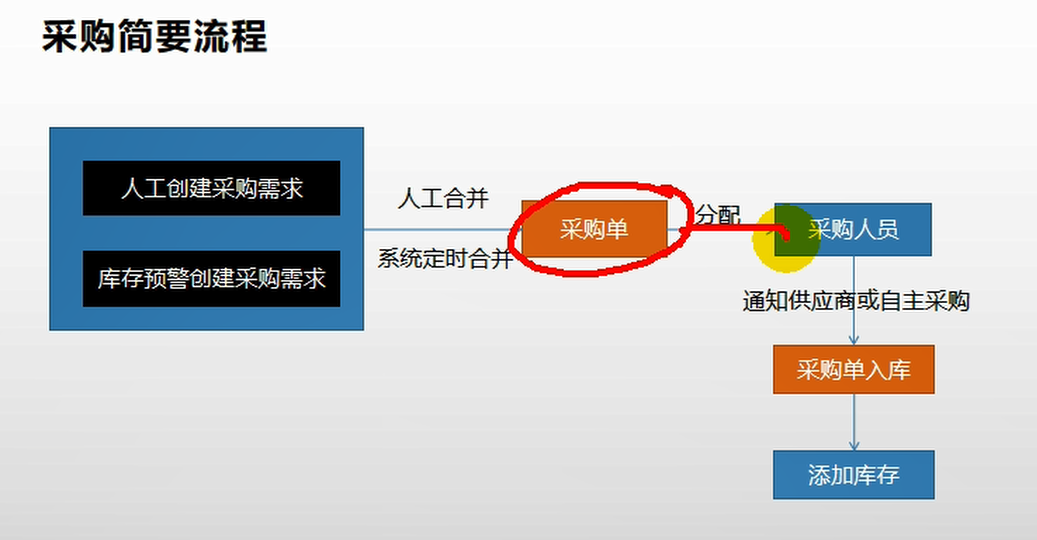
【3】查询采购需求:
【4】 合并采购需求:
合并整单选中parcharseID:Request URL: http://localhost:88/api/ware/purchase/merge
请求数据:
{purchaseId: 1, items: [1, 2]}
items: [1, 2]
合并整单未选择parcharseID :Request URL: http://localhost:88/api/ware/purchase/merge
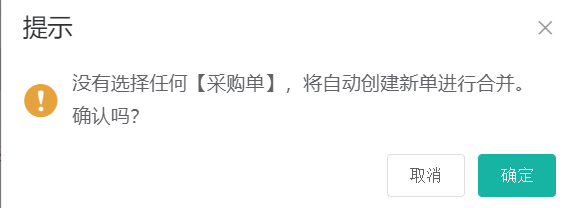
items: [1, 2]
涉及到两张表:wms_purchase_detail,wms_purchase
现在采购单中填写数据,然后关联用户,关联用户后,
总的含义,就是根据采购单中的信息,更新采购需求,在采购单中填写采购人员,采购单号,采购的时候,更新采购细节表中的采购人员ID和采购状态。
领取采购单
http://localhost:88/api/ware/purchase/received
(1)某个人领取了采购单后,先看采购单是否处于未分配状态,只有采购单是新建或以领取状态时,才更新采购单的状态
(2)
【1】仓库列表功能: https://easydoc.xyz/doc/75716633/ZUqEdvA4/mZgdqOWe
【2】查询商品库存: https://easydoc.xyz/doc/75716633/ZUqEdvA4/hwXrEXBZ
【3】查询采购需求: https://easydoc.xyz/doc/75716633/ZUqEdvA4/Ss4zsV7R
【4】 合并采购需求:https://easydoc.xyz/doc/75716633/ZUqEdvA4/cUlv9QvK
【5】查询未领取的采购单: https://easydoc.xyz/doc/75716633/ZUqEdvA4/hI12DNrH
【6】领取采购单: https://easydoc.xyz/doc/75716633/ZUqEdvA4/vXMBBgw1
完成采购,在完成采购过程中,需要涉及到设置SKU的name信息到仓库中,这是通过远程调用“gulimall-product”来实现根据sku_id查询得到sku_name的,如果这个过程发生了异常,事务不想要回滚,目前采用的方式是通过捕获异常的方式,防止事务回滚,是否还有其他的方式呢?这个问题留待以后解决。
 @Override
    public void addStock(Long skuId, Long wareId, Integer skuNum) {

        List<WareSkuEntity> wareSkuEntities = wareSkuDao.selectList(new QueryWrapper<WareSkuEntity>().eq("sku_id", skuId).eq("ware_id", wareId));

        if(wareSkuEntities == null || wareSkuEntities.size() ==0 ){
             //新增
            WareSkuEntity wareSkuEntity = new WareSkuEntity();
            wareSkuEntity.setSkuId(skuId);
            wareSkuEntity.setWareId(wareId);
            wareSkuEntity.setStock(skuNum);
            wareSkuEntity.setStockLocked(0);

            //远程查询SKU的name,若失败无需回滚
            try {
                R info = productFeignService.info(skuId);
                if(info.getCode() == 0){
                    Map<String,Object> data=(Map<String,Object>)info.get("skuInfo");
                    wareSkuEntity.setSkuName((String) data.get("skuName"));
                }
            } catch (Exception e) {

            }

            wareSkuDao.insert(wareSkuEntity);
        }else{
            //插入
            wareSkuDao.addStock(skuId,wareId,skuNum);
        }

    }
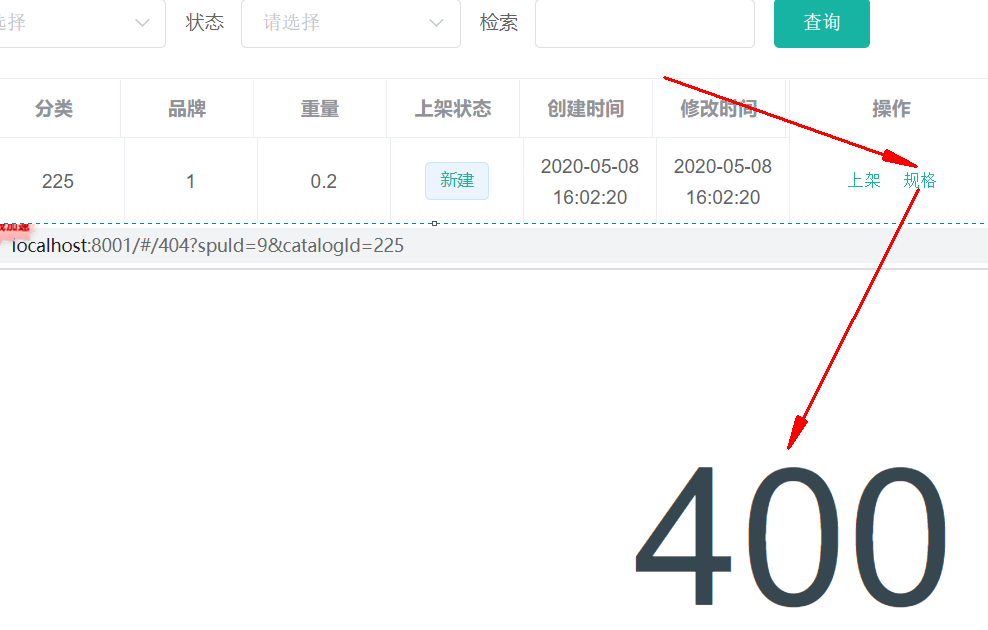
30. 获取spu规格
在SPU管理页面,获取商品规格的时候,出现400异常,浏览器显示跳转不了
问题现象:
出现问题的代码:
    attrUpdateShow(row) {
      console.log(row);
      this.$router.push({
        path: "/product-attrupdate",
        query: { spuId: row.id, catalogId: row.catalogId }
      });
    },
暂时不知道如何解决问题。只能留待以后解决。
经过测试发现,问题和上面的代码没有关系,问题出现在“attrupdate.vue”上,该vue页面无法通过浏览器访问,当输入访问URL( http://localhost:8001/#/product-attrupdate )的时候,就会出现404,而其他的请求则不会出现这种情况,不知为何。
通过POSTMAN进行请求的时候,能够请求到数据。
经过分析发现,是因为在数据库中没有该页面的导航所导致的,为了修正这个问题,可以在“sys-menu”表中添加一行,内容位:

这样当再次访问的时候,在“平台属性”下,会出现“规格维护”菜单,
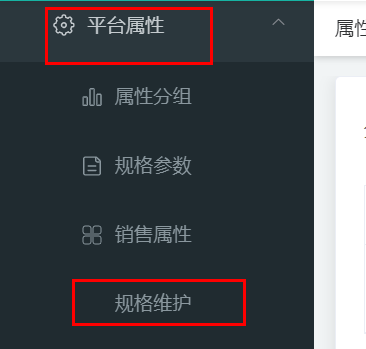
当再次点击“规格”的时候,显示出菜单

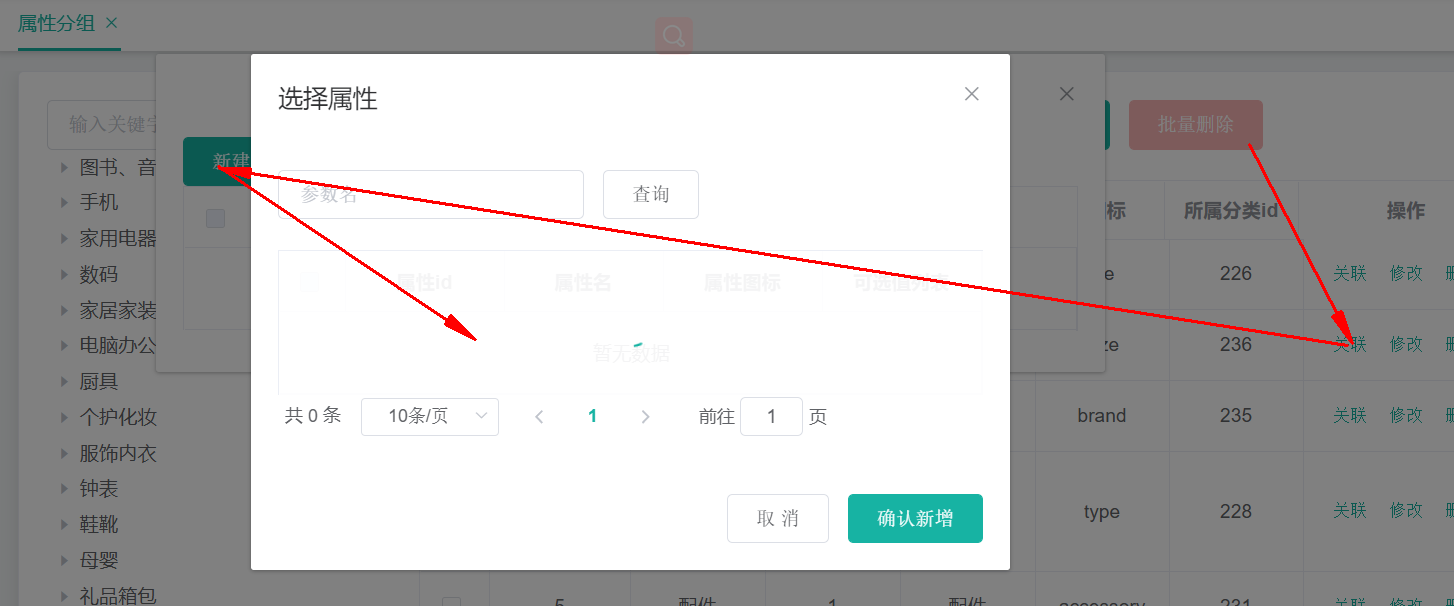
不过这种菜单并不符合我们的需要,我们需要让它以弹出框的形式出现。
31. 修改商品规格
API: https://easydoc.xyz/doc/75716633/ZUqEdvA4/GhnJ0L85
URL:/product/attr/update/{spuId}
小结:
1. 在open fen中会将调用的数据转换为JSON,接收方接收后,将JSON转换为对象,此时调用方和被调用方的处理JSON的对象不一定都是同一个类,只要它们的字段类型吻合即可。
调用方:
@FeignClient(value = "gulimall-coupon")
public interface CouponFenService {

    @PostMapping("/coupon/spubounds/save")
    R saveSpuBounds(@RequestBody SpuBoundTo spuBoundTo);

    @PostMapping("/coupon/skufullreduction/saveInfo")
    R saveSkuReduction(@RequestBody SkuReductionTo skuReductionTo);
}
被调用方:
    @PostMapping("/save")
    public R save(@RequestBody SpuBoundsEntity spuBounds){
        spuBoundsService.save(spuBounds);

        return R.ok();
    }

    @PostMapping("/saveInfo")
    public R saveInfo(@RequestBody SkuReductionTo skuReductionTo){
        skuFullReductionService.saveSkuReduction(skuReductionTo);
        return R.ok();
    }
调用方JSON化时的对象SpuBoundTo:
@Data
public class SpuBoundTo {
    private Long spuId;
    private BigDecimal buyBounds;
    private BigDecimal growBounds;
}
被调用方JSON数据对象化时的对象SpuBoundsEntity:
/**
 * 商品spu积分设置
 *
 * @author cosmoswong
 * @email cosmoswong@sina.com
 * @date 2020-04-23 23:38:48
 */
@Data
@TableName("sms_spu_bounds")
public class SpuBoundsEntity implements Serializable {
    private static final long serialVersionUID = 1L;

    /**
     * id
     */
    @TableId
    private Long id;
    /**
     *
     */
    private Long spuId;
    /**
     * 成长积分
     */
    private BigDecimal growBounds;
    /**
     * 购物积分
     */
    private BigDecimal buyBounds;
    /**
     * 优惠生效情况[1111(四个状态位,从右到左);0 - 无优惠,成长积分是否赠送;1 - 无优惠,购物积分是否赠送;2 - 有优惠,成长积分是否赠送;3 - 有优惠,购物积分是否赠送【状态位0:不赠送,1:赠送】]
     */
    private Integer work;

}
2. 事务究竟要如何加上?
存在Batch操作的时候,才需要加上事务,单个操作无需添加事务控制。
SpringBoot中的是事务
批量操作的时候,才需要事务
一个事务标注的方法上,方法内存在这些操作:
(1)批量更新一个表中字段
(2)更新多张表中的操作
实际上不论是哪种类型,方法中所有对于数据库的写操作,都会被整体当做一个事务,在这个事务过程中,如果某个操作出现了异常,则整体都不会被提交。这就是对于SpringBoot中的@Transactional的理解。
@EnableTransactionManagement和@Transactional的区别?
https://blog.csdn.net/abysscarry/article/details/80189232
https://blog.csdn.net/Driver_tu/article/details/99679145
https://www.cnblogs.com/leaveast/p/11765503.html
其他
1. 文档参考地址
https://blog.csdn.net/ok_wolf/article/details/105400748
https://www.cnblogs.com/javalbb/p/12690862.html
https://blog.csdn.net/ok_wolf/article/details/105456170
https://easydoc.xyz/doc/75716633/ZUqEdvA4/jCFganpf
2. 开机启动docker

在Docker中设置开机启动容器

#查看防火墙状态
[root@hadoop-104 module]# systemctl status firewalld
  firewalld.service - firewalld - dynamic firewall daemon
   Loaded: loaded (/usr/lib/systemd/system/firewalld.service; enabled; vendor preset: enabled)
   Active: active (running) since Wed 2020-04-22 21:26:23 EDT; 10min ago
     Docs: man:firewalld(1)
 Main PID: 5947 (firewalld)
   CGroup: /system.slice/firewalld.service
           └─5947 /usr/bin/python -Es /usr/sbin/firewalld --nofork --nopid

Apr 22 21:26:20 hadoop-104 systemd[1]: Starting firewalld - dynamic firewall daemon...
Apr 22 21:26:23 hadoop-104 systemd[1]: Started firewalld - dynamic firewall daemon.
#查看防火墙是否是开机启动
[root@hadoop-104 module]# systemctl list-unit-files|grep firewalld
firewalld.service                             enabled
#关闭开机启动防火墙
[root@hadoop-104 module]# systemctl disable firewalld
Removed symlink /etc/systemd/system/multi-user.target.wants/firewalld.service.
Removed symlink /etc/systemd/system/dbus-org.fedoraproject.FirewallD1.service.
#停止防火墙
[root@hadoop-104 module]# systemctl stop firewalld
#再次查看防火墙
[root@hadoop-104 module]# systemctl list-unit-files|grep firewalld
firewalld.service                             disabled
[root@hadoop-104 module]#
3. 查看命令的安装位置
whereis mysql:查看mysql的安装位置
4. vscode中生成代码片段
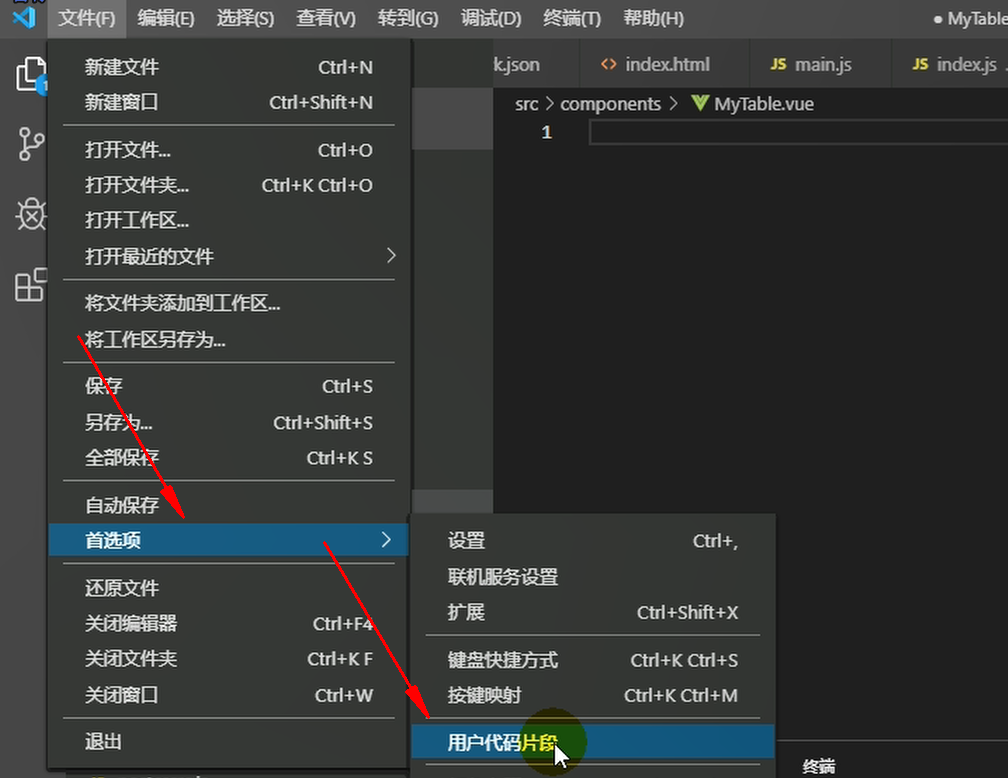
新建一个全局的代码片段,名字为vue,然后回车:
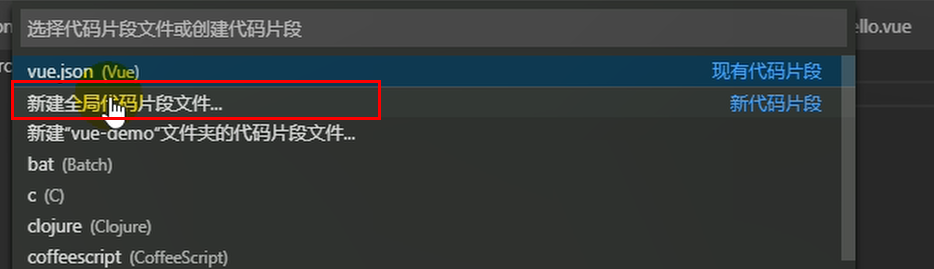
将下面的代码片段粘贴到“vue.code-snippets”
{
    // Place your 全局 snippets here. Each snippet is defined under a snippet name and has a scope, prefix, body and
    // description. Add comma separated ids of the languages where the snippet is applicable in the scope field. If scope
    // is left empty or omitted, the snippet gets applied to all languages. The prefix is what is
    // used to trigger the snippet and the body will be expanded and inserted. Possible variables are:
    // $1, $2 for tab stops, $0 for the final cursor position, and ${1:label}, ${2:another} for placeholders.
    // Placeholders with the same ids are connected.
    // Example:
    // "Print to console": {
    //     "scope": "javascript,typescript",
    //     "prefix": "log",
    //     "body": [
    //         "console.log('$1');",
    //         "$2"
    //     ],
    //     "description": "Log output to console"
    // }
    "生成vue模板": {
        "prefix": "vue",
        "body": [
            "<!-- $1 -->",
            "<template>",
            "<div class='$2'>$5</div>",
            "</template>",
            "",
            "<script>",
            "//这里可以导入其他文件(比如:组件,工具js,第三方插件js,json文件,图片文件等等)",
            "//例如:import 《组件名称》 from '《组件路径》';",
            "",
            "export default {",
            "//import引入的组件需要注入到对象中才能使用",
            "components: {},",
            "data() {",
            "//这里存放数据",
            "return {",
            "",
            "};",
            "},",
            "//监听属性 类似于data概念",
            "computed: {},",
            "//监控data中的数据变化",
            "watch: {},",
            "//方法集合",
            "methods: {",
            "",
            "},",
            "//生命周期 - 创建完成(可以访问当前this实例)",
            "created() {",
            "",
            "},",
            "//生命周期 - 挂载完成(可以访问DOM元素)",
            "mounted() {",
            "",
            "},",
            "beforeCreate() {}, //生命周期 - 创建之前",
            "beforeMount() {}, //生命周期 - 挂载之前",
            "beforeUpdate() {}, //生命周期 - 更新之前",
            "updated() {}, //生命周期 - 更新之后",
            "beforeDestroy() {}, //生命周期 - 销毁之前",
            "destroyed() {}, //生命周期 - 销毁完成",
            "activated() {}, //如果页面有keep-alive缓存功能,这个函数会触发",
            "}",
            "</script>",
            "<style lang='scss' scoped>",
            "//@import url($3); 引入公共css类",
            "$4",
            "</style>"
        ],
        "description": "生成VUE模板"
    },
    "http-get请求": {
        "prefix": "httpget",
        "body": [
            "this.\\$http({",
            "url: this.\\$http.adornUrl(''),",
            "method: 'get',",
            "params: this.\\$http.adornParams({})",
            "}).then(({ data }) => {",
            "})"
        ],
        "description": "httpGET请求"
    },
    "http-post请求": {
        "prefix": "httppost",
        "body": [
            "this.\\$http({",
            "url: this.\\$http.adornUrl(''),",
            "method: 'post',",
            "data: this.\\$http.adornData(data, false)",
            "}).then(({ data }) => { });"
        ],
        "description": "httpPOST请求"
    }
}
更多详细说明见: https://blog.csdn.net/z772330927/article/details/105730430/
5. vscode快捷键
ctrl+shift+f 全局搜索
alt+shift+f 格式化代码
6. 关闭eslint的语法检查
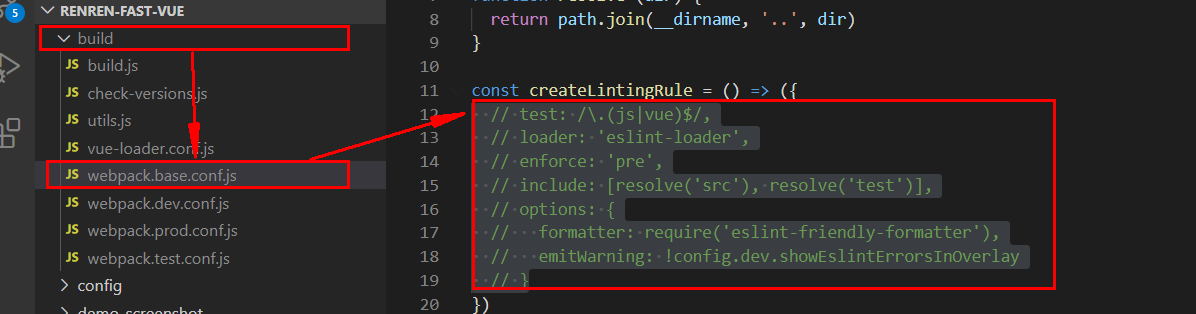
7. 安装mybatisx插件
在Marketplace中搜索“mybatisx”,安装后重启IDEA,使用时会自动在@Mapper标注的接口上,产生小图标,然后alt+enter,generate statement,就会自动的在xml文件中生成SQL。
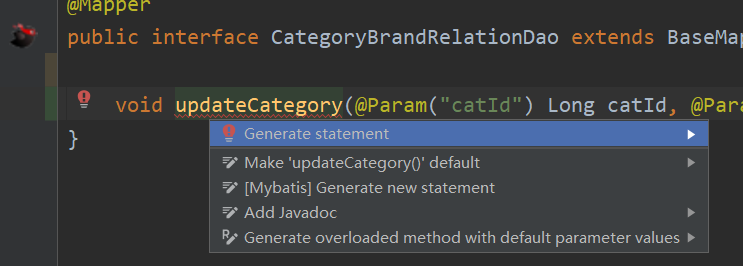
8. mysql的批量删除
DELETE FROM `pms_attr_attrgroup_relation` WHERE (attr_id= ? AND attr_group_id ) OR (attr_id= ? AND attr_group_id )
9. String.join
java.lang.String @NotNull
public static String join(@NotNull CharSequence delimiter,
                          @NotNull Iterable<? extends CharSequence> elements)
Returns a new String composed of copies of the CharSequence elements joined together with a copy of the specified delimiter.
返回一个由CharSequence元素的副本和指定分隔符的副本组成的新字符串。
For example,
 List<String> strings = new LinkedList<>();
 strings.add("Java");strings.add("is");
 strings.add("cool");
 String message = String.join(" ", strings);
 //message returned is: "Java is cool"

 Set<String> strings = new LinkedHashSet<>();
 strings.add("Java"); strings.add("is");
 strings.add("very"); strings.add("cool");
 String message = String.join("-", strings);
 //message returned is: "Java-is-very-cool"
Note that if an individual element is null, then “null” is added.
注意,如果单个元素为null,则添加“null”。
Params:
delimiter – a sequence of characters that is used to separate each of the elements in the resulting String
用于分隔结果字符串中的每个元素的字符序列
elements – an Iterable that will have its elements joined together.
将其元素连接在一起的可迭代的。
Returns:
a new String that is composed from the elements argument
由elements参数组成的新字符串
Throws:
NullPointerException – If delimiter or elements is null
    public static String join(CharSequence delimiter,
            Iterable<? extends CharSequence> elements) {
        Objects.requireNonNull(delimiter);
        Objects.requireNonNull(elements);
        StringJoiner joiner = new StringJoiner(delimiter);
        for (CharSequence cs: elements) {
            joiner.add(cs);
        }
        return joiner.toString();
    }
能够看到实际上它就是通过创建StringJoiner,然后遍历elements,加入每个元素来完成的。
StringJoiner
java.util public final class StringJoiner
extends Object
StringJoiner is used to construct a sequence of characters separated by a delimiter and optionally starting with a supplied prefix and ending with a supplied suffix.
tringJoiner用于构造由分隔符分隔的字符序列,可以选择以提供的前缀开始,以提供的后缀结束。
Prior to adding something to the StringJoiner, its sj.toString() method will, by default, return prefix + suffix. However, if the setEmptyValue method is called, the emptyValue supplied will be returned instead. This can be used, for example, when creating a string using set notation to indicate an empty set, i.e. “{}”, where the prefix is “{“, the suffix is “}” and nothing has been added to the StringJoiner.
在向StringJoiner添加内容之前,它的sj.toString()方法在默认情况下会返回前缀+后缀。但是,如果调用setEmptyValue方法,则返回所提供的emptyValue。例如,当使用set符号创建一个字符串来表示一个空集时,可以使用这种方法。“{}”,其中前缀是“{”,后缀是“}”,没有向StringJoiner添加任何内容。
apiNote:
The String “[George:Sally:Fred]” may be constructed as follows:
 StringJoiner sj = new StringJoiner(":", "[", "]");
 sj.add("George").add("Sally").add("Fred");
 String desiredString = sj.toString();
A StringJoiner may be employed to create formatted output from a java.util.stream.Stream using java.util.stream.Collectors.joining(CharSequence). For example:
使用StringJoiner从java.util.stream创建格式化输出流,使用java.util.stream.Collectors.joining (CharSequence进行)。例如:
 List<Integer> numbers = Arrays.asList(1, 2, 3, 4);
 String commaSeparatedNumbers = numbers.stream()
     .map(i -> i.toString())
     .collect(Collectors.joining(", "));
通过分析源码发现,在“”内部维护了一个StringBuilder,所有加入到它内部的元素都会先拼接上分割符,然后再拼接上加入的元素
 public StringJoiner add(CharSequence newElement) {
        prepareBuilder().append(newElement);
        return this;
 }
   private StringBuilder prepareBuilder() {
        if (value != null) {
            value.append(delimiter);
        } else {
            value = new StringBuilder().append(prefix);
        }
        return value;
    }
10. 在Service中微服务比较多的时候,可以配置将一些微服务放置到compound中,组成一个小组
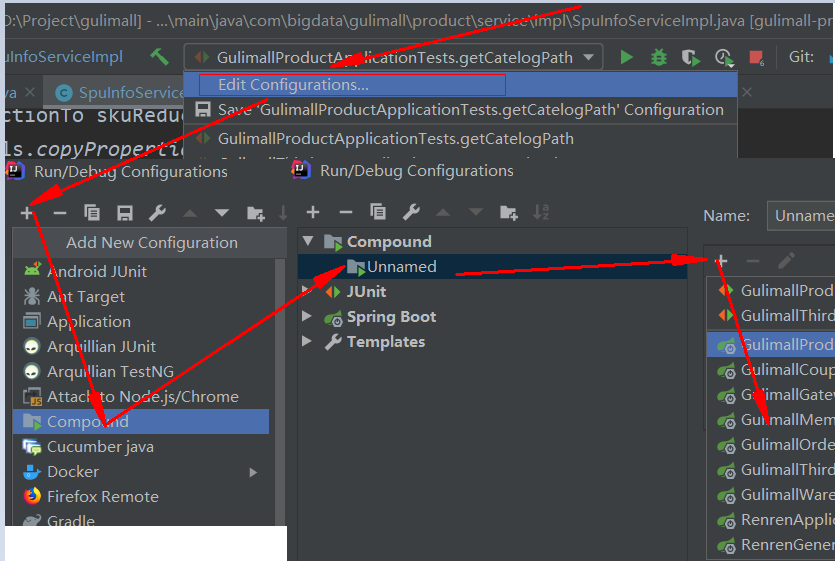
以后再运行时,直接选择这个compound即可很方便的运行或停止一组微服务:
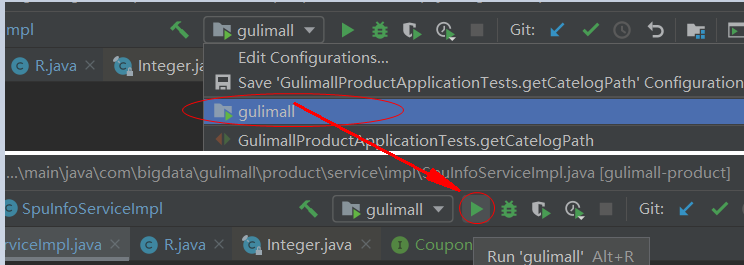
另外可以单独为每个微服务,设置需要的运行时最大堆内存大小:
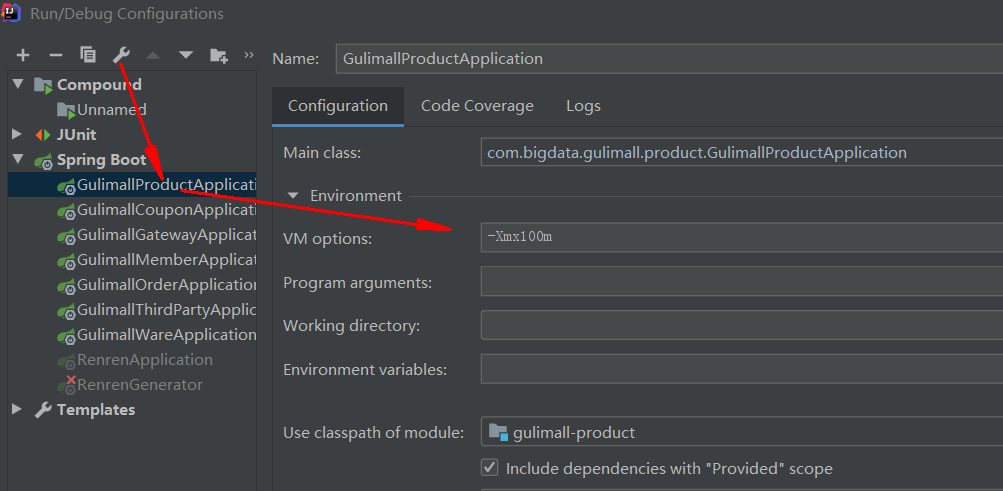
11. mysql的dateTime和timestamp的区别?
MySQL中datetime和timestamp的区别及使用
TIMESTAMP和DATETIME的相同点:
1> 两者都可用来表示YYYY-MM-DD HH:MM:SS[.fraction]类型的日期。
TIMESTAMP和DATETIME的不同点:
1> 两者的存储方式不一样
对于TIMESTAMP,它把客户端插入的时间从当前时区转化为UTC(世界标准时间)进行存储。查询时,将其又转化为客户端当前时区进行返回。
而对于DATETIME,不做任何改变,基本上是原样输入和输出。
2> 两者所能存储的时间范围不一样
timestamp所能存储的时间范围为:’1970-01-01 00:00:01.000000’ 到 ‘2038-01-19 03:14:07.999999’。
datetime所能存储的时间范围为:’1000-01-01 00:00:00.000000’ 到 ‘9999-12-31 23:59:59.999999’。
总结:TIMESTAMP和DATETIME除了存储范围和存储方式不一样,没有太大区别。当然,对于跨时区的业务,TIMESTAMP更为合适。
https://www.cnblogs.com/Jashinck/p/10472398.html
12. SpringBoot中的事务
https://blog.csdn.net/Z__Sheng/article/details/89489053
13. IDEA RESTFUll clinet
FAQ
1. TypeError: _vm.previewHandle is not a function

若有收获,就点个赞吧
0 人点赞
